
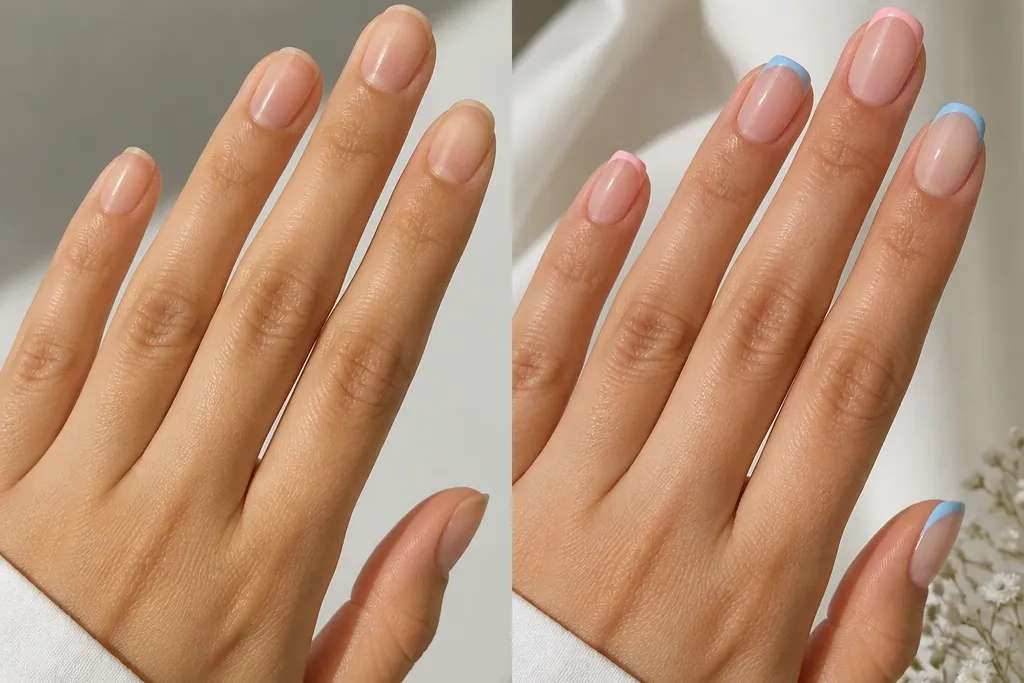
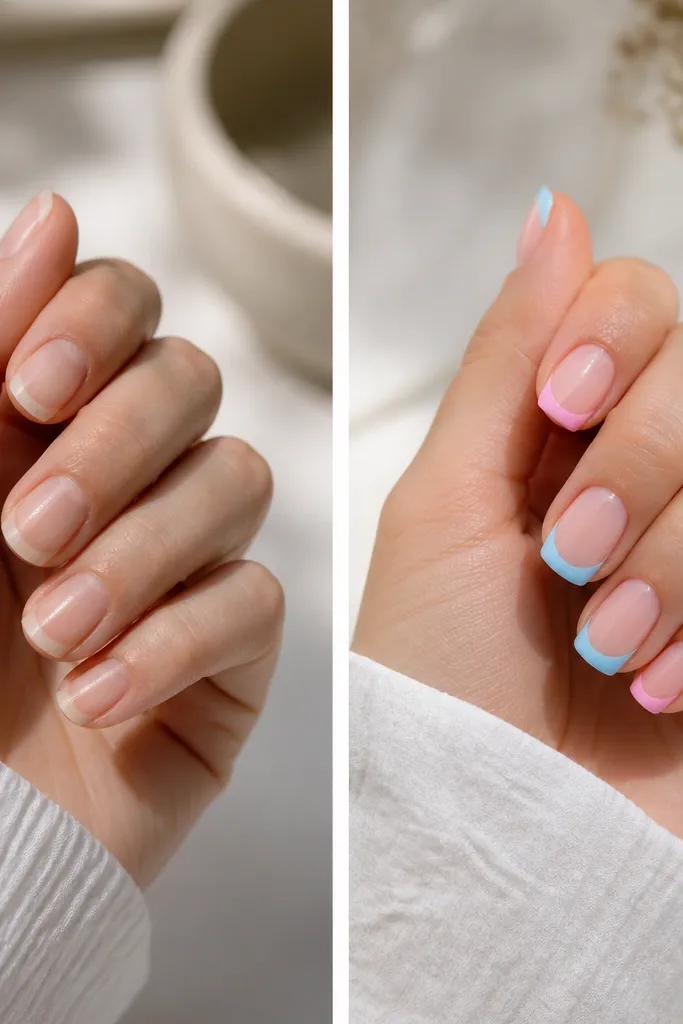
1. Milky Pink Base With Sky Blue Micro French (Short Squoval)
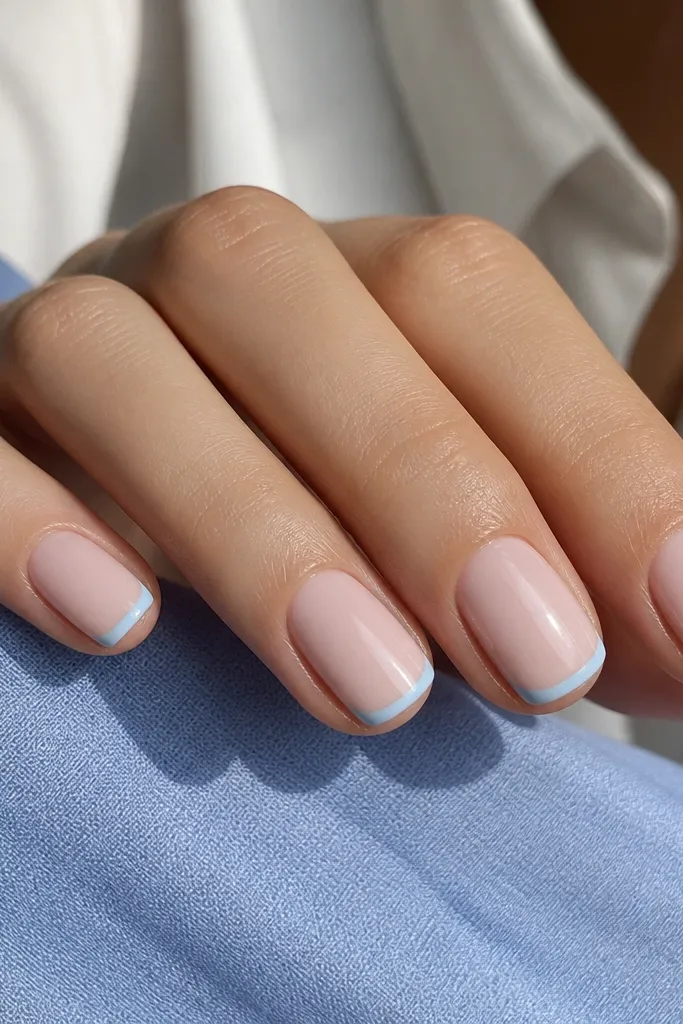
Start by pushing back cuticles and buffing the shine off your nail plate lightly, then wipe with alcohol. Paint two thin coats of milky pink gel or long-wear polish, curing each coat if you use gel. Use a striping guide or a French tip guide to paint a sky blue line about 1.5 mm wide at the smile line, then fill the outline just enough to cover the tip edge. Finish with a glossy top coat and cap the free edge so the blue stays crisp.
This one is for when you want the pink-and-blue vibe without the tips looking heavy. The milky pink base is opaque enough to smooth the nail visually, and the sky blue micro tip stays light so the set looks airy on short squoval nails. I’ve worn it on hands with shorter nail beds and it still reads “clean” because the blue is a whisper, not a block. It’s especially flattering on fair to light-medium skin because the pink stays soft and the blue pops without turning neon.
Watch outAvoid a thick blue tip on short nails — it makes the nail look smaller and the French line looks sloppy.
Editor's noteIf your smile line is uneven, place a dot of polish at each side first, then connect them with the thinnest brush you own.
2. Blush Pink + Cornflower Blue French With Reverse Half-Moon
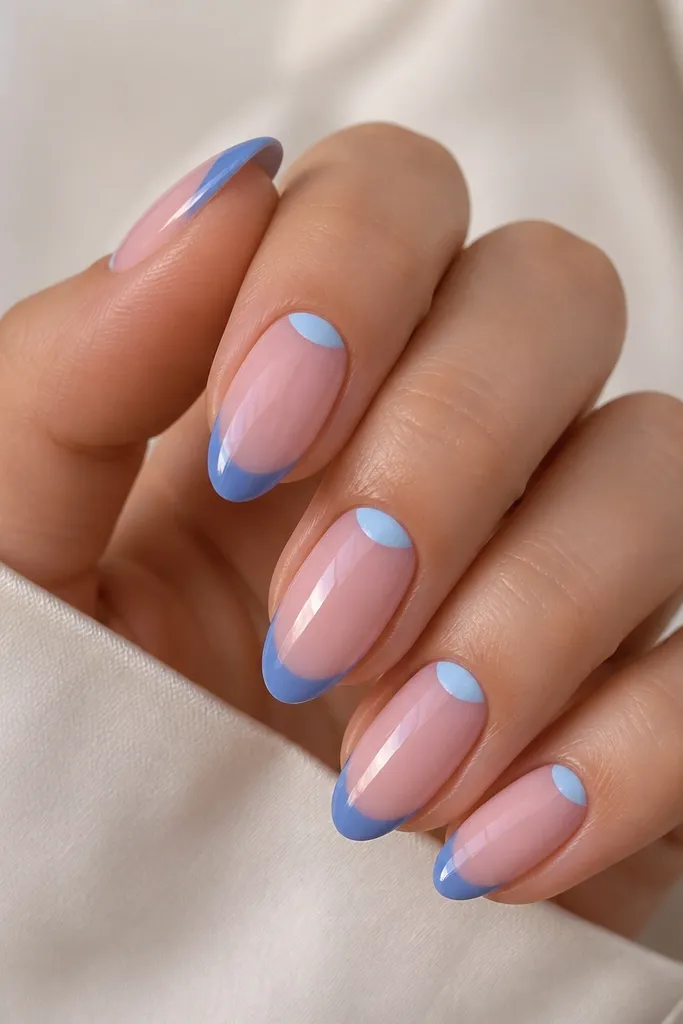
Apply a blush pink base in two thin coats so it stays smooth at the center of the nail. Paint the cornflower blue French tip with a slightly wider 2.5 mm tip width, keeping the curve consistent across fingers. Then, using a fine liner brush, add a small reverse half-moon in a lighter blue right under the cuticle — about 1/6 of the nail width. Clean the edges with a brush dipped in acetone or gel cleanser, then seal everything with top coat.
This design adds a little sparkle of detail without adding gems. The blush pink base keeps things warm, while the cornflower blue French tip gives you that classic French look with a stronger blue tone. The reverse half-moon near the cuticle makes the nail look longer because it draws attention upward. It looks great on medium skin tones and on anyone who wants the set to feel “styled” for photos but still wearable for errands.
Watch outSkip a big half-moon — if it’s too wide, it makes the nail look top-heavy.
Editor's noteDo the half-moon last, after the French tip is fully cured, so you don’t smear the blue edge.
3. Pink Glass Base With Water-Blue French Fade
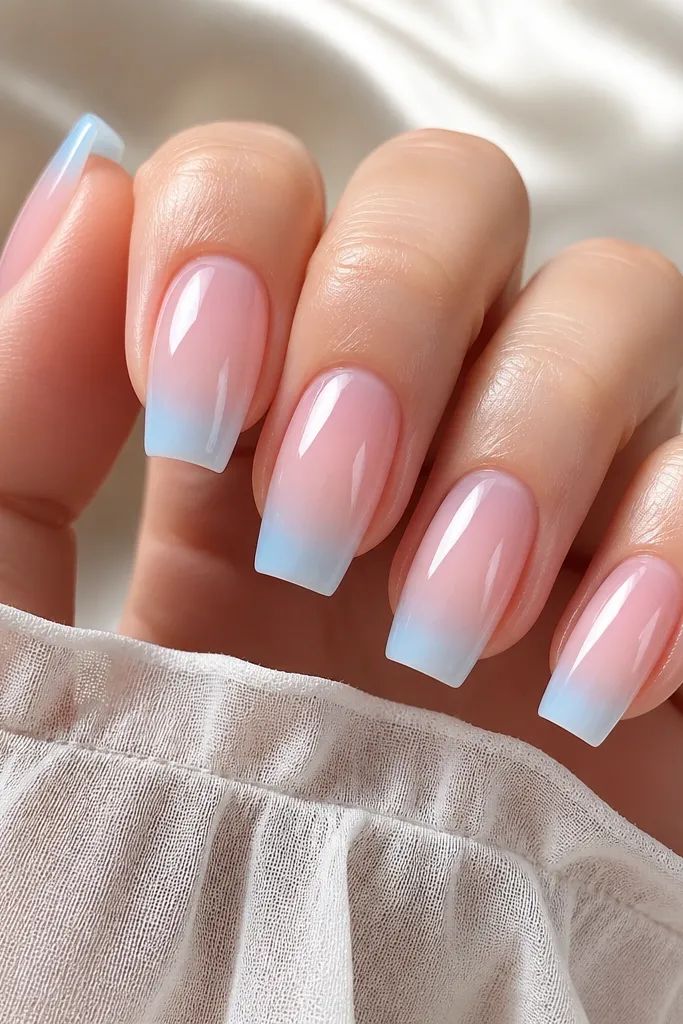
If you like dreamy nails that look like they belong in soft lighting, this fade does it. The pink glass base is sheer enough to show a natural nail glow, and the water-blue fades create a gentle gradient that looks expensive. On long square nails, the fade makes the tips look like they’re melting into the base instead of sitting on top. It flatters olive and medium-deep skin tones because the blue stays cool and doesn’t fight the warmth in your skin.
Start with a pink glass base (a sheer milky pink) in two coats, keeping it thin so the nail still looks like your own. Sponge a water-blue onto the tip area starting at the very edge, then blend upward toward the smile line using a clean makeup sponge. Use a smaller brush to tidy the smile line so the fade has a defined boundary. Finish with a glossy top coat that smooths the gradient and cures it evenly if you’re using gel.
Use a makeup sponge that’s slightly dense, not fluffy — fluffy sponges leave speckle in the fade.
Don’t over-layer the fade — too many coats turn it chalky and the dreamy effect disappears.
4. Baby Pink Base With Royal Blue Outline French
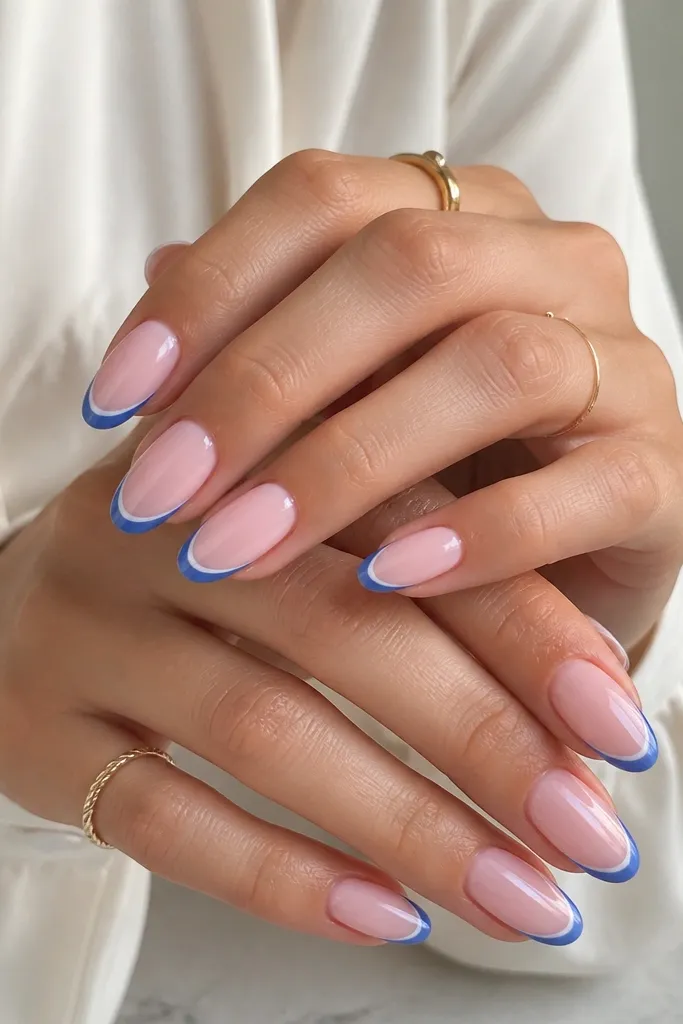
Paint baby pink in two coats for full coverage at the center and a smooth edge near the sides. Add a royal blue line along the smile curve first as an outline, then decide how much fill you want — for this look, fill only the very tip center with a thin layer so the outline stays the star. Clean the sides with a liner brush and a tiny amount of remover on a lint-free wipe. Top coat with an ultra-gloss finish and cap the tip edge.
This is my go-to when you want the French shape to look crisp but you don’t want heavy blue coverage. The baby pink base is a soft, almost creamy pink that keeps the set delicate. A royal blue outline gives you that graphic “fresh manicure” look, and the lightly filled center keeps it airy. It flatters hands with slightly wider nail beds because the outline creates clean edges without making the tips look bulky.
Watch outAvoid filling the whole tip thickly — outlining only looks intentional; full fill can look like a block.
Editor's noteIf your blue outline wobbles, let it dry fully and go back with a second outline line — don’t try to fix it while wet.
5. Hot Pink Base With Pastel Blue French Tips (Long Almond)
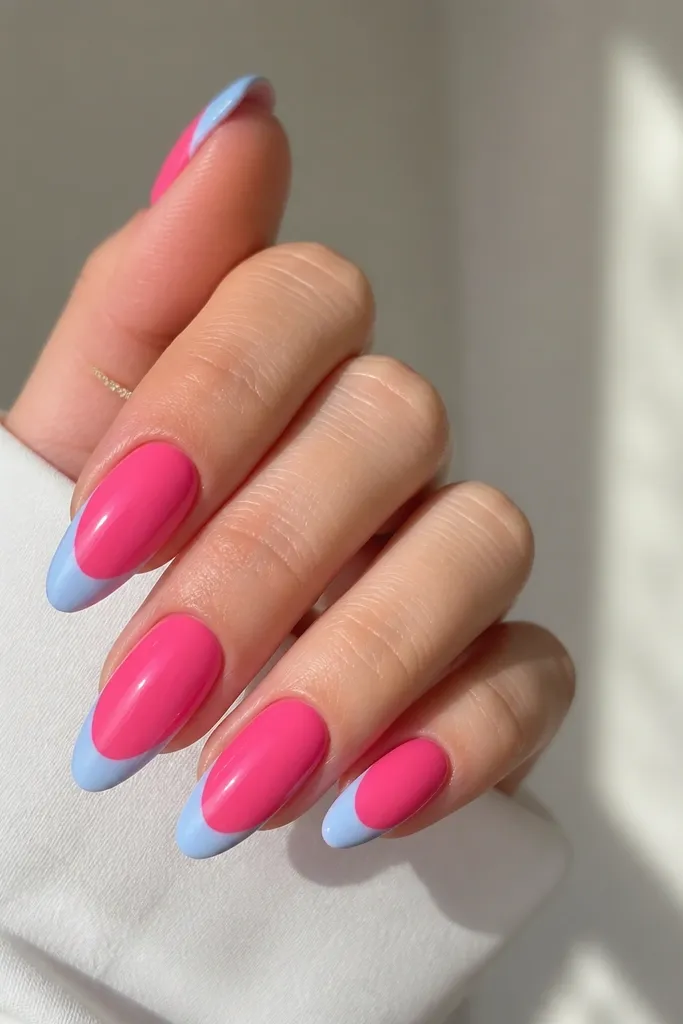
Apply hot pink in two coats, making sure the first coat is thin so you don’t get streaks. Paint the pastel blue French tips with a 3 mm wide tip area and keep the smile line slightly higher in the center for an almond-friendly curve. Use a steady hand and a thin brush to define the edges before filling the center. Seal with glossy top coat and cap the sides so the pastel blue doesn’t chip first.
This set is bold in a fun way. The hot pink base is vivid and gives you that “main character” energy, while pastel blue keeps it from feeling too aggressive. On long almond nails, the contrast makes the fingers look extra elegant because the blue tips frame the nail shape. It’s best for fair to medium skin when you want color to show clearly in daylight and in flash photos.
Watch outDon’t choose a pastel blue that’s too white — it can look chalky against hot pink.
Editor's noteFor cleaner edges, start from the sidewalls and drag inward — you’ll get a smoother curve than starting in the middle.
6. Powder Pink Base With Denim Blue French (Matte Top Coat)
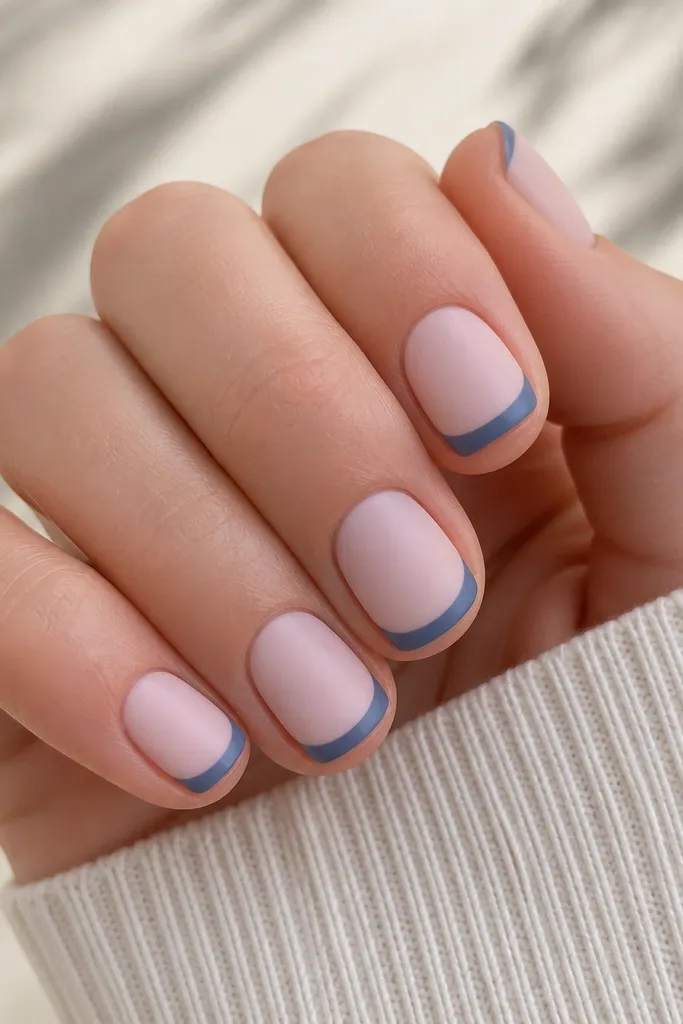
Matte makes blue look deeper and more “fabric-like,” which is why denim blue works so well here. Powder pink stays soft and neutral, and the matte finish makes the French line look like it’s printed on. This is one of the few pink-and-blue sets that looks good on short round nails without feeling childish. I’ve worn it to a casual dinner and it still looked styled because the texture catches light differently than glossy nails.
Do a clean prep and then paint powder pink in two thin coats. Apply denim blue French tips at about 2 mm wide, keeping the curve centered and the edges sharp. Let everything cure or dry fully, then apply a matte top coat over the whole nail. For the crispest French line, avoid thick top coat — thin matte coats keep the blue edge defined.
If matte makes your base look streaky, do one extra thin coat of powder pink before you matting top coat.
Skip glossy top coat on this design — denim blue loses its depth when everything is shiny.
7. Peony Pink Base With Two-Tone Blue French (Inner Thin Line)
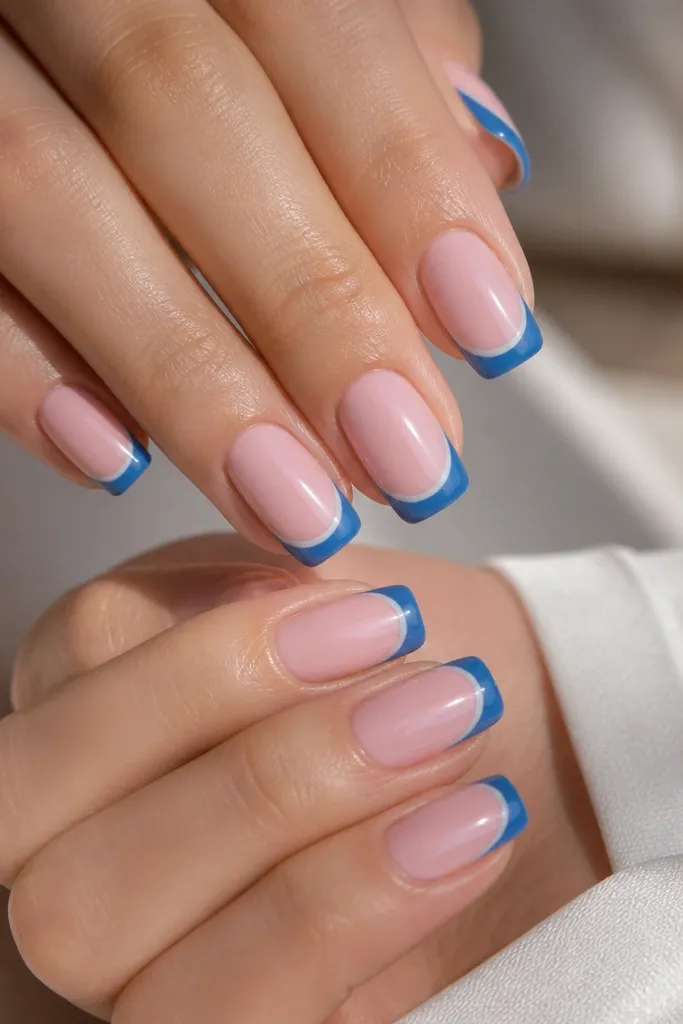
Paint peony pink in two coats and let it level for a minute between coats. Fill the French tip with a darker blue, keeping it around 2.5 mm wide and fully opaque. Then, with a striping brush, add a thin lighter blue line just inside the smile curve, leaving a tiny gap so it reads like a highlight. Seal with top coat, and cap the free edge so the inner line doesn’t lift.
This is the “upgrade” version of a basic French tip. Peony pink has a soft rosy tone that looks flattering on cool and neutral skin, and the two-tone blue adds depth without adding glitter. The darker outer fill holds the shape, while the lighter inner line adds a delicate highlight that makes the tips look polished. It’s especially pretty on squoval nails because the edges are already slightly structured.
Watch outDon’t blend the two blues together — the inner line should stay crisp.
Editor's noteUse a striping brush that’s truly skinny — if it’s too wide, the inner line will look like a second French tip.
8. Creamy Pink Base With Blue French Tips and White Star Dots
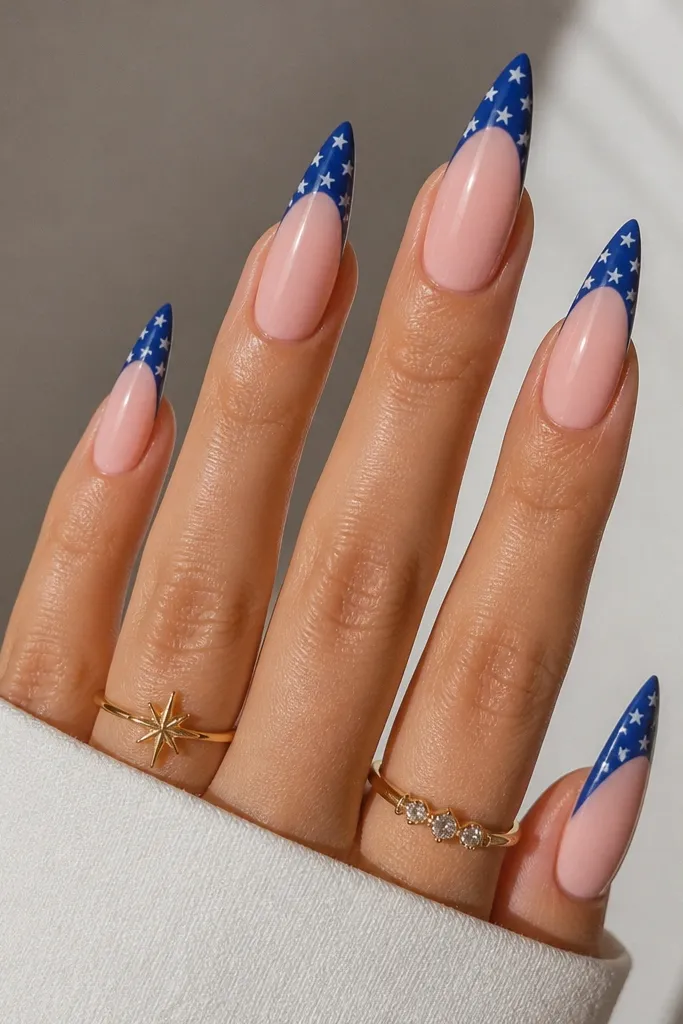
This set feels dreamy because the tiny stars look like confetti at the tip. Creamy pink gives you a smooth, almost porcelain base, and the solid blue keeps the stars readable. On stiletto nails, the stars look like a pattern that’s meant to move with your hand. It flatters medium-deep skin because the white stars pop hard, and it looks extra cute for parties, birthdays, and date nights.
Apply creamy pink in two coats, then outline your blue French tips with a thin brush first. Fill the tips solid with blue at about 3 mm wide on the stiletto shape. Using a dotting tool or nail art stamp, place tiny white star dots along the outer half of the tip edge — 4 to 6 stars per nail max so it doesn’t get busy. Add top coat carefully around the stars so you don’t smear them.
If you’re using gel, cure stars for the same time as your top coat so they don’t sink into the glossy layer.
Avoid too many stars — it turns from dreamy to childish fast.
9. Nude Pink Base With Electric Blue French and Thin White Border
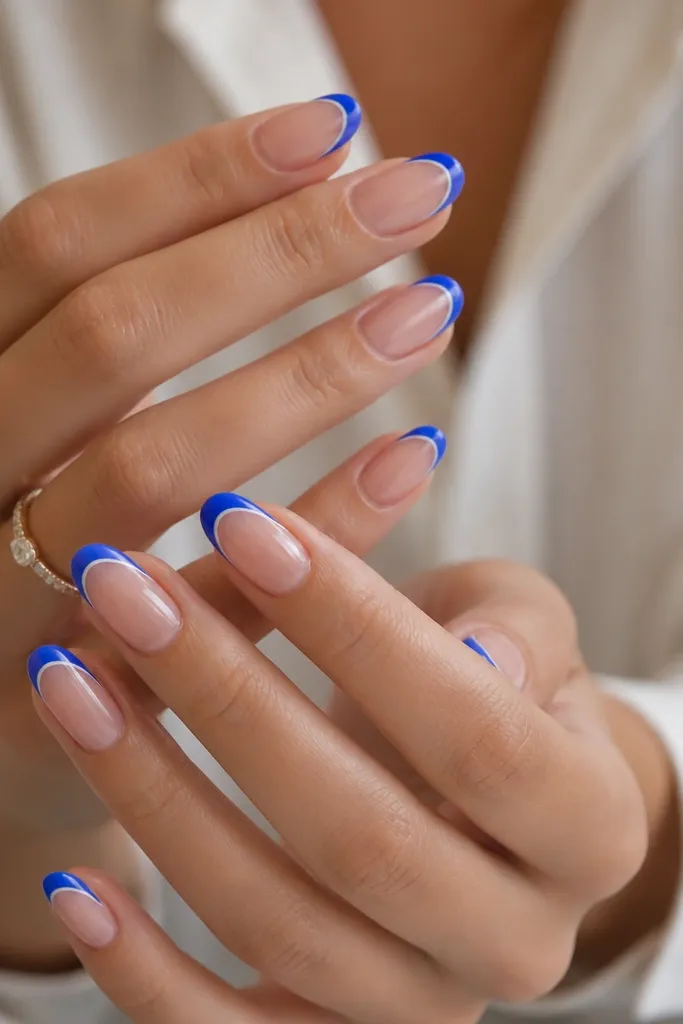
Paint nude pink in two coats and make sure the base is even near the cuticle. Apply electric blue French tips at 2.5 mm wide, then let it set long enough that it won’t smear when you add the border. Add a thin white border line inside the blue edge using a fine liner brush — keep it about 0.5 mm thick. Seal with glossy top coat and cap the edges so the white line stays intact.
This look is sharp and clean. A nude pink base keeps your hands looking neat, while electric blue gives you that punchy color that reads well on camera. The thin white border creates a crisp definition, so even if your French curve isn’t perfect, the border hides the wobble. I’ve done this for summer events and it always gets compliments because it looks like nail art you’d see in a salon.
Watch outDon’t make the white border too thick or it turns into a second French tip.
Editor's noteUse a white gel that’s creamy, not watery — thin watery white looks streaky.
10. Rose Pink Base With Cornflower Blue French and Tiny Rhinestone Stripe
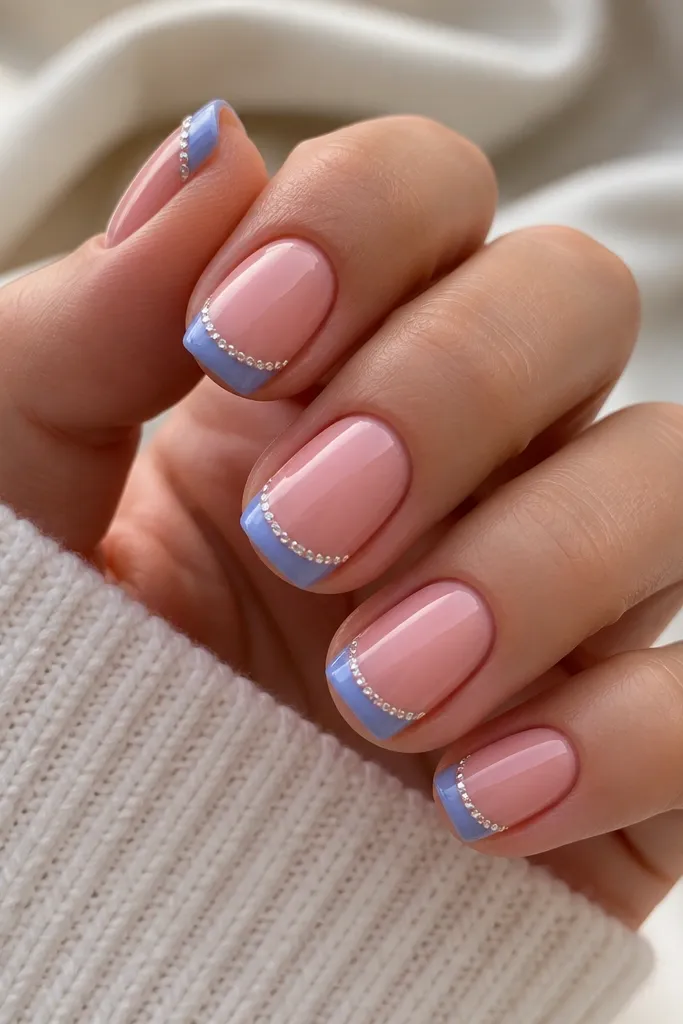
This is for when you want a little sparkle but you still want the set to look like French tips, not a full bling manicure. Rose pink is a flattering mid-tone pink that looks good against almost any undertone. The rhinestone stripe near the smile line makes your tips look extra crisp and gives a subtle flash when you move your hands. On short squoval nails, it elongates visually because the sparkle sits where the eye naturally lands.
Start with rose pink base in two thin coats. Paint cornflower blue French tips about 2 mm wide and let it cure/dry fully. Place 3 to 5 tiny clear rhinestones on each nail in a straight line near the smile curve using nail glue or gel adhesive, spacing them evenly. Press gently, cure if needed, then seal with top coat — use a thin top coat around the stones so they don’t get cloudy.
Pick stones that are the same size across the set — mixed sizes look uneven fast.
Avoid placing rhinestones at the very edge of the tip — they catch on everything and pop off first.
11. Soft Pink Jelly Base With Navy Blue French Tip (Curved Smile)
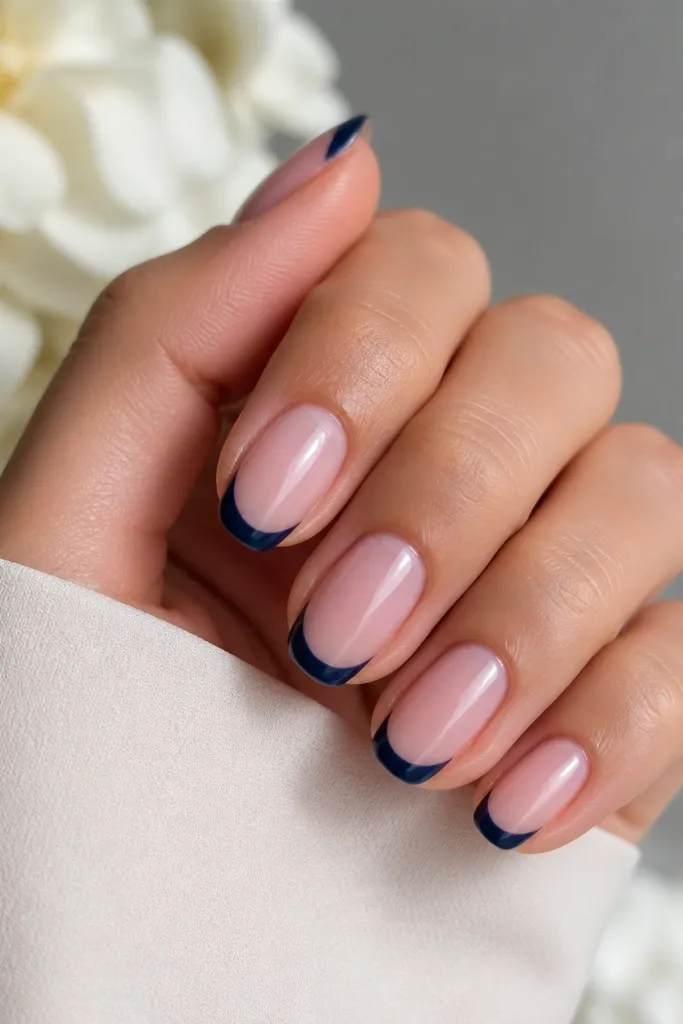
Paint a soft pink jelly base in two coats, keeping it glossy and not too thick. Use navy blue to draw the French curve first, then fill the tip area with a thin, even layer. Keep the tip width around 2.5 mm and angle the smile curve so it rises just a bit at the center. Finish with a glossy top coat that levels everything and cures fully for a glassy surface.
Jelly bases look like your nails are lit from within, and this one makes the navy blue look richer. The navy is deep enough to feel elegant, but the soft pink jelly keeps it from looking heavy. The curved smile tip — slightly higher in the center — is the trick that makes the nail look longer and more lifted. It’s flattering on hands with slightly flat nail beds because the jelly base adds dimension.
Watch outDon’t make navy tips too wide — navy can overpower and shrink the nail visually.
Editor's noteIf your jelly base pools at the cuticle, wipe the brush on the bottle rim and work in a thin first coat.
12. Pastel Pink Base With Blue French Tips and Micro Hearts
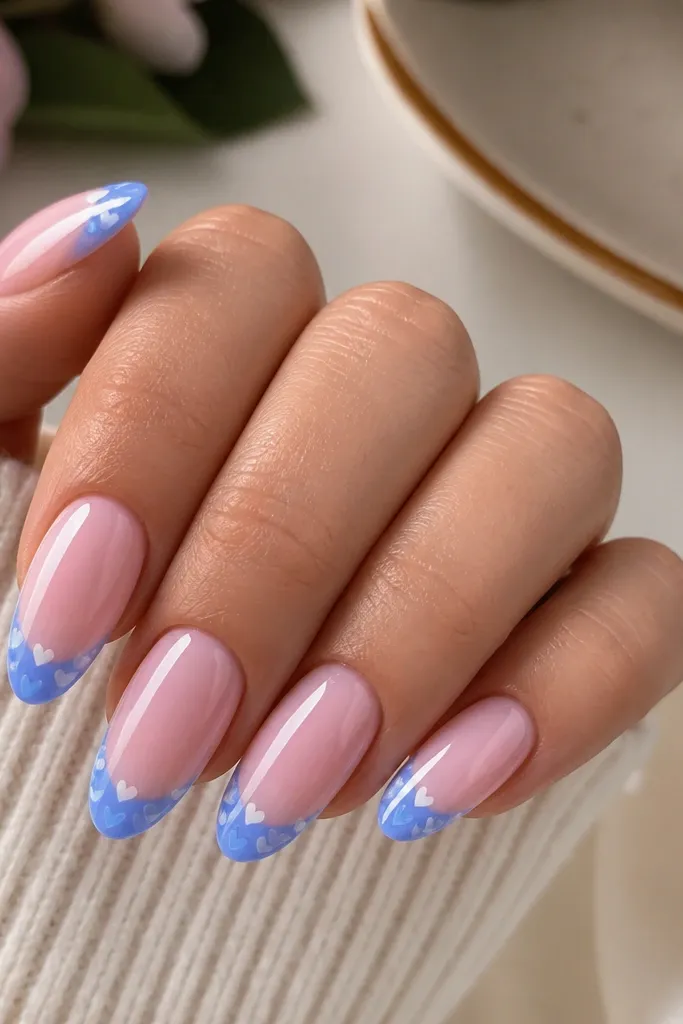
Apply pastel pink in two coats and cure/dry completely. Paint blue French tips at about 2.5 to 3 mm wide depending on your nail length. With a dotting tool, draw tiny heart shapes using white and a lighter blue — place 2 to 3 hearts per nail, mostly on the outer half. Top coat in thin layers so the hearts stay sharp.
Micro hearts make the set feel sweet without turning it into a cartoon. Pastel pink is light and forgiving, and the blue French tips keep it structured. The hearts are placed near the tip edge so the nail reads “French” first, then “cute detail” second. This works well on fair to medium skin because the hearts stay crisp and don’t blend into the base.
Watch outSkip big hearts — they make the French shape look messy.
Editor's noteUse a nail art brush with a pointed tip for the heart notch — dots alone look like circles.
13. Warm Blush Base With Powder Blue French and Gold Foil Flecks
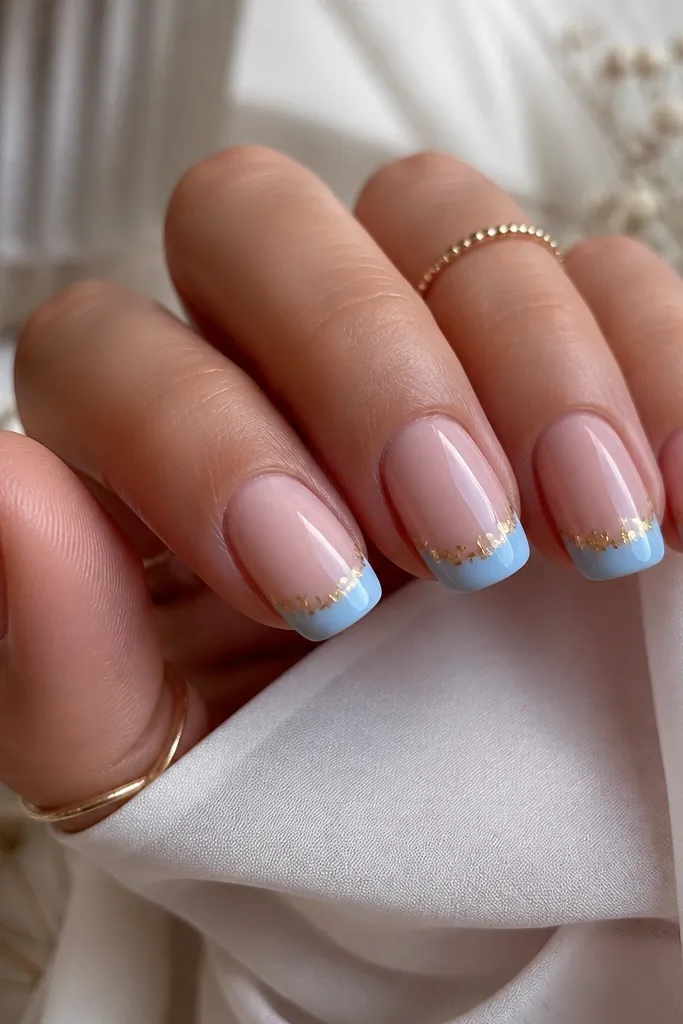
Paint warm blush pink in two coats and keep the base smooth at the sides. Apply powder blue French tips at around 2.5 mm wide. While the blue layer is still tacky (or use a thin gel layer), press tiny pieces of gold foil near the smile line — 3 to 6 flecks per nail. Seal with a glossy top coat, pressing gently around the foil so it doesn’t lift.
Warm blush plus powder blue feels like a soft sunset. The gold foil flecks add warmth so the blue doesn’t feel icy, and they look like tiny highlights when the light hits. On medium squoval nails, the gold near the smile line makes the tips look more dimensional. It flatters warm undertones and looks gorgeous for spring events, brunch, and wedding guest nails.
Watch outDon’t cover the foil with thick gel — it dulls the shine.
Editor's noteUse small foil flakes, not big sheets, or the set looks uneven and patchy.
14. Icy Pink Base With Blue Marble French Tip Veins
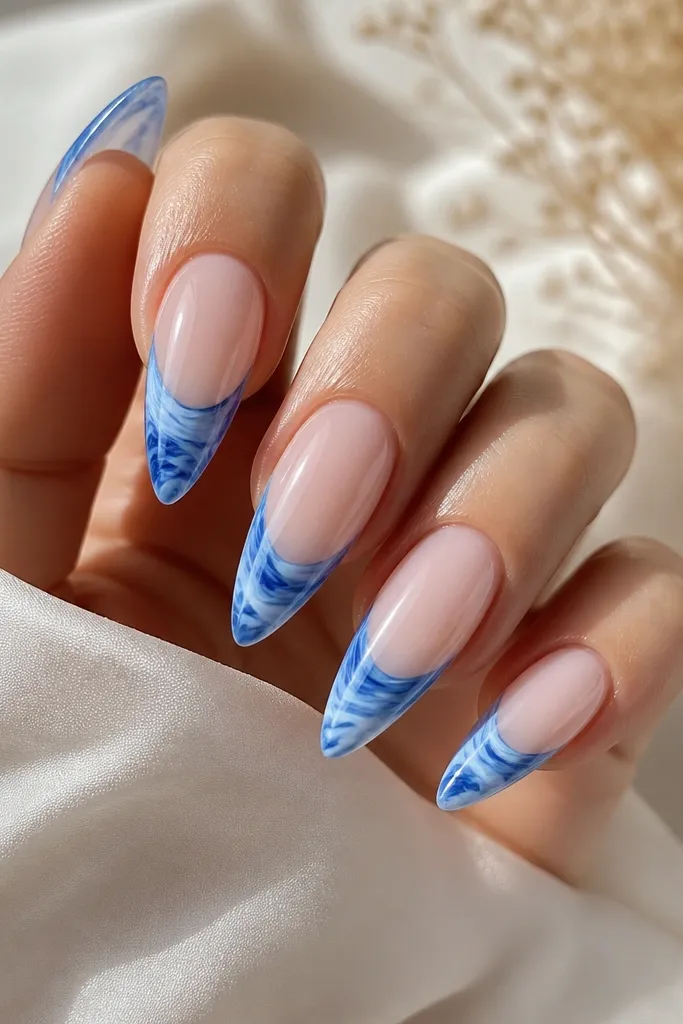
Start with an icy pink translucent base in two thin coats. Paint a blue French tip outline first, then fill the tip lightly so you can pull marble veins through it. Use a thin brush to drag white and darker blue lines through the wet or tacky blue — swirl them in small arcs that curve toward the center. Add a final thin blue layer to even out any gaps, then seal with glossy top coat.
Marble tips make the French shape feel one-of-a-kind. An icy pink translucent base keeps things airy, and the blue marble veins add movement. I love this look on long almond nails because the swirl follows the nail curve and looks smooth instead of chaotic. It flatters cool undertones and looks extra pretty in daylight because the veins catch light.
Watch outAvoid heavy white marble — it can turn the tip chalky and muddy.
Editor's notePractice the vein motion on a paper towel first — marble veins look best when they’re slightly irregular.
15. Pink Base With Blue French Tips and White Cloud Cutouts
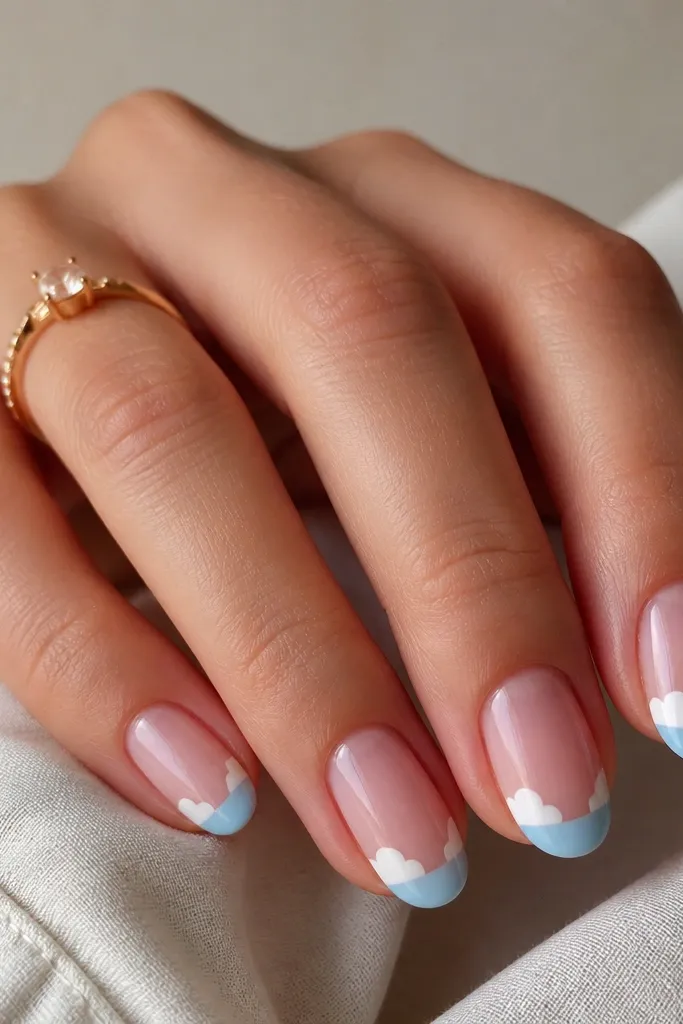
Apply pink base in two coats and cure/dry fully. Paint blue French tips at 2 mm wide with a crisp smile line. Using a small nail art sponge or a dotting tool, stamp tiny cloud puffs in white along the smile curve — 3 to 4 puffs per nail. Seal carefully with top coat, using a thin layer so the cutouts don’t blur.
Cloud cutouts make the French tip feel soft and playful instead of flat. The pink base keeps it sweet, and the white cloud shapes add texture without relying on glitter. This is a great option if you want a cute set that still feels “clean” because the cloud cutouts are controlled near the smile line. It looks cute on oval nails and flattering on hands with shorter fingers because the clouds create a gentle visual lift.
Watch outDon’t put clouds all the way down the tip — keep them near the smile line.
Editor's noteIf stamps look messy, use a dotting tool to place puffs one by one — it’s slower but cleaner.
16. Matte Pink Base With Glossy Blue French (Two-Finish Contrast)
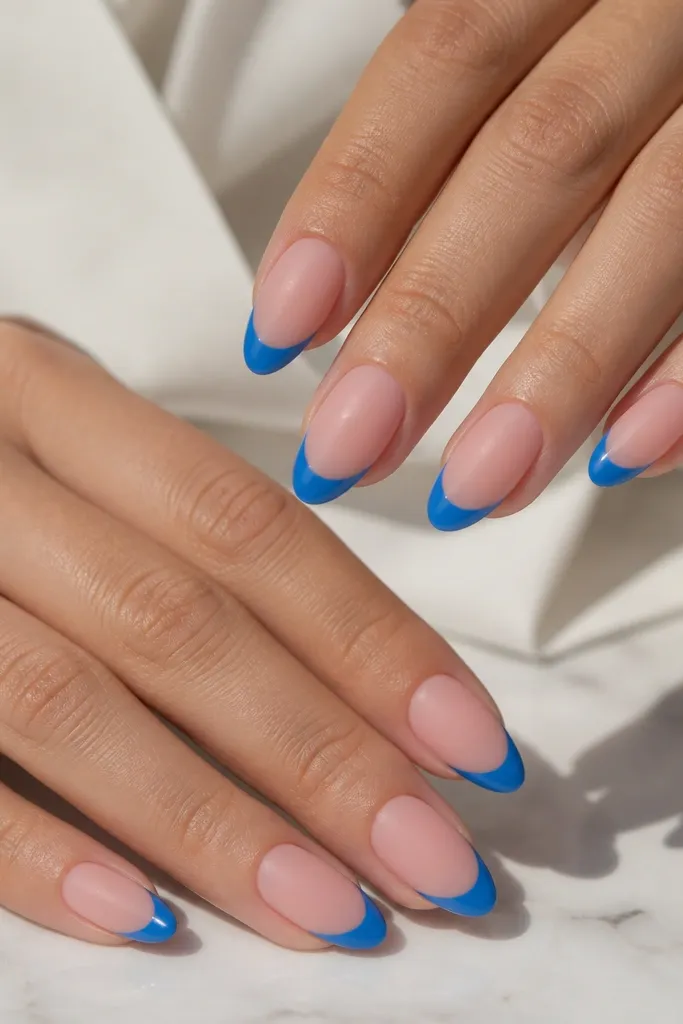
Paint matte pink base first, then apply matte top coat over the base only. Don’t matte the tips yet. Paint glossy blue French tips on top of the matte base by carefully avoiding the matte area around the smile line. After the blue is cured/dry, apply glossy top coat just on the tips, keeping the base matte. Let everything set fully so you don’t mix finishes.
This contrast is the reason the set looks high-end. Matte pink makes your nails look velvety, and glossy blue makes the tips pop like enamel. The sharp French line is what keeps it from looking messy. I’ve worn this for office days too because the matte base looks polished even without sparkle, and the blue tips make it feel fun. It’s flattering across skin tones since matte hides color variation in the nail plate.
Watch outAvoid matting the whole nail after you paint blue — you lose the crisp enamel effect.
Editor's noteUse a barrier method: brush a thin matte top coat on the base, cure, then paint tips with steady strokes to avoid overpainting the matte.
17. Dusty Pink Base With Cornflower Blue French and Tiny Pearl Studs
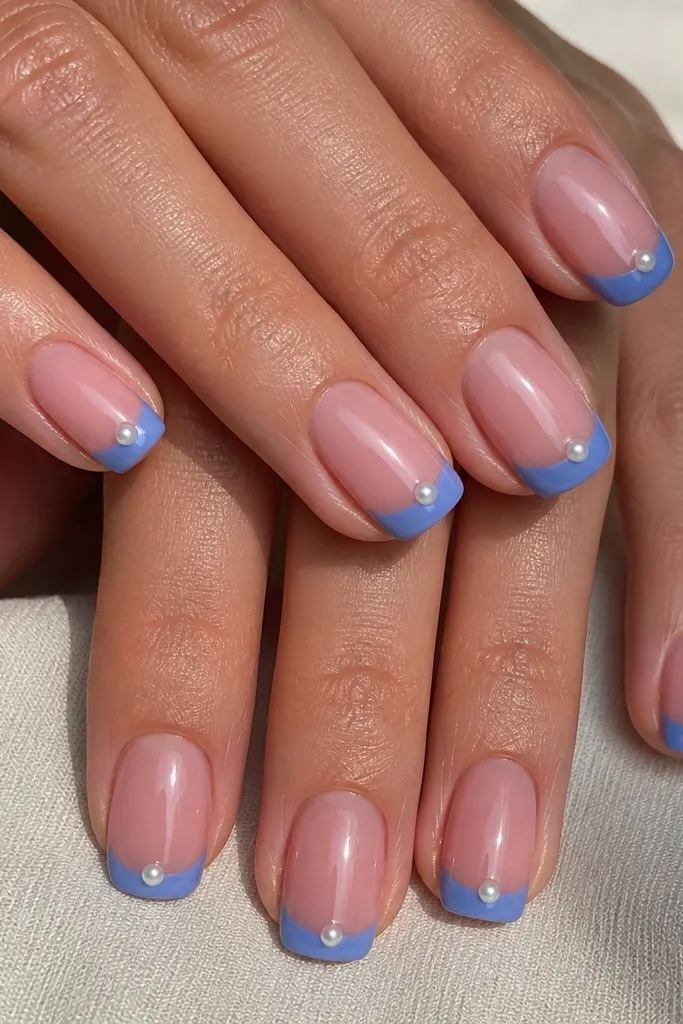
Paint dusty pink in two coats and cure/dry fully. Apply cornflower blue French tips at about 2.5 mm wide. Place one small pearl stud on each nail at the center of the smile line using nail glue or a tiny dot of gel adhesive. Cure if needed, then top coat around the pearl — don’t flood the pearl with gel or it can lose its shine.
Pearls make blue feel softer and more grown-up. Dusty pink is muted enough to look classy, and cornflower blue keeps it bright without going neon. One pearl per nail is the sweet spot because it frames the tip without turning the whole manicure into jewelry. I like this for weddings, baby showers, and any time you want something pretty that still feels grounded.
Watch outSkip multiple pearls per nail — the set starts to look like a craft project.
Editor's noteMatch pearl size across all nails — a tiny mismatch reads obvious in photos.
18. Nude Rosy Base With Blue French Tips and Diagonal Half-Stripe
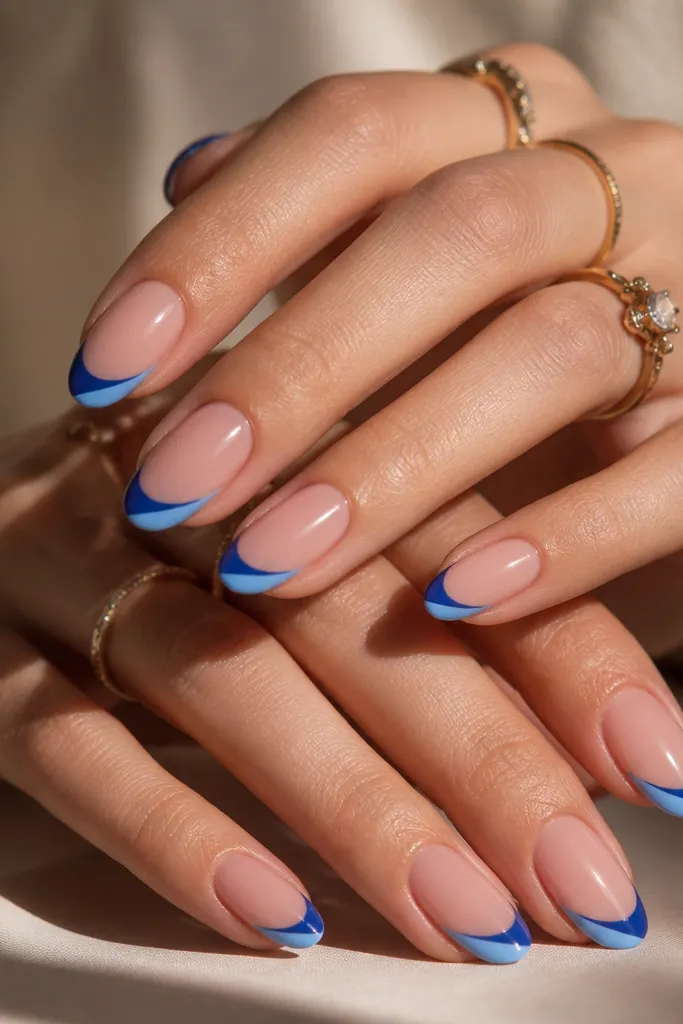
Apply nude rosy base in two coats and cure/dry fully. Paint blue French tips at 2.5 mm wide with a clean smile line. After the blue sets, add a lighter blue diagonal stripe across the tip — start from the upper side of the tip at about 1 mm from the edge and drag down toward the center, leaving one side of the tip plain blue. Seal with top coat, keeping the diagonal stripe crisp by painting it before the final top coat.
Diagonal details make French tips look modern. Nude rosy base keeps it natural, while the blue French gives the classic structure. The diagonal half-stripe in lighter blue adds movement and makes your nails look longer because the line angles upward. This one flatters hands that need a little visual “lift,” and it looks great in both daylight and indoor warm lighting.
Watch outDon’t go too wide with the diagonal stripe — wide stripes make the tip look uneven.
Editor's noteUse striping tape for the diagonal if you struggle with straight lines, then remove it right after painting so you don’t tear the polish.
19. Pearl Pink Base With Blue French Tips and Opal Shimmer Dust
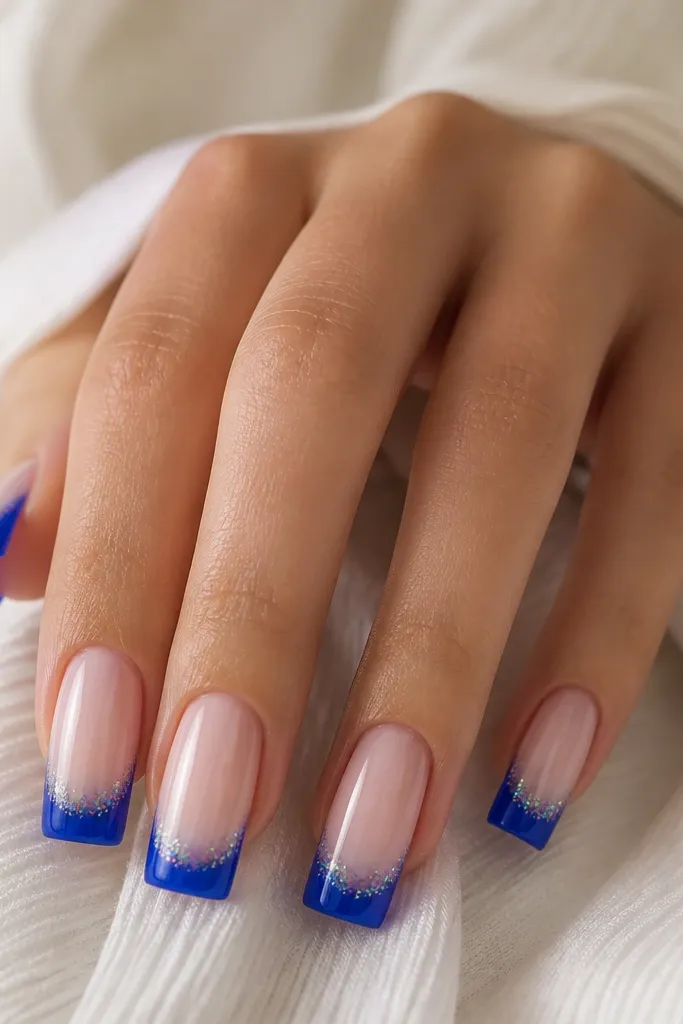
Opal shimmer dust makes the blue look like it has depth without adding chunky glitter. Pearl pink base gives that soft glow, and the solid blue French tip keeps the set from looking scattered. I like this for evenings because the shimmer shows up when you move your hands. It flatters light to medium skin tones and looks especially good if your nails run slightly ridged since the pearl pink hides them.
Paint pearl pink in two coats and cure/dry fully. Apply solid blue French tips at about 3 mm wide. While the blue is still tacky, lightly press opal shimmer dust only on the outer third of the tip — use a small eyeshadow brush so it stays controlled. Tap off excess, then seal with a glossy top coat that doesn’t smear the shimmer.
Less shimmer looks better. Start with a tiny amount and add only if it’s too subtle.
Avoid chunky glitter here — it fights the French shape and catches on hair.
20. Pink Base With Blue French Tips and Negative Space Triangle
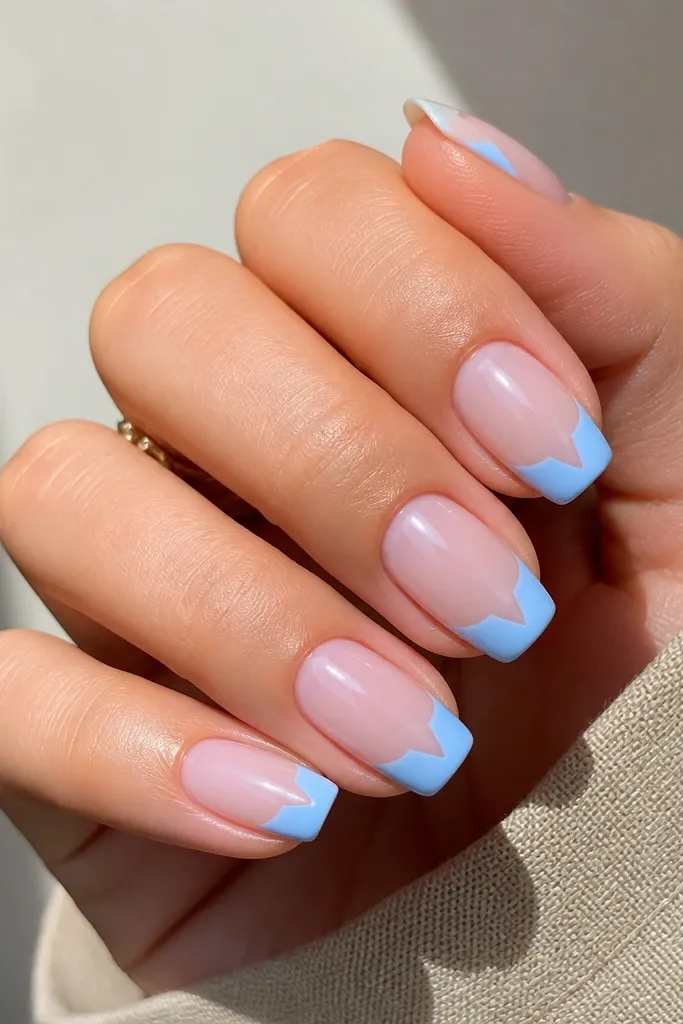
Paint pink base in two coats. Apply blue French tips at about 2.5 mm wide, but leave a small triangle of bare nail or clear gel at the center — about 1 mm wide at the base at the smile line and tapering upward. Use a fine brush to define the triangle edges before curing/drying. Then top coat over everything, making sure the triangle area stays clean and doesn’t fill in with thick product.
Negative space triangles make French tips feel modern and clean. The pink base stays smooth, and the blue tip is still the main color, but the triangle cutout gives your eye a place to rest. This is great if you want something different from hearts and stars without going full marble. It flatters almost everyone because it’s mostly color blocking and the triangle shape lengthens the nail visually.
Watch outDon’t make the triangle too big — large negative space looks unfinished.
Editor's noteUse tape or a nail stencil for the triangle if freehand triangles look shaky for you.
21. Milky Pink Base With Two-Layer Blue French (Gradient Edge)
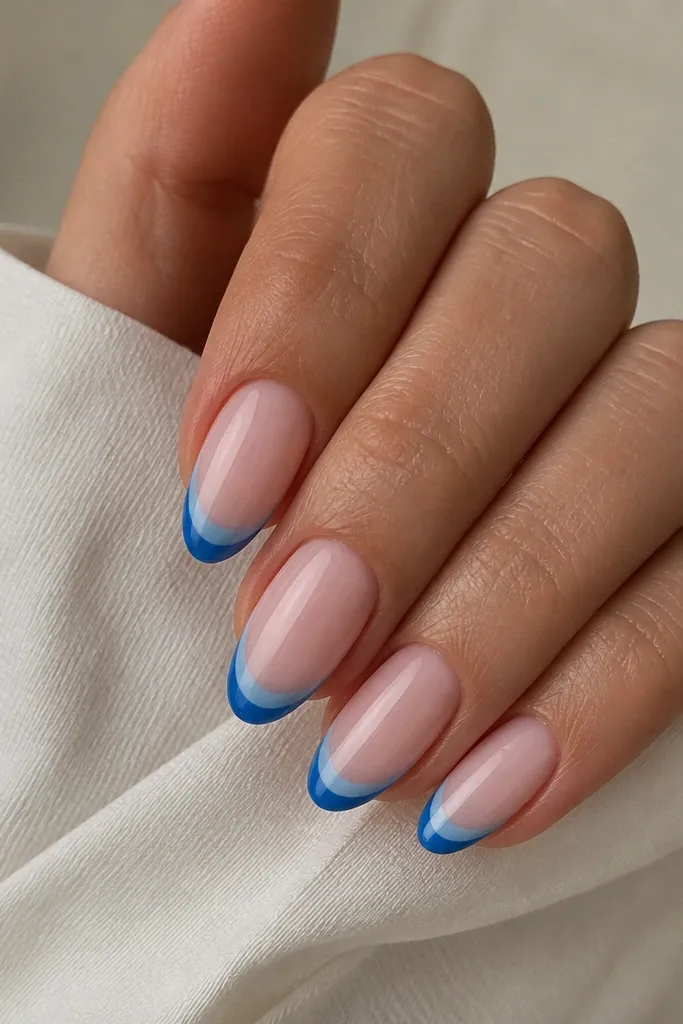
Apply milky pink in two coats and cure/dry fully. Paint a lighter blue French tip first at about 1.8 to 2 mm wide. Then add a second thin layer of darker blue only on the very outer tip edge — about 0.5 mm — and blend the boundary with a clean brush. Seal with glossy top coat and cap the tip edge.
Two-layer blue makes the tips look like they have a built-in highlight. The milky pink base keeps it soft, and the gradient edge gives depth without needing marble. On short almond nails, this looks balanced because the gradient is tight and doesn’t take over the nail. It’s flattering on hands that need a little dimension and it looks great in photos because the edge catches light.
Watch outAvoid hard lines between the two blues — it should fade, not stripe.
Editor's noteBlend the boundary while the second layer is still slightly tacky so the fade looks smooth.
22. Rose Quartz Pink Base With Blue French Tips and Tiny Linework
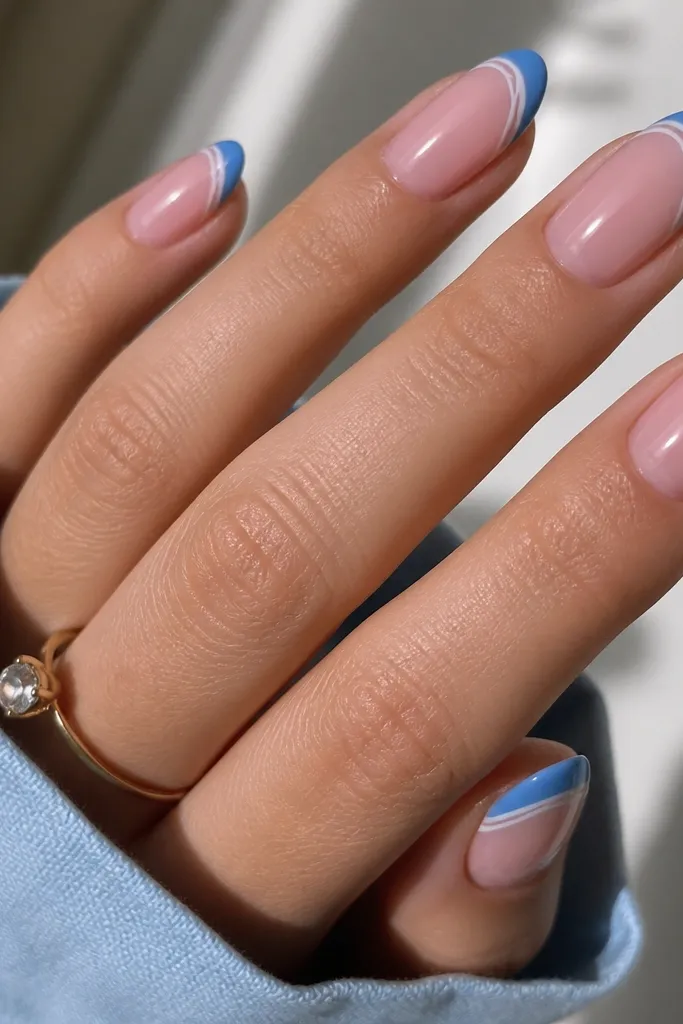
Paint rose quartz pink in two coats and cure/dry fully. Apply blue French tips at 2.5 mm wide and keep the smile line sharp. With a fine liner brush, add 2 to 3 thin white curves on each nail near the smile line, following the nail shape — not random scribbles. Finish with glossy top coat in a thin layer so the linework stays defined.
This one looks like fine jewelry on your nails. Rose quartz pink has that soft, slightly pearly tone that pairs beautifully with blue, and the thin white linework adds a delicate “thread” effect. I like it for everyday because it’s still mostly French tips, but the linework makes it feel styled. It flatters fair to medium skin because the white lines stay crisp and don’t get lost.
Watch outSkip thick linework — thick white lines look heavy and less classy.
Editor's noteIf your liner brush is too stiff, warm it between your fingers for a few seconds so it glides.
23. Soft Nude Pink Base With Blue French Tips and Micro Glitter Fade
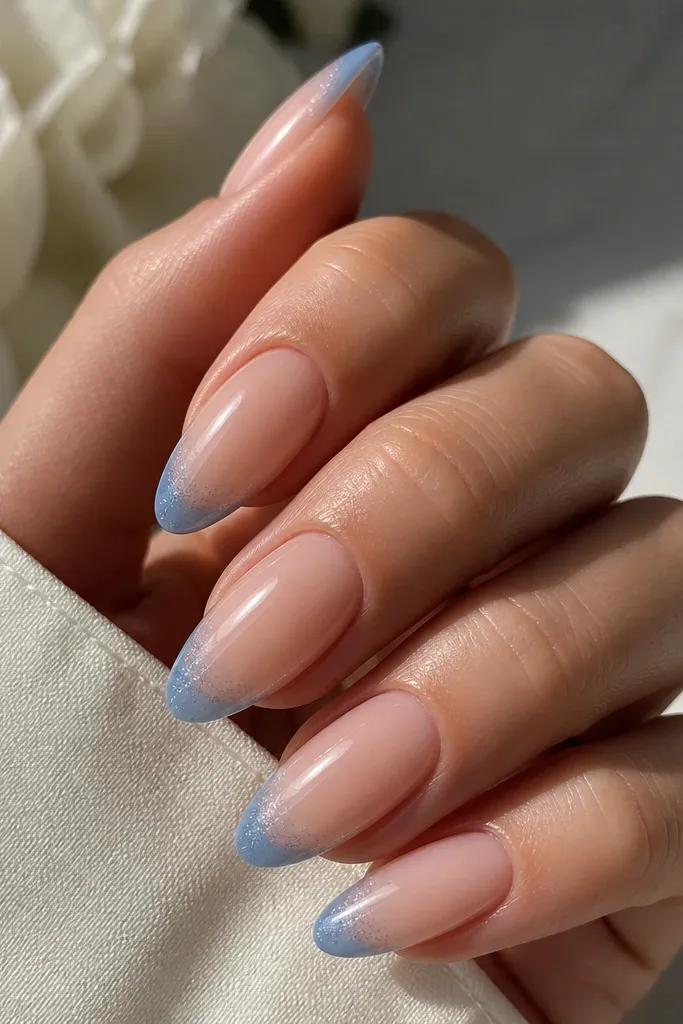
Apply soft nude pink in two coats and cure/dry fully. Paint blue French tips at about 3 mm wide. Before you fully cure, sprinkle micro glitter dust lightly only on the very tip edge — use a tiny amount and tap off excess. Brush away loose glitter, then seal with glossy top coat, curing until smooth.
Micro glitter fade makes the tips sparkle without looking like full glitter nails. The soft nude pink base keeps everything wearable, and the blue French tips give you structure. The glitter only at the extreme edge reads like light reflecting off glass, which is why it looks dreamy instead of busy. This set is flattering for medium-deep skin because the glitter catches and brightens the overall look.
Watch outDon’t put glitter across the whole tip — it turns into a glitter French instead of a blue French sparkle.
Editor's noteUse glitter dust that’s fine like sugar, not chunky craft glitter.
24. Dusty Rose Base With Periwinkle French Tips and White Swirl Ends
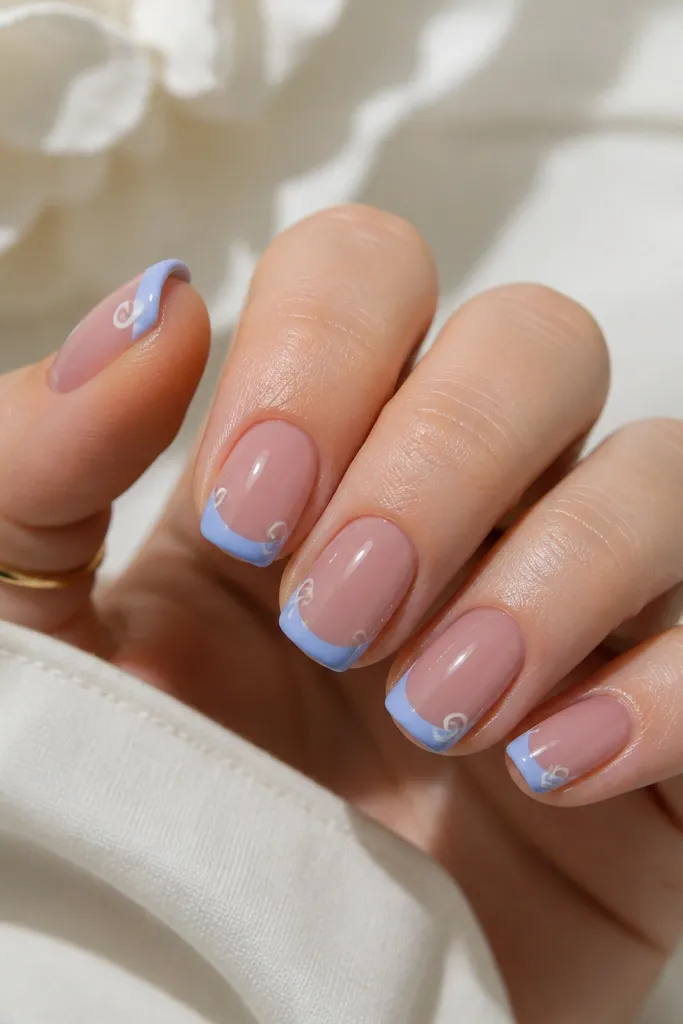
White swirl ends give the tips a little motion and they look cute without adding extra shapes everywhere. Dusty rose base is muted and flattering, and periwinkle French tips keep the blue soft. On short squoval nails, the swirl ends are small enough that the nail still looks tidy. I’ve worn this for everyday weeks when I wanted something playful but not loud.
Paint dusty rose base in two thin coats. Apply periwinkle blue French tips at about 2 mm wide with a neat smile line. Using a dotting tool or a fine brush, add tiny white swirl ends at both outer corners of each tip — keep them under 1 mm from the edge inward. Cure/dry and then seal with glossy top coat.
Do swirls last and cure them fully before your final top coat so they don’t smear.
Avoid big swirls — they steal attention from the French line.
25. Milky Pink Base With Blue French Tips and Pink-to-Blue Tip Edge Lining
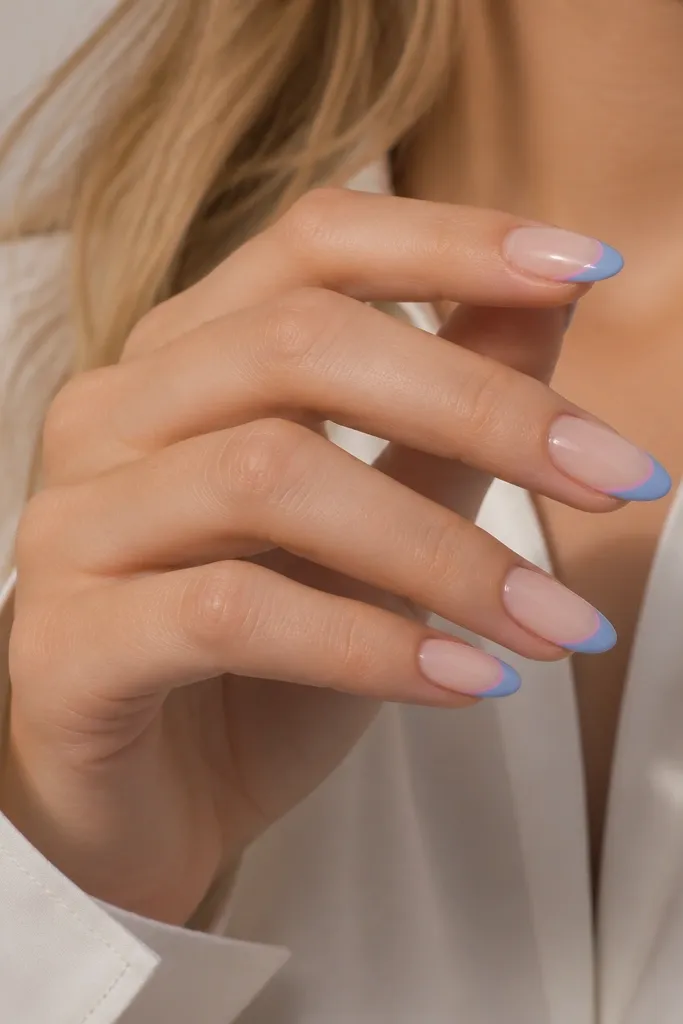
This look is for people who love color transitions but still want a French tip. The milky pink base is the bridge color, and the blue tip is the main section. The thin edge lining that blends pink to blue makes the tips look like they’re lit from the edge, which looks dreamy in both sunlight and flash. It flatters almost any skin tone because the pink lining matches the base and the blue stays controlled.
Paint milky pink base in two coats and cure/dry fully. Paint the blue French tips first with a 2.5 mm width and keep them opaque. Then mix a tiny amount of pink and blue on a palette, and use a fine brush to paint a 0.3 to 0.5 mm edge line exactly at the tip border. Clean the line by wiping your brush edge and then seal with glossy top coat.
Use a palette or a glossy tile — matte surfaces make the mixed paint grab and clump.
Don’t make the edge line thick — thin lining is what keeps it elegant.



