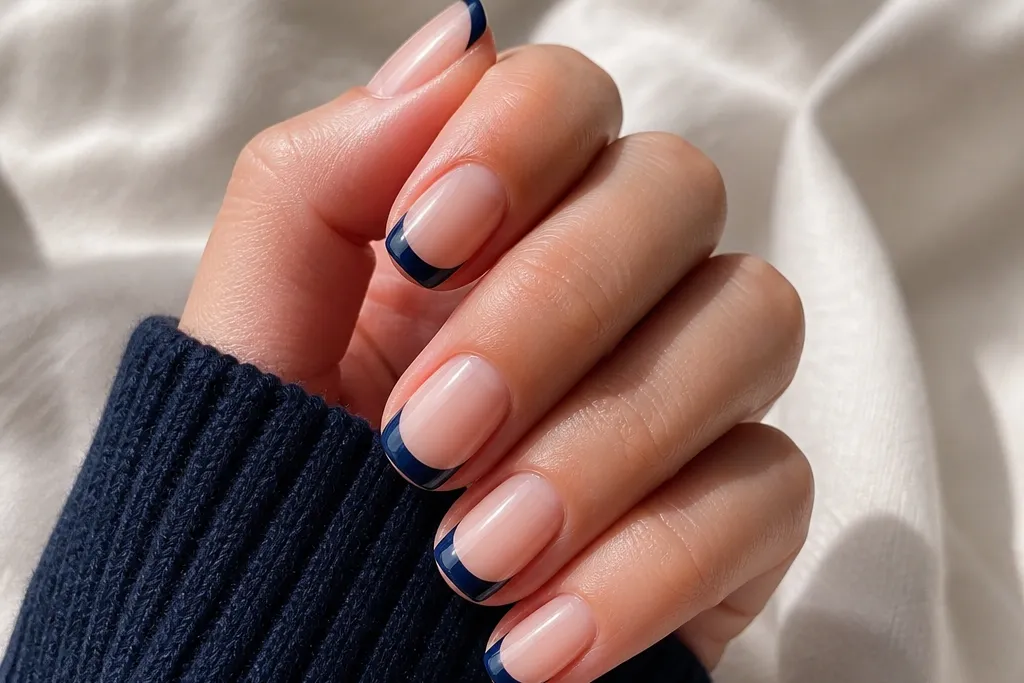
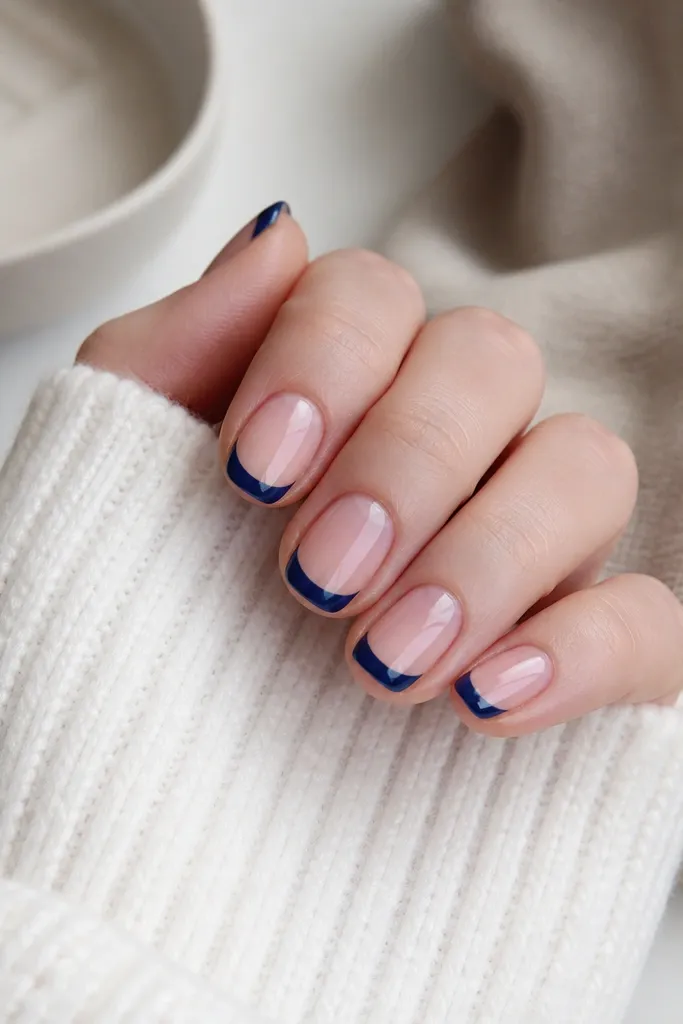
1. Classic Navy Micro French on Short Squoval
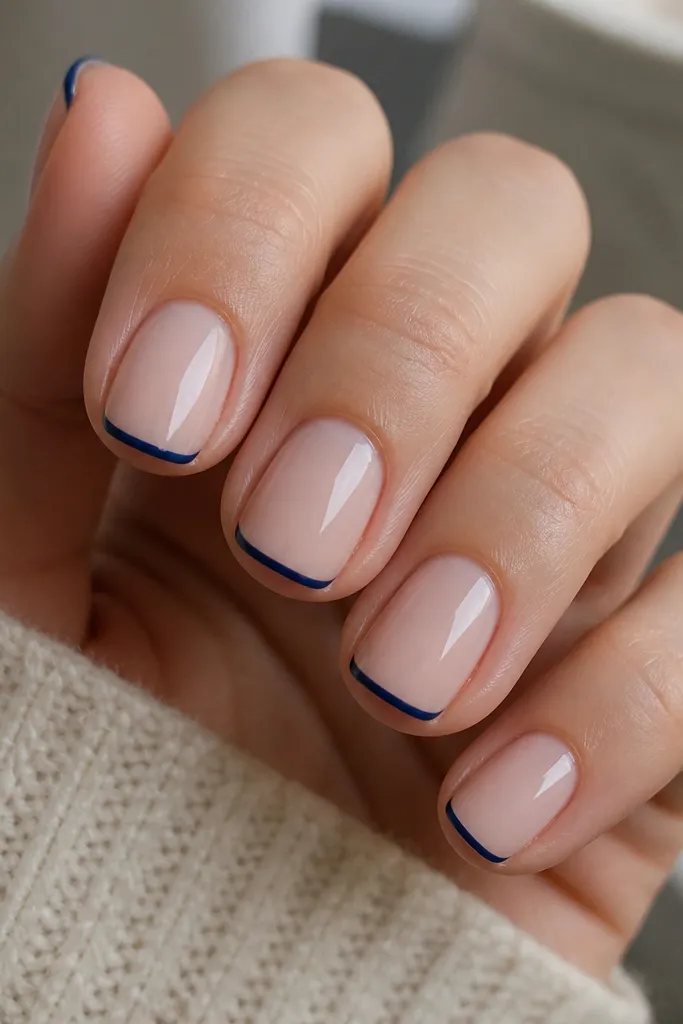
This look is for hands that need neat, not flashy. The sheer nude base keeps your nail bed looking clean, while the micro French tip makes the blue feel intentional instead of heavy. I like it on short squoval because the tip line is narrow enough to avoid a chunky outline. Dark navy also flatters warm and cool skin tones since it reads like a shadow, not a harsh color block. Wear it to work, interviews, or any day you want “put together” without drama.
Start by pushing back cuticles and buffing a light matte surface so gel or polish grips. Apply a sheer nude base in one thin coat, cure or dry fully. Place a dot of navy gel or polish at the center of the tip, then pull the line outward with a striping brush, keeping it about 1 mm thick. Add a second thin coat of navy only where the line looks uneven, then seal with glossy top coat and cap the free edge.
Editor's noteIf your brush keeps dragging, wipe it on a lint-free pad before you touch the nail. That one habit makes the line look like it came from a stencil.
Watch outDon’t paint the navy too wide — on short nails it looks like a thick frame and makes your fingers look shorter.
2. Velvet Matte Deep Blue French on Almond
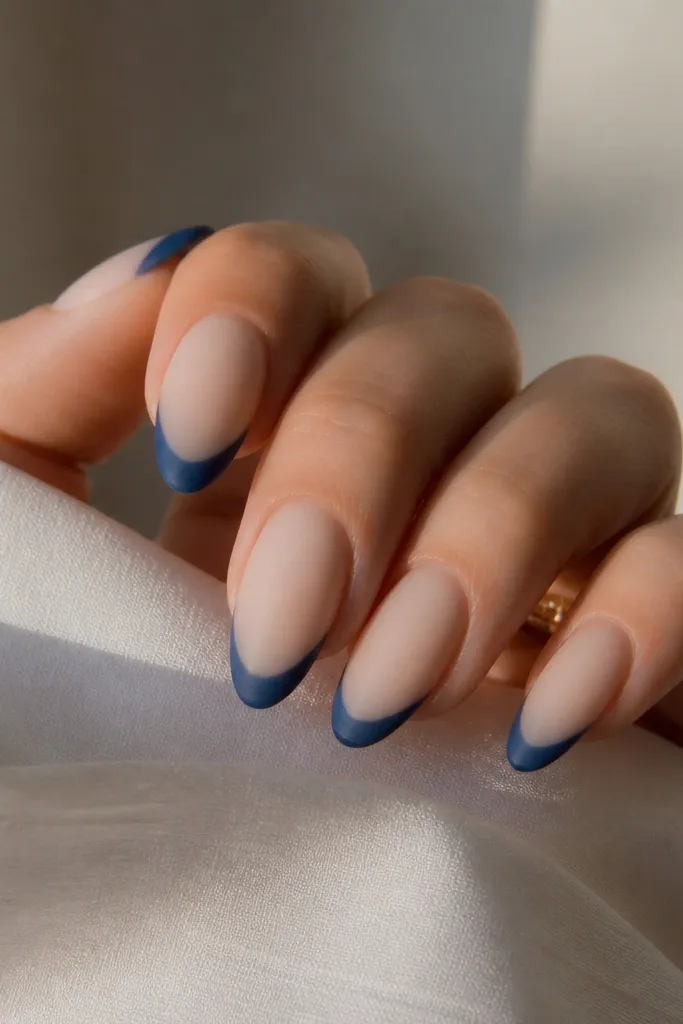
Matte changes dark blue in a good way. Glossy navy can look shiny and a bit formal, but matte makes it look plush and fashion-forward. The milky nude base gives you a smooth transition so the tip doesn’t look like it’s floating. Almond shape is perfect here because the tip follows the natural curve and looks longer. This works especially well if your skin tone is olive or medium — the blue turns smoky instead of stark.
File your nails into almond and keep the free edge slightly longer than you think you need for a clean arc. Apply a milky nude base coat and cure/dry completely. Paint the French tips with deep blue gel in two thin coats, starting near the sidewalls and meeting at the center so the smile line looks even. Finish with a matte top coat, then do not skip the final edge cap so the matte doesn’t chip at the corners.
Test your matte top coat on one nail first — some brands go chalky if your base is too thick.
Avoid heavy base layers under matte, since thick product makes the nail look bumpy under a flat finish.
3. Ombre French Fade Navy to Nude on Medium Length
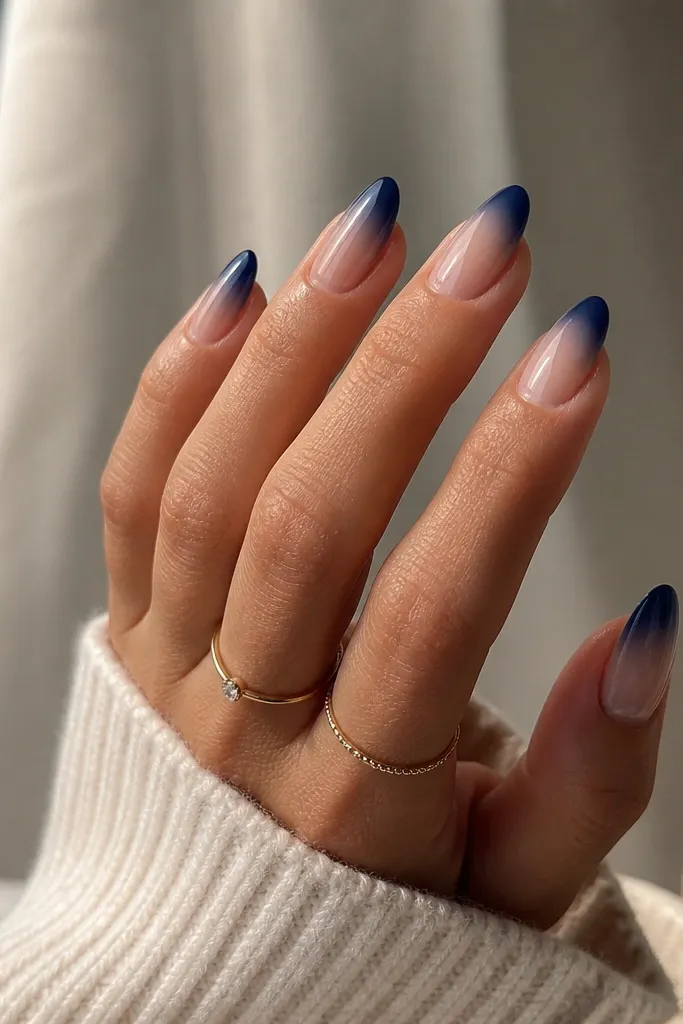
This is French tip energy without a hard border. The navy fades into the nude so your nails look airy and longer, especially on medium lengths. I love it for days when you want dark color but hate the look of a thick line. The nude-to-navy gradient also hides small application imperfections because the fade blends them. It flatters fair to deep skin tones since the contrast stays soft rather than high-contrast.
Apply a nude base that’s slightly pinker than your skin tone so the ombre has warmth. For the navy, use a sponge or ombre brush and start at the very tip edge, then drag the color upward in light passes. Keep the darkest point at the free edge and keep the fade stopping about 2-3 mm above the tip line. Let it dry or cure, then add a glossy top coat to smooth the gradient and cap the tip.
Use a small makeup sponge and dab off excess on a paper towel — too much product makes the fade blotchy.
Don’t stop the fade too high; if navy climbs too far, it turns into a full ombre rather than a French look.
4. Dark Blue Chrome French Over Sheer Pink
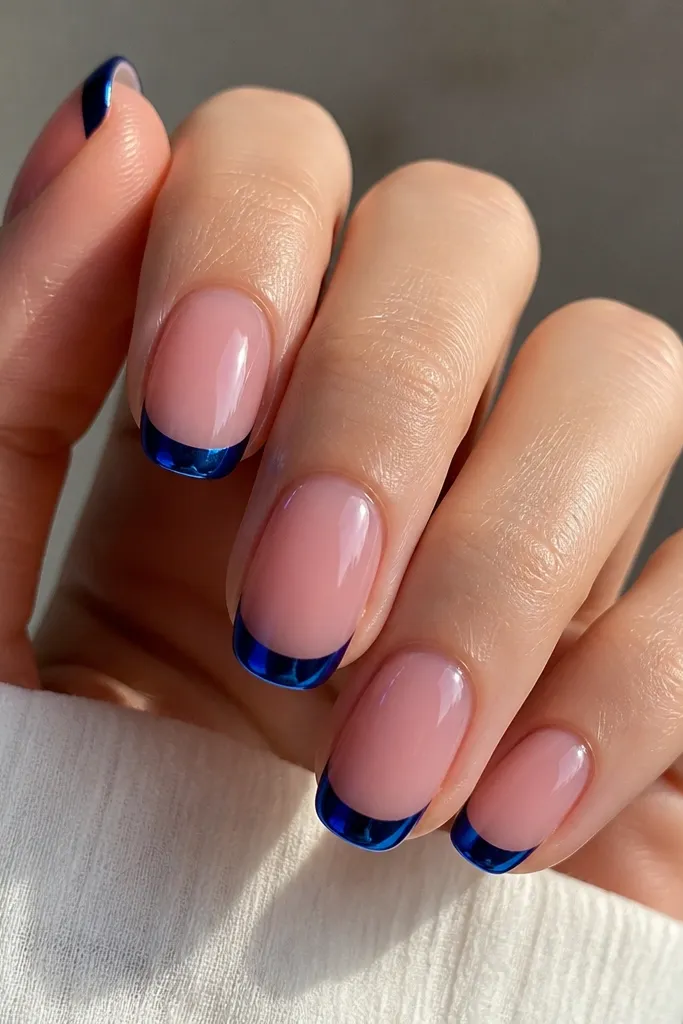
Chrome makes navy look expensive fast, even on a budget. The mirror effect catches light and makes the tip line look cleaner than paint alone. I use this when I want the set to look event-ready without adding gems everywhere. Sheer pink base keeps the chrome from looking too heavy, and it suits almost any skin tone because the base stays light. On short squoval or medium almond, chrome French tips look crisp and modern.
Start with a sheer pink base and cure it fully. Paint a dark blue gel French tip using a striping brush, then cure. Apply a thin layer of chrome gel or use chrome powder designed for gel, pressing it lightly with an applicator sponge only on the blue tip area. Wipe off excess, then seal with a non-wipe top coat that won’t dull the chrome too much. Cap the free edge so the chrome stays smooth through wear.
Rub the chrome applicator gently, not hard — hard pressure can streak the mirror finish.
Skip regular nail glue on chrome — it can dull the surface and make the tip look cloudy.
5. Navy French with White Micro Outline
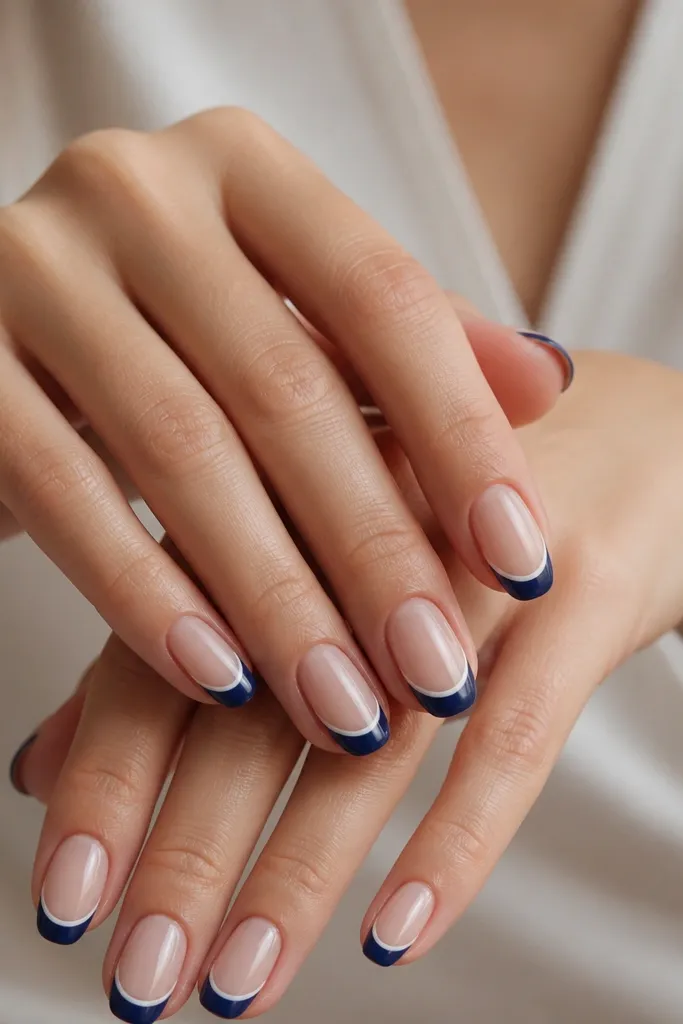
This is the easiest way to make dark blue look sharper. The white micro outline creates a tiny border that makes the navy look intentional and clean, like a graphic graphic liner. It’s flattering because it adds lightness at the tip without going full glitter. I wear this on medium almond when I want a sharper look for nights out. It also works on short nails if you keep the white line under 0.5 mm.
Paint your nude base first and cure/dry fully. Create the navy French tip in two thin coats, keeping the outline edge smooth. With a fine striping brush, add a white line inside the navy tip edge, leaving a hairline of navy visible. After the white dries or cures, add glossy top coat to lock everything in and cap the tip.
Use a liner brush with a pointed tip, not a flat striping brush, for that hairline white border.
Don’t flood the white line — thick white looks chalky and can peel at the edges.
6. Deep Blue French with Tiny Star Dots
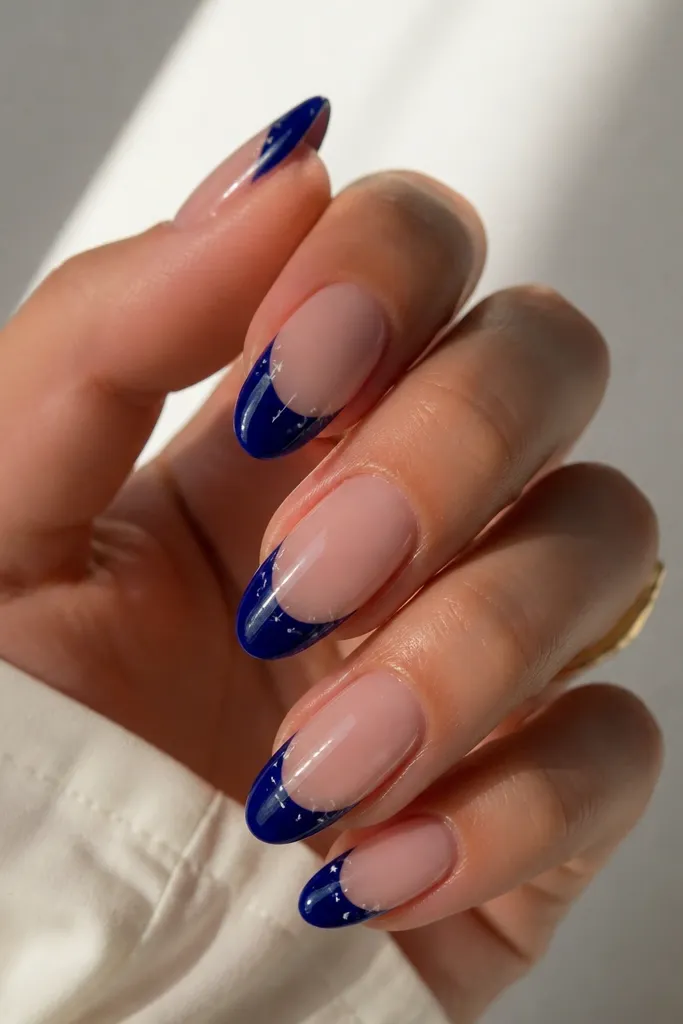
If you want cute without bulky charms, tiny star dots are your friend. The stars sit right where your eye lands — near the smile line — so the design feels intentional, not random. White stars pop against deep blue and look good on both fair and deep skin tones. I do this on almond because the tip curve gives the stars a natural path. It’s a fun date-night set that still looks clean enough for casual events.
Start with a nude base, then paint deep blue French tips in two thin coats. While the last coat is still slightly tacky (or after curing if you’re using gel dots), place 3-5 tiny white star dots using a dotting tool. Keep them mostly near the center and one side so the nail doesn’t look crowded. Cure again if needed, then seal with glossy top coat and cap the edges carefully around the dots.
Make the stars one-size only. Mixing sizes makes it look like decals instead of a hand-painted accent.
Don’t add stars all the way to the outer corners — it turns into a messy confetti look.
7. Navy French with Gold Foil Half-Moon Accent
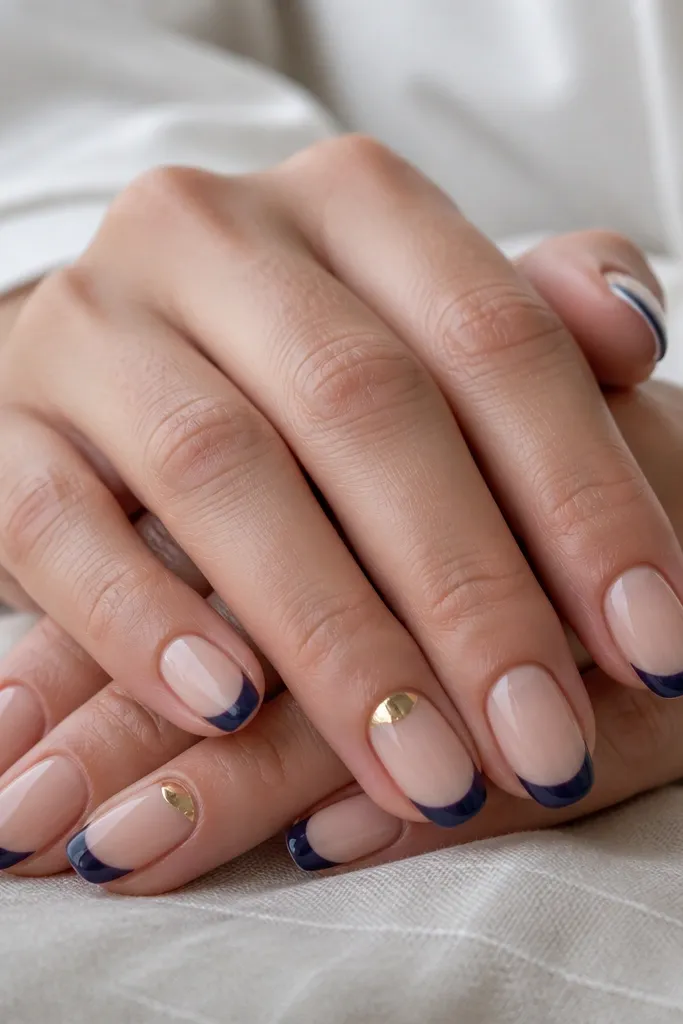
Gold foil near the cuticle balances the dark blue tip so your set looks styled, not top-heavy. I like this on medium length because the half-moon has space to look crisp. Gold also warms up cool-toned navy, which helps on fair skin that can look washed out with dark colors alone. If you’re going to do an accent, keep it to two nails so the set stays elegant. This is a great option for holidays and birthday dinners when you want something special but still wearable.
Apply a sheer nude base and cure/dry fully. Paint navy French tips on all nails, keeping the smile line neat. On two accent nails, add a tiny dab of gold foil adhesive or gel near the cuticle and press in gold foil to form a small half-moon. Seal with top coat, and for the foil nails, use a slightly thicker top coat but only over the foil area so it doesn’t flood the French line.
Tear the foil into small pieces before you place it. Small pieces lay flat better and look cleaner.
Don’t cover the entire nail in foil — it competes with the French tip and makes the look messy.
8. Dark Blue French with Silver Micro Glitter Fade
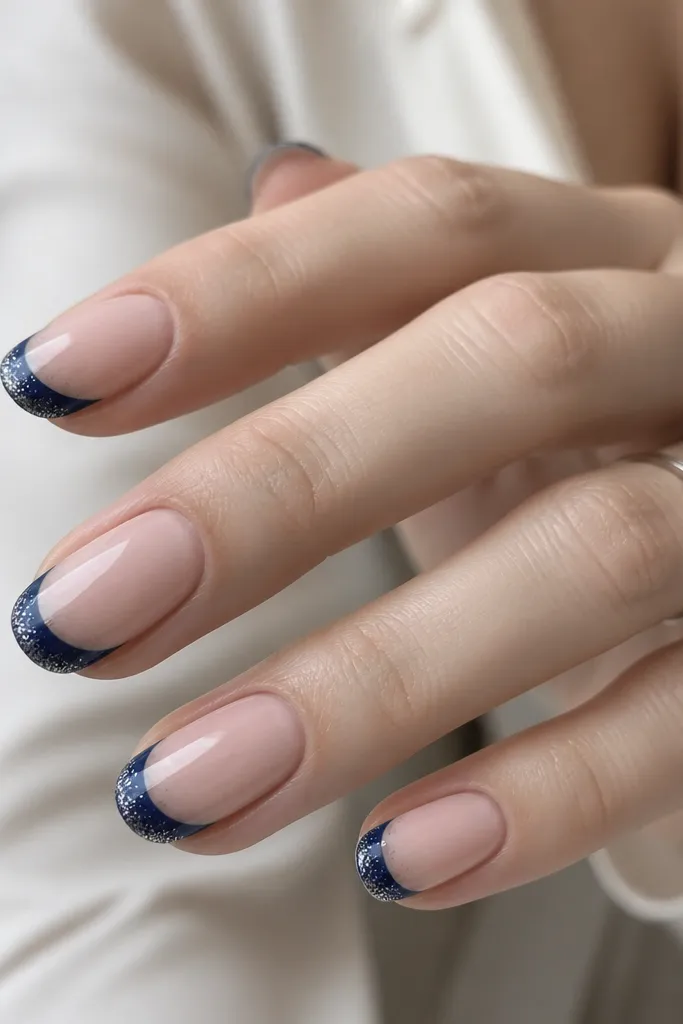
Micro glitter at the very tip edge makes navy look like it’s catching light underwater. The key is keeping the glitter concentrated at the free edge so it reads as a French accent, not a full glitter nail. This flatters most skin tones because silver reflects and brightens the nail bed. I use it when I want a party-ready set that still looks professional enough for daytime photos. Short to medium lengths both work because the glitter is limited to the tip.
Start with a nude base coat and cure/dry fully. Paint the French tips in dark blue in two thin coats. Then tap a fine silver glitter gel or loose glitter (sealed with a thin clear gel) only on the last 1-2 mm of the tip edge. Blend the glitter into the blue with a light brush stroke so it fades, then top coat over everything and cap the free edge.
If you use loose glitter, apply with a sponge and press, then seal — brushing loose glitter can scatter it onto the nude area.
Don’t add glitter up the sides of the tip. Side glitter makes it look uneven and cheap fast.
9. Navy French with Matte Top and Glossy Smile Line
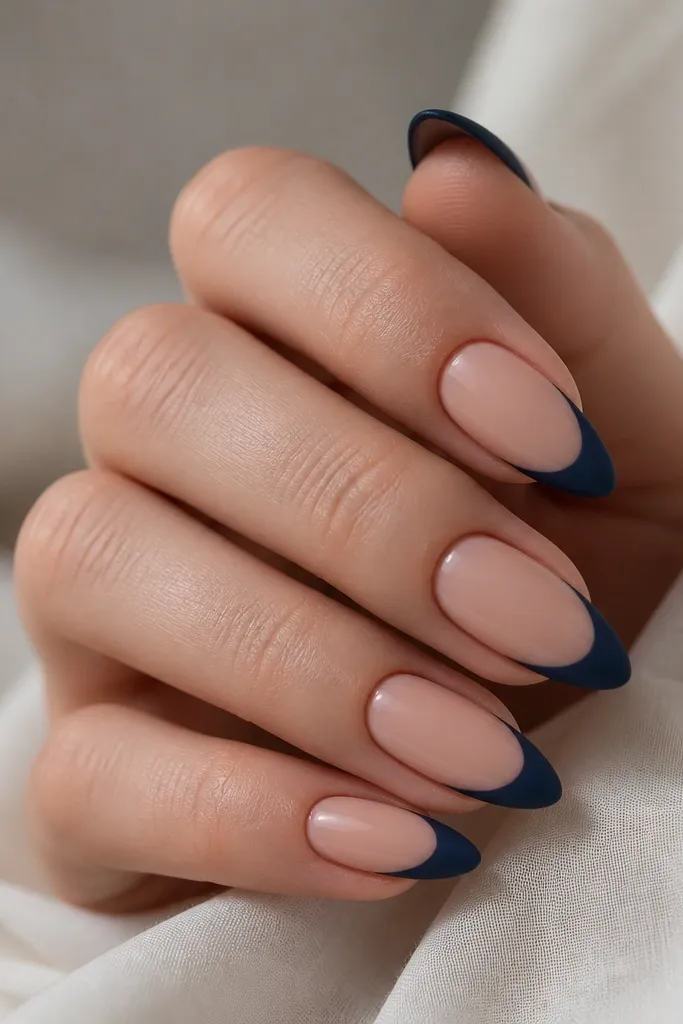
This two-finish look looks like nail art you’d see in a salon, but it’s just top coat control. Matte blue makes the color feel soft, and a glossy smile line gives you that sharp, framed effect. The nude base keeps the contrast clean and makes your hands look neat. I like it on almond because the smile line is more visible along the curve. It flatters hands with slightly wider nail beds since the glossy line adds structure.
Apply a nude base and cure/dry fully. Paint navy French tips in two thin coats and cure. Brush matte top coat over the entire nail including the blue, then cure. With a thin liner brush, paint a tiny strip of glossy top coat exactly along the smile line area and cure again. Keep the glossy strip narrow so it looks like a frame, not a second French tip.
Editor's noteLet the matte cure fully before you add the glossy line — touching matte too soon can smear it.
Watch outDon’t cover the smile line with matte too thickly. Thick matte makes the glossy line look raised.
10. Dark Blue French with Tiny Rhinestone Studs at Corners
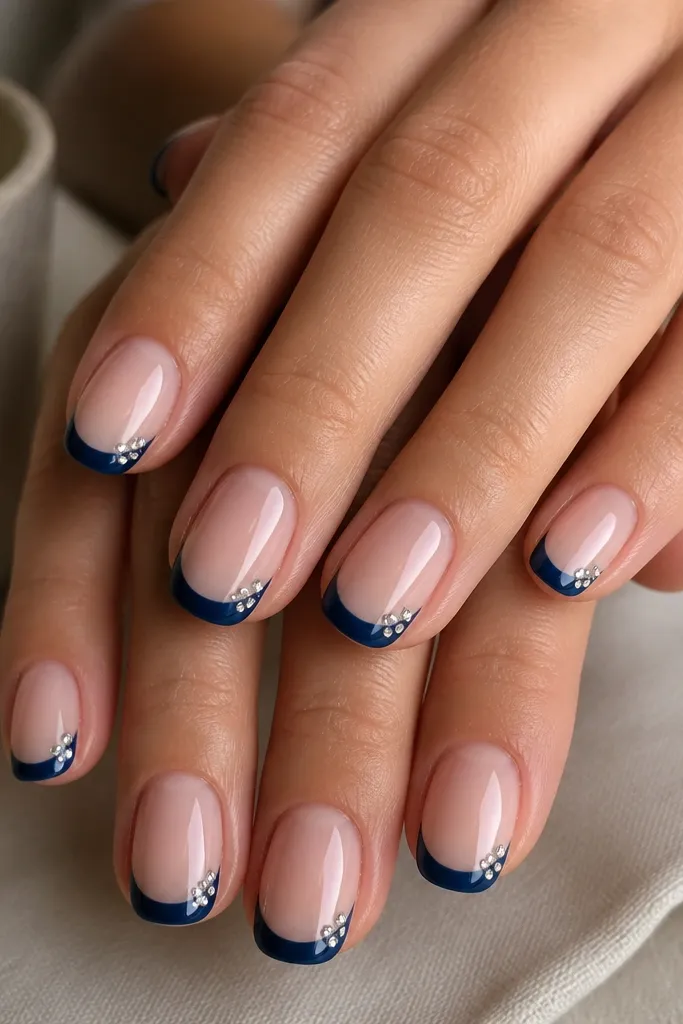
Corner studs make dark blue feel extra polished without turning into a full bling nail. The stones catch light at the edges, which makes your nails look longer because your eye tracks outward. I like this on short squoval because the studs sit right where the nail is widest, balancing the shape. It works on fair to deep skin tones, and the clear stones keep it classy. If you’re attending something formal but don’t want heavy charms, this is the answer.
Start with a nude base and cure/dry fully. Paint navy French tips in two thin coats. Add a tiny dot of gel or rhinestone glue at each outer corner of the blue tip — just enough to hold, not enough to ooze. Place one small clear rhinestone on each corner and press lightly. Cure and seal with glossy top coat, being careful not to flood around the stones.
Use flat-back rhinestones under 2 mm so they don’t snag on hair or fabric.
Don’t place stones too close to the center. Corner placement looks intentional; center placement looks random.
11. Navy French with Blue-Tinted Nude Base
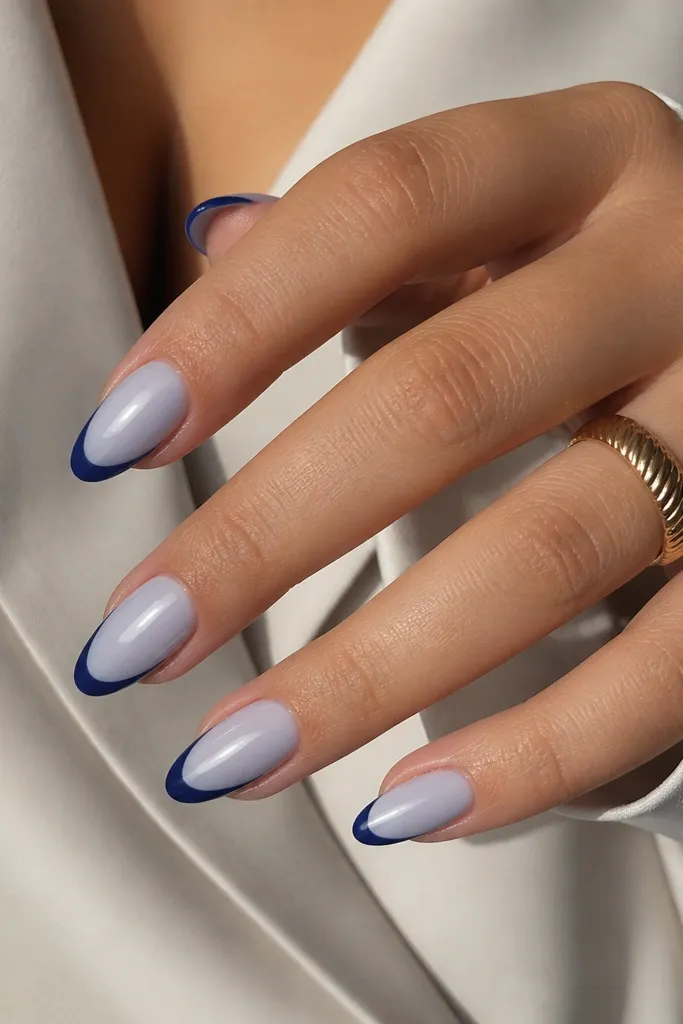
This look is all about color harmony. When the nude base has a blue tint, the navy French tip blends in instead of looking pasted on. It’s a subtle trick that makes the set look higher-end, especially in photos with flash. I like it for medium almond because the base color shows near the cuticle and along the sides. It flatters people with warm undertones too because the blue tint balances the warmth without turning the base gray.
Choose a nude base that leans slightly mauve-blue or milky rose with a cool tone. Apply it in thin coats so it stays sheer. Paint navy French tips in two thin layers, keeping the tip line clean and consistent. After curing/drying, use a glossy top coat to smooth any micro texture from the base. If the base looks too pink, add a second navy-thin coat only at the tip edge to keep contrast controlled.
If you don’t own a blue-leaning nude, mix a drop of navy into a nude top coat on a palette for a quick custom base.
Don’t use a super peachy nude under navy. The clash makes the set look messy.
12. Dark Blue French with Diagonal Center Stripe
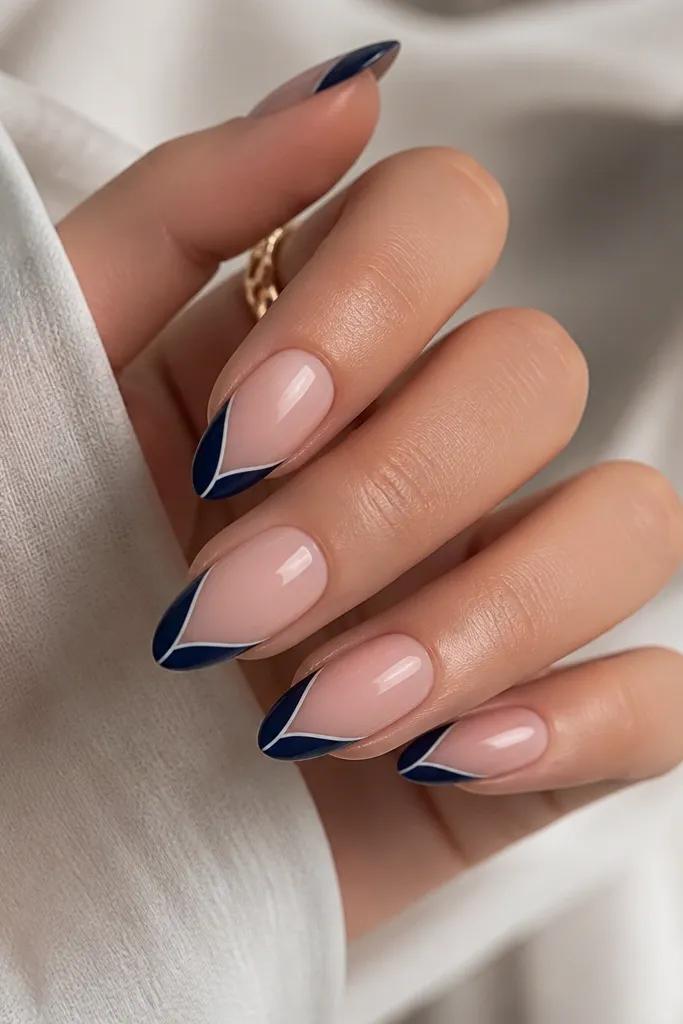
Diagonal accents are flattering because they create a long line from the center. The white stripe gives the dark blue a graphic look without covering the whole tip. I wear this when I want something sporty but still clean. Almond shape handles the diagonal stripe best because the tip has enough surface to keep the line straight. It suits most skin tones, but I notice it looks extra good on medium and deep because the white pops clearly.
Start with a nude base and cure/dry fully. Paint navy French tips, keeping the tip curve smooth. With a striping brush, paint a thin white diagonal line from the center of the smile line down to the tip edge. Keep the stripe thickness consistent — about the width of a hairline. Seal with glossy top coat, then cap the free edge so the diagonal line doesn’t lift.
Editor's noteUse painter’s tape as a guide for your diagonal — stick it on the nail after base, then remove before painting the stripe.
Watch outDon’t make the diagonal stripe too wide. Wide stripes turn the French tip into a divider line.
13. Navy French with Tiny Polka Dots Along the Smile Line
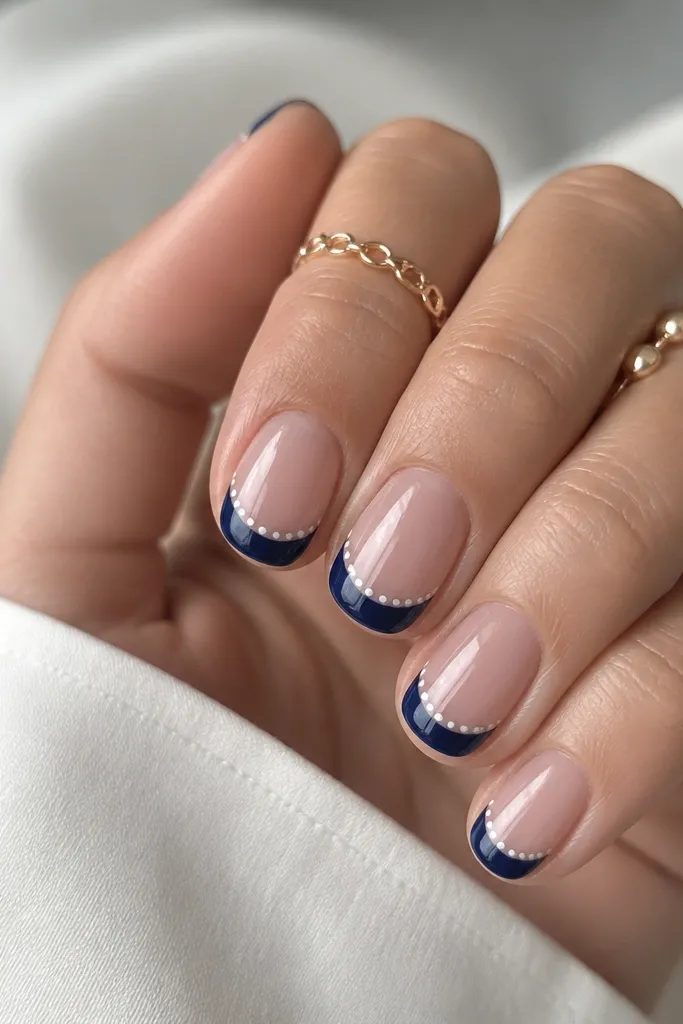
Polka dots under the smile line make the French tip look playful while staying neat. The dots are small enough that they don’t steal focus from the blue color. This is a good option if you want art but you’re not great at freehand. The nude area stays mostly clean, so the nail bed looks longer. It flatters fair, neutral, and deep skin tones because the white dots add contrast without harshness.
Apply a nude base and cure/dry fully. Paint navy French tips in two thin coats. With a dotting tool, place 4-6 tiny white dots right along the smile line on the nude area, starting near one sidewall and ending near the other. Space them evenly so the arc looks balanced. Cure/dry, then seal with top coat and cap the edges.
Editor's noteUse the smallest dotting tip you own. Oversized dots make the design look cartoony and cheap.
Watch outDon’t cover the whole smile line with dots all the way to the corners. Keep it in the middle third.
14. Dark Blue French with Glitter Top Coat Only on Tips
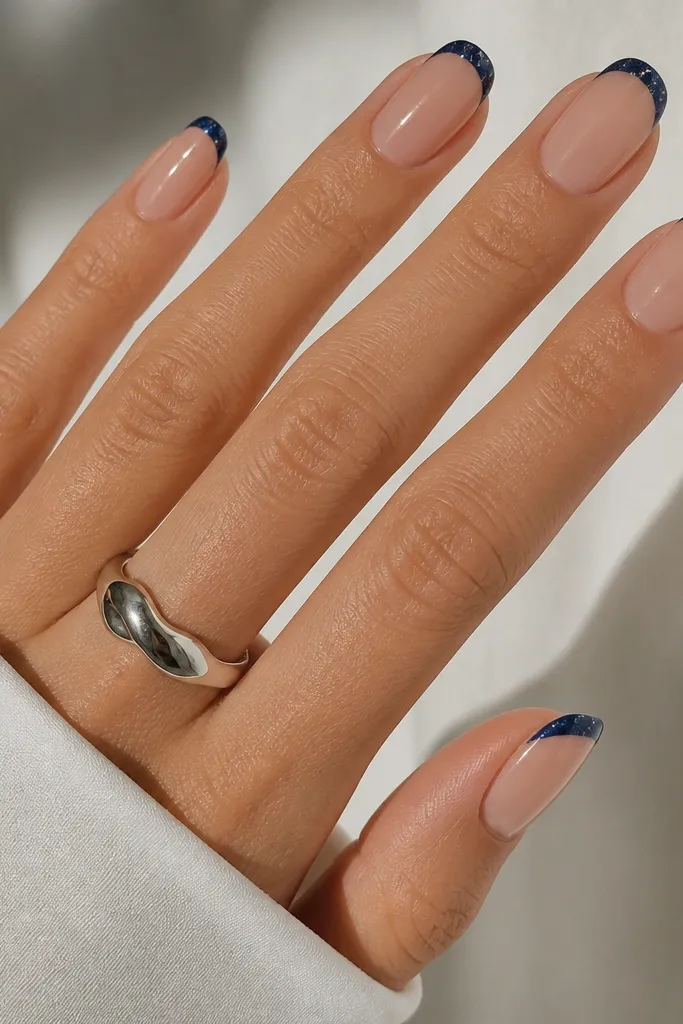
This is the budget-friendly way to get sparkle without buying a bunch of separate glitter polishes. You paint a normal navy French tip first, then add a glitter top coat only where you want shine. It looks controlled, not messy, because the glitter stays inside the tip area. I like it on medium almond because the glitter catches light along the curve. It also works on short nails since the sparkle stays contained at the edge.
Paint your nude base and cure/dry fully. Apply navy French tips in two thin coats and cure. Brush or dab a glitter top coat only on the blue tip area, keeping it off the nude base. Cure again, then wipe if your top coat is wipe-type. Finish by checking the edge under light — if glitter overlaps the nude, clean it with a tiny brush dipped in acetone.
Use a thick top coat glitter formula so it doesn’t run down the sides.
Don’t glitter the nude base. It turns the look into a full mani and ruins the French shape.
15. Navy French with Micro Swirl Accent on Ring Finger
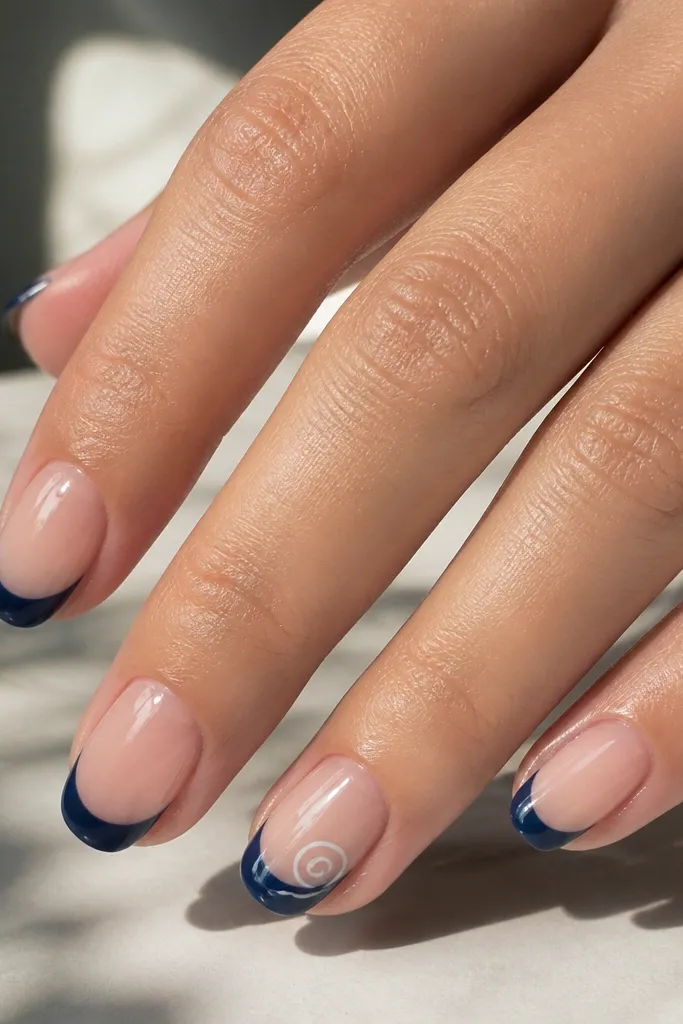
A micro swirl is a small detail that makes your set feel custom. Keep the swirl inside the blue tip so it looks like part of the French design, not a sticker on top. I do this on ring finger because it’s the one people notice when you gesture. The swirl looks crisp in white against navy and keeps the set from feeling too plain. This style flatters both short squoval and medium almond because the swirl can be scaled down.
Start with nude base and paint navy French tips on all nails. On the ring finger, add a tiny white dot near the center of the blue tip, then pull a short swirl with a fine liner brush. Keep the swirl small — about 2-3 mm — and stop before it reaches the outer corners. Cure/dry, then seal with glossy top coat. Cap the free edge carefully so the tiny line doesn’t lift.
Editor's noteDraw the swirl in one stroke if you can. Starting and stopping usually makes the line look thick at the ends.
Watch outAvoid swirls that go too close to the tip edge. They snag on fabric and chip faster.
16. Dark Blue French with Sheer Navy Jelly Layer
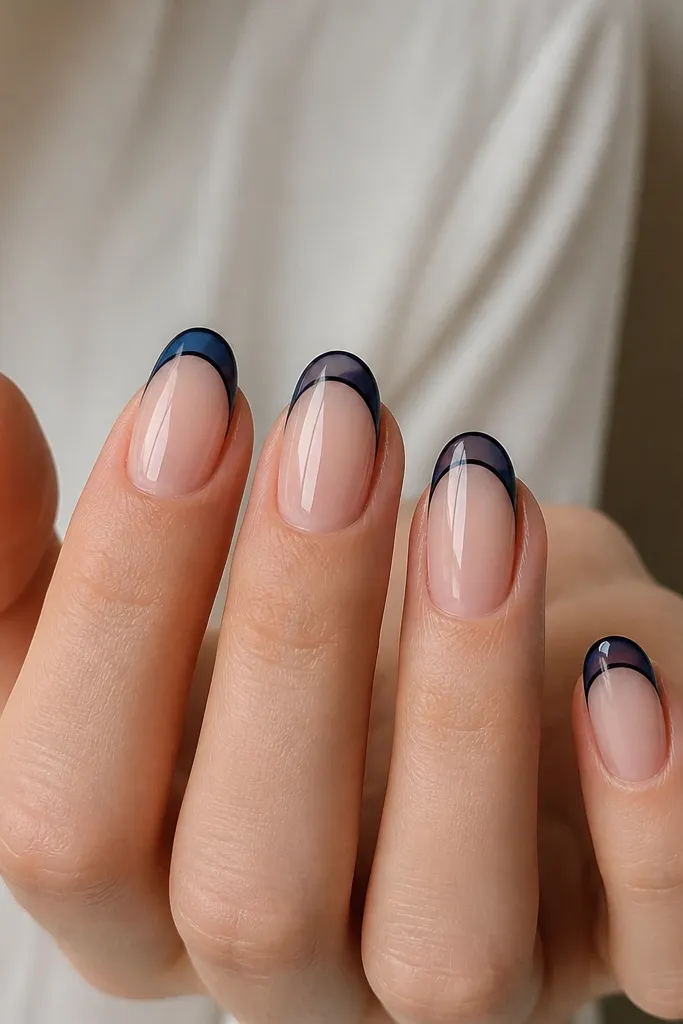
Jelly layering makes dark blue look dimensional without using pricey 3D elements. You get a deeper outline and a translucent fill, so the tip looks like it has depth. It’s especially flattering on medium length because the jelly catches light and makes the nail look thicker and healthier. I like this when my nails are slightly thin — jelly fill makes them visually smoother. It works on all skin tones because the base stays nude and the blue stays controlled.
Apply nude base and cure/dry fully. Paint a thin deep navy line for the French outline, then cure. Next, add a sheer navy jelly layer inside the outline, keeping it translucent and even. Cure again, then top coat with glossy seal to lock in the jelly shine. If you need more color, add one more thin jelly coat instead of thickening the deep outline.
Use a jelly polish that’s slightly thick — watery jelly makes streaks inside the outline.
Don’t skip curing between the outline and jelly. Mixing them while wet makes the edges bleed.
17. Navy French with White Lace-Look Curve (Tape Method)
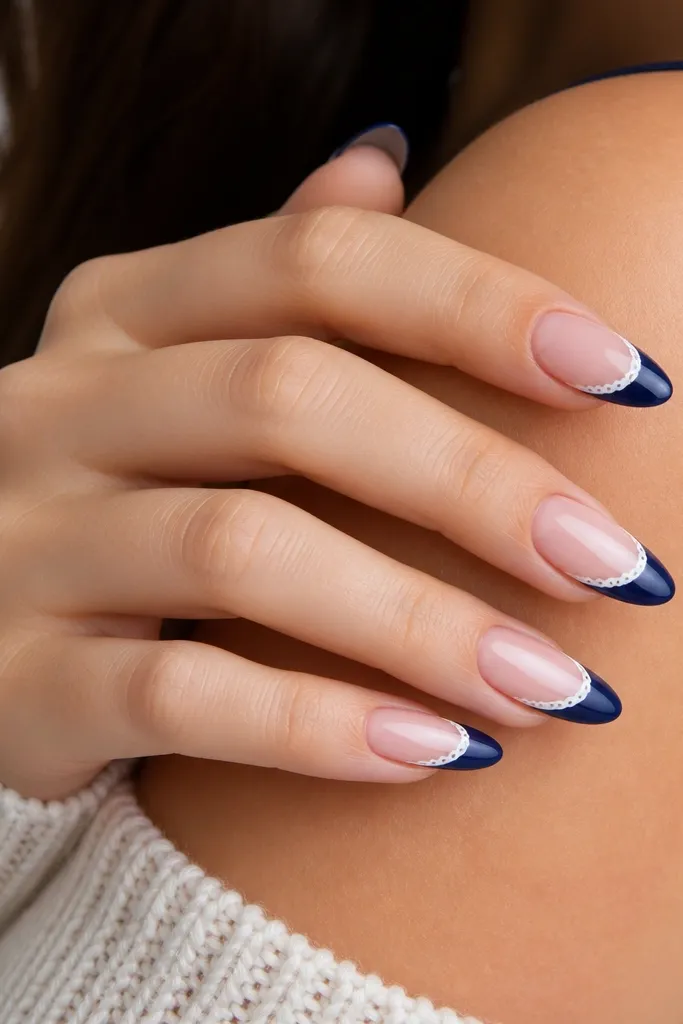
This lace-look French is the one I get the most compliments on because it looks detailed without needing freehand lace. The white scallops inside the navy create a delicate edge that reads like lace in photos. It flatters hands with longer nail beds because the inner curve gives you a refined frame. I do it with tape guides so the scallops stay consistent. Dark blue makes the white pattern pop even if your lace lines are tiny.
Start with a nude base and cure/dry fully. Paint navy French tips first. For the lace edge, cut small scallop shapes from thin striping tape or use a scalloped nail tape guide and place it along the inner edge of the French tip. Paint white over the exposed area, remove the tape while the paint is still slightly tacky (or after fully dry if it’s regular polish), then cure/dry. Seal with glossy top coat and cap the free edge.
Make scallops bigger on almond, smaller on short nails. Scale matters for the lace look.
Don’t use thick tape — thick edges create jagged white lines that look cheap.
18. Dark Blue French with Tiny Heart at Tip Center
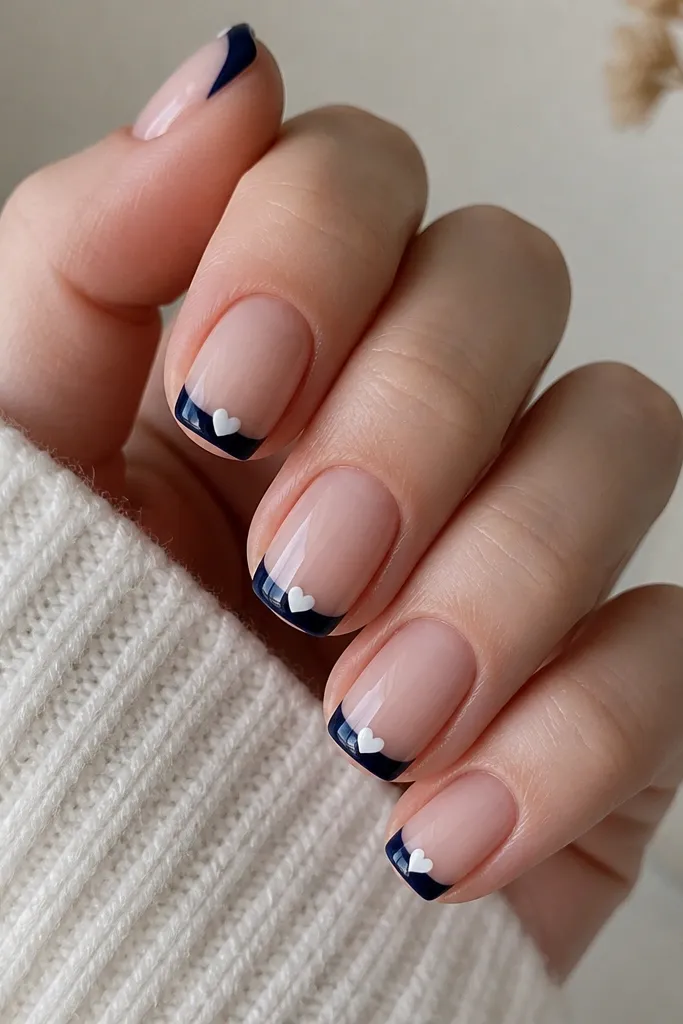
A tiny heart turns the French tip into a sweet detail without losing the clean vibe. Keep it centered so your nails look balanced, not chaotic. I like this when I’m wearing a dark outfit and want my manicure to look playful in close-up photos. White hearts pop against navy and look good on every skin tone because the contrast stays crisp. This looks best on short squoval and medium almond where the tip has enough space for a small heart.
Apply a nude base and cure/dry fully. Paint navy French tips in two thin coats. Use a dotting tool to place two small white dots for the heart, then connect them with a fine liner brush to form the heart outline. Keep the heart about 1-2 mm tall so it stays dainty. Cure/dry and seal with glossy top coat, making sure the heart edges are fully covered.
If your heart looks uneven, draw it as a “U” first, then add the top line. It’s easier than trying to draw a perfect heart at once.
Avoid hearts that touch the sidewalls — they look cramped and can peel.
19. Navy French with Clear Negative Space Smile
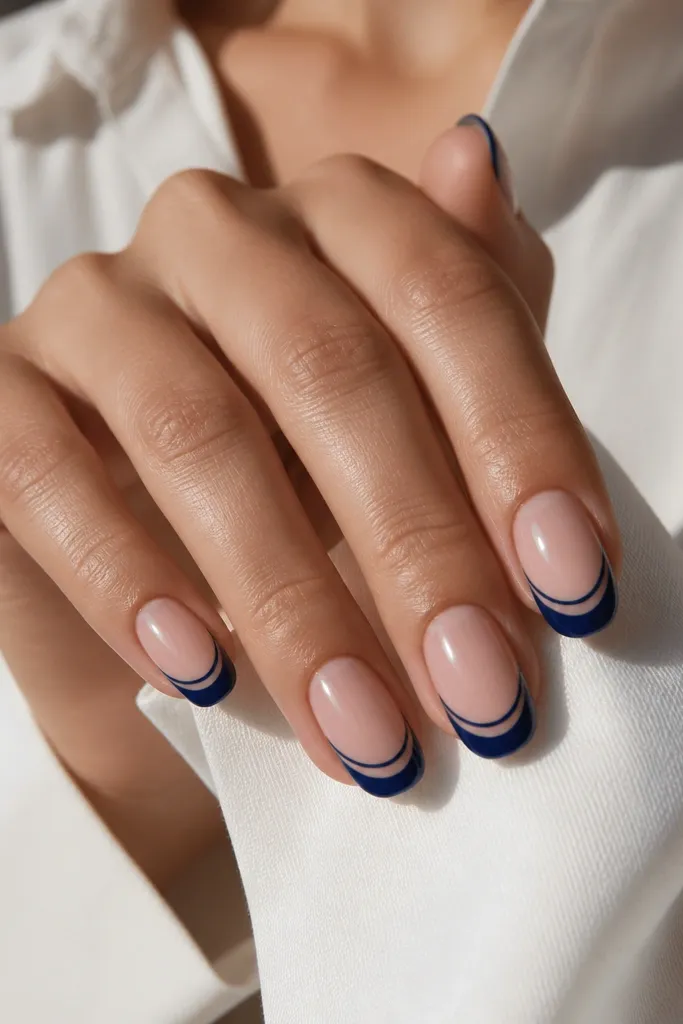
Negative space makes dark blue look modern and sharp. You leave a clear smile line so the navy reads like a banner across the tip instead of a filled block. This is flattering because it visually breaks up the color and makes short nails look more delicate. I recommend it for short squoval and medium almond when you want something more design-y than classic micro French. The clear line also hides tiny mistakes because the design is meant to be “open.”
Start with a nude base that matches your natural nail tone — sheer is key. Paint navy French tips around where you want the negative space, leaving a narrow clear gap at the smile line. Clean up the edges with a small brush dipped in acetone before curing. Cure/dry, then apply top coat carefully over the navy while keeping the clear gap clean. If you notice top coat flooding the negative space, clean it right away with a cotton swab.
Use a French guide sticker so your negative gap stays the same width across all nails.
Don’t make the negative space too wide. Too much clear area makes it look like an accident.
20. Dark Blue French with Tiny Gold Stud at Center
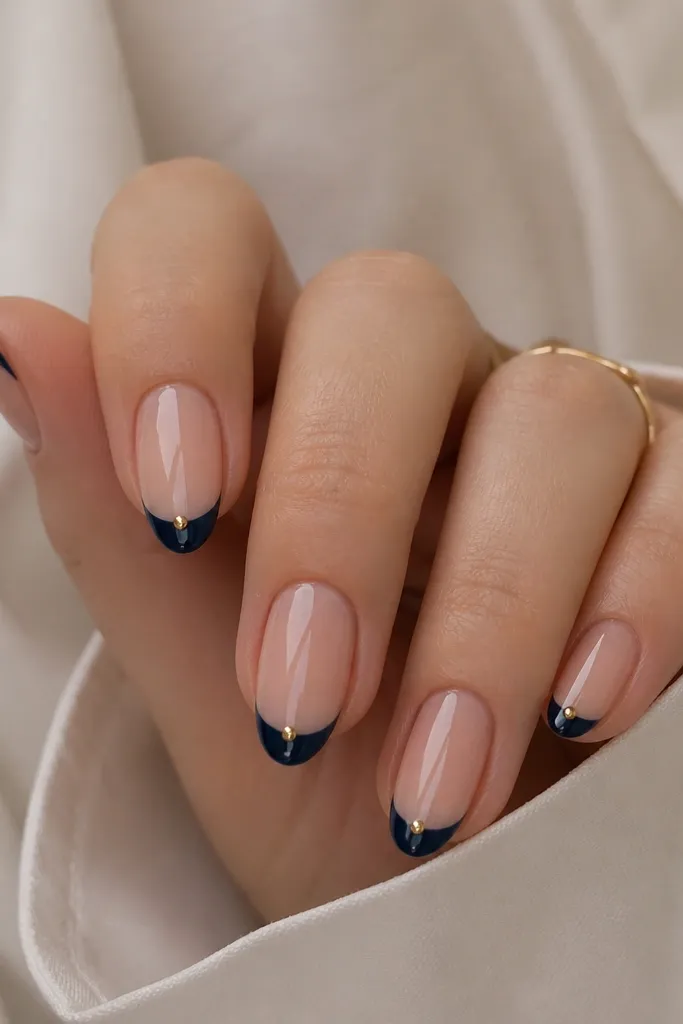
A single gold stud at the tip center looks clean and expensive because it’s one focal point. It makes the navy look like it has jewelry built into it. I like this on medium almond because the stud sits on a smooth curved surface and catches light when you move your hands. It works on fair, medium, and deep skin tones, since gold plays nicely with navy. This is a great choice for weddings, dinners, and anything where you want your nails to look intentional.
Apply nude base and cure/dry fully. Paint navy French tips in two thin coats and cure. Add a small dot of gel or rhinestone glue exactly at the center of the tip edge, then place one tiny gold stud. Press lightly and cure again if you’re using gel. Seal with top coat, then cap the free edge so the stud doesn’t snag. Keep top coat thin around the stud so it stays reflective.
If you’re using loose studs, pick them up with a sticky wax dot or gel residue on a toothpick.
Avoid placing the stud too far down the nail. It should sit near the free edge, not the middle of the tip.
21. Navy French with Light Blue Watercolor Splash Tip
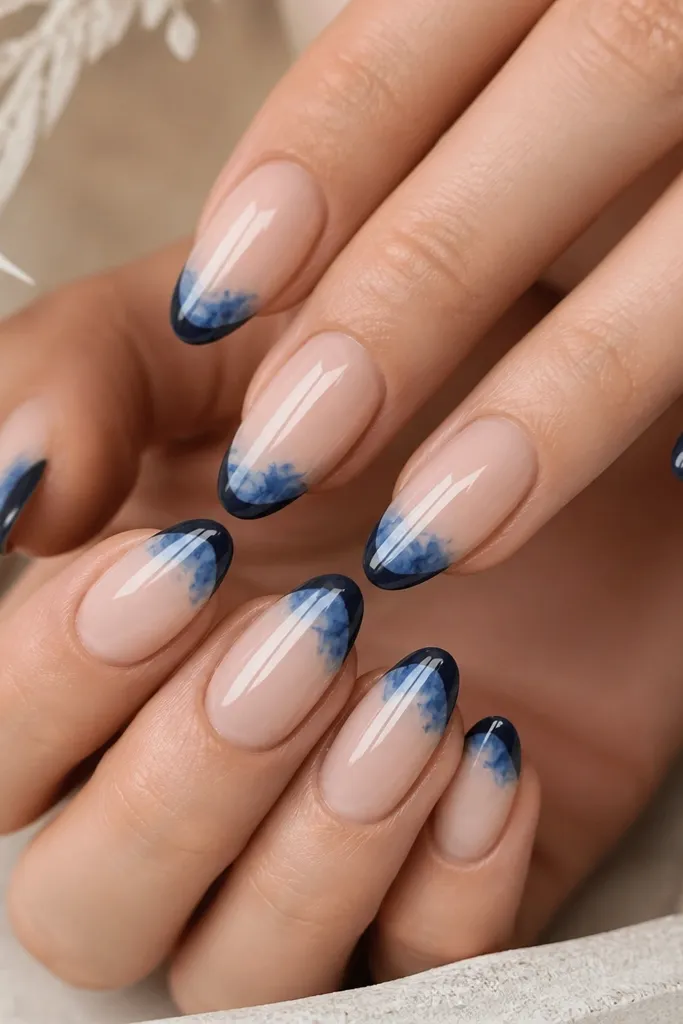
Watercolor splashes make dark blue feel softer and less “hard line.” The light blue splash adds a second tone without needing glitter or stones. I love this for spring and casual weekends, especially if you like nail art but hate anything too sharp. It looks best on medium almond where the tip surface can hold the splash shape. This flatters deeper skin tones because the light blue shows up clearly and looks luminous.
Start with a nude base and cure/dry fully. Paint navy French tips and cure. On the center of each tip, dab a small amount of light blue watercolor polish or gel with a sponge or stippling brush, then blend slightly outward with a clean brush for a soft edge. Let it settle, then top coat with glossy to smooth the watercolor effect. If the splash looks too harsh, add a thin clear gel layer over the splash before top coat.
Editor's noteUse a makeup sponge for the splash — it gives that natural watercolor speckle instead of a painted blob.
Watch outDon’t outline the splash with a hard line. Watercolor looks right when edges stay soft.
22. Dark Blue French with Thick Glossy Tip and Thin Base
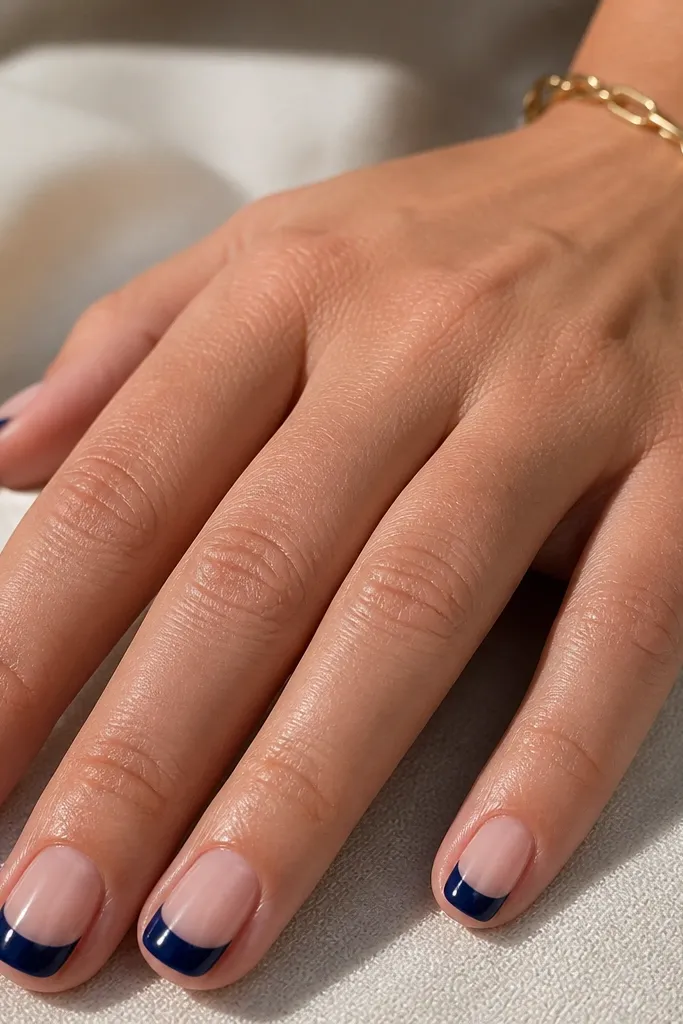
Sometimes you want the French tip to feel like a solid block of color, not a thin line. This version has a slightly thicker navy tip while keeping the nude base thin and clean. The glossy finish makes the blue look smooth and glassy, which helps it look salon-done. I like it on short to medium almond because the thicker tip gives a bold look without making the nails too short. It’s flattering on hands with narrower nail beds because the bold tip widens the visual space.
Prep and buff lightly, then apply a sheer nude base in a thin coat. Paint navy French tips slightly wider than micro French, keeping the curve even. Apply navy in two coats, then add a third ultra-thin coat only if you need opacity, avoiding bulk at the sides. Cure fully and top coat with a thick, glossy top coat that self-levels. Cap the free edge and wipe any stray polish on the skin for a clean look.
If your tip looks bulky, file gently at the sides after curing, then re-seal with top coat.
Don’t make the nude base too thick. Thick base makes the nail look heavy and the French line lose its shape.
23. Navy French with Sparkly Blue Gel Tip Fade
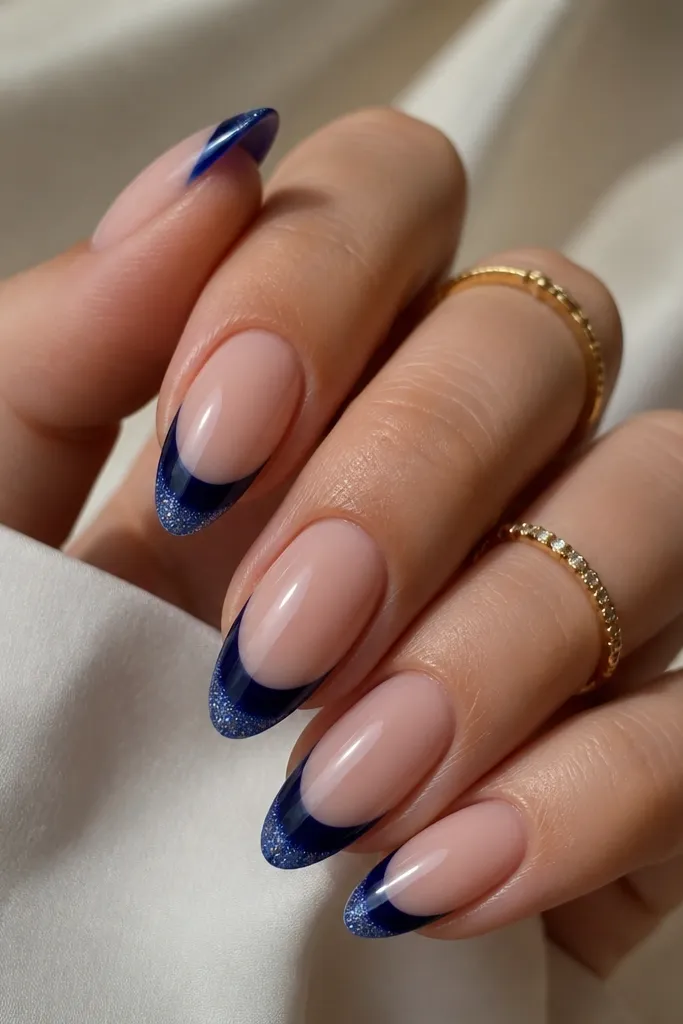
This look is like a gradient sparkle tuned to blue, not silver. The dark navy anchors the tip, and the sparkly blue at the edge adds depth without looking icy. I like it for evening because it looks subtle in daylight and clearly sparkly under light. It flatters medium to deep skin tones best because the blue sparkles blend with the navy instead of turning silvery. If your nails chip easily, the gradient also hides tiny edge wear since the sparkle is concentrated at the tip.
Apply a nude base and cure/dry fully. Paint navy French tips in two thin coats and cure. On the last 1 mm at the tip edge, dab a sparkly blue gel and drag it slightly downward so it fades. Cure again, then seal with glossy top coat. Check the underside edge and cap the tip so the glitter gel doesn’t catch and peel.
Use a small brush to place the sparkly gel — sponging spreads it too far up the tip.
Don’t use large glitter for this. Large chunks look uneven and snag.
24. Dark Blue French with White Half-Moon at Cuticle (Two-Tone)
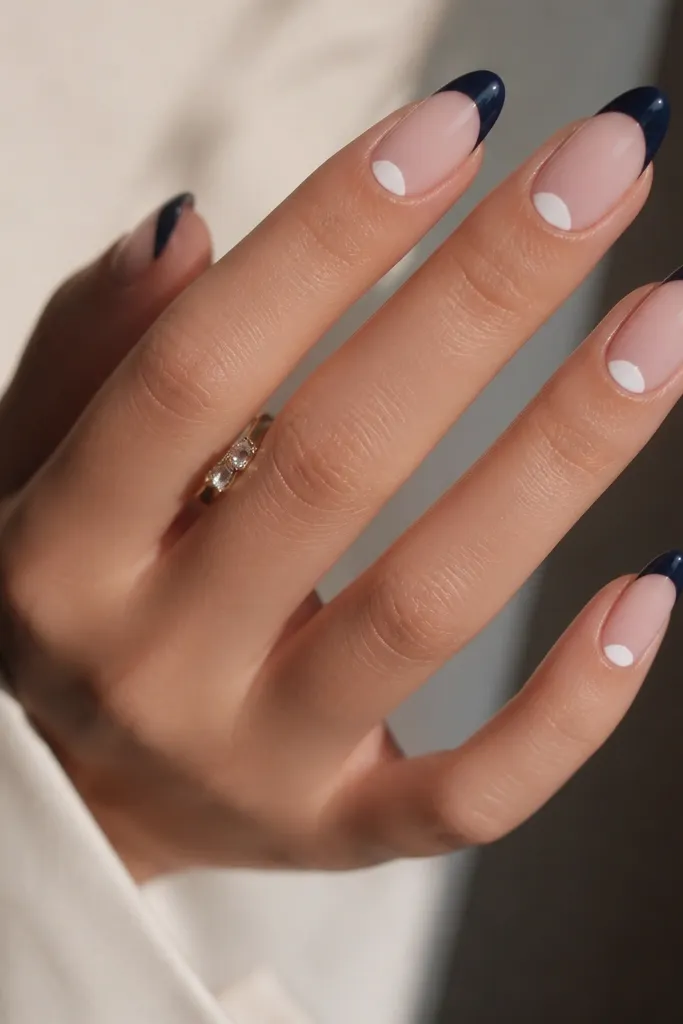
This two-tone layout balances top and bottom color so the manicure feels intentional. The white half-moon at the cuticle echoes the French tip and makes your nails look designed, not random. It flatters hands with longer nail beds because the half-moon gives a clean frame near the cuticle. On fair skin, the white looks bright and crisp; on deeper skin, it still pops but stays classy if you keep the half-moon small. It’s a great alternative to full French if you want more detail.
Start with a nude base and cure/dry fully. Paint the navy French tips in two thin coats. For the half-moon, use a small half-moon stencil or freehand with a liner brush — keep it just above the cuticle line and about 2-3 mm wide. Paint the half-moon white, cure/dry, then top coat. Seal carefully at the cuticle edge so the white doesn’t shrink or lift.
Editor's noteUse a stencil and rotate it for each nail so the half-moon matches your nail curve.
Watch outDon’t make the half-moon too big. Big cuticle shapes look like regrowth marks.
25. Navy French with Purple Undercurrent (Indigo + Violet Mix)
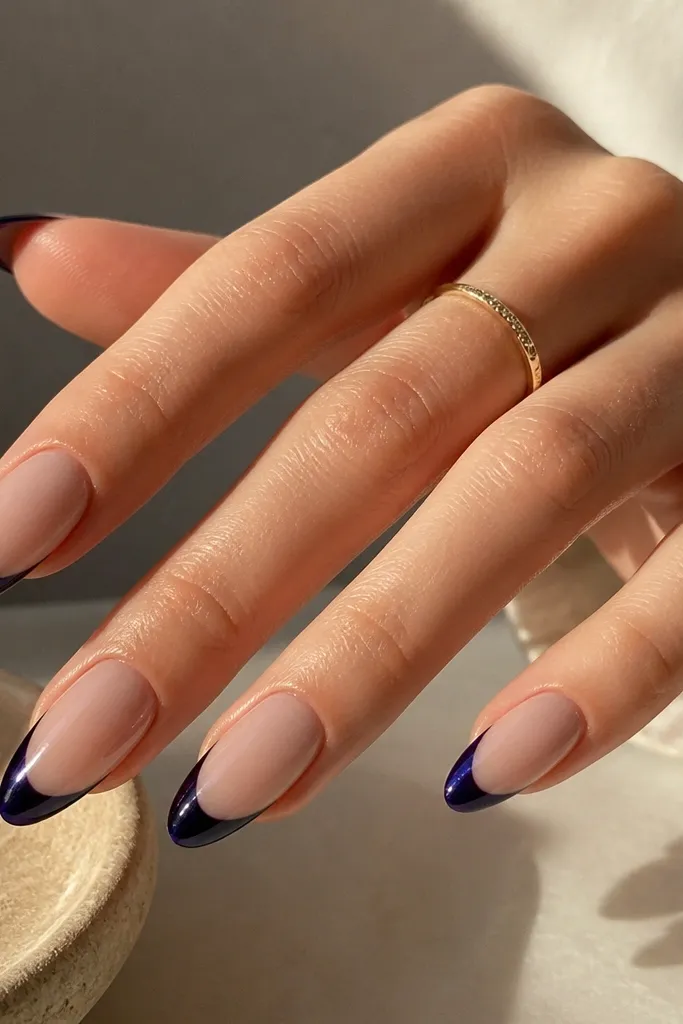
This is the “dark blue but not boring” version. When navy has a hint of violet, it looks richer in different lighting — like indigo ink with a purple glint. I like it for people who feel blue always looks flat on them. It flatters most skin tones because the purple undertone adds dimension instead of looking one-dimensional. Use it on medium almond or long squoval so you get enough tip area to show the color shift. It looks great with silver jewelry and cool-toned outfits.
Apply a nude base and cure/dry fully. Paint French tips using a navy that has violet undertones, or mix navy gel with a tiny drop of violet on a palette. Apply in two thin coats so you keep the color shift smooth, not streaky. Let it cure fully, then top coat glossy for maximum depth. If the violet tint is too subtle, add a third ultra-thin coat only on the center of the tip.
Mix on a palette for consistency. Mixing in the bottle can change the whole product’s color over time.
Don’t use a purple that’s too bright. Bright purple under dark blue looks like separate colors instead of one shift.