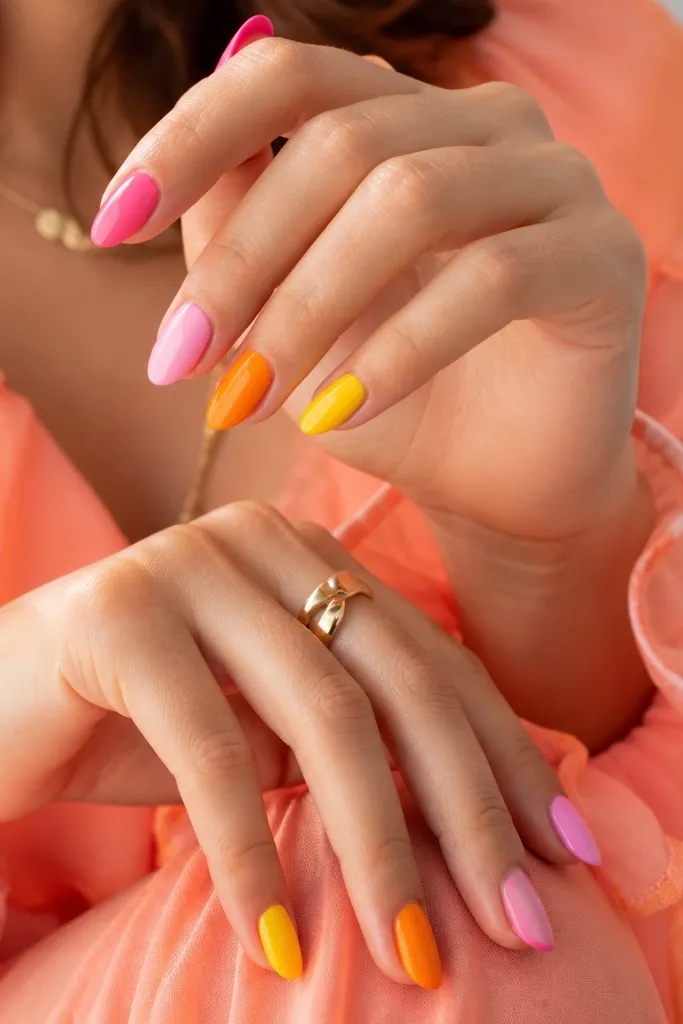
1. Milky Pink Base With Tangerine Half-Moons
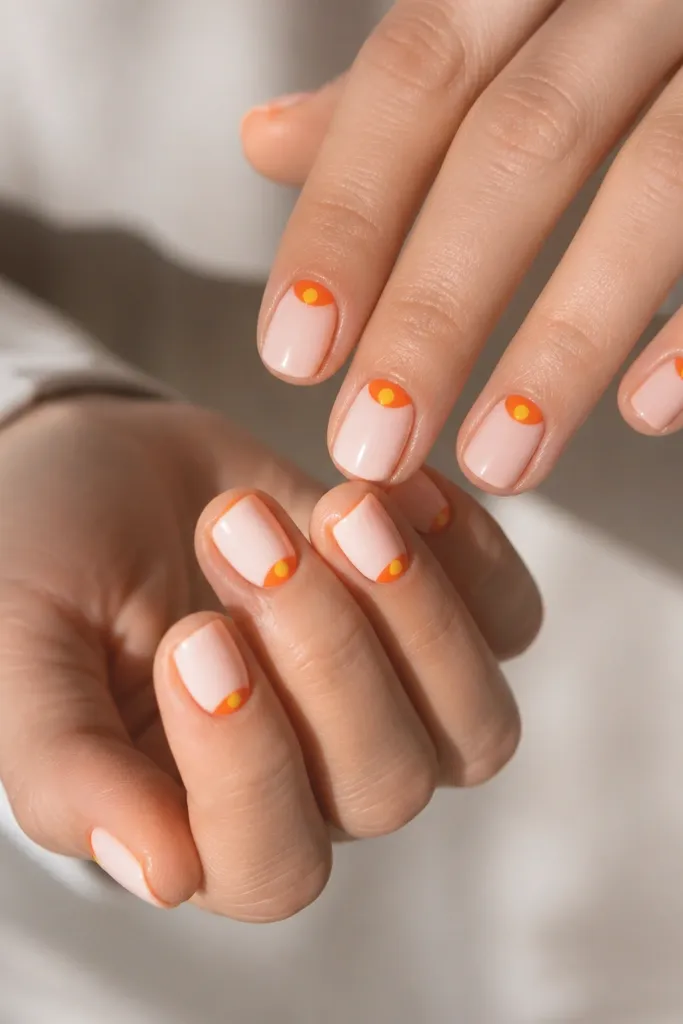
This one looks clean and expensive because the milky pink fills the whole nail like a soft filter. The orange half-moon sits near the cuticle where contrast looks flattering, not loud. I've worn it on medium-light and deeper skin tones; the orange pops without washing out the pink. The yellow dot adds a small "sun" moment that reads cute in person and camera flash. It's perfect for work weeks, brunch, and any outfit where you want color but not chaos.
Start by applying two thin coats of milky pink gel and cure fully. Use a half-moon guide sticker or a curved brush to paint a tight orange crescent at the cuticle, leaving a thin gap of pink around the edges. Add a single butter-yellow dot in the center of the orange crescent using a dotting tool. Finish with a thick, glossy top coat, making sure you seal the free edge with extra polish. If you want it even sharper, wipe the brush with gel wipe before you draw the crescent line.
Editor's noteUse a slightly thicker orange gel for the half-moon so it stays opaque in one pass.
Watch outDon't drag the orange from the cuticle too far down - the set turns muddy when the crescent grows.
2. Creamy Pink French With Sunshine Tips
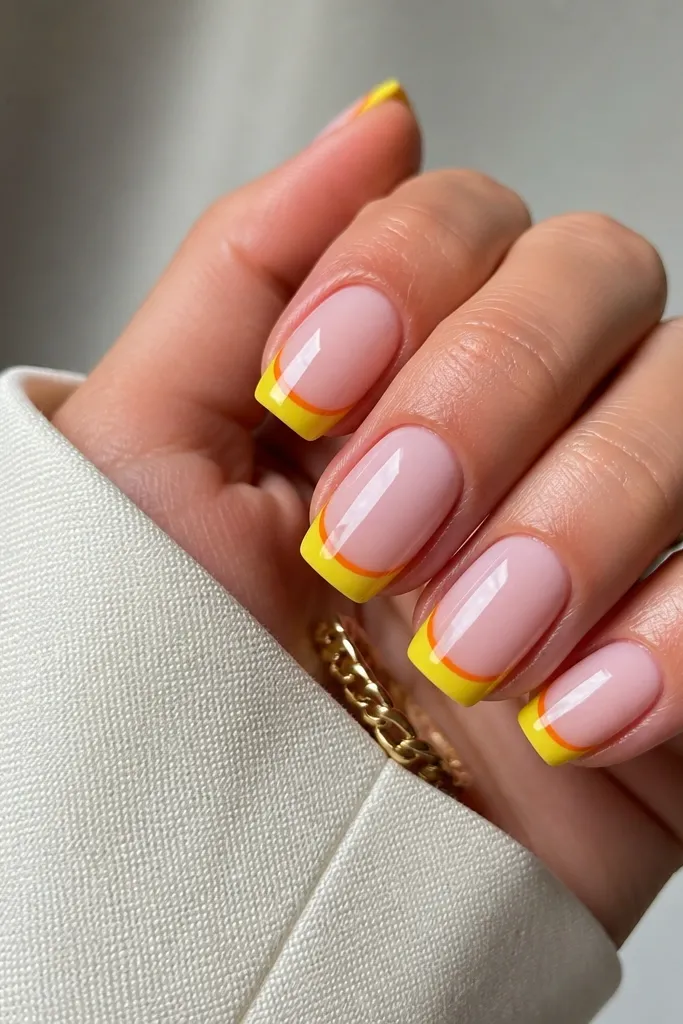
A French tip is the easiest way to look put-together, and this version keeps the color placement intentional. The creamy pink base makes the yellow feel warm instead of neon. I like the thin orange line under the yellow because it creates a shadow effect, so your nails look longer and cleaner. This is flattering on short to medium lengths because the negative space stays controlled. Wear it for summer events, vacation photos, or whenever you want your nails to look like a "color trend" without going full abstract.
Start with a sheer creamy pink base and cure. Paint the French tips with sunshine yellow using tape guides or a steady angled brush, keeping the tip width about one-third of the nail. Then add a thin orange line just beneath the yellow curve, like a double-line detail. Clean up the edges with a small brush dipped in gel cleanser before curing. Seal with two coats of glossy top coat, focusing on the tip line.
Editor's noteMake the yellow French slightly wider on the ring and middle fingers for a balanced look.
Watch outSkip thick yellow tips - heavy fill makes the French line look bulky and chips sooner at the edges.
3. Orange Swirl Over Pink With Micro Yellow Stars
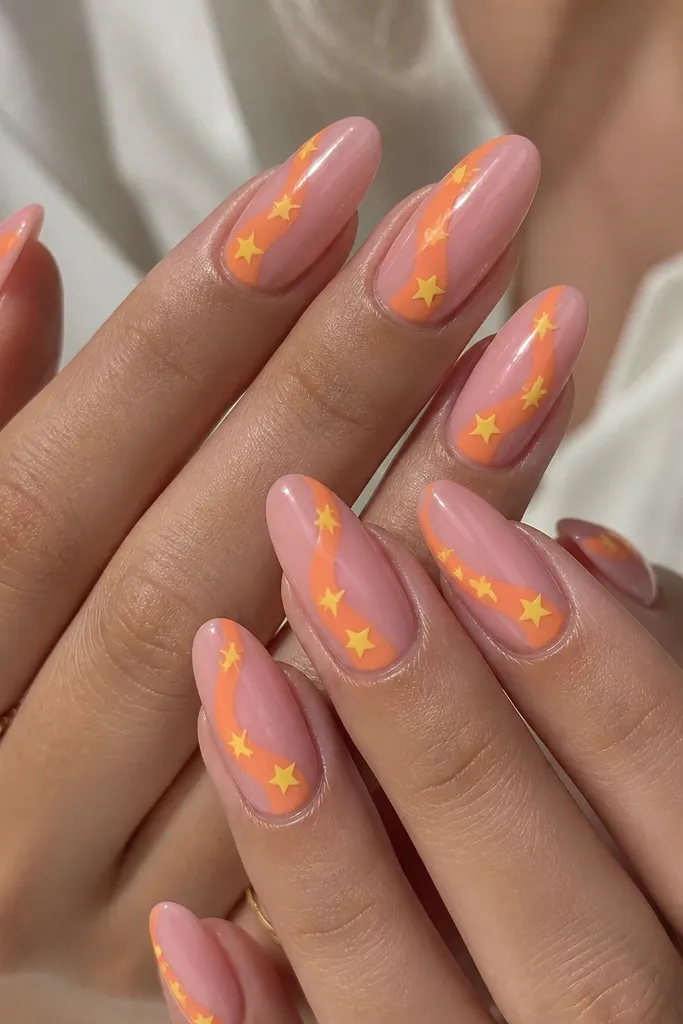
Diagonal swirls look dynamic and they hide small nail imperfections because your eye follows the curve. The glossy pink base keeps everything smooth, and the orange swirl adds warmth without needing full coverage. Tiny yellow stars are the secret - they read like confetti and stay cute even when the orange is bold. I've done this set on warmer undertones and it flatters hard; on cooler undertones it still works, but I keep the orange more tangerine than brick. This is a fun choice for festivals, date nights, and any time you want "bright but artsy."
Apply a glossy pink base with two thin coats, then cure. Use a fine liner brush to pull a single orange swirl across each nail, starting near the sidewall and ending near the center of the tip. Add micro stars with a dotting tool or star stamp by placing 1-2 stars per nail, clustered near the swirl. Cure each hand carefully so the gel doesn't flood the star edges. Finish with a top coat that's thick enough to flatten the swirl slightly for a glassy look.
Editor's noteUse a liner brush with a shorter, stiffer tip so your swirl stays sharp instead of fuzzy.
Watch outDon't put stars on every nail with big shapes - it turns into clutter on long nails.
4. Pink Aura Fade Into Orange, With Yellow Center Glow
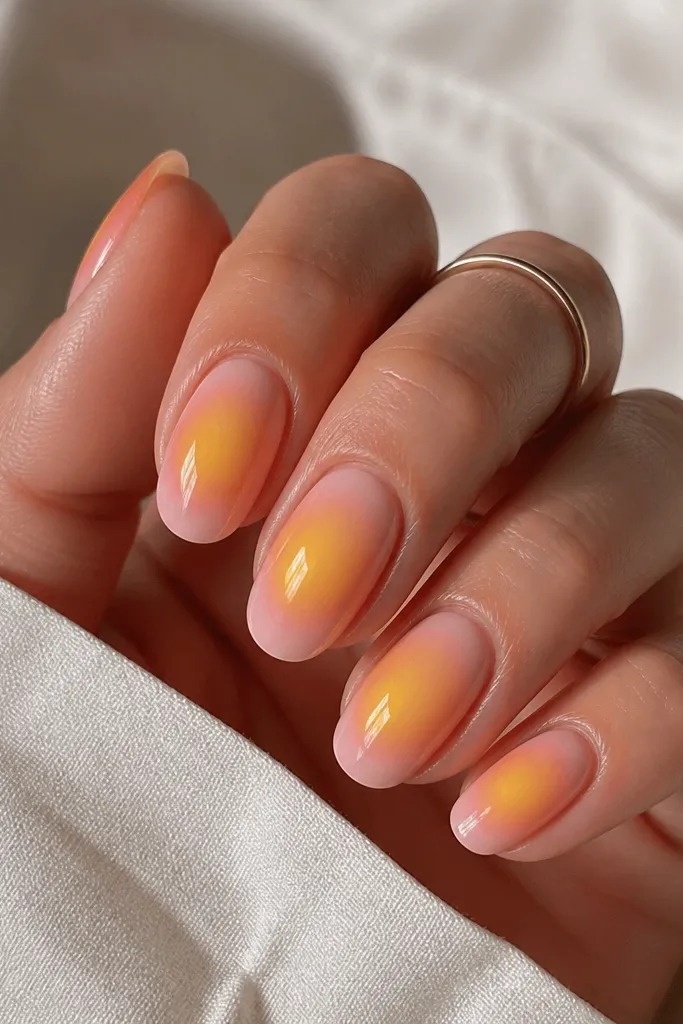
Aura nails look like light is coming from the nail, and that's exactly what makes pink, orange, and yellow feel "beautiful pop." The milky pink outer edges keep it wearable, while the orange adds warmth in the mid-layer. The yellow center glow is small but powerful - it makes the nail look brighter without turning neon. This works great on oval and almond shapes because the glow circle looks centered and clean. It's a strong pick for spring events and photos where you want a soft, pretty look with real color impact.
Start with a milky pink base and cure, then sponge a soft aura using a makeup sponge. Blend orange from the outer sidewalls toward the center, keeping the center lighter for the yellow. Tap bright yellow only in the middle area - think "spotlight," not full coverage. Clean the cuticle with a brush and gel cleanser, then cure. Seal with a glossy top coat and wipe the tacky layer to get that smooth, glowing finish.
Editor's noteIf your yellow looks too streaky, mix it with a tiny amount of clear builder gel to improve spread.
Watch outDon't blend yellow into orange too much - it turns into muddy peach instead of a bright glow.
5. Bubblegum Pink Base With Orange Dot Ladder and Yellow Corners
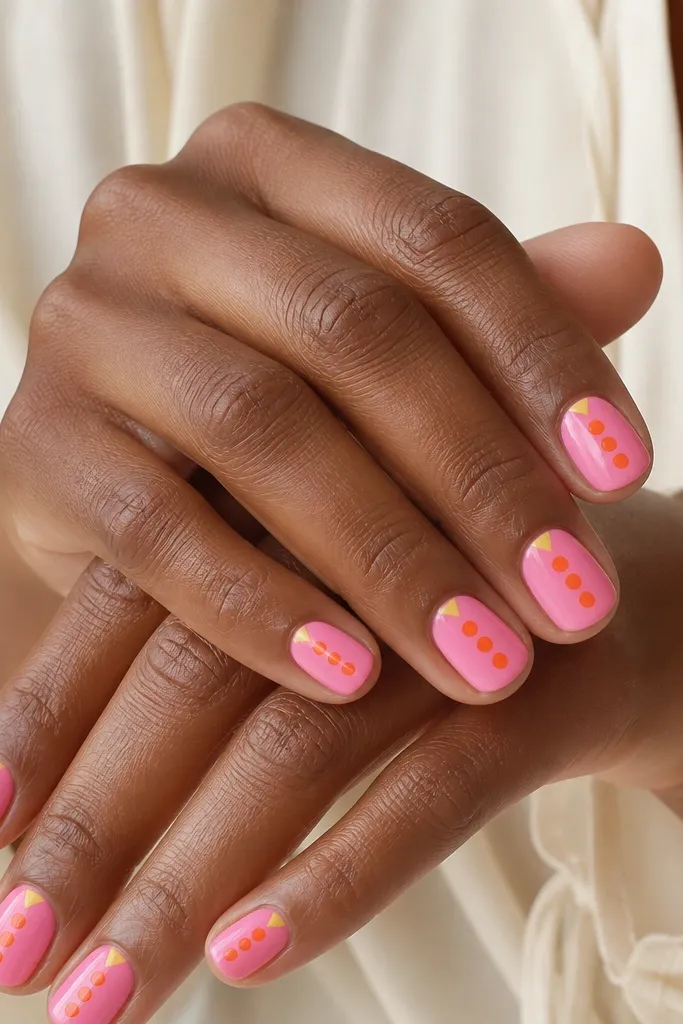
This design is playful but controlled, which is why it looks cute on short nails. The orange dot ladder creates a vertical line that makes your nail bed look longer. Yellow triangles in the upper corner add a tiny pop that feels like sunshine on top. I've done this on rounded nails for people who hate pointy shapes; it still looks neat because the dots stay inside a defined column. It's great for everyday wear when you want color that doesn't catch on everything.
Paint two coats of bubblegum pink and cure. Use a dotting tool to place orange dots in a straight vertical line, spacing them about one dot-width apart. Add a tiny yellow triangle near the cuticle corner by dragging a small brush from a dot into a point. Clean the edges with a detail brush so the triangle stays crisp. Top coat two layers, and focus on sealing the dot edges so they don't snag.
Editor's noteUse a dotting tool with a consistent tip size so the ladder looks even across all five nails.
Watch outDon't overfill the cuticle area with dots - it makes the design look messy and can lift.
6. Orange Outline French on Milky Pink With Yellow Tip Cap
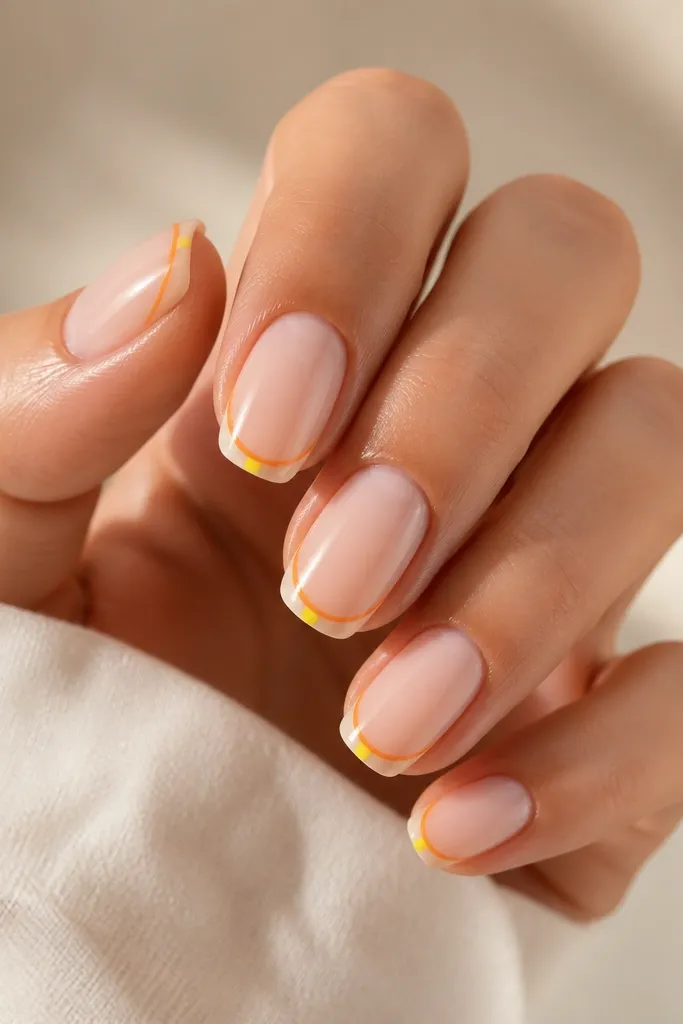
This is one of my go-to "pretty but not loud" sets because it uses color like a frame. The milky pink base keeps it soft, the orange outline makes the tip look defined, and the yellow cap adds a focal point without covering the whole tip. It's flattering on most skin tones because it doesn't rely on heavy yellow coverage. I like it for office days and weddings where you want something bright but still classy. The design also photographs well because the lines stay crisp.
Start with milky pink as your base and cure twice for opacity. Paint a French curve in orange, but keep it thin - about a brush-width line. Then add a small yellow cap at the tip center, leaving orange visible around the cap edges. Use a striping brush for the curve so it stays even across fingers. Finish with a glossy top coat and lightly file the top after curing if you feel any raised line.
Editor's noteIf your French curve wobbles, place a tiny paint dot at the side corners first, then connect them with the brush.
Watch outSkip a thick outline - thick orange lines make the tip look heavy and can chip faster.
7. Marbled Orange-Pink With Yellow Vein Detail
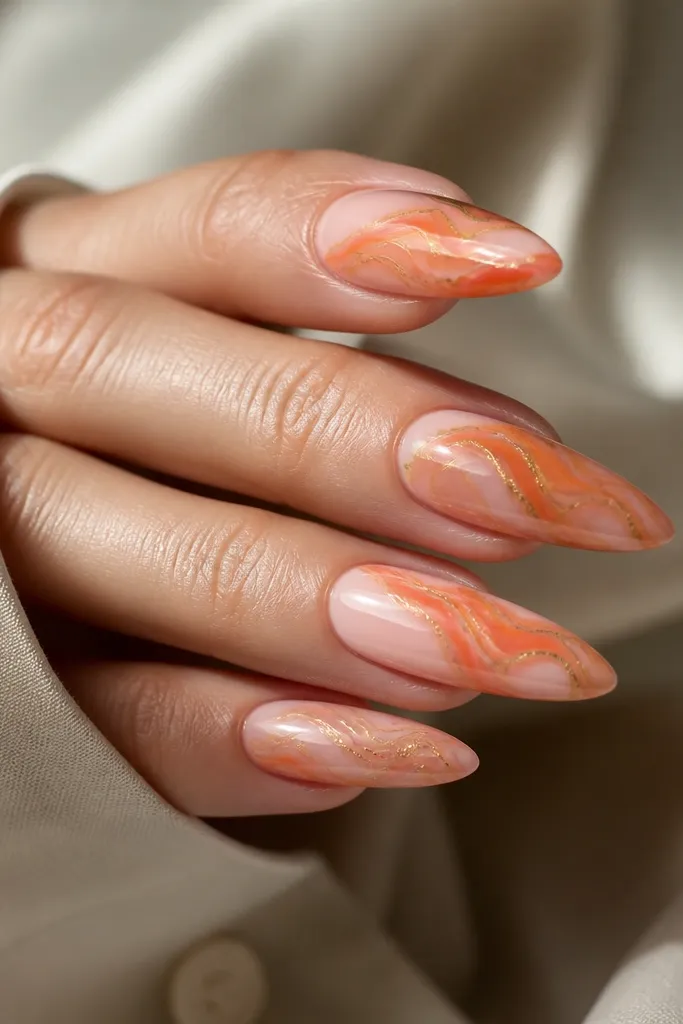
Marble nails look high-end because your patterns are never perfectly identical. The pink-orange marble creates warmth, and the thin yellow veins act like the lightest highlight. I've had this look last longer than simple gradients because the design is layered and doesn't show minor imperfections as much. It flatters both fair and deep skin tones since the marble has multiple tones that match undertones. This is a great pick for long almond or coffin if you want something dramatic but still wearable.
Apply a milky pink base and cure. Add orange gel in a few small pools across the nail, then drag it with a marbling tool or a toothpick to create swirls. Pull a thin yellow line through the swirls like a vein - keep it narrow so it reads as highlight. Cure and then top coat with a thick layer to smooth the surface. If you want extra depth, repeat the orange swirl on one or two nails only, not every nail.
Editor's noteUse a slightly thicker orange gel than your pink so the marble stays visible after top coat.
Watch outDon't marble too evenly across all nails - mismatched patterns look cheap when they look identical.
8. Hot Pink Base With Orange Half-Swipe and Yellow Micro Glitter
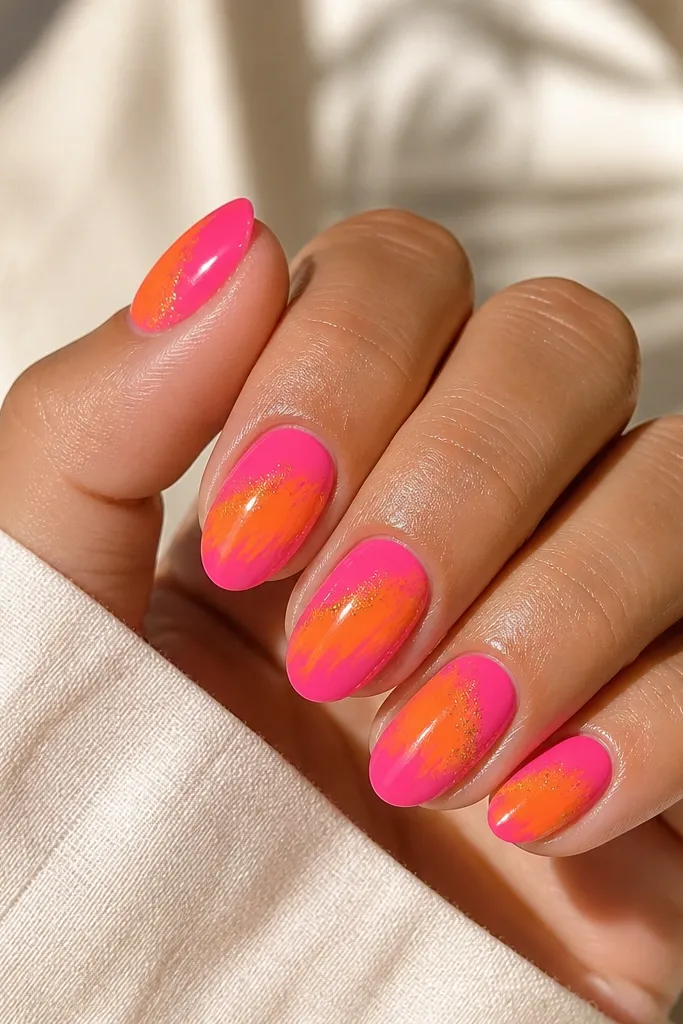
This set is bold, but it still looks intentional because the orange swipe is placed in the center and the yellow glitter is localized. Hot pink gives you the "pop" instantly, while orange keeps it warm and not too bubblegum. The micro yellow glitter makes the orange edge look brighter, like it's catching light. I've worn this for nights out and it stays fun without needing rhinestones. It flatters hands with longer nail beds because the middle swipe makes the nail look extra lengthened.
Start with two coats of hot pink gel and cure to a glossy finish. Paint an orange swipe across the middle third of the nail, leaving a clean strip of pink at the top and bottom. While the orange is still tacky, tap a small amount of yellow micro glitter at the edge where orange meets pink. Cure, then apply a thick top coat to lock everything down and prevent gritty texture. Clean up sidewalls with a small brush and cleanser before the final cure.
Editor's noteKeep glitter only on the transition line - it looks like light, not like fallout.
Watch outDon't cover the whole nail in glitter - it turns flat and can look dusty after a week.
9. Pink Ombré to Orange, With Yellow Stiletto Tip
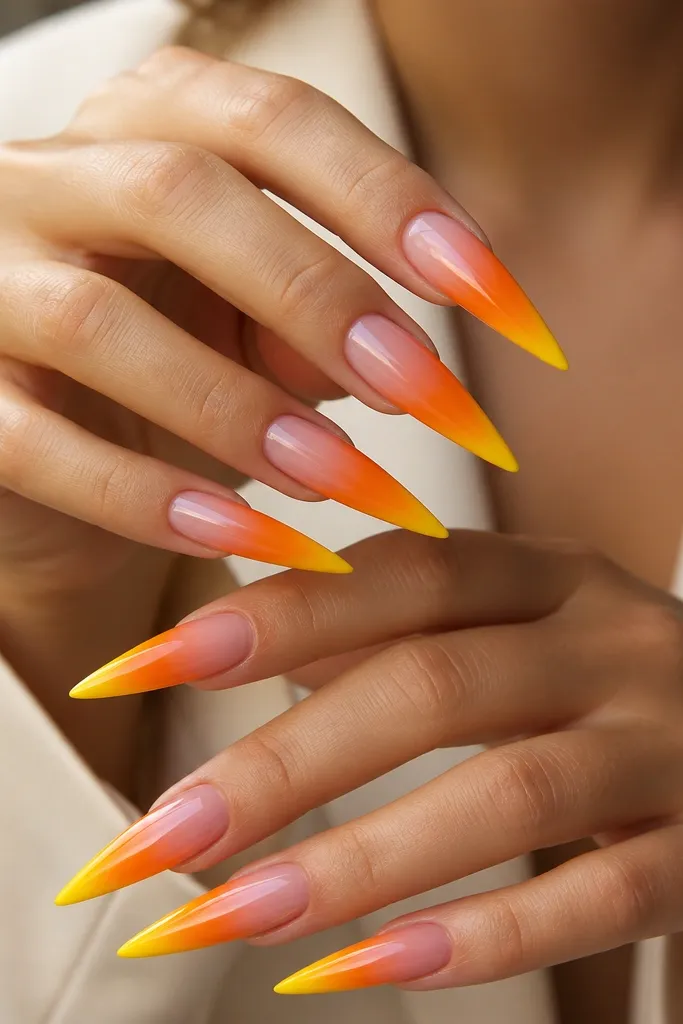
Ombré looks best when it's smooth and the color changes are slow. Here, pink fades into orange so your nail looks warm and dimensional, then the yellow tip gives you that bright "beautiful pop" moment. I like this on long stiletto because the yellow tip sits at the most visible point. It flatters medium to deep skin tones especially well, since the yellow reads bright against warm undertones. For fair skin, keep the orange more coral so the ombré doesn't look too intense.
Apply a sheer pink base and cure. Sponge or airbrush pink into orange, blending so the orange starts around mid-nail and becomes strong near the tip. Leave the extreme tip clean for yellow, then paint the tip in solid yellow gel with a sharp edge. Cure fully and wipe any tacky residue if needed. Finish with a thick glossy top coat and cap the free edge so the yellow tip stays sealed.
Editor's noteUse a makeup sponge for the ombré and do two light layers instead of one heavy layer.
Watch outDon't rush the blend - harsh lines between pink and orange make the set look like separate stickers.
10. Pink and Orange Checker With Yellow Accent Nail
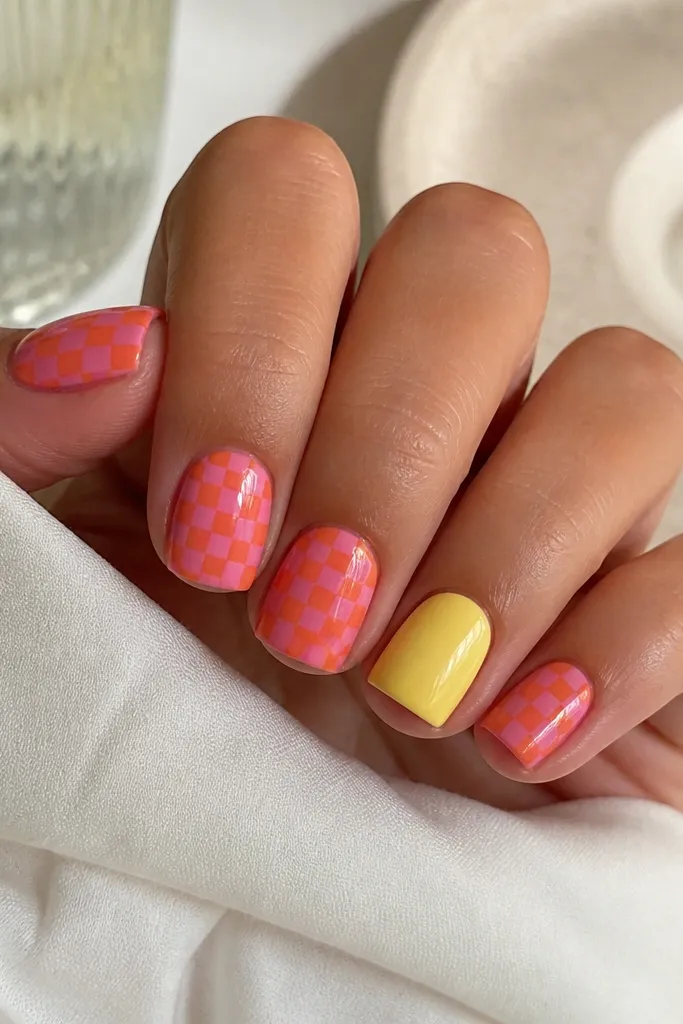
Checker patterns read fun and graphic, and they're easy to keep neat on short squares. Pink and orange checks create movement, while the single yellow accent nail adds a bright focal point without making every nail busy. This set is great for people who want color but hate complicated art. It also flatters small nail beds because the pattern stays tight and doesn't spill toward the sides. I've done it for spring birthdays and it always gets compliments because it looks designed, not accidental.
Base everything with a milky pink or sheer pink gel and cure. For four nails, paint alternating orange and pink squares using a striping tape grid - keep each square about 2-3 mm on short nails. Use a fine brush to fill any tiny gaps and cure. Leave the ring finger or middle finger solid buttery yellow, then cure. Top coat all nails with two layers for a flat, glossy finish.
Editor's noteTape your grid first. Even a cheap striping tape makes the squares look straight.
Watch outDon't make the squares too big - large checks can look cartoonish and messy on short nails.
11. Glossy Pink Base With Orange Stipple Fade and Yellow Tip Dot
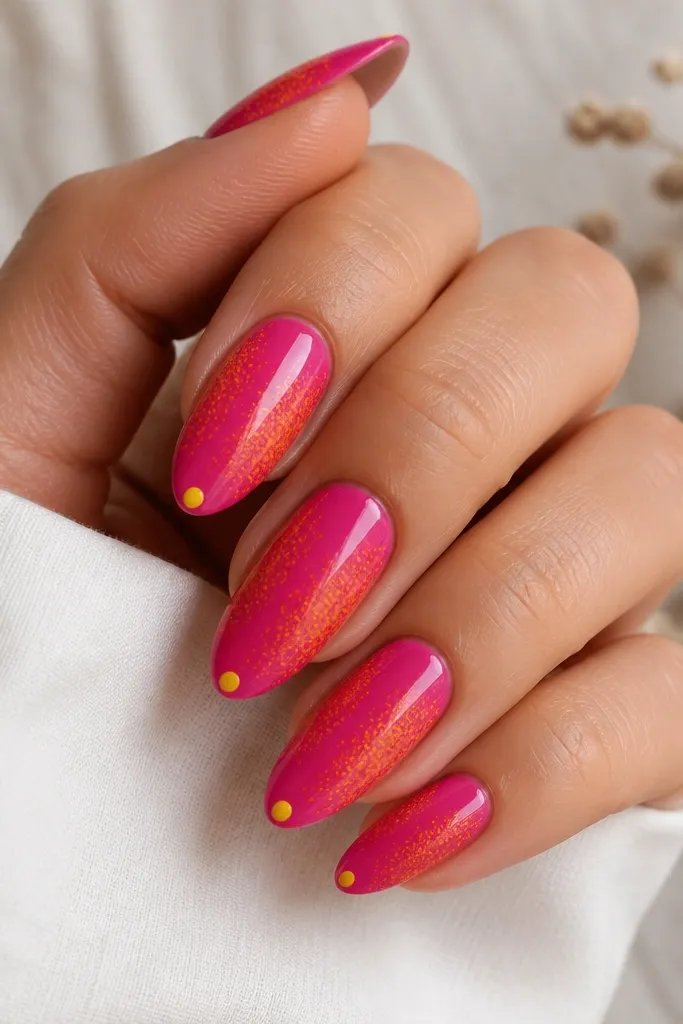
Stipple fades look textured in a good way, like color is drifting across the nail. The glossy pink base keeps everything smooth, while orange stippling adds warmth without covering fully. The single yellow dot at the tip is a clean focal point that makes the set feel intentional. On my hands, this looks best when you keep the stipple light in the center and stronger near the sides. It flatters almost any skin tone because pink is the anchor and yellow stays as a highlight.
Paint two glossy coats of pink and cure. Dip a small stippling sponge in orange gel and tap lightly to create texture starting around mid-nail, fading as it approaches the tip. Use a clean brush to soften the stipple edges so it doesn't look like dust. Add one yellow dot at the tip center with a dotting tool. Cure and seal with top coat, making sure the dot is fully covered.
Editor's noteIf the stipple looks too dense, wipe your sponge on a paper towel before tapping the nail.
Watch outDon't smear the orange - stipple should be tapped, not dragged.
12. Pink Glass Nails With Orange Confetti and Yellow Foil Flecks
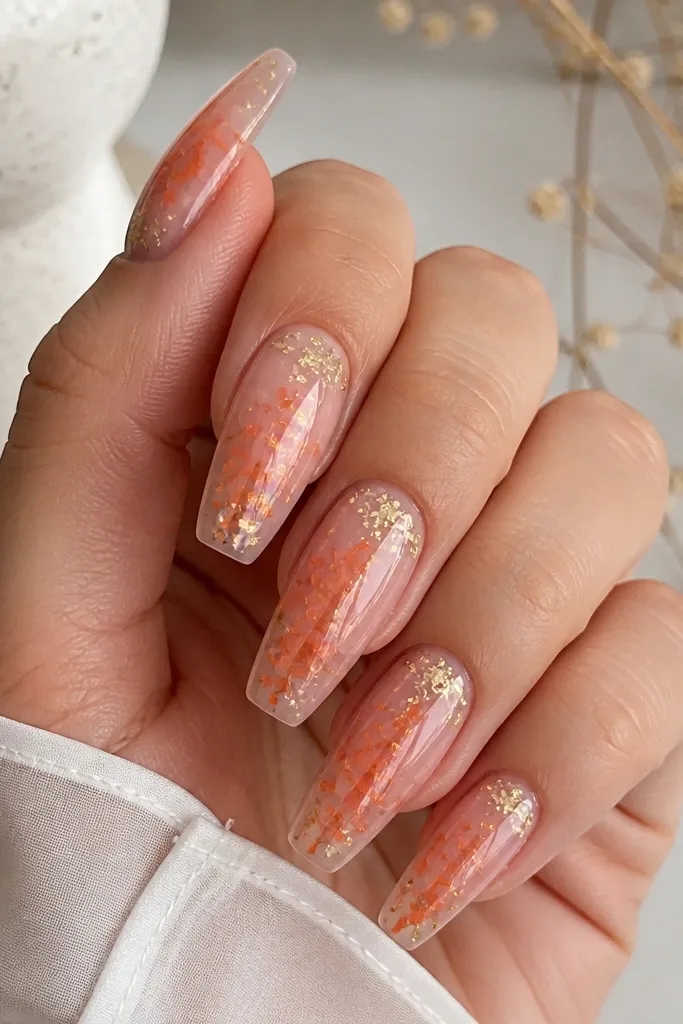
Glass nails look like your nail is smooth and thick, and they make foil details look extra shiny. A clear-pink base lets orange confetti look dimensional instead of flat. Yellow foil flecks near the cuticle give you that bright pop right where your eye lands first. I've worn this at outdoor events where sunlight hits and it looked like the nails were glowing. It flatters most nail shapes, but coffin and almond show the foil best because the surface reflects light.
Build a clear-pink base with a gel that gives you thickness, then cure. Place orange confetti flakes in a loose cluster around the center and press lightly so they don't lift. Add a few yellow foil flecks near the cuticle, keeping them sparse. Cure again, then apply a thick top coat in two passes to fully encapsulate flakes. Clean around the cuticle line with a brush so the glassy finish stays crisp.
Editor's noteUse fewer yellow foils than orange confetti. Too much yellow makes it look like glitter overload.
Watch outDon't skip encapsulation - exposed flakes catch fabric and lift fast.
13. Pink Base With Orange Line Art Flowers and Yellow Center Dots
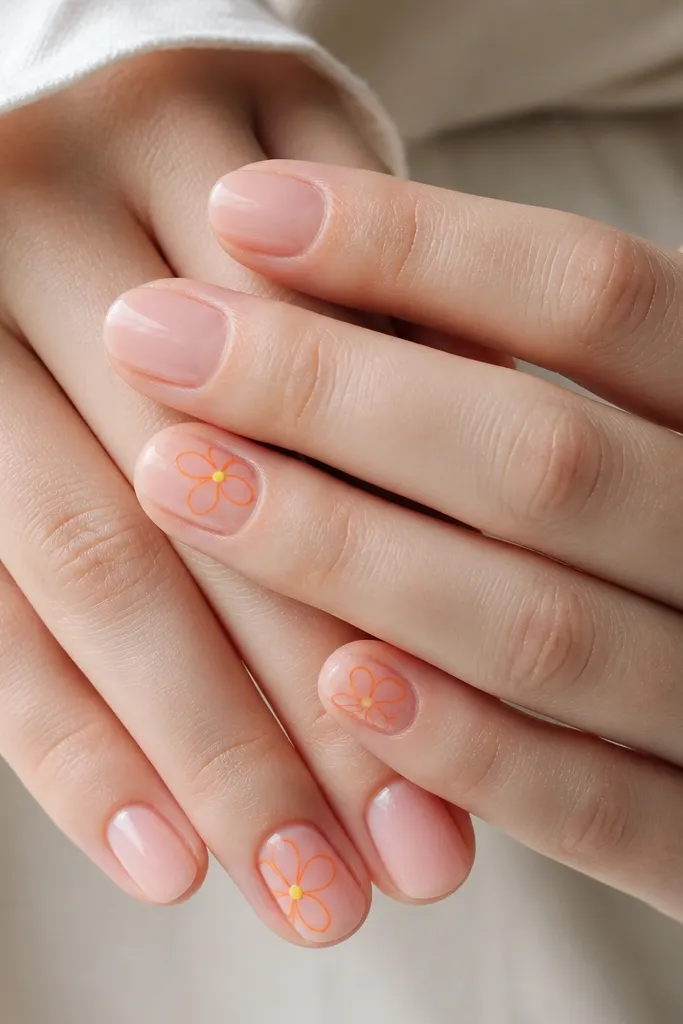
Line art is the cleanest way to use bold orange without making the nail look busy. The sheer pink base keeps everything light, and the yellow center dots give a "bud" effect that reads bright in photos. This is flattering when your nails are short because the art stays small and doesn't need lots of space. I like it for everyday wear because it looks delicate even though the colors are strong. It also works with casual outfits because the design feels like tiny graphic stickers.
Start with a sheer pink base and cure. Pick two nails per hand for the flowers, then outline petals in orange with a fine liner brush. Add a single yellow dot at the center of each flower and a small yellow dot at the stem end if you want extra detail. Let the line art cure fully so it doesn't smear under top coat. Finish with one careful top coat, avoiding heavy pooling over the lines so they stay crisp.
Editor's noteDraw the flower outline first in a lighter orange, then go back for a second pass for stronger opacity.
Watch outDon't fill the petals solid. Outline petals look cleaner and last longer.
14. Pink to Orange Gradient Tips With Yellow Micro Stripes
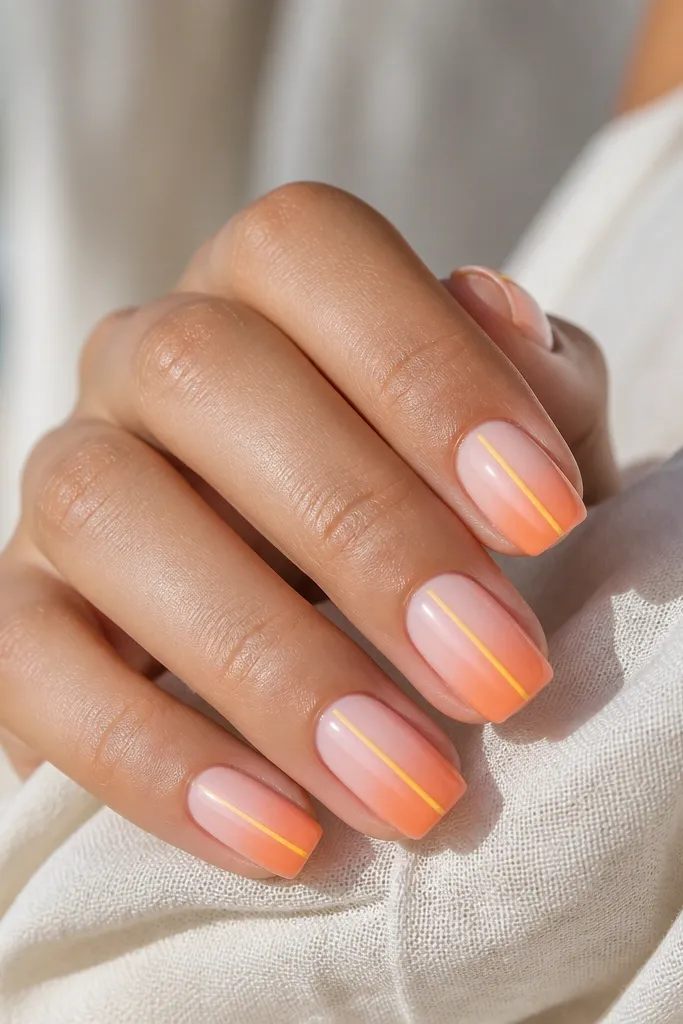
This set is a "fashion nails" look that stays wearable because the color change is at the tip, not the whole nail. The pink-to-orange gradient gives warmth and depth, and the yellow micro stripes add a graphic edge. I like it on medium squoval because the stripes look straight and tidy instead of curving oddly. On fair skin, the yellow stripes brighten the whole hand; on deeper skin tones, the contrast reads sharp and clean. It's a solid choice for concerts, parties, and any day you want your nails to look styled.
Apply a milky pink base and cure. Sponge orange starting at the upper third of the tip and blend down until the gradient looks smooth, then cure. With a striping brush, paint two thin yellow vertical lines down the center, keeping them parallel and about 1 mm apart. Cure and then apply top coat in thin layers first, then a second thicker layer for shine. Cap the stripe ends at the tips so they don't lift.
Editor's noteIf your stripes look wobbly, rest your hand on a folded towel and paint one line at a time.
Watch outDon't make stripes too thick - thick stripes cover the gradient and flatten the look.
15. Pink Base With Orange and Yellow Diagonal Candy Stripes
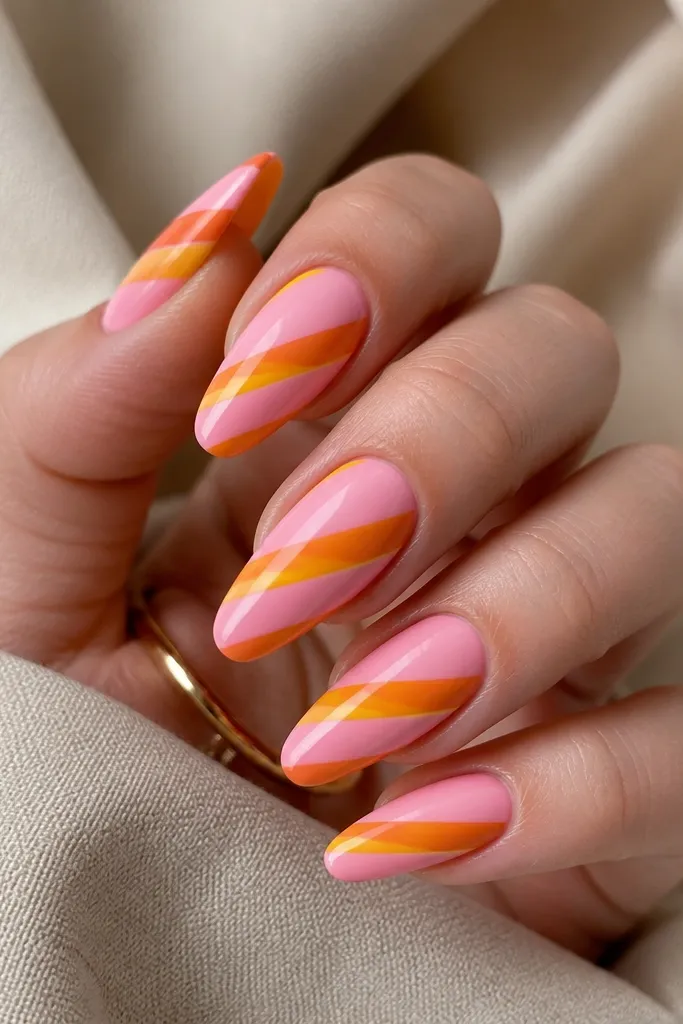
Diagonal candy stripes make nails look longer because the eye follows the slant. The glossy pink base keeps the stripes from looking too loud, and the orange/yellow pairing gives that warm candy vibe without going neon. I've worn this on almond and it looks best when the stripes are crisp and consistent across nails. It flatters most skin tones because pink is the anchor and the stripes are thin enough to read "fashion" instead of "theme party."
Start with a glossy pink base and cure. Place striping tape diagonally across the nail in alternating bands, then paint exposed sections orange and cure. Remove tape carefully, then fill the remaining bands with yellow and cure. If any edges are uneven, clean them with a thin brush and gel cleanser. Finish with a glossy top coat and cap the free edge so the stripes don't lift.
Editor's noteUse tape that's narrow and press it down firmly at the sidewalls to stop seepage.
Watch outDon't freehand the stripes if you want sharp lines - wobbly stripes look cheap fast.
16. Soft Pink Jelly With Orange Jelly Peeks and Yellow Outline
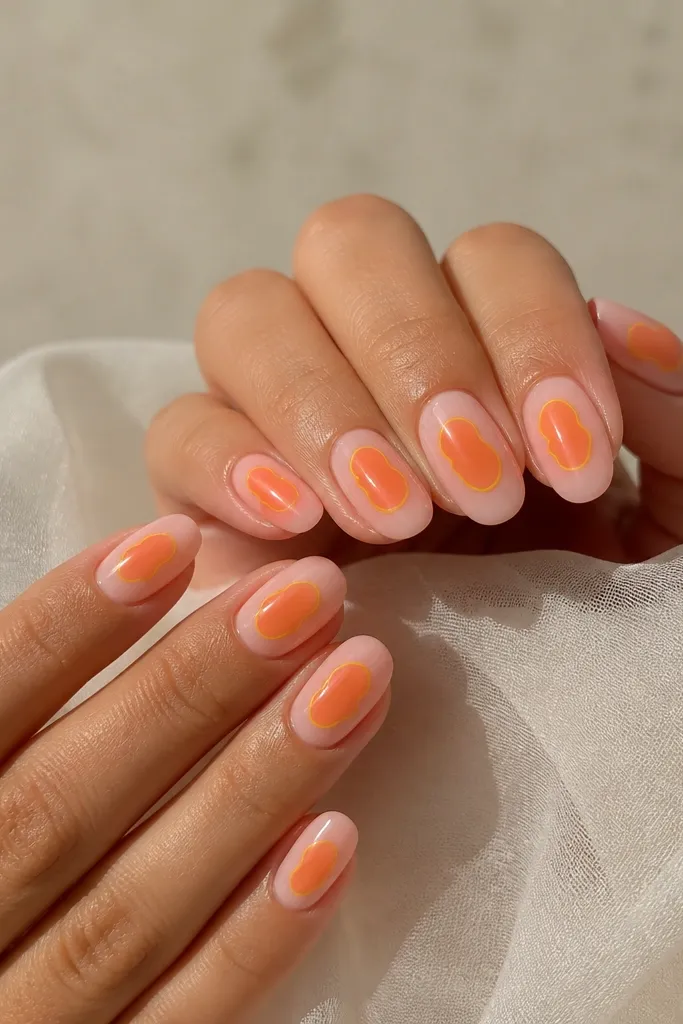
Jelly nails look like candy and they photograph with a wet shine. The soft pink base stays translucent, so orange peeks look like layered gel rather than painted on top. Yellow outlines make each orange blob look brighter and more separated, which is key for the "beautiful pop" effect. This is flattering if you like a slightly see-through look; it also works well on short to medium nails because the jelly depth hides minor shape imperfections. Wear it for summer, vacations, and anything where you want your nails to look juicy.
Apply a jelly-soft pink gel base and cure, keeping it slightly translucent. Add small orange jelly blobs in the center area, leaving space between blobs for the pink to show through. Outline each orange blob with a thin yellow line using a fine brush. Cure and then apply a thick top coat that smooths the jelly texture into a glassy finish. Clean sidewalls carefully so the jelly doesn't smear at the edges.
Editor's noteKeep jelly shapes smaller than you think. Too big makes the design heavy.
Watch outDon't use opaque orange on a jelly base - it kills the layered candy look.
17. Pink Base With Orange Corner Cut and Yellow Center Dot
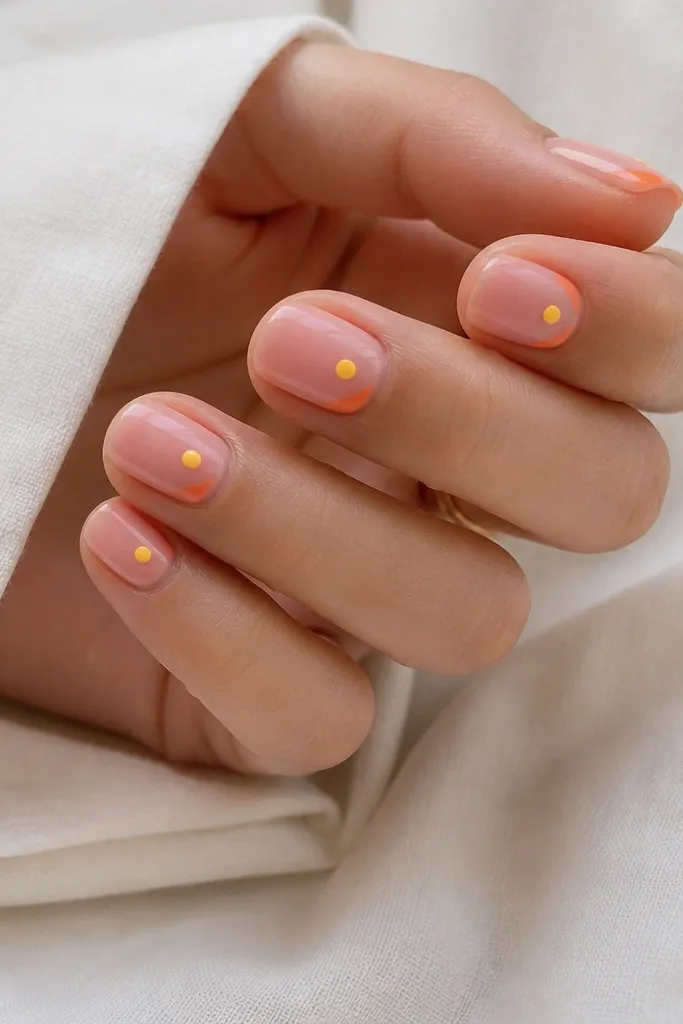
This design is geometric, clean, and easy to replicate. The orange corner cut adds interest near the side without covering the whole nail, and the yellow center dot gives a bright focal point. I like it on short squares because the corners are already strong, and the geometry looks intentional. It flatters hands with shorter nail beds since the negative space stays open. This is a great option when you want something fun but still minimal enough for work.
Start with sheer pink gel and cure. Paint an angled orange corner cut on each nail - think a small diagonal wedge in the upper corner near the cuticle. Add one yellow dot centered on the nail, about halfway between cuticle and tip. Use a detail brush to keep the orange wedge sharp and not rounded. Finish with a glossy top coat and cap the edges where the wedge meets the free space.
Editor's noteMark the center with a tiny dot before you place the yellow so it stays aligned across nails.
Watch outDon't place the yellow dot too high near the cuticle - it can look off balance on short nails.
18. Pink Marble With Orange Top Veins and Yellow Tips
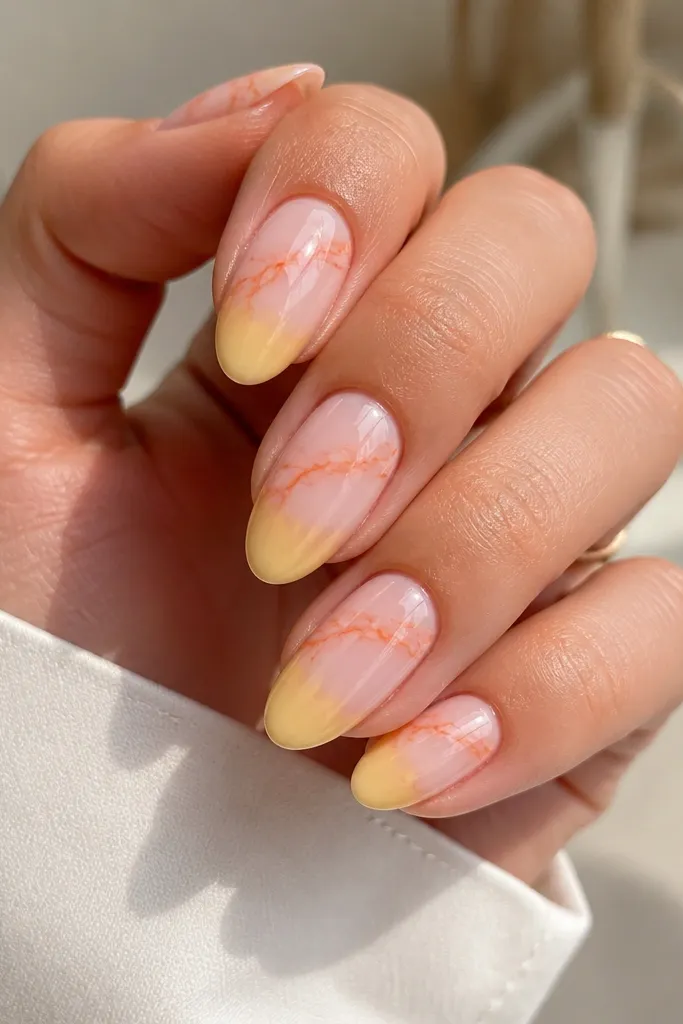
This version uses marble for softness, then adds structure with orange veins and a yellow tip. The yellow at the tip makes the nails look lifted and bright, while the orange veins keep the set from feeling flat. I've found this works well for people who want "pretty" without tiny details everywhere. It flatters olive and warm undertones because the orange and yellow look warm together against pink. It's perfect for events where you want your nails to stand out in photos but still look classy.
Apply milky pink base and cure. Add orange veins in the top half only by dragging thin orange gel lines through a few marble swirls, then cure. Paint the tips in yellow, but keep the edge soft by blending the yellow slightly into the marble with a clean sponge. Cure again and wipe tacky layer if needed. Top coat with two layers so the marble and tip blend looks smooth, not patchy.
Editor's noteKeep the yellow tip edge softer on your ring finger so the set looks natural, not copy-paste.
Watch outDon't put full orange coverage under the yellow - it makes the transition look muddy.
19. Pink Ombre Cuticles With Orange Side Bars and Yellow Centerline
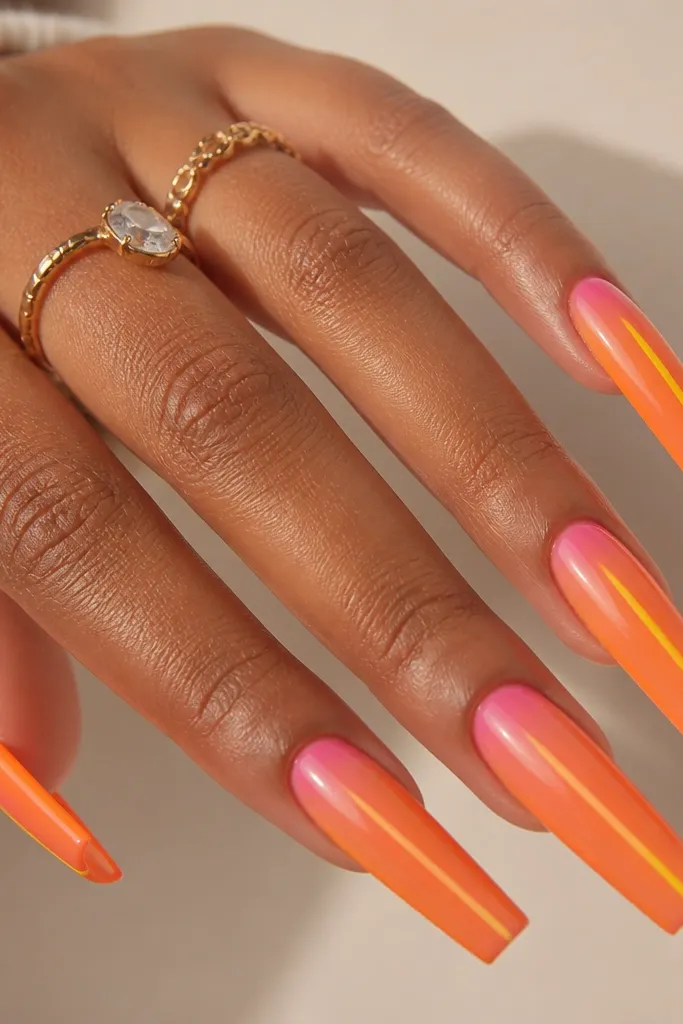
This design is made for length. The orange side bars create a frame, the yellow centerline adds a bright vertical line, and the pink-orange cuticle fade gives depth at the base. I like it on coffin because the flat surface lets your lines stay straight. On deeper skin tones, the yellow reads bold and clean; on fair skin, the orange bars keep the design from looking washed out. It's a strong choice for nights out or whenever you want nails that read "styled" from across the room.
Start with a pink ombré near the cuticle, blending pink into orange for the base gradient. Use striping tape to place two thin orange side bars, leaving the center open for yellow. Paint the centerline in yellow with a thin brush and cure. Remove tape carefully and clean the edges with a detail brush. Seal with a thick top coat and cap the tip so the lines stay smooth.
Editor's noteUse striping tape for the bars even if you think you can freehand - it keeps everything symmetrical.
Watch outDon't widen the centerline too much - a thick line makes the coffin tip look shorter.
20. Pink Base With Orange and Yellow Half-Drop Dots
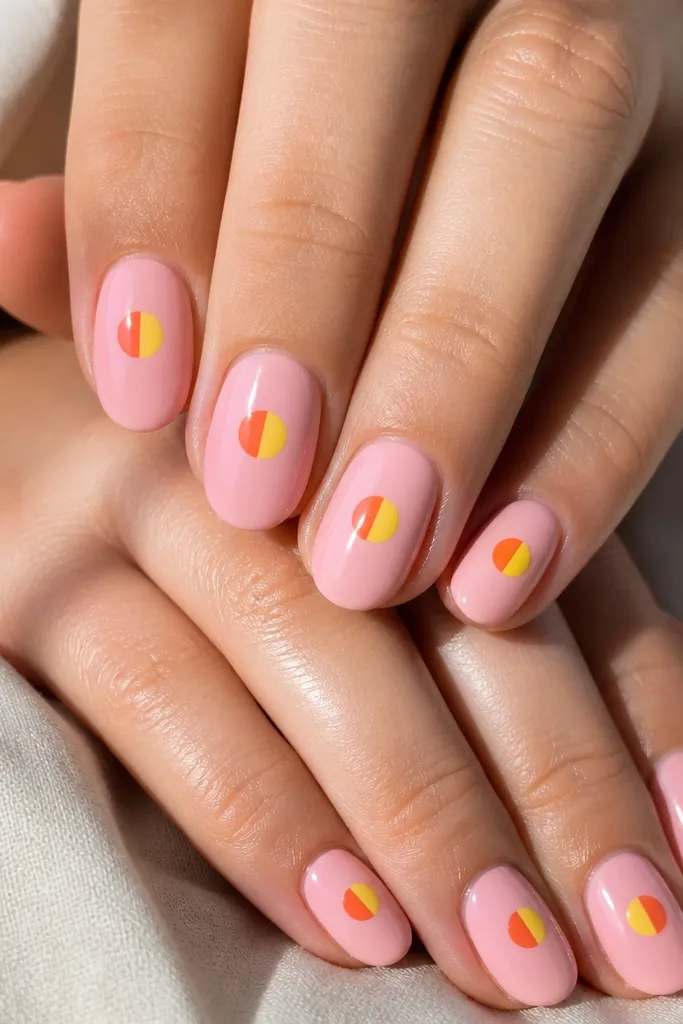
Half-drop dots look like tiny marbles and they add dimension without needing a full design. The split orange/yellow dot reads bright and playful, while the pink base keeps it balanced. I like this on medium round because the dot shape matches the curve of the nail. It flatters hands because the dot is centered and the design doesn't crowd the cuticle area. This is a great choice if you want something cute that still looks neat after a few days of growth.
Paint two coats of glossy pink and cure. Use a dotting tool to place one large base dot in orange, then immediately add yellow to half of the same dot area while the gel is still workable. Use a toothpick or detail brush to smooth the split line so it looks clean. Repeat one dot per nail, keeping them centered and the same size. Top coat lightly first, then add a second coat thick enough to level the dot.
Editor's noteWork one nail at a time so the gel stays workable for the split dot.
Watch outDon't let the dot cure before adding the second color - you'll get a raised seam.
21. Pink French Side Swipe With Orange and Yellow Blend
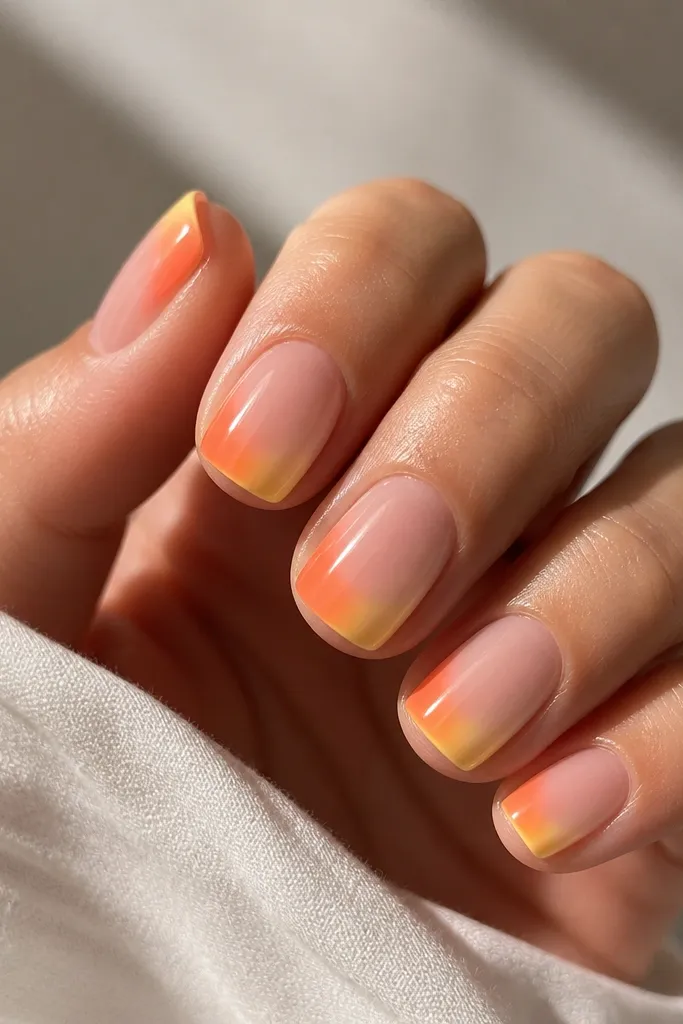
Side swipes look modern and they keep the nail from feeling crowded. The sheer pink base makes the orange-to-yellow blend feel smooth, and the side placement keeps the color near the highlight area of your nail. I like how this flatters different nail shapes because the swipe follows the natural curve of the nail bed. It's also beginner-friendly compared to full gradients because you only blend in a narrow strip. This set works for everyday wear and summer weekends.
Start with a sheer pink base and cure. Paint an orange side swipe along one lateral edge, stopping about 2-3 mm before the tip. Blend yellow into the outer end of the swipe so the last third shifts from orange to yellow. Use a small brush to tidy the swipe edge and keep it straight. Finish with two coats of glossy top coat, making sure the swipe is sealed at the sides.
Editor's noteBlend the colors on a paper palette first to find the exact ratio that looks smooth.
Watch outDon't blend across the whole nail width - keep it narrow so it stays flattering.
22. Pink Base With Orange Outline Hearts and Yellow Mini Hearts
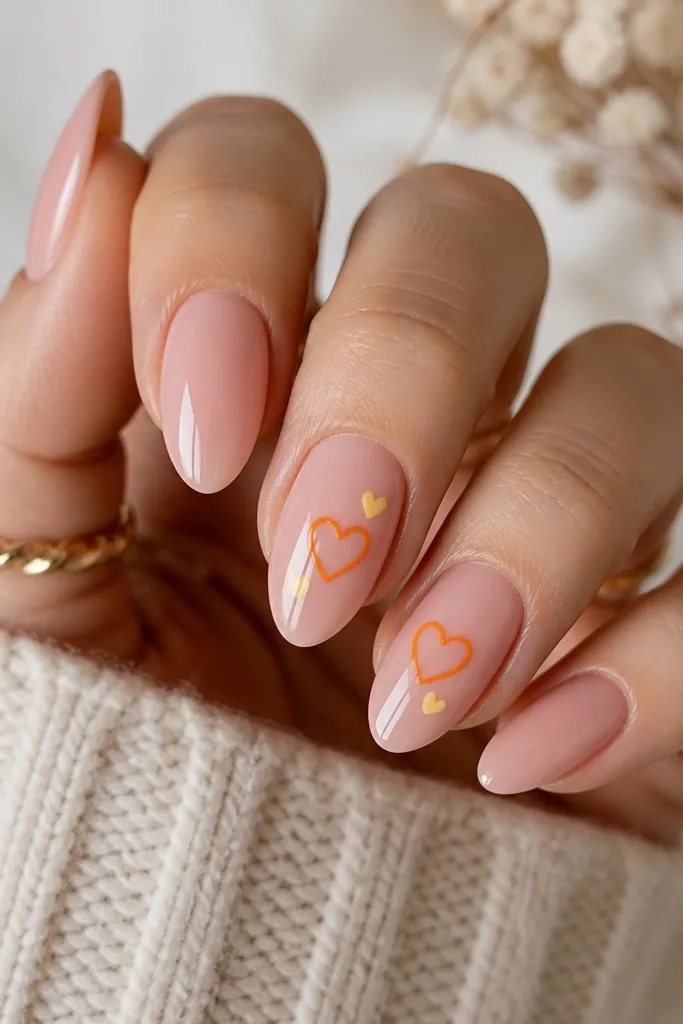
Hearts can look childish, but outline hearts feel grown-up when you keep them small and clean. The glossy pink base is the soft background, orange outline gives you warmth, and yellow mini hearts act like a bright highlight. I've worn this on date nights and it looks sweet without looking themed. It flatters most skin tones because the heart shapes are thin outlines rather than heavy fills. Keep it to two nails per hand so the set stays classy.
Apply a glossy pink base and cure. On two nails, draw one orange outline heart near the center using a fine liner brush. Add a tiny yellow mini heart next to the orange heart on the same nail. Let the lines cure fully so the heart edges stay crisp under top coat. Finish with a glossy top coat and use a brush to keep the hearts from flooding the cuticle area.
Editor's notePractice one heart on a strip of plastic first so your curves match every time.
Watch outDon't fill the hearts solid - filled hearts can look thick and chip at the edges.
23. Orange and Yellow Watercolor Wash Over Pink
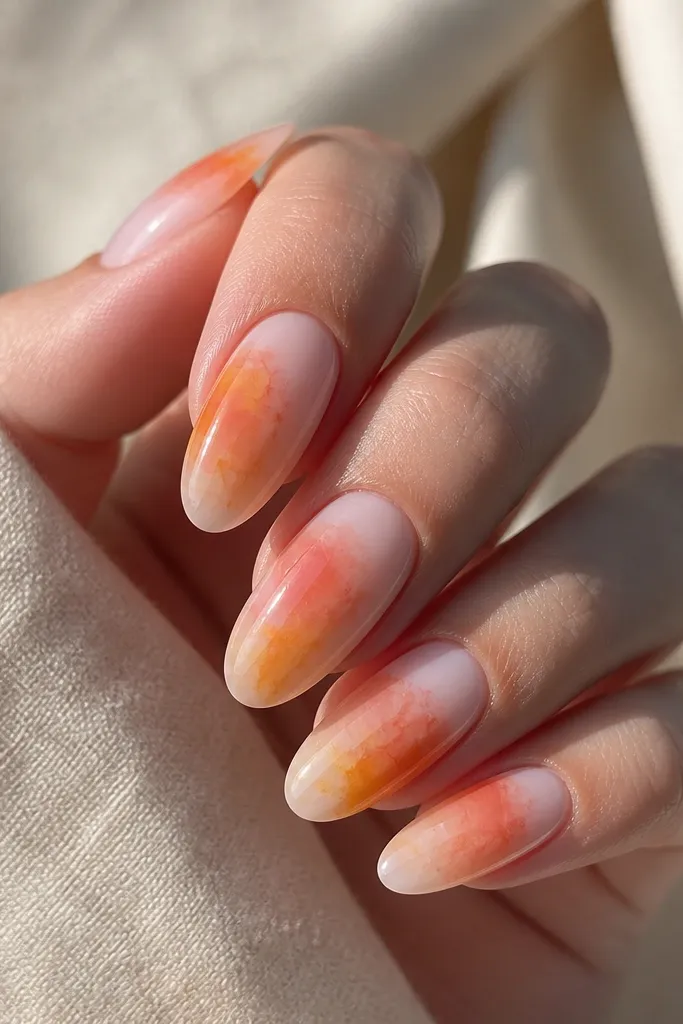
Watercolor washes look soft, artsy, and still bright enough for a "beautiful pop" because orange and yellow are placed where light hits. The pink base keeps everything cohesive so the colors don't separate into blocks. I like this on long oval because the soft edges look natural on a curved surface. It flatters fair skin by warming it up, and it flatters deeper skin tones because the orange and yellow still show clearly even with softness. This is a great choice for creative events, art shows, or any day you want nails that look like a mood.
Start with a milky pink base and cure. Dab orange gel with a makeup sponge in small patches across the middle and sides, then cure lightly. Add yellow watercolor patches on top of or near the orange patches, keeping the edges soft by tapping rather than brushing. Cure fully and then apply top coat in thin layers first so the watercolor doesn't smear. Finish with a thick final top coat for glass shine.
Editor's noteUse the lightest pressure possible when tapping the sponge - that's what keeps the watercolor edges soft.
Watch outDon't over-layer - too many passes make the wash look muddy instead of airy.
24. Pink Base With Orange Cable Twist and Yellow Accent Line
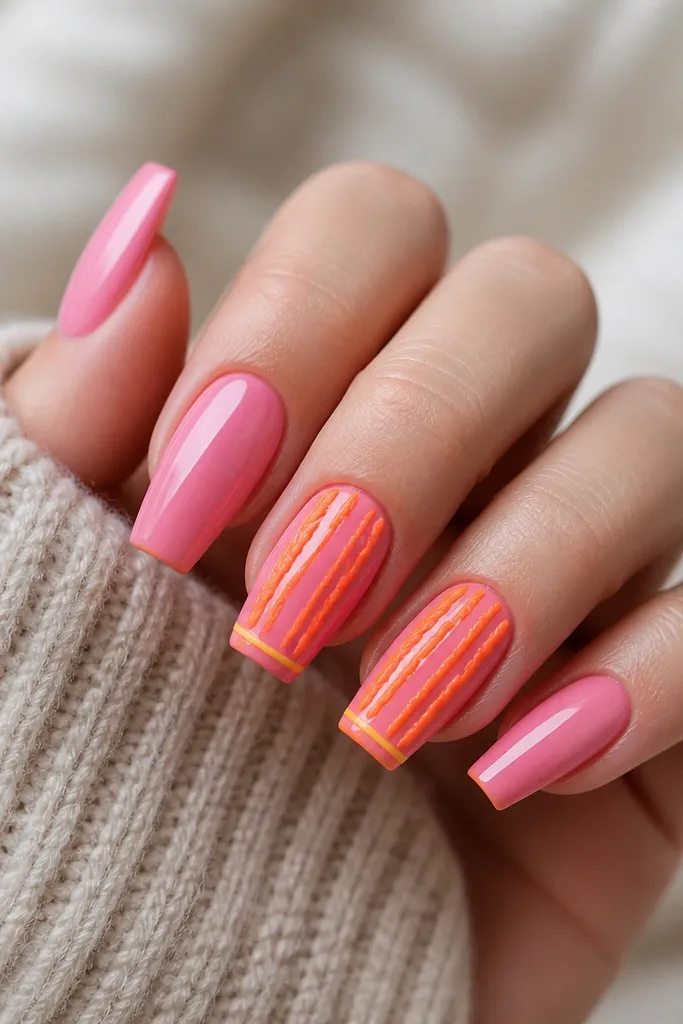
Raised cable twists look like knitwear, and orange makes it feel warm instead of wintery. The glossy pink base keeps the texture from looking heavy. Yellow accent lines near the tip add a bright "cut" that makes the raised pattern look intentional, not bulky. This set flatters hands with longer nail beds, but it also works on medium coffin if your twist is scaled down. It's perfect for cooler seasons when you still want bright colors.
Apply glossy pink base and cure. For the cable twist nails, paint an orange guide line down the center, then create the cable by adding two curved raised sections on either side using thicker gel or a gel strip technique. Use a thin brush to define the twist channels and cure. Add a thin yellow line near the tip across the width of the nail. Cap with top coat and press gently around the raised areas so the finish stays smooth.
Editor's noteBuild the twist in two layers so it's raised but not so thick you feel it catch on hair.
Watch outDon't make the cable too tall - high texture chips at the edges sooner.
25. Pink Aura With Orange Ring and Yellow Center Dot
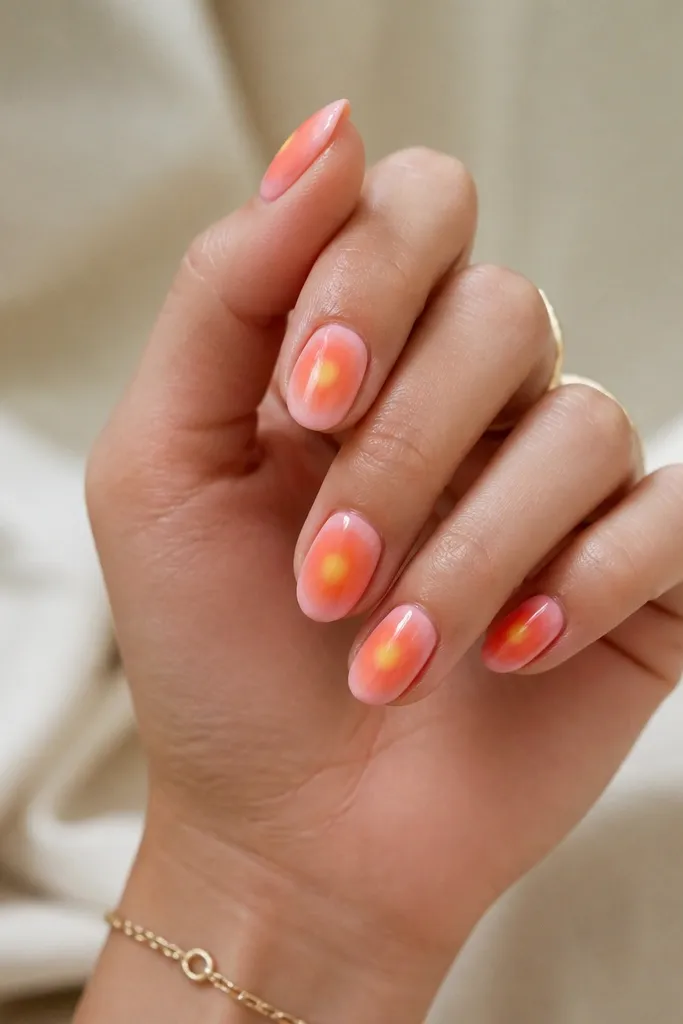
This design is basically a glowing target, and it looks adorable on short almond because the ring stays proportional. The pink aura gives softness, the orange ring adds structure, and the yellow center dot gives that spark. I like it when your nails are short because it still reads as a complete design without needing lots of space. It flatters hands because the center placement draws attention to the nail bed. It's a great everyday "statement" that doesn't feel overdone.
Start with a sheer pink base and cure. Sponge a light aura so the edges look slightly deeper pink while the center stays lighter. Paint an orange circle ring around the center area, keeping the ring thickness about a brush-width. Place one yellow dot in the exact center and cure. Seal with a glossy top coat and lightly buff the surface after curing if the ring feels uneven.
Editor's noteUse a small round stamp or a ring-shaped guide for the orange ring if you struggle with perfect circles.
Watch outDon't make the ring too thick - thick rings swallow the yellow dot and look heavy.