
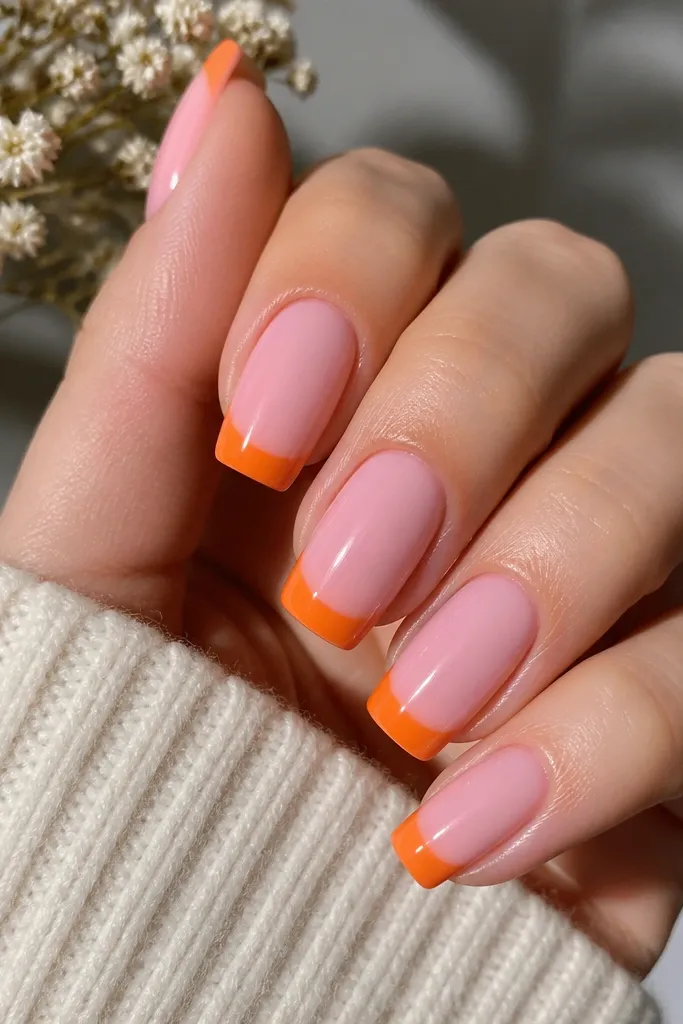
1. Milky Rose Base With Tangerine Micro Tips
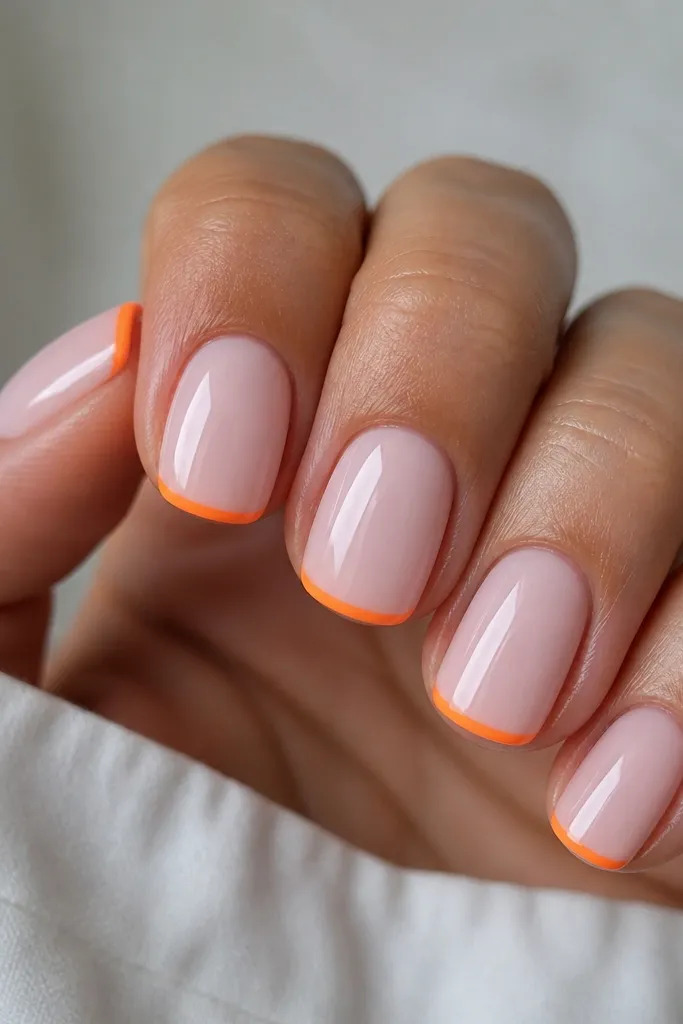
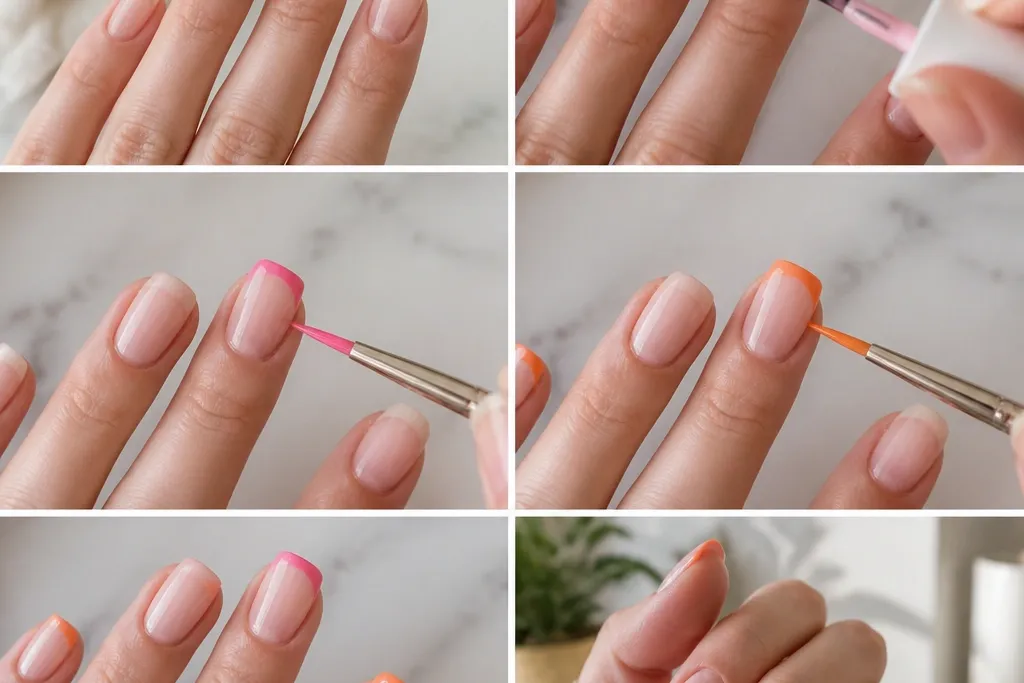
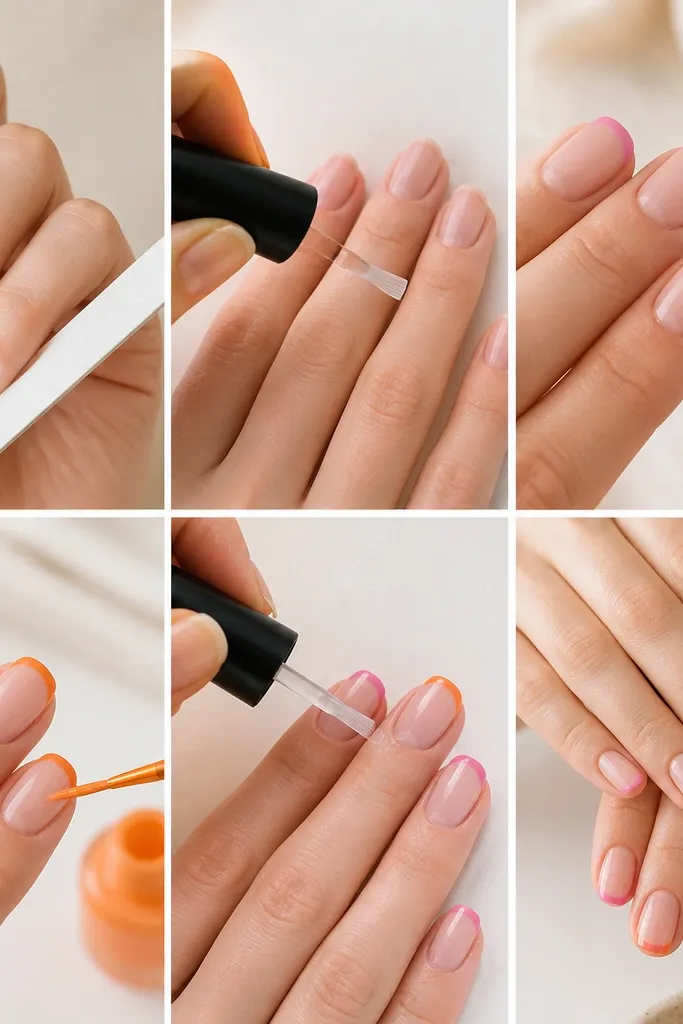
Start with a milky rose base because it makes the orange look warm instead of loud. I like this combo on short squoval nails because a micro tip visually stretches the nail bed. The orange line is narrow — about 1/10 of the nail width at the widest point — so it stays elegant even when the orange is saturated. This set looks flattering on fair to medium skin tones and works for everyday wear because the base is soft and the tip is the only bold color. The styling principle is contrast control: thin tip + opaque base = clean and wearable.
First, prep nails and apply a dehydrator, then a rubber base coat if you chip easily. Paint two thin coats of milky rose, curing each coat fully. For the micro tips, use a French tip guide or a nail art stencil and paint orange only inside the guide, keeping the line centered. After curing, remove the guide while the polish is still slightly tacky so the edge stays crisp, then clean any tiny smudges with a flat brush and acetone. Finish with two coats of glossy top coat, and press the brush along the free edge.
If your orange is thick, thin it with a drop of polish thinner so the line stays sharp instead of blobbed.
Don’t make the orange tip too wide — wide tips look heavy and start chipping faster.
2. Sheer Pink Base With Peach Orange Rounded Tips
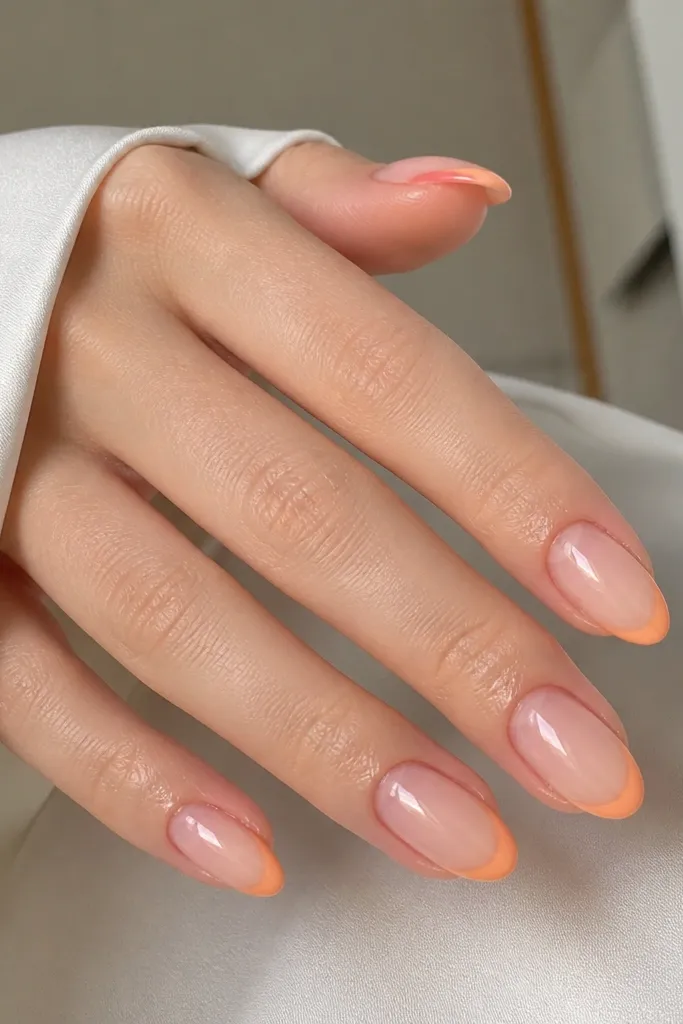
This version is for when you want the French tip to blend more with the nail, not look like a hard stripe. A sheer pink base makes the nails look refined and keeps the orange from overpowering your look. Peach orange is the best orange for this because it reads softer and more “sunset” next to pink. I love it on medium almond because the rounded tip shape matches the almond curve and keeps everything balanced. It’s flattering on cool and warm undertones since sheer pink adapts to your skin color. The principle is softer edges: rounded French line + sheer base = gentle contrast.
Begin by applying a sheer pink builder gel or a sheer nude polish in two coats, curing after each. Use a French guide and paint peach orange over the guide, keeping the smile line slightly higher at the sides for almond balance. Pull the orange in thin strokes, then go back once for opacity instead of piling it on. Cure fully, remove the guide, and use a micro brush to tidy the edges where orange meets pink. Seal with a glossy top coat and cap the free edge with a careful, slow swipe.
Use a smaller brush than you think you need — a thin liner brush makes the smile curve look intentional.
Don’t use neon orange — it clashes with sheer pink and makes the tip look harsh.
3. Hot Pink Base With Tangerine Zig-Zag French Tips
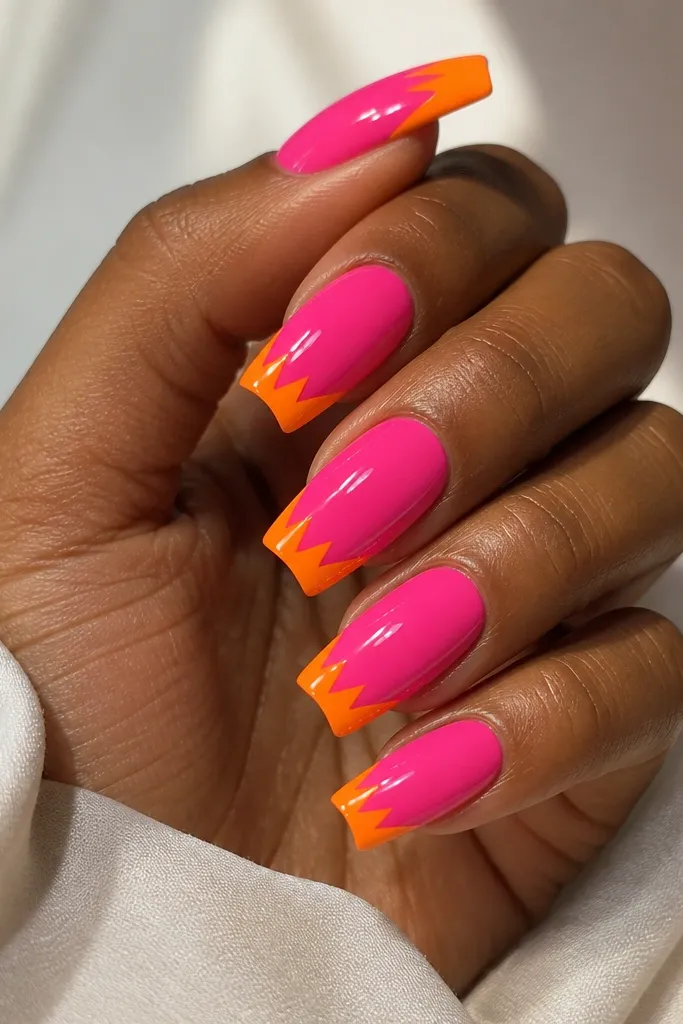
If you want these to look like nail art, this is the one. Hot pink base gives the orange a punch, and the zig-zag tip turns a simple French into something graphic. I’ve worn this for festivals and photos because it looks bold without needing glitter. It’s also surprisingly flattering on medium-long nails since the zig-zag pulls the eye upward. This combo works best when your orange is a clear tangerine, not a muddy pumpkin shade. The principle is shape interruption: the zig-zag breaks the usual French line and looks intentional.
Start with a smooth hot pink base in two thin coats, curing each coat until glossy but not too thick. Use a striping tape or a French zig-zag guide — lay tape to create angled sections across the tip area. Paint tangerine orange over the exposed areas, then cure. Remove tape slowly at a low angle, and if any edges look fuzzy, sharpen them with a tiny brush dipped in acetone. Finish with one thick glossy top coat so the zig-zag feels sealed and doesn’t catch on fabric.
Editor's notePress the tape down with a silicone tool or your fingertip pad so orange doesn’t seep under it.
Watch outDon’t rush tape removal — peeling straight up can lift polish and leave chips.
4. White-Lined Pink Base With Orange Outline Tips
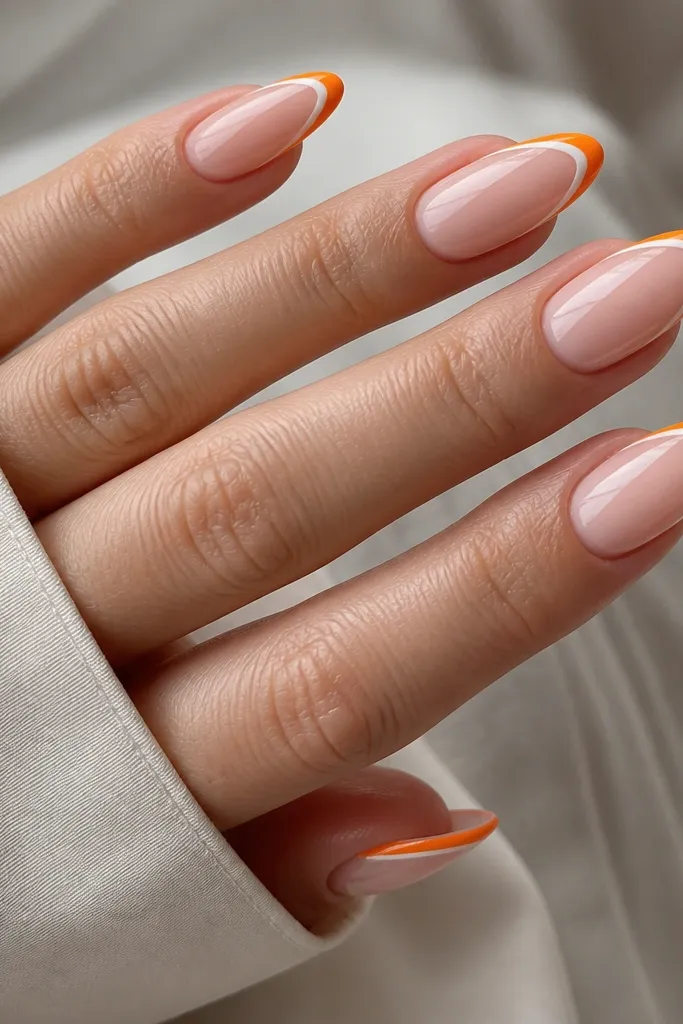
This is the “clean girl but make it summer” version. The white line acts like a divider between pink and orange, so the orange tip looks sharper and more expensive. I use it when my orange polish is slightly translucent, because the white underneath makes it pop without needing thick layers. On almond nails, it makes the tip look longer and more defined. This set flatters most skin tones because white balances the warm orange. The principle is separation: a thin divider line makes the French tip feel crisp even with limited opacity.
Apply a milky pink or sheer rose base in two thin coats and cure fully. Use a French guide and paint a thin band of white across the tip area — keep it narrow, about the width of a standard gel brush bristle. Cure, then paint orange over the guide but leave a hairline of white visible at the inner edge. Clean up with a flat brush and acetone for sharp corners. Seal with top coat, and make sure you cap the white line too so it doesn’t snag.
If the white line smears, let the base cure longer — tacky base pulls white into streaks.
Don’t make the white line too thick or it turns into a chunky border.
5. Pink Ombré Base Into Orange French Tips
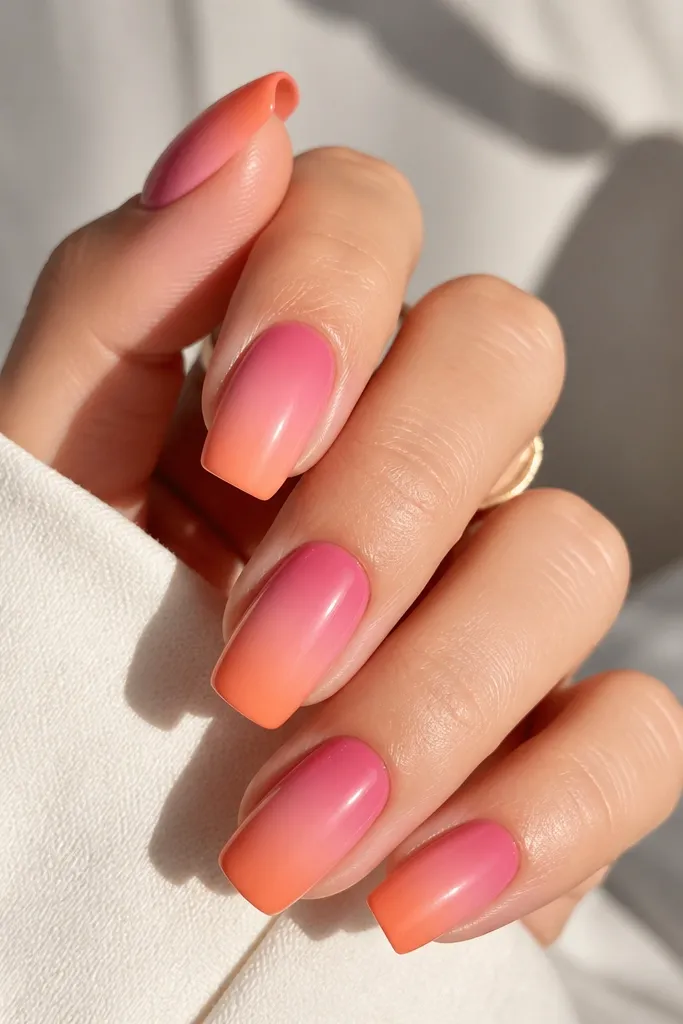
This one looks like a salon gradient because the orange starts softly, not like a hard French stripe. I use it when I want something more “glowy” than a straight line French tip. The key is using a sponge for the ombré and keeping the orange concentrated at the last third of the nail. This looks great on longer nails and on anyone who wants their nails to look fuller — the gradient adds dimension. Choose a warm pink for the ombré (rose to bubblegum) and a peach-orange for the tip. The principle is controlled blending: fade at the edges, concentrate color at the tip.
Paint two coats of your pink base and cure. Take a makeup sponge and lightly dab a lighter pink shade in the middle area, then blend upward toward the cuticle with tiny taps. For the orange, dab peach-orange only on the top third of the nail, keeping the sponge movement horizontal so it stays French-like. Clean around the cuticle with a cotton swab and acetone before it fully cures. Finish with glossy top coat in two coats for a smooth, glassy finish.
Do three light sponge passes instead of one heavy pass — heavy passes create muddy edges.
Don’t skip cleaning the sides — ombré polish smears can dry and look dirty.
6. Glossy Pink Base With Matte Orange Tip Cap
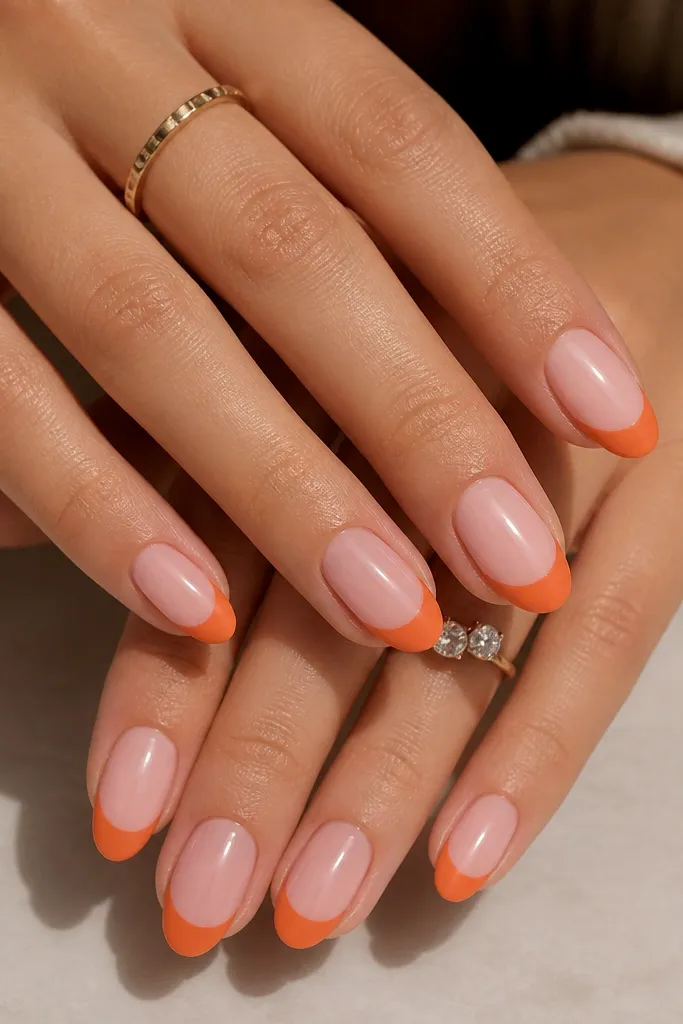
This set is for texture lovers. A glossy pink base makes the nails look fresh, while the matte orange tip cap makes the orange feel softer and more modern. I’ve worn matte tips during summer because they don’t show tiny surface smudges the way glossy does. It flatters hands that show dryness since matte hides micro texture better than gloss. Choose an orange that is opaque in one or two coats, because matte polishes show patchiness. The principle is contrast in finish: gloss base + matte tip reads intentional and crisp.
Start with a strong base: apply two thin coats of glossy pink and cure well. Use French guides to paint orange only on the tip area, then cure. Let the orange cool, then apply a matte top coat only over the orange tips — I paint it with a smaller brush so it doesn’t fog the pink. Cure the matte top coat and check edges in bright light. If you want extra crispness, seal the orange with matte top coat on the free edge only, then avoid dragging product over the glossy area.
Use a separate brush for matte top coat so it doesn’t mix into your glossy bottle.
Don’t put matte top coat over the whole nail — it kills the contrast that makes this look special.
7. Candy Pink Base With Gradient Orange Tips (Two-Tone French)
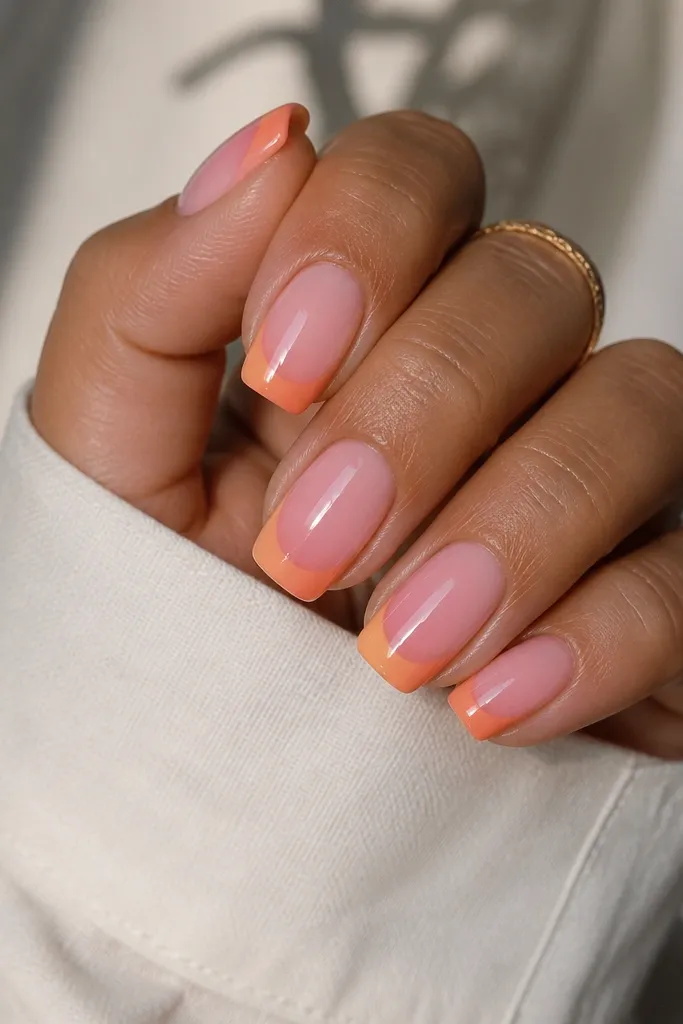
This is my go-to when you want French tips that look detailed but still doable at home. The two-tone gradient makes the orange feel dimensional, like it’s lit from within. I use candy pink because it’s playful and gives enough contrast for the gradient to show. This looks great on squoval and almond because the tip shape gives the gradient a clear boundary. It flatters most skin tones since the inner edge stays light and the outer edge stays warm. The principle is tonal depth: one orange tip, two shades, smooth transition.
Apply a candy pink base in two thin coats and cure. Place a French guide if you’re nervous about the shape, then paint a light peach orange along the inner half of the tip area. Without wiping, add deeper tangerine orange on the outer half and blend the two with a tiny sponge or a thin brush using feathered strokes. Cure, then remove the guide. Clean edges with a liner brush and acetone, then seal with glossy top coat, focusing on the outer free edge.
Editor's noteBlend with a nearly dry brush — wet blending makes the orange bleed under the guide.
Watch outDon’t skip curing between shades if your polish is runny — it turns into a blob.
8. Peach Coral Base With Reverse French Orange Line
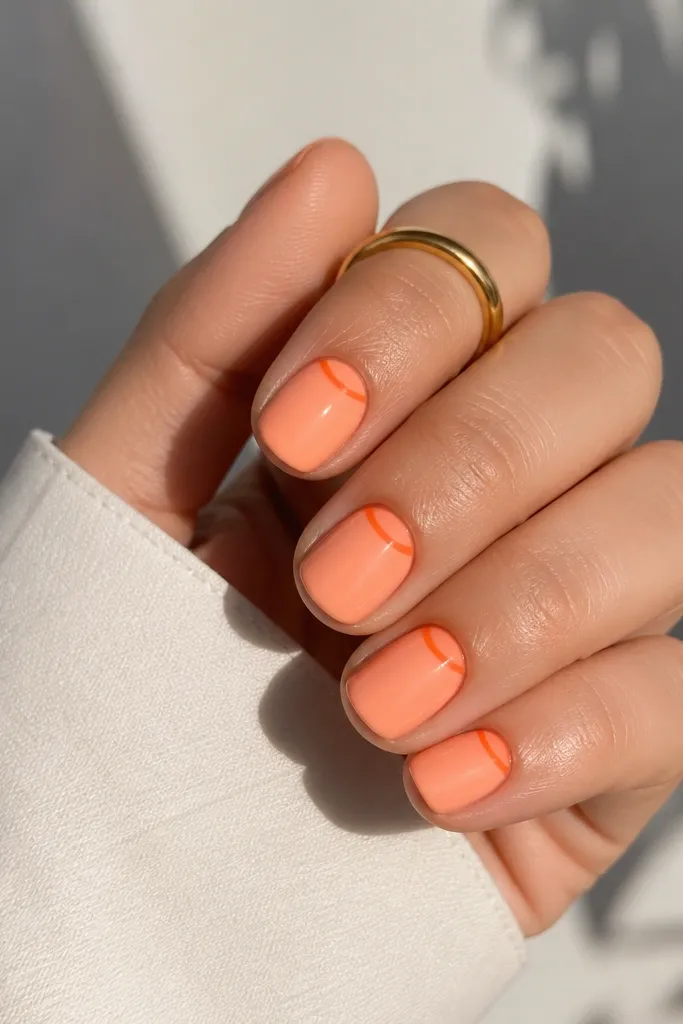
Reverse French is a fun twist when you’re tired of the classic tip. The peach coral base warms up the whole nail, and the orange line near the cuticle reads like a jewelry detail. This style works especially well on short nails because it draws attention upward without needing a long tip. I’ve done it for workdays too — it looks neat, not flashy. Choose a peach coral base that matches your undertone and an orange line that stays thin and even. The principle is placement: shifting the French line changes the visual length and makes short nails look intentional.
Start by painting peach coral as your base in two thin coats and cure. Use a cuticle French guide or a thin striping tape to create a curved line near the cuticle, leaving a small gap so it doesn’t flood the skin. Paint orange along the guided curve, then cure. Remove the guide carefully and tidy the line with a small flat brush dipped in acetone. Finish with glossy top coat, and cap the free edge lightly so it stays smooth.
Editor's noteKeep a tiny gap between orange and cuticle — that gap makes it look like a clean design, not a smear.
Watch outDon’t paint the line too close to the skin — it peels faster and looks messy.
9. Pink Chrome Base With Orange French Tips (Mirror Accent)
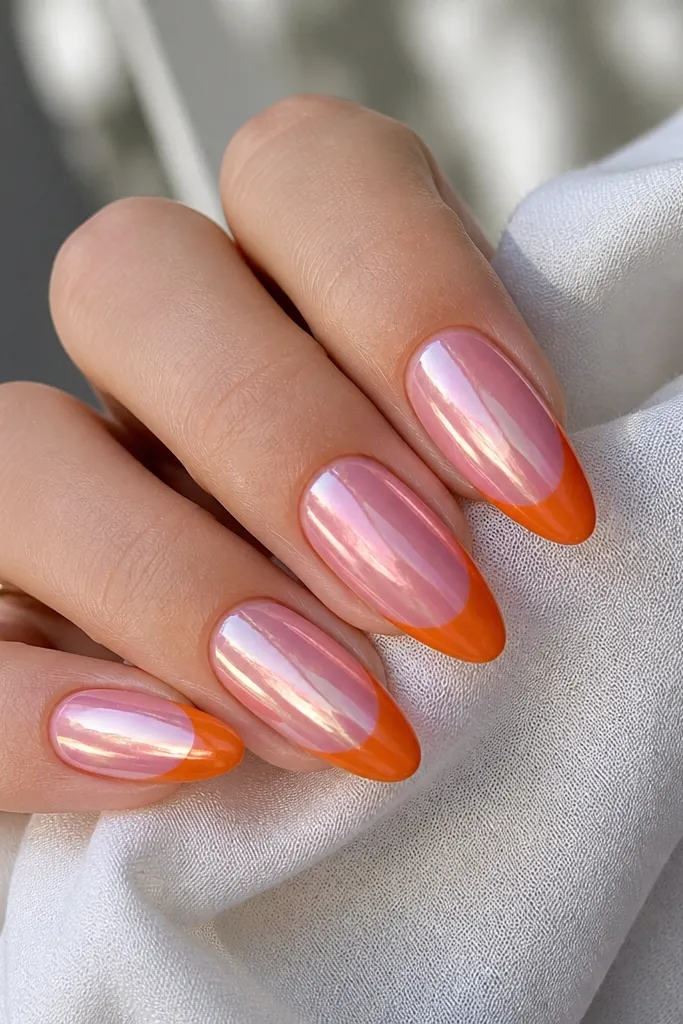
Chrome changes the whole vibe. A pink chrome base makes the orange tips look like they’re glowing, even without glitter. I use this when I need nails that pop under daylight and indoor lighting for events. Almond shape is best because the chrome catches light along the curve. This flatters medium to deep skin tones especially well because the chrome reflects warm tones. The principle is reflective base + solid accent: chrome provides the shine, orange provides the color block.
Apply a pink chrome gel base according to your product — I usually use a chrome gel or tacky base and then buff the chrome powder onto it. Cure, then wipe off excess powder gently with a dry pad. For the French tips, use guides and paint orange over the tip area, keeping the chrome exposed on the rest of the nail. Cure fully, then seal with a glossy top coat that is safe for chrome (some top coats dull chrome, so I test first on one nail). Finish by cleaning the guide edges with acetone on a flat brush.
Editor's noteIf your orange looks dull next to chrome, add one extra thin coat of orange before top coat.
Watch outDon’t top coat too thick — thick top coat can flatten chrome and reduce the mirror effect.
10. Soft Blush Base With Orange Polka Dot French Tips
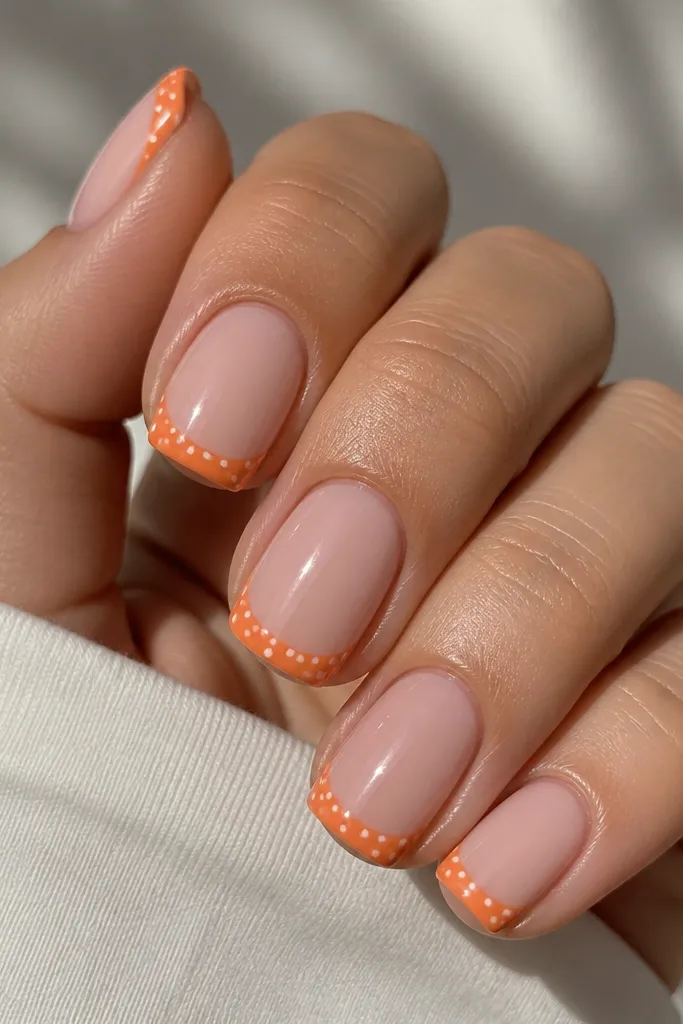
Dots inside the orange tip area make the French feel playful without adding heavy art. A blush pink base keeps the look gentle, and the polka dots brighten it up. I like this on short squoval because the dots make the tip area look intentional even when the nail is small. It’s flattering for fair, medium, and deeper skin tones because the dot color repeats the lightness of the blush. The principle is pattern control: small dots, even spacing, no messy smears.
Apply a blush pink base in two thin coats and cure. Use French guides and paint orange tips, curing fully. While the orange is tacky or after you cure depending on your dot method, use a dotting tool to place small dots near the center of the orange area first, then fill outward. For a crisp look, let the dot color dry flat before top coat. Seal with a glossy top coat in one smooth coat, then go back with a second coat only if the dots feel raised.
Editor's noteUse the same dot size on every nail — consistency is what makes it look designed, not random.
Watch outDon’t overload the orange with dots — too many dots makes the tip look crowded.
11. Pink Base With Orange Side French Tips (One-Sided Accent)
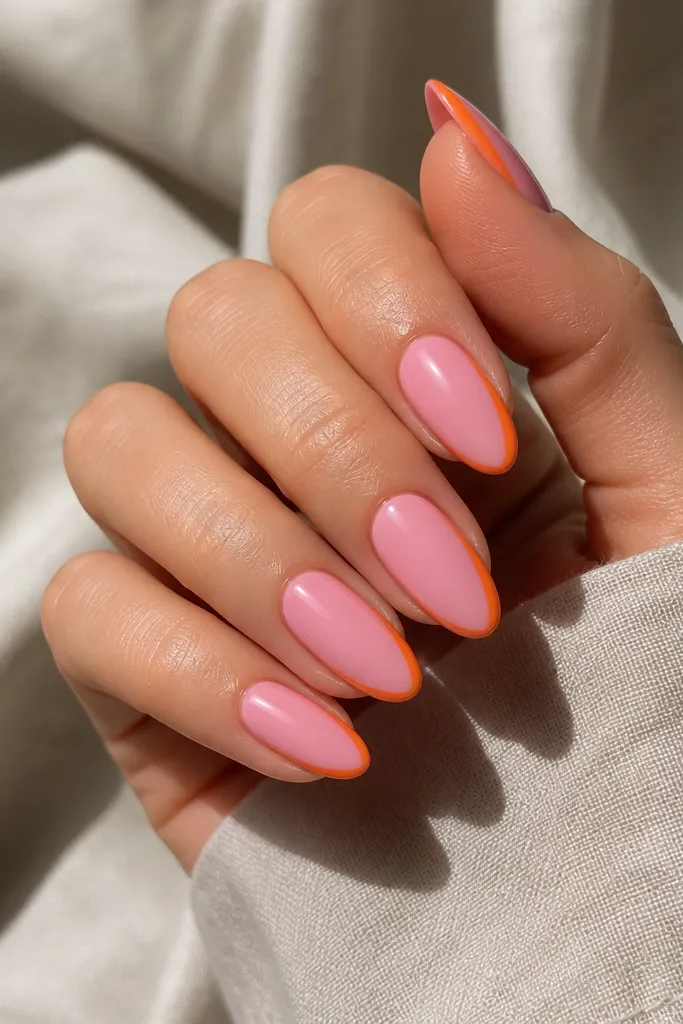
One-sided French tips look modern and they’re easier than a full symmetrical tip. The pink base stays the main color, and the orange side stripe acts like a highlight along the nail curve. I love this on almond and oval shapes because it makes the nail look slimmer and longer. This set flatters hands where you want a little visual structure — the orange line gives definition. Choose a medium orange that matches your outfit palette, and keep the stripe thin for a sleek look. The principle is asymmetry control: one clean stripe beats a messy full tip.
Paint your pink base in two thin coats and cure. Use a small striping tape along the outer side of the nail to create a straight edge for the orange stripe. Paint orange along the taped area only, keeping the stripe from touching the cuticle. Cure, remove the tape, and use a small flat brush with acetone to tidy any edge. Finish with glossy top coat, and cap the free edge where the orange stripe ends.
Editor's noteIf your stripe looks uneven, fix it before top coat — acetone cleanup is way easier on wet polish.
Watch outDon’t make the stripe too wide — wide side tips can look like a nail stain.
12. Pink Base With Orange French Tips And Tiny Gold Dot Stars
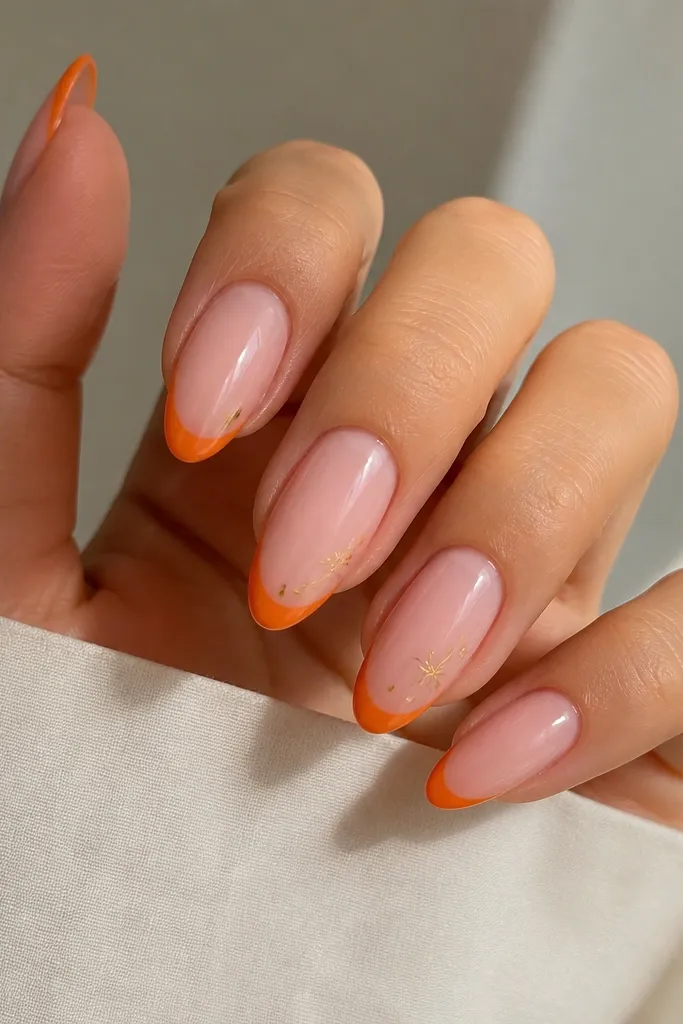
This version is for when you want a bit of “special” without doing full nail art. The gold dots catch light and make the orange tip feel more polished. I use it for date nights and birthdays because it reads cute in photos but still wearable for daytime. It flatters nearly everyone because gold matches warm undertones and the base stays soft. Keep the gold dot cluster small — 3 to 5 dots per accent nail. The principle is minimal sparkle: small gold accents placed near the tip edge for a clean focal point.
Start with a milky pink base in two thin coats and cure. Apply orange French tips using guides and cure. Choose two accent nails and place tiny gold dots right above the orange tip line using a dotting tool or a fine brush loaded with gold acrylic paint. Arrange dots like a tiny star by putting one dot in the center and four around it with equal spacing. Let the gold set, then seal everything with glossy top coat, keeping the brush away from the dot shapes until they’re covered.
Editor's noteUse gold acrylic paint over loose gold foil flakes if you want the dots to stay smooth under top coat.
Watch outDon’t add gold on every nail — it turns into clutter fast.
13. Matte Pink Base With Glossy Orange French Tips
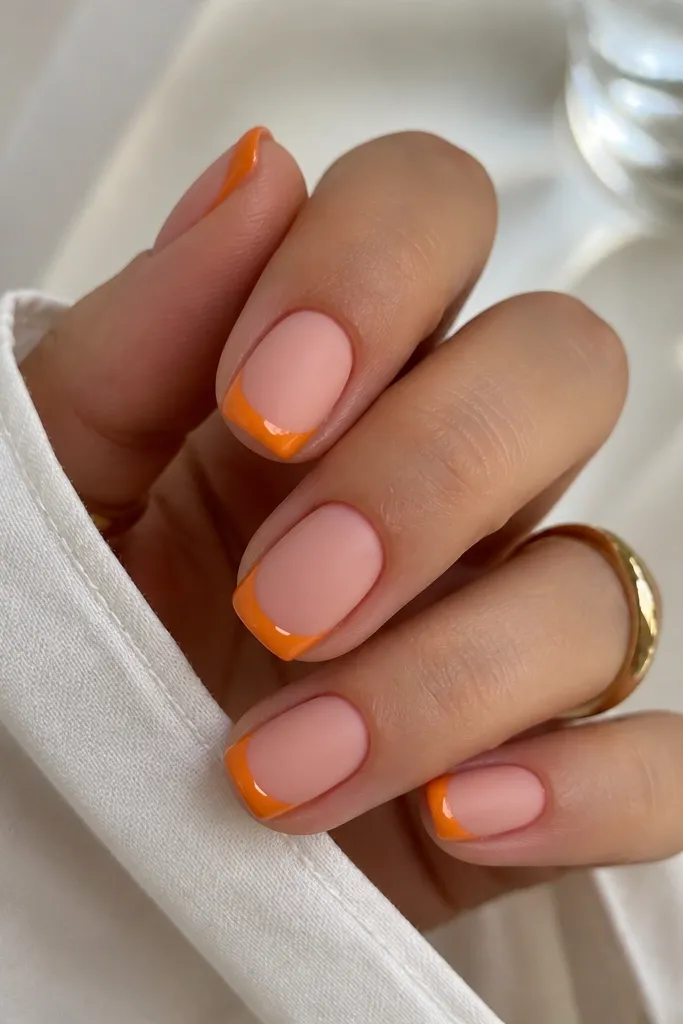
This flips the texture combo so the orange is the glossy focus. Matte pink is forgiving on small surface imperfections, and glossy orange makes the tips look freshly painted. I’ve done this on myself during summer when my nails had slight dryness — matte hides it, and gloss on the tip looks neat. It flatters hands that need visual smoothing because matte reduces shine distractions. Choose a matte top coat that doesn’t turn your pink gray. The principle is finish contrast with intentional focus: matte base hides, glossy tip draws the eye.
Apply a pink base in two thin coats and cure until smooth. Let it sit for a minute, then apply matte top coat over the whole nail and cure. Use French guides and paint orange tips on top of the matte — keep the orange glossy by using a regular gloss polish or gel color. Cure, remove the guide, and add a final glossy top coat only on the orange tip area so it stays reflective. Clean edges with a flat brush and acetone right after guide removal.
Editor's noteIf your orange looks streaky over matte, lightly buff the matte surface with a fine buffer before painting tips.
Watch outDon’t rush curing after matte — soft matte can smear when you apply orange.
14. Pink Base With Orange French Tips And Thin White Corner Accents
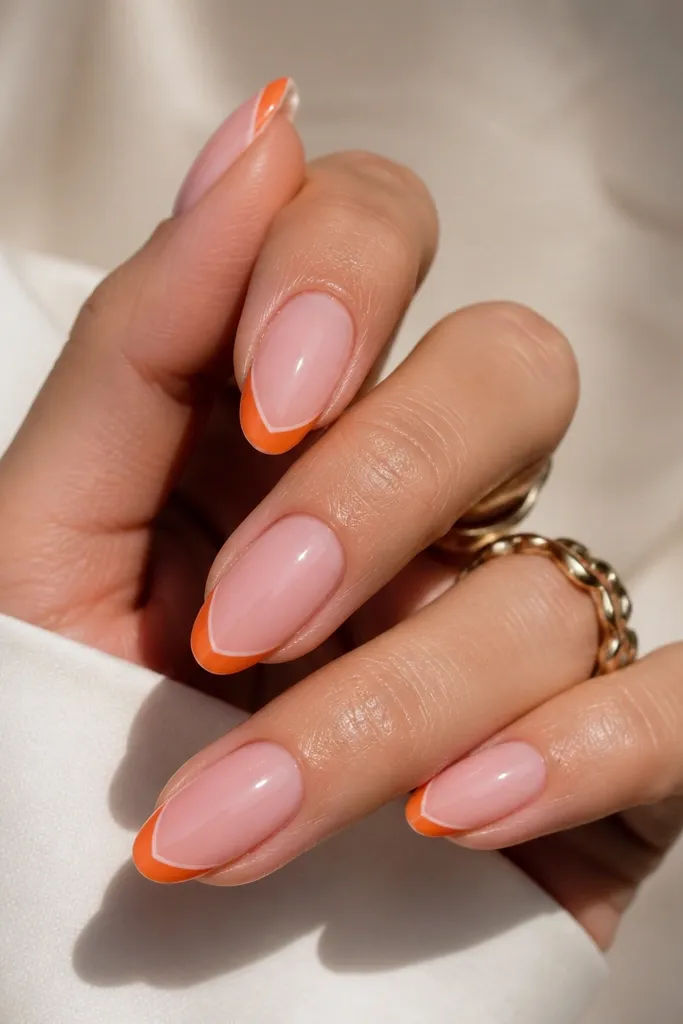
Corner accents make a French tip look custom even when you keep it simple. The thin white corner lines brighten the orange and make the smile curve feel sharper. I love this on medium almond because the tip corners show clearly and look balanced. This set is flattering for all skin tones since white adds light around your nail edges. Keep the accent tiny — think “fine pen line,” not a thick stripe. The principle is micro-detail: small white corner strokes add definition without adding bulk.
Paint your pink base in two thin coats and cure. Use French guides to paint orange tips and cure. With a liner brush, paint a very thin white line at each outer corner of the orange tip area, following the angle of the nail sidewall. Cure again and check symmetry by looking from the side under bright light. Finish with glossy top coat, making sure the liner lines are sealed but not dragging across the orange.
If you’re nervous, draw the corners lightly with a white striping tape first, then paint over it and remove the tape.
Don’t draw corner lines too far inward — they turn into thick blocks and ruin the clean French look.
15. Pink Base With Orange French Tips Using Nail Stickers And Hand-Finished Edges
Nail stickers are the quickest way to get uniform French tips at home, and they look best when you finish the edges by hand. A glossy pink base makes the stickers look like real paint instead of pre-made decals. I like this method when I’m doing nails for a friend or when I need the tips to match perfectly across all fingers. It flatters longer nails because the sticker line stays straight and makes the nail look tidy. Choose orange stickers in a peachy or tangerine tone so they look warm next to pink. The principle is speed with refinement: use stickers for the shape, then seal and tidy for a painted look.
Start with a glossy pink base in two thin coats and cure fully. Apply the orange French tip stickers centered on the free edge, pressing down with a silicone pusher so the edges contact the nail. Trim excess at the sides with a small nail clipper, then file gently to blend the sticker edge into your nail. Apply a thin layer of top coat over the entire nail, then a second thicker top coat focused on the sticker seam for sealing. Wipe the brush with acetone between nails so you don’t drag sticker edges and smudge the border.
Press stickers for 30 seconds with firm pressure — the bond improves and you get fewer lifting corners.
Don’t skip the second top coat over the seam — the sticker edge lifts first.



