1. Grape Jelly Base With Silver Foil Half-Moons
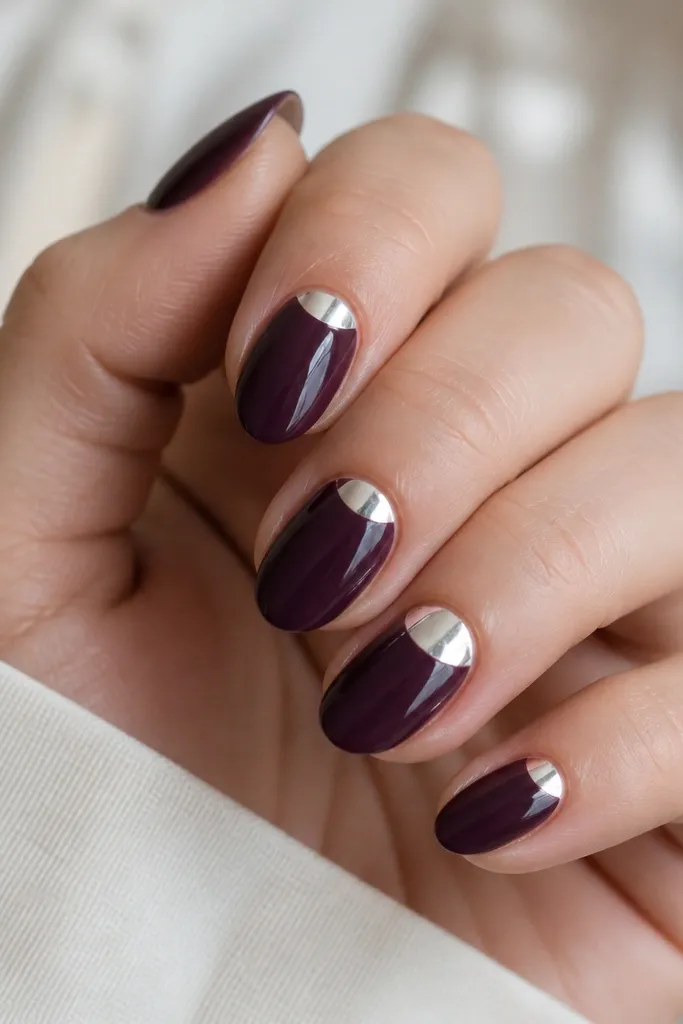
Start by applying two thin coats of grape jelly gel or polish, curing each coat until it’s fully even. Clean up the cuticle line with a small brush and isopropyl alcohol so the half-moon has a crisp edge. Place a half-moon foil sticker or press foil into a half-moon shape right at the cuticle, using tweezers for control. Then seal everything with two coats of glossy top coat, making sure you cap the free edge on every nail.
This look is the one I do when I want dark purple to look soft instead of harsh. The jelly base lets light pass through, so the foil catches sparkle without turning the nail into a mirror. Silver foil at the cuticle visually lengthens the nail because it frames the base and keeps the design concentrated near the center. It looks great on all skin tones, but it’s especially flattering on warm undertones because the purple stays saturated rather than turning gray. For daily wear, it reads “intentional” but still low-effort.
Watch outAvoid thick jelly coats that pool — foil sits better on a flat, smooth base.
Editor's noteIf your foil lifts, press it down for 10 seconds with a silicone-tipped tool before top coat. Use glossy top for photos; matte makes the foil look dull.
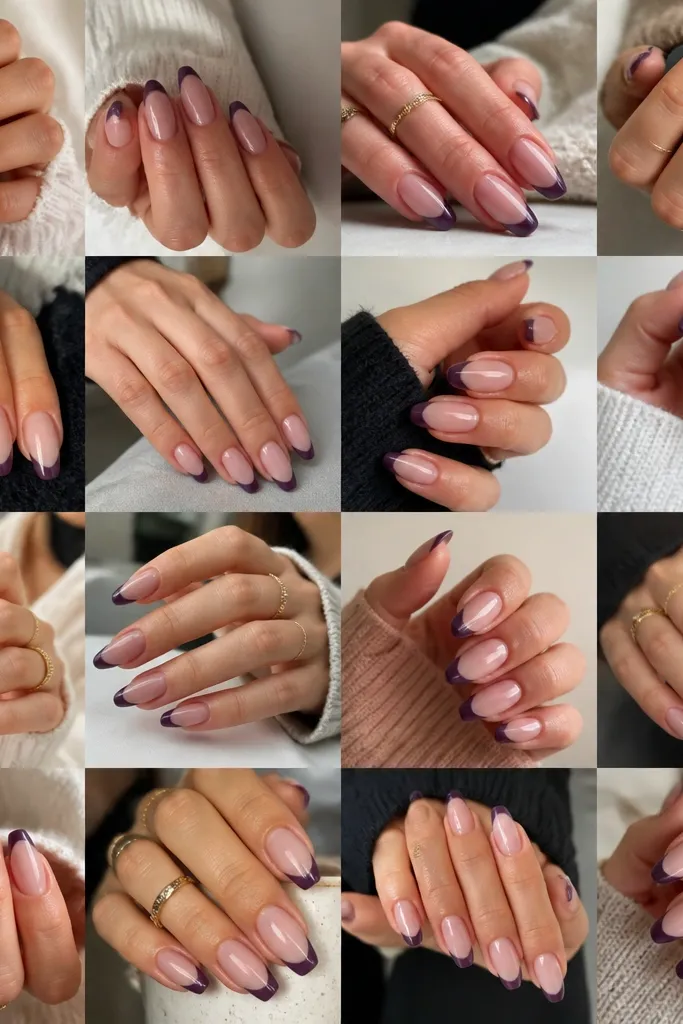
2. Plum Creme Nails With Thin White Micro-French
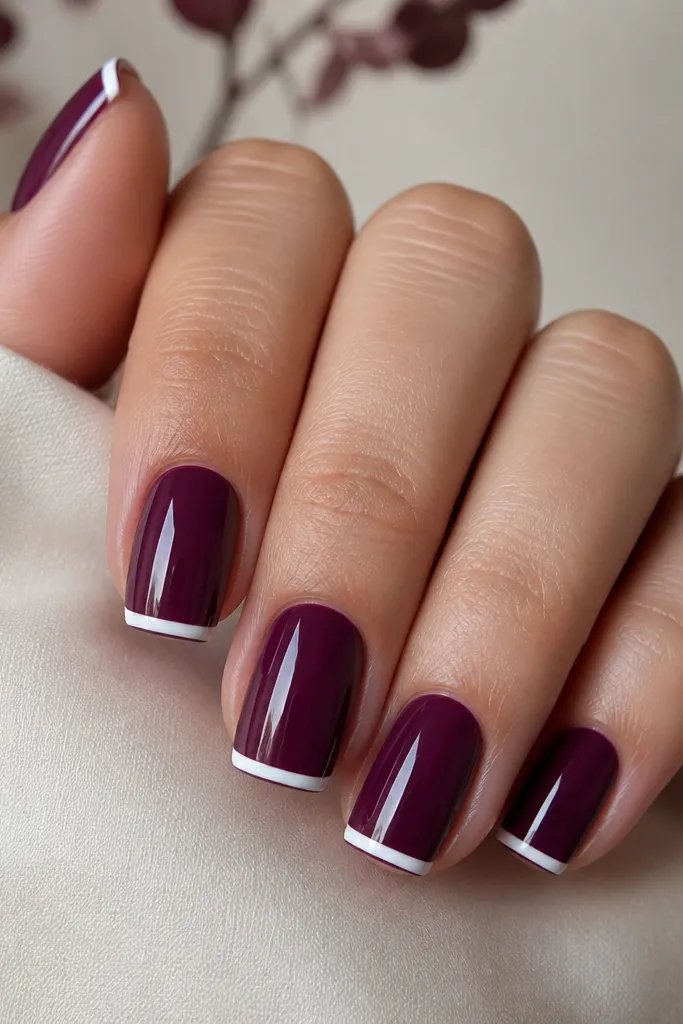
Micro-French is clean, and dark purple makes it look sharp instead of childish. The thin white line keeps negative space minimal, so the set still feels modern. Plum creme is opaque and smooth, which makes the white look crisp even in low light. This style flatters short fingers because the line is narrow and doesn’t cut the nail into a big two-tone block. It also looks great for work because it’s graphic without being loud.
Paint the nails with two coats of plum creme, letting each coat self-level. Use a striping brush to draw a straight white line right at the tip border, keeping it consistent across all nails. If you want extra precision, tape a thin guide along the tip for two nails at a time, then remove the tape before curing. Finish with one coat of glossy top coat, then lightly wipe the sticky layer if you’re using gel.
For a softer look, use off-white rather than bright pure white. Keep the line thinner than you think — that’s the whole point.
Don’t make the French line wide — wide lines turn this into a heavy color-block that looks cheap.
3. Eggplant Velvet Matte With Black Lace Vein Lines
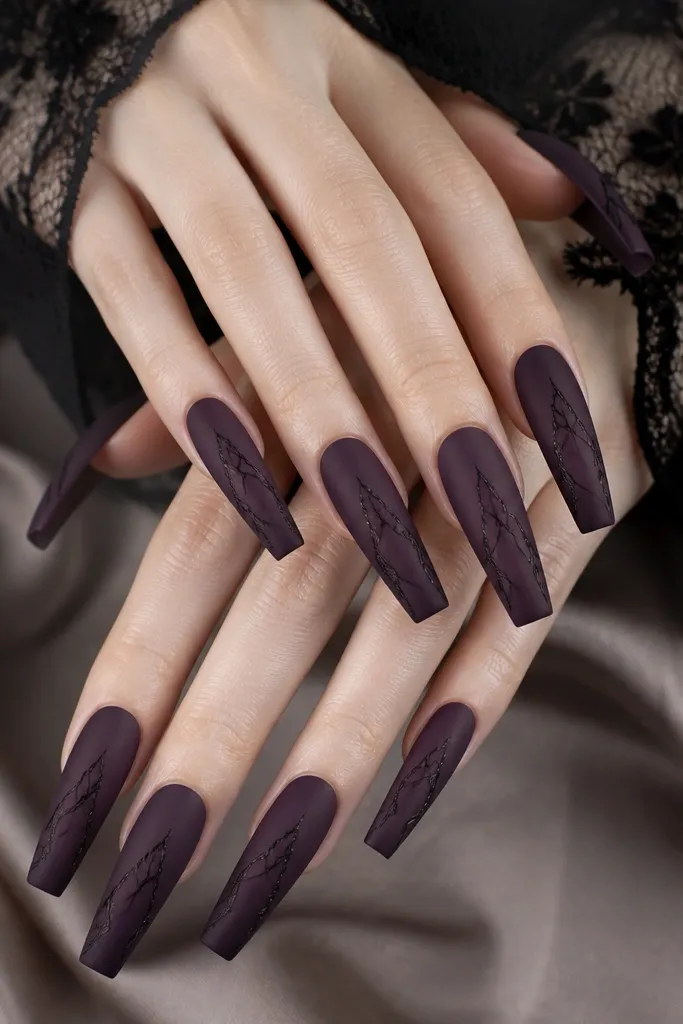
Apply two coats of eggplant gel and cure fully, then buff lightly for an even matte surface. Paint thin black lines with a liner brush, starting from the center and pulling outward in V-shaped strokes. Leave some clear purple space between lines so it doesn’t look like scribbles. Seal with a matte top coat, but keep it light on top of the lines so the ink stays crisp.
Matte velvet and dark purple look like “soft goth” in the best way. The matte finish kills shine so the black lines look like ink on paper, not glitter on plastic. I like vein-style lace lines because they move the eye without covering the whole nail. This is flattering on longer nail shapes and on hands that want a little drama but not heavy sparkle. If you like a moody look, this is the one that always gets compliments from strangers.
Watch outSkip thick gel for the black lines; thick lines look raised and cheap under matte.
Editor's noteUse a liner brush with a pointed tip — a rounded brush makes the veins look blobbed. Do one nail at a time so the lines stay sharp.
4. Dark Purple Chrome Fade Over Neon Tips
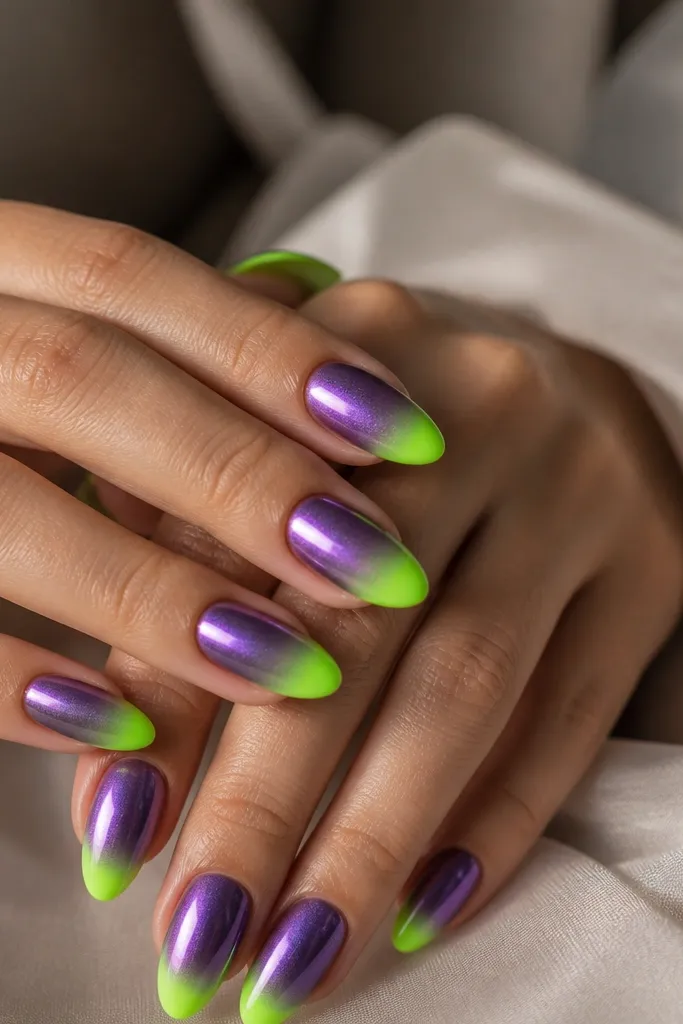
Paint neon green on the top third of each nail and cure, then blend the edge with a thin brush dipped in purple gel so the transition looks smooth. Over the purple portion, apply chrome gel or a tacky base and rub chrome powder in small circular motions for that smoky fade. Avoid chrome on the neon tips so the green stays punchy. Top coat: use glossy on the neon and a lighter layer on the chrome so you keep the mirror effect.
This is for when you want dark purple to look edgy, not just pretty. The neon tips give a pop that makes the purple look more saturated, and the chrome fade adds a smoky metallic layer that looks expensive. Chrome over purple also photographs better because it reflects light without turning the whole nail glittery. This set flatters fair and medium skin tones because the neon reads bright and clean. It’s also great for festivals or nights out where your nails are in the spotlight.
Watch outDon’t chrome the neon — it turns the green gray.
Editor's noteDo the blend with a barely-damp brush, not a wet one. Wet blending smears and dulls the chrome.
5. Rhinestone Star Cluster on One Accent Nail
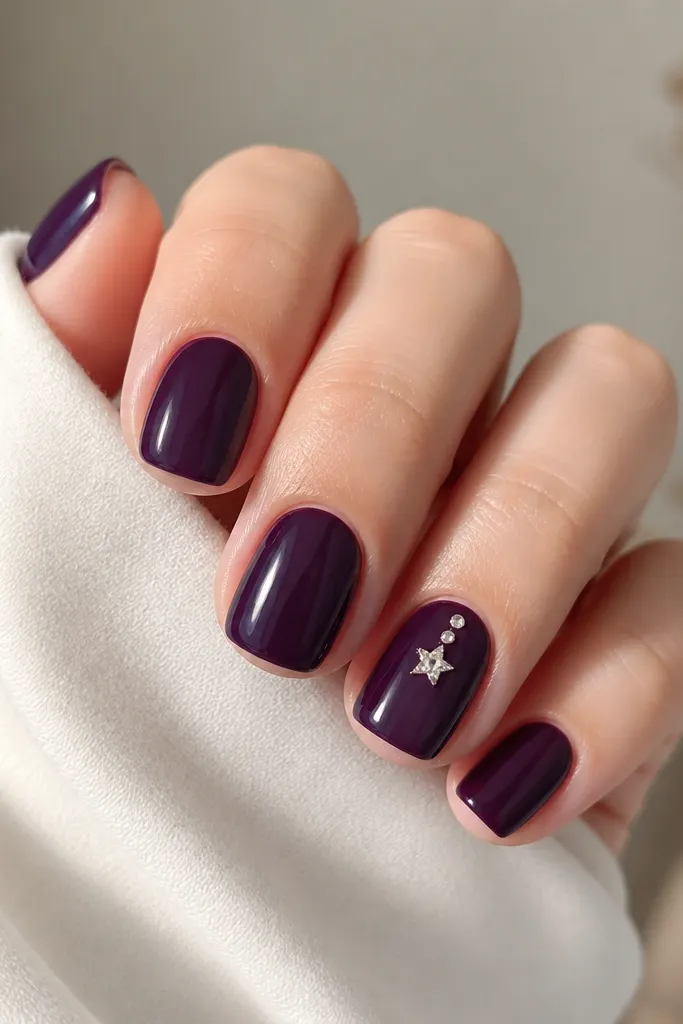
One accent nail keeps dark purple from feeling costume-like. The star cluster sits near the cuticle where it catches movement as you gesture, so it looks lively even when you’re not wearing jewelry. Clear rhinestones on dark purple have a strong contrast, and they show up in photos without needing glitter. This is flattering on short nails because the design is compact and doesn’t overwhelm the finger. It’s also beginner-friendly because placement matters more than complexity.
Start with two coats of glossy dark purple, then cure fully. Pick one accent nail and apply a tiny dab of clear gel where you want the stones. Place a star rhinestone first, then add two smaller stones on either side with tweezers. Cure, then seal with one careful top coat layer, dragging the brush from cuticle to tip to lock the stones down.
Use a dotting tool to place gel — too much gel squeezes out and clouds the stone base.
Avoid putting stones on every nail; it makes the set look busy and can snag on sleeves.
6. Dark Purple Marble Swirls With Clear Jelly Highlights
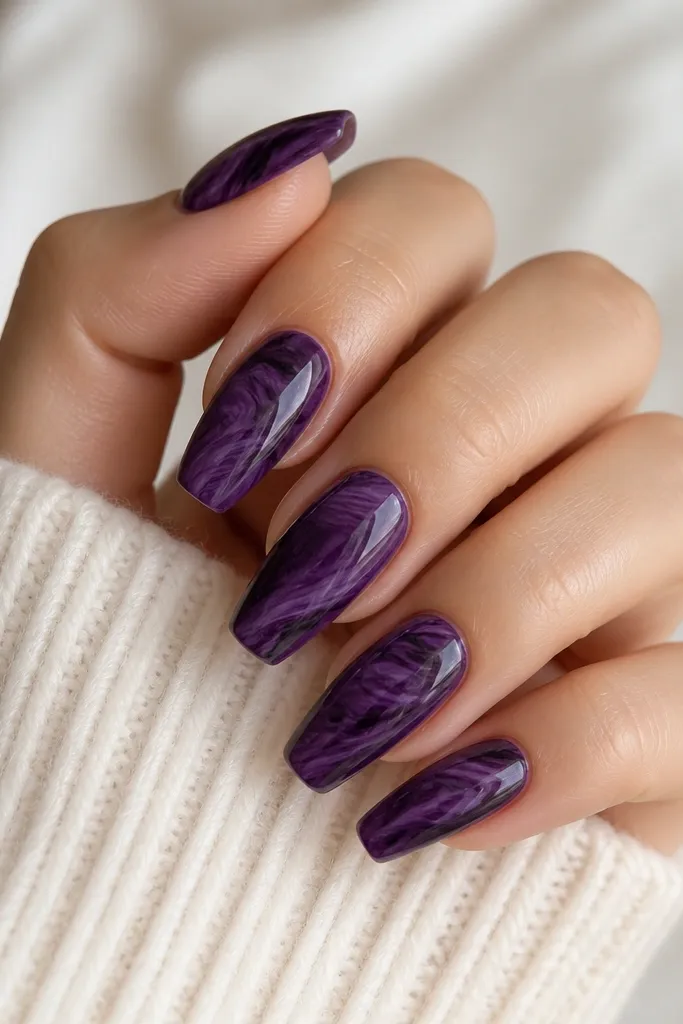
Marble works because it looks layered, even when you keep the palette to purple tones. The key is the clear jelly highlights — they make the marble look like it’s under glass instead of painted on top. Dark purple marble is also forgiving because tiny asymmetries look natural. It flatters hands that need a little visual movement, and it looks good on both cool and warm skin tones because the purple family stays consistent. This is my pick for birthdays or anything where you want “wow” without neon.
Apply a dark purple base and cure. Sponge or brush on lighter plum and near-black swirl patches, then use a thin brush to pull the colors into marble veins. Add clear jelly streaks in the middle of the swirls, then cure so they look raised but smooth. Finish with glossy top coat and cap the edges so the marble doesn’t catch.
Marble looks best when you keep the swirls uneven — straight lines make it look like wallpaper.
Don’t fully blend everything; marble needs visible separation to read.
7. Black V-Cut Outline Over Dark Purple
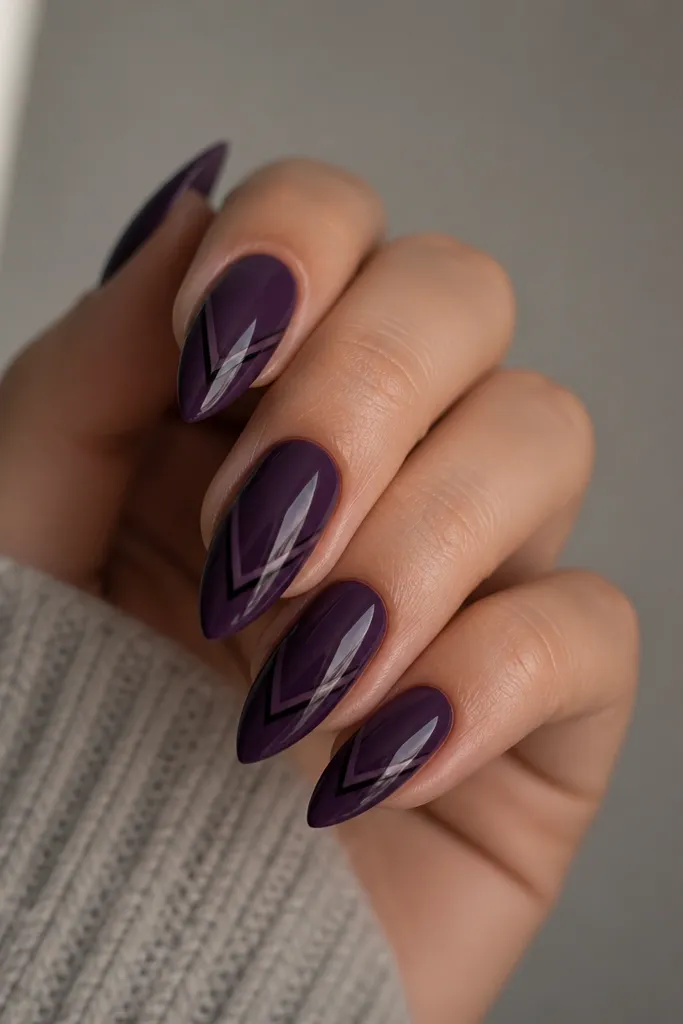
This design is graphic, but it still feels classy because the colors are restrained. The black V creates a long eye line that makes the nail look slimmer and longer. Dark purple holds the contrast well, so the outline stays crisp instead of turning fuzzy. It flatters medium and long nail shapes most, especially if you like a clean, sharp aesthetic. It also looks great with silver rings because the black outline gives structure to the look.
Paint two coats of glossy dark purple and cure. With a fine liner brush, draw a V shape starting about halfway down the nail center, then extend the points toward the tip without touching the very edge. Go back to thicken the outline slightly only where the V turns, so it stays sharp. Seal with glossy top coat, and check the sidewalls so the lines don’t feel rough.
If your line wobbles, wipe the brush and fix the edges before curing — gel cleanup is easier early.
Avoid thick outlines; bulky V lines look heavy and can chip at the edges.
8. Dark Purple Galaxy Dots With Starry Top Coat
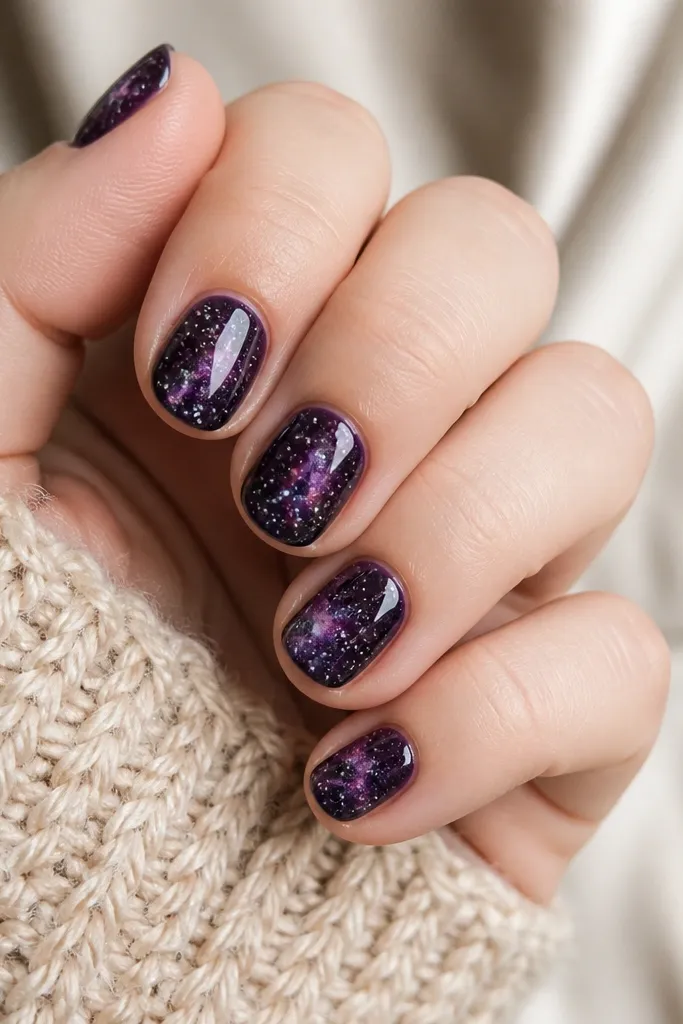
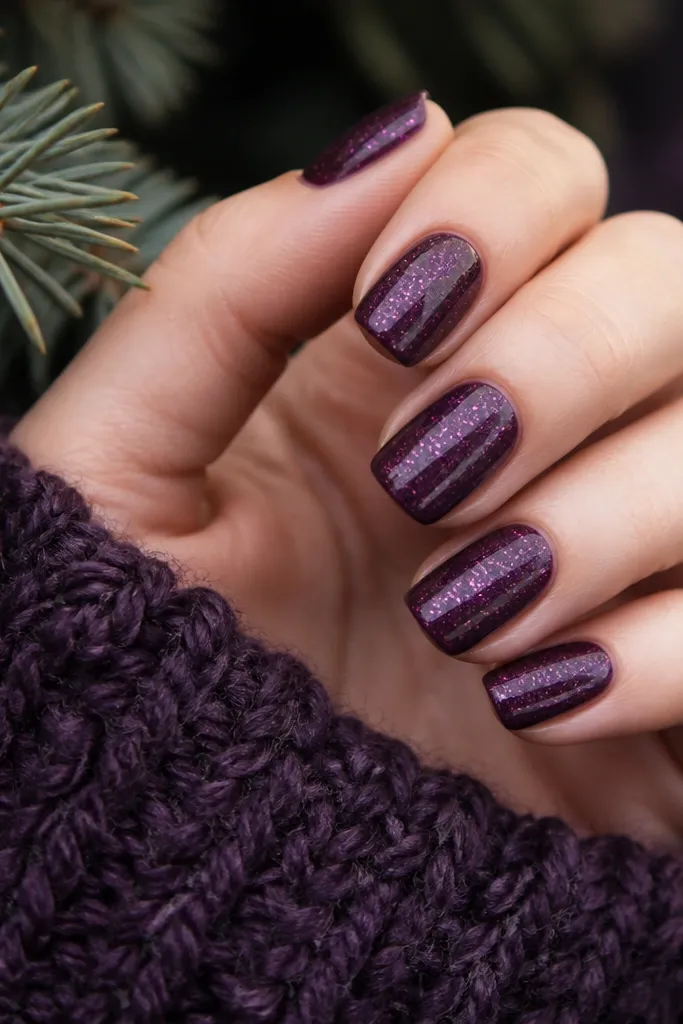
Start with two coats of deep purple and cure. Use a dotting tool with white gel to place tiny dots randomly, then add a few dots in light lavender around the edges. For the sparkles, tap micro silver glitter or silver gel specks lightly over the center of two nails. Finish with glossy top coat in two thin layers so the dots stay smooth.
Galaxy dots are the easiest way to make dark purple feel magical without using chunky glitter. The scattered dots create depth, and small lavender dots keep it from looking like plain black-and-white. This style flatters every nail length because it’s tiny and doesn’t need long lines. It also works for both casual and dressy outfits — I’ve worn it with jeans and with a black dress. The glossy top coat makes the dots look suspended in gel.
Watch outDon’t pack the dots too tightly — star patterns need breathing room.
Editor's noteUse the smallest dotting end you have. Big dots make it look like confetti instead of stars.
9. Plum Gradient With Metallic Lilac Line
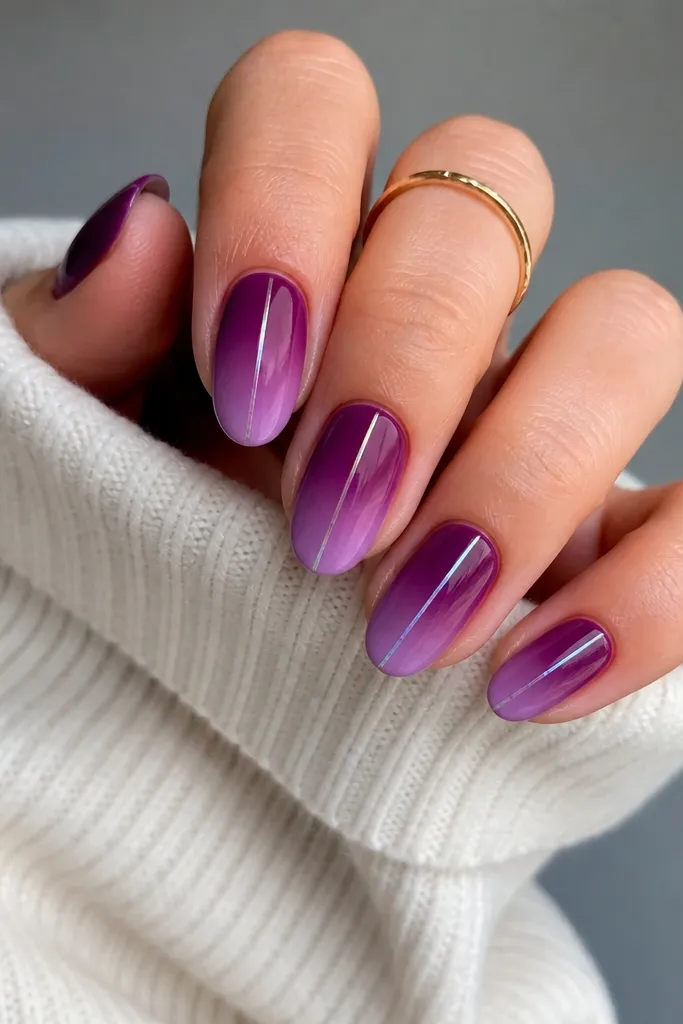
A vertical gradient makes nails look longer because the color travels up the nail. Adding one metallic line keeps the look from feeling like a simple ombre. The metallic lilac line catches light and gives a clean focal point, which is why it looks stylish in close-ups. This flatters hands with shorter nail beds because it visually stretches the nail. It also looks great on warm skin tones because the lilac doesn’t go brown.
Create the gradient by blending darker plum gel near the cuticle into lighter lilac gel toward the tip using a makeup sponge or airbrush. Cure after blending until smooth. Then draw a center line with a metallic lilac striping gel, keeping it narrow and straight. Top coat with glossy gel, making sure you cap the free edge so the gradient doesn’t fade at the tip.
Blend in thin layers. One thick gradient layer looks streaky under gloss.
Avoid a metallic line that’s too wide — it turns into a stripe instead of a detail.
10. Dark Purple Half-Swirl French Tips
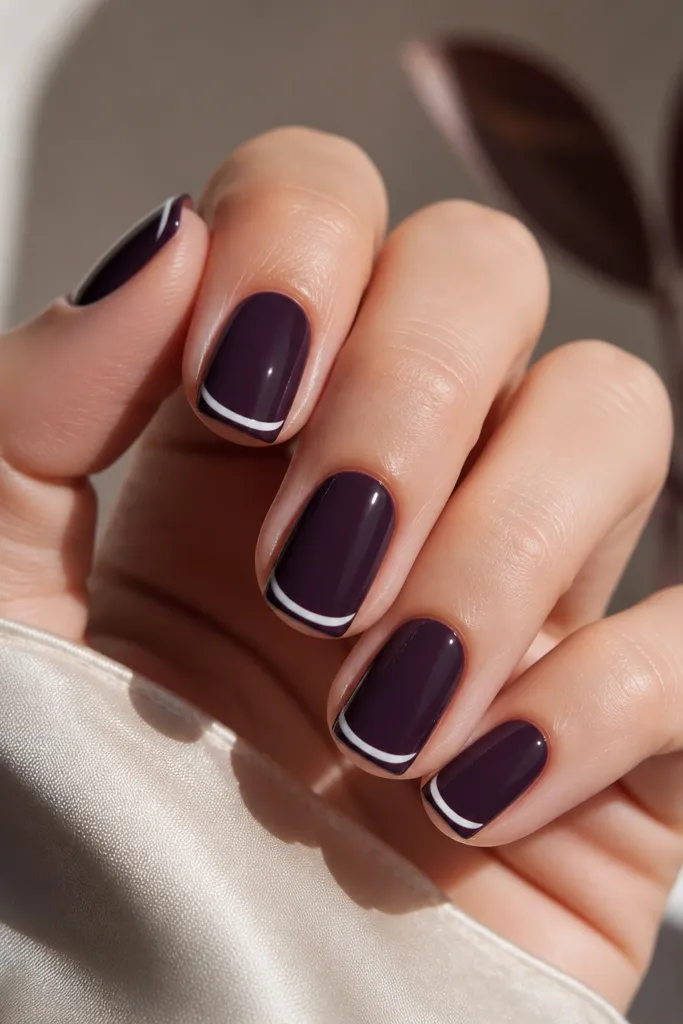
This is French tips for people who hate full white tips. The half-swirl shape reads playful, but the design stays minimal because it only lives at the tip edge. Dark purple makes the white swirl look crisp instead of chalky, especially with a glossy top coat. This is flattering on short nails because the swirl is narrow and doesn’t add extra length. It also works if you want something cute that still looks grown-up.
Paint two coats of glossy dark purple and cure. Using a thin liner brush, draw a white curved bracket at the tip — start on one side, curve up and across slightly, then stop before the center. Repeat on each nail with consistent size so it looks intentional. Add a final glossy top coat, and cap the sides so the swirl doesn’t snag.
If you’re shaky with freehand curves, do two nails with a small strip of tape as a guide, then remove and cure.
Don’t make the swirl too thick; thick white near the tip can look messy.
11. Grape Chrome Tears on Matte Purple
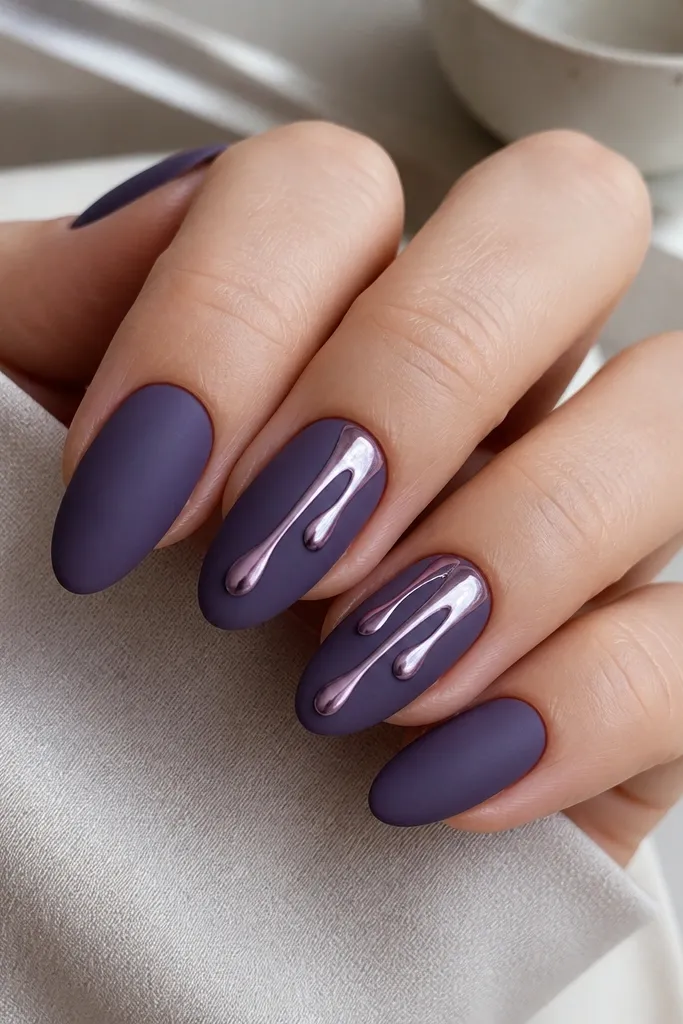
Chrome tears on matte look like intentional art, not random shine. Matte purple gives you a soft base that makes the chrome look sharp and reflective. I like placing chrome tears on only two nails because it keeps the set cohesive and makes the metallic parts feel special. This flatters medium nails and looks great with silver hardware jewelry. It also hides minor imperfections because matte smooths out shine irregularities.
Apply matte grape purple by using a matte top coat after your base cures. For the chrome tears, use chrome gel or a tacky layer where you want the streaks, then press chrome powder in a downward motion to create tear shapes. Keep the streak width narrow at the top and slightly wider at the bottom for a natural drip look. Seal the rest of the nails with matte top, but avoid covering the chrome tears with heavy matte so they keep their mirror effect.
Use a small fan brush to remove loose chrome before top coat. Loose chrome smears and dulls the shine.
Don’t cover chrome with matte top; it kills the whole effect.
12. Dark Purple Ombre With Black Micro-Glitter Fade
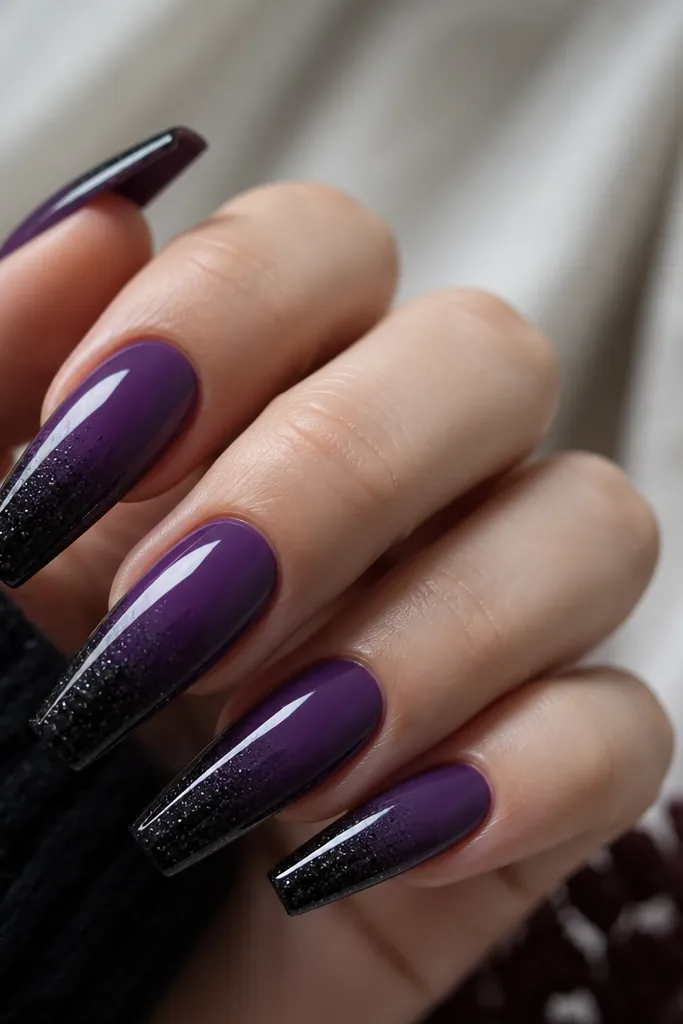
Blend a dark purple near the cuticle into near-black at the tip using a sponge, curing each blend layer until smooth. Add black micro-glitter only on the top third of the tip, then tap off excess so it doesn’t spread. Cure and then apply glossy top coat in two thin layers to smooth the glitter texture. Make sure you cap the free edge so the glitter doesn’t catch on fabric.
This is the kind of dark purple that looks smoky in person. The ombre creates depth, and the micro-glitter near the tip adds sparkle where your hands catch light most. Black micro-glitter stays elegant because it doesn’t look like chunky glitter on nails. This flatters longer shapes and makes fingers look slender. It also pairs well with both casual and dressy outfits because the sparkle is subtle.
Watch outAvoid glitter across the whole nail; it turns smoky ombre into a sparkly mess.
Editor's noteMix glitter into gel before applying if your glitter is stubborn and wants to clump.
13. Plum Rose Lines With Tiny Gold Dots
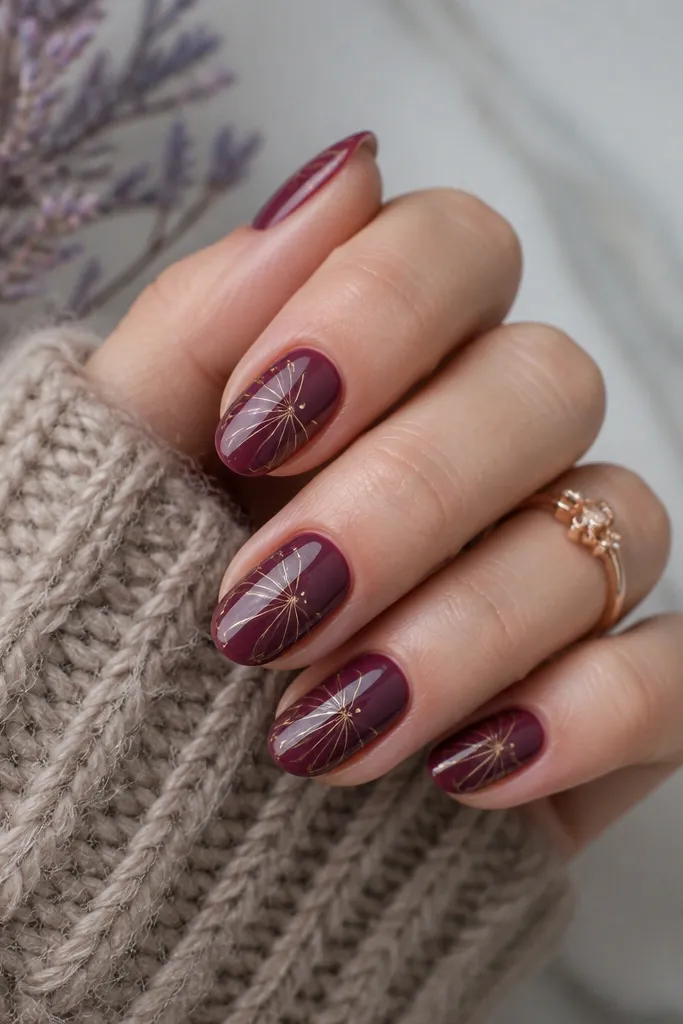
This design looks delicate because the lines are thin and the gold dots are small. Rose-gold over plum makes warm skin tones glow and keeps cool undertones from looking too icy. The curved petal lines guide the eye upward, which makes the nail look more sculpted. It’s also a good option if you want something feminine but not floral clutter. I’ve worn this to dinners and it still looks neat after long days.
Paint two coats of plum gel and cure. Use a thin liner brush to draw 2-3 curved rose-gold lines that meet near the center, like simplified petals. Add one tiny gold dot at the outer end of each curve so it looks intentional, not random. Seal with glossy top coat, and cap the line ends so the gold dots feel smooth.
Keep the lines uneven in thickness by pressing lighter at the start and heavier at the center. That variation looks hand-done.
Don’t use thick metallic paint for the lines; it chips at the edges.
14. Dark Purple Marble With One Matte Nail Accent
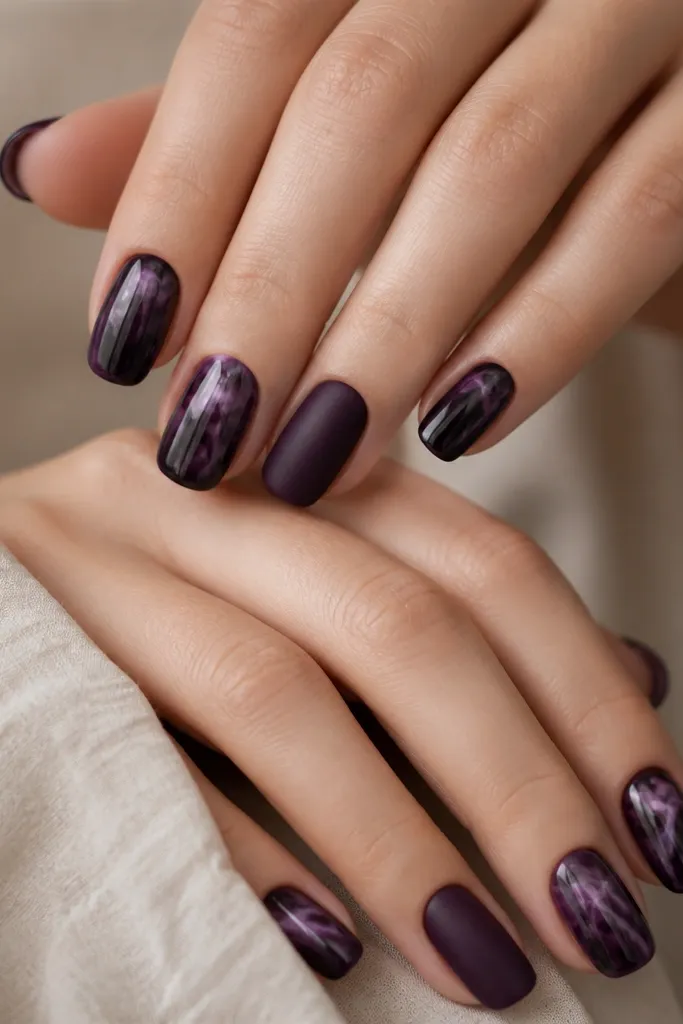
Create marble on four nails with a dark purple base, then sponge in lighter plum and swirl with a thin brush. Add clear jelly streaks if you want extra depth, then seal with glossy top coat. On the accent nail, paint the same dark purple but finish with matte top coat. Check that the matte nail is fully cured and dry to the touch so it doesn’t smear against the glossy nails.
Mixing finishes is the easiest way to make a set look high-end. The marble nails look dimensional under gloss, and the matte accent nail makes the whole set feel more curated without adding more design elements. Dark purple marble already has movement, so you don’t need extra gems. This is flattering on short to medium nails because it adds contrast without changing nail length. It’s also great for people who get tired of glitter but still want something interesting.
Watch outAvoid two matte nails — you lose the contrast that makes this work.
Editor's noteUse the same purple shade for both finishes. If the colors differ, the set looks mismatched.
15. Dark Purple "Smoked" Glitter Only at the Cuticle
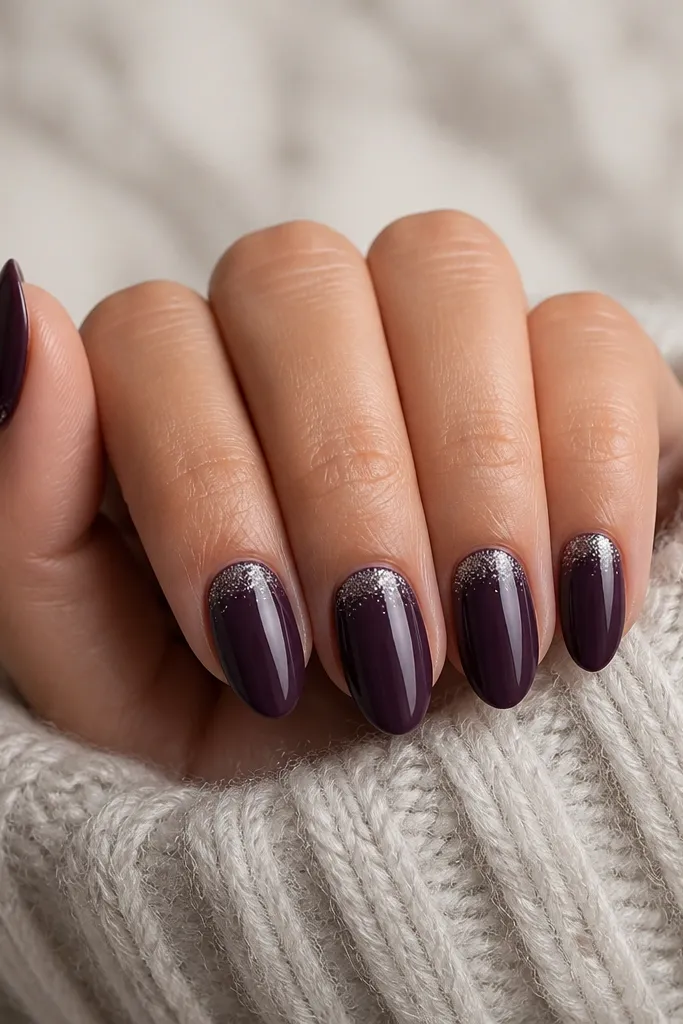
Paint two coats of dark purple and cure. Apply a thin ring of clear gel around the cuticle area, leaving a small gap at the sidewalls so it doesn’t flood. Press silver micro-glitter into the gel and gently tap off the excess so it fades naturally. Seal with a glossy top coat, focusing on smooth coverage over the glitter so it doesn’t feel gritty.
Cuticle halos look expensive because they mimic natural shine and light reflection. The glitter is concentrated where your nails naturally catch light when you move your hands, so you get sparkle without a full-on glitter bomb. Dark purple keeps the glitter from looking too bright, which is why silver works here. This flatters short nails because the halo sits near the base and doesn’t visually shorten the tip. It’s also a nice choice if you want something subtle for work.
Watch outDon’t put glitter right up to the sidewalls; it lifts faster there.
Editor's noteUse a makeup sponge to blur the halo edges with a tiny bit of purple gel on top of the glitter before curing.
16. Black Stripe Down the Center With Purple Glow
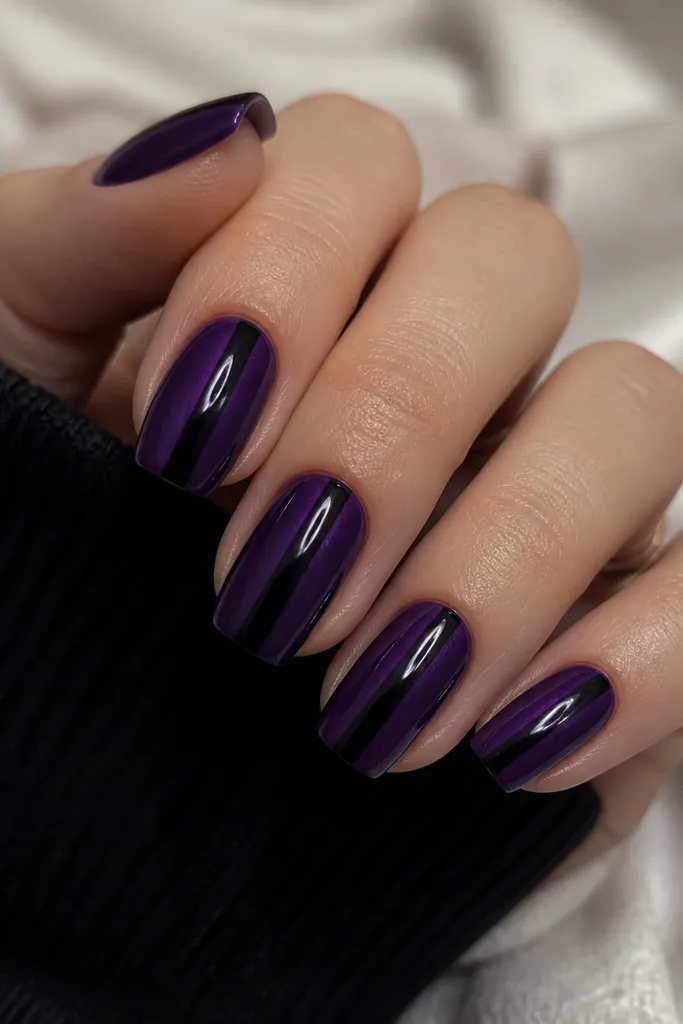
Paint two coats of glossy dark purple and cure. With a striping brush, draw a thin black line down the center, starting from just below the cuticle. To create the glow edge, lightly blend a tiny amount of purple gel on either side of the stripe with a sponge, then cure. Finish with glossy top coat so the stripe blends smoothly into the base.
This look gives you instant structure. The center stripe makes the nail look slimmer, and dark purple makes the black look sleek instead of harsh. The purple glow edge is what keeps it from looking like a plain sticker stripe. This flatters hands that want a clean, long line, especially if you have wider nail beds. It also looks great with gold or silver rings because the stripe is a strong visual anchor.
Watch outAvoid a stripe that touches the cuticle — leave a tiny gap so it doesn’t look messy.
Editor's noteMake the black stripe slightly thicker at the tip than the cuticle. It looks more flattering and less flat.
17. Purple Matte With Glossy Dot Grid Accent
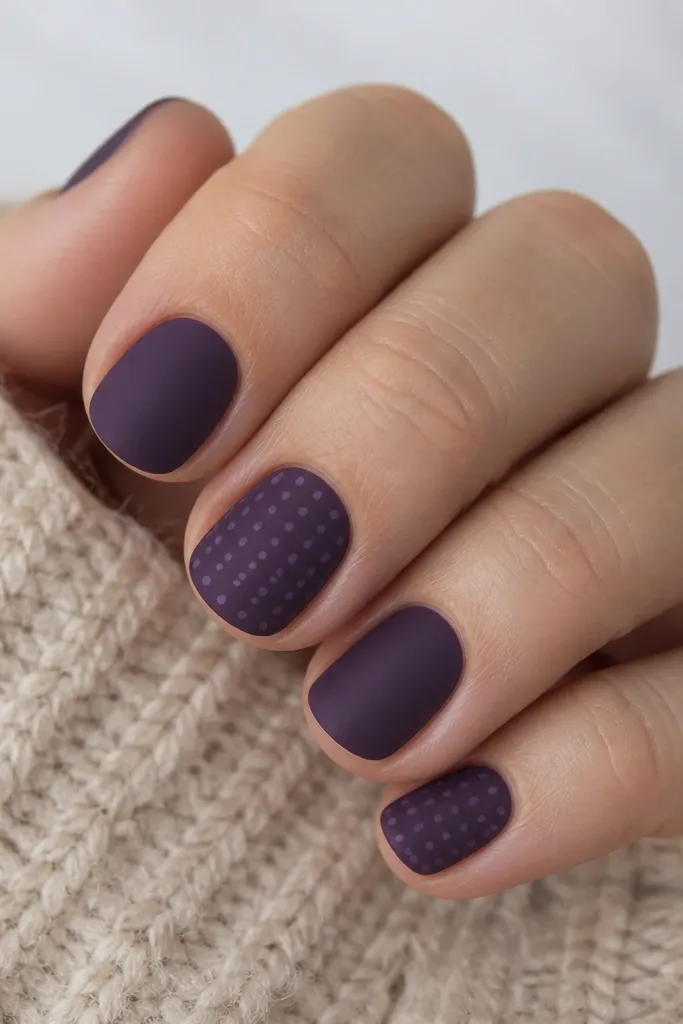
Matte with a glossy dot grid looks like modern nail art, not traditional polish. The dot grid reads clean because the dots are evenly spaced, and the glossy finish makes them pop against the matte base. Keeping the grid on only two nails makes it feel intentional and wearable. This design flatters short nails because the dots sit on the surface without adding bulk. It also works well for people who want graphic patterns but hate big shapes.
Paint all nails with two coats of matte dark purple and cure. On two accent nails, apply a base coat of glossy top where the grid will go. Use a dotting tool to place tiny dots in a lighter purple, forming a grid with consistent spacing. Cure and then seal the accents with a glossy top coat so the dots stay raised and reflective.
Count spacing: place dots, then check the distance between rows before curing. Consistency is what makes it look salon-done.
Skip matte top over the dot grid; it makes the dots look flat.
18. Dark Purple "Satin" Finish With Crisscross Silver Lines
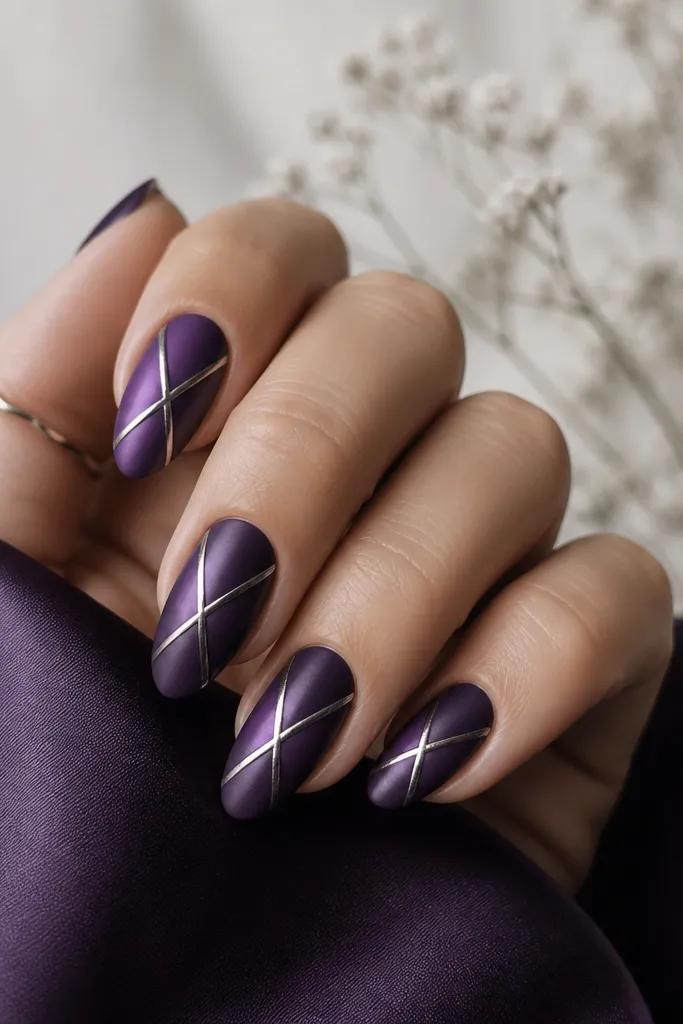
Satin finish is my favorite middle ground because it looks smooth like gloss but doesn’t glare. Crisscross silver lines give movement and make dark purple feel more tailored. The loose X pattern keeps it from looking like school notes while still giving a geometric vibe. This set flatters medium almond and oval nails because the center lines visually pull the nail together. It also looks great on hands with longer fingers because the lines guide the eye upward.
Apply dark purple base and cure, then use a satin top coat or mix a matte top with gloss to get that soft sheen. Draw a thin silver cross in the center of each nail, then add a second lighter line that overlaps slightly for depth. Keep the lines narrow so the nail still looks airy. Finish with a second satin top coat, but keep it light over the silver lines so they don’t blur.
Use striping tape for one nail to get the angle right, then freehand the rest with the same angle.
Don’t make the crisscross lines too dense; it turns into a dark blob.
19. Plum Ombré With Tiny White Hearts on Accent Nails
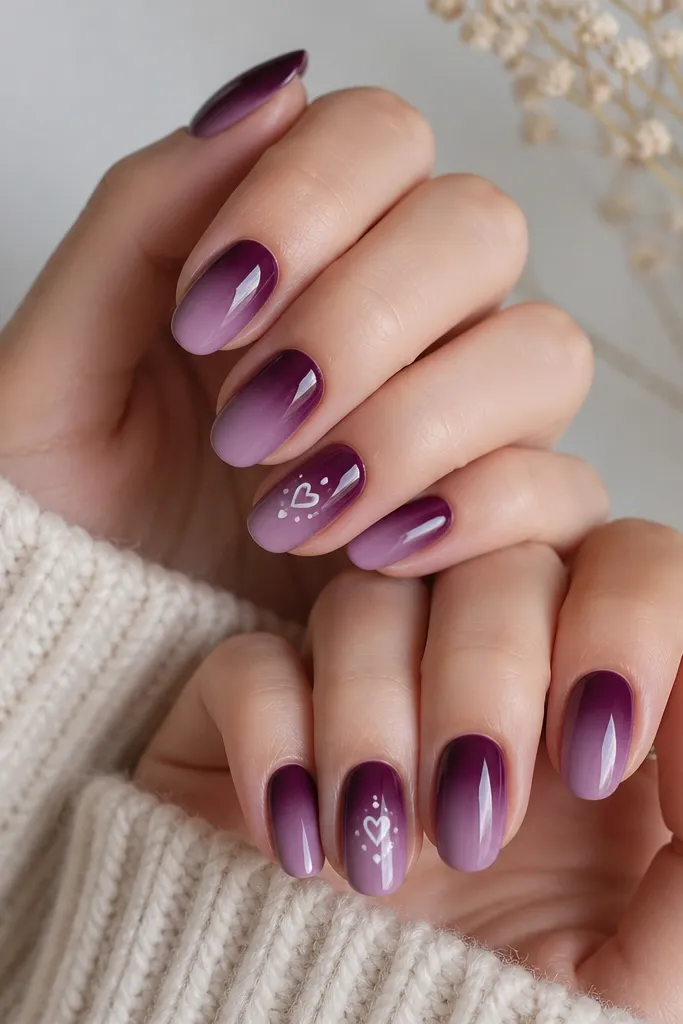
Blend deep plum into lighter lilac on all nails and cure. On two accent nails, place one tiny white heart using a dotting tool and a small liner brush for the point. Add two tiny white dots next to the heart if you want more balance, then cure. Seal everything with glossy top coat, keeping it thin over the hearts so they don’t spread.
Hearts can look juvenile, but tiny hearts on a purple ombré look romantic and grown-up. The ombré gives a soft backdrop so the hearts look like they’re floating. I keep the hearts to two nails because dark purple already carries drama. This flatters all skin tones since the lighter lilac portion brightens the hand. It’s an easy option for dates, anniversaries, or any day you want cute without looking childish.
Watch outAvoid big hearts — they take over the nail and make dark purple look heavy.
Editor's noteIf your hearts look uneven, use nail heart stickers once, then practice drawing just one heart shape freehand on the next set.
20. Dark Purple "Half Chrome" Ring Finger Only
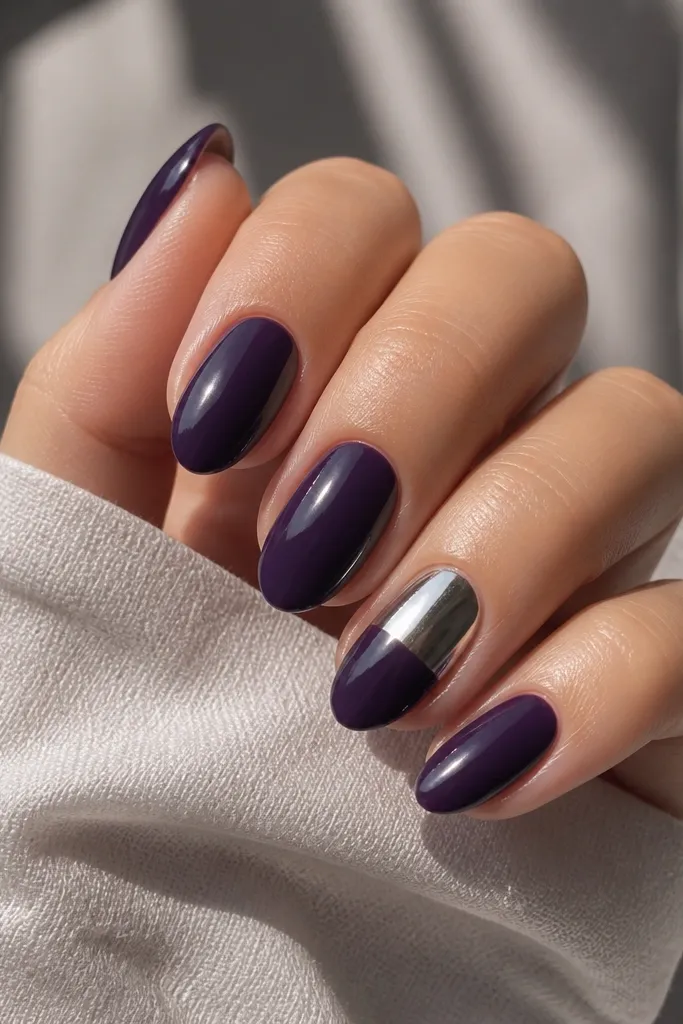
Half chrome is punchy without being messy because it’s a clean division. Doing it on the ring finger only keeps the set classy and makes the chrome feel like a jewelry piece. Dark purple under chrome makes the transition look intentional and high contrast. This flatters medium and long nails and looks great with rings because the chrome echoes metal. It’s also perfect if you want a “statement nail” but don’t want rhinestones.
Paint all nails with two coats of glossy dark purple and cure. On the ring finger, apply chrome gel to the top half of the nail, keeping a straight boundary with striping tape if you want it super crisp. Rub chrome powder over the gel, tap off excess, then remove tape before curing. Finish with one glossy top coat on the purple nails; on the chrome nail, use a thin top coat only if you need it for durability, because thick top can dull chrome.
If your chrome looks patchy, build it in two lighter layers instead of one heavy layer.
Avoid covering the chrome with thick matte top — it kills the mirror look.
21. Dark Purple French With Micro Rhinestone Border
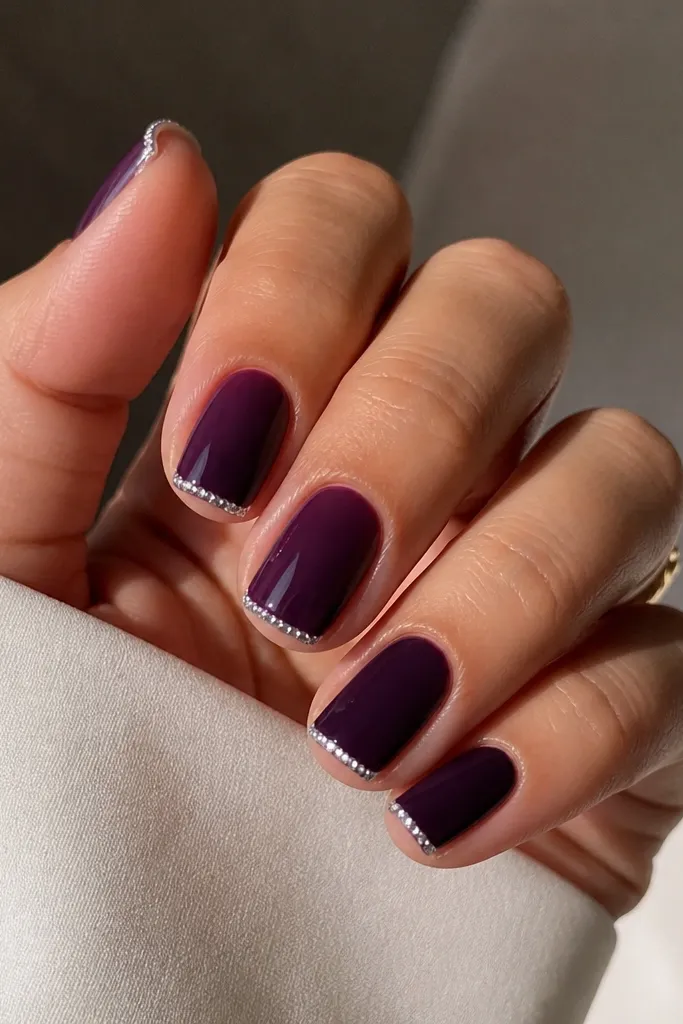
Paint two coats of glossy dark purple and cure. Create a thin white French line at the tip with a striping brush, then cure. Place tiny clear rhinestones along the border using a dot of clear gel, starting from one side and working across so spacing stays even. Cure again and seal with a top coat that’s thin enough not to flood between stones.
This is the “clean bling” version of rhinestones. Micro rhinestone borders sit right where light hits the tip, which makes the set sparkle when you move your hands. Dark purple keeps the rhinestones from looking too bridal or too bright. It also flatters short nails because the border is narrow and doesn’t add visual bulk. If you want a party look that still looks neat, this is the one I keep coming back to.
Watch outDon’t use large stones; they snag and make the border look uneven.
Editor's noteUse a wax pencil to pick up rhinestones — it saves time and prevents tugging the gel.
22. Eggplant Base With Purple Galaxy Drip Edge
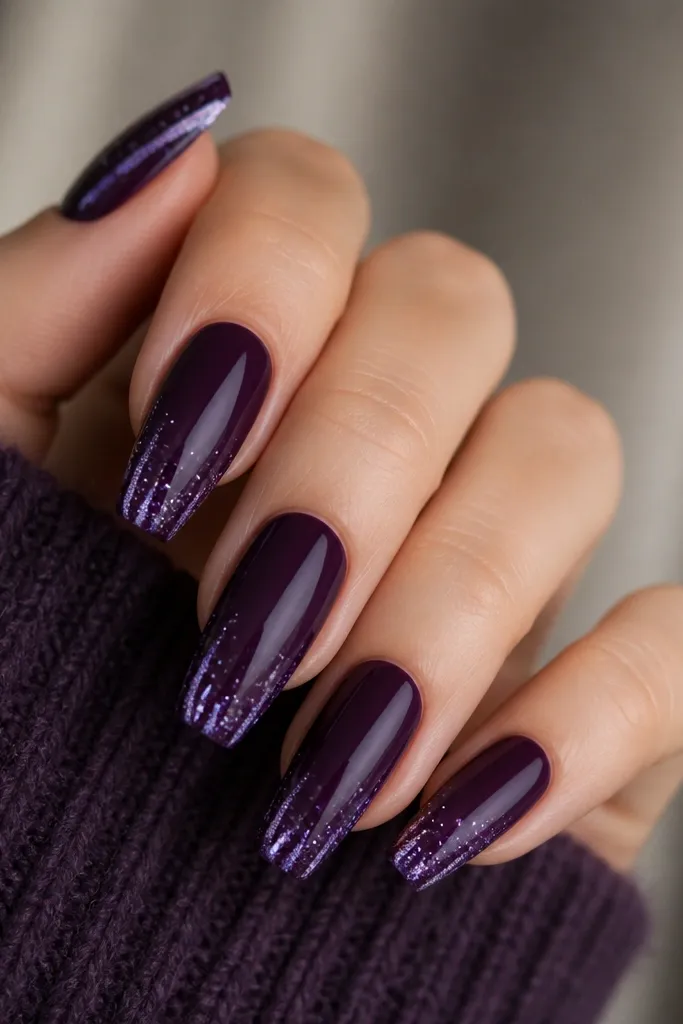
Drip edges make dark purple look artsy without covering the whole nail. The galaxy dots at the tip create a gradient of interest where your nails naturally catch light when you type or hold a drink. Eggplant base stays rich, and the lavender dots keep it from turning into plain black glitter. This flatters medium coffin and almond shapes because the tip has room for the drip to taper. It’s a strong look for nights out and photos because the drip reads clearly from a distance.
Apply two coats of glossy eggplant purple and cure. On each nail, place tiny white and light lavender dots near the tip edge, leaving a clean gap in the middle so it doesn’t turn into full glitter. Add micro glitter specks, then use a thin liner brush with clear gel to pull a few dots downward slightly to form the drip edge. Cure and finish with glossy top coat, keeping the drip area sealed but not thick.
Pull the drip down less than you think — a tiny taper looks more controlled than a long drip.
Avoid heavy glitter layers at the tip; they feel rough and chip faster.
23. Dark Purple Wraparound Diagonal Line Art
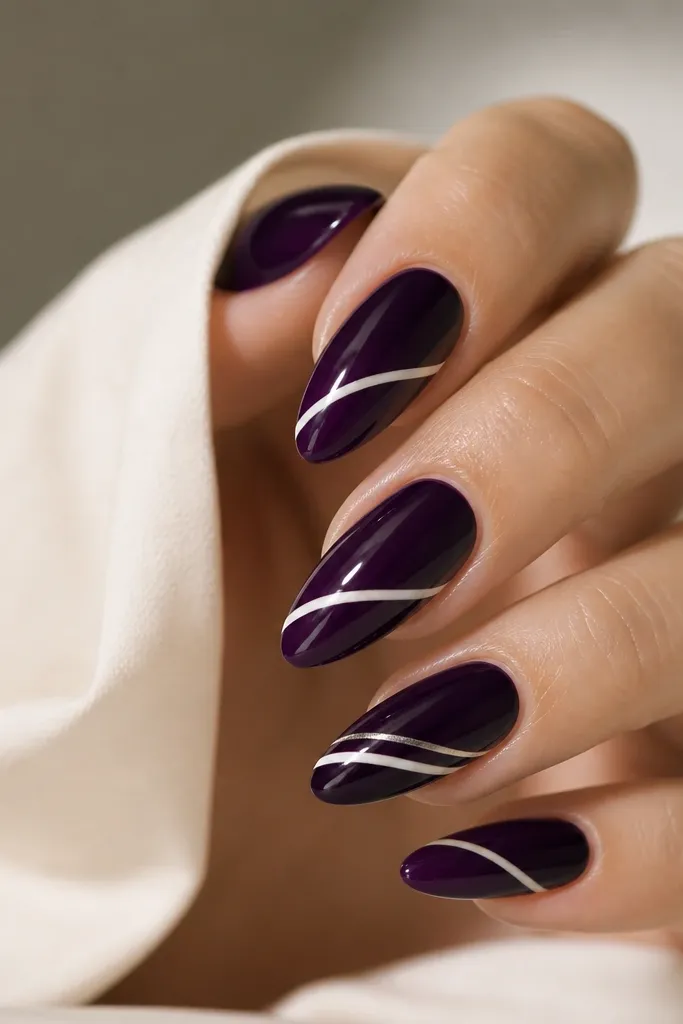
Paint two coats of glossy dark purple and cure. Use striping tape to create a diagonal guide if you want perfect symmetry, then place the tape lightly and cure after applying the white line. Draw the white line with a liner brush, then add a thin silver line parallel if you want two-tone. Remove tape before curing so edges stay crisp, then seal with glossy top coat and cap the free edge.
Diagonal line art makes nails look longer and slimmer because it pulls the eye across the nail. White adds sharp contrast against dark purple, and a thin parallel silver line makes it look more high-end. I like wraparound diagonals because they look dimensional — like the design is on the sidewall too. This flatters long almond and coffin shapes, and it looks great with both casual outfits and sleek evening looks. It also works if you have uneven nail shapes, because the diagonal helps balance perception.
Watch outAvoid thicker diagonal lines — they make the nails look shorter and heavier.
Editor's notePress tape down gently — if you push too hard, it can leave a ridge under top coat.
24. Plum Cuticle Confetti With Tiny Color Dots
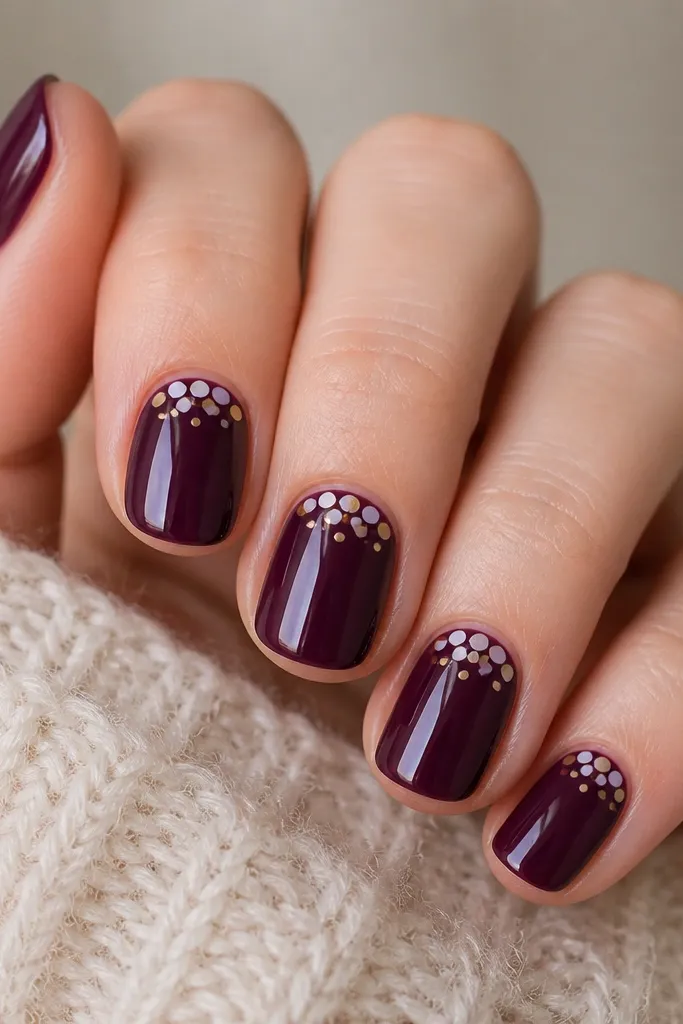
Paint two coats of glossy plum purple and cure. Apply a small ring of clear gel at the cuticle area, staying inside the natural nail curve. Use a dotting tool to place tiny dots — two white, one lavender, and one gold in each cluster, then cure. Finish with glossy top coat in one careful layer so the dots stay smooth and don’t smear.
Cuticle confetti is a fun way to add color without turning the whole nail into a pattern. The tiny dots make the base purple look more dimensional, and the mix of white and lavender keeps it in the same family. A touch of gold makes it feel special, but the set still reads wearable. This flatters shorter nails because the design sits at the base and doesn’t take up the tip area. It’s also great if you hate big art because it’s tiny and forgiving.
Watch outAvoid bigger dots at the cuticle; they lift first and look messy.
Editor's noteKeep the dots uneven in size by using different dotting ends. Perfect dots look too printed.
25. Dark Purple Glitter Fade Tips With Clear Negative Space
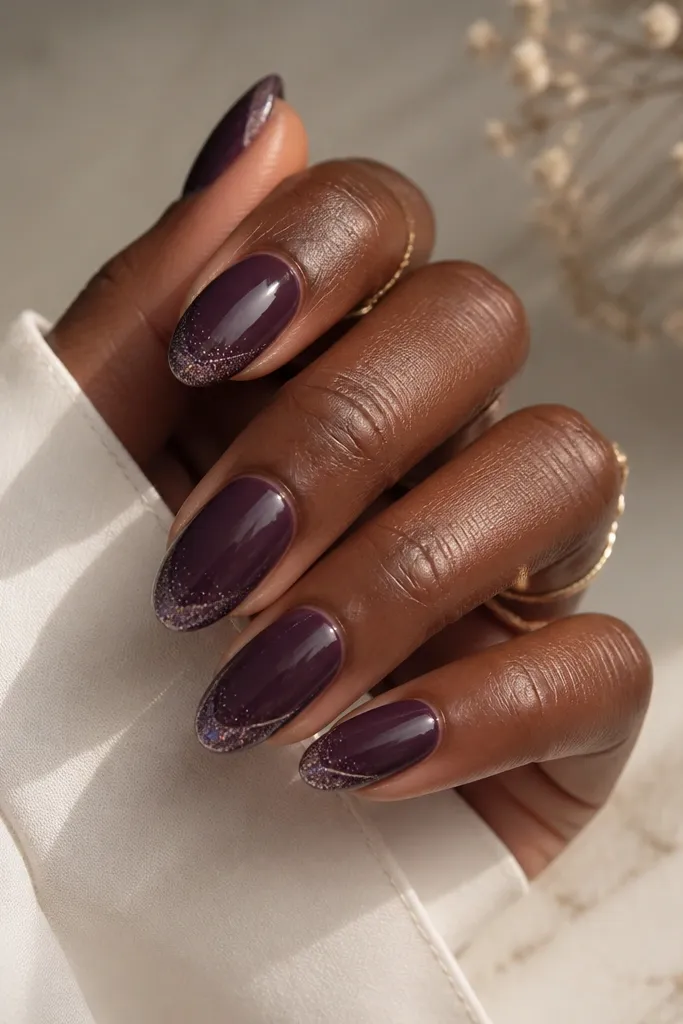
Apply two coats of dark purple and cure. Place a thin strip of tape where you want the clear negative space line, then paint glitter gel or glitter polish below the tape at the tip. Remove the tape before curing so the clear line stays crisp. Seal with glossy top coat, and be extra careful around the clear line so it doesn’t get cloudy.
This is a clever trick when you want glitter but still want the nails to look clean. The clear negative space line acts like a “separator,” so the glitter reads intentional and not messy. Dark purple base keeps the glitter dark and cohesive, while the clear line makes the design look modern. It flatters medium nails and makes the tip look sharper. It also looks good on cooler and warmer skin tones because the clear space brightens the hand.
Watch outDon’t skip the tape if your line matters — freehand clear separators look wobbly.
Editor's noteUse fine glitter, not chunky. Fine glitter fades cleaner at the tip.