
1. Red Corner Frame on Glossy Black
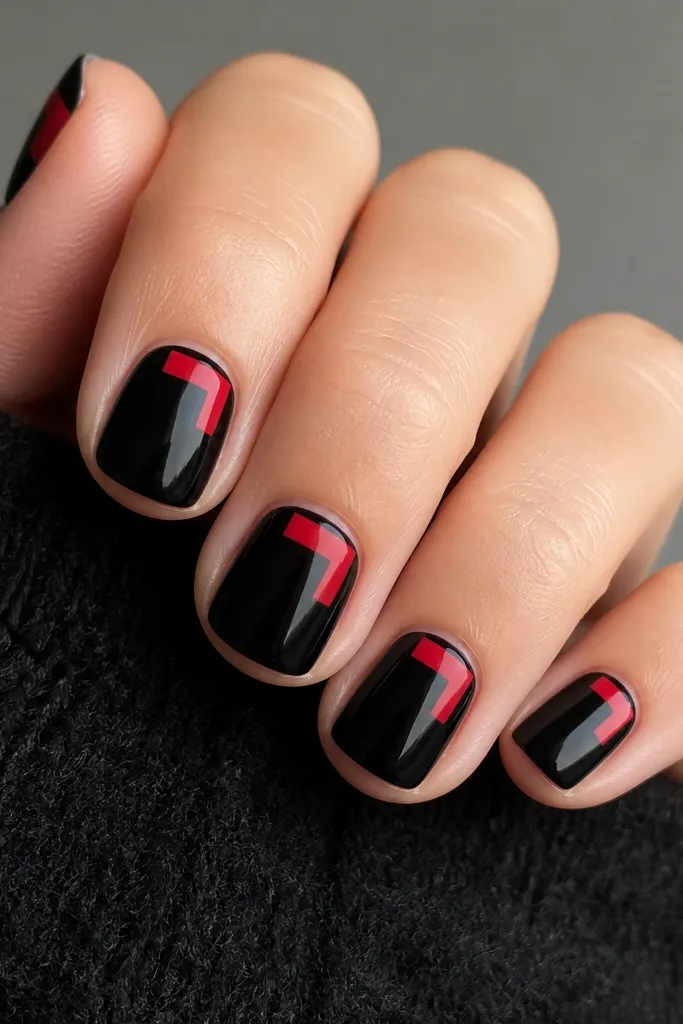
Start with a solid glossy black base — it makes the red corner look like a graphic sticker instead of a random block of color. The red L-shape in the top corner creates a corner-to-center pull, which makes the nail read longer on small surfaces. I like this for medium skin tones and fair skin with warm undertones because red feels bright without looking harsh. For everyday wear, this design stays classy because it’s mostly negative space and only uses red in a controlled area. The black outline keeps the edges crisp so it looks salon-clean even when you’re working at home.
First, paint two thin coats of glossy black gel or lacquer, then cap the free edge. Next, place 1.5 mm striping tape so it forms an L near the cuticle: one strip angled toward the center and one strip horizontal across the upper third. Fill the taped area with red, remove the tape before it fully sets, and clean the corners with a small brush dipped in acetone. Finally, add a thin top coat over the whole nail, making sure the red corner is sealed at the tip.
Use a small detail brush to sharpen the inner edge of the red after the tape comes off. Seal with top coat twice on the first two days so the corner doesn’t catch on hair or fabric.
Avoid a thick red block — it makes short nails look even wider.
2. Black V French with Micro Red Tip
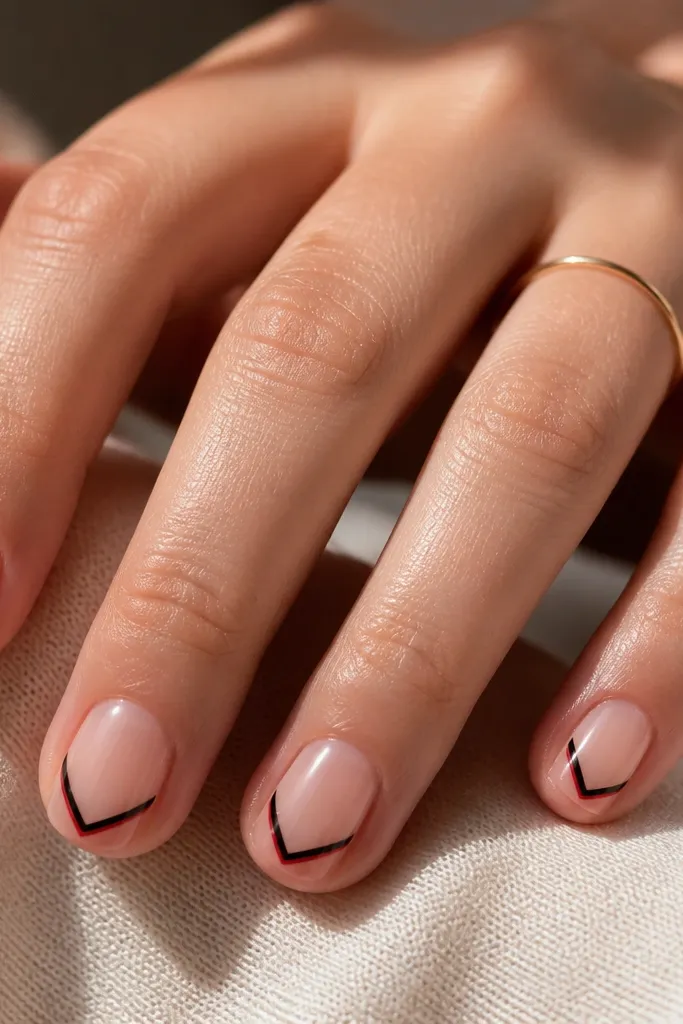
A V French is my go-to when you want length without covering the whole nail. The black V draws the eye toward the center and gives structure, while the micro red tip adds a pop that still stays small-space friendly. The nude base matters: it blends the nail into your hand and makes the black lines look intentional. This looks great on both cool and warm undertones because the nude base softens the contrast. It also holds up well for workdays because most of the design sits away from the cuticle line.
Start with a sheer nude base in two thin coats, then top with a tacky layer if you’re using gel. Use striping tape to form a V: place two strips starting near the upper sides and meeting at the center about halfway down. Paint black inside the tape, remove tape after curing or when the polish is set enough not to smear. Then, with a fine brush, draw a thin red line right at the tip curve, keeping it under 1 mm tall. Finish with a glossy top coat and cap the red at the very edge.
If the V looks too wide, make it narrower than you think — small nails need thin geometry. Keep the red line slightly off-center on one nail for a natural, asymmetrical look.
Avoid covering the whole tip with red — it turns into a blunt stripe on short nails.
3. Half-Moon Red Cuticle with Matte Black
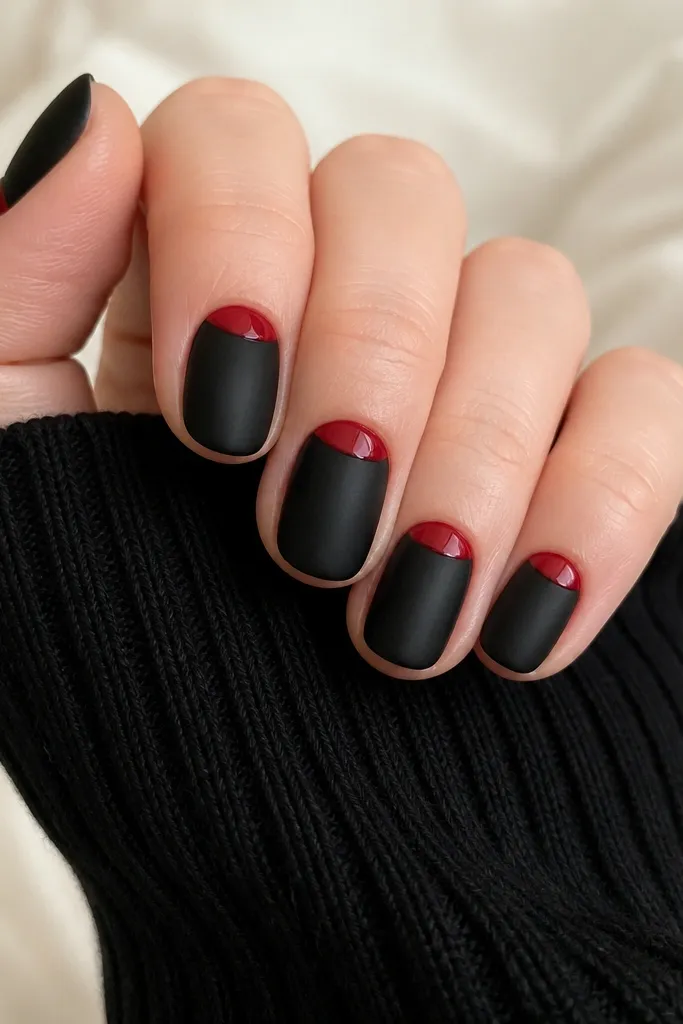
This is the quickest way I know to make small nails feel styled without adding bulk. Matte black hides tiny surface texture, and the red half-moon at the cuticle gives that “lift” effect because it sits at the base where nails look shortest. The red crescent flatters hands because it mimics the natural cuticle shape but adds contrast. I’ve seen it look especially good on medium to deep skin tones since the red reads clean rather than muddy. If you’re wearing rings, the red draws attention to the cuticle area and makes the whole hand look put together.
First, prep the nail surface and apply matte black in two thin coats, then cure fully. Add a small piece of nail vinyl or use a half-moon guide stamp to mask the cuticle area, leaving a crescent opening. Paint red into the crescent and cap it with a thin glossy layer so it contrasts with the matte black. Remove the vinyl carefully while the gel is still slightly movable or right after curing if your vinyl is firm. Finish with a matte top coat everywhere except over the red crescent, where you should keep it glossy.
For a sharper crescent, use a tiny brush to clean the edge after you remove the vinyl. Keep the crescent height under the top third of the nail for small-space balance.
Avoid a red crescent that reaches too far down — it shortens the nail visually.
4. Thin Black Pinstripes Over Red Jelly Base
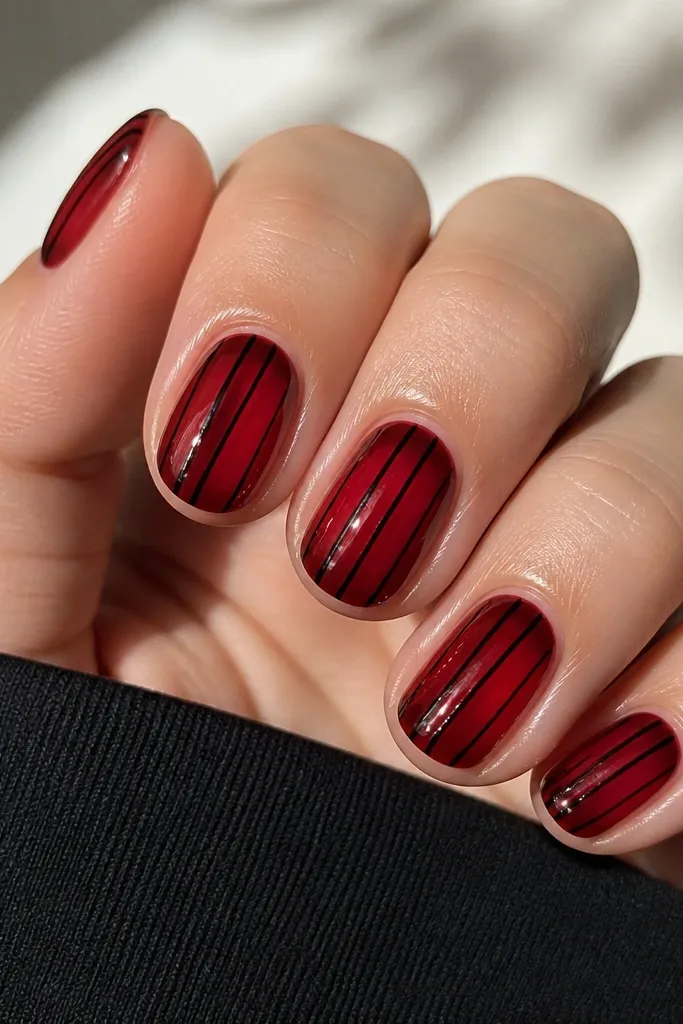
A jelly base is a cheat code for small nails because it lets your nail bed peek through and keeps the design from feeling heavy. I use a red jelly that’s see-through enough that it doesn’t fully cover the nail, then I add thin vertical black stripes to create length. This works on any undertone because the jelly effect softens the red. It also looks good on hands with prominent knuckles since the design is vertical and doesn’t cling to the sides. For a classy edge, keep the stripes thin and evenly spaced, not thick blocks.
Start with a red jelly gel in two very thin coats, curing between coats so it stays translucent. Then apply striping tape or use a nail art guide to mark where the stripes will go: I usually place three stripes on the ring and middle nails and two on the index and pinky. Paint black over the exposed lines with a small liner brush, remove tape after curing if you used tape. If you want a slightly raised stripe, add a second coat only on the black lines. Seal everything with a glossy top coat and cap the tip.
Editor's noteChoose black that’s not gray — deep, inky black makes the jelly red look brighter. Keep your stripes vertical even if your brush hand shakes; tape fixes that fast.
Watch outAvoid thick stripes — they turn a length illusion into a chunky stripe on short nails.
5. Black Brushstroke with Red Negative Space Swirl
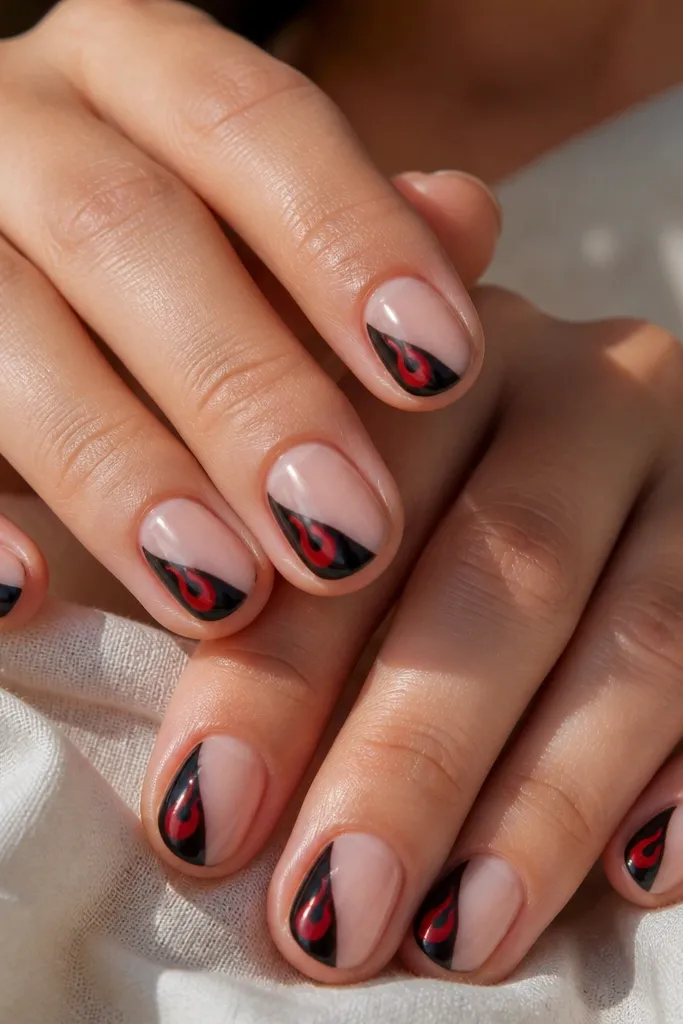
This design looks artsy but still reads clean on small nails because it uses one bold black element and one controlled red accent. The diagonal brushstroke creates movement and makes the nail look longer, while the red swirl cutout adds a “flash” without taking over the whole surface. I like it for people who get bored with standard French tips — it feels custom even when you keep the layout simple. It’s flattering on short oval and squoval shapes because the diagonal line follows the nail’s natural curve. The nude base keeps everything from feeling crowded.
Paint a sheer nude base and let it dry to a smooth, even finish. Use a liner brush to paint one diagonal black brushstroke on each nail, starting near the upper side and ending at the lower tip area, keeping the stroke about 2-3 mm wide. While the black is still workable, use a tiny brush to paint a thin red swirl line within the black area, leaving the rest of the nail nude. If you want sharper edges, outline the red swirl with a tiny dot of black gel instead of widening it. Finish with a glossy top coat and cap the brushstroke ends so it doesn’t lift.
Editor's noteKeep the black stroke thicker at the start and thinner at the end — it makes the diagonal look intentional. Use the same swirl size on each nail so the set looks cohesive.
Watch outAvoid adding extra dots or glitter — one bold stroke is enough.
6. Red and Black Checker Corner on Nude
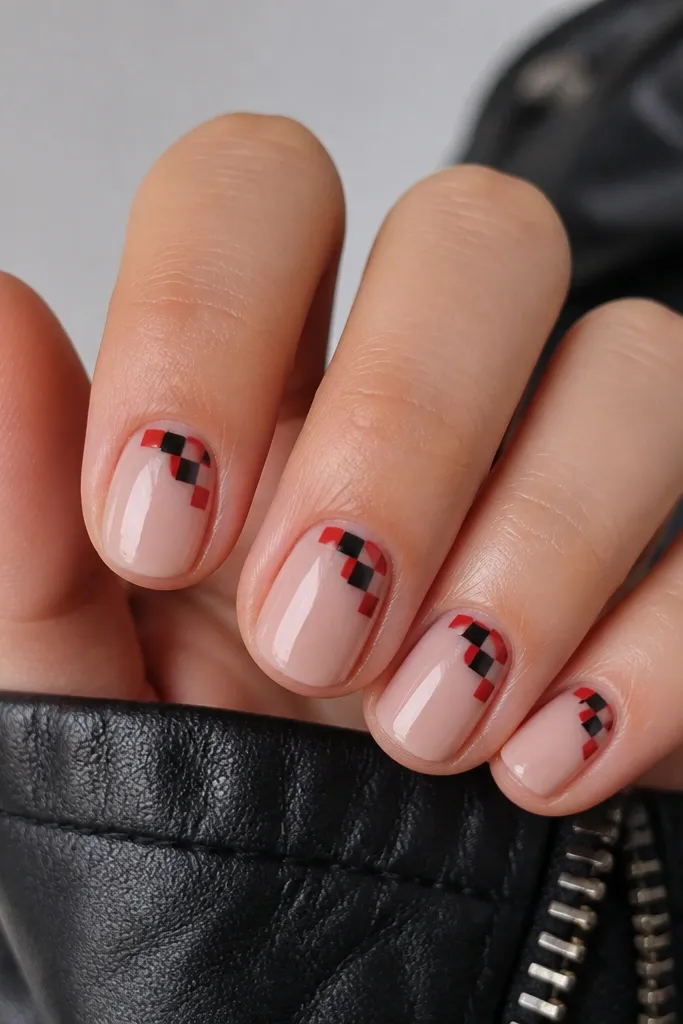
Checker patterns can get busy fast, so for small nails I keep it to one corner. The nude base gives breathing room, and the tiny red-black squares create a geometric edge that looks intentional rather than accidental. This flatters fair to deep skin because the nude neutralizes the contrast and makes the red feel bright. I’ve worn this to events where I wanted something fun but not long-nail flashy. It also looks great on short squoval because the corner placement matches the nail’s rounded shape.
Start with a nude base gel in two thin coats, then cure. Use a nail vinyl or a cut strip of thin tape to mask a small triangle in the upper corner, about 20-25% of the nail width. Paint alternating red and black squares inside the mask, using a dotting tool for consistent sizes. Keep each square around 1 mm so it stays small-space friendly. Remove the mask carefully, then top coat the whole nail and cap the edges.
Editor's noteUse the same dotting tool tip for every square so the pattern looks even. If the corners look uneven, cover the edge with a thin black outline line.
Watch outAvoid full checkerboards — they swallow the nail surface.
7. Black Dotted Outline Around a Red Center
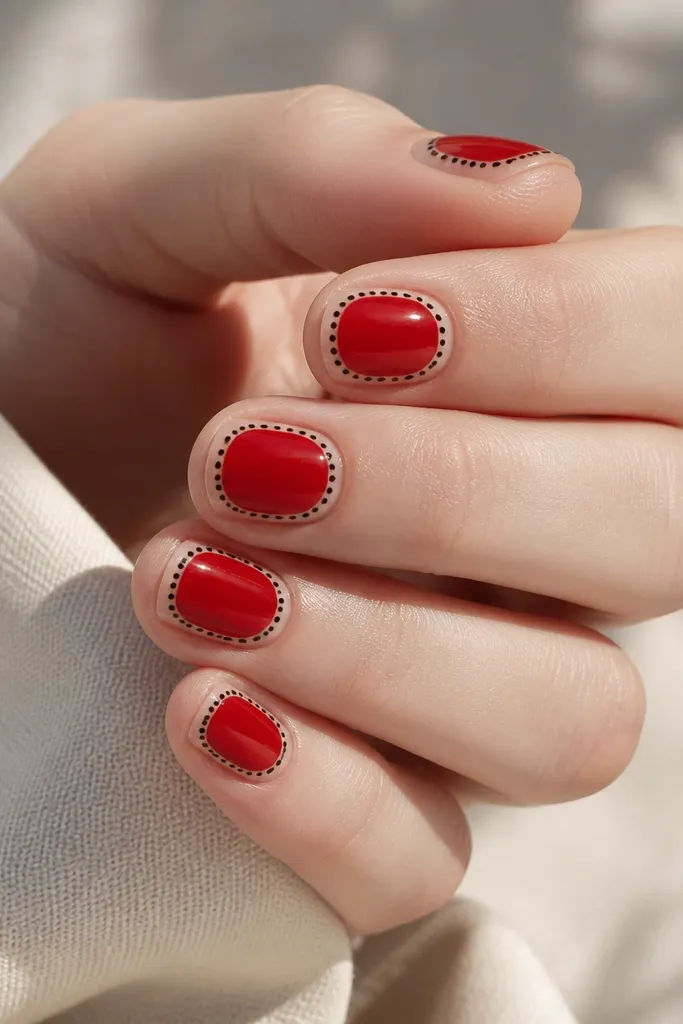
This is a graphic framing trick that makes small nails look designed, not painted randomly. The red center panel gives color impact, but the black dotted outline keeps it structured and airy. I like this on short nails because the dotted border creates a visual boundary, so your eye knows where to focus. Nude outer areas keep the design from feeling heavy. It looks especially good if you wear silver rings because the black dots mimic tiny studs.
Apply a sheer nude base and cure. Paint a red center panel using a striping brush: keep it centered and about 60-70% of the nail width, leaving a thin nude margin on both sides. Let the red level out, then use a dotting tool to place black dots along the edge of the red panel, starting at one side and working around. Keep spacing tight and consistent so it looks like a border, not scattered dots. Finish with a glossy top coat, and make sure the dotted border is sealed so dots don’t snag on fabric.
Editor's noteIf dots look messy, place a thin line of black first, then tap dots along it. Dots look best when they’re all the same size.
Watch outAvoid thick solid borders — dots look cleaner on small nails.
8. Reverse French with Red Base and Black Arc
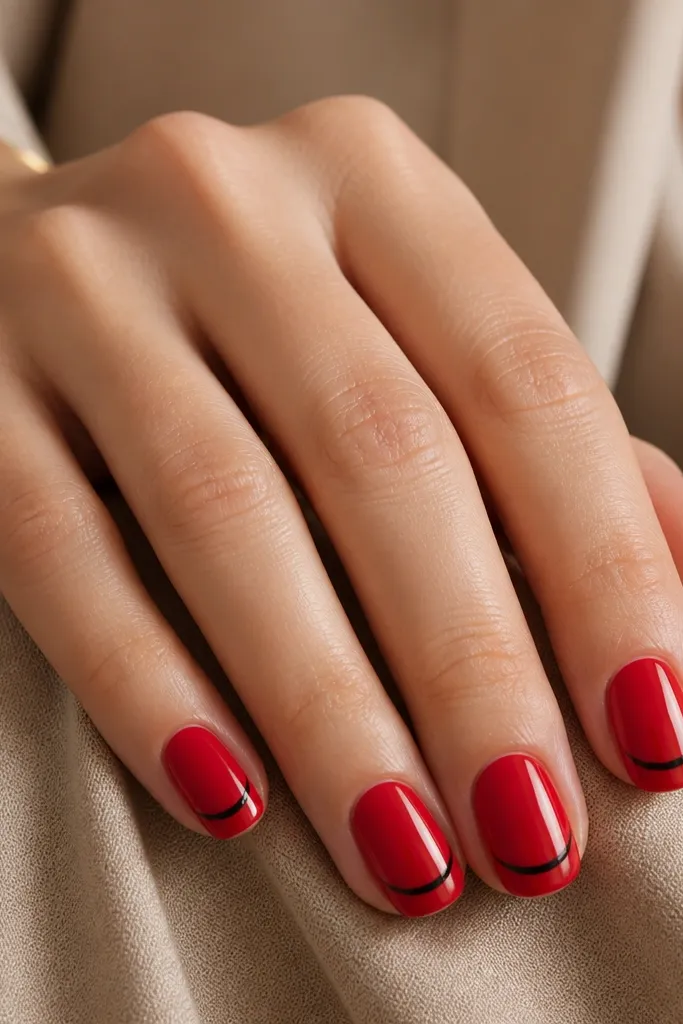
Reverse French puts the darker color at the tip edge, which makes short nails look more elongated because the arc creates a clean boundary. Red as the base keeps the design warm, while the thin black arc adds class without making the nail look shorter. I’ve had this work on both pale and deeper skin tones because black and red contrast clearly, and the red base matches the hand’s warmth. It also looks good on round and almond shapes since the arc follows the nail curve. If you want something bold but still office-friendly, this one nails it.
Start with two glossy coats of red, curing each layer. Use a thin strip of tape or a French guide to mask a curved line about 1.5-2 mm above the tip. Paint black along the arc and remove the mask for a sharp edge. Keep the arc thin so you still see the red underneath. Add a glossy top coat and cap the tip twice, since reverse French is where chips like to start.
Editor's noteUse a gel with good self-leveling for the arc — it gives you a smooth curve without streaks. If your arc is too thick, remove some with a fine file and repaint a thinner line.
Watch outAvoid painting the black arc too close to the tip — it looks like a blunt band.
9. Matte Black Roses with Tiny Red Buds
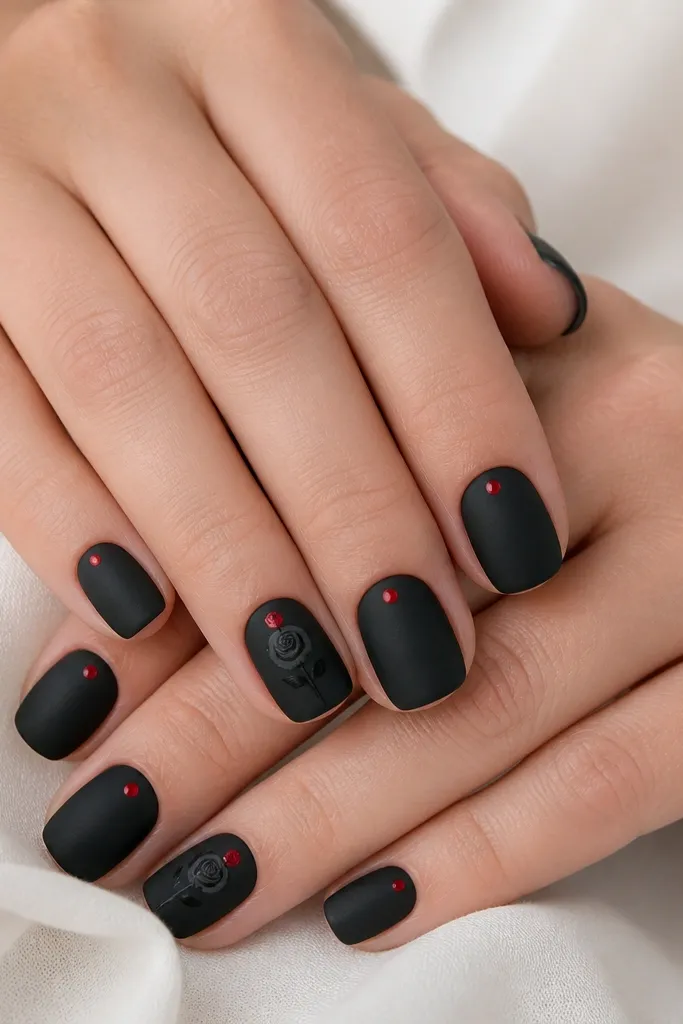
If you want romance without the long-nail requirement, keep the rose small and let matte do the heavy lifting. Matte black makes the art look soft and velvety, and the tiny red buds give you the red pop that still stays in a small space. I’ve done this on short almond nails and it looks chic, not cartoonish, because the rose is minimal and the bud is simple. This flatters hands with stronger nail beds because the design sits in the middle and doesn’t crowd the cuticle. It also works for fall and winter because matte black reads seasonal.
Paint matte black as your base on all nails and cure fully. On accent nails, use a fine liner brush to sketch a small rose spiral in black, keeping it about the width of a dime on your nail. Add a tiny red bud near the top of the rose with one clean dot and a small comma-shaped stroke. For non-accent nails, add one small red dot near the cuticle on the same side of each nail for consistency. Finish with a matte top coat over everything except the red bud, where you can add a thin glossy top coat.
Editor's notePractice the rose spiral on a paper nail tip first — the bud comes out cleaner. Keep the rose size the same on both accent nails so it looks intentional.
Watch outAvoid big roses — they swallow short nails.
10. Red and Black Diagonal Half-Sheets
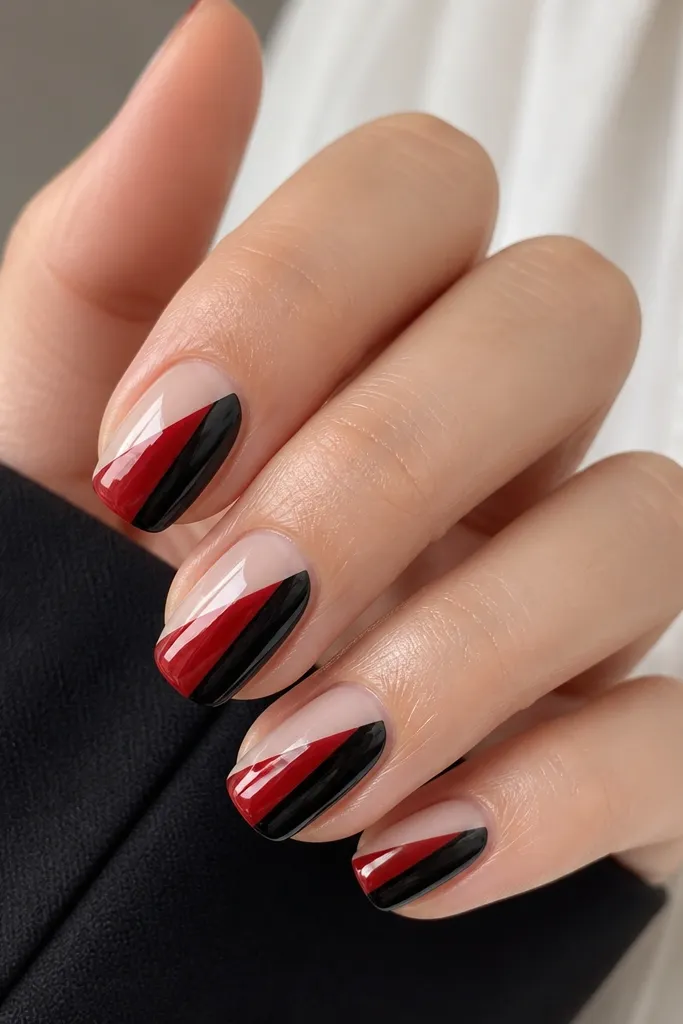
Diagonal splits create instant structure and they make the nail look longer because the eye follows the line across the surface. Using red on one side and black on the other gives you high contrast without needing extra art. The nude base doesn’t have to show much here, but it helps clean up the cuticle edge and makes the colors look crisp. This design looks great on medium and deep skin tones because the colors stay bold and readable in daylight. It also works for short nails because the design fills the space evenly instead of stacking elements.
Apply a sheer nude base and cure. Use striping tape to mask a diagonal line from near the lower side of the nail to the upper opposite side, keeping the line straight. Paint one half glossy red and the other half glossy black in thin coats, curing each. Remove tape carefully and clean any bleed with a flat brush dipped in acetone. Seal with a glossy top coat, and cap the diagonal edges at the tip so the split stays sharp.
Angle the split slightly so it rises toward the cuticle on each nail — it reads like length. If your diagonal wobbles, redo with tape; don’t try to “fix” it freehand.
Avoid uneven split widths — one side shouldn’t look thicker than the other.
11. Black Halo Dots Over Red Jelly French
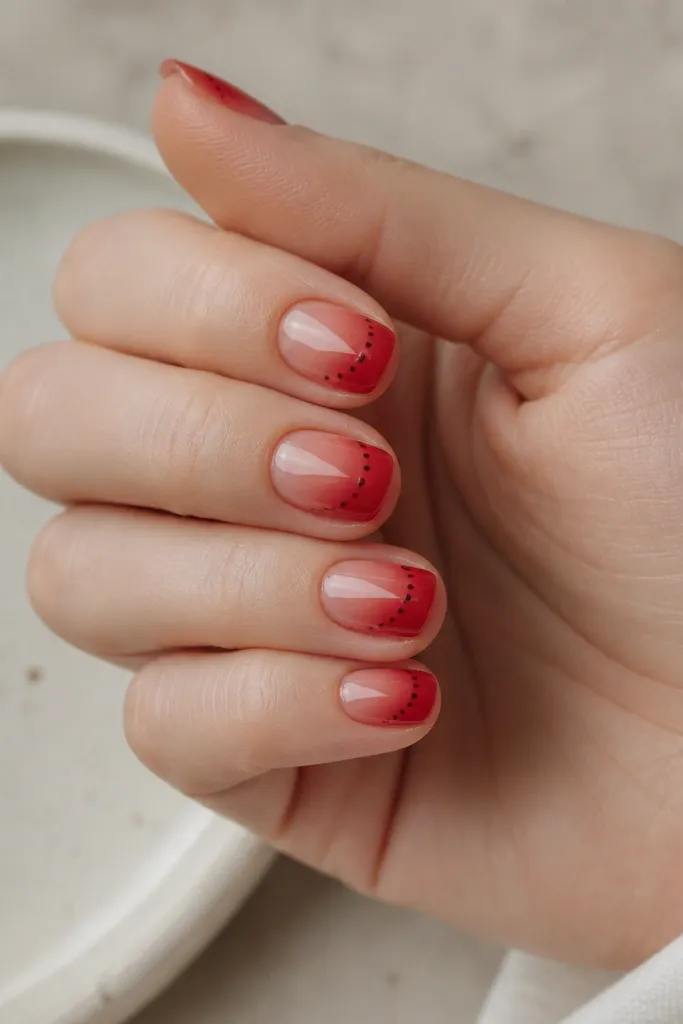
This design uses the tip zone as the focus, but it stays small-space friendly because the red is translucent. The jelly French fades instead of forming a hard block, so your nail looks smoother and longer. The black dot halo adds contrast at the exact place where nails look shortest — the free edge — and it frames that area like jewelry. This looks great for everyday wear because it’s bold enough to notice but clean enough for work. I’ve gotten compliments on this even from people who usually think nail art is “too much.”
Start with a clear or sheer nude base, then apply red jelly to build a soft French at the tip. Use a sponge or a flat brush to keep the fade subtle — aim for a gentle gradient, not a stripe. While the gel is tacky, place black dots around the tip in a ring; use a dotting tool and keep each dot the same size. Let the dots settle, cure, then add a glossy top coat. Cap the tip so the jelly edge doesn’t chip.
Editor's noteIf the fade looks harsh, add one more thin jelly layer and blend at the center. Keep the dot ring slightly separated from the very edge for a cleaner halo.
Watch outAvoid a solid red tip — the jelly fade is what keeps it classy on short nails.
12. Red Micro Hearts on Matte Black Frames
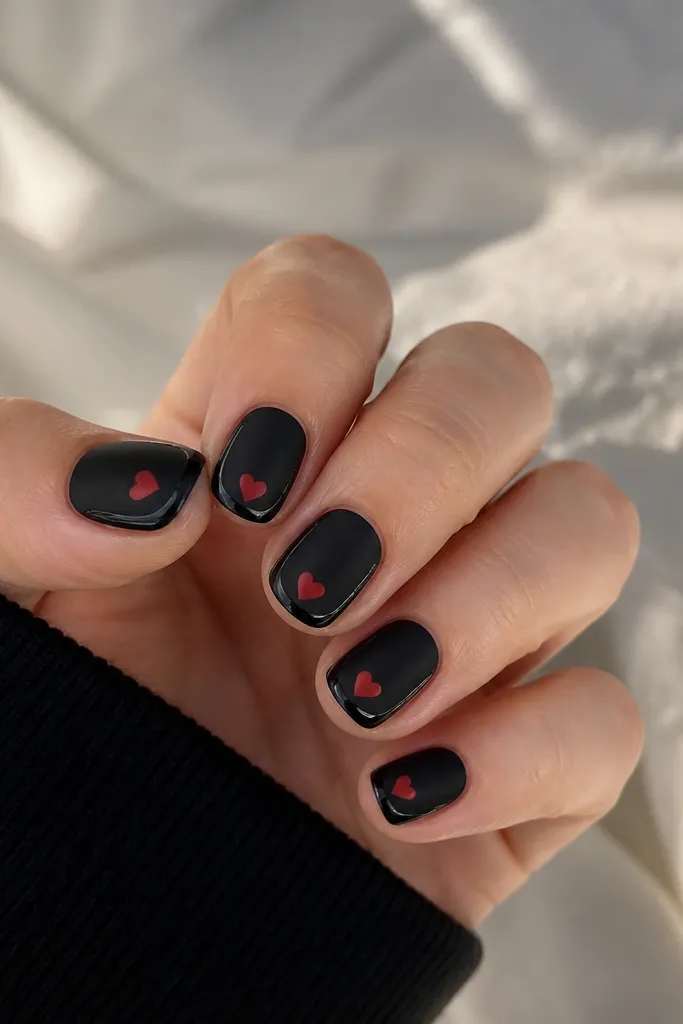
Hearts can look childish if they’re big, so I keep them micro and place them inside a frame. Matte black makes the design feel grown-up, and the glossy frame line gives it a crisp, graphic look. The single tiny red heart adds romance without covering the nail surface. This flatters hands with short nails because the frame holds the eye inside the nail, and the heart sits where it looks cute, not cramped. I’ve worn this with red lipstick and it always looks intentional.
Apply matte black as your base and cure fully. Use striping tape to mask a rounded rectangle frame: keep the frame about 1-2 mm away from the side walls and leave a small gap near the cuticle. Paint a glossy black line inside the mask and cure, then remove tape. With a dotting tool, place two small red dots for the heart points and connect them with a tiny brush stroke. Finish with a glossy top coat over the frame and heart, but keep the rest matte.
Editor's noteUse a toothpick for the heart center line — it gives you a sharper point than a brush. Make the heart about the width of your dotting tool tip.
Watch outAvoid multiple hearts on one nail — it crowds the small space.
13. Black Glossy Chevron Over Red Base
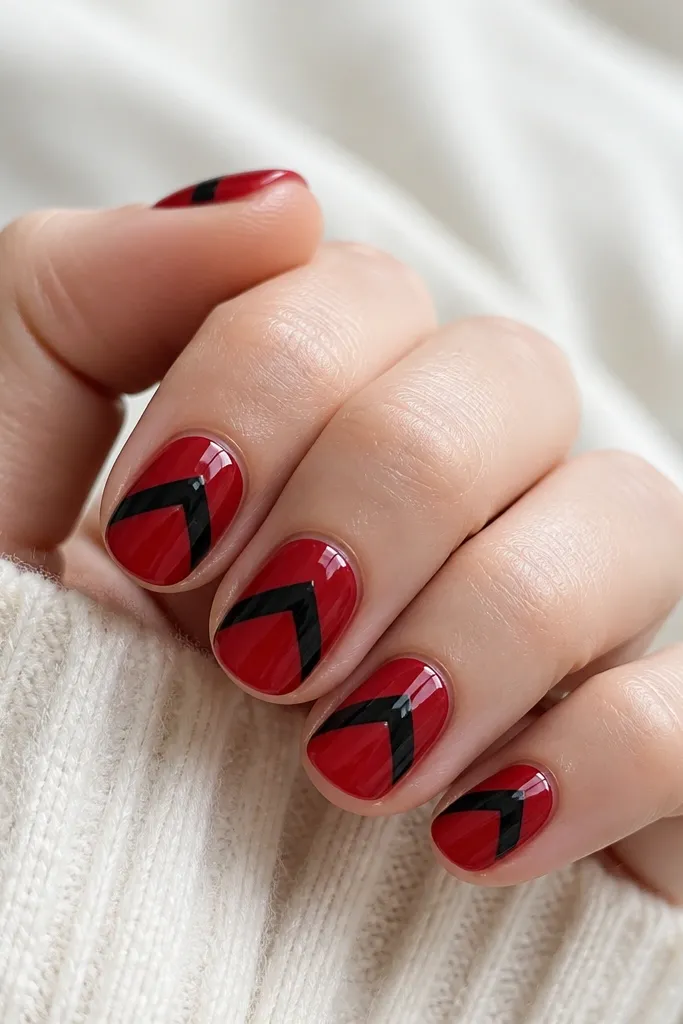
Chevron is one of the few patterns that still looks sharp on short nails because the V shape pulls your eye upward. A glossy black chevron over a glossy red base looks bold but still classy when the lines are crisp. I like this on nails that are slightly wider at the tip, because the chevron narrows the visual width. It also looks good on people who want “statement nails” without tiny details that take forever. The clean geometry is what keeps it from looking messy on small nail beds.
Start with two glossy coats of red, curing each coat. Use striping tape to create a chevron: place tape lines so they form a V pointing toward the center of the nail, with the open end near the cuticle. Paint over the exposed area with black gel, then remove tape while it’s still tacky enough to keep edges clean. Fill any thin gaps with a liner brush. Seal with a glossy top coat and cap the chevron tips so they don’t snag.
Keep the chevron centered and let it end 1-2 mm above the free edge. If your lines are thick, file lightly and recoat just the black.
Avoid a chevron that reaches the cuticle — it can look crowded and heavy.
14. Black Bow Tie Linework with Red Center
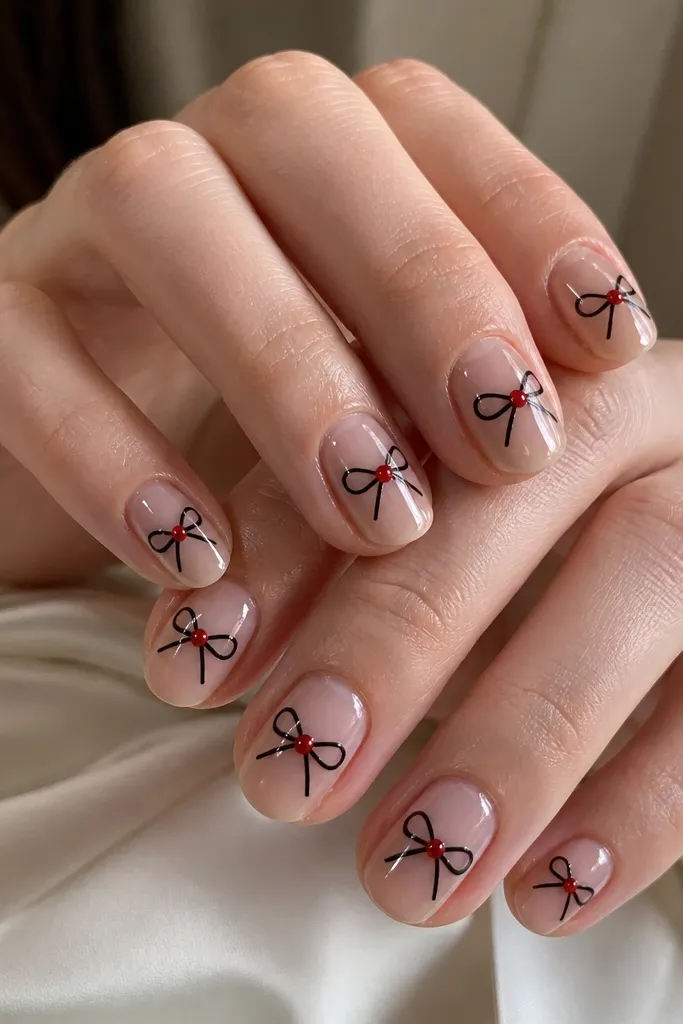
A bow tie outline is a classy way to add a “special occasion” look on short nails. The linework stays thin, so it doesn’t overwhelm the nail, and the red center gives you that signature black-and-red punch. I like this for formal events because it reads like fashion details rather than random nail art. It’s flattering on short round nails because the bow tie sits centered and doesn’t require long length. The nude base keeps the design airy, which matters when your nail surface is small.
Apply a sheer nude base and cure, then add a glossy top coat layer if your gel needs leveling. Use a fine liner brush to draw two symmetrical loops in black, forming a bow tie across the center of the nail. Add the knot in the middle with a small red dot, then cap it with a tiny layer of glossy top coat or gel so it looks rounded. Clean the edges with a small flat brush dipped in acetone. Finish with one full top coat over the nail and cap the tip.
Editor's noteMake the bow tie slightly wider than it is tall — it keeps the proportions flattering on short nails. If symmetry is hard, draw one side first, then mirror it with your brush tip as a guide.
Watch outAvoid thick black outlines — they make the bow tie look heavy on short nails.
15. Smoked Red Marble With Black Vein Lines
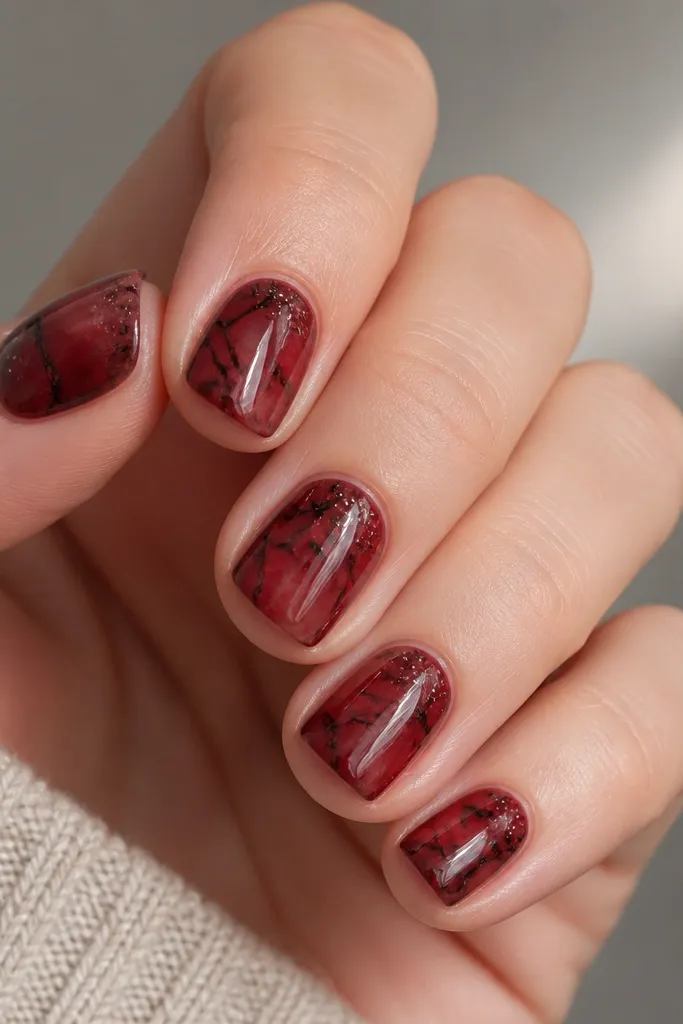
This design looks classy because the red reads soft and dimensional, not loud. The black vein lines give it structure so it still feels graphic, even with the marble pattern. I’ve worn this to work and gotten compliments because it looks custom, not like a random sticker. It also works great for small spaces like short nails since the pattern is concentrated in the center and doesn’t need long length to look intentional. The smoked effect hides tiny imperfections, so your lines don’t have to be perfect on day one.
1) Start with 2 thin coats of a smoked red polish or gel so it looks slightly translucent, especially near the cuticle. While the base is tacky (or right after curing the first coat if you’re using gel), drag a dark red or burgundy polish in loose swirls using a thin nail art brush — don’t fully fill the nail, leave some red haze. 2) Add black vein lines with a detail brush by pulling thin strokes from one side toward the center, then branching once or twice. Use less pressure as you reach the tip so the lines taper instead of staying thick. 3) Add 2-3 tiny white specks near the cuticle using the tip of a toothpick (or a dotting tool), then do a final glossy top coat in two thin layers for smooth glass shine. Cure each layer fully if you’re using gel so the marble doesn’t smear.
Editor's noteIf your black veins look too harsh, soften one edge by lightly dragging a clean brush through the line right after you place it. Keep the marble swirls wider in the middle and narrower near the cuticle so the nail still looks balanced on short length.
Watch outDon’t flood the nail with opaque red — thick red layers make the marble look like a sticker instead of stone.