
1. Matte Black Half-Moons With Glossy Red Under-Cuticle
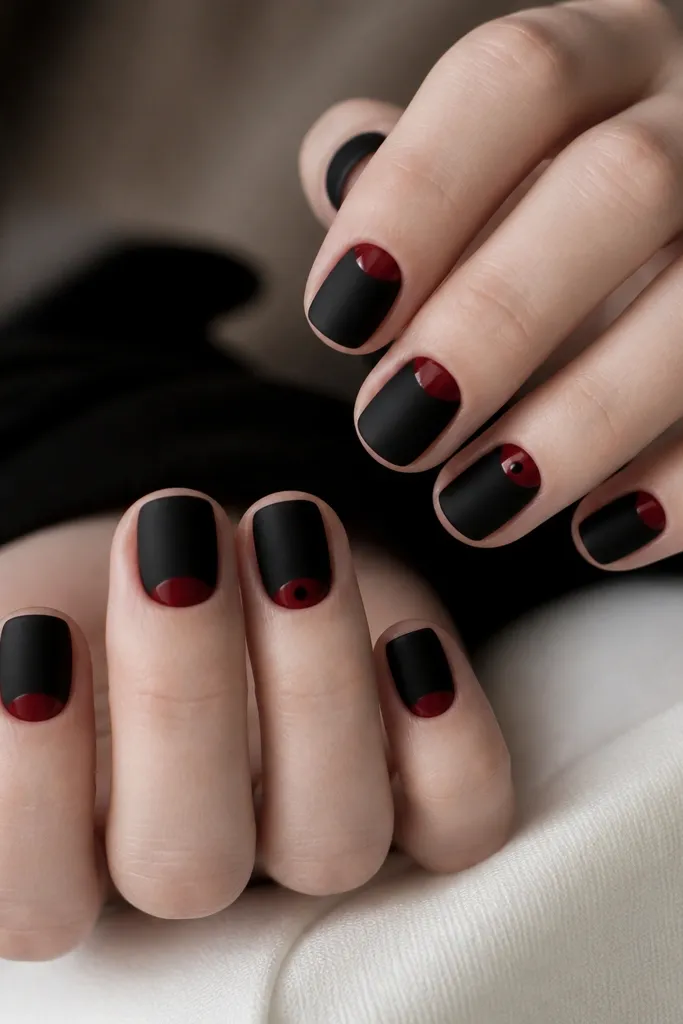
This set looks chic because it uses the cuticle as the “window” for red. Matte black hides small texture and makes the glossy red crescent pop under indoor light. I like it on medium tan to fair skin because the red reads warm and the black frames the shape. It’s also flattering on short nails since the half-moon creates a visual lift at the base without shrinking the nail tip. Wear it for Halloween dinner, then keep it for fall because it doesn’t scream costume.
Start by painting the whole nail matte black and let it cure fully. Next, use a small liner brush to paint a glossy red crescent under the cuticle — leave a thin matte black line between the red and the cuticle edge so it looks crisp. Seal with a glossy topcoat only over the red crescent and finish with matte topcoat over the rest. For ring fingers, add one tiny black dot in the center of the red using the tip of a dotting tool. Finally, cap the free edge with topcoat so the crescent stays smooth as your nails grow.
Use a peel-off cuticle barrier (or careful tape) for the clean crescent edge, especially if your cuticles are close to the nail plate.
Don’t let the red bleed into the black — fuzzy crescents look messy fast.
2. Classic Red Tips With Black Spider Web Lines
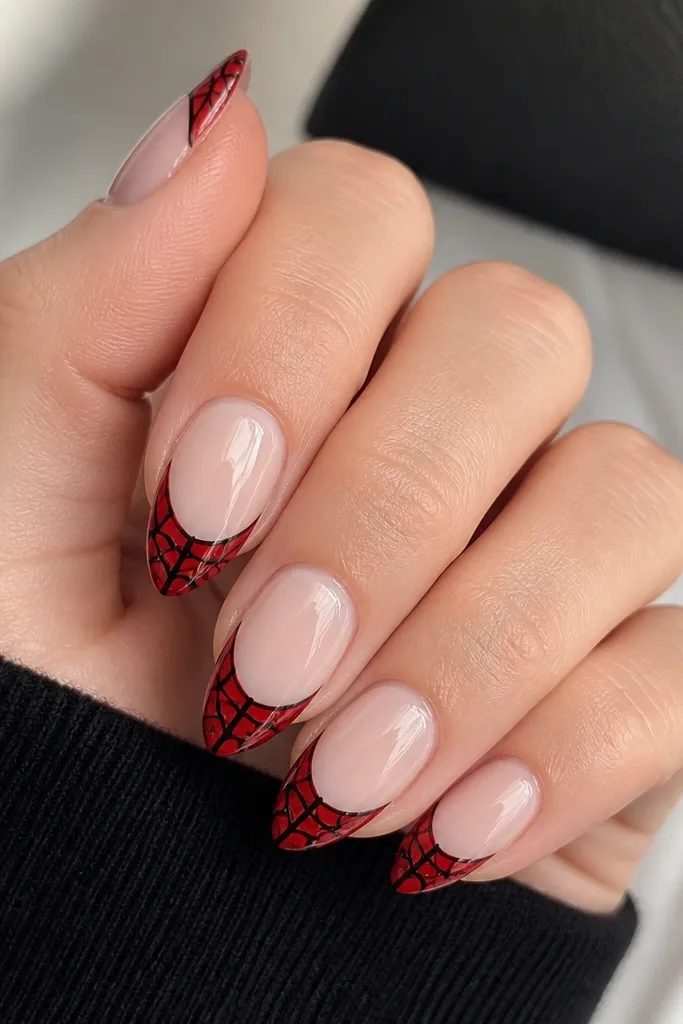
This is the Halloween look that still looks wearable because the base is nude and the web sits only on the tips. The glossy red tips catch light, and the thin black web lines read delicate instead of chunky. I’ve worn this on my hands with lighter skin tones and it still looks bold — the nude base keeps it from overwhelming your fingers. It flatters almond shapes because the web lines follow the curve and make the nail look longer. It also works for people who hate full black nails.
Begin by applying a sheer nude base (pink or nude-rose) and cure it. Then paint a glossy red French tip with a slightly rounded edge so it doesn’t look like a thick block. For the web, take a striping brush and draw one vertical line down the tip, then add diagonal lines from that center outward. Add smaller curved arcs between lines, like a web, and let the black sit cleanly on the red. Finish with a high-gloss topcoat and cap the tip edge.
If your web lines get shaky, practice on a scrap nail or on paper first and keep your brush loaded lightly.
Don’t paint the web too thick — chunky lines make it look like marker, not nail art.
3. Black Crackle Over Red Crepe Gel
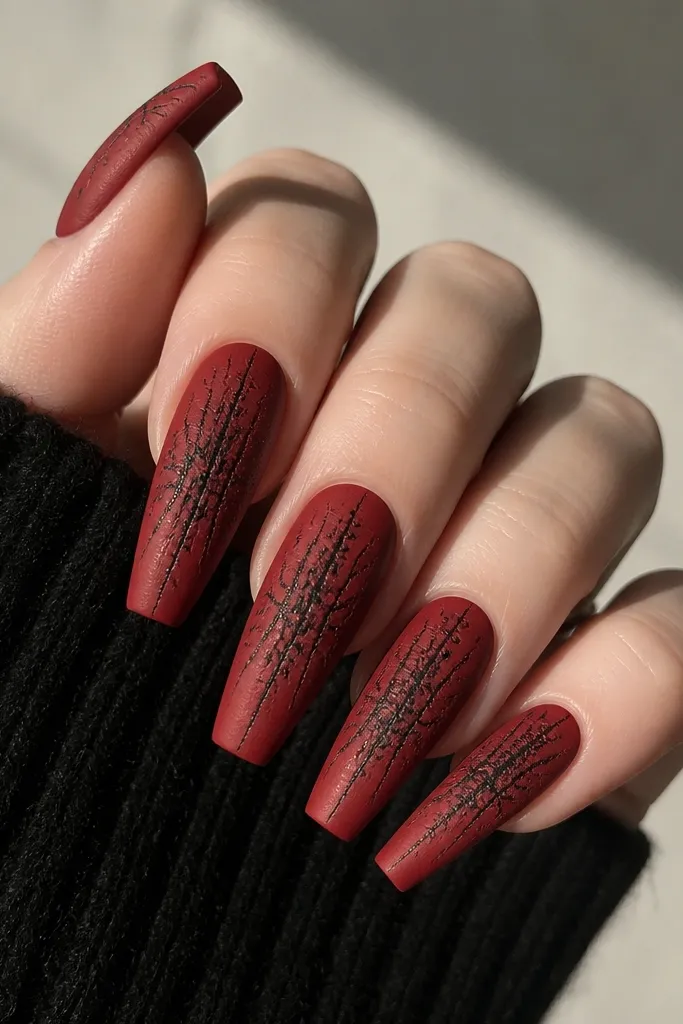
Crackle gel over a red base looks spooky without using characters or big shapes. The crack lines create movement — like something breaking through — and black against red reads very Halloween in photos. This one flatters longer nail shapes because the crack pattern has room to spread naturally. I like it on red-toned skin because the base looks richer, but it also works on cooler undertones since the black lines keep the palette grounded. It’s a great choice if you want “spooky chic” instead of “cute Halloween.”
Start with a red crepe gel or red matte gel base — two thin coats so it doesn’t get lumpy. Cure, then apply black crackle gel over the center first and spread outward without fully covering every crack area. Watch the gel — it should start cracking as it cures; don’t rush between coats or you’ll get uneven texture. Add a second pass only if you want more branching, then cure again. Finish with a topcoat that smooths the surface, then lightly buff just the top if it feels too raised.
Use thinner coats than you think. Thick crackle gel stops cracking and turns into a flat black layer.
Avoid thick topcoats that drown the texture — the cracks should still look like lines, not a glossy blob.
4. Red And Black Diagonal Stripe With Micro-Glitter Edge
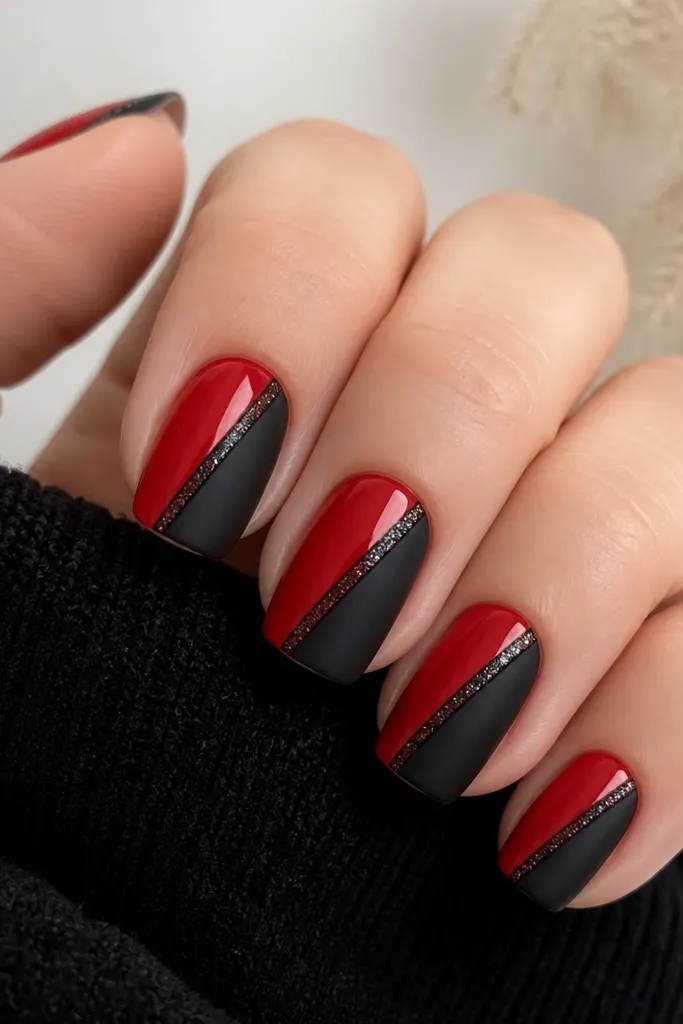
Paint the full nail glossy red first and cure. Then apply matte black on the other diagonal side using striping tape to get a straight edge — press the tape down firmly at the corners. Remove the tape while the polish is still slightly tacky for the cleanest line, then cure. Add a micro-glitter gel or loose glitter line right on the diagonal seam — keep it narrow, about 0.5 mm wide. Seal everything with a glossy topcoat and cap the free edge.
Diagonal stripes feel modern and Halloween without looking childish. The red and black split gives you bold contrast, and the micro-glitter line makes it look like you planned the design instead of freehanding it. This set looks great on hands with shorter fingers because the diagonal angle elongates the nail bed visually. I’ve done it on fair skin and medium skin and it reads clean — the glitter line helps separate the two colors so they don’t merge. Wear it with a black blazer or a red sweater for instant “done” nails.
Watch outDon’t use chunky glitter — it turns the diagonal seam into a ridge.
Editor's noteFor tape lines, wipe your tape with a dry paper towel first — dust makes edges lift and smear.
5. Black Cat Eye Liner Over Red Base
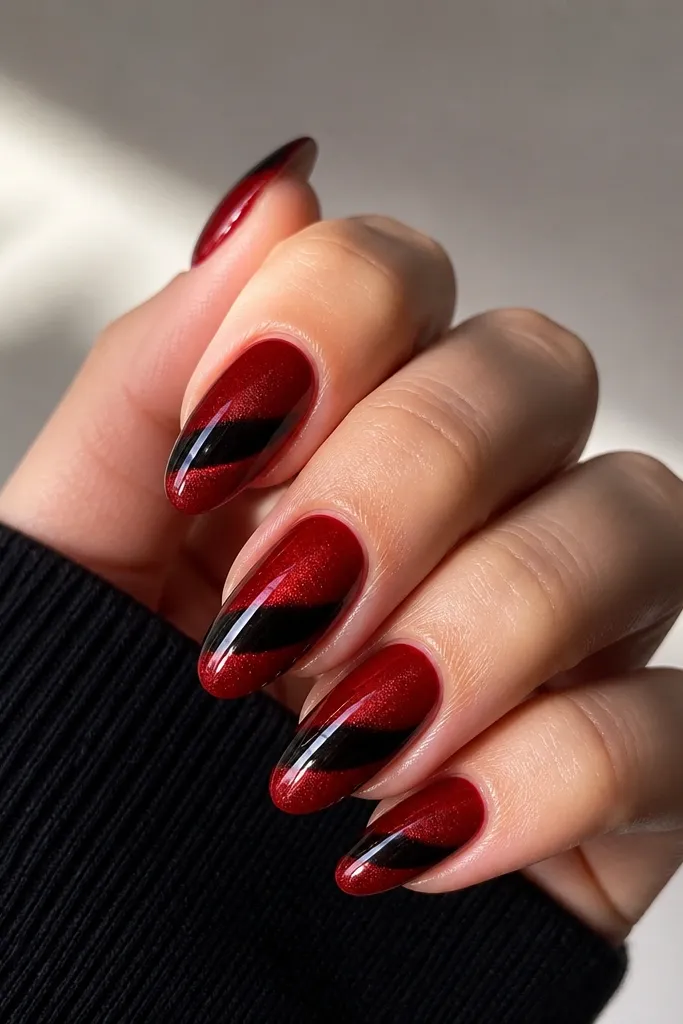
Start with two coats of glossy deep red, then cure fully. Apply black cat-eye gel in a horizontal stripe across the middle — not the whole nail, just a band about one-third of the nail width. Hold the magnet close to the nail for 5-10 seconds to pull the shimmer into a sharp line; move carefully so it stays centered. Cure, then add a thin black gel topcoat only over the band if you want it darker. Finish with a full glossy topcoat over the entire nail and cap the edges.
Cat-eye gel gives you that haunted, glowing effect without adding characters. The black band over red looks like a shadow moving across the nail, and it photographs insanely well under phone flash. I like this on medium to deep skin tones because the red looks saturated and the cat-eye line stays crisp. It’s also flattering on almond and oval shapes since the band can be placed to follow your nail’s curve. If you want Halloween nails that look like jewelry, this is the one.
Watch outDon’t pull the magnet too long. Over-magnetizing can blur the line.
Editor's noteAngle the magnet so the shimmer line lands where you want it — I aim slightly above center for a more lifted look.
6. Red Velvet Matte Nails With Black Studded Tips
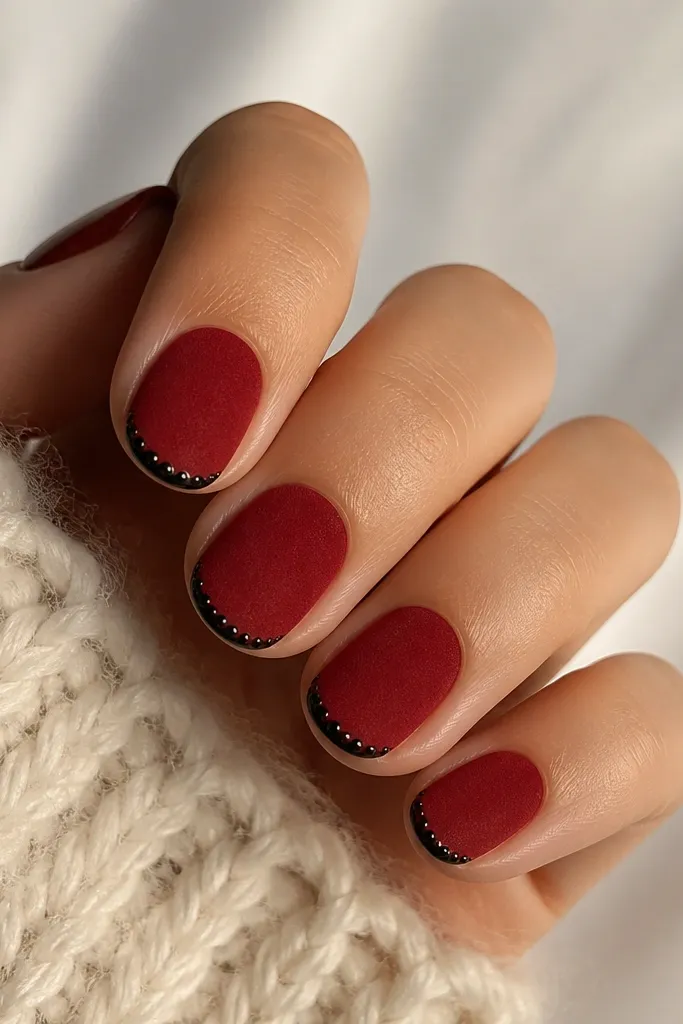
Velvet matte red looks expensive and reads autumn even when it’s Halloween. The black studded tip is small but loud — it gives you that “spooky chic” edge without covering the whole nail. This works on short nails because the studs sit at the tip line and visually extend the nail bed. I’ve worn it to parties where you’re moving a lot, and the matte finish hides minor surface dents better than glossy. If you like clean, graphic nail art, this one lands perfectly.
Prep the nail, then apply a velvet matte red polish or gel — two thin coats so it stays soft, not gritty. Cure according to the brand instructions. Paint a thin black border across the tip using a striping brush, leaving about 1 mm of red visible above the border. Place tiny black studs along the border — use tweezers and press each stud into tacky gel. Cure again, then seal with a matte topcoat over the red and a thin glossy topcoat only over the studs so they stay shiny.
Use a dotting tool to place studs — it prevents you from smearing the black border.
Don’t put studs too close to the center. They look heavy and cheap on wide nails.
7. Black Base With Red Reverse French And Tiny Web Accent
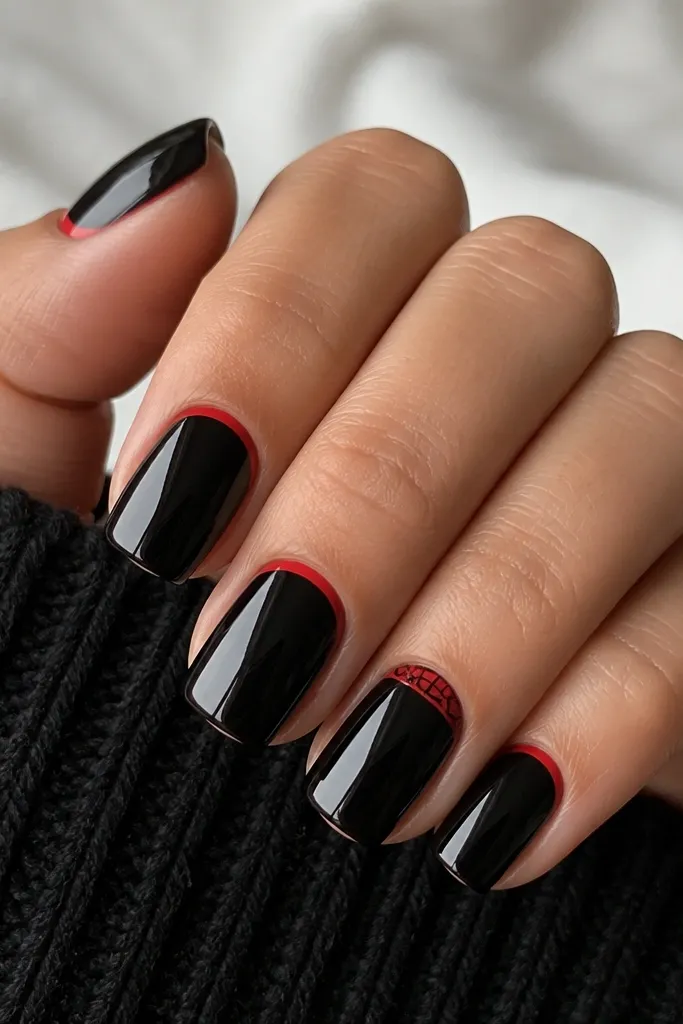
Paint your full nails glossy black and cure. Then use striping tape to mask a thin area at the cuticle and paint that crescent with glossy red gel or polish. Remove tape carefully to keep a sharp edge. For the ring finger, draw a small web pattern within the red crescent using a fine liner brush — two curved arcs and a few radiating lines are enough. Finish with a glossy topcoat, and cap the free edge so the reverse French line doesn’t lift.
Reverse French is the fastest way to make black nails look intentional instead of flat. The red line at the cuticle gives you a clean focal point and makes fingers look more “finished.” It flatters most nail lengths because the design stays near the base, where your nails already have structure. I like it for people who want black but still want Halloween red. The tiny web accent on one nail keeps it from becoming repetitive.
Watch outDon’t make the red crescent too thick. Thick reverse French can look like a bandage.
Editor's noteIf your cuticle line is uneven, widen the red crescent slightly so it hides minor shape differences.
8. Red Skulls On Black Negative Space
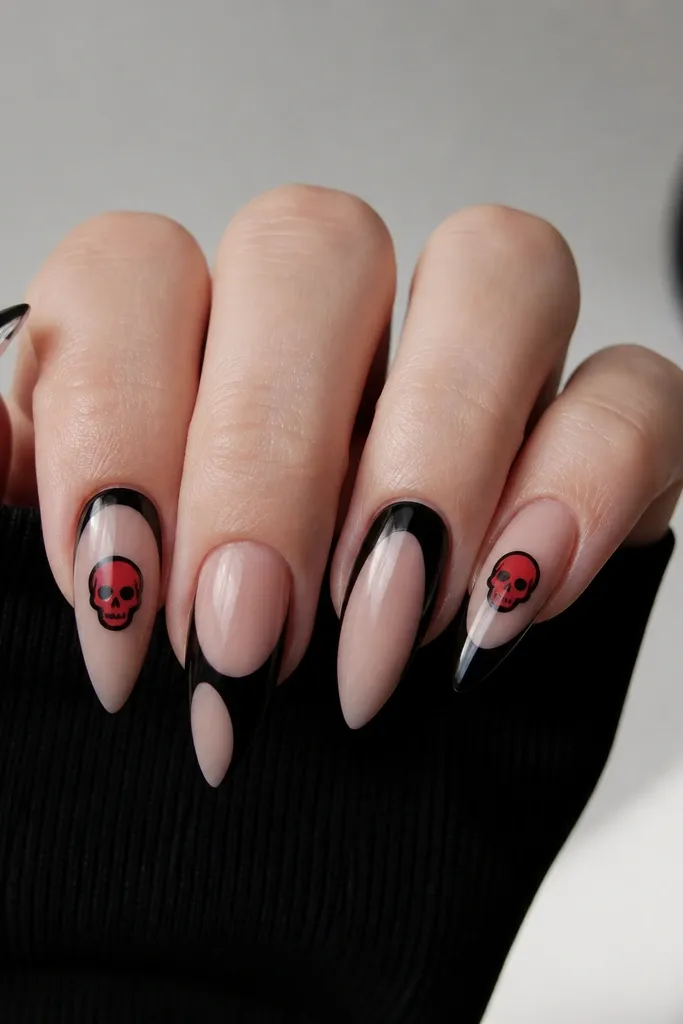
Apply a sheer nude base and cure. Paint black geometric negative-space blocks using tape or a stencil so each nail has one or two clean black shapes, not messy blobs. On your accent nails, add red skull decals or hand-paint small skulls — keep them about the size of a pea, centered. Outline the skull with a thin black liner if your decal doesn’t already have it. Seal with a glossy topcoat, pressing down around the edges so decals don’t lift.
Skulls can look cartoonish fast, so the trick is using negative space and keeping the skull size small. Here, the red skulls stay crisp against nude and black, and the black blocks give the set structure. I like this on medium and long almond nails because the skull placement follows the nail’s center line. It’s also a good choice if you want Halloween without going full glitter or full black. This one looks sharp on cooler undertones because the red skulls act like a warm accent.
Watch outDon’t put skull art on every nail. Two accent nails look intentional; five looks busy.
Editor's noteIf you hand-paint skulls, use a dotting tool for the eye sockets first, then connect with a tiny liner brush.
9. Black Plaid Over Red Base With Micro-Topcoat Gloss
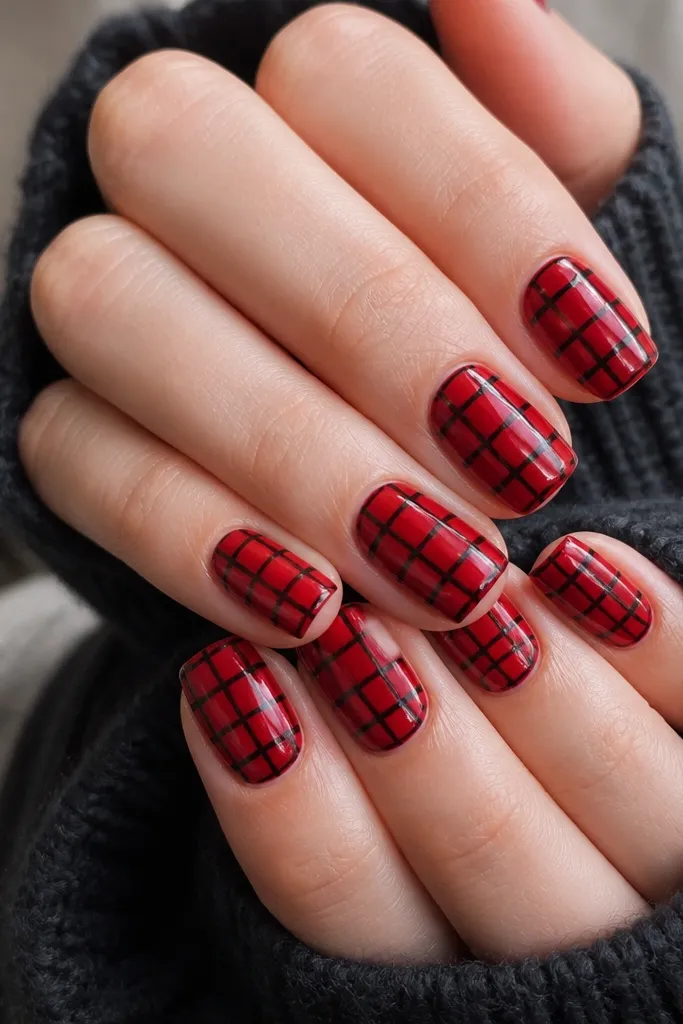
Plaid reads cozy fall, then the red makes it Halloween. The key is crisp linework — when the grid is sharp, the whole set looks like nail art from a salon. I’ve worn this on hands with shorter nail beds and it still looks balanced because the plaid squares stay consistent in size across each nail. It also works well with matte or glossy topcoat; I prefer glossy so the lines look clean and not chalky. If you like patterns more than characters, this is your move.
Paint the nails glossy red and cure. Use striping tape to create vertical black stripes first, then remove tape and paint the lines with black gel. Next, tape horizontal lines across at equal spacing to form a grid; press down firmly at the corners so the lines don’t bleed. Fill any gaps with a thin striping brush so the plaid looks continuous. Cure and apply a glossy topcoat, then cap each edge with one extra thin layer.
Measure spacing by eye using your nail width — keep the plaid squares roughly the same size on each finger.
Avoid thick black lines. Plaid should look like a grid, not chunky blocks.
10. Red Gloss With Black French Sidewalls And Spooky Dots
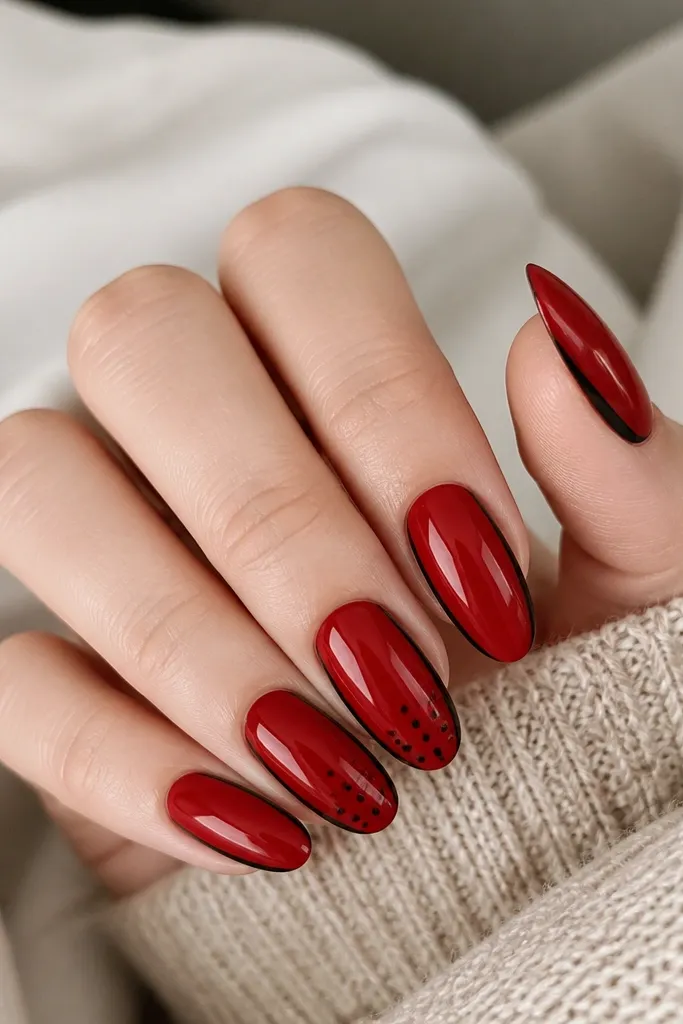
Start with two coats of glossy red and cure. Take a thin striping brush and paint a black line along the left sidewall, leaving a small gap between the line and the side edge of your nail. Repeat on the right sidewall so both lines mirror each other. For the dot nails, add 4-6 tiny black dots with a dotting tool clustered near the lower third — not near the tip. Seal with glossy topcoat and cap the side edges by brushing topcoat slightly down into the seam.
This is one of my favorite “grown-up Halloween” designs because it uses the sidewalls, not the tip, for the black. The thin black lines make your nails look slimmer and longer, especially on wider nail beds. The glossy red keeps it festive, and the dot clusters add a spooky detail without turning into a full theme. I like it on oval and almond shapes because the side lines follow the curve cleanly. If you want Halloween nails that still look office-safe, this hits the mark.
Watch outDon’t over-thicken the side lines. Thick sidewalls make nails look short.
Editor's noteIf your lines wobble, use a small piece of tape to protect the center — remove before curing.
11. Black Roses On Red Matte Background
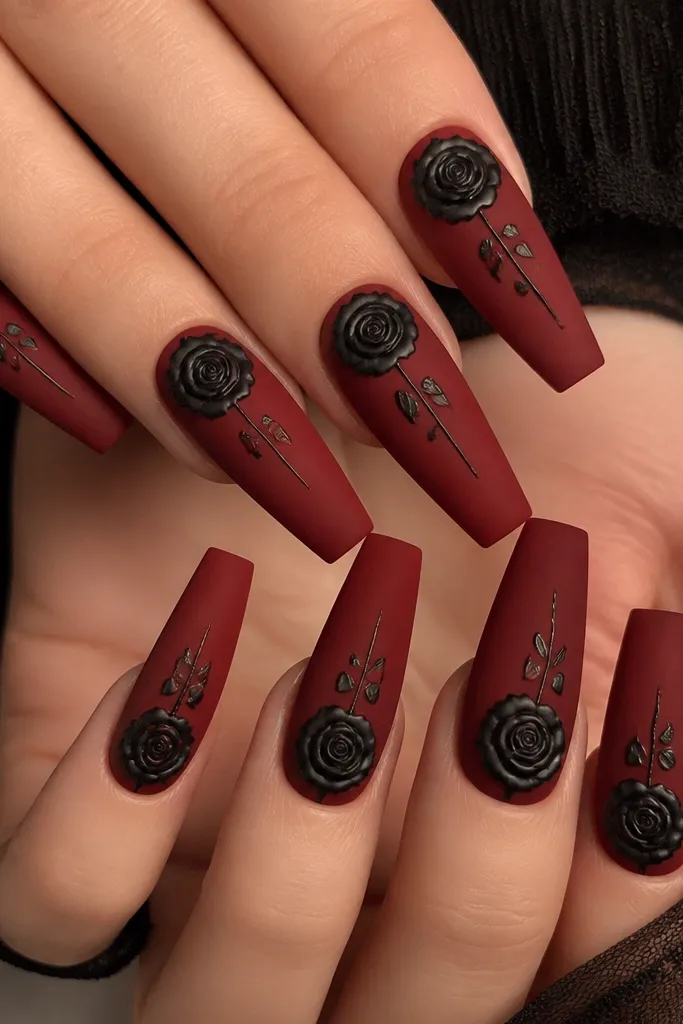
Black roses give “dark romance” Halloween energy. Matte deep red makes the black line art stand out, and the rose placement near the cuticle makes your nails look delicate instead of heavy. I’ve worn this with dark green and black outfits, and it always gets compliments because it looks like actual art, not just decals. This set flatters long coffin or almond nails because the rose has space to curve. If you like spooky but classy, this one is my go-to.
Paint the nails with matte deep red gel or polish and cure. Use a fine liner brush or rose stamping plate to place the black rose near the cuticle — aim for the top of the rose to start 1-2 mm below the cuticle line. Add thin stem lines that fade toward the center, keeping the lines delicate. Let it dry or cure, then apply a satin-smooth topcoat over the rose area only if you want the art to look slightly raised. Finish with a matte topcoat over the rest so the background stays velvety.
If freehanding, draw the outer petals first, then add the inner curl lines last — it keeps the rose from looking like a blob.
Don’t place the rose too low. Low roses crowd the nail tip and shrink the look.
12. Red And Black Candy Corn Accent Nails
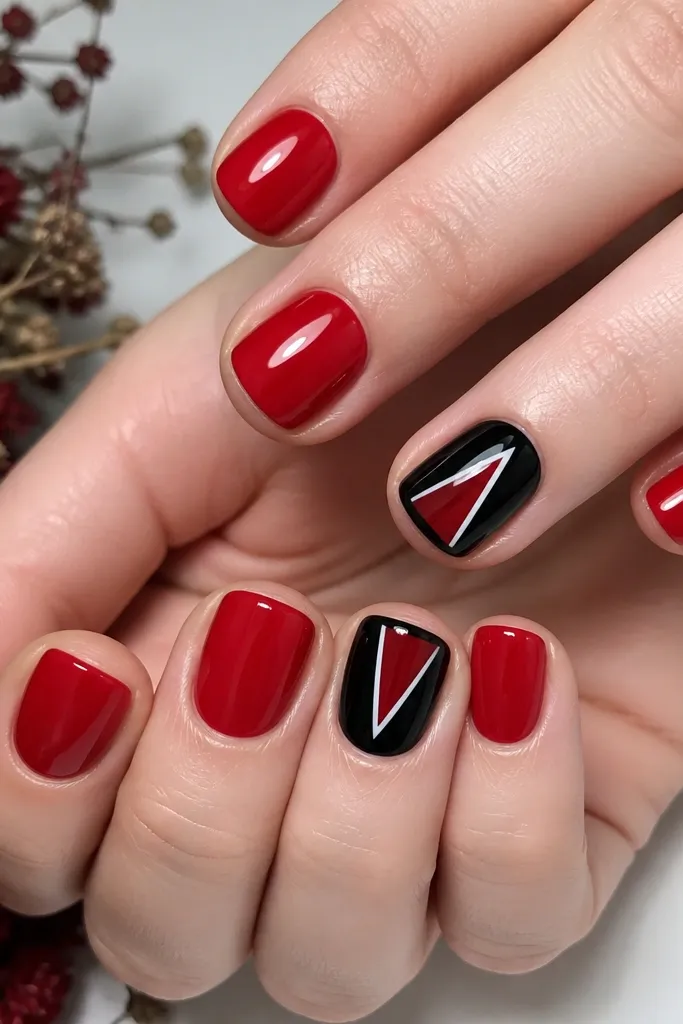
Paint most nails glossy red and cure. For the two accent nails, paint the base glossy black and cure. Add a centered triangle shape using striping tape: first paint the top triangle area red, then remove tape and paint the bottom triangle area red or leave it black depending on your triangle layout. Add a thin white line between colors for separation, then remove tape carefully. Seal with glossy topcoat and cap the triangle edges so they don’t catch on fabric.
Candy corn is iconic, but doing it with red and black makes it feel more modern than yellow/orange. Keeping most nails solid red keeps the look clean, and the two accent nails handle the Halloween theme. The small white gap (even if it’s just a thin line) helps the triangles look crisp and not muddy. This design flatters short nails because the triangles stay centered and don’t require long tip space. It’s also a fun choice if you want a theme but don’t want full cartoon nail art on every finger.
Watch outDon’t skip the separation line. Without it, red and black blend into a single dark blob.
Editor's noteUse tape for the triangle edges. Freehand candy corn triangles always go wobbly on me.
13. Black Matte Lightning Over Glossy Red Storm
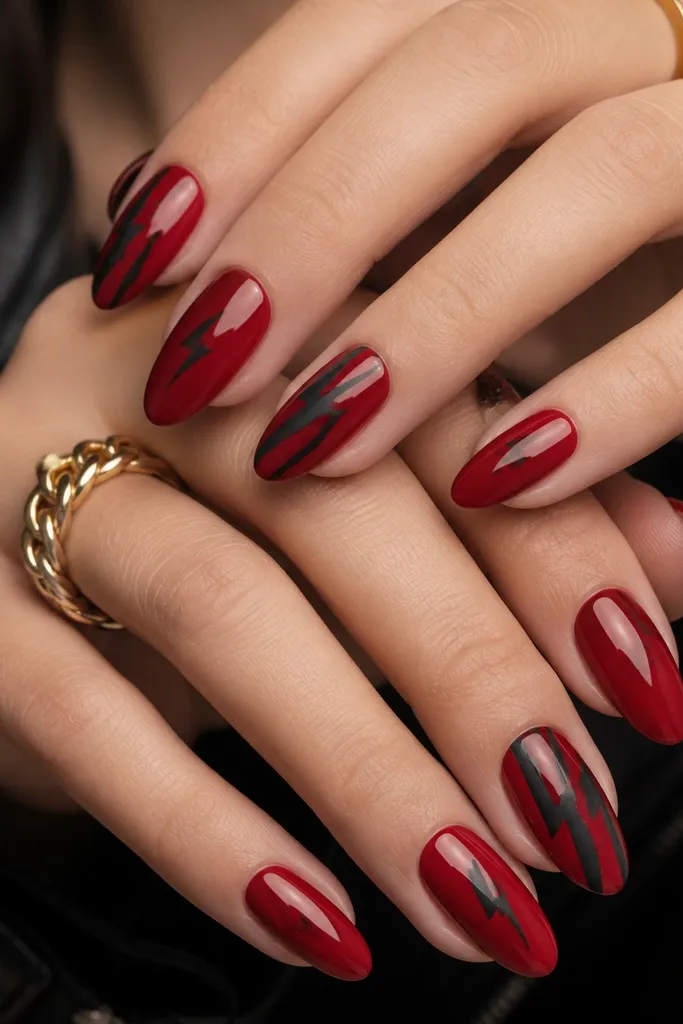
Paint all nails glossy deep red and cure. Use a thin brush or striping tape to place a black matte bolt: start near the cuticle and angle it slightly toward the side of the nail so it feels natural. Fill the bolt with matte black gel, cure, then add a glossy topcoat only on the red base — leave the bolt matte by avoiding topcoat over it. For the accent nails, make a smaller bolt near the lower third instead of full length. Finish by capping the red free edge so the glossy surface stays protected.
Lightning bolts look Halloween without being too literal, and matte black over glossy red is a strong contrast. The bolt angle makes your nails look longer and more dynamic, like a storm rolling in. I like this for parties because it feels edgy, not cute. It flatters almond and oval shapes since the bolt can follow the nail’s center. If you’re wearing black eyeliner or a black leather jacket, this set matches that vibe instantly.
Watch outDon’t cover the bolt with glossy topcoat. It loses the lightning contrast.
Editor's noteIf matte gel gets streaky, stir it gently and apply in one direction — don’t overwork it.
14. Red Gradient Fade Into Black Smoke Tips
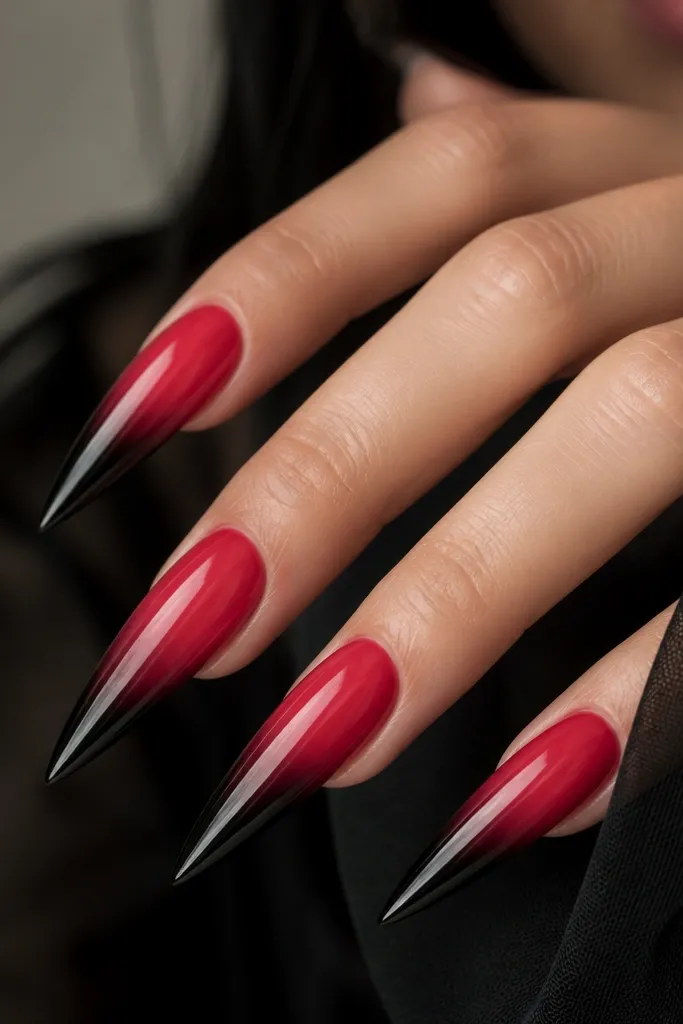
A red-to-black smoke fade looks spooky and expensive because it looks like airbrushed effects. The gradient softens the Halloween vibe so it doesn’t look harsh, and the black tips pull the eye toward the nail end. This style looks best on longer shapes where you have room for the fade to breathe. I like it on fair skin because the red gradient looks bright and the black smoke stays dramatic. It also works with both glam and casual outfits since it reads like abstract art.
Start with a light base — either nude or a very pale pink — then sponge on a red gradient using a makeup sponge. Keep the darkest red toward the center and fade it lighter as you move toward the tip. Next, tap black gel onto the very tips and blend upward lightly with the sponge so you get a smoke effect, not a hard line. Cure after each sponge stage so the gradient doesn’t muddy. Finish with a glossy topcoat and cap each edge to lock the blend in place.
Use a light hand on the sponge. You want transparency layers, not one heavy coat.
Avoid dragging the sponge. Dragging makes streaks.
15. Black Widow Web Accent With Red Base Stripes
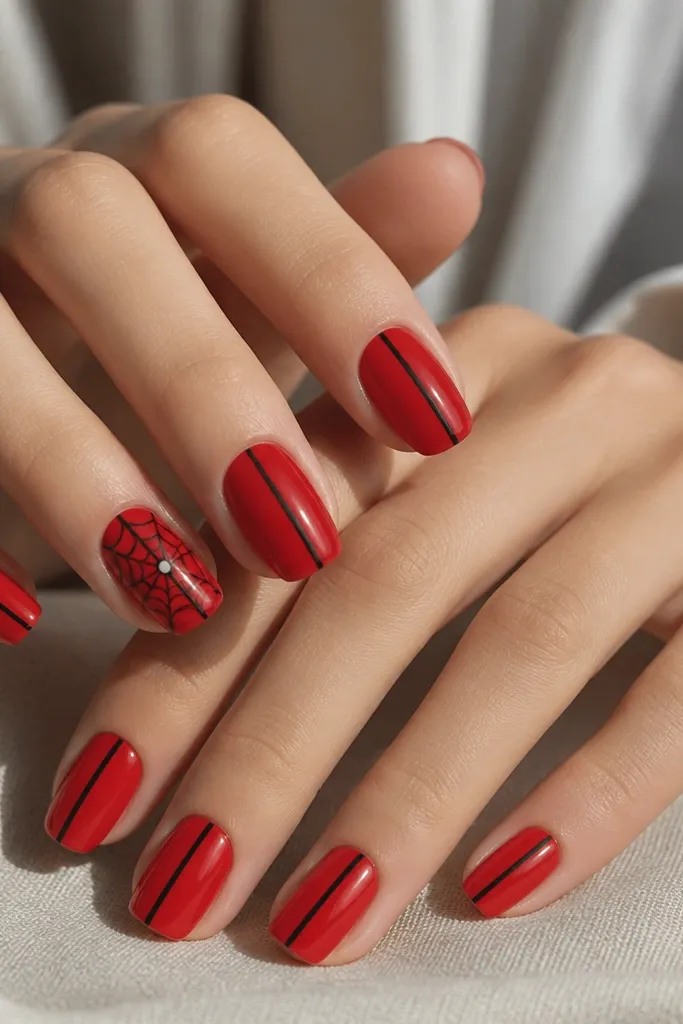
This design is balanced: red stays dominant, black adds structure, and the web is only on the fingers that can handle the detail. The thin center stripe makes the nail look longer, and the web gives you that “Halloween spider” vibe without covering everything. I like it because it’s easy to replicate even when your hand isn’t steady; your base stripes cover small imperfections. It flatters all skin tones because the red is bright and the black web lines are clean. It also wears well since the web stays near the center and doesn’t require a perfect tip line.
Paint all nails glossy red and cure. Add a thin black stripe down the center of each nail using a striping brush — keep it straight by resting your hand on the table. On ring fingers only, draw a web: start with a small circle in the center, then add curved arcs outward and connect them with lines that radiate. Add a tiny red dot in the center so it looks like the spider’s hub. Seal with glossy topcoat and cap the free edge carefully.
If you mess up a line, wipe the brush and touch up with topcoat. It blends better than you’d expect.
Don’t put the web on every nail. It becomes cluttered and harder to keep clean.
16. Black Marble Veins In Red Gel With Clear Topcoat Shine
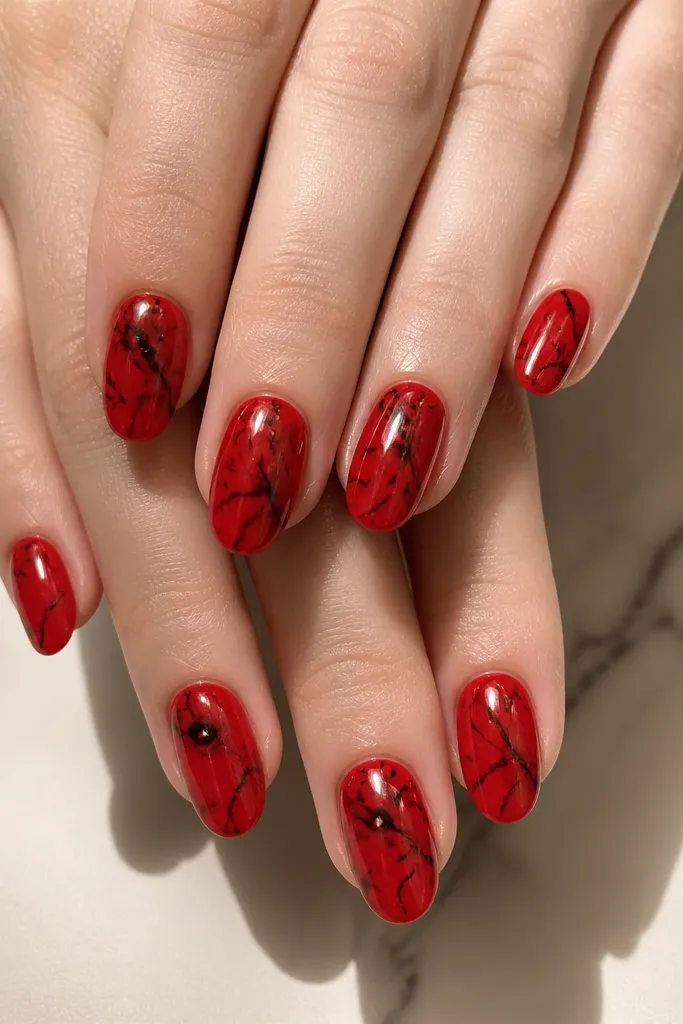
Paint a glossy red base and cure. Add black gel in very thin lines using a detail brush — draw one main vein and then branch it into smaller lines. Use a clean brush dipped in gel thinner or a tiny amount of clear gel to soften the edges of a couple lines so it looks like stone, not drawn lines. Cure, then apply a clear glossy topcoat in two thin layers so the surface looks glassy. Cap the edges with the second topcoat layer.
Marble nails look fancy and Halloween when the palette stays red and black. The trick is using thin veins so the red still shows through; that keeps it from looking like a solid dark stain. I’ve worn this with silver rings and it looks extra clean because the marble lines catch light. It flatters short almond nails because marble veins create natural movement that draws the eye up the nail. If you want spooky chic that’s still wearable after Halloween, marble is the best pick.
Watch outAvoid heavy black coverage. Thick veins turn marble into messy blotches.
Editor's noteUse a detail brush you trust. Marble fails when the brush is too thick or splayed.
17. Red Glitter Cuticle Halo With Matte Black Surround
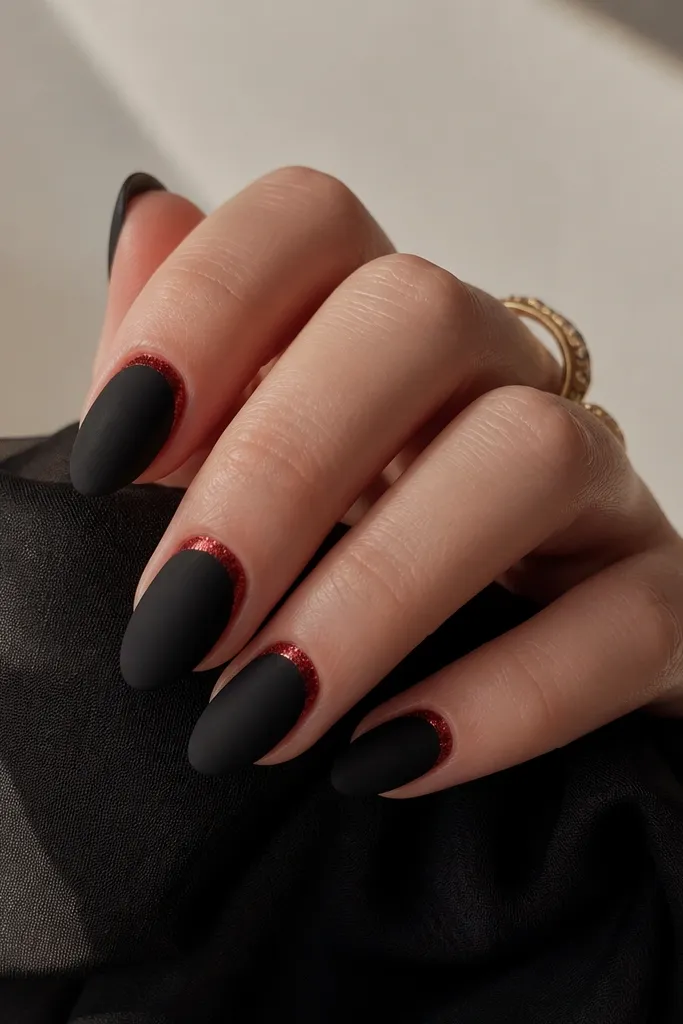
This one looks like jewelry because the glitter ring sits exactly where your nails catch light. Matte black around it makes the halo look intentional and keeps glitter from looking messy. I love it on medium oval nails because the halo follows the shape and makes the nail bed look longer. It also flatters hands with darker skin tones since the red glitter stands out hard against black. If you want Halloween nails that still feel elegant, this does it without characters.
Start by painting the whole nail matte black and cure. Then apply a thin strip of clear gel around the cuticle in a semi-circle — not a full circle, just enough to form a halo. Press red glitter into the tacky gel, then tap off excess so it doesn’t spread. Cure and apply a matte topcoat over the black areas, keeping the halo glossy or lightly sealed so the glitter sparkles. Finally, cap the free edge with matte topcoat.
Use a glitter gel or clear gel base for the halo — loose glitter alone sheds too fast for me.
Don’t flood the cuticle area with glitter. Too much makes it look like fall-out.
18. Black Coffin Nails With Red "Blood Drip" Tips
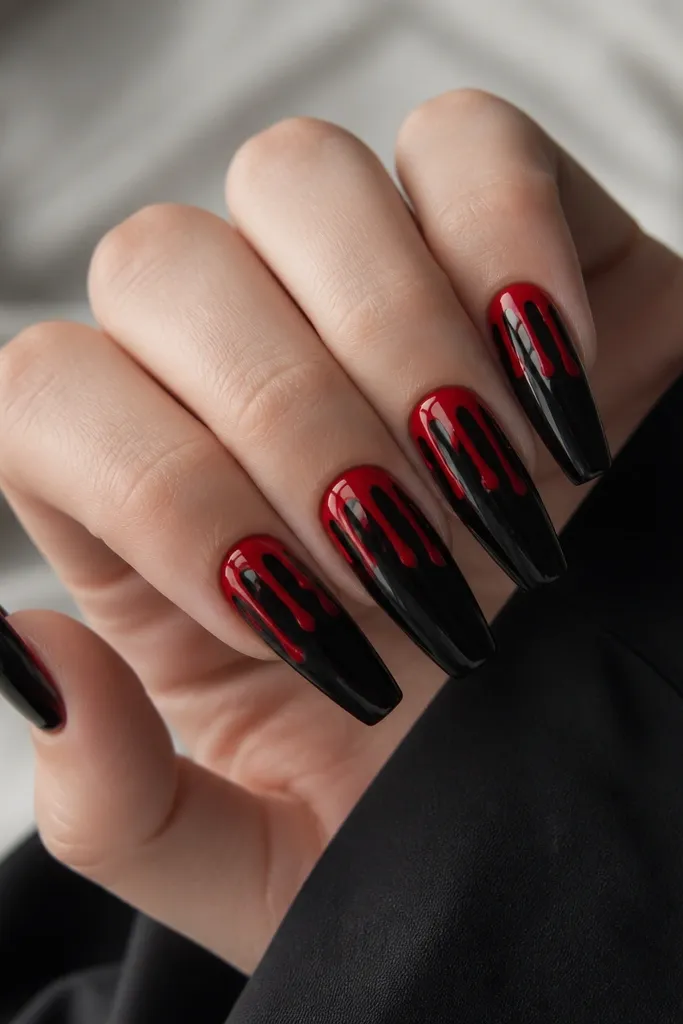
Paint the entire nail glossy black and cure. Mix or use a thick red gel — the viscosity matters so the drip holds its shape. Create three drip points at the top edge of the nail tip, then drag the gel downward slightly and let it taper by pulling the brush away. Cure, then add a glossy topcoat over the drips only if needed to smooth the surface. Finish with topcoat over the whole nail and cap the edges so the gel drips don’t chip.
Blood drip tips are Halloween in the most direct way, but the coffin shape and glossy black base keep it from looking like a kid costume. The drips read better when they’re uneven — one longer, one shorter — so the nail looks natural and not patterned. This is best on longer nails because the drips need space to hang and taper. It looks dramatic on fair and medium skin tones, and the glossy red against black always looks intense in photos. If you’re going to a party where people will stare at your hands, this set gets attention fast.
Watch outDon’t make identical drips on every nail. Symmetry makes it look printed.
Editor's noteUse a red gel that’s thick enough to stand up on the brush. Thin polish makes drips run like water.
19. Red And Black Fire Escape Steps With Tiny Bat
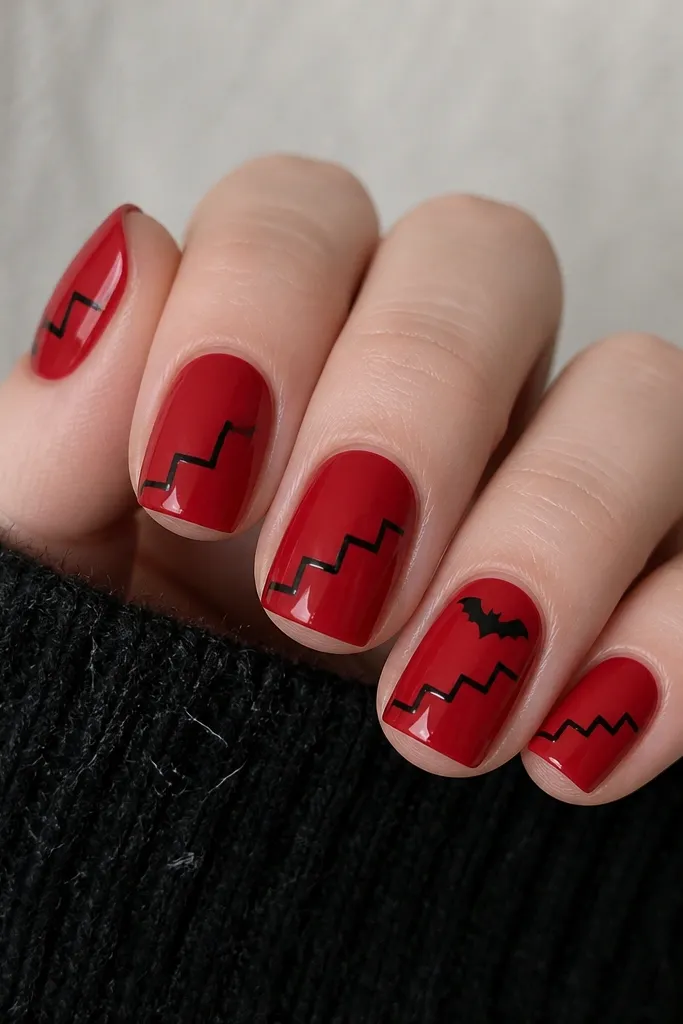
Start with a glossy red base and cure. Use a striping brush to draw black step lines diagonally — create 3-4 steps across the nail, keeping the spacing even. Then connect the steps with short vertical segments so it looks like a ladder or fire escape. On one accent nail, add a small bat silhouette using a decal or a stencil, placing it near the top corner of the nail. Seal with glossy topcoat and cap the free edge.
This design looks like a spooky blueprint — clean, graphic, and surprisingly flattering. The step ladder lines create strong angles that make fingers look longer, and the red base keeps it Halloween without turning dark and heavy. I like it on short nails because the pattern fills the nail without needing space for webs or characters. The tiny bat detail adds fun for Halloween photos but stays subtle. It also works well if you’re wearing striped tops or a black dress since the lines echo that structure.
Watch outAvoid too many steps. Over-detail makes the nail look cluttered on short lengths.
Editor's noteIf your step lines drift, use painter’s tape to mark the diagonal angle first, then paint the steps within that guide.
20. Cherry Red Chrome With Black Houndstooth Cuticle Panels
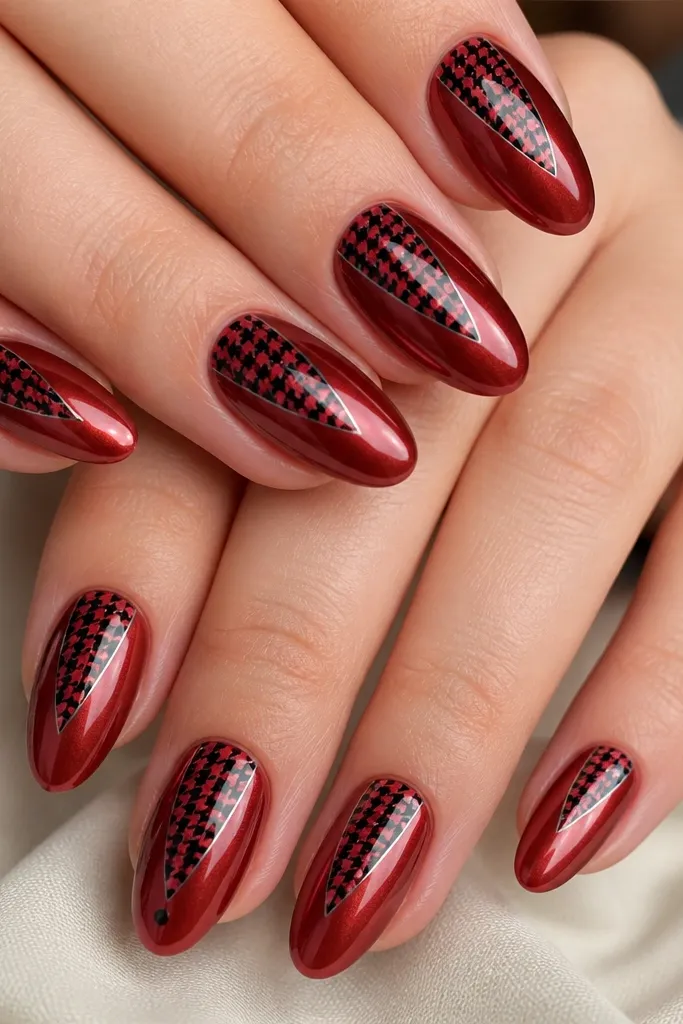
File nails to a smooth almond shape and buff the shine down just enough for adhesion. Apply a cherry-red gel base, cure, then use chrome powder over the tacky layer and buff to a mirror finish. Cut small houndstooth decals or stamp pieces into thin strips, place them so each panel begins at the cuticle and angles slightly toward the center ridge. Seal with two thin coats of clear topcoat, curing fully between coats so the pattern stays crisp. For the accent nail, use a larger panel and add one tiny black dot with a liner brush near the free edge before topcoat.
This look hits the spooky-chic sweet spot without going full cartoon. The cherry red chrome gives that Halloween glow even in daylight, and the black houndstooth panels read like a “costume detail” instead of random nail art. I’ve worn this to a fall party where everyone asked where the outfit pattern came from because the nails look like fabric. The cuticle placement also makes your nails look longer since the graphic area starts high and stays narrow as it moves down.
Watch outDon’t slap chrome on top of a thick matte layer — it dulls the mirror finish and makes the houndstooth edges look fuzzy.
Editor's notePress the houndstooth strip down with a silicone tool for 10 seconds so edges don’t lift. If your decals wrinkle, warm them between your fingers for a few seconds before placing.



