
1. Velvet Matte Black Hearts With Cherry Tips
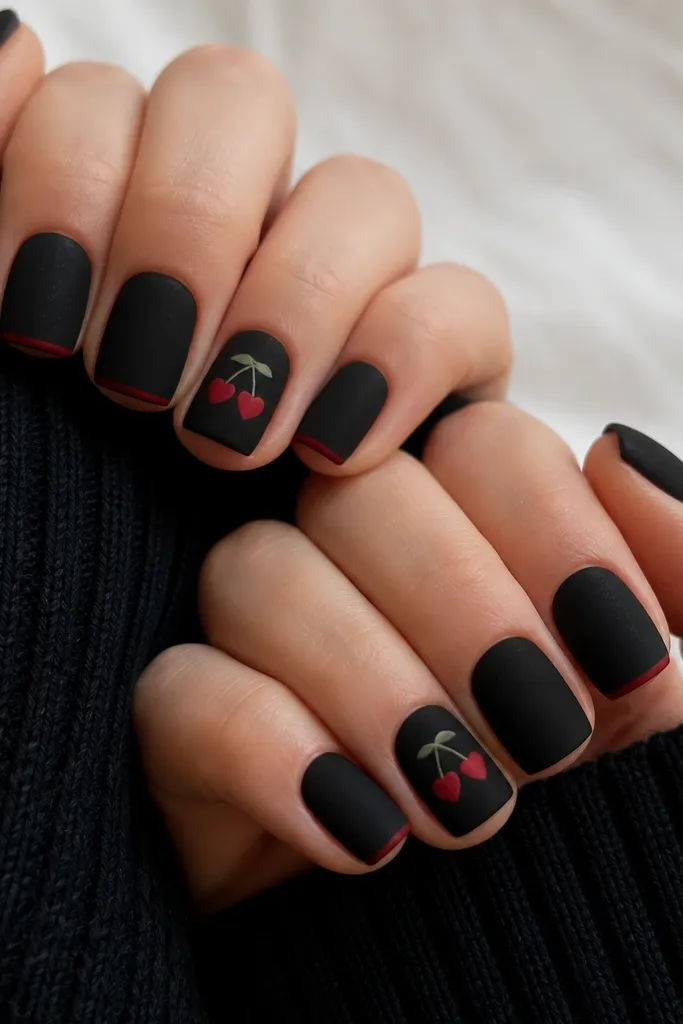
This is the cozy set I wear when the date outfit is a thick sweater. Matte black has a dry, plush look that makes the cherry red hearts feel warm instead of loud. I like it on medium to short nails because the hearts stay small and sit neatly over the nail bed. If your skin tone is fair, the red reads crisp; if you’re deeper, the black keeps everything grounded and the red pops without looking neon. The styling principle is simple: matte black is the background, and red is the emotional cue — tiny hearts, not big blocks.
Start by filing nails to a short square shape and buffing shine off the surface. Apply a matte black gel in two thin coats, curing between coats, then cap the free edge. On ring fingers, use a fine striping brush to paint two small red hearts centered near the cuticle line, then connect the heart with a tiny V notch so it looks like one clean shape. Finish by adding a sliver of cherry red at the tips on the other nails — just enough to frame the nail edge. Seal everything with a matte-top gel so the hearts stay velvety, not glossy.
Editor's noteIf your hearts look lumpy, paint one half at a time and let it tack for 10-15 seconds before the second half.
Watch outDon’t use glossy black with a matte top — it creates a spotty texture that looks cheap in photos.
2. Black French With Red Micro-Heart Outline
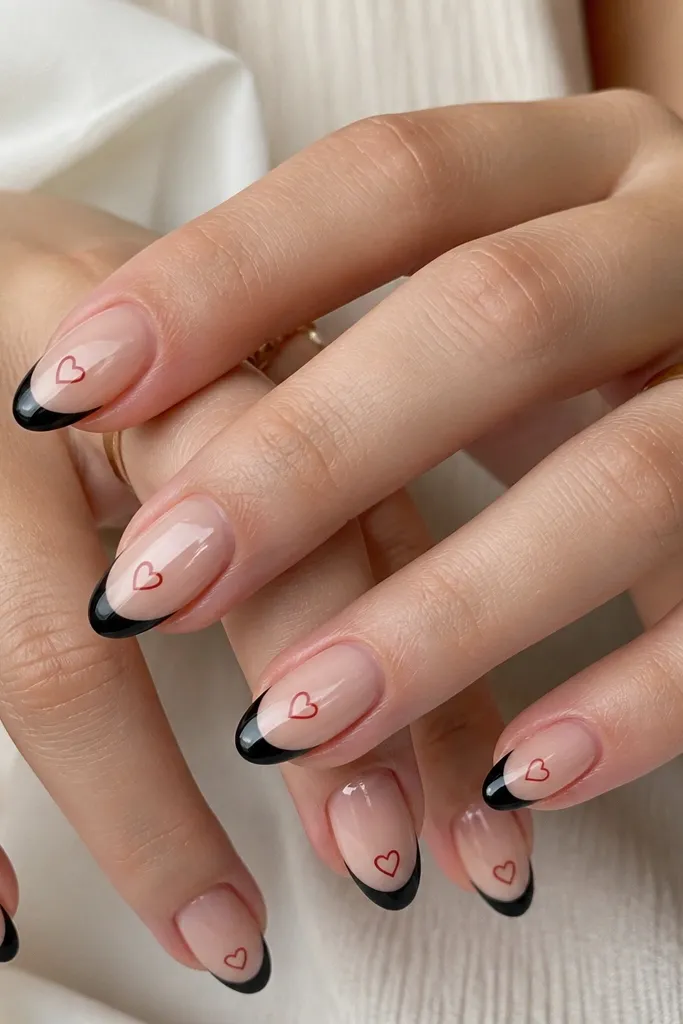
This one flatters almost everyone because it keeps the nail bed looking longer. The black French curve adds structure, and the red micro-heart outline reads delicate instead of childish. I wear it when I want Valentine nails that don’t scream “theme party.” On fair skin, the nude base makes the hearts look crisp; on warmer skin tones, the nude base warms the look without turning it orange. The principle is contrast control: a bold black shape plus a tiny red line drawing.
Start with a sheer nude base, then draw a black French tip curve using a nail guide or freehand with a steady hand. Cure fully, then switch to a liner brush to outline a small heart in red at the center of each nail — keep it under 2mm tall. For extra neatness, place the heart so its point sits just above the smile line of the French curve. Add a second pass on the outline only if you see gaps, then top coat with a glossy finish to make the line art look sharp. Clean up the edges with a brush dipped in acetone after curing.
Editor's noteUse a nail guide for the French curve, then remove it immediately so the line stays crisp.
Watch outDon’t make the hearts too big — large hearts over a French tip make short nails look crowded.
3. Negative Space Heart Cutouts Over Glossy Black
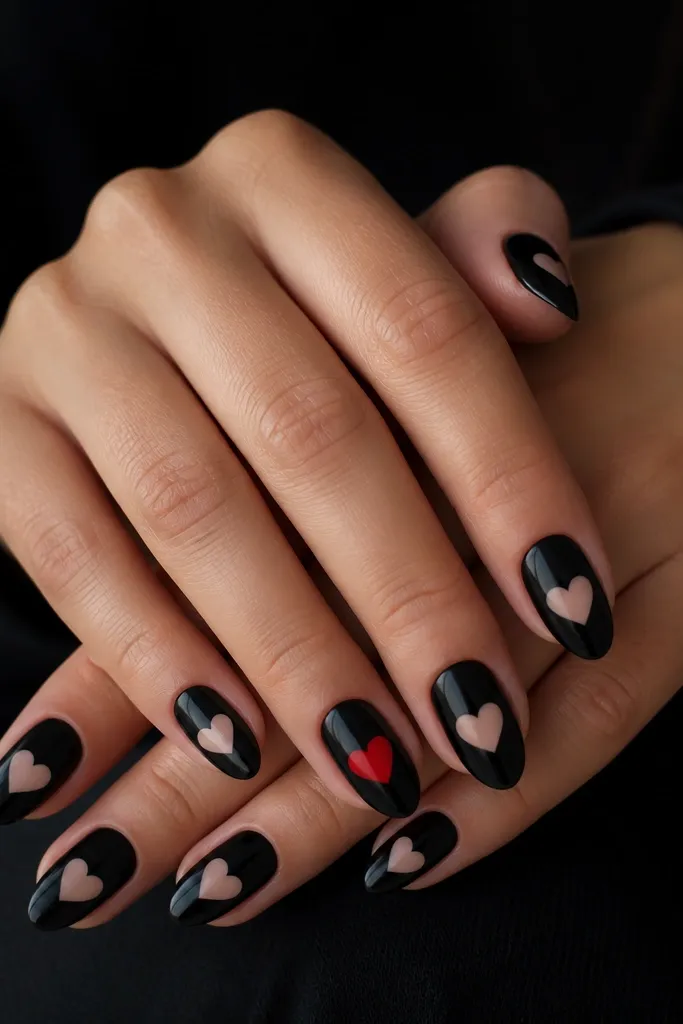
Negative space hearts look cozy because they feel airy while still romantic. The glossy black behind the cutout gives a smooth, candle-friendly shine, and the nude heart edge looks neat even as your nails grow out. This is great if you hate thick 3D decorations. It’s flattering on short nails because the heart shape gives a vertical focal point. For deeper skin tones, the nude heart looks intentional rather than washed out.
Apply glossy black as your base in two thin coats, curing between each. For the heart cutout, use a thin stencil or freehand with a liner brush to mark the heart shape, then paint around it in black — leaving the center nude. If you’re doing gel, keep the black layer thin so the cutout edges stay sharp. On ring fingers, replace the nude heart with a red heart filled in cherry red while keeping the other nails cutout-only. Finish with a high-gloss top coat across the whole set.
If you’re freehanding, draw the heart outline first in black gel, cure, then fill the cutout edge with a nude gel to keep it clean.
Don’t overbuild the black around the cutout — thick edges lift and catch on fabric.
4. Matte Black Lace Lines With Red Center Dots
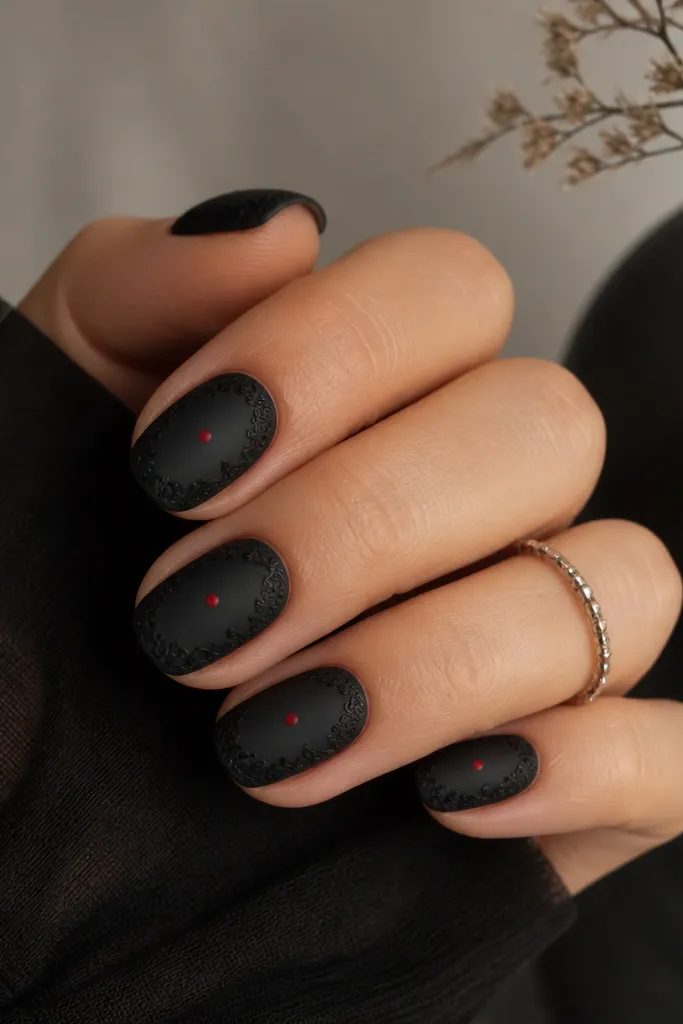
Lace lines make black and red feel romantic without going full Valentine cartoon. Matte black softens the lace so it looks cozy on real hands, not like a costume. The red center dot acts like a “heart eye” focal point. This is especially flattering on oval nails because the pattern follows the curve and makes your fingers look longer. If you’re fair and get red irritation on your skin, keep the red to a single dot so you don’t create too much contrast near the cuticle.
Start with matte black as your base, two thin coats, cure, then wipe the tacky layer if your top coat requires it. Use a nail art lace stencil or a fine liner brush to paint thin black lines that curl like lace — keep them mostly around the sidewalls and lower half. While the lace lines are still tacky, place a tiny red dot at the center using a dotting tool — aim for about 1mm wide. Cure, then top coat with a matte top so the lace and dots keep their soft texture. Clean around the cuticle with a flat brush and acetone.
Dab the red dot on with the tip of the tool, not the side, so it stays round.
Skip chunky rhinestones — they make lace patterns look messy on short nails.
5. Glossy Black Aura With Red Heart Halo
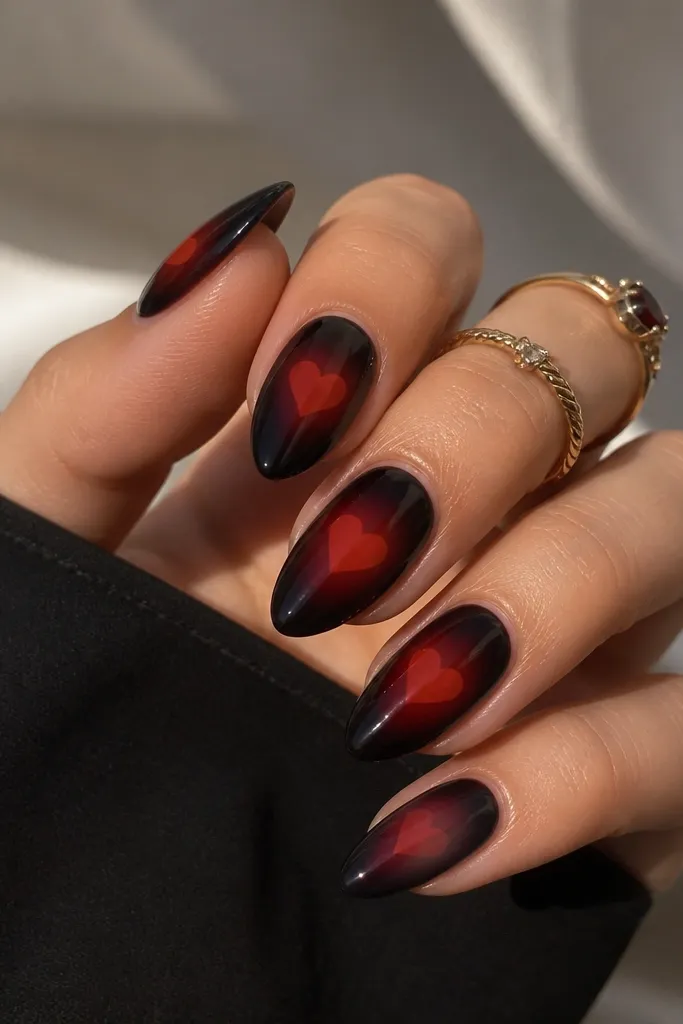
Aura designs are cozy because they look soft and blended, not harsh. Glossy black gives depth, and the red heart halo looks like it’s lit from within. I like this when I want something Valentine-themed but still grown-up. It flatters medium to long nail beds because the aura spreads visually and lengthens your fingers. On olive and warm skin tones, the red looks rich instead of flat.
Paint a glossy black base in a thin coat, cure, then add a second coat only where you want the darkest center. For the aura, use a makeup sponge to dab black gel in a soft circle around the center, blending outward before curing. Then paint a red heart in the exact center, using a liner brush; keep the heart small so it doesn’t fight the aura. Add a second thin red layer only on the top half of the heart for dimension. Seal with a glossy top coat and cap the edges.
Editor's noteUse a sponge with less fluff — a dense makeup sponge gives cleaner aura edges.
Watch outDon’t cure the aura too early before blending — you’ll get a hard ring.
6. Black And Red Candy Cane Stripes On Two Nails
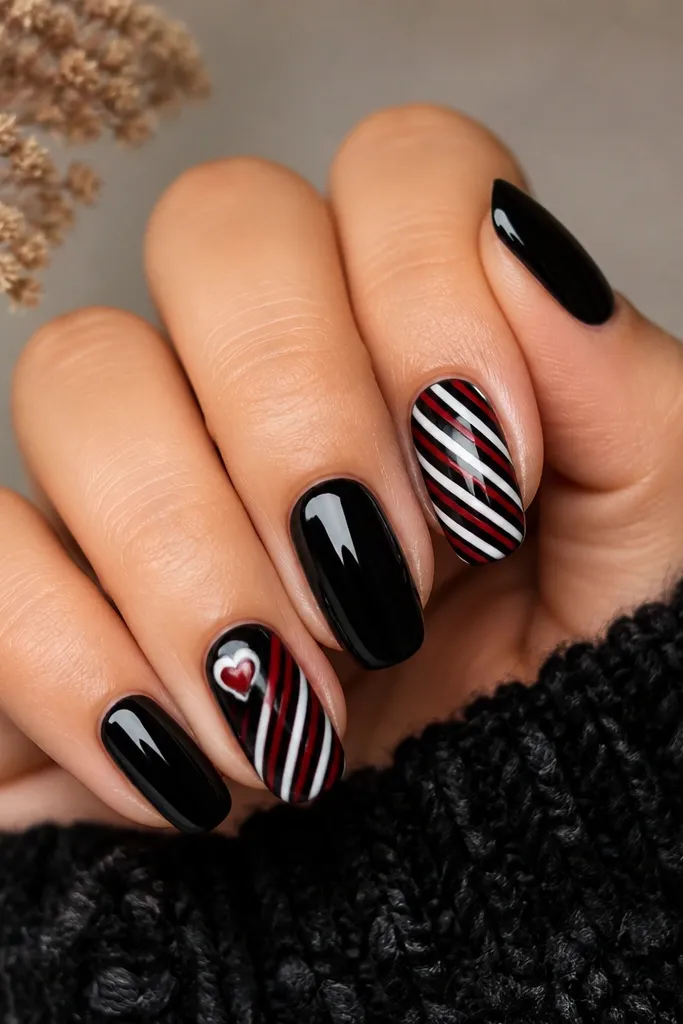
This set feels cozy because the stripes look fun but the base keeps it grounded. I do it on two accent nails so it doesn’t feel like a theme party on your hands. Glossy black makes the red stripes look sharper, and the one tiny heart keeps it Valentine-specific. It’s flattering on short, round nails because the bold base color makes your nail shape look tidy. If your skin tone is cool, the red reads crisp; if warm, the white stripe keeps it balanced.
Start with a full glossy black manicure on all nails, two thin coats. Choose your accent nails (I pick ring fingers) and paint a black base there too so the stripe edges blend. Use striping tape or a thin nail art brush to create diagonal stripes: red first, then a thin white line between stripes. Leave a small negative-space crescent near the cuticle on one accent and paint a tiny red heart on it. Finish with glossy top coat on all nails.
Press striping tape down for 5 seconds, then remove slowly at a 45-degree angle.
Don’t try to paint stripes thick — thin stripes look crisp and feel smoother.
7. Red Velvet Heart Tips Over Black Base
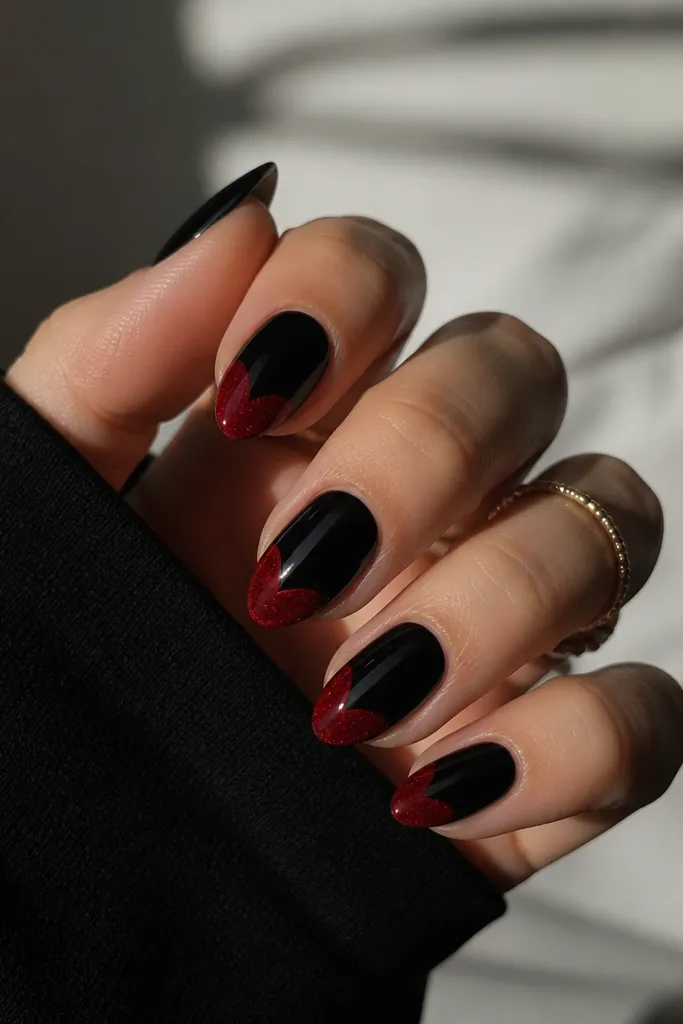
Velvet-effect tips look cozy because they catch light softly instead of reflecting hard. The black base makes your red feel intentional, and the heart-shaped tip keeps it romantic. This is a great pick if you want Valentine without tiny line art. It flatters shorter nails because the tip design draws the eye to the center. On darker skin tones, the velvet red looks like a warm stain, not a harsh block.
Apply glossy black base in two thin coats and cure. On each nail, mark the tip center with a small dot using red gel as a guide. Use a heart-shaped nail art brush or freehand to build a red velvet-effect gel from the sides toward the center point, keeping it under 2/3 of the nail width. Cure fully, then apply a thin glossy top coat only on the black areas if your velvet gel requires it — follow the velvet product instructions for top coat compatibility. For a consistent look, keep the velvet texture on the red and gloss on black.
Use a slightly thicker brush for velvet gel so it lays down without streaks.
Don’t cap the velvet tip with too much product — it flattens the texture.
8. Black Marble Swirls With Red Veins
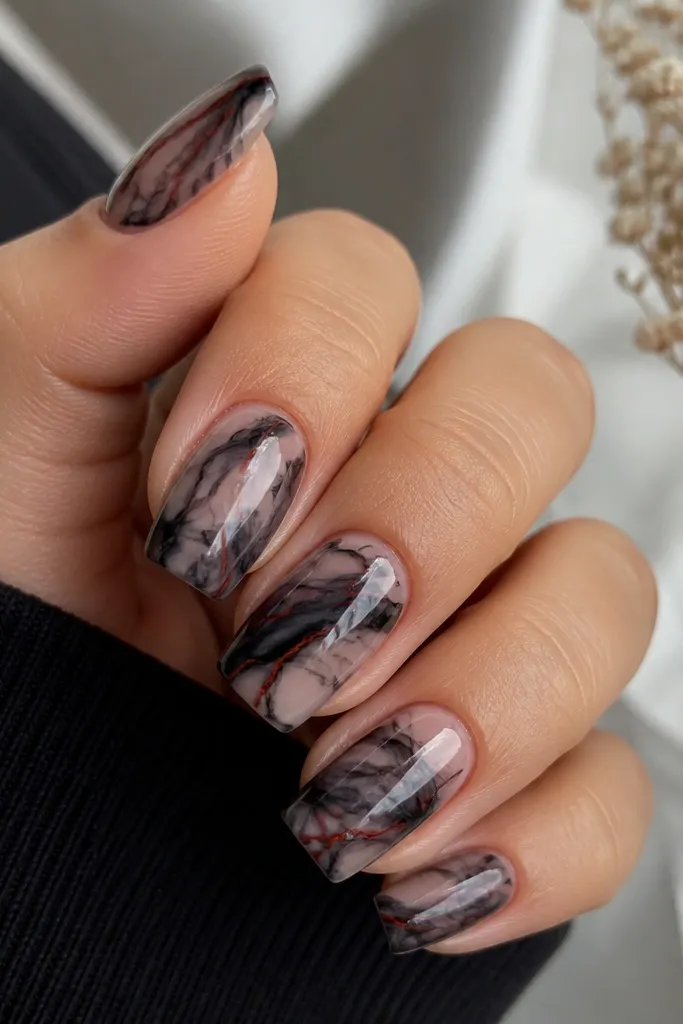
Marble nails feel cozy to me because they look like a warm stone — not a flat print. Black marble gives depth, and red veins look like natural movement instead of sticker hearts. I like this when you want Valentine nails that still feel “adult,” especially with a black coat or red scarf. It works on medium square because the marble lines can run horizontally without shrinking. On pale skin, the clear base makes it feel lighter; on deeper skin, the marble depth shows up clearly in indoor light.
Start with a clear or sheer nude base and cure. Add black gel in wispy streaks using a thin brush, then drag a little with a clean brush tip to create marble flow — cure between thin layers if needed. Add red gel veins by placing tiny red lines and pulling them slightly through the black swirls. Keep the red veins sparse so the marble doesn’t turn into a busy pattern. Finish with glossy top coat and cap the free edge with a thin layer.
Practice the marble motion on a silicone mat first — the wrist movement matters more than the color.
Don’t flood the nail with gel — marble needs air and variation to look real.
9. Red Outline Hearts On Black Half-Moons
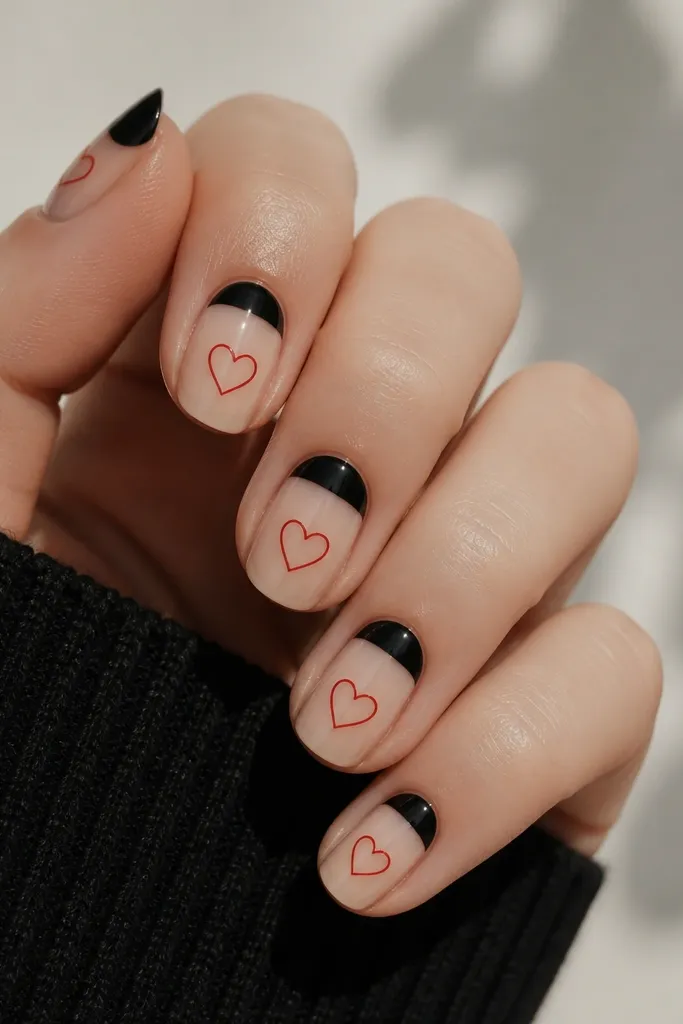
Half-moons at the cuticle feel cozy because they mimic a tidy, old-school manicure but with Valentine detail. The black half-moon gives a strong base, and the red outline heart keeps the romantic part small and clean. This is flattering for hands that get dry around the cuticle because the design draws attention slightly upward. If your nails are short, the half-moon helps make the nail bed look structured. The principle is framing: black frames the cuticle, red gives a single focal symbol.
Apply a sheer nude base and cure. Paint a black half-moon around the cuticle on each nail, keeping it centered and about 2-3mm wide — cure. Use a liner brush to draw a red outline heart in the center of the nude area, making the heart about the width of your middle fingertip nail bed. Add a second pass on the red outline only where you see light gaps. Top coat glossy and cap the edges lightly.
Editor's noteUse a small dot of black gel on a flat brush tip for the half-moon so you don’t drag into the nude area.
Watch outDon’t make the half-moon too wide — it can shorten the nail visually.
10. Black Gloss With Red Foil Heart Shard Accent
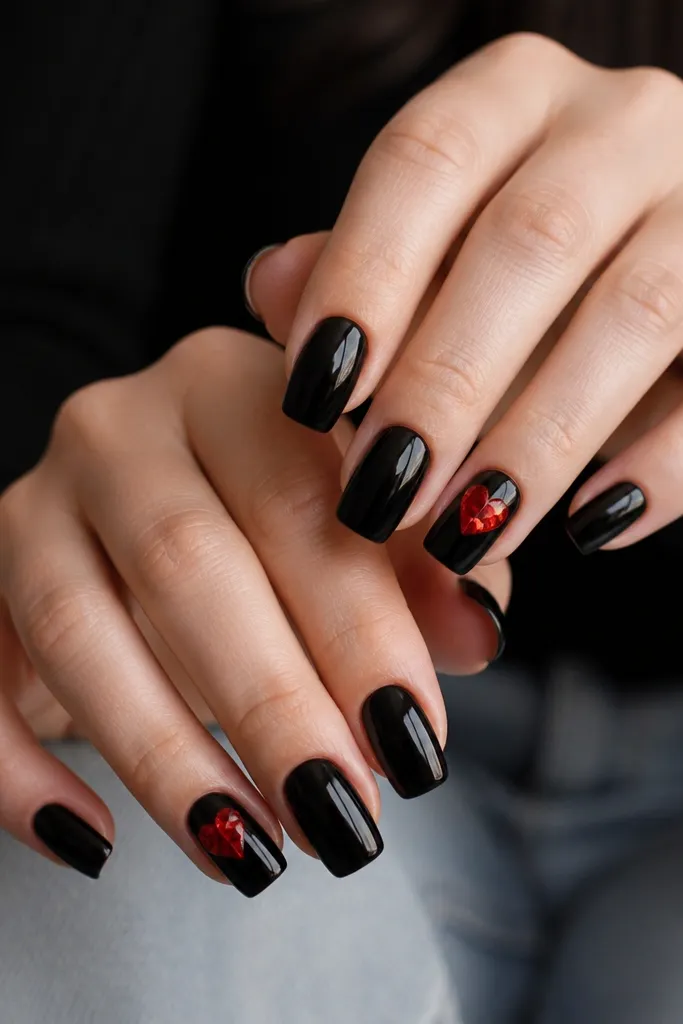
Foil accents feel cozy because they look like a soft glow instead of a loud glitter bomb. The glossy black base makes the red foil look richer and more dimensional. I do this when I want Valentine nails that still fit work — only one or two nails get the drama. It flatters medium almond and oval shapes because the heart shard placement follows the curve. On cool undertones, red foil reads more jewel-like than candy red.
Paint all nails glossy black, two thin coats, cure, and wipe tacky layer if needed. On ring fingers (or thumbs), use a thin layer of red foil glue where you want the heart shape — a teardrop heart outline is easiest. Place red foil pieces inside the heart area, pressing gently and leaving tiny gaps for shine variation. Seal with a foil-safe top coat in two thin layers so the foil doesn’t lift at the edges. Keep the rest of the nails solid black for a clean look.
Editor's notePress foil with a silicone tool, not your fingers — it keeps the placement sharp.
Watch outDon’t cover foil with thick gel — it dulls the shine and can wrinkle.
11. Matte Black With Red Heart Cuticle Stars
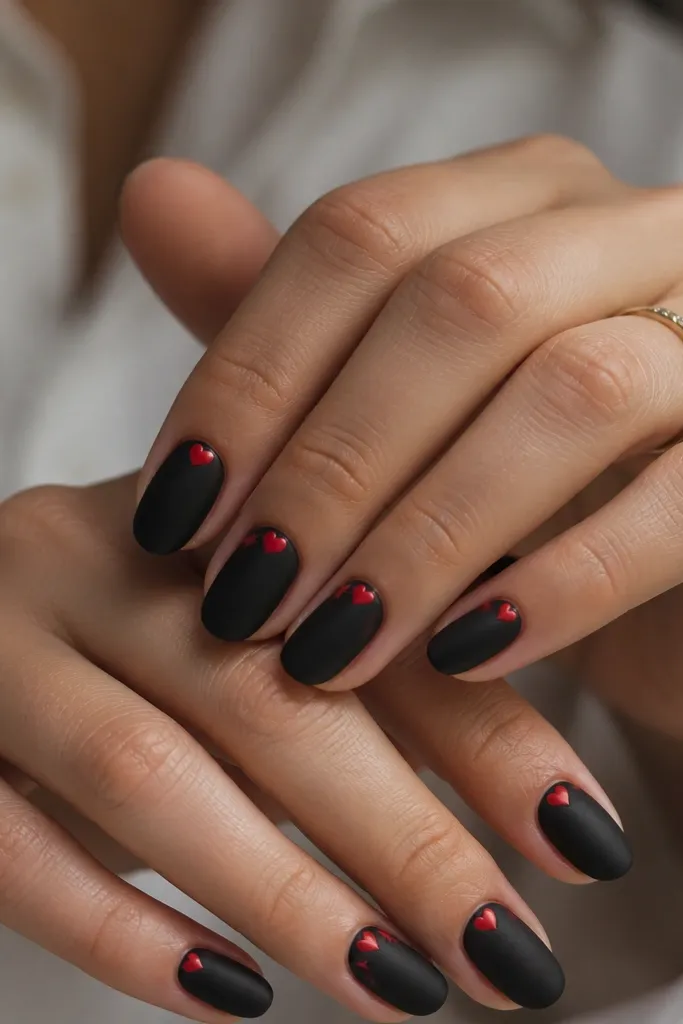
Tiny cuticle details make nails look cozy because they feel like a secret, not a billboard. Matte black is the perfect background since it keeps the red from feeling too “party.” The hearts near the cuticle also help visually even out uneven nail beds because your eye lands at the top. This works well on short squoval nails and on hands with peeling around the edges — the matte finish hides small texture. The principle is micro placement: keep the red detail small and high.
Prep nails and apply matte black base, cure, and remove tacky layer if your matte top needs it. Use a dotting tool to place a small red heart near each cuticle — about 1-2mm tall — with one dot for the top lobes and one point for the bottom. Add a tiny red star dot on two nails only, placing it on the sidewall about halfway between cuticle and center. Cure and finish with matte top coat. Clean the cuticle edges with a thin brush and acetone.
If hearts look crooked, use a small piece of tape as a guide for the heart point direction.
Don’t put hearts too low — they look like they’re stuck to the nail midline.
12. Glossy Black With Red Crisscross Heart Strings
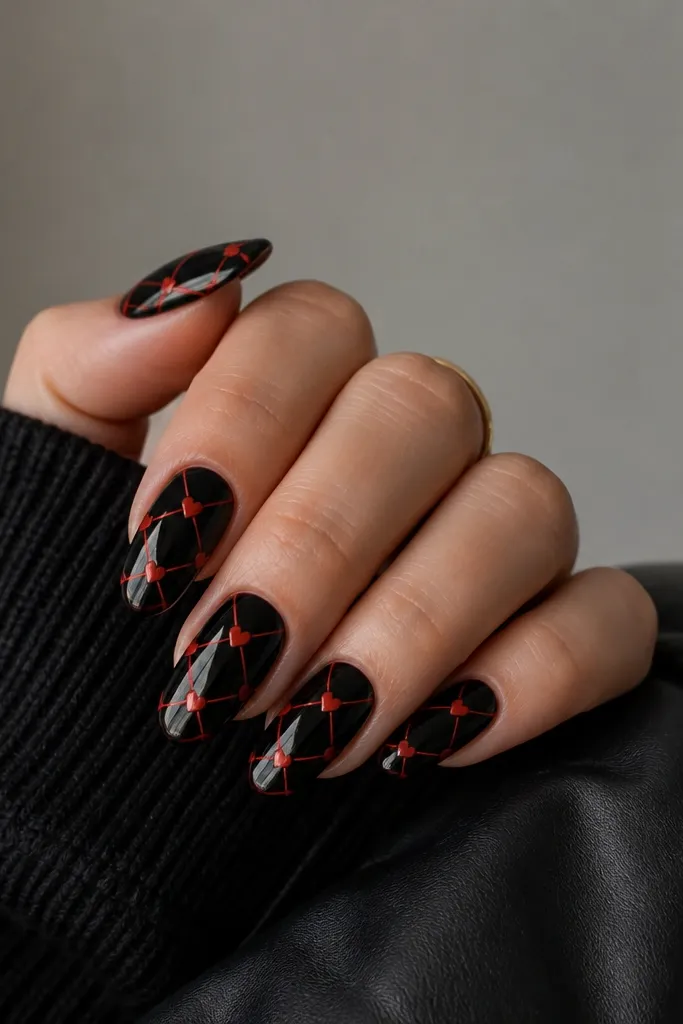
This is the cozy Valentine look that still feels sporty. The glossy black makes the red lines pop, and the hearts at the crossings keep it romantic without adding bulk. I like it on medium length because the lattice needs space to breathe. On fair skin, the pattern looks crisp; on deeper skin, the glossy black makes the lines visible even under warm lighting. The styling principle is structure: lines give the shape, hearts give the message.
Start with glossy black base, two thin coats, cure. Use a striping brush to draw two diagonal red lines across the nail, then add the opposite diagonal to make an X lattice. At each intersection, place a tiny red heart — about 1mm — using either a heart stamp or a liner brush. Cure, then apply glossy top coat in a thin layer so the hearts don’t smear. Cap the free edge with the same top coat.
Editor's noteWork one nail at a time so the gel doesn’t set while you place the heart intersections.
Watch outDon’t make the lines too thick — thick lattice looks like paint blobs.
13. Black And Red Checkerboard With One Heart Nail
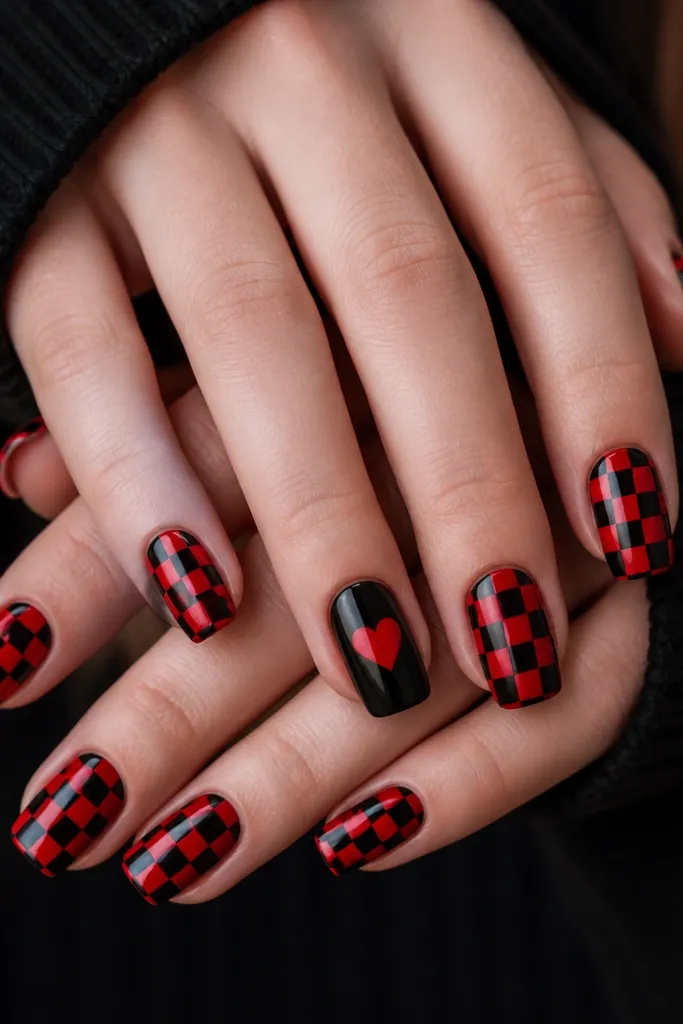
Checkerboard nails feel cozy because the pattern looks like warm fabric — it’s playful but controlled. The black and red squares keep it Valentine without relying on obvious hearts on every nail. I do one solid heart nail so the set has a clear focal point. This works best on medium square or short square because the squares need crisp edges. On all skin tones, the high contrast makes the nails look polished in photos.
Paint a base coat and cure. For checker nails, alternate black and red using nail tape strips in a grid — first create the vertical lines, cure, then do horizontal lines. Fill each square with thin coats so the grid stays sharp and doesn’t bleed. On the accent nail, paint solid black and then add a centered red heart in the middle of the nail bed. Cure, then seal with glossy top coat and cap edges.
Press tape down lightly, then remove before the gel fully cures if you’re working with tacky layers.
Don’t eyeball the square sizes — uneven squares make the set look messy.
14. Red Gradient From Cuticle To Black Tips
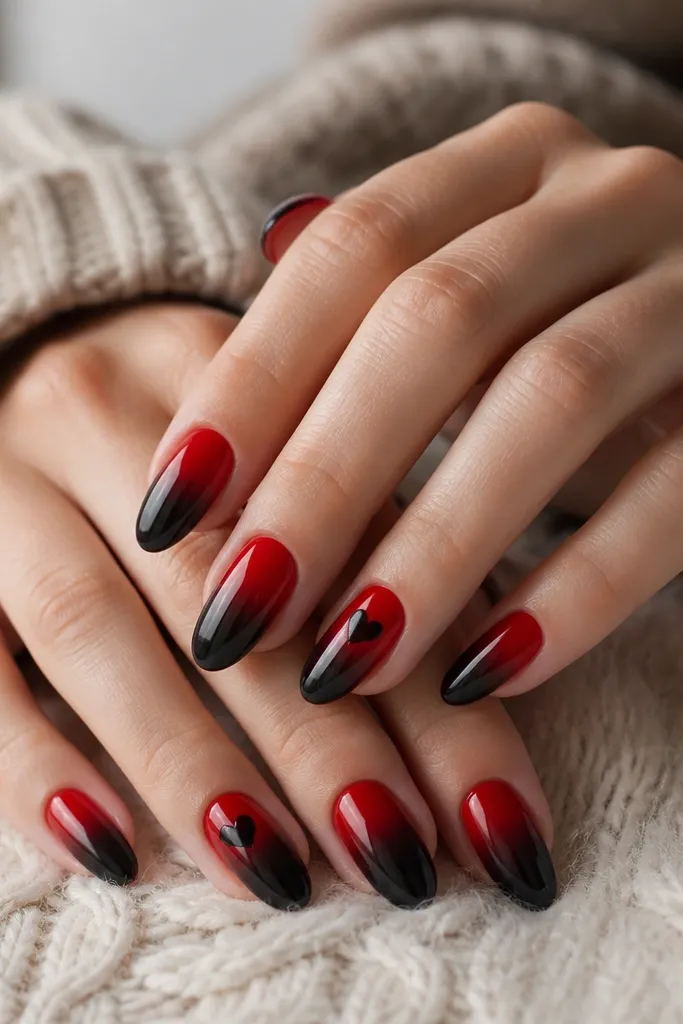
A red-to-black gradient reads cozy because it looks like a warm sunrise meeting a dark night. The ombre is flattering because it gives you a smooth vertical transition that lengthens the nail. I love this for date nights because red near the cuticle catches light and looks healthy. On fair skin, it looks soft and romantic; on deeper skin, the red gradient still shows clearly without turning muddy. The principle is gradient placement: keep the strongest red at the cuticle and let it fade into black for balance.
Apply a sheer base and cure. Sponge on red gel at the cuticle area, blending downward with a makeup sponge — cure. Then sponge or brush black gel starting at the tip area and blending upward into the red — cure again. Use a liner brush to paint a small black heart silhouette on ring fingers only, placed just above the midline of the nail. Finish with glossy top coat so the fade looks smooth and not chalky.
Use two separate sponges (or clean one fully) so your red doesn’t turn brown when blending into black.
Don’t overblend — if red and black merge too much, you get a gray mess.
15. Black Gloss With Red Heart French Corner
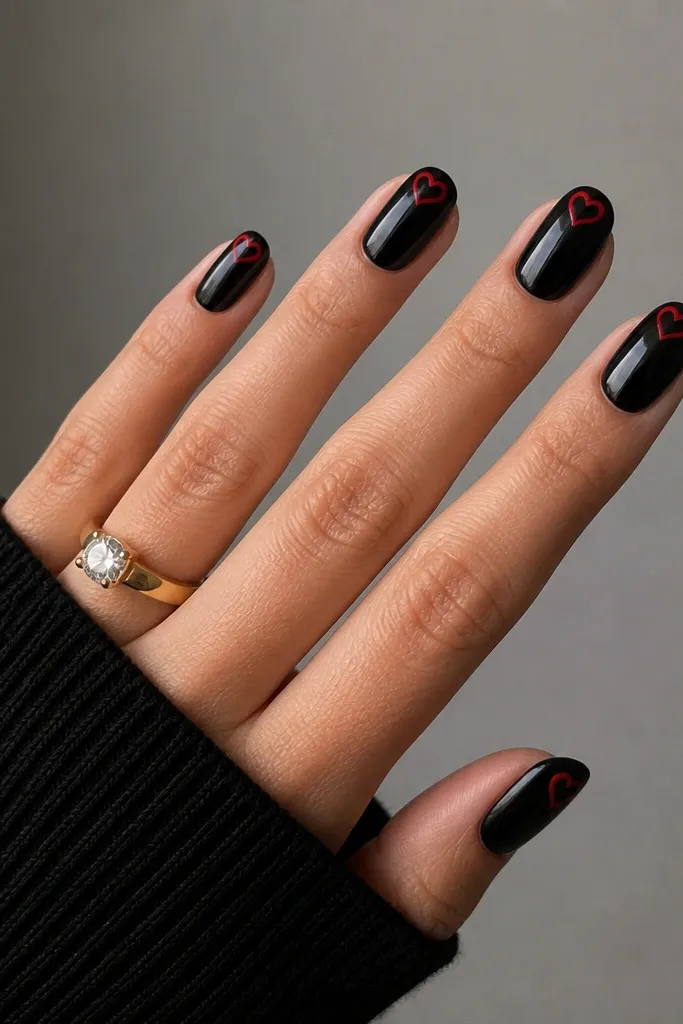
Corner heart French looks cozy because it’s subtle and still unmistakably Valentine. You get a graphic red element without covering the entire nail with hearts. I like it on short nails because the corner placement keeps the nail looking tidy. It also looks good on hands with shorter nail beds since the design sits high near the natural curve. The principle is negative space: keep most of the nail black, put the red detail where the eye naturally starts.
Paint a glossy black base in two thin coats and cure. With a fine liner brush, draw a small red heart at the top corner of each nail — choose the same corner on all nails so the set looks intentional. The heart should be about 2-3mm wide and sit near the smile line area. If you want extra sharpness, draw a tiny black outline around the heart edges with a steady hand before curing. Seal with glossy top coat and cap the free edge.
If your hearts wobble, use a tiny piece of tape to block the corner while you paint the first half.
Don’t put the heart too close to the cuticle — it will flood and blur as you grow out.
16. Matte Black With Red Heart Confetti Glitter
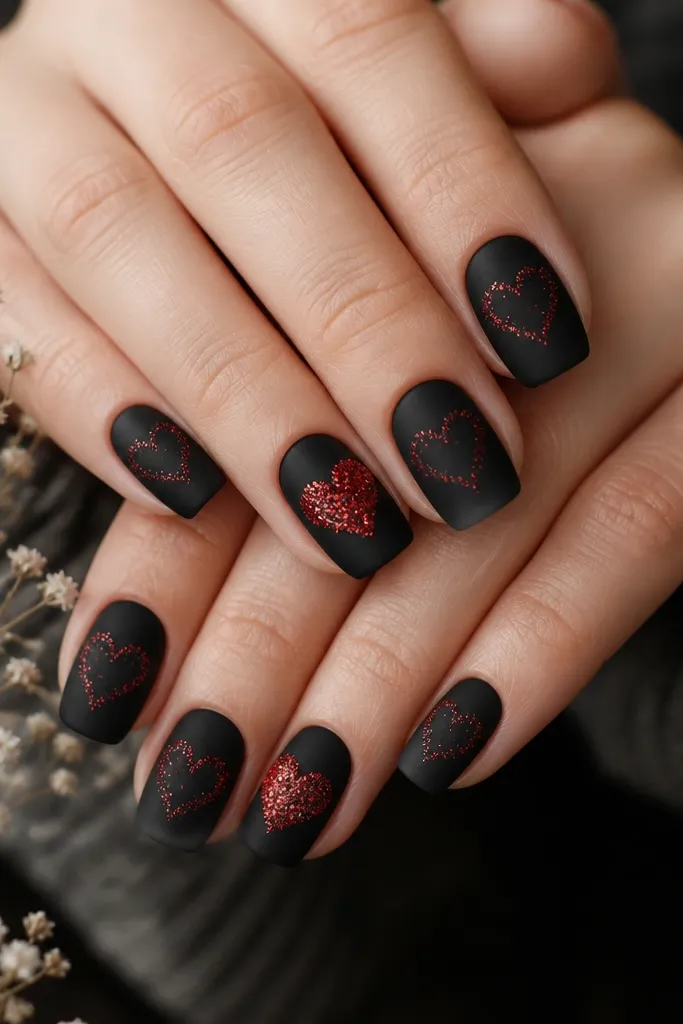
Confetti glitter hearts feel cozy because they look like soft sparkle, not heavy bling. Matte black mutes the glitter so it looks warm and date-night friendly. This set is flattering on short to medium nails because glitter is placed in a heart shape rather than covering everything. On all skin tones, the red glitter reads romantic and keeps your hands looking lively when you move. The principle is controlled sparkle: concentrate glitter in the heart area and leave the rest matte black.
Start with a matte black base, two thin coats, cure. For each nail, use a heart-shaped guide drawn lightly on paper under your nail to help placement. Apply a thin layer of red glitter gel where the heart would be, then tap glitter in until you like the density — cure. On ring fingers, build a slightly denser center so the heart is more obvious. Finish with matte top coat that doesn’t crush the glitter texture.
Editor's noteTap glitter gently with a sponge tip so it lands evenly and doesn’t clump.
Watch outDon’t use chunky glitter — it catches on fabric and feels rough.
17. Black And Red Stained Glass Hearts
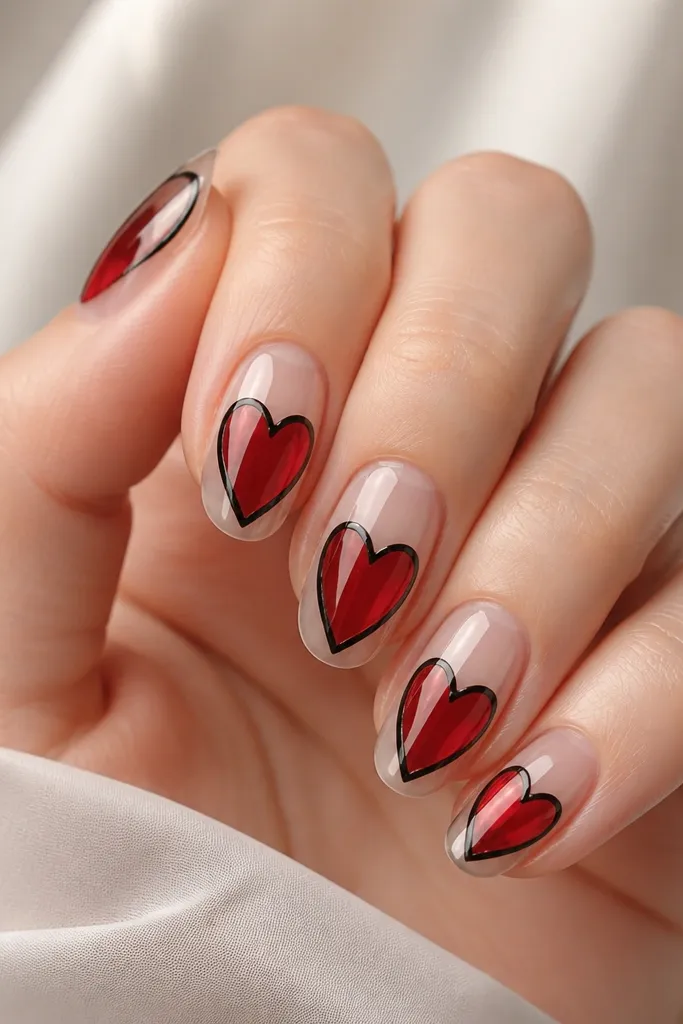
Stained glass hearts look cozy because they feel like warm candy held in a window frame. The black outlines keep the red from bleeding and make the hearts look crisp even when your nails grow out. I love this for people who want a Valentine look that still feels modern. It’s flattering on medium almond because the hearts can be wider and curved. On fair skin, the translucent red looks soft; on deeper skin, it reads jewel-like.
Start with a clear or sheer nude base and cure. Use a liner brush to draw heart outlines in black gel — make the outline thick enough to look like stained glass lead, then cure. Fill inside each heart with a translucent red gel in one or two thin layers, curing between. Add a tiny clear highlight line on one side of the heart if you want extra depth — cure. Finish with glossy top coat to seal and smooth everything.
Editor's noteOutline first, cure, then fill — it keeps the red from smearing into the black.
Watch outDon’t fill too thick — stained glass needs transparency to look like glass, not jam.
18. Red Chrome Heart On Black Mirror Base
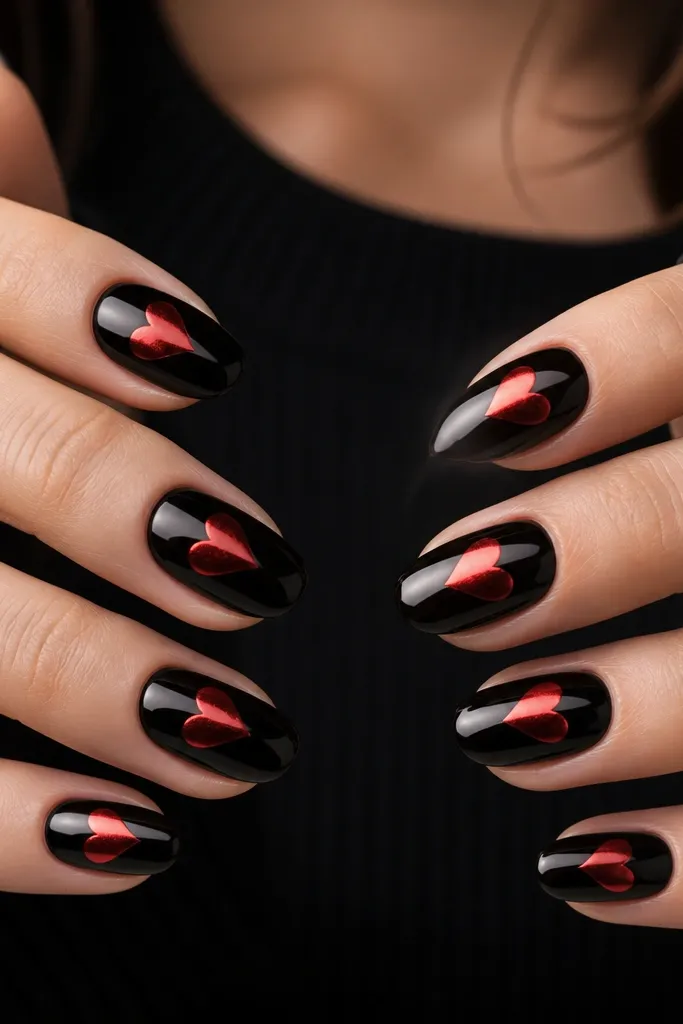
Chrome hearts feel cozy when they’re paired with a true mirror black. The mirror base makes red chrome look like it’s reflecting candlelight, not fluorescent light. I wear this when I’m going somewhere nicer but still want comfort — it’s dramatic without being busy. It flatters medium oval nails because the heart shape looks balanced. On warm skin tones, red chrome looks like a rosy jewel; on cool tones, it looks like classic lipstick red.
Apply a black mirror base (or a black gel with a mirror powder system) and cure. Create a heart stencil on each nail so the shape stays identical. Paint the heart area with a thin red chrome adhesive layer and apply red chrome powder, then buff gently to remove excess. Seal with a chrome-safe top coat to lock in the shine. Keep the heart centered and cap the edges so it doesn’t lift at the corners.
Editor's noteUse a mirror base that’s fully cured and smooth — texture under chrome shows up fast.
Watch outDon’t swipe chrome powder aggressively — it smears and blurs the heart edges.
19. Black Sweater Knit Texture With Red Heart Patch
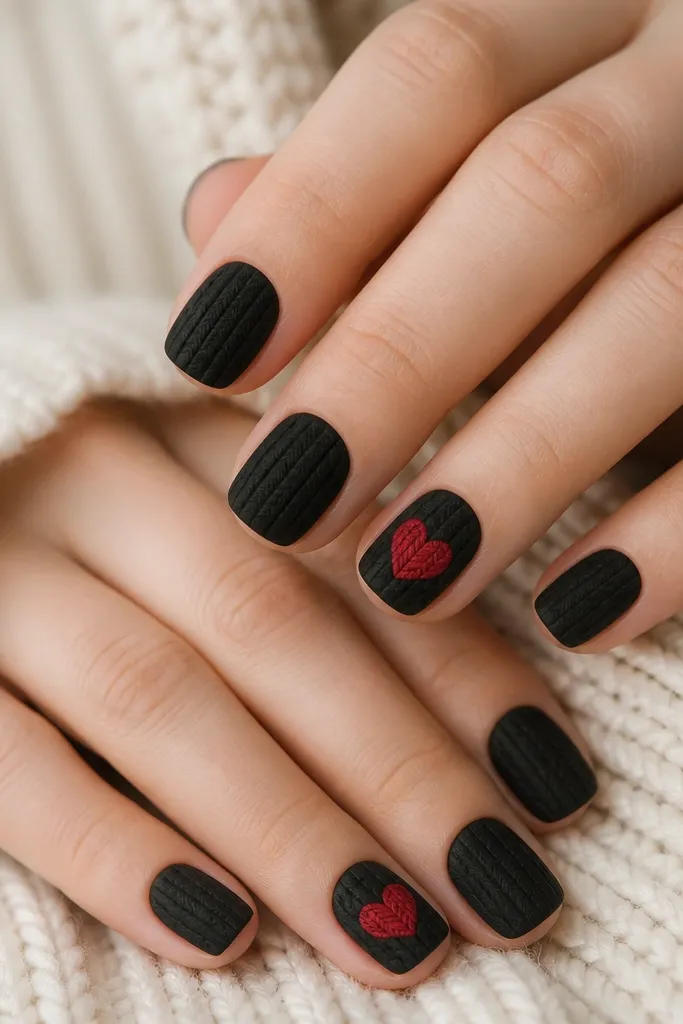
Texture nails are cozy because they match winter clothing. A knit texture in black makes the whole set feel soft and huggable, and the red heart patch gives the Valentine message without using shiny decals. I like it on short squoval because the texture looks intentional and doesn’t snag. This is flattering when your hands look a little dry — the texture hides tiny surface imperfections. The principle is tactile contrast: black texture base plus a flat, clean red heart spot.
Start with a black gel and add knit texture using a texture gel or sponge technique designed for 3D texture, cure, then keep the layer thin. On accent nails, flatten the surface slightly by applying a thin base gel and curing again. Paint a small red heart patch in the center using a liner brush, then add a slightly darker wine-red along the edges to mimic fabric shading. Cure and seal with a top coat that doesn’t erase texture — many texture gels need a specific finish. Clean the sidewalls so the knit doesn’t build up at the edges.
If your texture feels rough after top coat, file lightly with a fine buffer — don’t overdo it.
Don’t do heavy 3D everywhere — it feels bulky and catches on sleeves.
20. Red And Black Hearts Over Clear Jelly Base
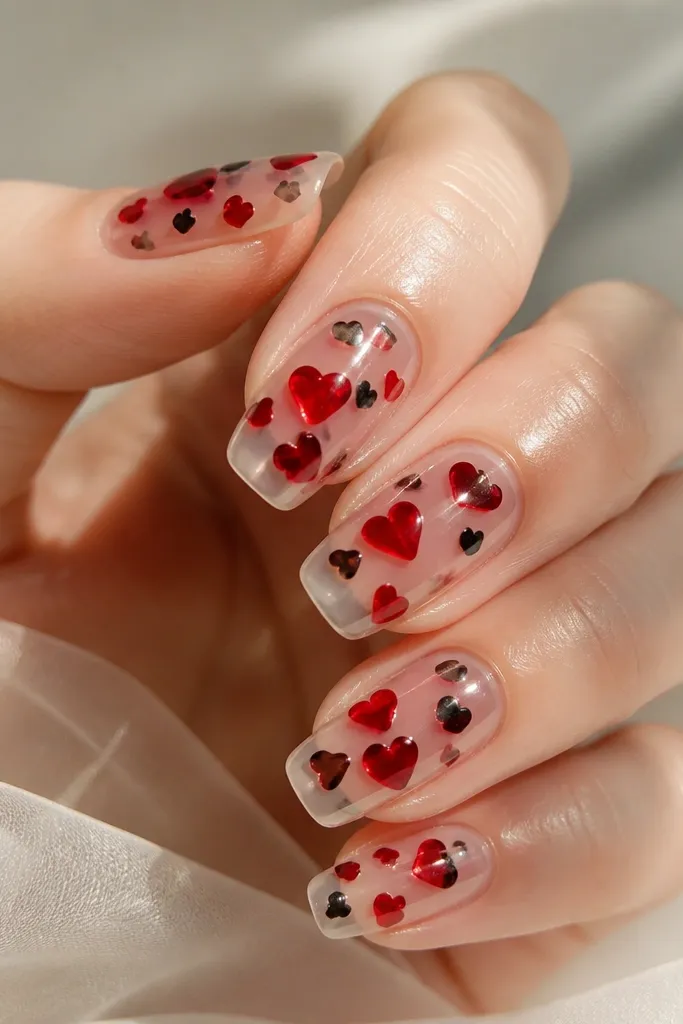
Jelly base nails look cozy because they feel light, like glossy candy. Hearts float instead of sitting on top of thick gel, so the set grows out better. I like this for people who hate heavy nail art but still want Valentine style. It flatters short nails because the clear base keeps them looking longer. On all skin tones, the red stays soft and romantic instead of harsh.
Apply a clear jelly base and cure, then add a second thin jelly layer for that glassy look. Place small hearts using a stamping plate or freehand: alternate red hearts and tiny black hearts, keeping them mostly near the middle of the nail. If you’re stamping, use a light press so the hearts don’t look raised. Cure and seal with glossy top coat, then cap the free edge. Leave a tiny bit of negative space around each heart so they look suspended.
Use a toothpick to nudge hearts into place before curing if they shift.
Don’t pack hearts too close together — it turns into a sticker wall.
21. Black Base With Red Heart Stamping On Two Nails
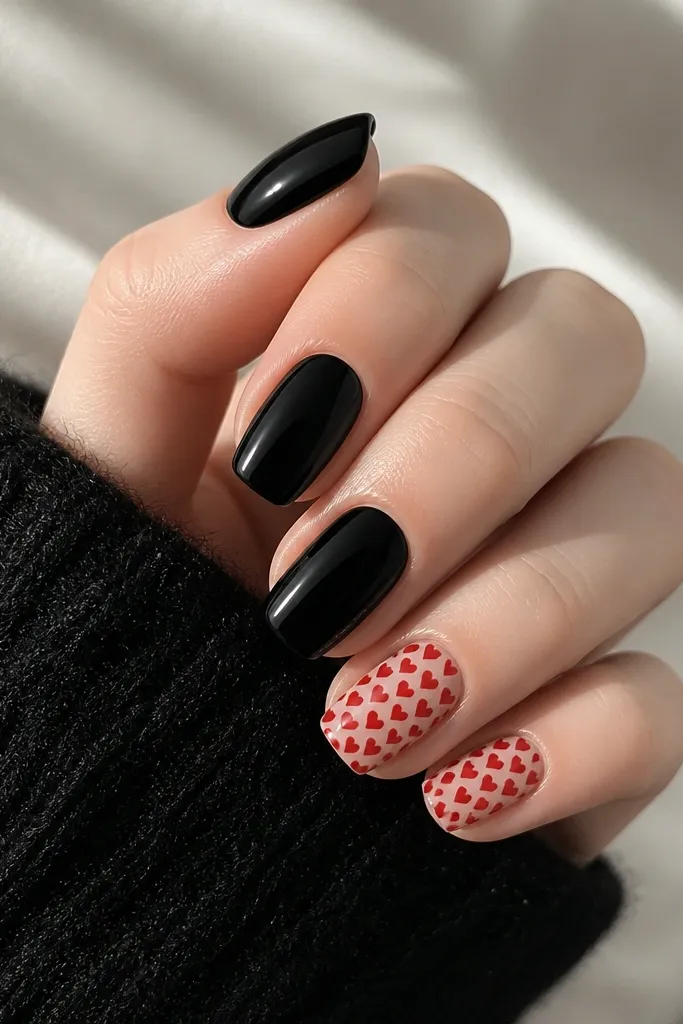
Stamping is cozy because it gives you clean lines without hours of hand-drawing. With a glossy black base, the red stamp looks sharp and intentional. I like doing it on two nails because the rest stays simple and the set still feels wearable. This is flattering on both short and medium nails since stamping patterns fill space evenly. On deeper skin tones, the contrast is strong enough to show even in low indoor light.
Paint all nails glossy black in two thin coats and cure. Choose two accent nails and stamp a red heart pattern using a heart plate — apply stamping polish, scrape, then press the stamp onto the nail. Clean up the edges with a small brush dipped in acetone. Add a thin clear gel layer over the stamp to smooth any texture from stamping, cure, then top coat glossy on all nails. Cap the free edge on the accent nails so the stamp doesn’t lift.
Wipe the stamping plate with a lint-free wipe right before stamping for sharper transfer.
Don’t skip the smoothing gel over the stamp if your top coat alone makes it feel bumpy.
22. Red Ombre Tips Over Matte Black Mid-Nails
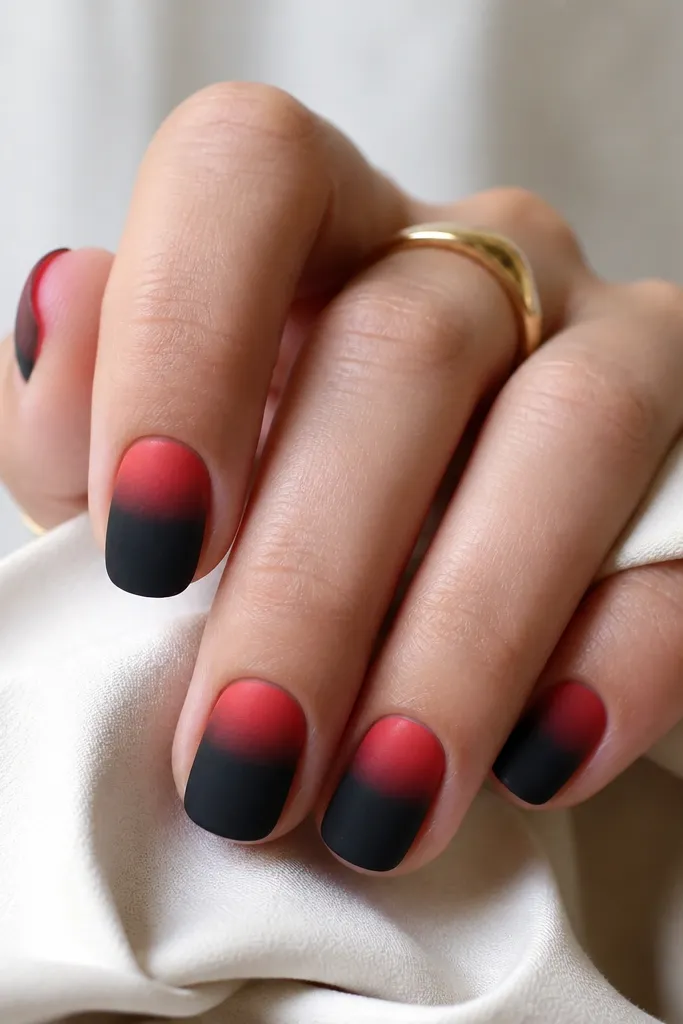
This design feels cozy because it blends soft red into a grounded black base. The matte black mid-nail hides imperfections and makes the red tips look like warmth at the end of your fingers. I like it on short to medium nails because the ombre doesn’t overpower the nail bed. It’s flattering on hands with shorter cuticles too since the nude transitions keep things smooth. The principle is split focus: black anchors the hand, red lifts the look at the tip.
Start with a sheer nude base and cure. Sponge on red ombre starting from just above the nail tip line, blending down toward the midline — cure. Once the red is set, cover the lower half with matte black gel using a striping brush, leaving the red ombre visible. Cure again, then top coat only the red area with glossy top coat if you want contrast, or keep everything matte for a softer look. Cap the free edge with a thin layer over the red tip so it stays smooth.
Mark the split line lightly with a tiny dot of nude gel so your matte black edge stays straight.
Don’t make the matte black edge too thick — it looks like a harsh stripe.
23. Black Hearts In Red Outline On Nude Nails
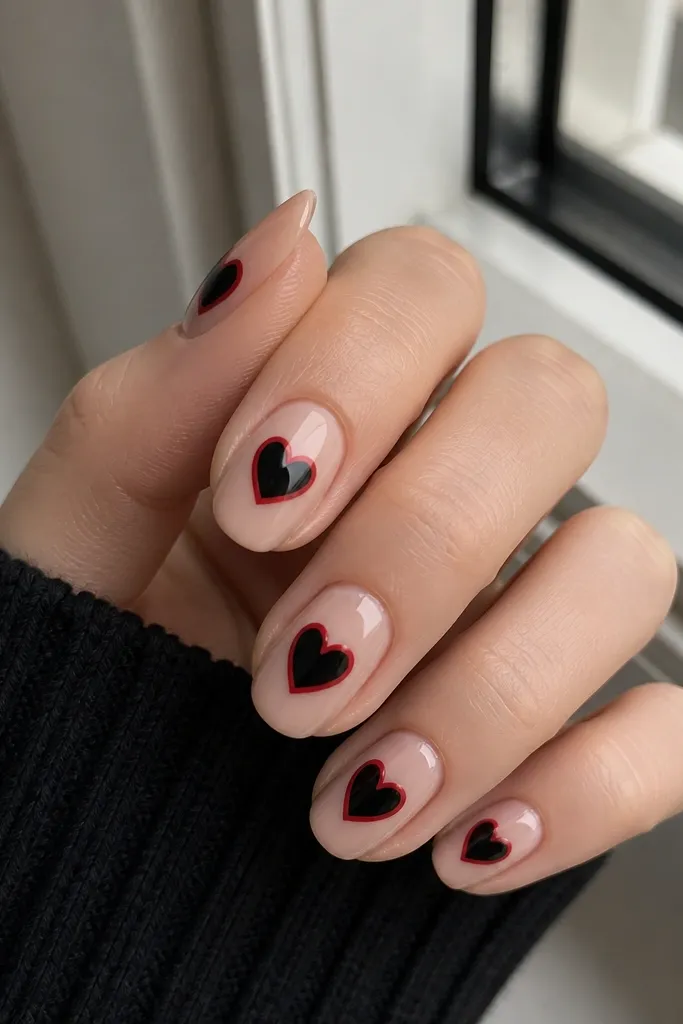
This is the cleanest Valentine set when you want hearts that look modern and not childish. The nude base keeps it cozy and wearable, while black hearts give a classy contrast. The red outline adds that Valentine punch without covering the whole nail. It’s flattering on medium almond and short oval because the heart shape sits nicely in the center. On fair skin, the nude looks fresh; on deeper skin, the nude base can be swapped for a sheer rosy nude so it doesn’t disappear.
Apply a nude base gel and cure. Paint black hearts centered on each nail using a liner brush — keep the heart shape about 3-4mm tall. Let the black hearts cure, then add a thin red outline around the heart edges with a fine detail brush. Cure again, then top coat glossy. Cap the free edge lightly so the outline doesn’t catch.
Editor's noteUse a red gel that’s opaque enough for a single outline pass, or you’ll get patchy lines.
Watch outDon’t outline in a thick layer — thick outlines look like stickers.
24. Black And Red Half-Swirl French With Hearts
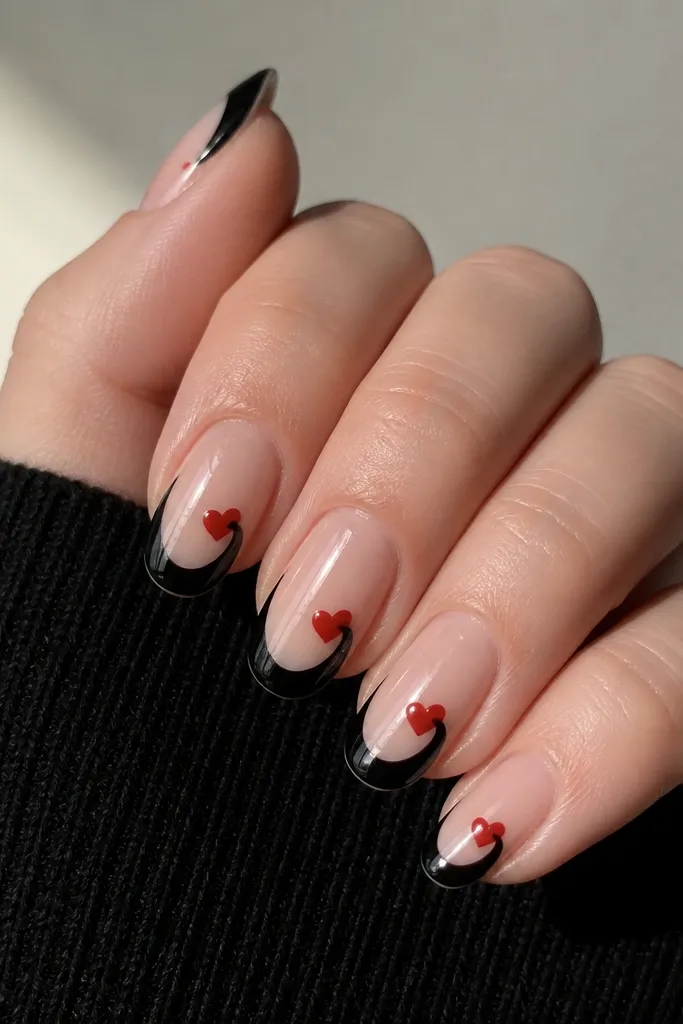
Swirl French feels cozy because it looks like a handwritten flourish. The black tip is sculpted and neat, and the red hearts at the swirl ends give a romantic payoff. I like this when I want something a little more detailed but still clean enough for a dinner reservation. It flatters medium length because the swirl needs space to show. On warm skin tones, red hearts look like a soft blush-red; on cool tones, they look like classic red lipstick.
Start with a sheer nude base and cure. Paint a black French tip, but instead of a simple curve, extend it into a soft swirl at the outer edges of the nail — cure. On each nail, place a small red heart right at the end of each swirl, so the heart looks like it’s “anchoring” the flourish. Keep hearts tiny and centered on the swirl ends. Finish with glossy top coat and cap the edges.
Editor's noteIf your swirl looks uneven, practice one nail on a display finger first and match the same hand movement.
Watch outDon’t make hearts bigger than the swirl tip — the balance will tip into clutter.
25. Cocoa Black Nails With Cherry Red Heart Chain Links
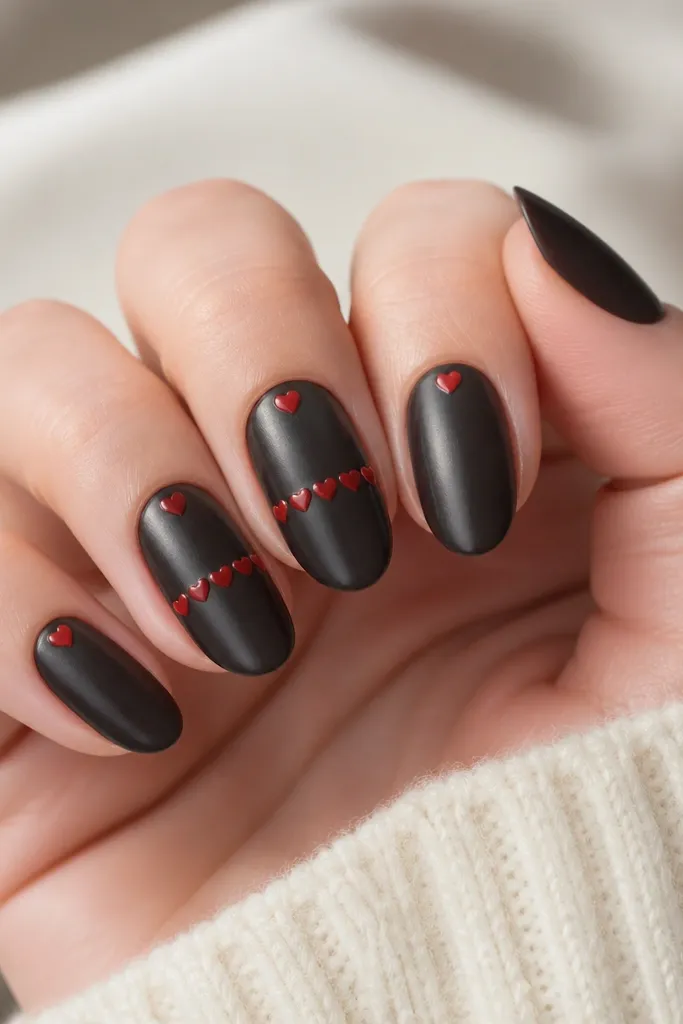
I did this one for a cozy Valentine dinner because it looks sweet without going full pink overload. The cocoa-black base has warmth, so the cherry-red hearts look brighter and a little more romantic than they would on flat jet black. The chain-link layout makes the hearts feel intentional, not randomly placed, and it gives your nails movement as your hands move. I like doing it with two accent nails plus tiny cuticle hearts on the rest so the design reads clean instead of busy.
Start with two thin coats of cocoa-black creme polish. Let it dry fully, then seal with a glossy top coat if your base dries slightly flat. Use a striping brush to paint a straight guide line across the accent nails where the chain will sit, centered from sidewall to sidewall. Dot small cherry-red hearts along that line, alternating left and right like links, then connect them with a super-thin red line so the hearts look interlocked. Finish by adding one tiny heart near the cuticle on each non-accent nail and top coat everything with two careful coats for a smooth, glassy feel.
Editor's noteIf your hearts look wobbly, place the first two links, cure or dry them, then fill in the rest so you can keep the spacing even.
Watch outDon’t make the hearts too big — if they cover the whole nail, the chain effect disappears.



