
1. Crimson Base With Matte Black Half-Moons And Gold Foil Ring Finger
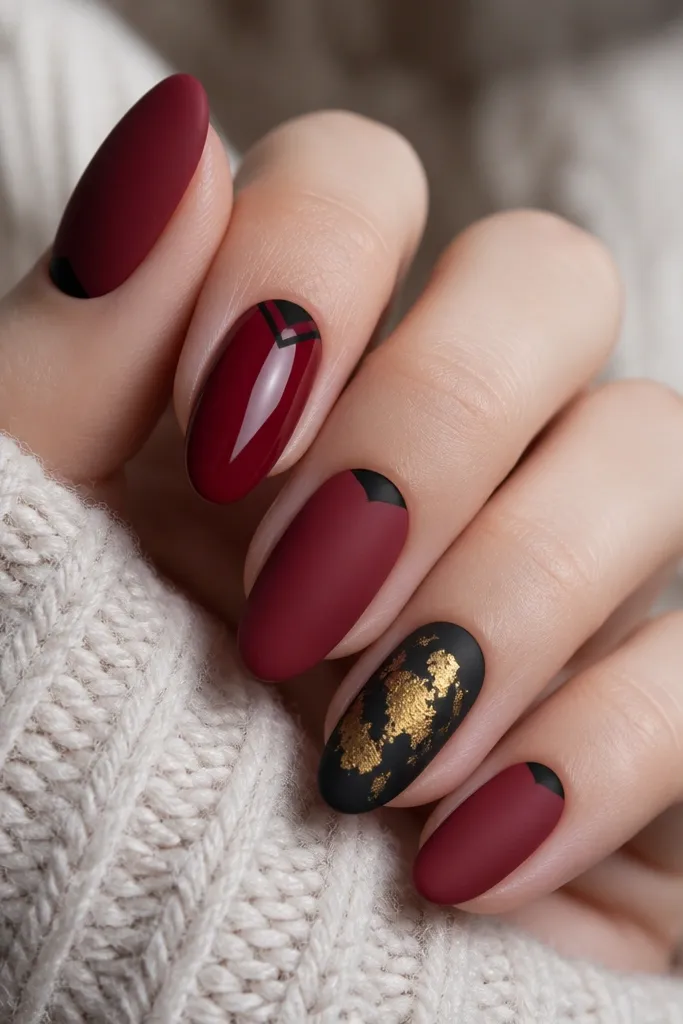
Paint two thin coats of crimson on all nails, then cure or fully dry. On thumb, middle, and pinky, sponge or stamp a matte black half-moon right under the cuticle line — keep it small, about 1/8 inch tall. On the index nail, pull a matte black V from mid-sidewalls toward the tip, then keep the center red. Finish the ring finger with matte black, then press gold foil pieces in the center and seal with top coat, focusing on the foil edges so they don’t snag.
Start with a blue-toned crimson base because it stays flattering next to gold under harsh lighting. The matte black half-moons near the cuticle give shape without taking over the nail, and matte makes gold foil look sharper instead of brassy. This set flatters hands with short to medium nail beds because the half-moons create an illusion of length. It’s also great for warm skin tones because the crimson has a cool undertone that keeps everything from turning orange.
Watch outAvoid a thick gold foil blob — it lifts and catches on sweaters.
Editor's notePress gold foil with a silicone tool or tape edge, then wipe stray bits away before top coat so it stays crisp.
2. Black Gloss French Tips Over Red Jelly With Micro Gold Lines
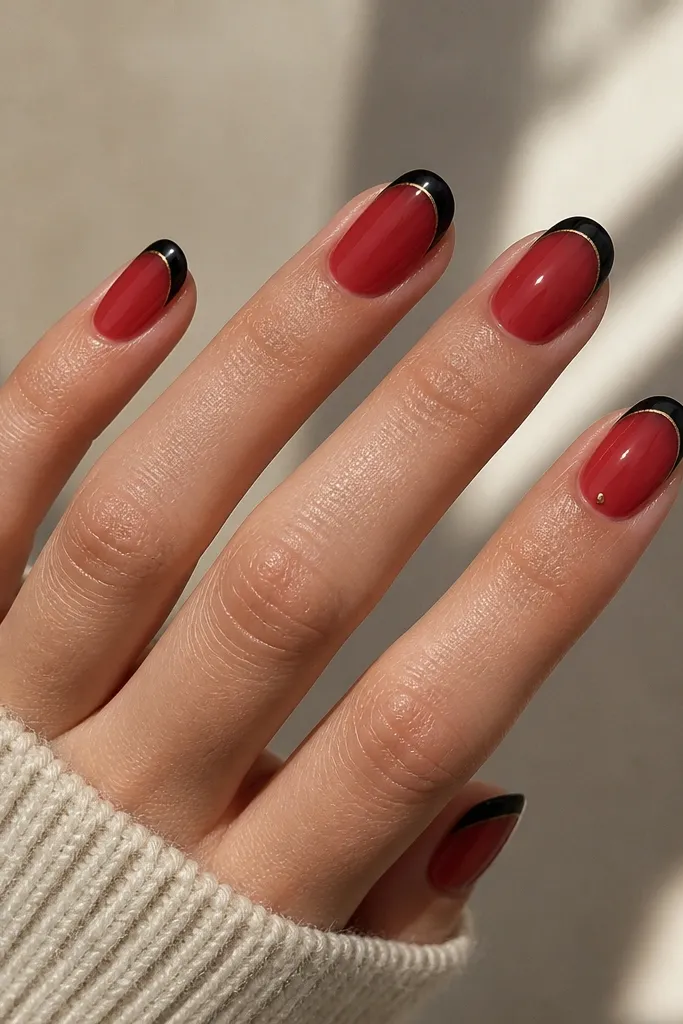
Apply a red jelly base in two light coats so it stays translucent, then top coat lightly. Create French tips by using a guide sticker or freehand: paint the tip glossy black and keep the line super thin. While the black is still slightly tacky (gel) or right after polish sets (regular), add a micro gold striping line along the inner edge. On the ring finger, add a tiny gold dot at the outer corner of the tip, then seal everything with a glossy top coat.
This design looks luxe because the jelly red keeps it soft while the glossy black tips give sharp contrast. The micro gold line is the secret — it reads like jewelry, not decoration. I’ve worn this with both red lipstick and a black dress, and it matches either without fighting your outfit. It works best on medium-length nails because the French edge needs space to show clean lines.
Watch outSkip bulky gold stickers — thick pieces look heavy and cheap on a French tip.
Editor's noteUse striping tape as a straightedge for the gold line, then remove it immediately for a clean edge.
3. Red And Black Flame Sides With Gold Chrome Center Stripe
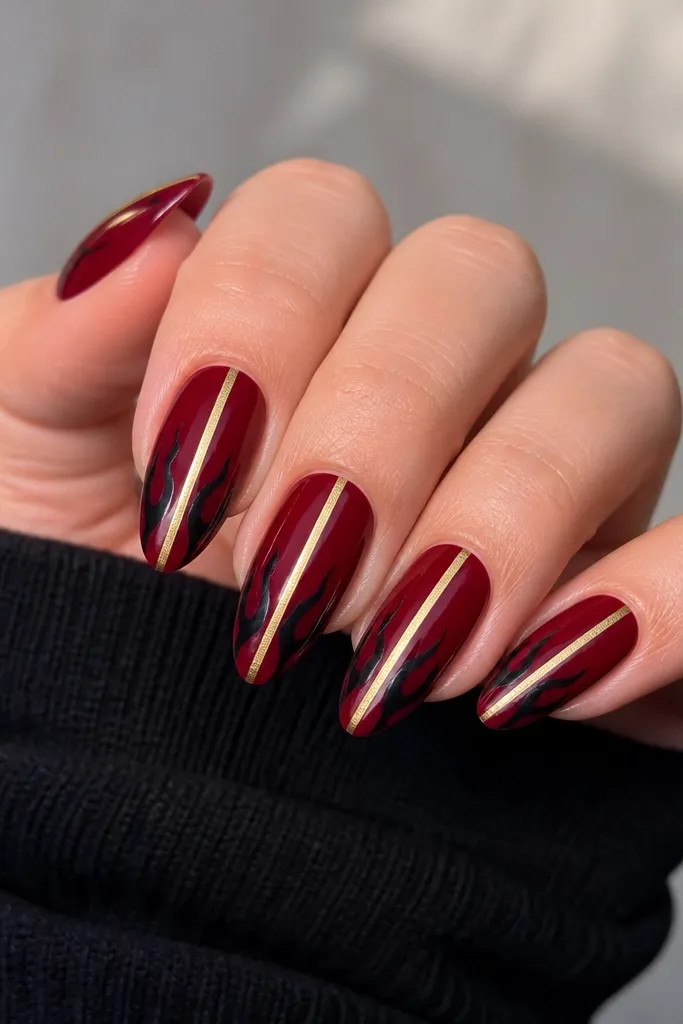
Flames are bold, but the gold center stripe keeps them from looking random. I use a gold chrome that’s mirror-like because it catches club lights and makes the red look richer. This set flatters hands with a slightly wider nail bed because the center stripe visually narrows the nail. It also looks great on darker skin tones because the contrast between black and crimson pops cleanly.
Start with two coats of deep crimson, then top coat lightly and cure fully. Paint black flame shapes on both side edges using a thin liner brush, leaving the center clear. Keep the flame point about 1/3 of the way down from the tip so it doesn’t cover the whole nail. Add a vertical gold chrome stripe in the center using chrome powder over gel or a chrome pen, then seal with a high-gloss top coat that won’t dull the chrome.
If your flames get messy, clean the edges with a cotton swab dipped in acetone before curing.
Don’t put gold chrome over thick black — it can look grainy instead of mirror-smooth.
4. Matte Black Full Coverage With Red Velvet V-Cut And Gold Stud Accent
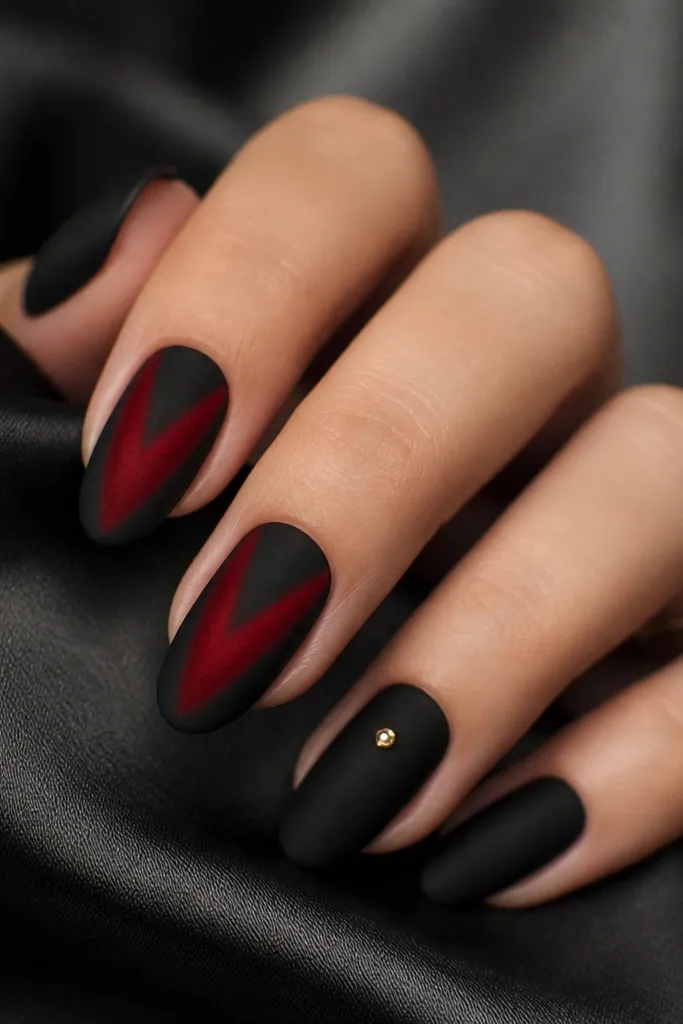
Matte black full coverage is the fastest way to make nails look expensive, and the red V-cut gives you a clean focal point. The red looks like velvet when you use a slightly textured finish — even regular matte polish mixed with a touch of matte top coat can get you there. This design looks best on almond or squoval nails because the V shape frames the tip and makes fingers look longer. It’s also a dream for formal events because it reads polished even in low light.
Paint matte black on all nails with two thin coats, then cure and skip extra shine. On index and middle, place a V using red matte polish: start at the mid-sidewalls and bring the lines toward the center near the tip, then fill the center panel. Leave the edges crisp — use tape if you struggle with straight lines. On the ring finger, place one small gold stud on the center area and press it firmly into tacky gel, then seal around it with top coat.
For the red velvet look, add a matte top coat over the red after it dries, not before.
Avoid a shiny top coat over the matte black — it kills the luxe contrast.
5. Glossy Red Base With Black Crackle Overlay And Gold Leaf Corners
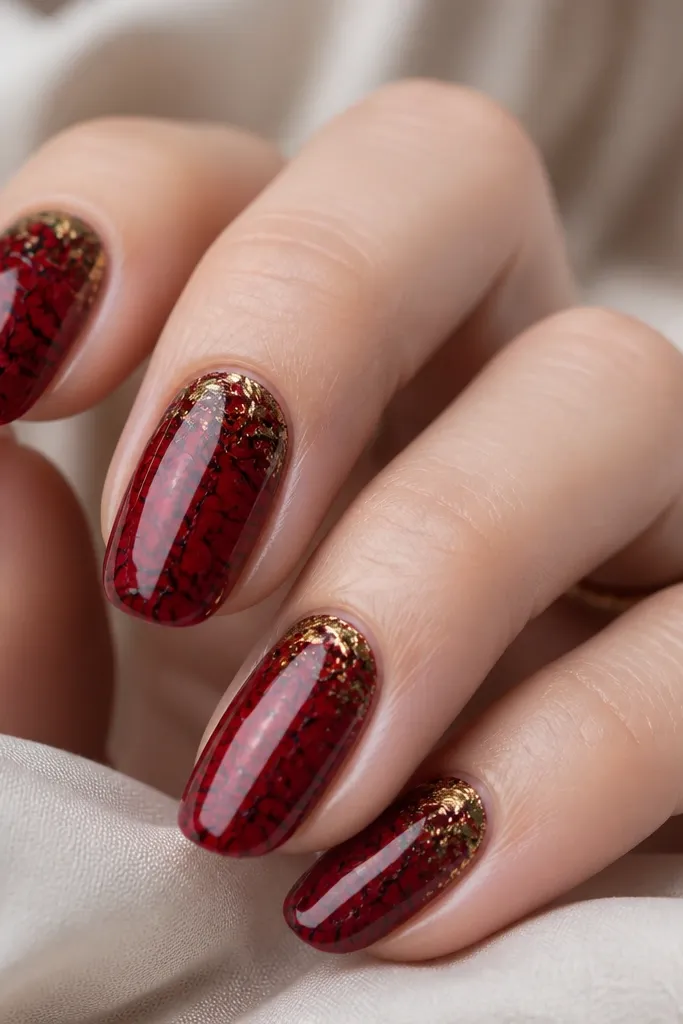
Crackle polish looks dramatic because it creates natural-looking fractures, and black crackle over red looks like a high-end lacquer finish. Gold leaf in the corners makes it feel like jewelry hardware instead of festival nails. This set works on short nails too because crackle fills the space without needing length. I’ve seen it photographed in flash and it still looks sharp because the crackle lines catch light.
Apply glossy crimson in two coats and let it fully dry or cure. Add the black crackle overlay over the red, then avoid touching it while it sets so the pattern stays even. Place small gold leaf bits at the top corners near the cuticle — about two pieces per nail — then press gently. Seal with a thick top coat to lock the leaf and smooth the surface.
Press gold leaf with a flat brush handle so the flakes sit down instead of sticking up.
Don’t use too many gold pieces — corner accents should stay minimal.
6. Black Gradient From Tip Into Red Fade With Gold Foil Accents
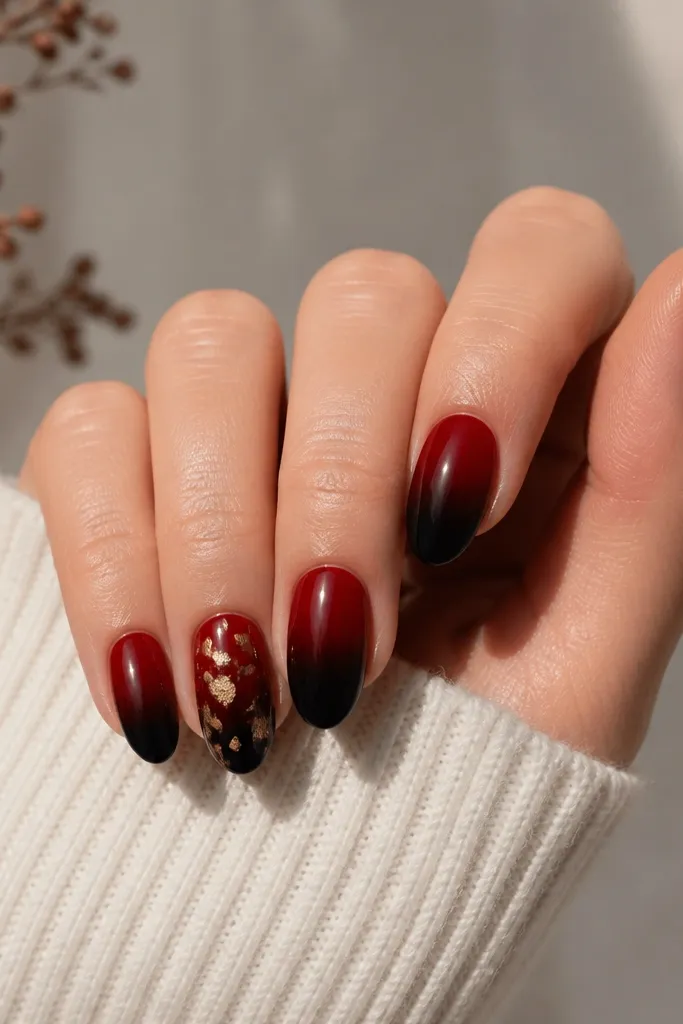
Start with crimson base in two coats. Sponge black polish onto the tip area, blending upward with a clean makeup sponge so there are no harsh lines. For the ring finger, add gold foil confetti pieces on the mid-nail where the colors meet so it looks like light scattering. Seal everything with a glossy top coat, and do a second top coat on the gradient nails because sponge edges can feel rough.
A gradient is luxe when it’s smooth, not streaky. The black-to-red fade looks sleek on both square and almond nails, and it makes your hands look longer because the darkest area is at the tip. Gold foil confetti on just one or two nails adds party glam without making every nail compete. This is a smart choice if you want the vibe of heavy nail art but you still want it to look clean with everyday outfits.
Watch outAvoid painting the gradient too high — keep black mostly on the last third of the nail.
Editor's noteUse a damp sponge for blending so the gradient stays soft.
7. Red Velvet Matte With Black Lace Stamping And Tiny Gold Frame
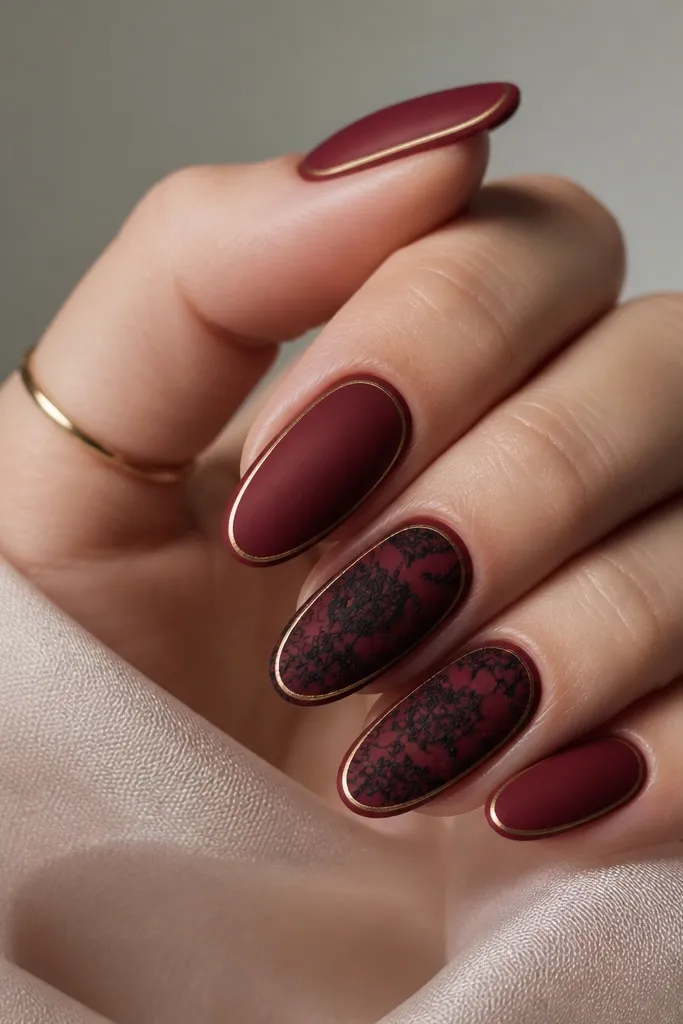
Paint matte deep red on all nails, then let it dry fully so stamping doesn’t smear. Use a lace stamping plate with black polish and stamp onto the middle and ring nails, pressing firmly once and lifting straight up. Add a thin gold border line around those nails using striping tape or a fine liner brush, placing it about 1mm inside the sidewalls. Top coat with matte top coat on the red areas but use glossy top coat only on the gold border for contrast.
Lace stamping turns this combo into something party-ready but still delicate. The matte red gives a velvety background so the black lace looks crisp, and a thin gold border makes it feel like couture. This set is flattering on medium-length nails because lace needs space to show its holes and loops. It also looks great on hands with warm undertones because the red is deep enough to stay flattering next to gold.
Watch outDon’t stamp over wet matte polish — the lace turns fuzzy.
Editor's noteClean your stamp with acetone right before stamping so the lace lines pick up perfectly.
8. Black Gloss Sidewalls With Red Center And Gold Outline On Almond Nails
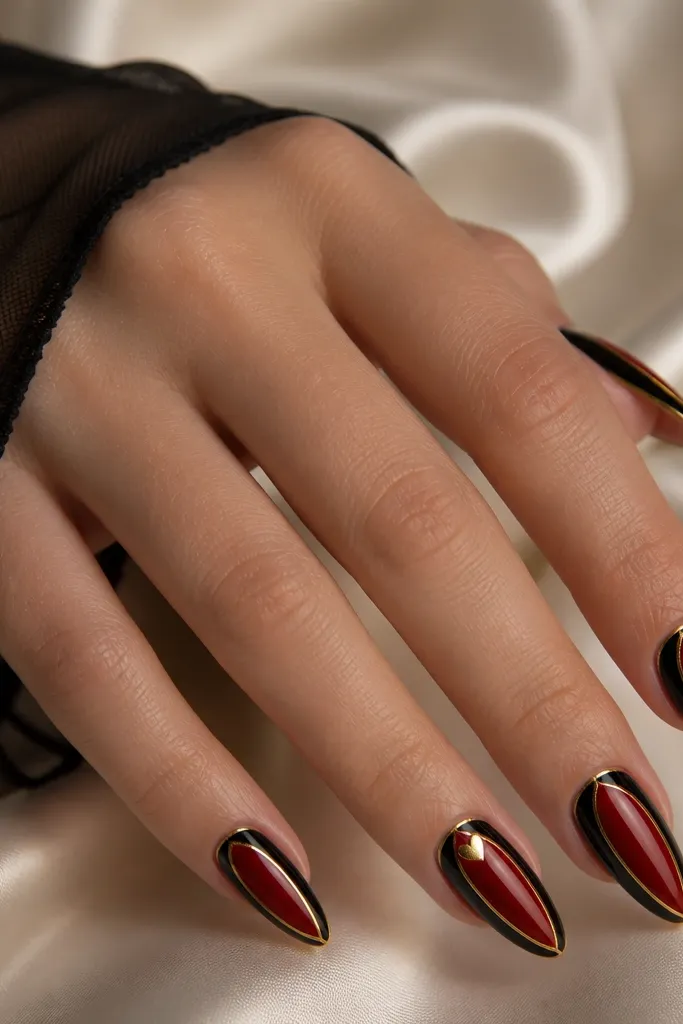
This is one of my favorite “luxe but wearable” looks because it gives you structure. The black sidewalls slim the nail visually, and the gold outline makes the shape look intentional. I wear this when I want my nails to look sharp with both black outfits and red dresses. It flatters almond nails the most, but you can do the same concept on squoval if you keep the sidewalls narrow.
Paint the entire nail red first and cure or fully dry. Add glossy black only on the sidewalls, leaving the center untouched — use a striping brush and stay inside the side edges. Outline the outer perimeter with a thin gold striping line, keeping it even on each nail. On the ring finger, place a tiny gold heart at the cuticle corner and seal over it with top coat.
If your gold outline looks wobbly, use striping tape to set the curve before painting.
Avoid flooding gold into the corners — it makes the perimeter look thick and cheap.
9. Red Gloss Base With Black Dot Cluster and Gold Starburst Accent
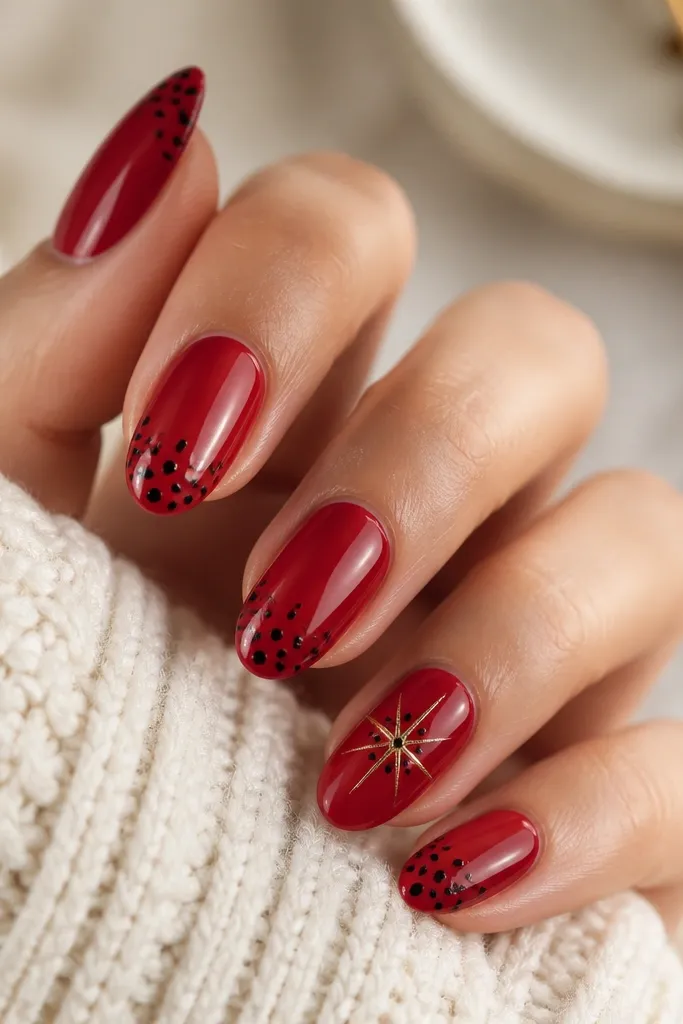
Paint two coats of glossy crimson and top coat once it’s set. Add black dots near the tip using a dotting tool: start with 1 larger dot, then surround it with 4-5 smaller dots so it forms a tight cluster. On the ring finger, skip the dot cluster and instead draw a gold starburst: place a gold dot in the center, then draw 8-10 short lines radiating outward. Seal with glossy top coat to lock everything.
Dots look playful, but when you keep them tight and use a single starburst accent, it reads party glam instead of kiddie nail art. The glossy red makes the black dots pop, and the gold starburst brings in the “jewelry” vibe. This set flatters short nails because dots and star shapes fill space without needing length. It’s also great for holiday parties where you want something that looks good in both indoor lighting and phone flash.
Watch outDon’t scatter dots across the whole nail — keep the cluster near the tip.
Editor's noteUse a toothpick for the smallest gold lines so they stay thin.
10. Black Marble Veins Over Red Jelly With Gold Micro Drips
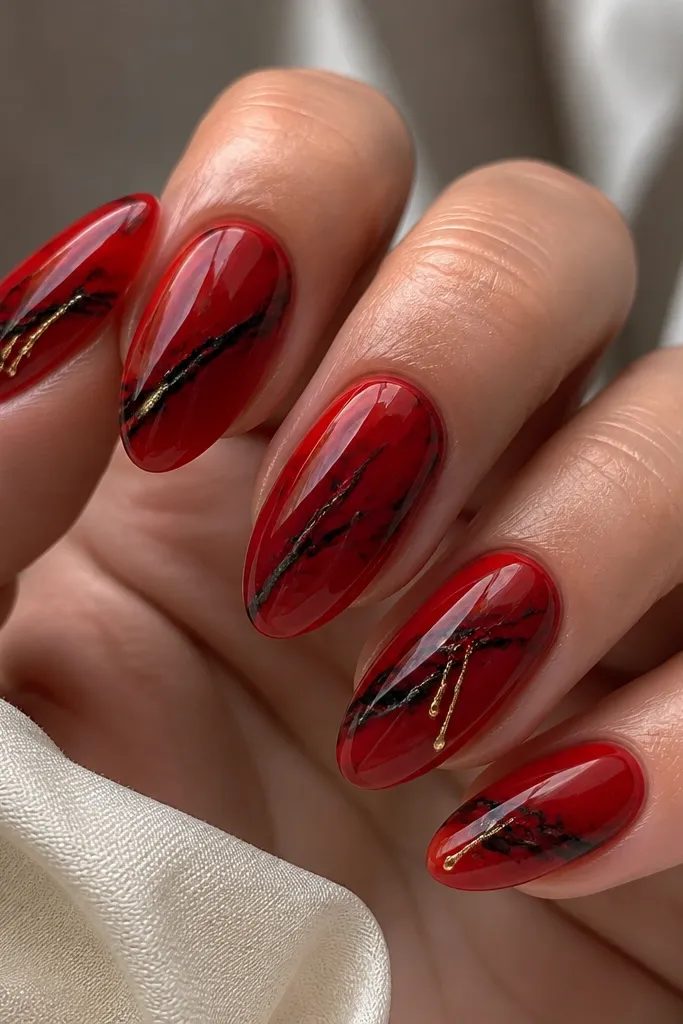
Apply a red jelly base in two thin coats for translucency. Use a thin liner brush to paint black veins that curve and branch, leaving gaps so the jelly shows through. Add gold micro drips only on two nails: load a fine brush with gold paint or gold gel and pull tiny drips from where a vein crosses, about 2-3mm long. Finish with a glossy top coat and cap the free edge so the marble lines don’t catch.
Marble nails look luxe when the base stays translucent and the veins look fluid, not painted-on. The red jelly underlayer makes the black veins look darker and richer, and gold micro drips add that “designer spill” effect. This set looks great on hands that already have length because the veins guide the eye upward. It also works for skin tones from fair to deep because the red jelly is sheer enough to stay flattering.
Watch outAvoid thick black filling in the marble — it turns into flat stripes.
Editor's notePractice the vein pattern on a paper nail tip first so your curves look natural.
11. Red Chrome With Black Bow Tie Accent And Gold Outline
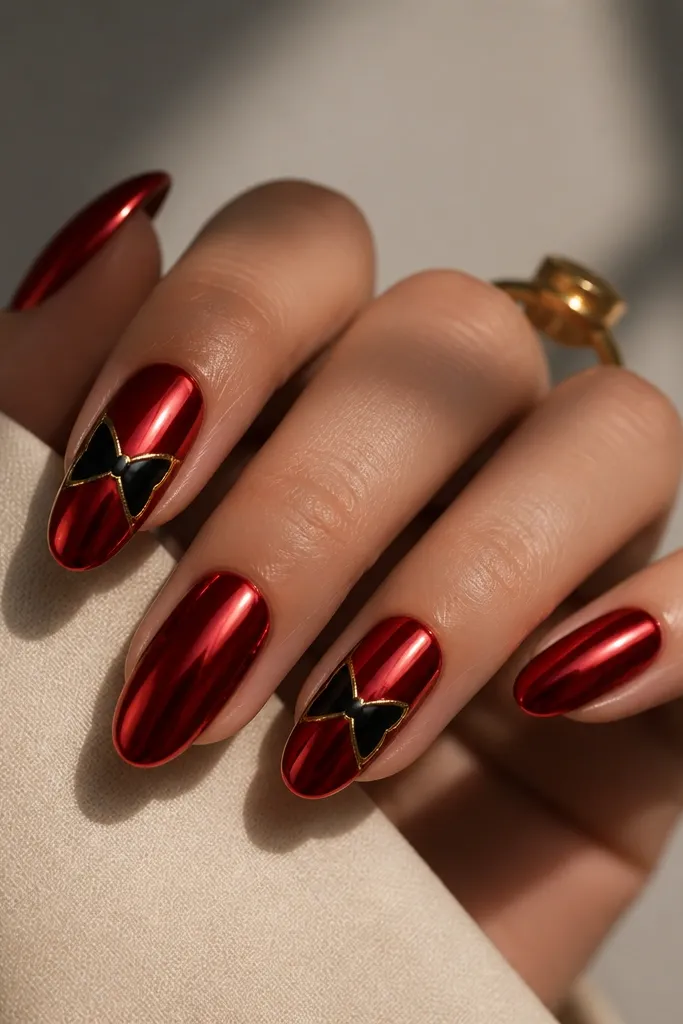
Apply red chrome gel (or chrome powder over red gel) in two layers so it’s mirror-smooth. On index and ring nails, paint a bow tie using black gel: two triangles for the ends and a small center knot. Outline the bow edges with a thin gold gel line, then cure. Seal the entire nail with a chrome-friendly top coat that won’t dull the finish.
Chrome reads luxe instantly because it reflects light evenly, and red chrome makes your hand look warmed-up without turning orange. The black bow tie is a party detail that feels intentional and a little playful. Gold outlining keeps the bow crisp so it doesn’t look blurry against the chrome shine. This set flatters medium-length nails and looks amazing with black outfits, especially if you wear a red bag or earrings.
Watch outDon’t use matte top coat over chrome — it kills the mirror effect.
Editor's noteUse a small flat brush to shape the bow knot so it stays symmetrical.
12. Black And Red Checkerboard With Gold Corner Gems
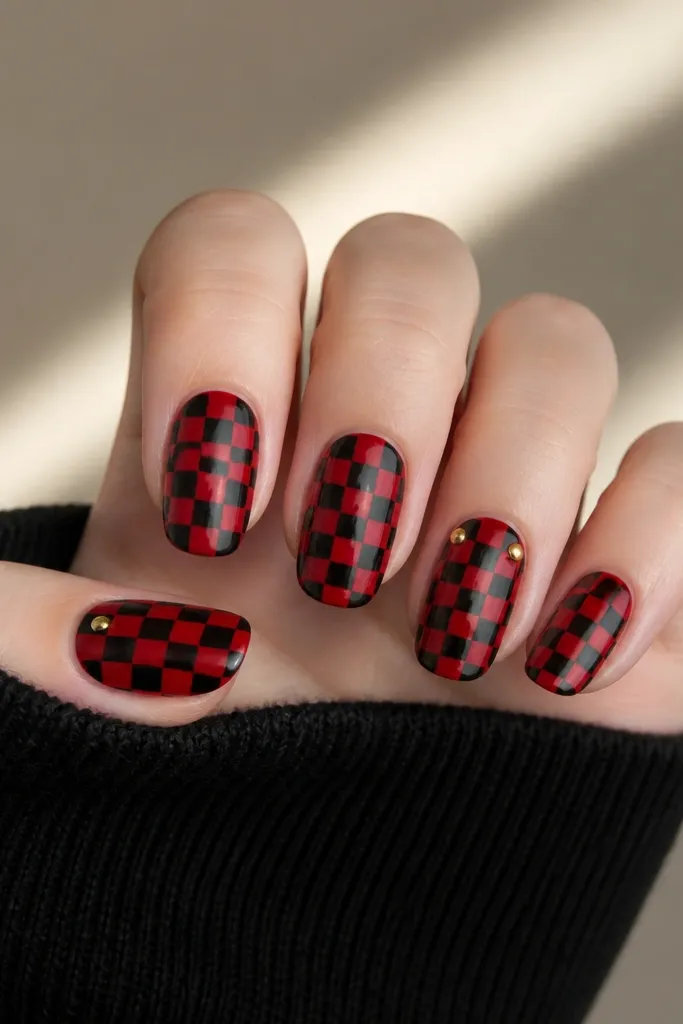
Checkerboard can look cheap if the squares are uneven, but when the grid is straight and the colors are saturated, it looks like luxury fabric. Gold corner gems add that “evening accessory” feel without covering the whole nail. This set flatters short to medium nails because the pattern is self-contained. It also looks great on cooler skin tones because the black and blue-crimson contrast stays clean.
Paint a red base first and cure. Use striping tape to section the nail into a grid, then fill squares with black polish or gel. Remove tape carefully after each color sets so the lines stay sharp. Place small gold gems at the top corners on ring finger and one corner on thumb, pressing them into tacky gel. Top coat over the rest of the gems and cap the free edge so the pattern stays smooth.
Measure your square size by using one width of tape as your unit — keep all squares the same.
Avoid freehand checkerboard without tape — wobbly squares scream DIY.
13. Red Ombre Tips Into Black With Gold Foil Halo
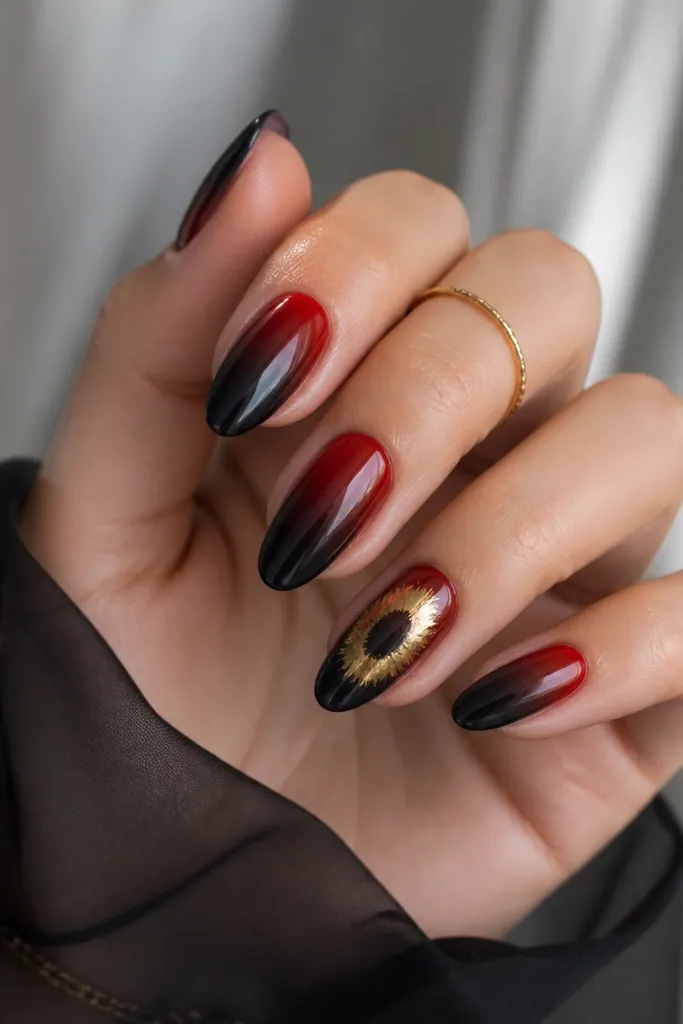
Paint red near the cuticle and blend toward the tip with a sponge using black, keeping the black concentrated in the last 20-25% of the nail. For the ring finger, after you build the gradient, press gold foil pieces into a semicircle around the middle — not at the cuticle, closer to center. Seal with glossy top coat, and add a second coat over the foil halo area so it doesn’t catch or lift.
This is the “dressy but not busy” version of red-black nails. The ombre from red to black makes a smooth transition that looks expensive in motion, and the gold foil halo adds a focal point. It’s flattering on fingers with shorter nails because the gradient pulls the eye from cuticle to tip. I’ve worn this to dinners where I needed my nails to look good in both daylight and night lighting.
Watch outAvoid letting the black swallow the red — keep the transition visible.
Editor's noteUse a foam sponge with minimal product and build the black gradually to avoid muddy color.
14. Black Velvet Matte With Red Cuticle Stripe And Gold Line Over It
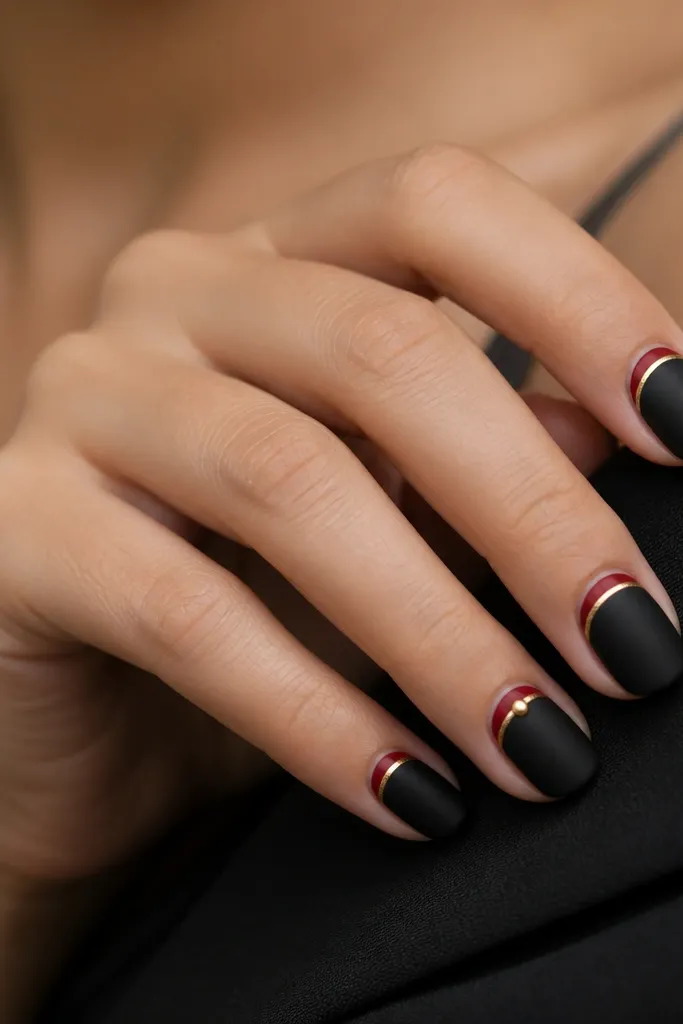
Apply matte black in two thin coats. Paint a thin red stripe above the cuticle on each nail, about 1mm tall, following the nail curve. Add a hairline gold line right on top of the red stripe using a striping brush or gold gel pen. On the ring finger, place a tiny gold dot at the stripe center. Seal with matte top coat on the black areas, but keep the stripe glossy if you want extra contrast.
This design looks luxe because it’s clean and graphic. The matte black gives you the “velvet” feel, the red cuticle stripe adds warmth, and the gold line makes it look like a manicure from a high-end nail bar. It flatters all nail shapes because the stripe is placed high and keeps the nail looking longer. If you have dry cuticles, this style also helps because the stripe draws attention to the top of the nail instead of the cuticle area.
Watch outAvoid thick stripes — they make the design look like stickers.
Editor's noteIf your cuticle stripe looks uneven, use a small brush to clean both side edges before curing.
15. Red Satin Sheen With Black Chevron and Gold Micro Studs
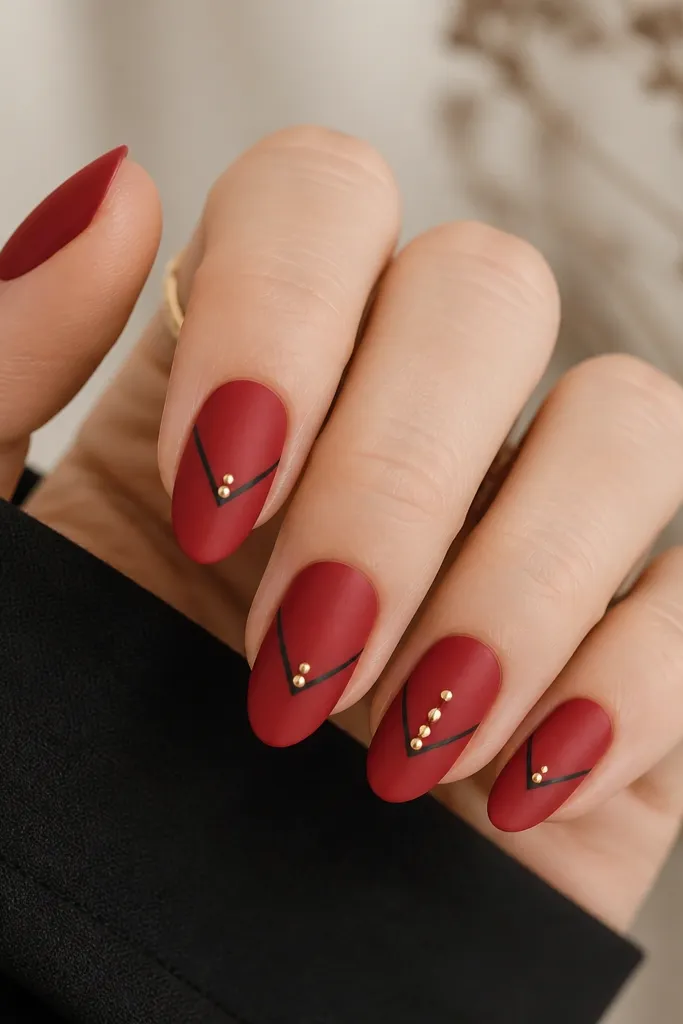
Apply red polish with a satin effect or add a satin top coat over a red base, then let it set. Paint a black chevron: start the arms near the side edges at mid-nail and meet at a point near the center of the tip. Place gold micro studs on each side of the chevron arms, pressing into tacky gel or using nail glue for regular polish. Keep studs small — think 1-2mm — and seal with a smooth top coat to prevent snagging.
Satin sheen looks expensive because it’s not as harsh as full chrome but still catches light. The black chevron is bold and makes fingers look longer, and the gold micro studs add a jewelry feel without turning into big rhinestones. This set is perfect for parties where you’ll be photographed at angles — the chevron shape reads clearly. It flatters hands with slightly wider nail beds because the chevron guides the eye toward the center.
Watch outAvoid large studs on short nails — they look top-heavy.
Editor's noteSpace studs evenly by placing them with tweezers and counting your nail’s width in your head.
16. Black And Red Marble Swirls With Gold Leaf Shards On One Nail
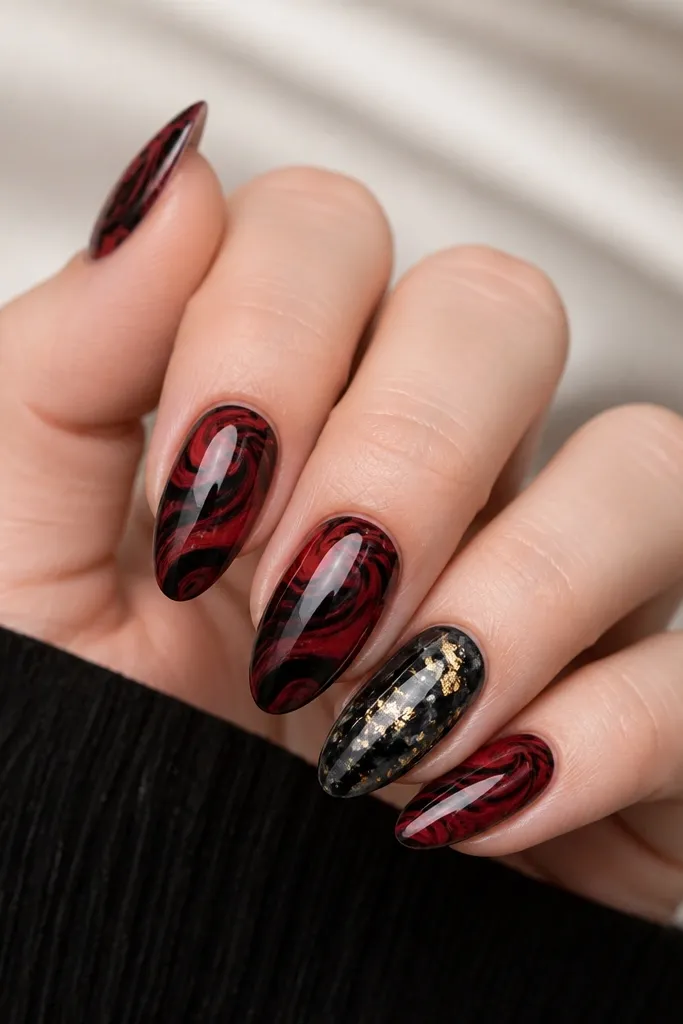
Paint a red base and cure fully. Use a marbling technique with black gel or polish: drop small amounts onto a palette, then drag with a thin brush to create swirl strokes, painting those strokes onto the nail. Add a second layer of marble if you want deeper contrast. On the ring finger, press gold leaf shards into the center over the black marble, then seal with glossy top coat and cap the edges.
Marble swirls give you movement, and the gold leaf shards make it feel like the manicure is catching real light. I keep gold to one accent nail so the set looks intentional and not like every nail is trying to grab attention. This design is flattering on long nails because the swirls follow the nail length and make the shape look elegant. It also works on medium nails if you keep the swirl path from cuticle to tip.
Watch outAvoid dull top coat — marble needs gloss to look luxe.
Editor's noteUse fewer black drops than you think, then build — heavy black makes marble look muddy.
17. Red And Black Half-Skull Face Paint With Gold Nose Bridge Accent
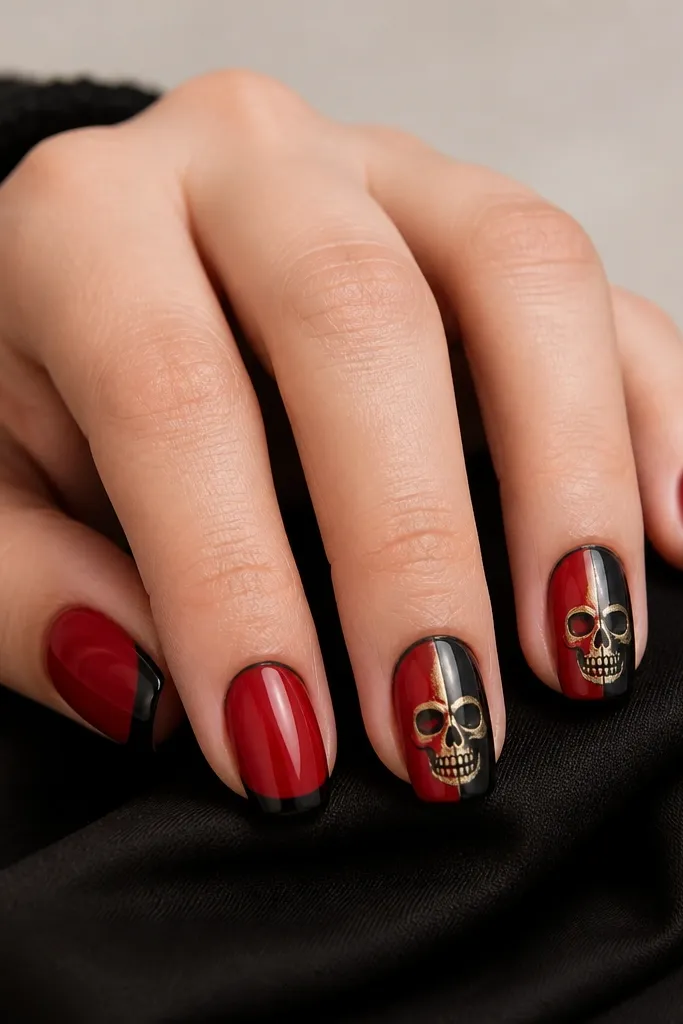
Paint solid red base on all nails. On index and ring, draw a skull mask shape using a nail art stencil or freehand: outline the cheek area and jaw line, then fill one half with black and keep the other half red. Paint the eye sockets as simple ovals in black or red depending on the split. Add a thin gold line across the center as the nose bridge and a small gold dot at the forehead. Seal everything with glossy top coat, especially around the edges of the face so it doesn’t lift.
This is party glam with an edge, and it works because the skull is stylized, not detailed. The split red and black gives instant contrast, and a thin gold nose bridge line makes it look like a wearable costume accessory. I like this for Halloween-adjacent parties or when your outfit is already bold. It flatters medium to long nails because the face needs space, and it looks great on hands with strong contrast between skin and nail.
Watch outAvoid tiny skull details — they blur in low light.
Editor's noteIf you mess up a line, wipe the area with a small brush dipped in acetone before curing — gel is forgiving early.
18. Black Glitter Fade Over Red Base With Gold Thread Lines
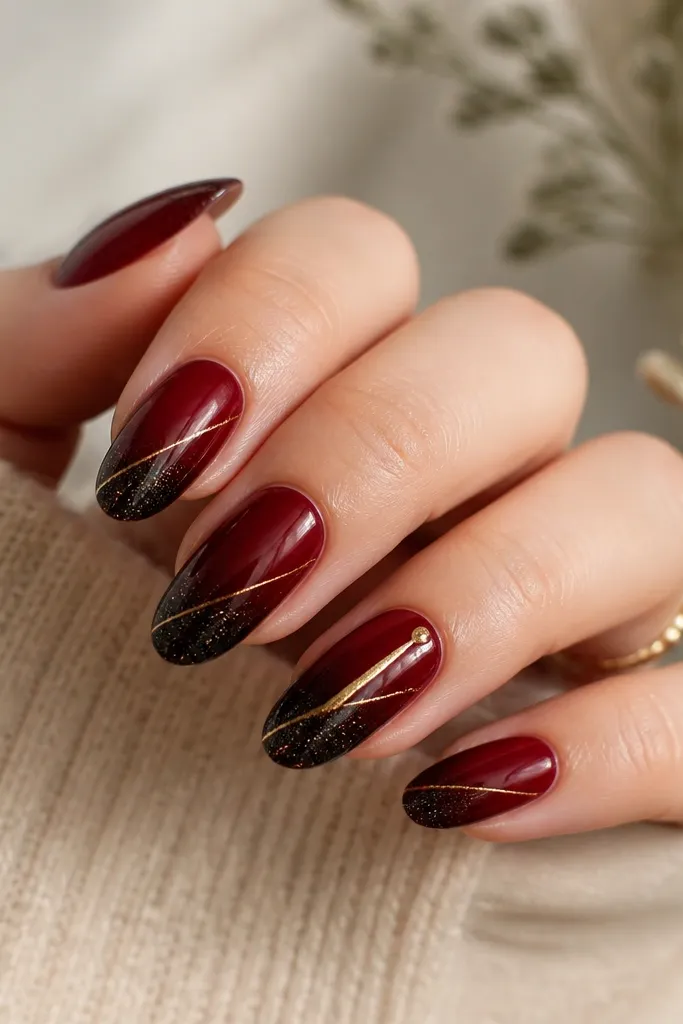
Apply two coats of deep crimson. Sponge black glitter onto the tips, blending up slightly but keeping most glitter at the last third. Use striping tape to place a diagonal guide line, then paint a thin gold line across the nail. On the ring finger, thicken the gold line and add one tiny gold dot near the tip. Seal with a glossy top coat, and do a careful second coat over glitter to smooth texture.
Glitter fades look expensive when the glitter is concentrated at the tip and doesn’t cover the whole nail. The red base keeps it warm, while black glitter adds that midnight party vibe. Gold thread lines make the set look like it has design details, not random sparkle. This flatters both short and medium nails because the fade creates an elongated tip.
Watch outAvoid glitter packed too high — it makes nails look bulky.
Editor's noteUse a glitter top coat to prevent gritty edges at the free edge.
19. Red Gloss Base With Black Outline Roses And Gold Petal Highlights
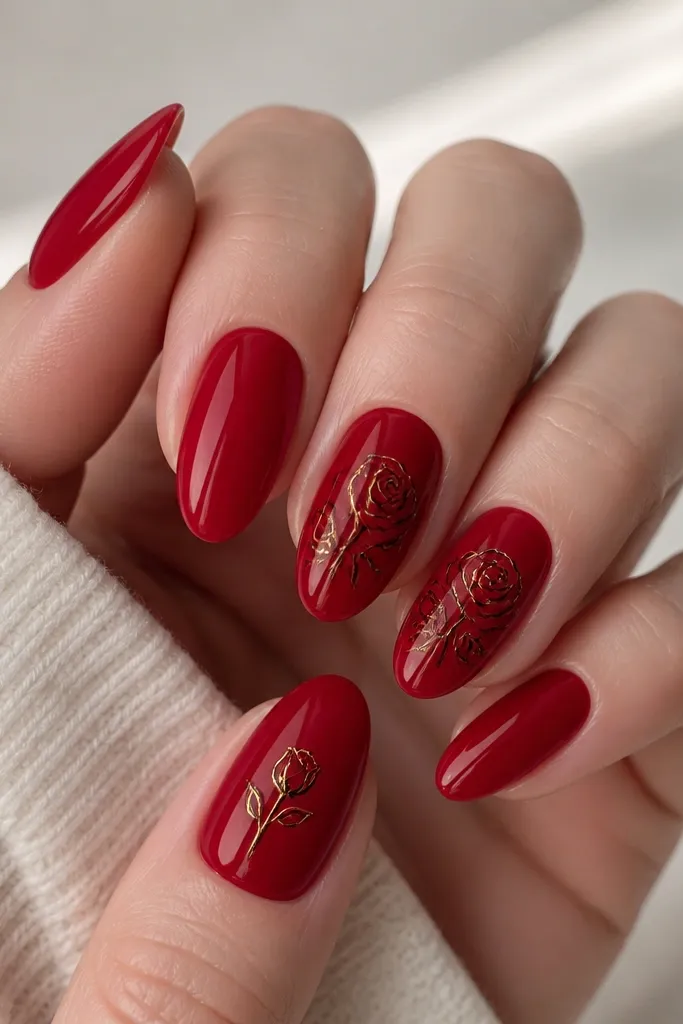
Paint glossy crimson on all nails. Use a rose outline stencil or freehand with a liner brush to draw black roses on the middle and ring nails — keep lines thin and leave red visible inside petals. Add small gold petal highlights by tapping gold paint on 3-5 spots per rose. On the thumb, draw a tiny rose bud with a gold center. Seal with glossy top coat, and cap the outline edges so they don’t snag.
Outline roses look luxe because they’re linework, not filled-in painting. The black lines keep it crisp against glossy red, and gold highlights add that “jewelry bouquet” effect. This set flatters fair to deep skin tones because the red is saturated and the outline stays sharp. It also looks great for date nights and birthdays because it feels romantic but still bold.
Watch outAvoid filling the rose with gold — it looks like a sticker, not a highlight.
Editor's noteIf gold looks streaky, mix gold paint with a drop of clear gel for smoother control.
20. Gold Chrome Tips Over Matte Black With Red Underlayer
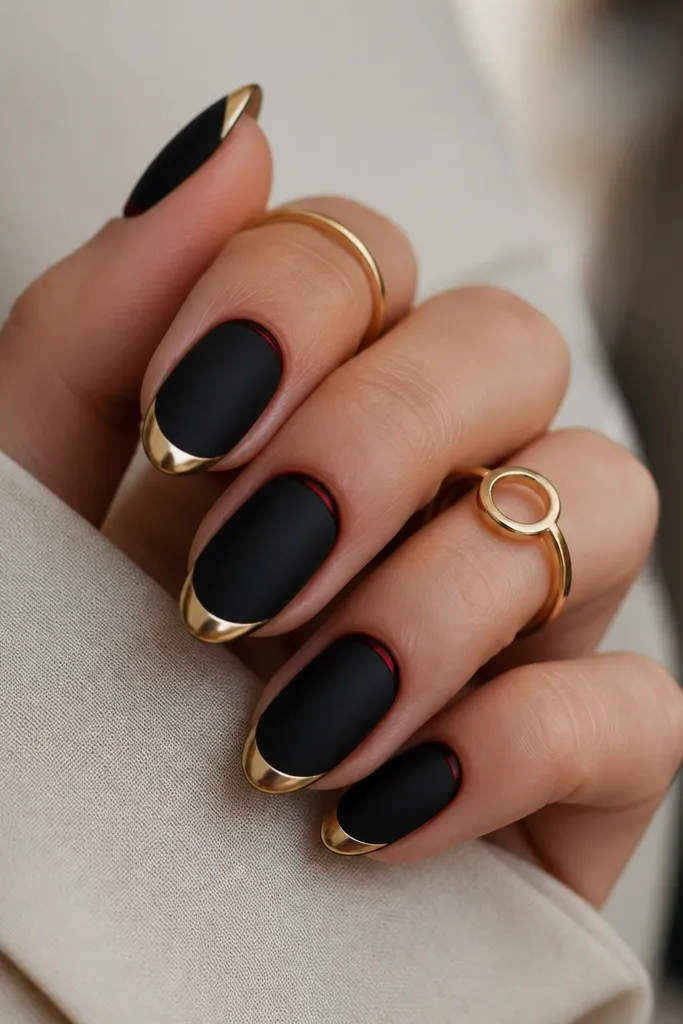
This design is clean and graphic, and the gold chrome tip makes it feel like party jewelry. The matte black keeps everything grounded, while the thin red underlayer adds warmth so it doesn’t look too cold. It’s flattering on short nails because the gold half-moon creates a length illusion at the tip. I like it for work parties too because it looks polished even when you’re holding a clipboard.
Start with a thin red underlayer at the cuticle area — just a crescent, about 1-2mm tall. Paint the rest of the nail matte black in two coats. Create a sharp gold chrome half-moon at the tip using chrome gel and a guide sticker so the curve is even. Cure fully, then seal with a chrome-safe top coat that keeps the mirror finish. Add one extra top coat only on the matte black to make it durable, not over the chrome.
Use a French tip sticker for the gold half-moon so the curve stays identical across nails.
Don’t blend gold into matte black with no edge — the design loses its clean look.
21. Red Base With Black Grid Lines And Gold Corner Sparks
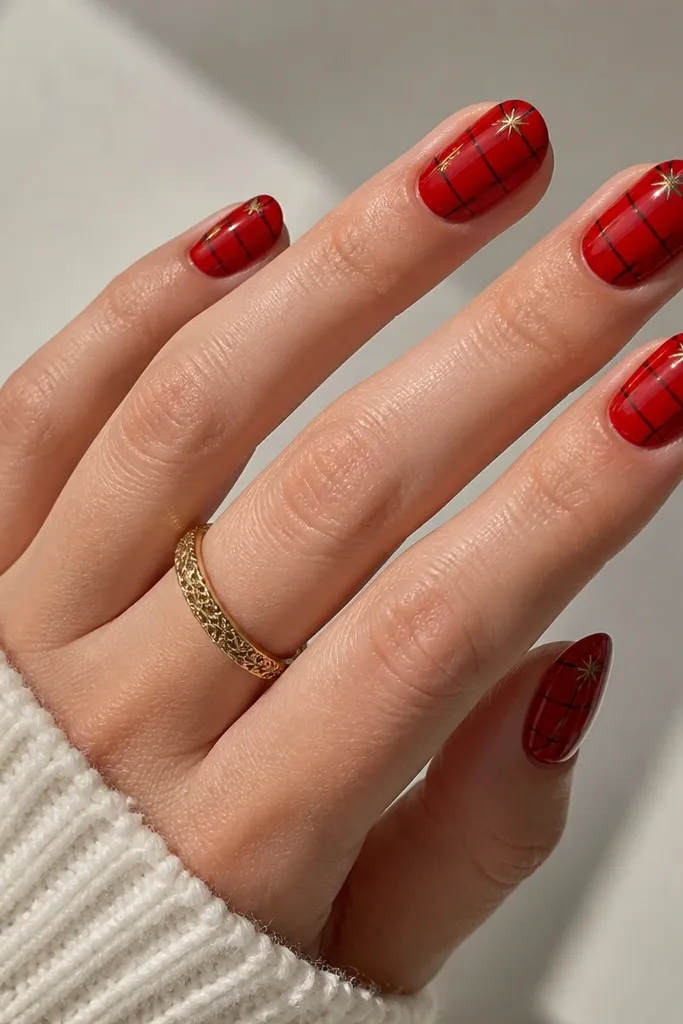
Paint glossy red in two coats. Add black grid lines using striping tape: place vertical strips, paint black over them, then remove tape and add horizontal strips to create the grid. On the thumb and ring finger, add a tiny gold spark at the top corner using a dot in the center and 4-6 short lines radiating outward. Seal with glossy top coat, and cap the tape-edges so the grid stays smooth.
A grid pattern looks modern and luxe because it’s structured. The black lines keep it crisp, and gold corner sparks add a party punch without cluttering the whole nail. This set flatters hands that like clean nail art because it looks neat even from far away. It also works well for medium-length nails where you can fit a full grid without it getting cramped.
Watch outAvoid chunky nail tape lines — they make thick borders instead of fine gridwork.
Editor's notePress tape down firmly, then pull it straight up so the black lines are razor-clean.
22. Black Crystal Glitter Over Red With Gold Halo Cuticle
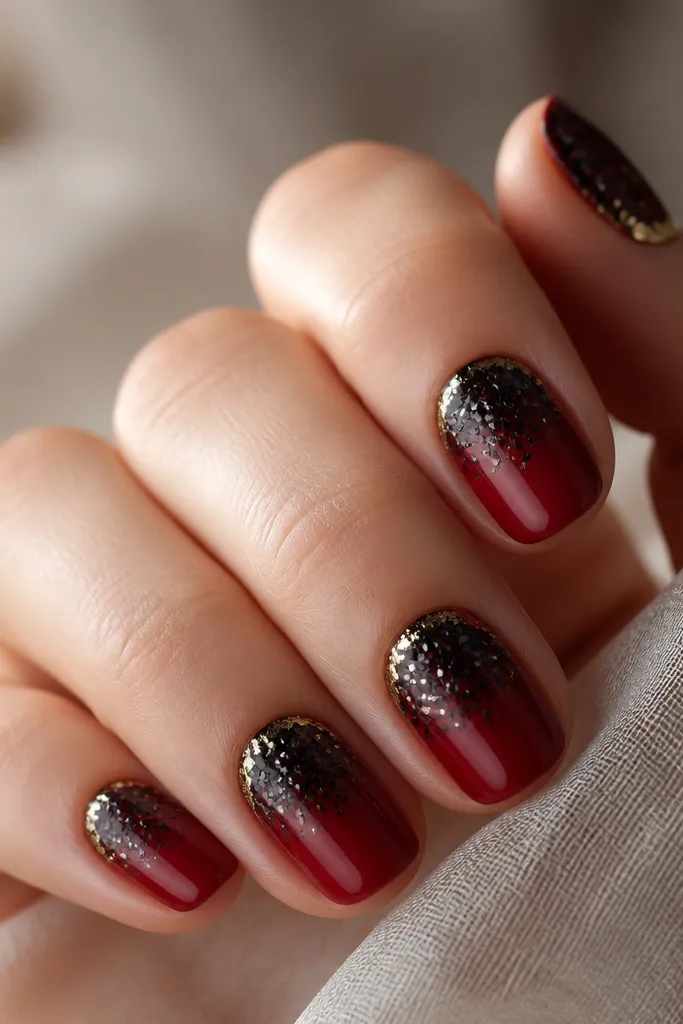
Crystal glitter over red is the fastest way to get party glam that still looks refined. The black glitter on the upper half frames the nail, and the gold halo cuticle makes it look like you’re wearing a ring on your finger. This set flatters slender nail beds because the glitter concentrates at the top. It also looks great on medium skin tones because the red base glows through the sparkle.
Apply two coats of deep red and cure fully. Add black crystal glitter only to the top half using a sponge or packing brush, keeping a clean boundary near mid-nail. For the gold halo, press gold flakes around the cuticle in a thin circle, leaving a small gap in the center so it looks like a ring. Seal with a glossy top coat in two thin layers so the glitter stays smooth and doesn’t feel gritty.
Tap off extra loose glitter with a clean brush before sealing — it prevents bumps.
Avoid putting glitter to the very edge of the cuticle skin — it lifts and peels.
23. Red And Black Watercolor Swipes With Gold Leaf Drizzle
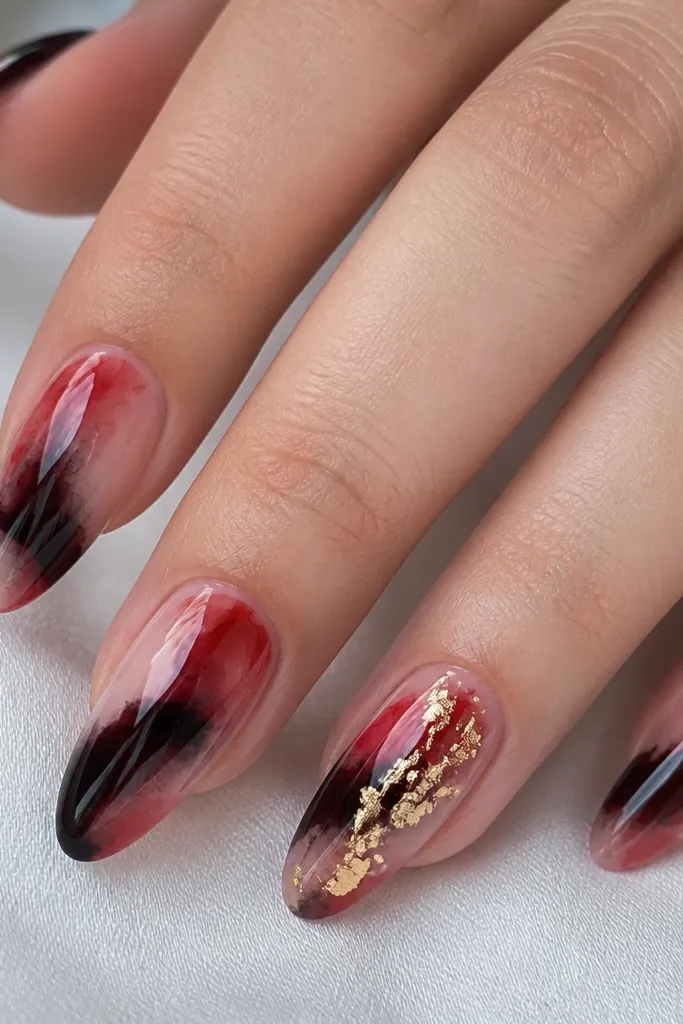
Paint a red base and cure. Use a makeup sponge lightly dipped in black to dab swipes across the nail, then blend the edges by tapping over them with a clean sponge. For the ring finger, add gold leaf pieces in a diagonal drizzle across the center, then seal. Keep the other nails simpler with fewer black swipes so the gold looks like an accent. Finish with a glossy top coat to unify the watercolor look.
Watercolor swipes look luxe because the edges are soft and the colors blend like paint, not nail polish. The gold leaf drizzle adds motion and keeps the set from feeling flat. This design flatters hands because it doesn’t demand perfect lines — it forgives small asymmetry and still looks expensive. It’s also ideal if you want something party-ready that won’t look too heavy on shorter nails.
Watch outAvoid heavy black coverage — watercolor should stay airy, not opaque.
Editor's noteBlend with a clean sponge between swipes so black doesn’t turn the whole nail gray.
24. Black Gloss Tips With Red Reverse Half-Moons And Gold Center Dot
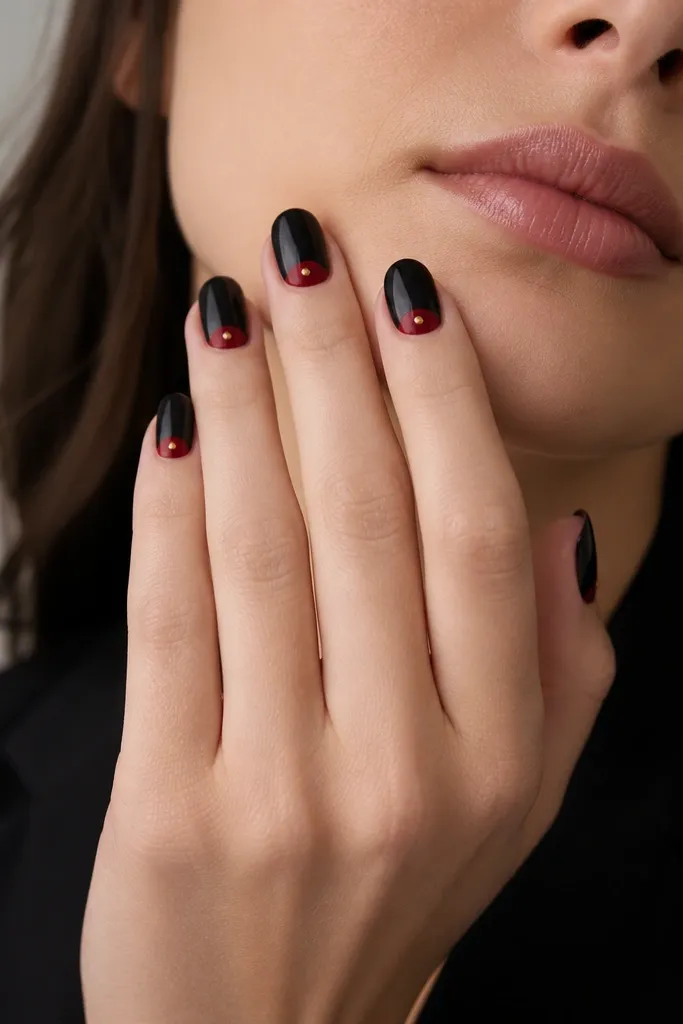
Start with a red base, then add glossy black tips using a French guide sticker. For reverse half-moons, paint red in a curved crescent near the cuticle on top of the black tip area — keep it small and centered. Add a gold dot in the middle of the red crescent using a dotting tool. On the ring finger, make the dot 1.5x bigger for emphasis. Seal with glossy top coat and cap the edges so the dot doesn’t chip.
Reverse half-moons bring the design upward so it looks clean and intentional. Glossy black tips add drama, while the red half-moon keeps it warm and flattering. The single gold center dot is the luxe finishing touch — it looks like a tiny earring. This set flatters short nails because the design creates a vertical focal point near the cuticle. It also looks good on hands with bitten or uneven cuticles because the dot draws attention to the nail art, not the skin.
Watch outAvoid gold dots larger than the half-moon — it looks like a rhinestone sticker.
Editor's noteLet the black tip set fully before placing the half-moon so you don’t smear the gradient edge.
25. Scarlet Red Cat-Eye With Black Shadow Cutouts And Gold Leaf Cuticle Halo
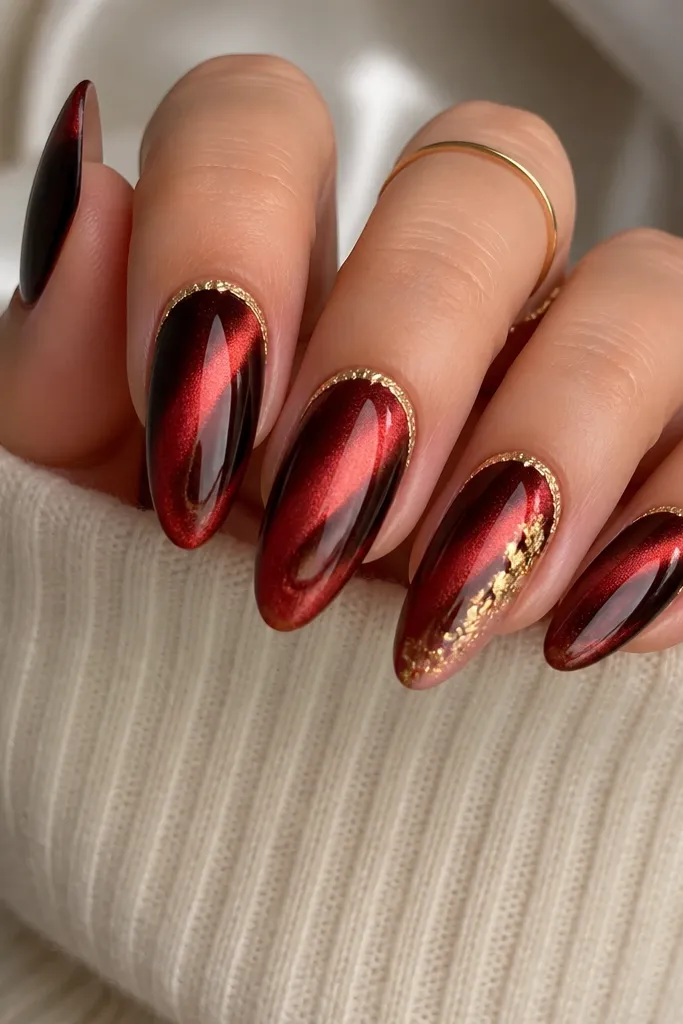
Start with a glossy scarlet cat-eye gel (I used one that shifts copper-green) over a base coat and cure each layer well. After the final cat-eye layer, use a fine striping brush to paint two narrow black cutouts — one on each side of the nail — leaving a little red bridge in the center so it still looks airy. Press small pieces of gold leaf onto a tacky cuticle band, then seal with a thin top coat to keep it from lifting. For the accent nail, add a crescent-shaped second cluster of gold leaf slightly above the cuticle so it looks like a halo rather than scattered flecks. Clean up the edges with a brush dipped in acetone so the black lines stay crisp.
This look is party glam because the cat-eye shift gives you movement even when you stand still. The black shadow cutouts make the red feel sharper instead of flat, and they frame your nail shape so your fingers look longer. The gold leaf halo at the cuticle catches light every time you move your hands, like tiny reflections on jewelry. I wore a version of this to a holiday dinner and kept getting compliments because it reads both dramatic and clean, not messy.
Watch outSkip painting black cutouts all the way to the free edge — the look gets heavy and shrinks the nail visually.
Editor's noteUse gold leaf on a tacky layer, not fully cured gel, or it will look dull and patchy. Seal with a slow, careful top coat around the cuticle so the leaf stays flat.



