1. Glazed White Base With Gold Foil Half-Moons
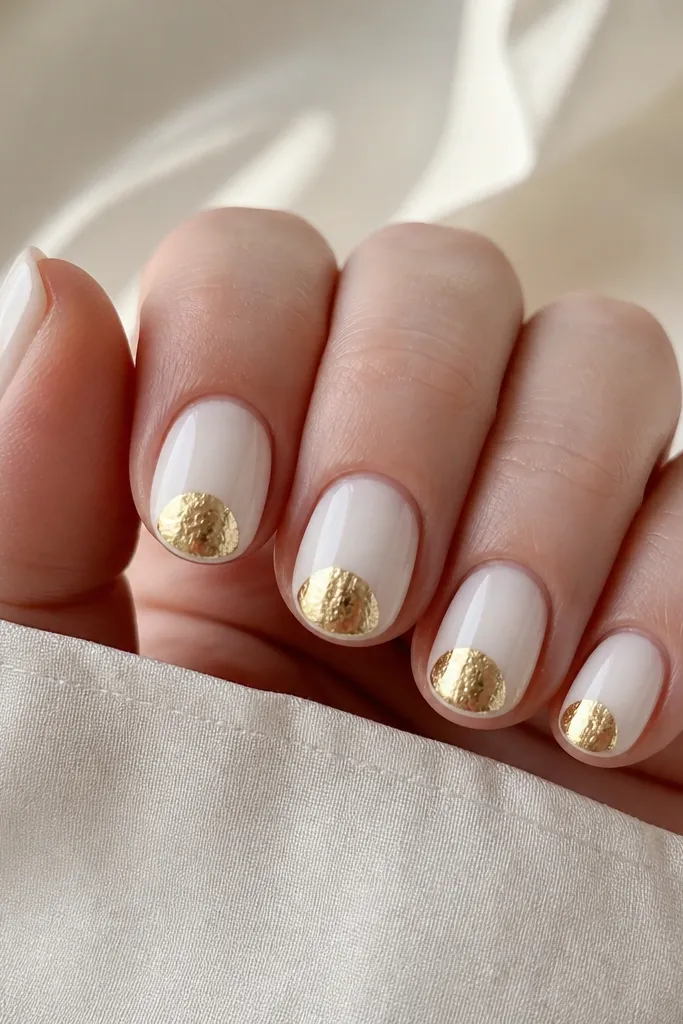
This design is for when you want birthday sparkle without heavy art. The glazed white base is smooth and reflective, so it looks crisp even when the gold foil catches flash. I've worn this with both warm and cool skin tones; the white stays bright and the gold foil warms everything up. The half-moon placement makes the nail look longer because it frames the cuticle instead of covering the center. It also looks great with simple rings because the foil gives you that "jewelry on nails" effect.
Start by prepping and buffing the surface lightly, then apply a rubber-base clear coat to protect your natural nail. Paint two thin coats of glazed white gel, curing each coat fully. Using foil glue, place gold foil at the cuticle in a half-moon shape on each nail, then press gently and peel for crisp edges. Seal with a thick, glossy top coat so the foil doesn't snag and the foil texture looks glassy.
Editor's noteIf your foil edges look messy, use a fine brush dipped in acetone to clean the line around the cuticle before top coat.
Watch outAvoid painting gold foil all the way across the nail - it kills the clean half-moon shape and looks bulky.
2. White Tip French With Micro Gold Lines
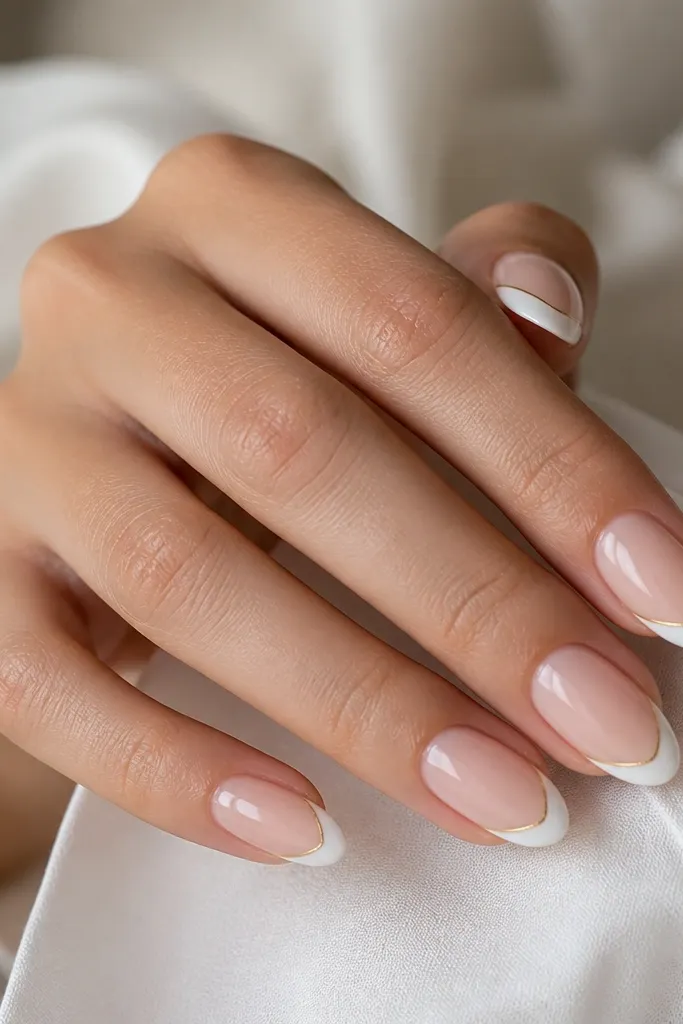
This is the "birthday but still classy" set. The white French tip makes your nails look polished, and the micro gold lines add sparkle without turning into full-on glitter. On my hands, the sheer nude base flatters my nail beds and makes the gold lines look like jewelry. This works especially well if you wear a white dress, champagne color, or anything with thin gold accessories. It also photographs well because the lines stay sharp, not textured.
Apply a sheer nude base (or a nude-pink builder gel) and cure. Create the French tips with a white gel in two coats, keeping the smile line thin and even. With striping tape or a gel liner brush, add one micro gold line slightly inside the tip edge, then add a second line only if you want extra sparkle. Finally, top coat with a high-gloss layer and cap the free edge to lock the lines in.
Editor's noteUse striping tape for the gold line if your freehand lines wobble; peel the tape while the gel is still slightly tacky.
Watch outDon't make the French tip too thick - chunky tips hide the gold line and look heavy on photos.
3. Milky White Marble With Gold Vein Accent
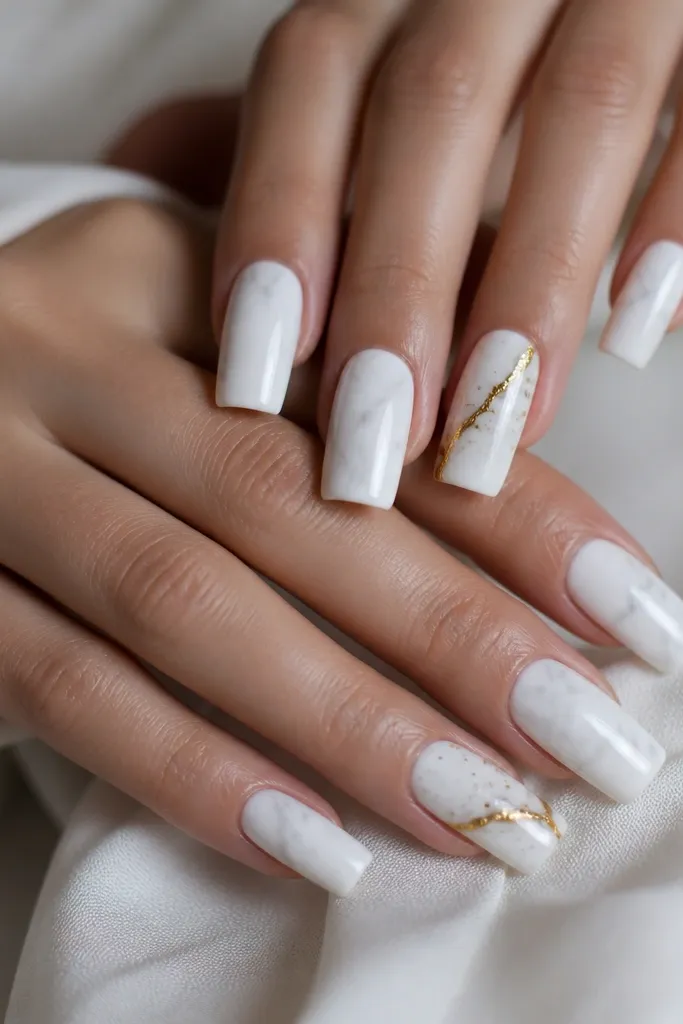
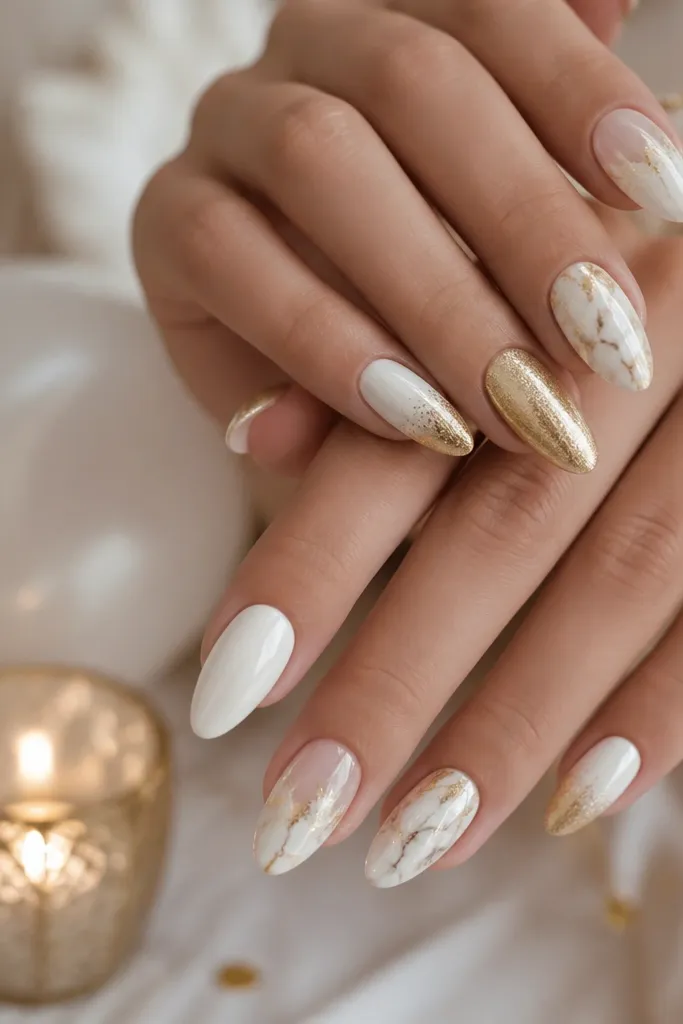
Marble looks fancy because your nails look different from every angle, and the gold vein keeps it birthday-ready. I like milky marble on birthdays because it doesn't look stark; it reads soft and romantic. This design flatters medium and deep skin tones because the white has enough opacity to stay bright. For hands with shorter nail beds, the diagonal gold vein visually lengthens. Keep the gold to one or two nails so the set stays elegant instead of chaotic.
Start with a base coat, then sponge or brush on milky white gel in two coats for opacity. For marble, drag a slightly translucent white or pale gray gel with a thin brush in random patches, then soften with a makeup sponge. On two accent nails, paint a single diagonal gold vein using gold gel liner, then add tiny gold flecks with a dotting tool. Seal everything with a glossy top coat and avoid matte - marble needs shine to look expensive.
Editor's noteIf the marble looks too gray, add one extra layer of opaque milky white before marble details.
Watch outSkip heavy black marbling; it makes the set look Halloween instead of birthday.
4. White Sparkle Gradient With Gold Edge Glow
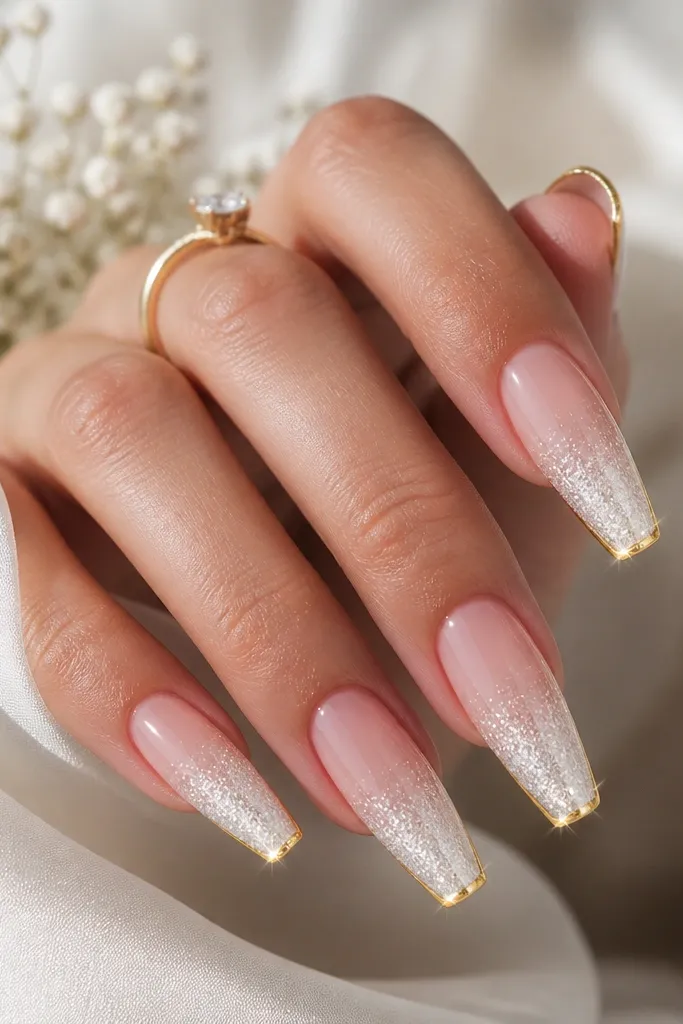
This one is pure party energy, but it still stays wearable. The white glitter gradient makes your nails look like they're lit from within, and the gold edge outline adds a "frame" that makes the tip look crisp. I've worn it to birthdays where everyone is taking close-up photos; the gradient catches light without feeling chunky. On fair skin, it looks bright and youthful. On deeper skin tones, it reads luminous instead of icy because the gold outline warms the white.
Apply a sheer base and cure, then sponge a white glitter gel starting at the tip and fade it toward the middle. Leave the cuticle area cleaner so the glitter doesn't look like frosting. Use a thin striping brush to outline the glitter edge with gold gel, keeping the line tight and even. Finish with a thick top coat, and cap the nail tip so the glitter doesn't catch on hair or fabric.
Editor's noteDust off loose glitter gently with a dry brush before curing to avoid gritty texture.
Watch outDon't put glitter all the way to the cuticle - it makes nails look shorter and messy.
5. Gold Confetti Under Glass White
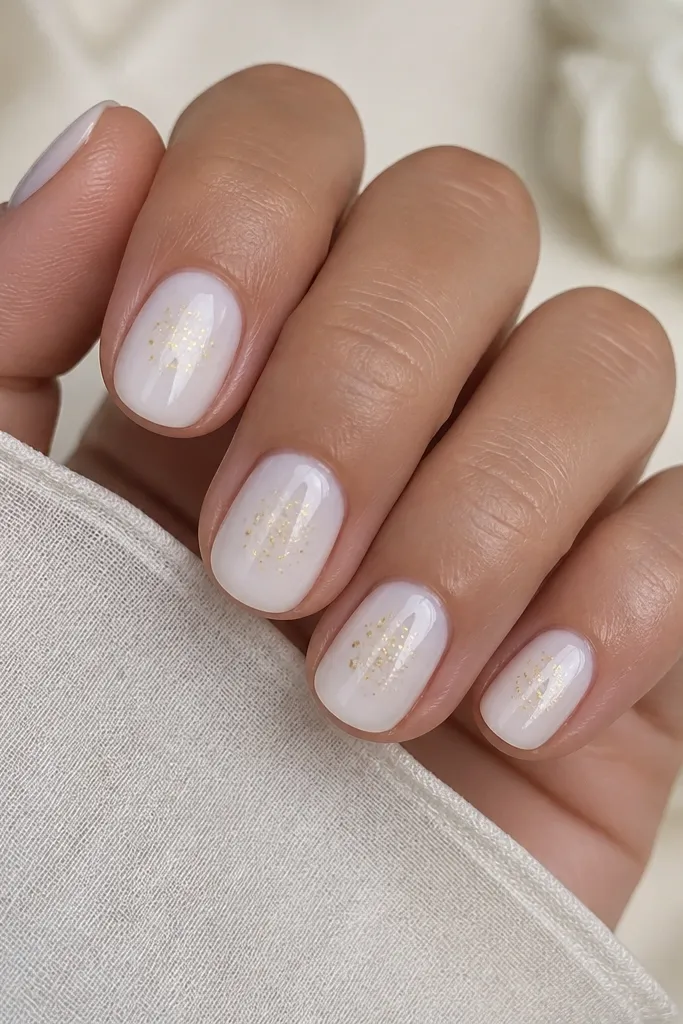
This is the set I reach for when I want "birthday" that feels smooth, not textured. The confetti is sealed under a glassy white layer, so it looks like it's trapped beneath clear ice. I like it on short nails because the confetti stays centered and your nails don't feel heavy. The gold confetti also plays nicely with both warm and cool outfits; it's bright but not loud. This works great for people who hate feeling glitter snag on sweaters or hair.
Start with a clear base gel and cure. Add small gold confetti pieces to the center of each nail using a dotting tool or a wax pencil for grip, then seal with a thin clear layer and cure. Paint opaque glassy white gel over the top in two thin coats, curing each. Finish with a thick top coat to create that smooth, domed "glass" look.
Editor's noteIf confetti sinks too much, use fewer pieces and place them closer to the center before curing.
Watch outAvoid skipping the clear seal layer before white - confetti can migrate and clump.
6. White Bow Accent With Gold Dots
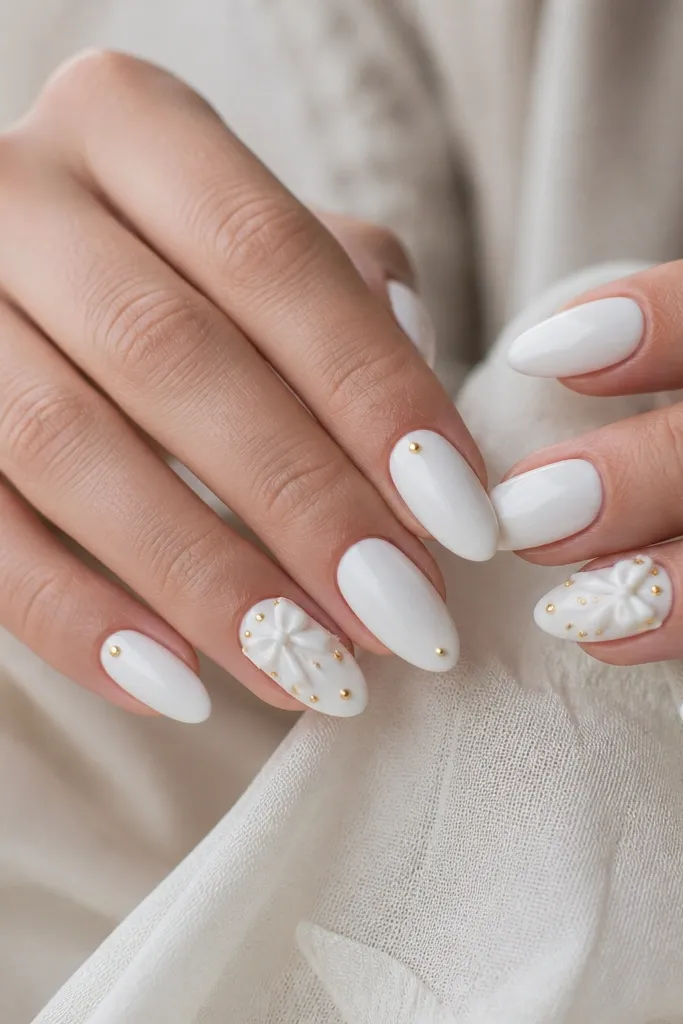
Bows read birthday instantly, and keeping it small keeps it from looking like a costume. I like glossy white for the base because it makes the bow look crisp and clean. The gold dots add a confetti vibe without glitter. This set flatters most hands because the bow sits near the cuticle, which lifts the look. If you're wearing a dress with bows, ribbons, or lace, this nail set matches the theme without trying too hard.
Paint all nails with opaque glossy white gel in two coats. On two accent nails, create a tiny bow by placing two small white gel loops near the cuticle and adding a narrow center knot, then cure. Add gold dot accents using a dotting tool with gold gel or gold acrylic paint, keeping clusters tight. Seal with top coat, but apply gently over the bow so you don't flatten it.
Editor's noteUse a detail brush to draw the bow center line - it makes the bow look like a real ribbon knot.
Watch outDon't make the bow too large on short nails - it crowds the cuticle and looks lumpy.
7. White Galaxy Swirl With Gold Star Specks
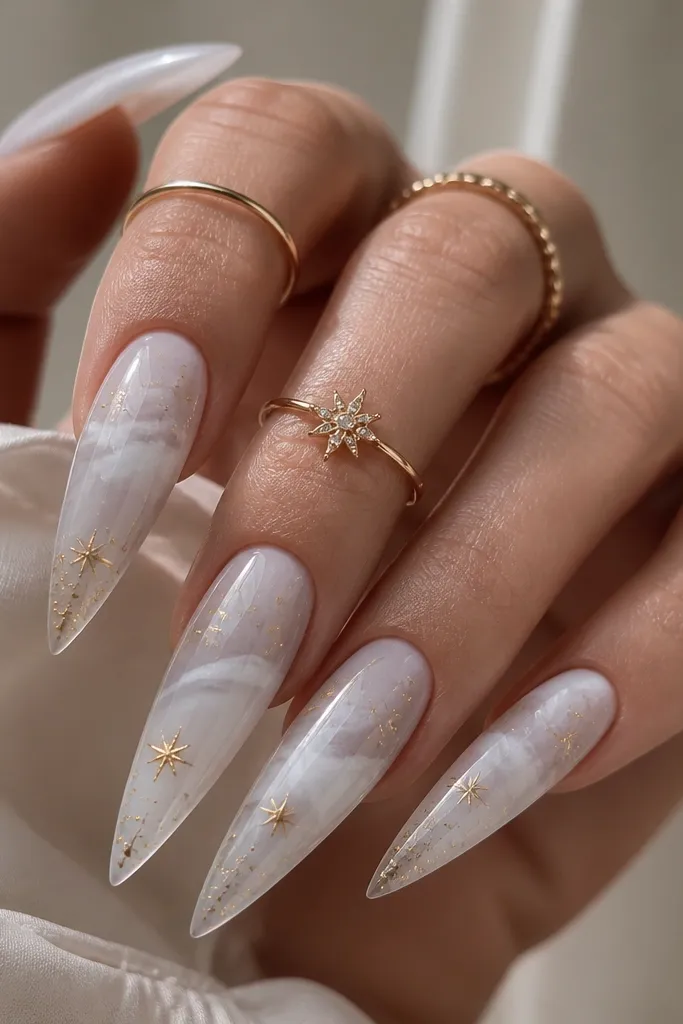
Galaxy nails feel dreamy, but the white version keeps it birthday-appropriate instead of spooky. The swirl gives movement, and the gold star specks look like you added actual tiny lights. I love this for nighttime birthdays because the specks pop under restaurant lighting. It looks best on long stiletto or almond nails because there's room for the swirl to travel. On fair to medium skin, it reads magical. On deeper skin, it still pops because the white base is opaque, not sheer.
Start with a milky white base gel and cure, then add soft gray-white swirls with a thin brush. Use a small sponge to blend the edges so the swirl looks cloudy, not painted lines. Add gold star specks with a toothpick or dotting tool, then cure. Seal with a glossy top coat in two layers if you want extra depth and shine.
Editor's noteMake your gold specks different sizes; one big dot and a few tiny stars look more realistic.
Watch outAvoid using chunky gold glitter - it covers the swirl and makes it look messy.
8. Half-White, Half-Cuticle Gold Chrome Split
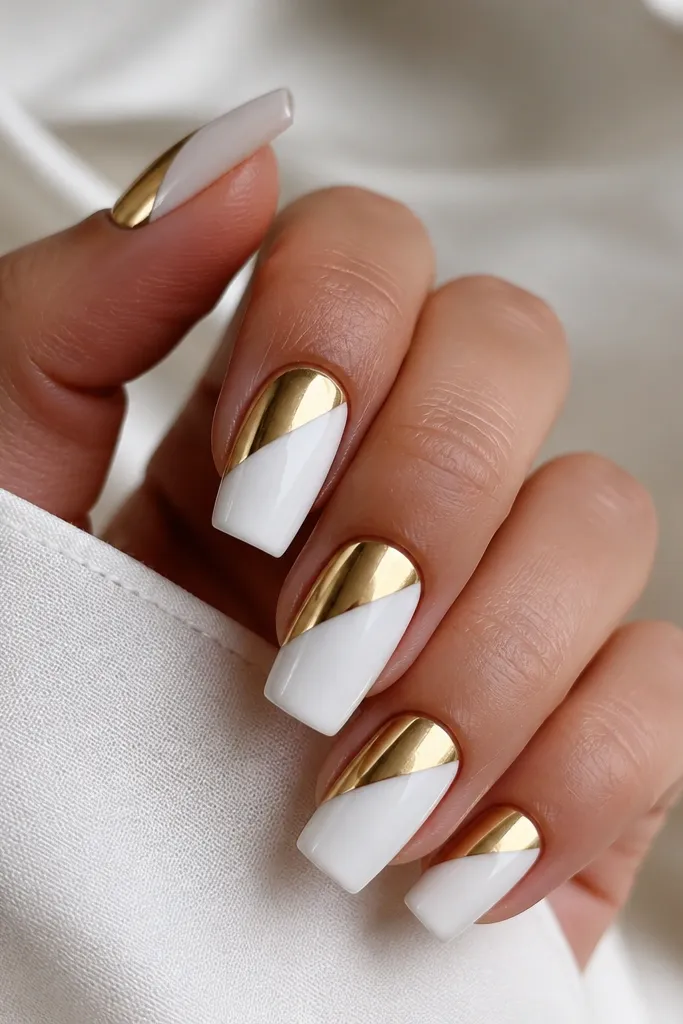
This is bold without being loud because the split is clean. Gold chrome looks like jewelry on nails, and the white side keeps everything readable. I've done this on hands with shorter nails and it still looks long because the chrome is anchored near the cuticle. It flatters medium and deep skin tones especially well, since chrome reflects warm tones. For birthdays, it feels modern and photo-ready - people always ask where the nails are from.
Paint the nail with a base gel and cure. Apply opaque white gel on the larger section and cure, then add gold chrome powder on the smaller cuticle section using chrome base. Use striping tape to keep the diagonal split straight, pressing it down firmly before applying chrome. Remove tape after curing and seal with a top coat that's compatible with chrome or use a chrome-safe top coat.
Editor's noteIf the chrome dulls, use a thin chrome-safe top coat instead of thick regular top coat.
Watch outDon't blur the line between white and chrome - a soft edge reads sloppy in close-up photos.
9. White Pearl Tips With Tiny Gold Studs
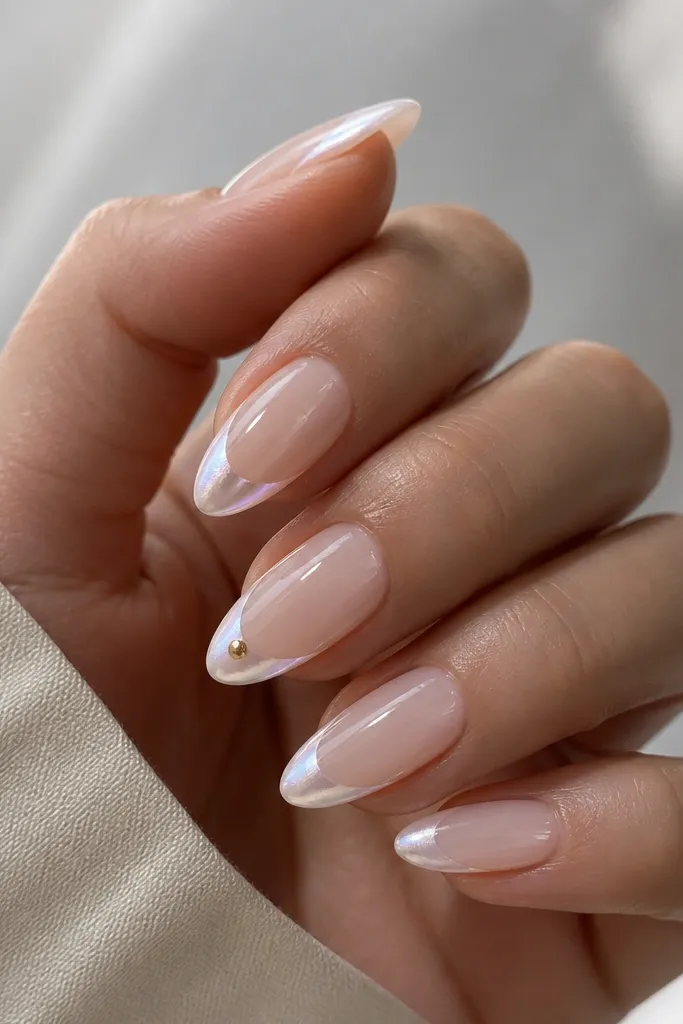
Pearl tips look expensive because they're shimmery but not glittery. The translucent nude base makes your hands look neat and gives the pearl a clean edge. Gold studs add "birthday gift" energy and they're easy to recognize in photos. This is flattering for people who want something delicate but still festive. I've seen it work beautifully on both short almond and medium almond, because the studs stay centered and don't overpower the nail.
Start with a sheer nude base and cure. Paint pearly white gel only on the tips, keeping the smile line neat, then cure. Place tiny gold studs in the center of the tip on two accent nails, pressing gently into a tacky gel layer. Finish with top coat, and cap around the stud edges to keep them from lifting.
Editor's noteChoose pearl white with a pinky shift if you have warm undertones; choose cooler pearl if you have rosy undertones.
Watch outAvoid large studs - they snag and make the pearl look cheap.
10. White Lace Overlay With Gold Outline
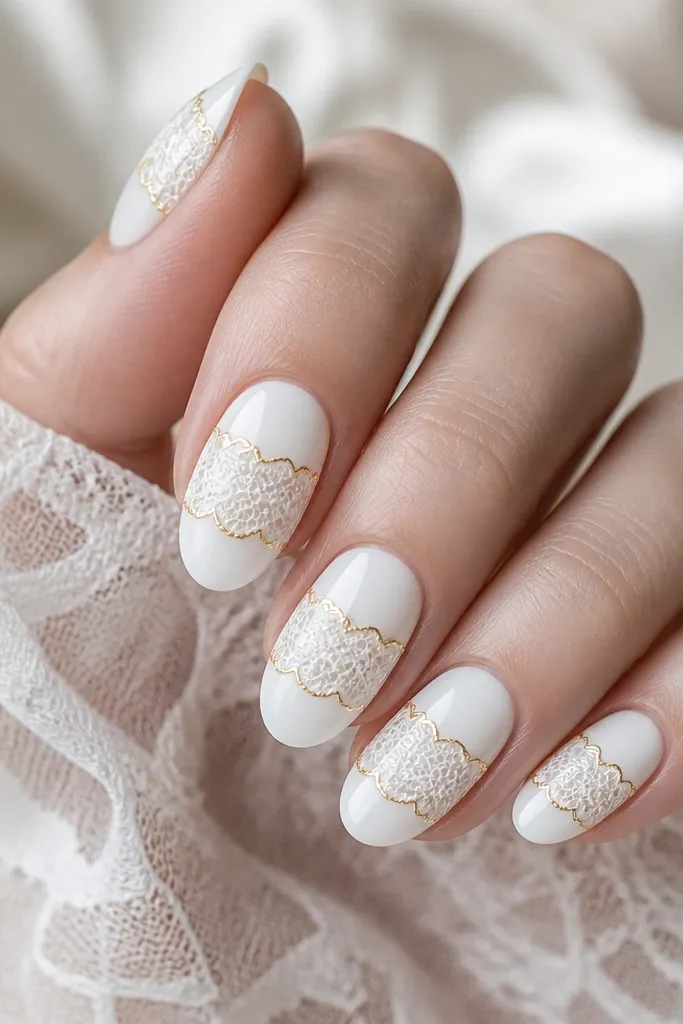
Lace nails feel like a party dress for your fingertips. The white-on-white lace pattern gives texture without adding bulk, and the gold outline keeps it from looking flat. I like this set when you're wearing something neutral or monochrome and want your nails to add detail. It works on fair, medium, and deep skin tones because the lace pattern is high-contrast against the glossy base. The gold outline is also great for balancing silver or gold jewelry - it's small enough to match either.
Paint a glossy white base and cure twice for full opacity. Add lace pattern using a lace nail stamping plate or a lace stencil - align it so it sits centered on the nail. Outline the lace edges with thin gold gel, using a liner brush for control. Seal with two top coat layers for a smooth, sealed look over the pattern.
Editor's noteIf the lace stamp looks cloudy, clean the plate with acetone and wipe with lint-free cloth before stamping again.
Watch outDon't skip top coat over the lace - patterns catch on fabric when they're not sealed.
11. White Ombré Fade Into Gold Chrome Tips
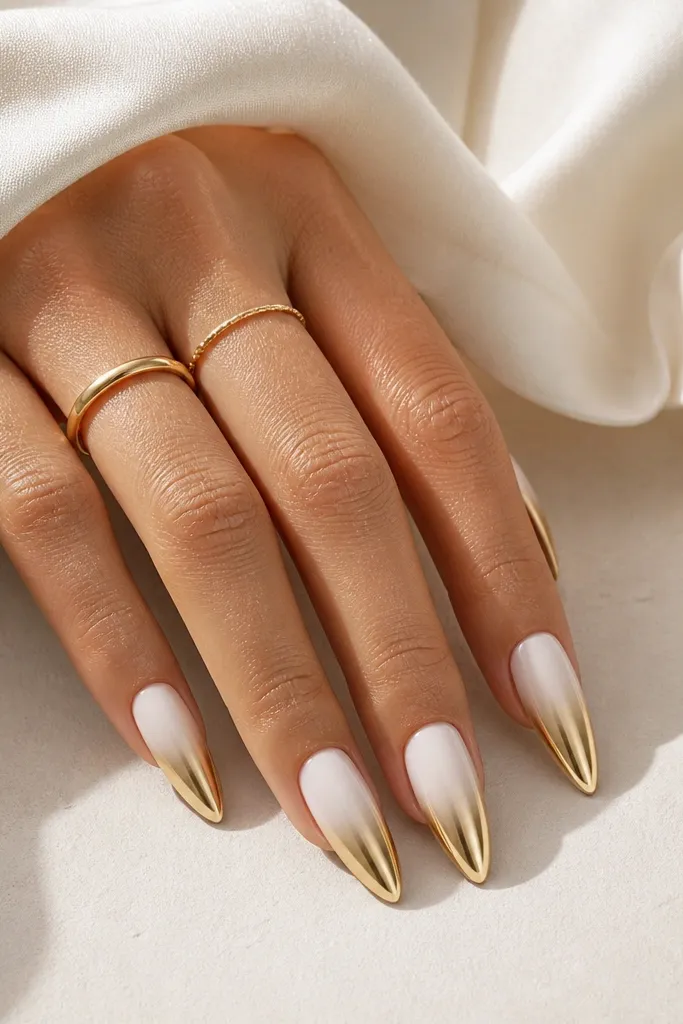
This is the "birthday fade" that looks smooth in every photo angle. The white ombré creates softness, while gold chrome at the tips brings the party. I've done this on long almond and it always makes hands look longer because the brightest gold sits at the edge. It's flattering for almost everyone because the gradient doesn't cut the nail into harsh blocks. If you're wearing a dress with metallic accents, this set ties it together.
Apply a sheer base and cure, then sponge on white gel starting mid-nail and fading toward the center. Cure the white layer. For the gold chrome tips, apply chrome base only at the tip area and blend slightly upward, then buff on gold chrome powder. Clean the edges with a small brush before curing and finish with a chrome-safe top coat.
Editor's noteDo two lighter chrome applications instead of one heavy one; it blends smoother.
Watch outAvoid painting gold chrome too far up the nail - it makes the ombré look harsh.
12. White Marble French With Gold Foil Corner
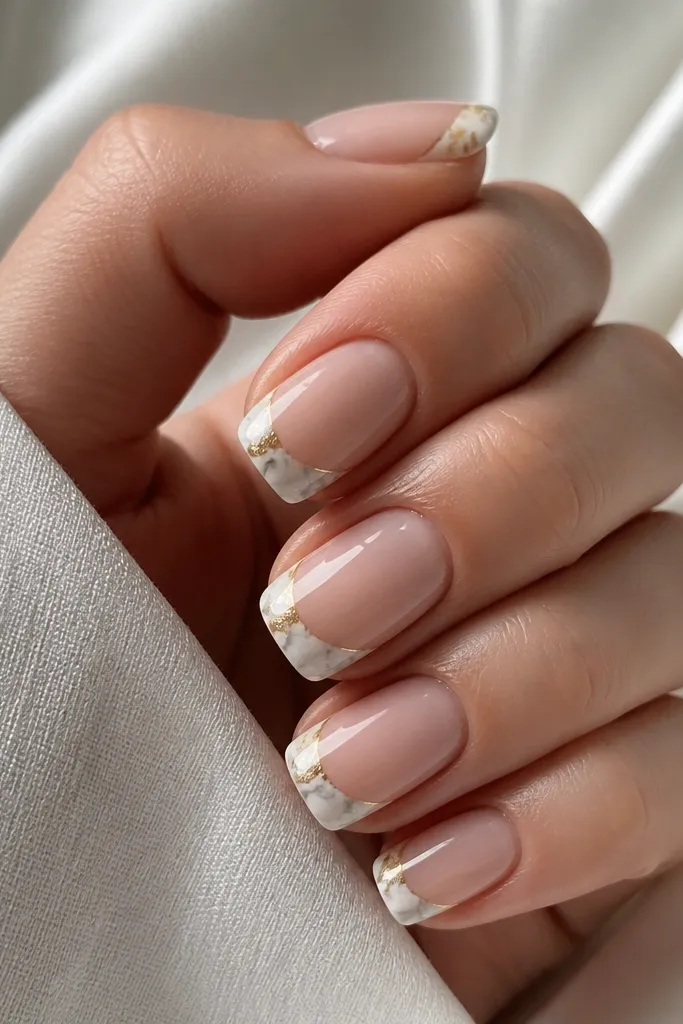
This one looks custom because the marble French tip isn't flat. The gold foil corner gives a "missing piece of jewelry" effect that feels intentional. I like it for short nails because the gold stays tiny and the marble tip adds length. It also works if you don't want full gold across the nail - it's subtle but still birthday. This is a great option if your outfit has a pattern; the marble echoes it without matching exactly.
Apply a sheer nude base and cure. Paint French tips with a marble technique: brush opaque white gel at the tip, then add a thin gray-white swirl and blend with a sponge. Keep the tip shape even across nails. Add a small gold foil patch in one corner of the tip (choose the same corner each nail) using foil glue, then press and peel. Seal with glossy top coat and cap the tip edges.
Editor's noteChoose one consistent corner placement for every nail so it reads as a design, not random foil.
Watch outDon't over-swirling the marble - too much gray makes it look dirty.
13. White Gloss Base With Gold Foil Drip Line
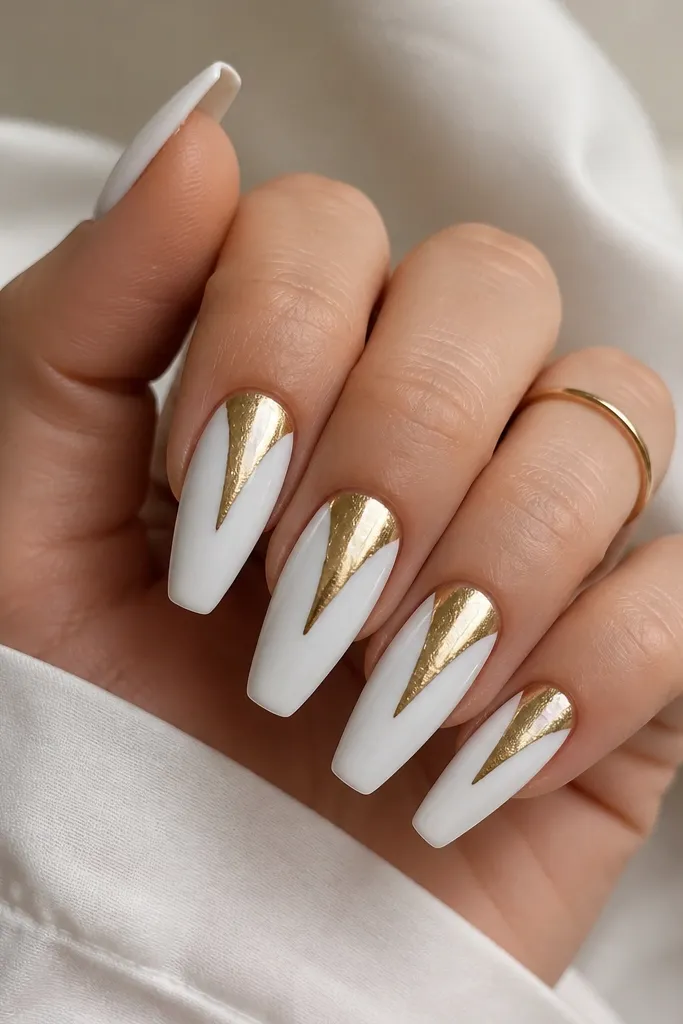
Drip lines look fun for birthdays because they feel playful, not formal. The key is keeping the drip narrow so it doesn't look like paint spill. The glossy white base makes the gold drip look sharp and expensive. I've used this with black outfits and also with pastel dresses; it works because the white is clean and the gold is metallic. This set flatters hands because the drip runs down the center and visually elongates your nails.
Start with opaque glossy white gel in two coats and cure. Add foil glue in a thin vertical line down the center, then press gold foil onto the glue while it's tacky. Shape the drip by leaving small gaps so the foil forms a controlled drop pattern. Add a second gold foil pass only where you want extra shine, then top coat with a thick layer to smooth over the foil.
Editor's noteIf your drip spreads, use less foil - gold foil expands when it sticks too wet.
Watch outAvoid wide drip lines - they cover too much nail surface and look messy.
14. White Glitter Cuticle Halo With Gold Micro Stars
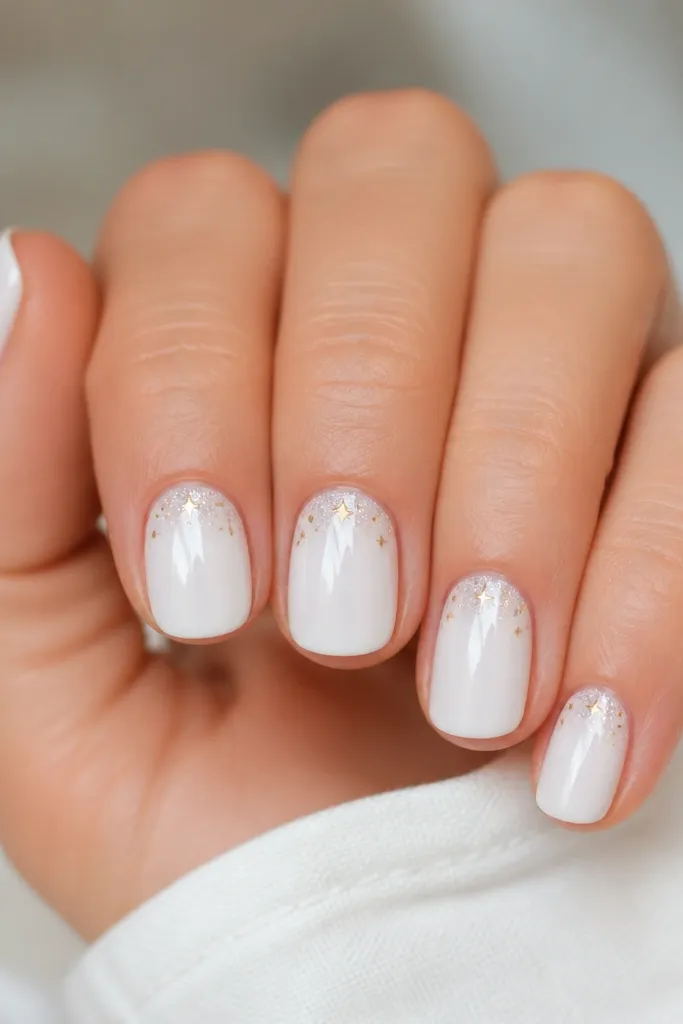
This is one of my favorite "small effort, big sparkle" sets. The cuticle halo frames your nail bed and makes it look neat, while the gold micro stars add birthday sparkle without using bulky glitter. I like it on short nails because it keeps the sparkle close to where the eye naturally starts. For deeper skin tones, the white glitter halo looks extra bright and clean. For fair skin, it reads delicate and cute.
Paint a glossy white base and cure. Apply a thin layer of clear gel around the cuticle area in a crescent shape, then tap on fine white glitter and cure. Add gold micro star dots with a dotting tool using gold gel or gold acrylic paint, keeping them sparse. Finish with top coat, and use a small brush to clean around the cuticle so the halo stays crisp.
Editor's noteUse a glitter that stays fine after curing; chunky glitter makes the cuticle halo look rough.
Watch outDon't cover the whole cuticle - only a crescent reads intentional.
15. Gold Foil Frame Around White Negative Space
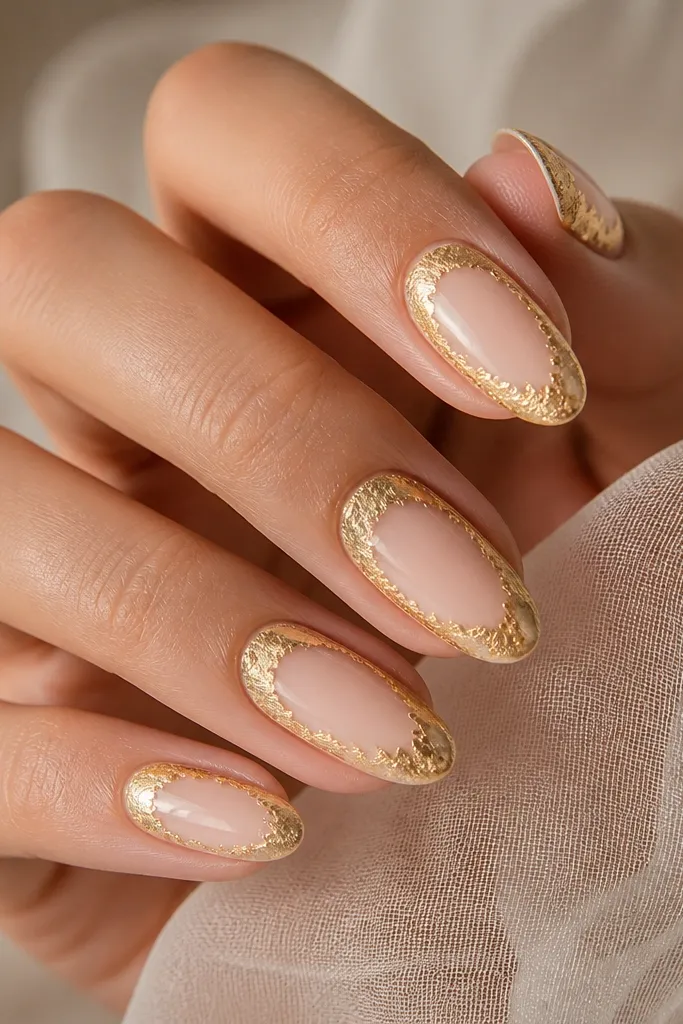
Negative space looks modern, and gold foil framing turns it into a birthday design. The white center keeps it bright, and the foil frame makes the nails look like they're wearing jewelry. I've done this for birthdays with lots of photos because it looks intentional from far away. It flatters hands that have nice nail beds because the negative space makes fingers look longer. If you wear gold or mixed-metal jewelry, this design still reads balanced because the frame is the focus.
Start with a sheer nude base and cure, then use striping tape to mask the center area where you want negative space. Paint the masked area opaque white and cure. Remove tape carefully. Apply foil glue around the perimeter of the nail where the frame should sit, then press gold foil onto it. Seal with top coat, and cap the frame edges so foil doesn't lift.
Editor's noteDo the masking with tape that's thin and flexible; thick tape leaves ridges under top coat.
Watch outAvoid leaving too much negative space; if the white center is tiny, it looks unfinished.
16. White Pearl Swirl Corner With Gold Outline
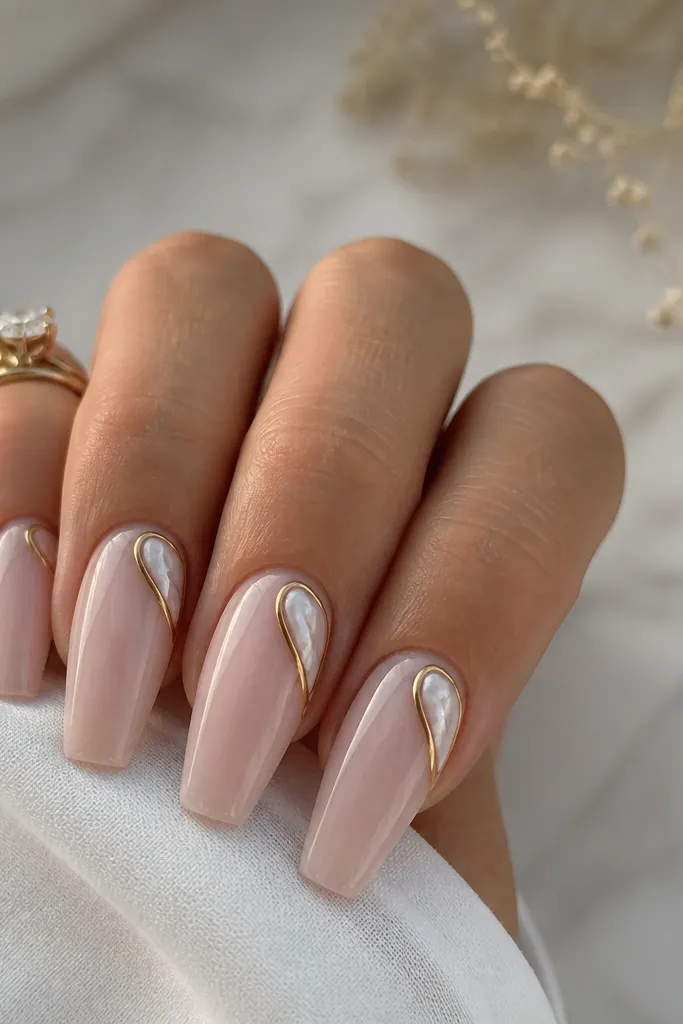
Corner swirls look cute and designer because they're placed where the eye naturally catches light. The pearl white swirl gives that soft glow, and the gold outline makes it look intentional instead of random. I like this set for medium length nails because the corner placement doesn't crowd the nail bed. It flatters hands with wider nail plates too, since the design sits in one corner and doesn't take over the whole surface. Pair it with a simple bracelet and your nails will feel like part of the outfit.
Apply a sheer nude base and cure. Paint a small pearl white swirl in the top corner of each nail using a detail brush or stamping gel. Outline the swirl with thin gold gel, keeping the gold line tight and even. Cure everything and finish with a glossy top coat, making sure the swirl is sealed along the edges.
Editor's noteIf the pearl looks patchy, do two thin pearl layers instead of one thick layer.
Watch outDon't outline the entire nail - keep gold only around the swirl so it stays elegant.
17. White Confetti Glitter Tips With Gold Thread Accent
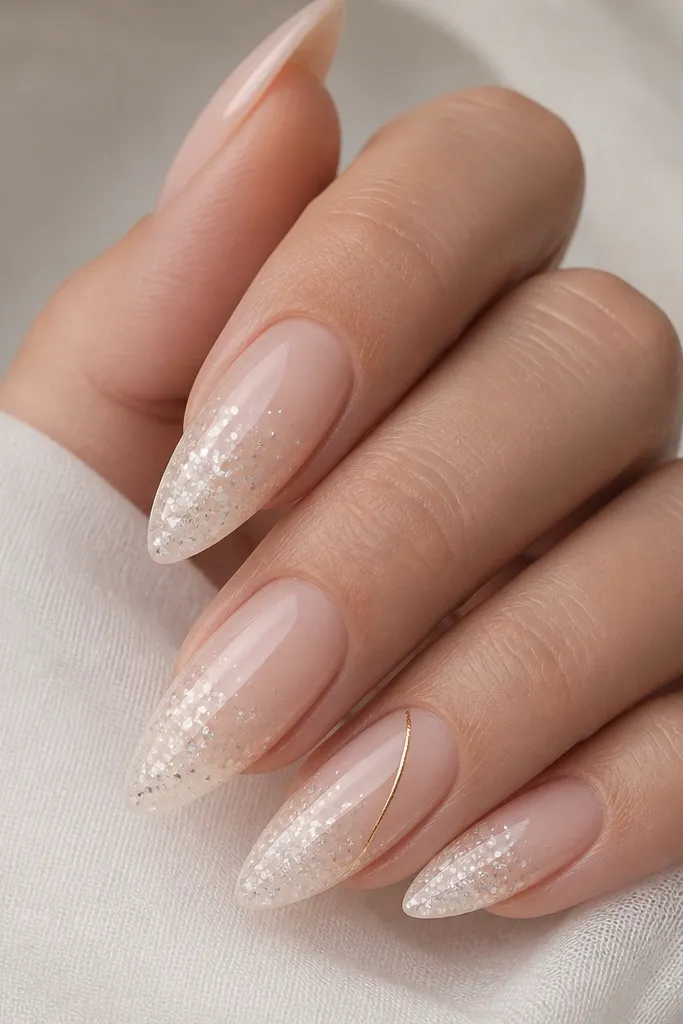
This set looks like party favors exploded, but the key is the controlled placement. The confetti glitter at the tips creates a fun gradient without covering the whole nail. Gold thread on one nail adds a "celebrity manicure" feel while keeping the rest simpler. It flatters long nails best, and it looks amazing with satin dresses because the glitter catches light smoothly. If your birthday outfit has gold buttons or a gold bag, this ties in perfectly.
Start with a translucent base and cure. Sponge or brush white confetti glitter onto the tips, leaving the lower half clear. Fade the glitter upward so it looks like a tip ombré. On one accent nail, paint a thin gold thread line using a gel liner brush, then cure. Seal with a glossy top coat in two layers so the glitter doesn't feel rough.
Editor's noteUse a top coat that doesn't shrink; shrinkage can create tiny gaps over glitter.
Watch outAvoid using only fine glitter - confetti shapes look more birthday than sparkly dust.
18. White Butterfly Wings With Gold Foil Body
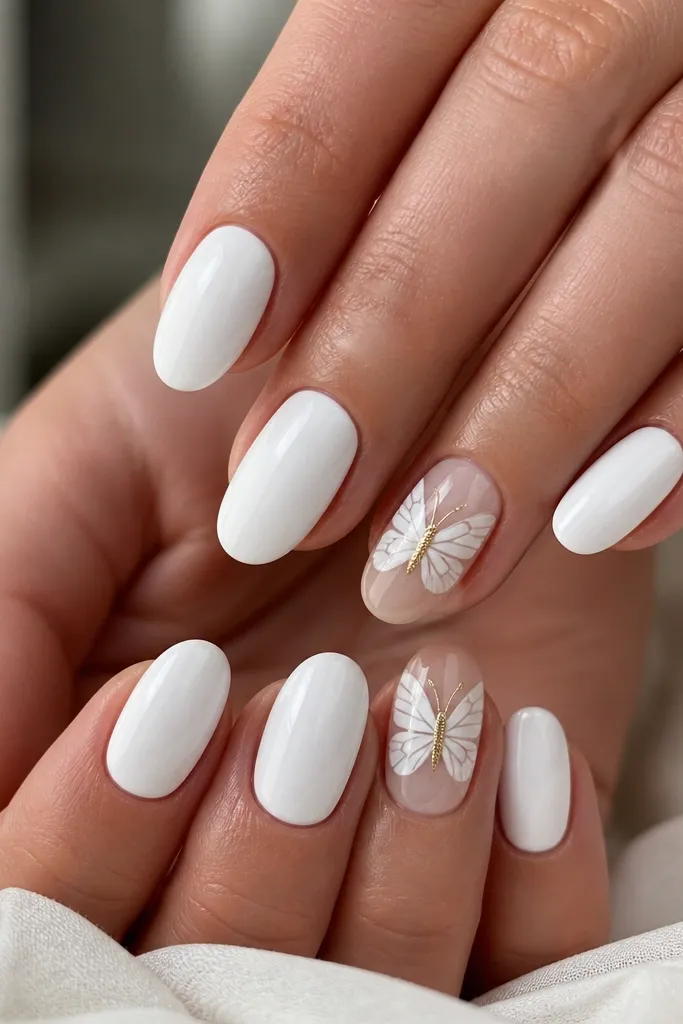
Butterflies read playful and sweet, and the gold foil body makes it look like real wings with a metallic thorax. This set is for birthdays where you want something a little more whimsical than a standard French tip. On fair and medium skin tones, the white wings look airy and bright. On deeper skin, the gold body gives enough contrast that the design still pops. I also like it because it doesn't require full gold coverage; the gold is just the focal point.
Paint a glossy white base on all nails and cure. On two accent nails, paint butterfly wings using a thin brush with slightly translucent white gel at the edges, then cure. Add the body by applying foil glue where the center body should be and pressing gold foil, then cure. Finish with top coat, and make sure the wings are sealed so they don't catch on fabric.
Editor's noteUse a small fan brush to remove dust from the nail before placing foil so it sticks evenly.
Watch outDon't add too many wing details - simple wing shapes read cleaner in photos.
19. White Skittle Nails With Gold Accent Lines
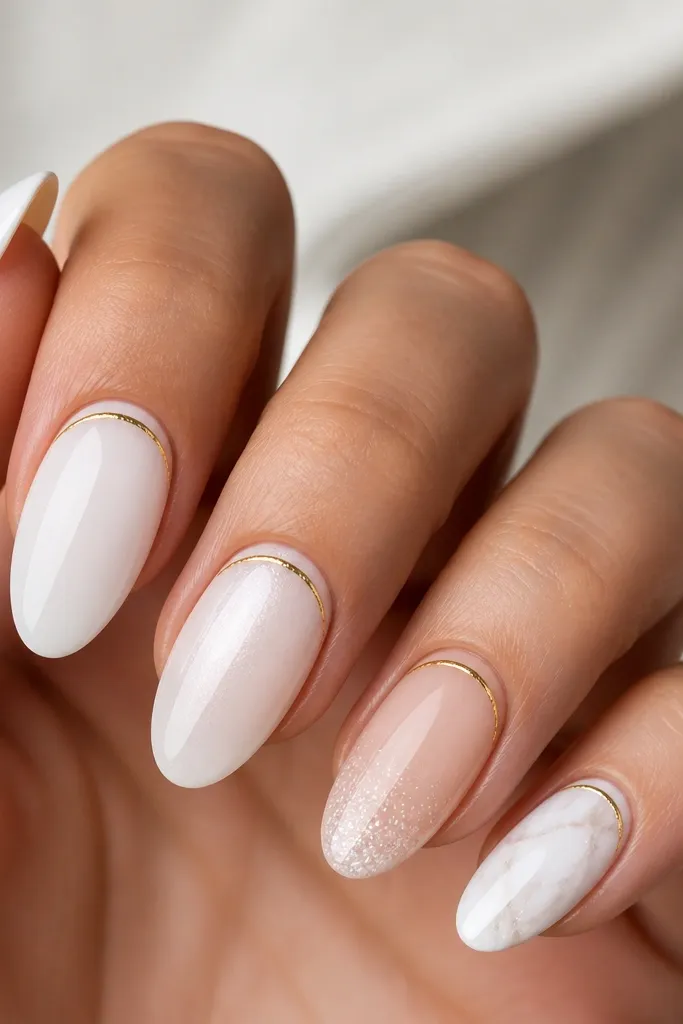
Skittle nails are my go-to when you want variety for a birthday but you still want the set to look coordinated. The constant is white, and the gold accent line ties everything together. I've worn this for parties where my outfit changed halfway through the night; the nails still matched because the gold line is consistent. This works on short and medium lengths because the gold is placed the same way on each nail. It also flatters different nail shapes since each nail has its own white texture.
Pick five white finishes and apply one per nail: glossy white, milky white, pearl white, white glitter tip, and a simple marble pattern. Keep each base opaque and cure well. Add a thin gold line near the cuticle on every nail using a gel liner brush, keeping the line length consistent. Seal with a glossy top coat and cap the edges so the gold line stays smooth.
Editor's noteIf you're unsure about the marble, do just two or three veins - fewer details look more expensive.
Watch outAvoid changing the gold placement on every nail; inconsistent placement makes it look random.
20. White Mini French With Gold Dot Corners
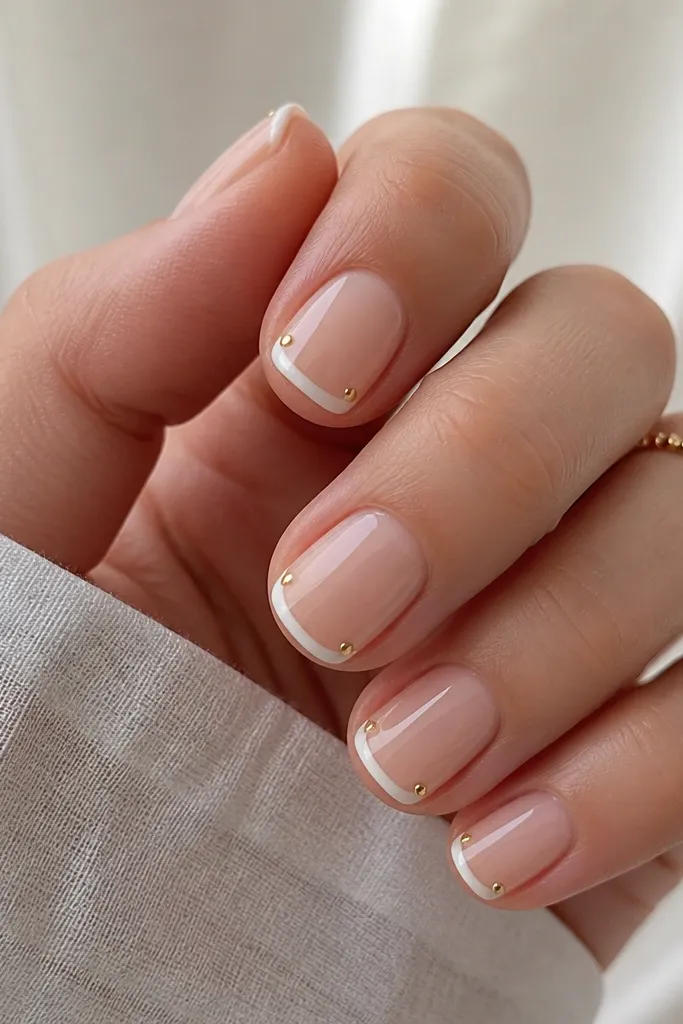
This is clean, cute, and fast, and it still feels like a birthday manicure. Mini French tips lengthen short nails without looking too dramatic, and the gold dot corners add sparkle where your fingers move most. I like it when I'm wearing a busy outfit or when I don't want glitter on my hands. The gold dots are small enough to match any jewelry metal. It looks great on straight nail shapes and short square especially.
Apply a sheer base or nude-pink base and cure. Paint a thin mini French tip in glossy white, keeping the tip width narrow. Place two tiny gold dots at the side corners of the white tip using a dotting tool, then cure. Add top coat and cap the free edge so the mini tip doesn't peel or chip.
Editor's noteUse a gel dotting tool or a toothpick with a flat tip so your gold dots are perfectly round.
Watch outDon't make the mini French tip too thick - it makes short nails look blocky.
21. White Glass Nails With Gold Flake Cuticle Scatter
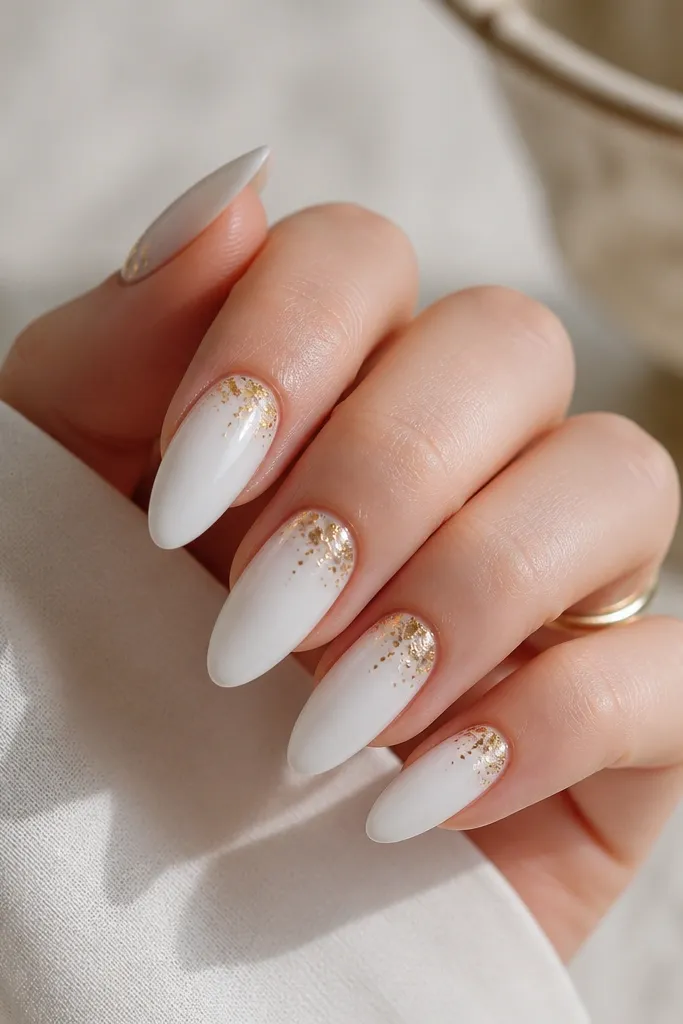
Glass nails look like you poured clear gel over marble, and the gold flakes near the cuticle make it feel like a celebration. The flakes are more forgiving than foil because they blend and don't require perfect edges. I like this design for birthdays because it looks polished from a distance and detailed up close. It flatters long nails and makes them look smoother because the glass finish reflects light evenly. If you hate rough glitter textures, flakes under glass are the better choice.
Build a smooth base with clear gel and cure, then apply a translucent thick white gel layer to create the glassy look. Before curing the final white layer, scatter small gold flakes around the cuticle area and press them lightly into the tacky gel. Cure, then add one more thin glassy white coat if you want the flakes to sit deeper. Finish with a thick glossy top coat for a domed, sealed surface.
Editor's noteKeep the flakes sparse; a light scatter looks more expensive than a full layer.
Watch outAvoid placing flakes too far down the nail; it can look like dirt once the manicure grows out.
22. White Side-Swoosh With Gold Foil Accent Nail
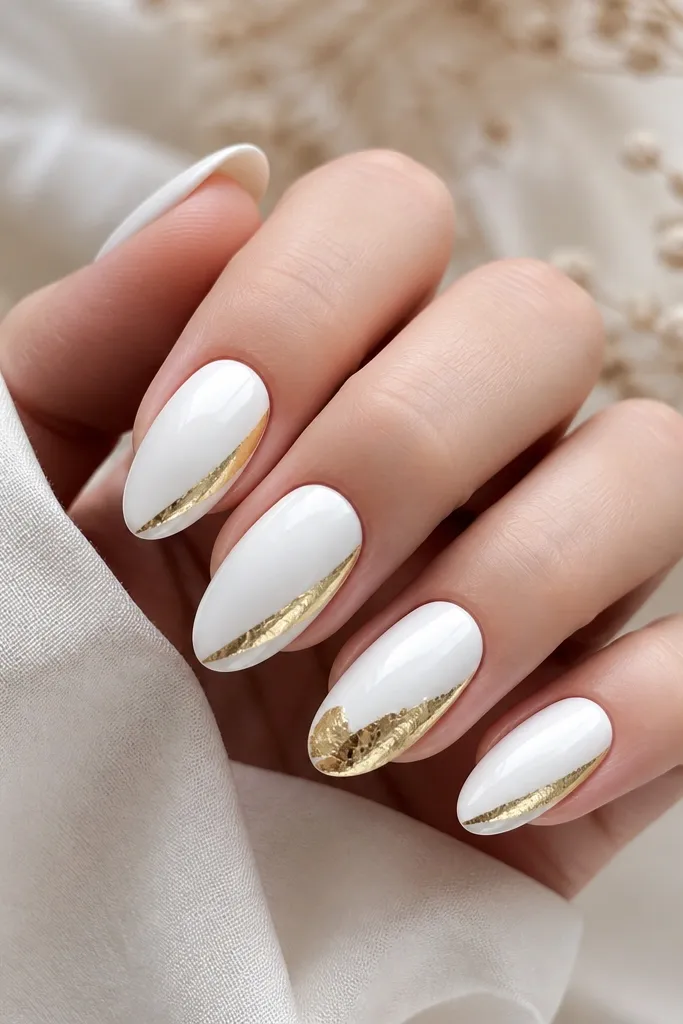
Diagonal swooshes look fast and stylish, and gold foil makes them look like you planned it. This is a good set if you want movement on the nail without using lots of tiny details. I've worn it with both long almond and medium coffin, and it always looks flattering because the gold swoosh angles upward. The accent nail gives you that birthday focus finger without turning every nail into a gold statement. It's also great if you're doing your own nails at home and want a design that forgives small placement differences.
Paint four nails glossy white and cure. For the side swoosh, use foil glue on one diagonal line starting near the sidewall and aim it toward the center, then press gold foil and peel. Leave one nail as solid glossy white, then add a larger gold foil patch near the tip using foil glue. Seal with top coat and cap the edges of the foil so it stays smooth.
Editor's noteUse a small piece of foil for the swoosh; smaller pieces stick and shape easier than one big sheet.
Watch outDon't make the swoosh too close to the free edge; foil can lift where the nail flexes.
23. White Swirled French With Gold Corner Spark
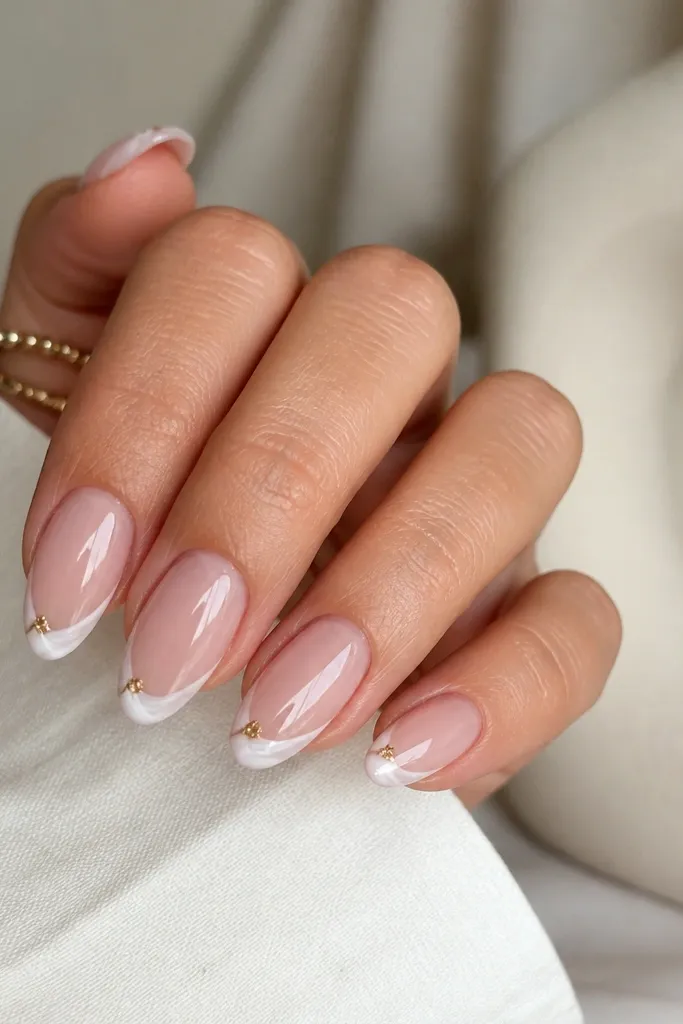
Swirled French tips look softer than straight French, and that makes the set feel more dreamy. The gold corner spark gives you a focal point without covering the whole tip. I like this for birthdays because it looks like you had time to plan, but it still grows out neatly. It flatters most nail shapes because the tip is still a tip; the swirl just adds motion. If you wear a nude dress or a soft color, this set looks extra clean and coordinated.
Apply a sheer nude base and cure. Paint French tips with opaque white gel, then add a few thin swirls using a pale gray-white gel before curing. Keep the swirl inside the tip so the edge stays defined. Add a small gold spark at one corner of the tip - a tiny gold foil triangle or a tight cluster of gold dots. Seal with a glossy top coat and make sure the tip edge is fully capped.
Editor's noteIf your swirl looks messy, keep it to one or two curved streaks per nail.
Watch outAvoid gold sparks that are too big; oversized corners look like accidents.
24. White Glitter Halo Tips With Gold Starburst Accent
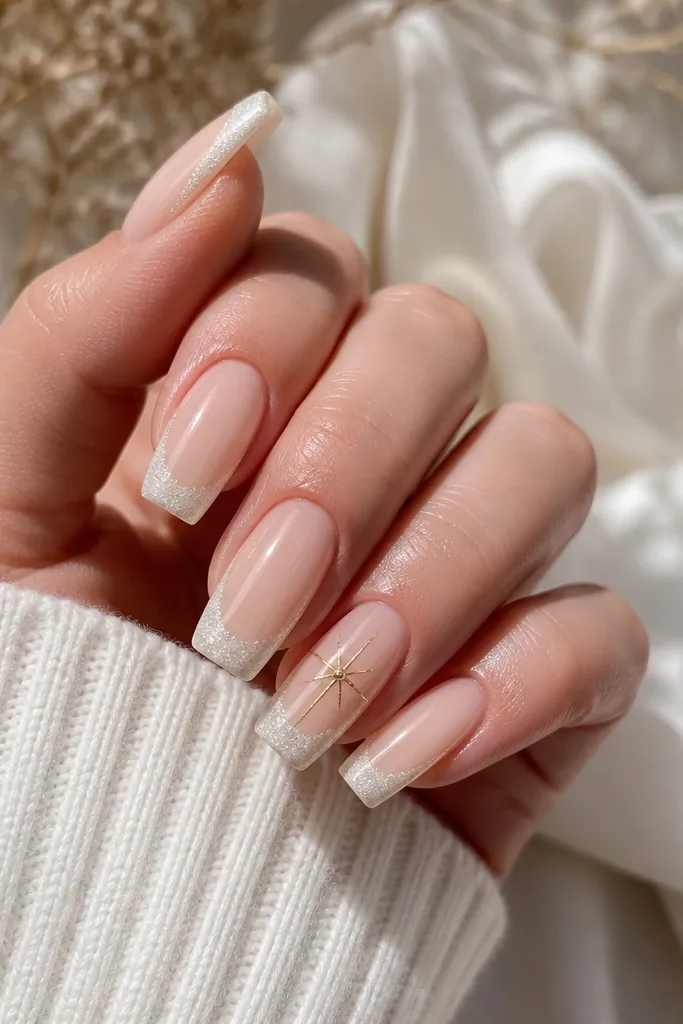
Halo tips make nails look festive without covering the entire nail plate. The white glitter wraps the smile line, so it looks neat as your nails grow out. The gold starburst accent adds a birthday "wow" moment without needing a full set of art on every nail. This is flattering on coffin and almond shapes because the smile line sits right where your fingers show off movement. It also looks great with party makeup because the nails match the shimmer.
Start with a translucent nude base and cure. Apply white glitter gel around the tip edge in a crescent that follows the smile line, keeping the glitter concentrated near the tip and fading inward. Cure. On one accent nail, draw a gold starburst with a fine liner brush - start with a small center dot, then add 6 to 8 radiating lines. Finish with glossy top coat to smooth the glitter halo.
Editor's noteUse a smaller liner brush for the starburst - thick lines look cartoonish in close-up photos.
Watch outAvoid glitter that reaches too far down; it makes the nail look shorter.
25. White Velvet-Look Base With Gold Foil Corner Cut
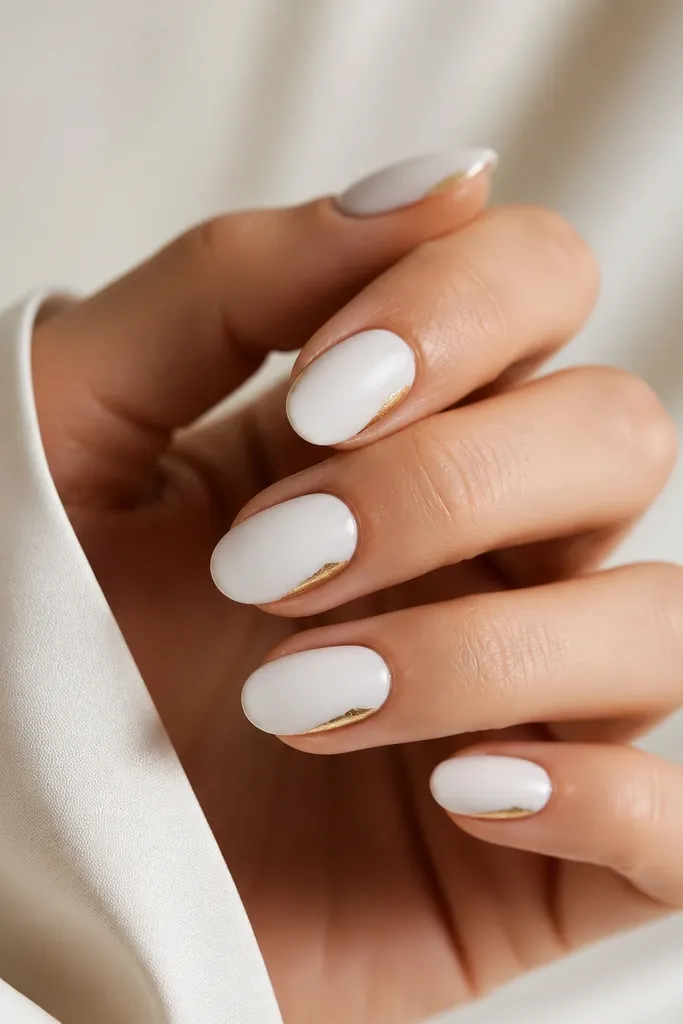
Velvet-look nails feel special because they look like fabric, not paint. Pairing matte velvet white with glossy gold foil gives you contrast that shows up in daylight. I like this set when the birthday is more casual but you still want your hands to look dressed. It's flattering for medium and deep skin tones because the white velvet reads bright and smooth without glaring. On fair skin, it still looks clean, but make sure your white is opaque so it doesn't look sheer.
Apply a matte white gel base in two coats and cure thoroughly. Add a velvet effect by using a velvet/matte powder or a velour top coat meant for gels, then cure. Place gold foil in a small corner near the sidewall and tip using foil glue, keeping it tight and symmetrical across nails. Seal with a top coat that keeps the velvet texture intact, not a normal glossy top coat.
Editor's noteIf your velvet finish pills, buff less - velvet looks best when you don't overwork the surface.
Watch outDon't cover velvet with glossy top coat; it kills the fabric look and makes it look like regular matte.