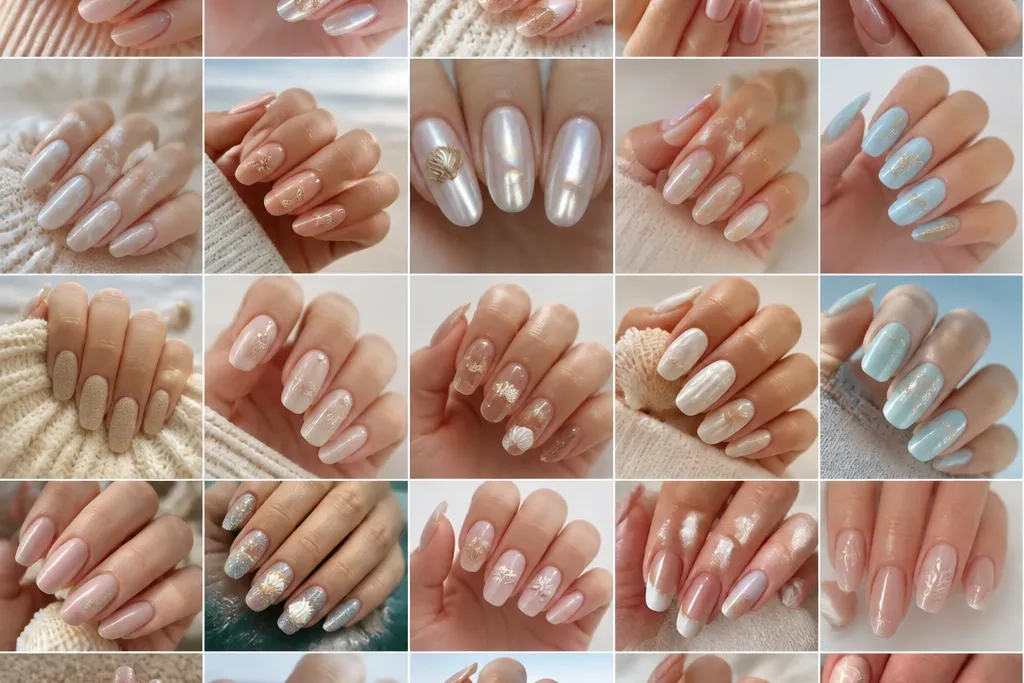
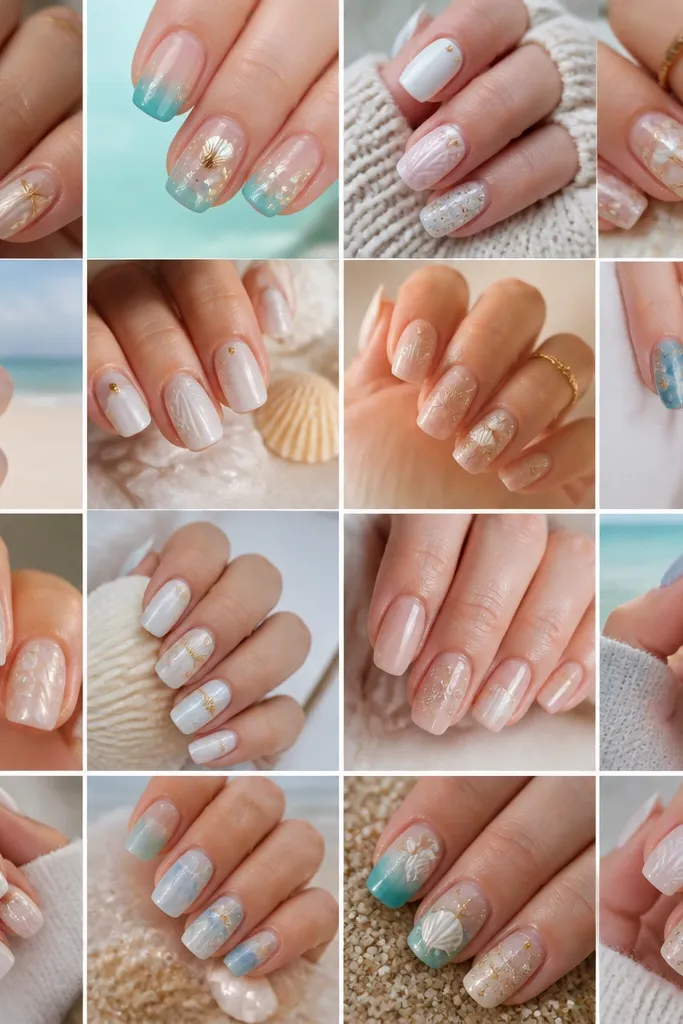
1. Creamy Sand Base With Tiny Pearl Shell Lines
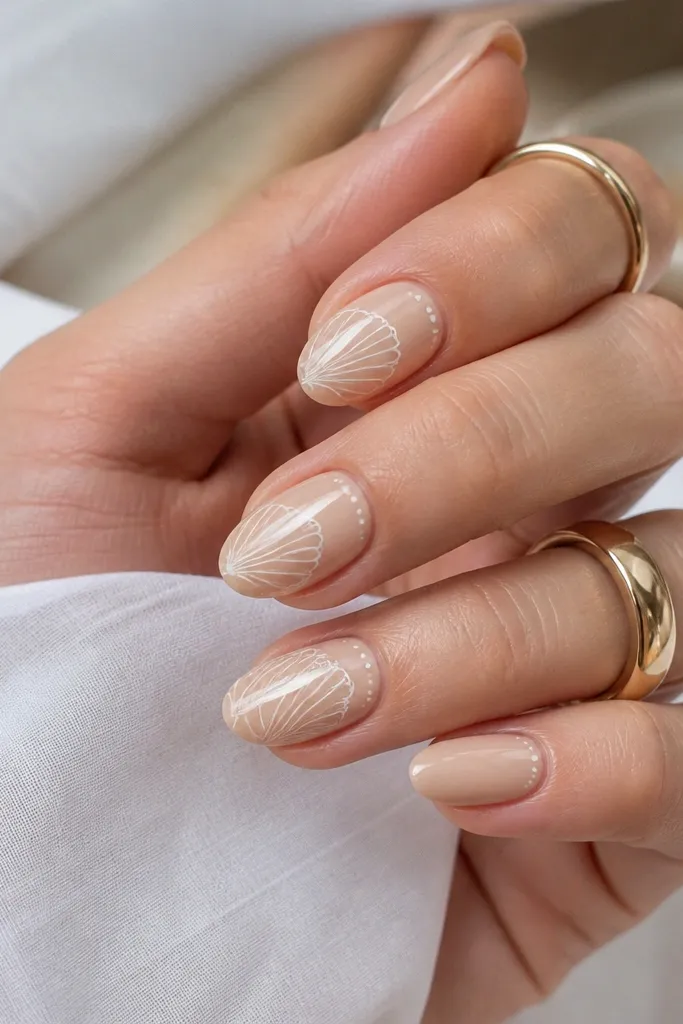
Start with a warm sand nude that looks like sunscreen on skin, not beige wallpaper. On top, draw shell arcs and little spiral ridges using a pearl-white gel liner - keep the lines thin so they look like shell patterns, not doodles. Add two or three micro dots at the cuticle like tiny shell pearls. This set looks flattering on light to medium skin because the sand tone warms your hand, and the pearl linework brightens your nails without turning them stark.
First, prep and push back cuticles, then apply a rubber base in a sand-matching nude and cure fully. Paint two thin coats of creamy sand gel polish, curing between each coat. With a fine liner brush, draw a half-moon shell ridge on each nail, then add one small spiral or curved line near the cuticle. Finish with a glossy top coat, and cure with extra time if your pearl liner feels slightly raised.
Editor's noteIf your liner looks chalky, mix pearl gel with a tiny drop of clear gel and use that for the shell lines.
Watch outAvoid using pure white or thick outlines - the pattern turns into "sticker art" instead of shells.
2. Milky White Shell Bloom On Peach Nude
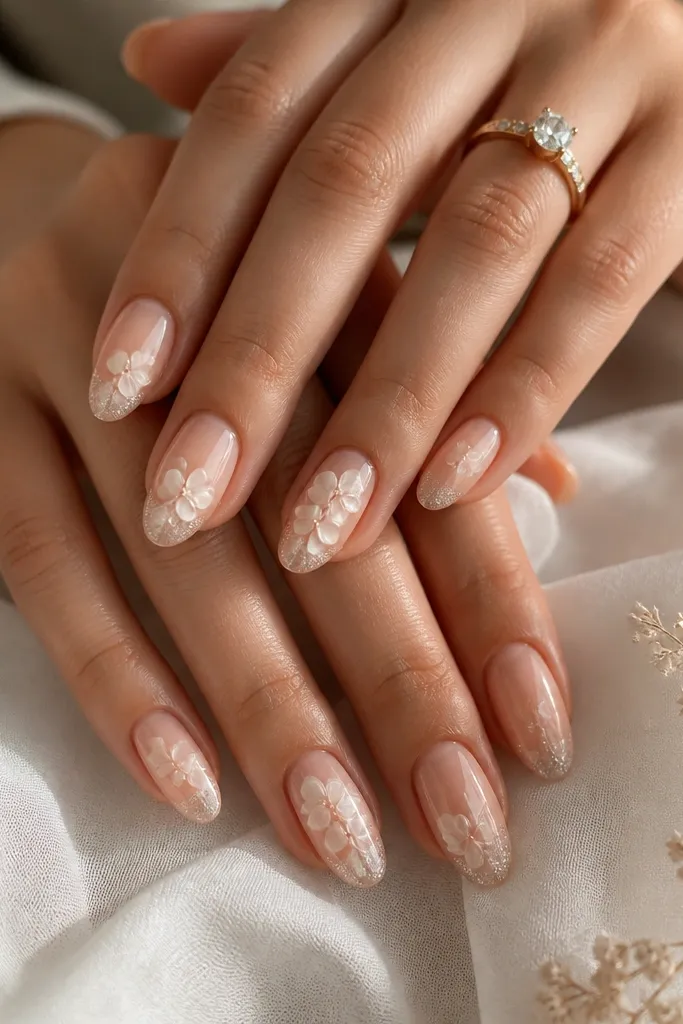
This one is cozy because the base is peach nude, which looks warm and friendly against most skin tones. The milky white shell bloom gives you that "sea foam" look without going cold. I like clustering the shell ridges in the center because it makes the nail look fuller and more plush. It's great for summer brunch, casual weddings, and anyone who wants shells but doesn't want the whole nail covered in busy art.
Start by painting two coats of peach nude gel polish on clean, shaped nails. Cure well so the surface is smooth. Use a milky white gel with a dotting tool to place a small center mound, then drag a few shell ridges outward using a liner brush. Add a whisper of soft shimmer at the free edge, then seal everything with a high-gloss top coat.
Editor's noteKeep the shell cluster small - about the size of a pencil eraser at the center - so it stays "bloom," not "map."
Watch outSkip heavy glitter on the shell area; it hides the ridges and makes the bloom look muddy.
3. Champagne Mermaid Shell Tips With Warm Nude Base
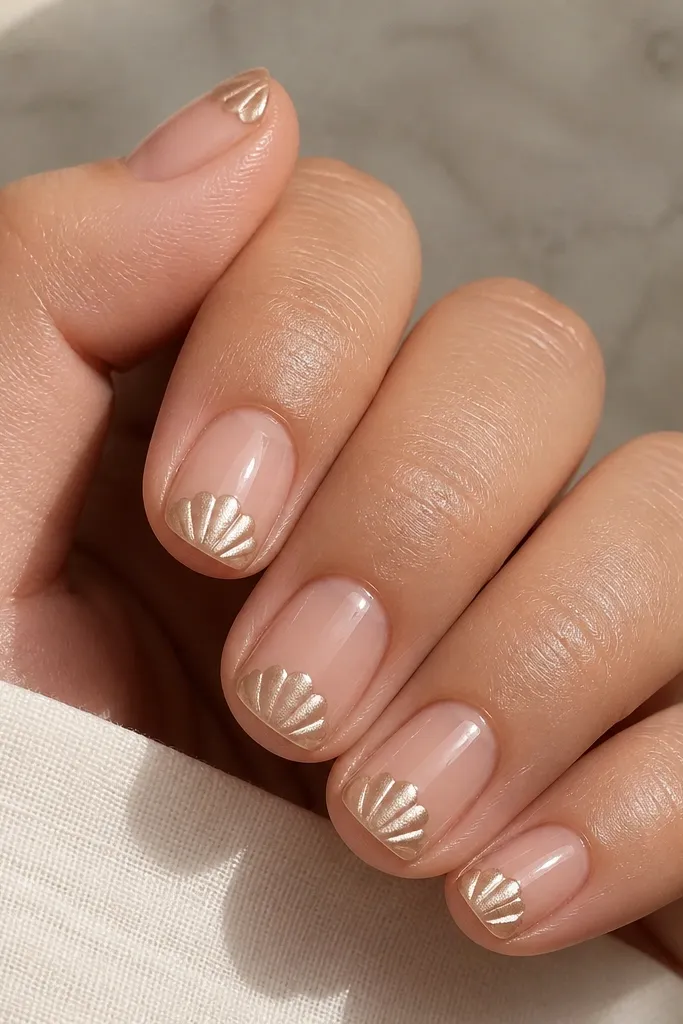
Metallic tips in champagne read expensive and cozy when you pair them with a warm nude. The shell-tip shape is the key: think scalloped waves, not straight French lines. I like short square here because the scallops look crisp and balanced, and the warm nude base makes your hands look even. This set works best when your skin has warm undertones, but it still looks good on cool undertones because champagne sits in the middle.
Apply a warm nude base gel in two thin coats, then cure. For the shell tips, use a small angled brush to paint a thin band near the free edge. Add scallops by tapping the metallic gel into curved points, alternating left and right so it looks like shell edges. Clean the sides with a brush dipped in gel cleanser, then finish with a glossy top coat.
Editor's noteUse a metallic gel that isn't too mirror - if it looks chrome-silver, it will feel icy instead of cozy.
Watch outDon't extend the scallops all the way to the nail's midline; tips only look neat and beachy.
4. Terracotta Seashell Half-Moons On Nude Pink
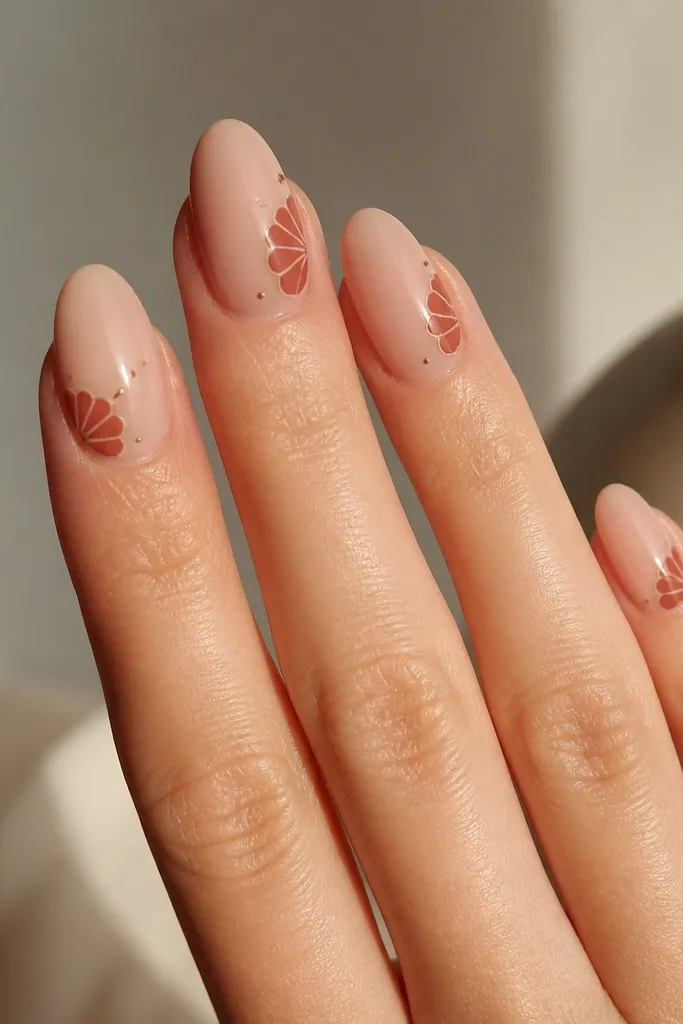
Terracotta is my secret for a cozy beach vibe because it warms the whole set like sun-baked clay. The nude pink base keeps it soft, while terracotta half-moons at the sides create a "shell imprint" look. I add tiny gold dots as highlights so the motifs catch light like tiny shell ridges. This looks flattering on fair to medium skin and is especially good if you wear a lot of white, cream, and denim.
Paint nude pink in two coats and cure fully. With a liner brush, draw half-moon shell shapes on both sides of the nail near the middle, leaving a small gap in the center. Use a second pass to add one or two curved ridge lines inside each half-moon. Tap gold micro dots at the ridge ends, then seal with glossy top coat.
Editor's noteIf terracotta stains, apply a thin base coat first and cure; it reduces color bleed.
Watch outAvoid using orange-red terracotta too bright; it can overpower the cozy beach feel.
5. Sheer Blush With 3D Seashell Cuticle Bumps
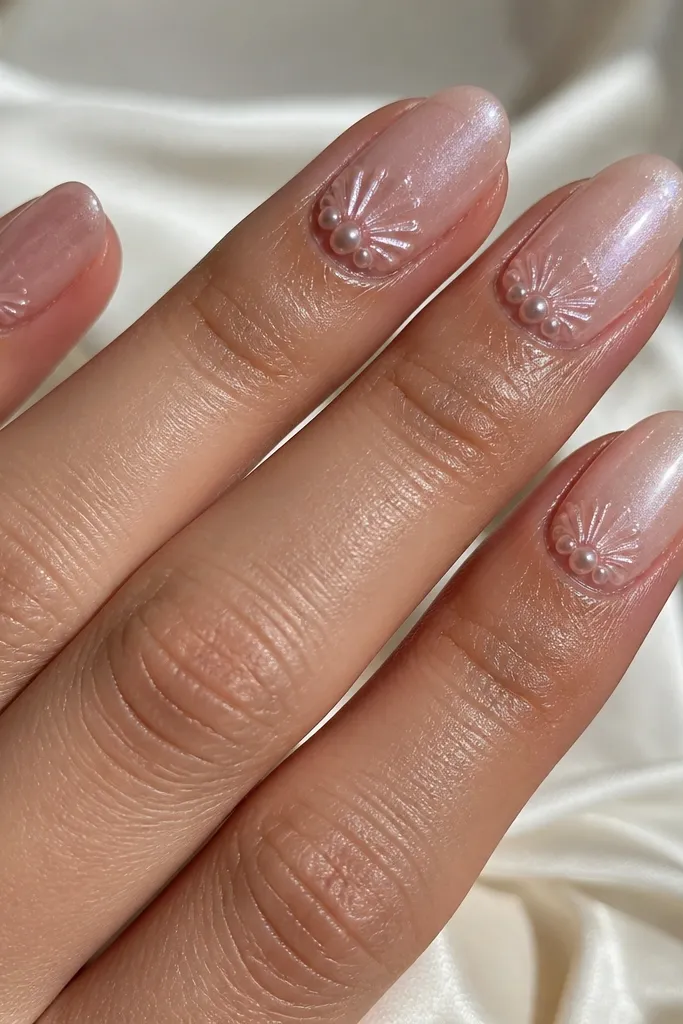
If you want maximum cozy, go 3D but keep it concentrated. A sheer blush base makes the bumps look like they're growing out of your nail, not sitting on top. I place small shell bumps at the cuticle and one side because that's where the light hits when your hands move. The pearl shimmer under the bumps makes it look soft and beachy, not heavy. This set is super flattering on short to medium nails because the visual weight sits near the base.
Start with a sheer blush gel and cure. Add a thin layer of pearl shimmer gel only at the lower half, then cure. Use sculpting gel or pre-made tiny shell charms set into gel near the cuticle, then lightly press so the bumps sit secure. Add one ridge detail with a fine brush if needed, cure, and finish with glossy top coat around the bumps without flooding them.
Editor's noteWhen placing 3D pieces, leave a tiny gap between bumps so the shell shapes stay readable.
Watch outDon't cover the bumps with thick gel; it smooths away the shell texture.
6. Oat Milk Marble With Seashell Speckle
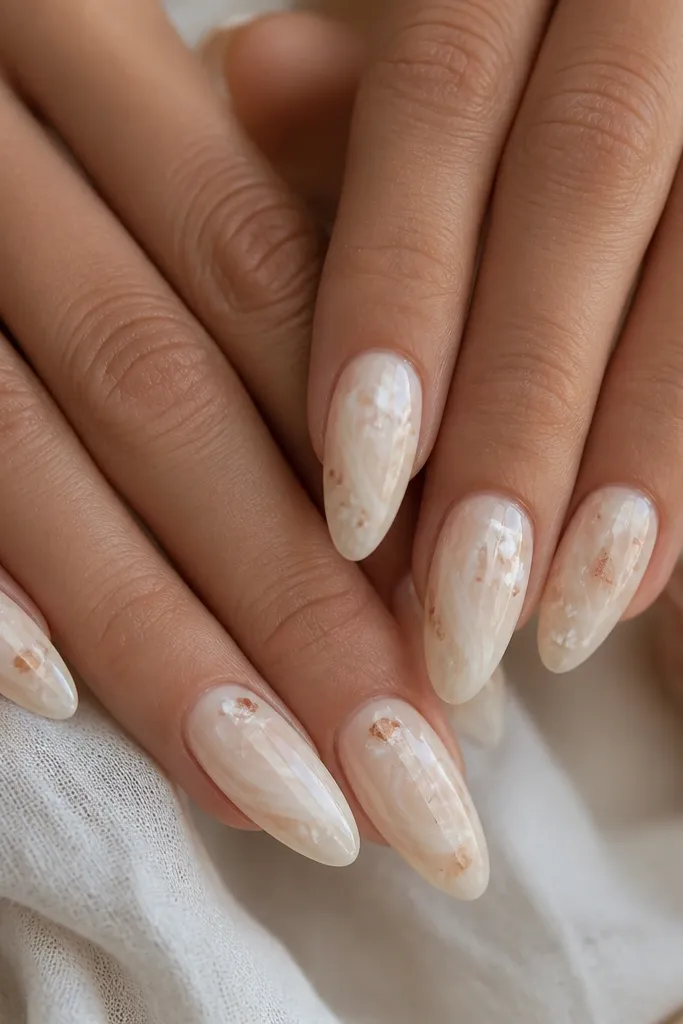
Marble can go messy fast, but oat milk marble stays cozy because the tones are close together. The seashell speckle adds that beach texture without needing big art. I use pearl specks plus soft warm-brown dots so the nails look like shell sand after a walk. This works on any skin tone because it's neutral and warm, and it looks good with casual summer outfits because it doesn't scream "theme."
Paint a base of oat milk nude gel, cure, then create marble by swirling two creams with a small detail brush using gel polish in thin streaks. Use a sponge to soften the transitions so the marble looks natural. Add tiny pearl dot speckles and a few warm-brown dots in a scattered pattern across the nail, focusing more near the free edge. Seal with glossy top coat and cure thoroughly to smooth the marble ridges.
Editor's noteKeep your marble streaks narrow - wide swirls make the nails look like wallpaper.
Watch outAvoid heavy black speckles; they turn the whole set from beachy to spooky.
7. Seafoam Green Micro Shells On Milky Nude
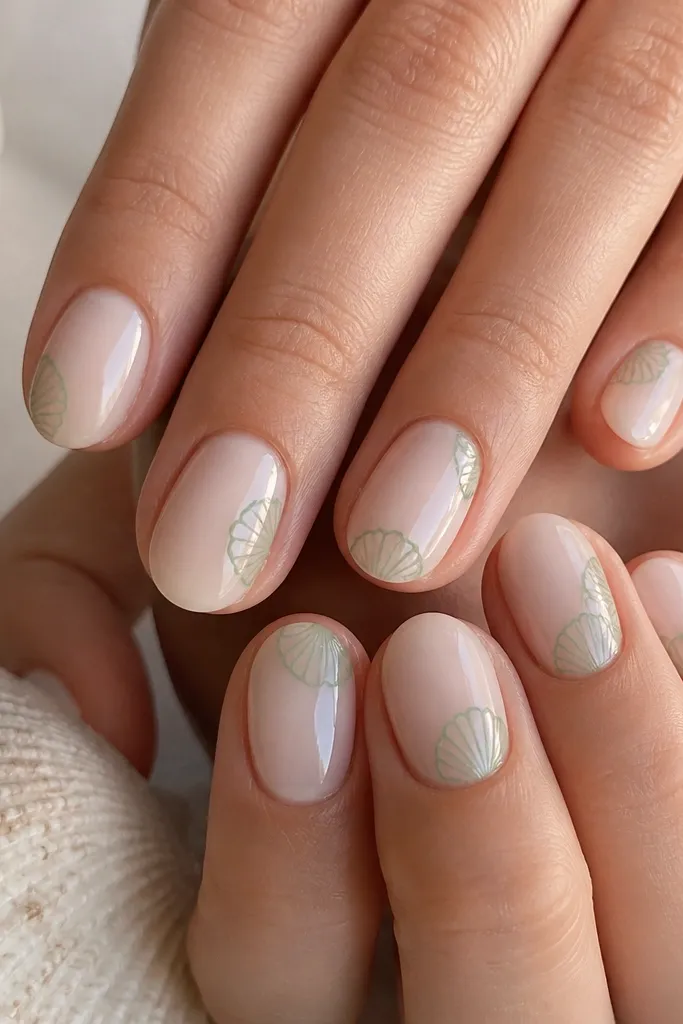
Seafoam green reads like ocean air, and when you use it in micro shell outlines it stays cozy instead of "pool party." The milky nude base makes the seafoam look gentle, almost like it's stained into the nail. I like side placement because it makes fingers look longer and keeps the design from feeling crowded. This set works great if you want a fresher summer color but still want the warmth of nude.
Apply milky nude gel in two coats, then cure. With a fine liner brush, draw tiny shell arcs on the left and right sides of each nail, spacing them evenly from near the middle to the tip. Add one or two shorter ridges within each arc. Finish with a glossy top coat, and clean the edges so the seafoam lines look sharp.
Editor's noteIf your seafoam looks too bright, mix it with a drop of clear gel to soften the tone.
Watch outSkip full-coverage seafoam backgrounds; it kills the cozy nude contrast.
8. Pearl Chrome Wave Over Sandstone Nude
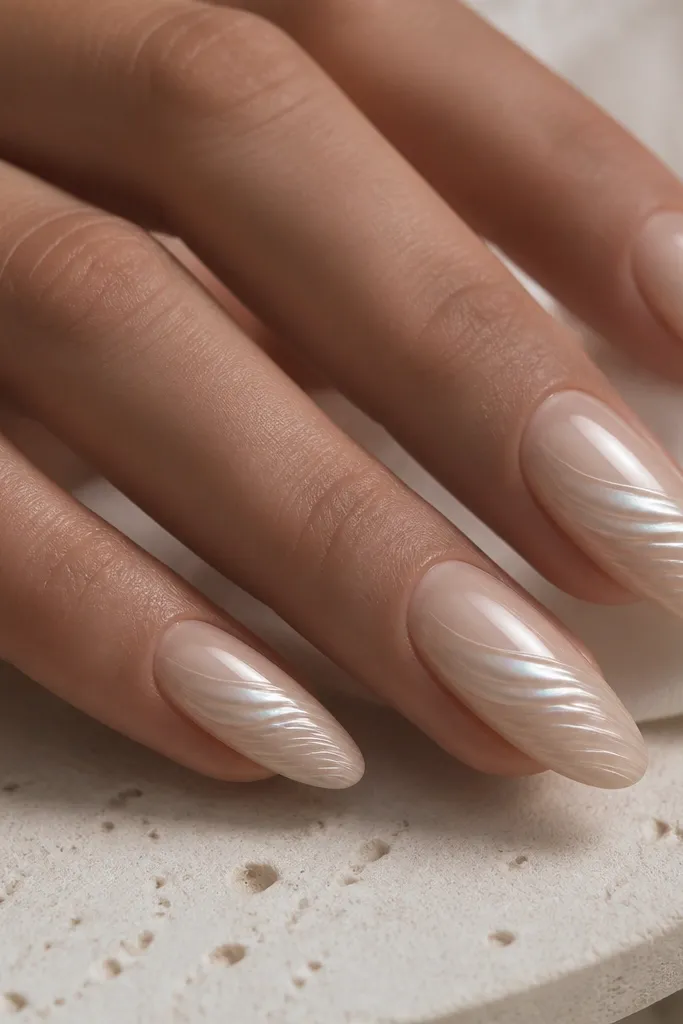
Pearl chrome is the quickest way to make shells look like they're lit from inside. I place a single wave across the center because it mimics a shell's curve and gives movement without clutter. The sandstone nude base keeps it warm and wearable. This set flatters hands because the wave draws the eye toward the middle, and it looks good with gold jewelry.
Start with sandstone nude gel polish in two thin coats. Apply a strip of pearl chrome gel or loose pearl chrome powder along the center and swipe it into a smooth wave. Use a thin liner brush to add faint shell ridges following the wave curve. Seal with glossy top coat; use a thicker top coat on top of the chrome to lock it down.
Editor's notePress chrome gently with a sponge tip so you don't muddy the wave edges.
Watch outAvoid stacking multiple waves; two or three lines start looking like random foil.
9. Warm White French With Seashell Ridge Accent
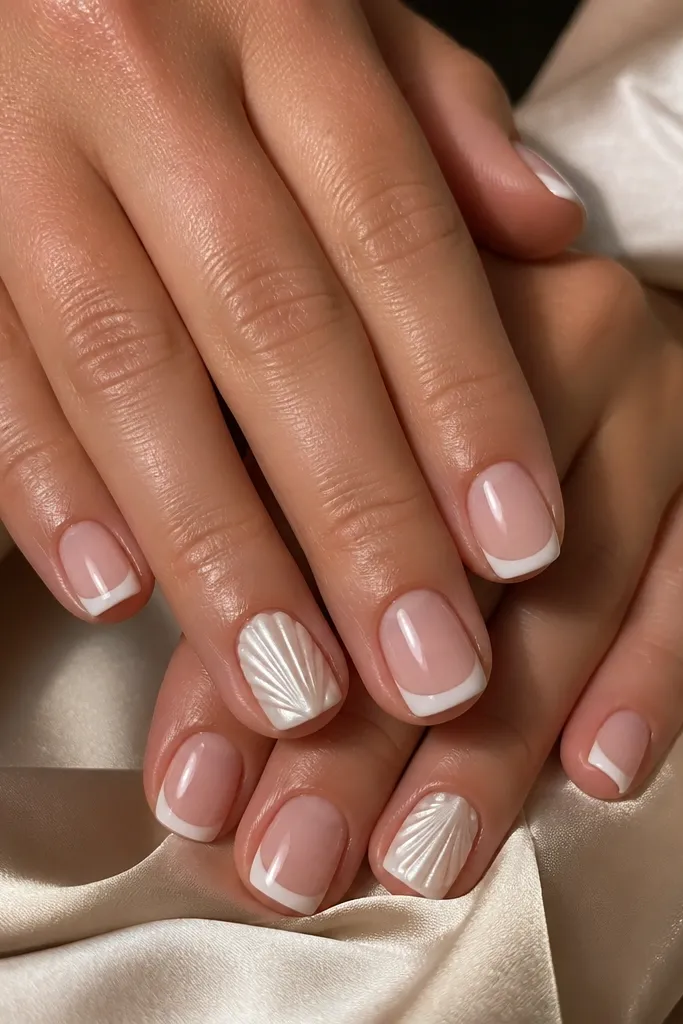
This is for people who want seashell nails but hate heavy nail art. Warm white French tips look creamy instead of harsh, and the single ridge accent keeps the theme clear. I usually put the ridge on the ring finger only, but you can do it on every nail if you keep the ridge small. It's flattering on hands because French tips visually lift the nail and the shell ridge adds just enough detail for compliments.
Paint a warm nude base in two coats and cure. Do a French tip with warm white gel using a consistent smile line, then cure. On the accent nails, use a fine liner to draw one shell ridge arc and add two short ridges beneath it. Finish with glossy top coat and clean the cuticle edges with a small flat brush.
Editor's noteUse a warm white, not bright optical white, so the set reads cozy.
Watch outDon't make the French tip too thick; thick tips look like paint, not nails.
10. Soft Peach Gloss With Embedded Shell Glitter
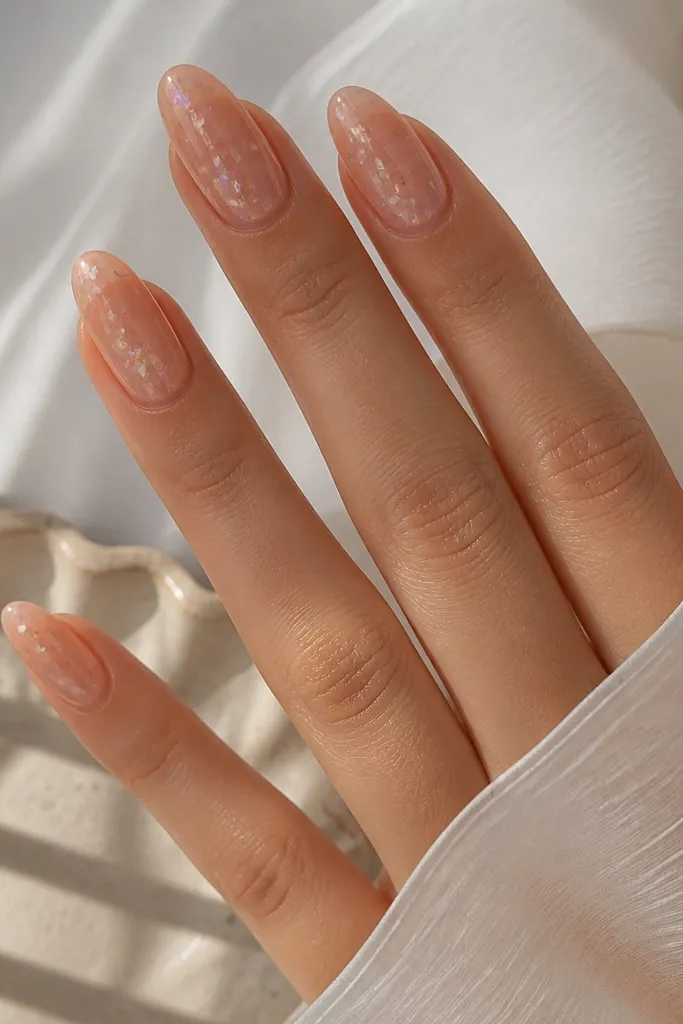
This set looks like you bottled the beach. Soft peach glossy gel is already cozy, and embedded shell glitter gives that "tiny shells in sand" look. I keep the glitter sparse and concentrated near the free edge, so it sparkles when you move without looking like craft glitter. It flatters medium and tan skin especially well because peach warms the undertones.
Apply a soft peach gel in two coats, then cure. Add a thin layer of clear gel only on the lower half and sprinkle fine iridescent shell glitter lightly, pressing it in with a silicone tool. Cure, then cap with clear gel over the whole nail to smooth it. Finish with a high-gloss top coat and cure fully for a glassy surface.
Editor's noteUse fine shell glitter, not chunky holographic pieces, for a realistic seashell effect.
Watch outDon't skip capping; glitter that sits on top chips and catches on fabric.
11. Sand Beige Base With Seashell Sidewall Scallops
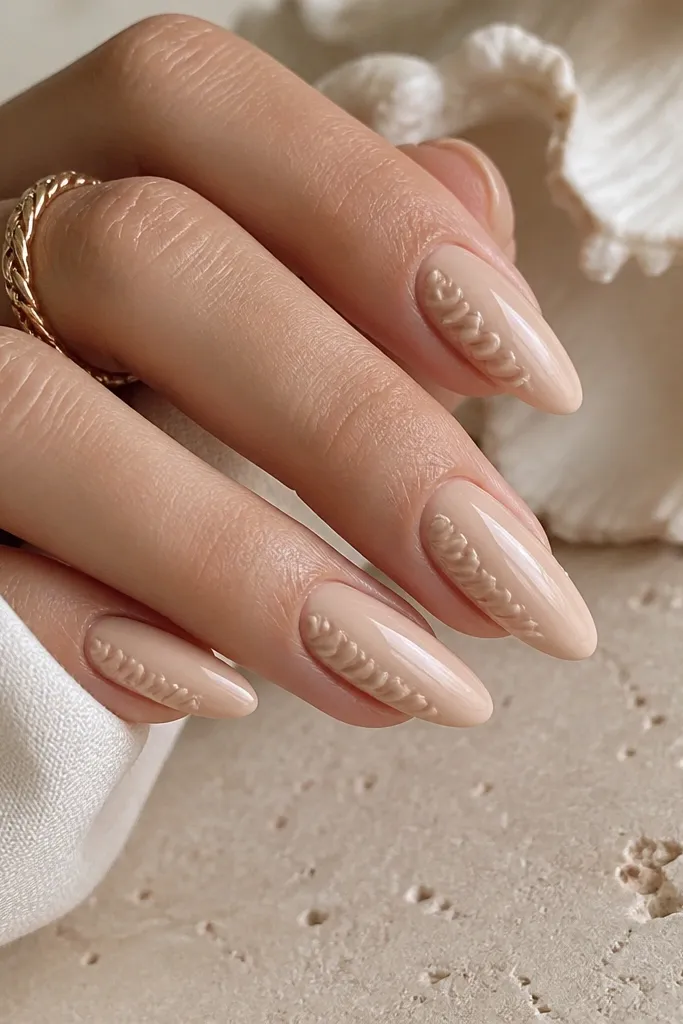
Sidewall scallops make nails look sculpted. A sand beige base keeps everything warm, and scallops along the side add dimension without covering the whole nail. I like this on almond shapes because the scallops follow the natural curve and make your nail bed look longer. This set works for everyday wear because it's detailed but controlled.
Apply sand beige gel polish in two coats and cure. With a liner brush, create small scallop dots along the left sidewall from near the middle to the tip, then mirror them on the right. Add a tiny ridge line inside each scallop using a slightly darker beige or warm brown. Seal with glossy top coat, and run the brush along the sidewalls to prevent snagging.
Editor's noteIf your scallops look uneven, use a dotting tool and press for consistent half-moons.
Watch outAvoid scallops that touch each other across the center; it makes the nails look crowded.
12. Pearl Milk Nails With Line-Drawn Conch Shells
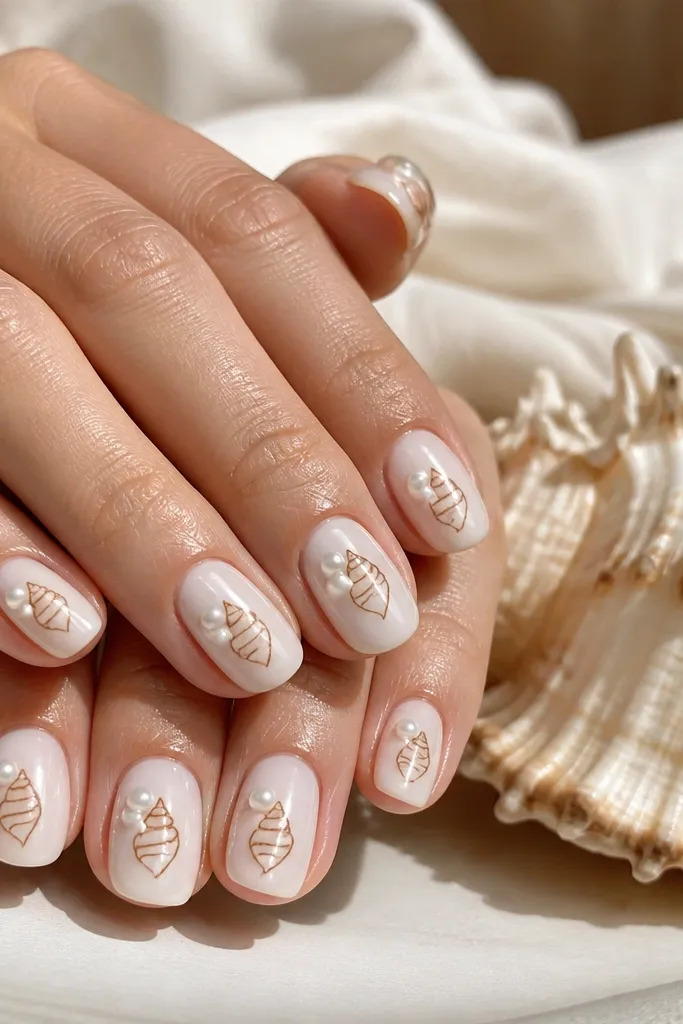
Pearl milk polish gives you that soft, creamy glow that screams "cozy beach." The line-drawn conch shells keep the look clean and readable, especially on short ovals. Warm brown outlines make it feel natural, like shell ridges you'd see in real life. I like this for people who want a calm set that still looks intentional in photos.
Paint pearl milk polish in two coats, cure, and keep the surface smooth. Use a warm brown gel liner to draw one conch shell outline per nail, centered slightly toward the cuticle. Add three small pearl dots along the inner curve to mimic ridges. Finish with glossy top coat, and cure long enough that the liner doesn't sink.
Editor's noteDraw lightly first, then go back for a second pass where the ridge should be darker.
Watch outAvoid black liner; warm brown makes the shells look sun-worn.
13. Ocean Blue Fade Into Sand With Shell Charm Sticker
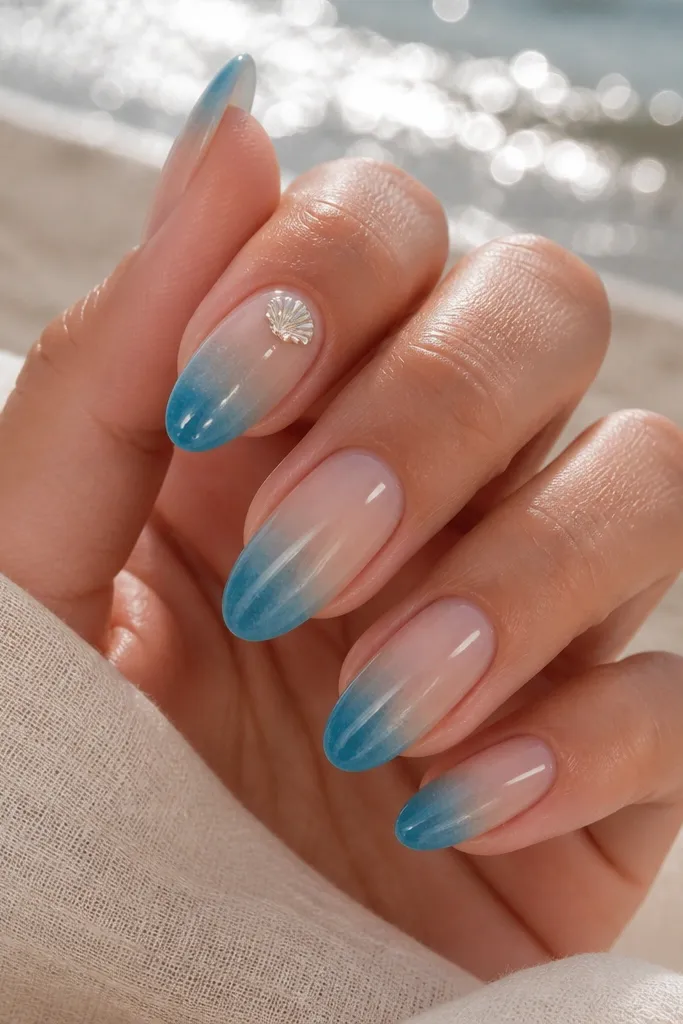
A blue-to-sand gradient reads like shoreline water meeting dry sand, and that's the cozy beach vibe in one move. Keep the blue muted, not neon, so it feels like early morning ocean. A tiny shell charm near the cuticle adds a focal point and makes the set look styled even with minimal line art. This looks great on hands that need a bit of contrast without heavy patterns.
Start with a sand nude base and cure. For the gradient, sponge ocean blue gel at the tips and blend upward into the sand using a clean sponge edge. Cure. Add a small shell charm sticker or tiny charm near the cuticle, then cap with clear gel to lock it down. Finish with glossy top coat to smooth the charm edges.
Editor's noteBlend in thin layers until the fade looks like airbrushing, not a hard line.
Watch outSkip bright cobalt - it looks harsh with the cozy sand base.
14. Satin Nude Base With Glossy Shell Ridge Highlights
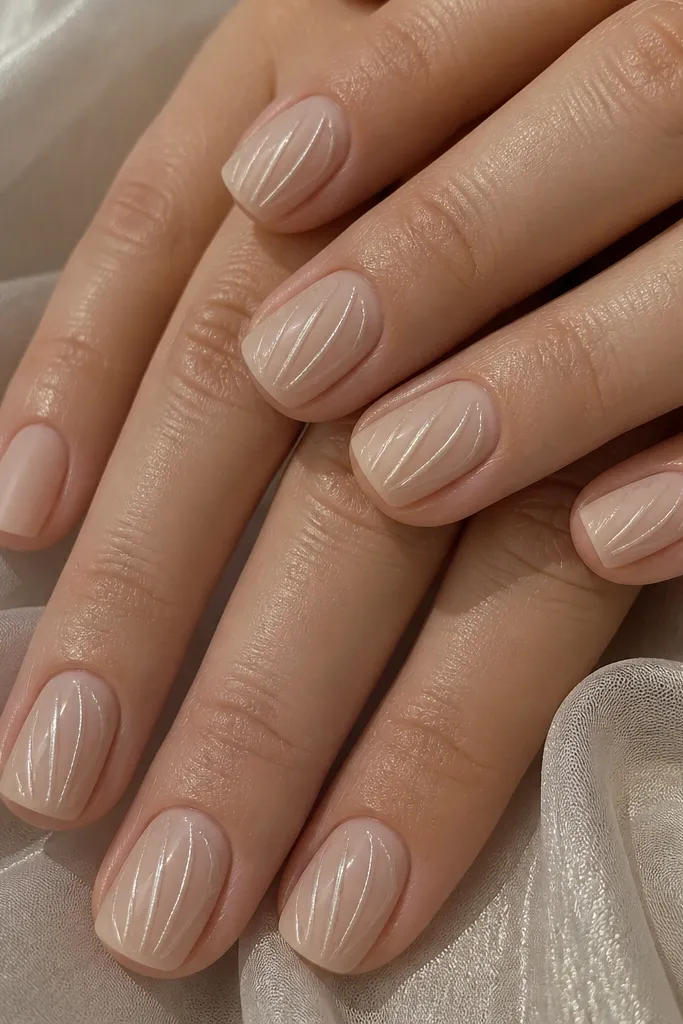
This one is cozy because the base is satin, so it looks like soft sand instead of plastic. Then you add glossy shell ridge highlights in white-pearl, which pop when light hits. I use glossy ridges only so the texture contrast looks intentional. It's beautiful on short square because the matte base keeps the edges clean and the ridges read clearly.
Apply satin nude gel polish or matte top coat over your nude base and cure. Use a white-pearl gel to draw one or two shell ridge lines down the center of each nail, keeping them thin. Cure, then top coat only over the ridge lines with glossy top coat, avoiding the rest of the nail. Clean the edges and cure fully so the matte surface stays matte.
Editor's noteUse a glossy top coat brush carefully - if it touches the matte base too much, you lose the contrast.
Watch outDon't matte the whole nail after you've placed 3D pieces; it dulls the shell texture.
15. Rose Quartz Seashell Swirls On Warm Nude
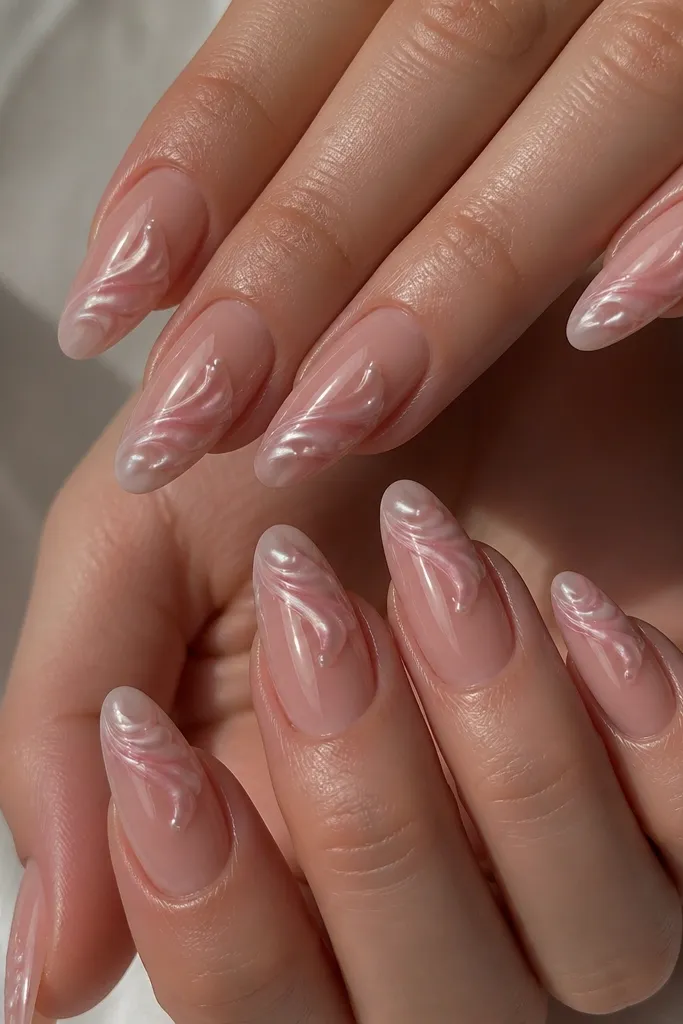
Rose quartz swirls feel romantic and cozy when you keep the base warm and the shell ridges subtle. The swirls mimic shell curves, and the tiny ridge dots at the swirl ends add realism. I like this for date nights because it reads soft and pretty without looking like candy gel. It flatters fair skin by adding warmth, and it flatters medium skin by keeping the design from looking washed out.
Paint warm nude base in two coats and cure. Use a rose quartz pink gel and a fine liner to draw thin swirl lines across the nail, not covering the entire surface. At the end of each swirl, add a tiny short ridge using a lighter pink or white-pearl gel. Seal with glossy top coat, and keep the swirls thin so they don't thicken the nail.
Editor's noteIf your swirls look wobbly, use a nail art striping tape to guide the curve for the first line.
Watch outAvoid wide swirls; they make the shell pattern look like abstract paint.
16. Taupe Sand With Micro Seashell Grid
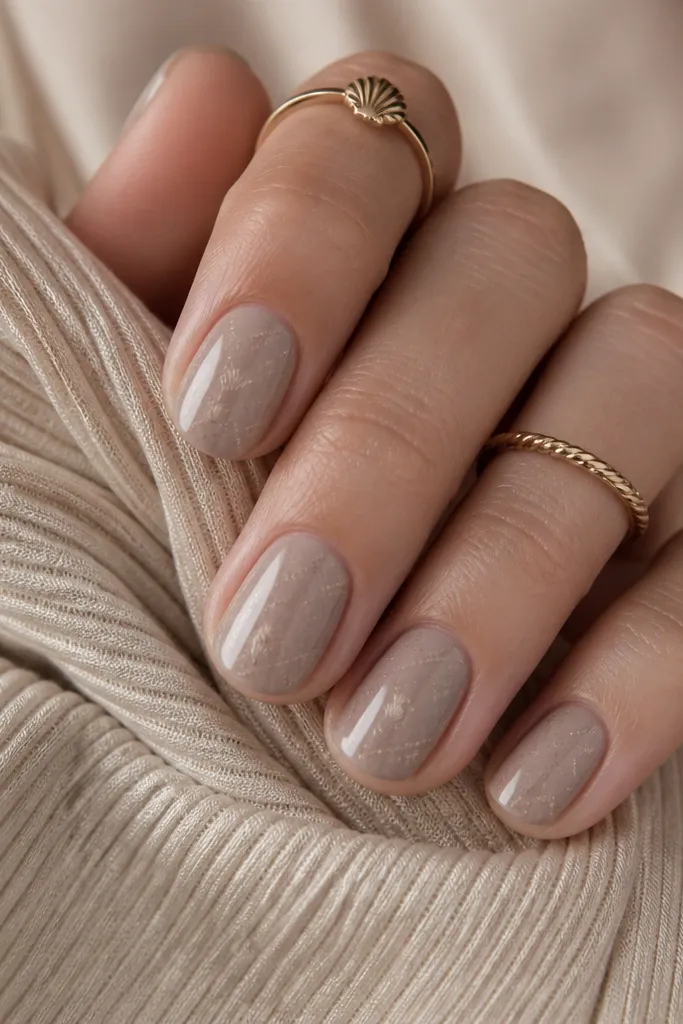
Taupe sand is a cozy neutral that looks good with every summer outfit. The micro grid makes the design feel intentional, and tiny seashell icons at intersections turn it into a "shell map" vibe. I like this set because it looks cute even when you're not close up - the pattern reads as texture. It's especially flattering if you wear lots of neutral clothing and want your nails to look styled without bright color.
Start with a taupe sand nude gel polish in two coats, cure well. With a thin liner, draw a very light grid using a warm gray-brown, keeping lines faint. Add tiny shell icons - small arcs with one ridge line - at a few intersections, not every one. Finish with glossy top coat to make the grid disappear slightly and look like embedded texture.
Editor's noteUse a lighter hand than you think; micro patterns should be subtle from arm's length.
Watch outAvoid heavy grid lines; thick lines make the nails look like grid paper.
17. Sea Glass Teal With Pearl Shell Dots
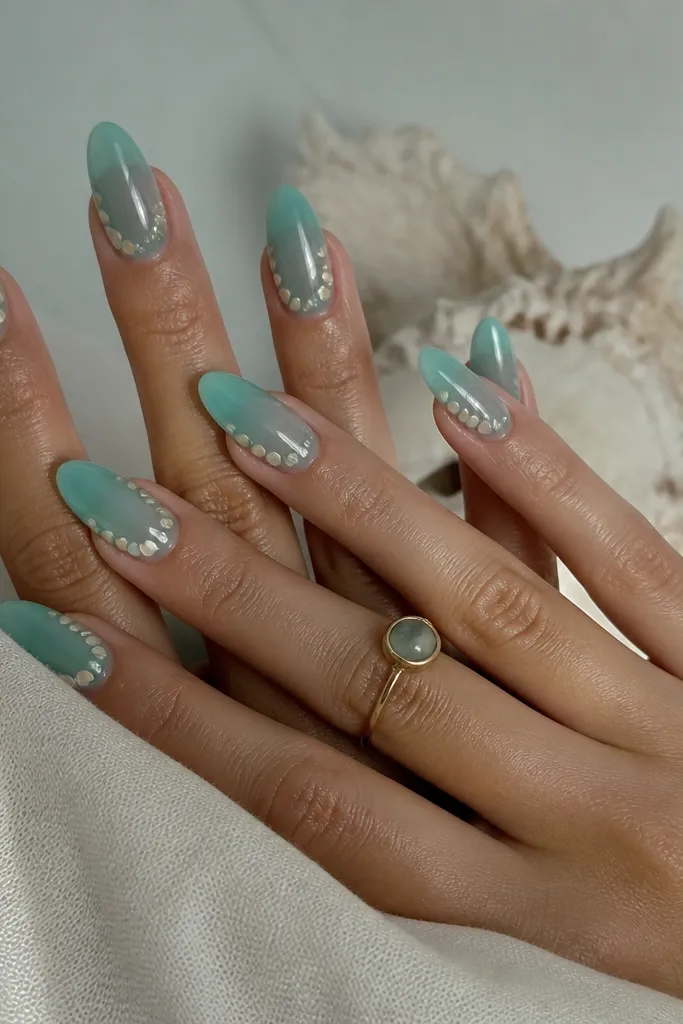
Sea glass teal reads like ocean water but it's still soft enough for a cozy beach vibe. The trick is using it in a jelly or semi-sheer layer so your nail bed stays warm-looking. Pearl shell dots mimic the little beads you see on real shells and they add movement. This set looks amazing on medium and deep skin because teal pops, and the pearl keeps it from looking too harsh.
Apply a sea glass teal jelly gel in two thin layers and cure. Add pearl micro dots near the cuticle and one side per nail, keeping the dots spaced so they look like clusters. Use a fine liner with white-pearl to add one tiny shell ridge line under a few dots. Cap with glossy top coat and cure fully so it stays smooth and shiny.
Editor's noteIf your teal is too dark, thin it with clear gel for a lighter sea glass effect.
Watch outAvoid a fully opaque teal; it loses the sea glass softness.
18. Warm White Base With Scattered Tiny Conch Shells
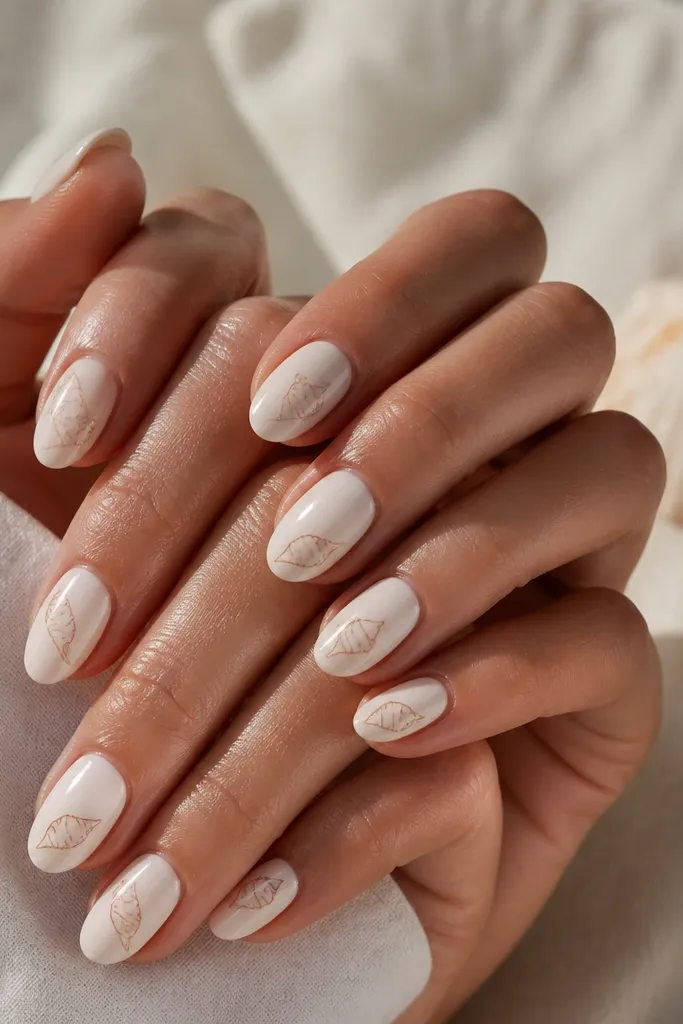
Warm white is cozy when it's creamy, not stark. Scattered tiny conch shells keep the theme playful and summer without making your nails feel heavy. I place shells in different positions - one near the tip, one near the side - because that randomness looks more natural, like shells you found on a walk. This set works for all skin tones and looks especially good on people who like clean nails but still want detail.
Paint warm white gel polish in two coats and cure. Use a warm brown liner to draw one small conch shell outline on each nail, then add one extra tiny shell on a couple nails. Keep the shells small - about a third of the nail length - so they don't crowd. Finish with glossy top coat and cure long enough that the liner stays crisp.
Editor's noteIf shells start looking like waves, shrink them and add one ridge line inside the conch outline.
Watch outDon't fill every inch with shells; scattered placement looks more beach-found.
19. Bronze Sand Glaze With Embedded Shell Foil
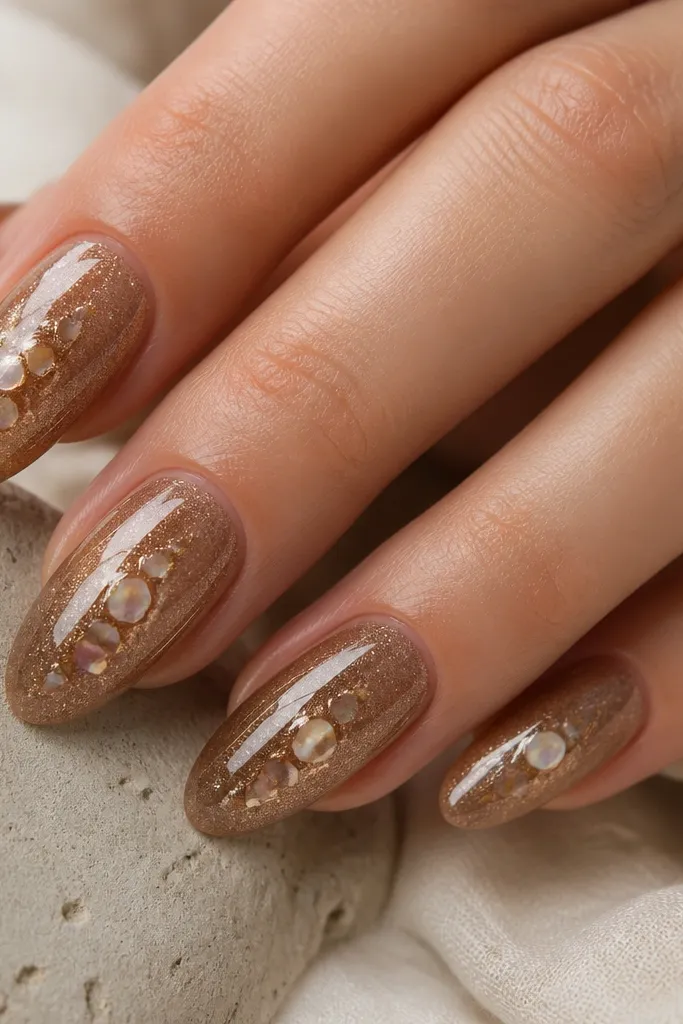
Bronze sand glaze gives you that sun-warmed beach metal look, and it reads cozy when the foil pieces are small. Embedded shell foil adds sparkle like shell fragments under water. I keep the foil near the center so the nail looks dimensional rather than chaotic. This set looks great with gold rings and tan sandals, and it's flattering on medium to deep skin because bronze warms everything up.
Apply a bronze sand glaze gel polish in two coats, cure between coats. Add a thin clear gel patch in the center of each nail and place tiny shell foil fragments into it. Press gently so the foil doesn't lift, then cure. Cap with clear gel to smooth the surface, then finish with glossy top coat.
Editor's noteUse foil fragments that are small and irregular; big flakes look too party and less shell-like.
Watch outAvoid heavy foil coverage; it turns into a glitter bomb instead of cozy sand.
20. Peachy Nude Ombré With Shell Ridge French
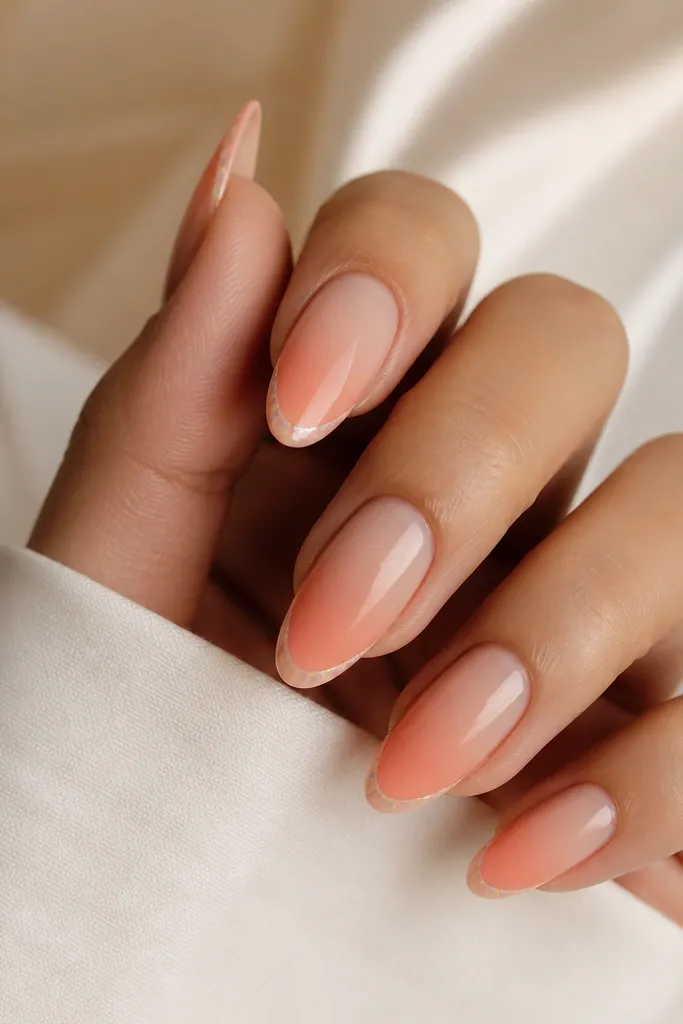
Ombré gives you the beach gradient without needing lots of art, and the shell ridge French line makes it seashell-specific. I use soft coral at the tips because it looks like sunset sand instead of neon orange. The shell ridge line is thin and warm, so it feels like shell texture rather than a sticker outline. This set is flattering on almond nails because the gradient elongates, and the ridge line adds structure.
Start with a nude peach base and cure. For the ombré, sponge soft coral gel at the tips and blend upward into the nude, doing it in two layers for smoothness. Cure. With a fine liner, draw a thin shell ridge line just above the tip line, adding one or two tiny ridges along it. Top coat with glossy finish and cure fully.
Editor's noteKeep the ombré blend higher than you think - it looks more natural on photos.
Watch outAvoid harsh tip edges; a hard ombré line looks like you used tape.
21. Ivory Shell Swirls On Sheer Nude Jelly
A sheer nude jelly base is the cozy secret because it looks light and airy, like bare nails with sun warmth. Ivory shell swirls mimic the ridges on a conch, and because the base is translucent, the swirls look embedded. I like this for short oval because the curves fit the shape and don't look stretched. It's also a good choice if you want something you can wear to the office without it looking too themed.
Apply a sheer nude jelly gel in one or two thin coats and cure, keeping the nail surface glossy. Use ivory gel liner to draw two or three curved ridges across the nail, following the natural nail curve. Add a small dot at the end of one swirl to mimic a shell knob. Cure and seal with a glossy top coat, keeping it thin so you don't lose the jelly effect.
Editor's noteIf your liner bleeds into the jelly, let the base cure slightly longer before drawing.
Watch outAvoid thick swirls; they sit on top and look like decals.
22. Sandy Nude With Seashell Nail Art Half-Plate
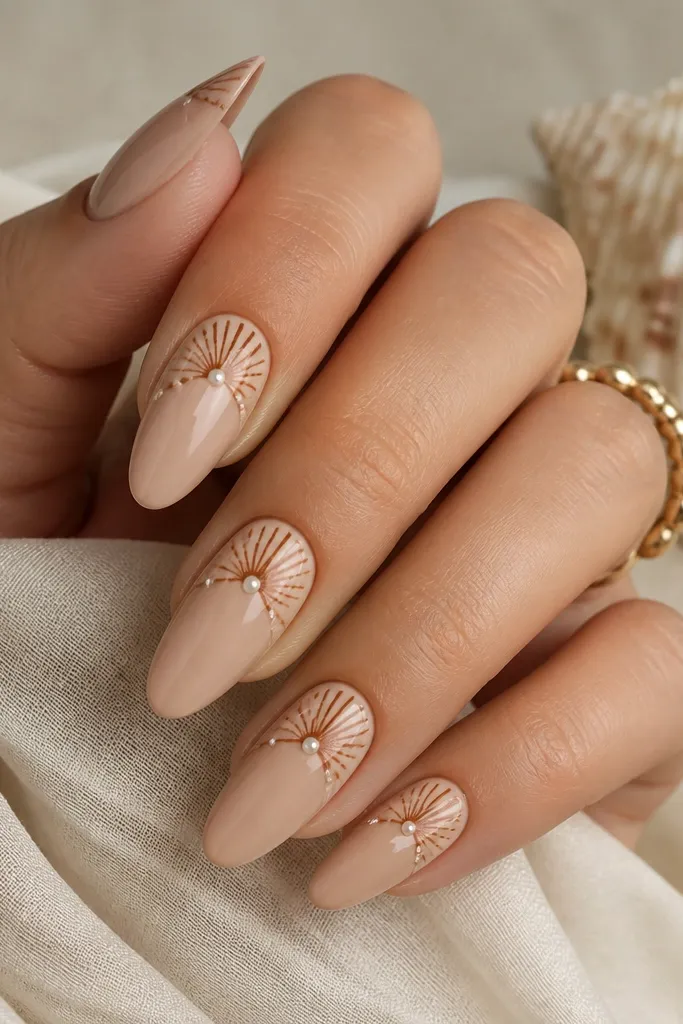
A half-plate design makes shells feel like a pattern on a shell, not scattered stickers. The sandy nude base keeps it warm, and the warm brown outlines make the seashell ridges look natural. Tiny pearl dots in the negative spaces add the cozy glow. I like this when you want something that looks "done" even if you only wear simple outfits.
Paint sandy nude base in two coats and cure. On the top half of each nail, use warm brown liner to draw shell ridge arcs that follow a curved plate shape. Fill the negative spaces with 1-2 pearl dots per nail. Keep the ridge lines thin and consistent so it looks like one shell pattern. Finish with glossy top coat and cap the edges carefully.
Editor's noteUse a half-plate width that matches your nail width - if it's too wide, it feels heavy.
Watch outAvoid filling the whole nail with ridges; half-plate keeps it airy.
23. Sea Salt Pink With Mini Seashell Charms
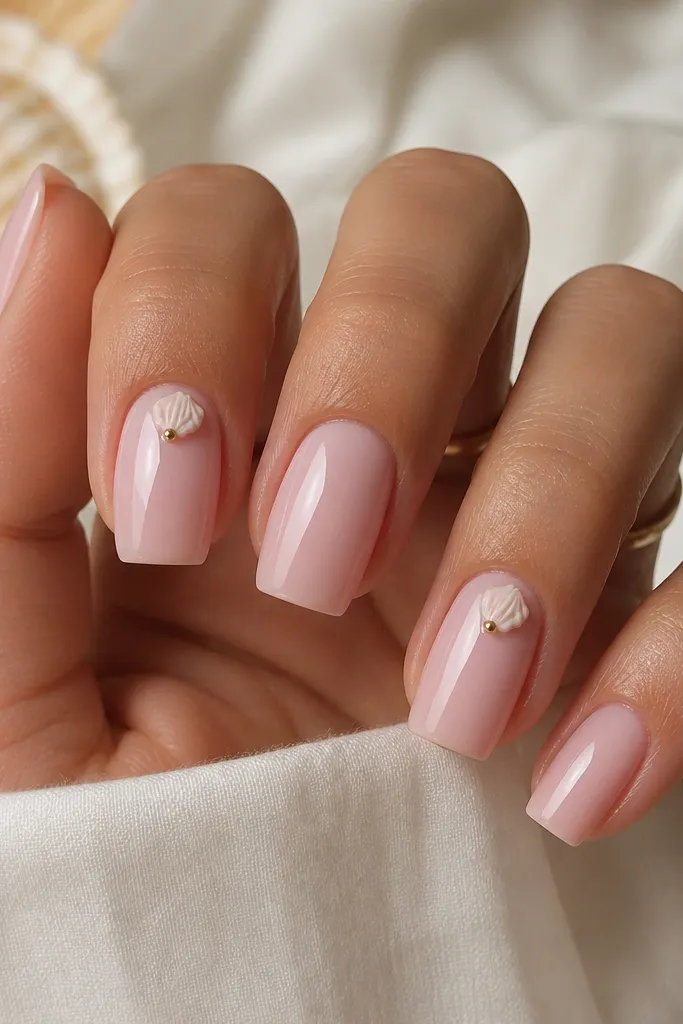
Sea salt pink is soft, warm, and flattering, and charms make it feel playful without going loud. I place mini charms only on two nails per hand so your set stays cohesive and comfortable. The rest of the nails get simple shell line accents so the charms don't look like random adds. This works well for short to medium lengths because the scale matches your nail bed.
Apply sea salt pink gel polish in two coats and cure. For accent nails, apply a small dab of clear gel near the cuticle, place the mini shell charm, and press lightly. Cure and check for lift, then cap the charm with clear gel. On the non-accent nails, draw one tiny shell arc near the sidewall. Seal with glossy top coat.
Editor's noteCap the charm with clear gel even if it feels smooth; it prevents snagging on hair and bags.
Watch outAvoid putting charms on every nail; it gets bulky and feels more like costume than cozy.
24. Sandstone Ombré With Shell Ridges In Clear Gel
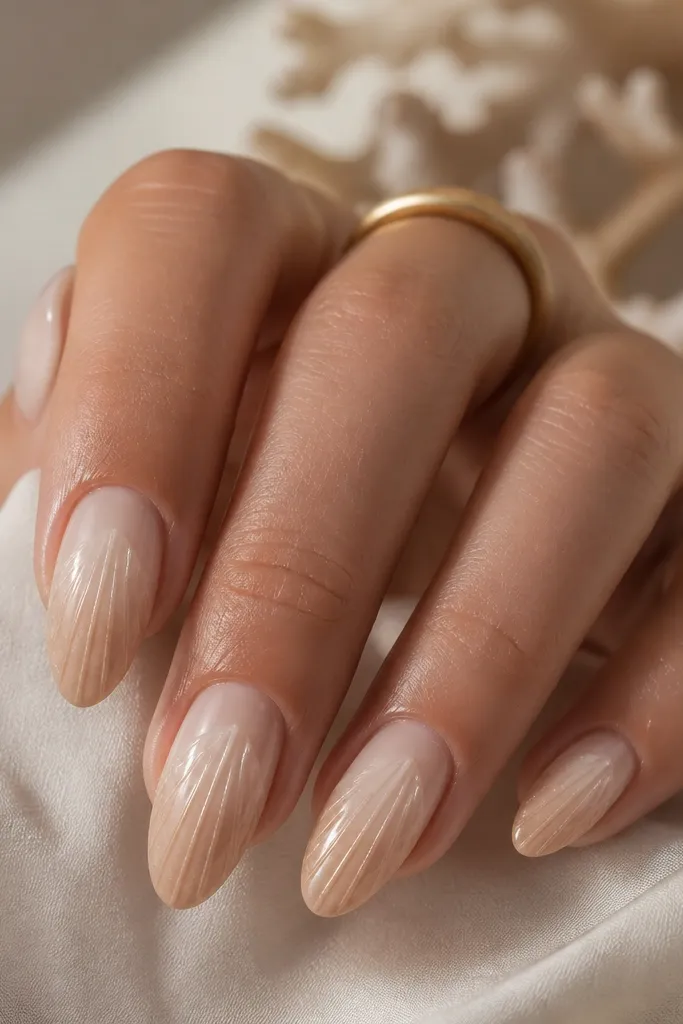
This one is subtle but looks expensive because the shell ridges are raised but transparent. The sandstone ombré sets a warm gradient, and the clear ridges catch light as you move. It's cozy because it doesn't rely on heavy pigment or big art. I like it on almond because the raised ridges follow the curve and make the nail look sculpted. It's a good pick if you want seashell nails that still feel grown-up.
Start with a nude sandstone base and cure. Create the ombré by sponging a deeper sand color at the tips and blending upward in two layers. Cure. Use clear sculpting gel or clear builder gel to draw shell ridge lines on top, pressing lightly so they sit raised but not thick. Cure again and finish with glossy top coat.
Editor's noteUse a thin liner brush for clear ridges; wide strokes look cloudy.
Watch outDon't overbuild clear ridges; thick ridges can feel rough and catch on fabric.
25. Warm Nude With Iridescent Shell Confetti Glow
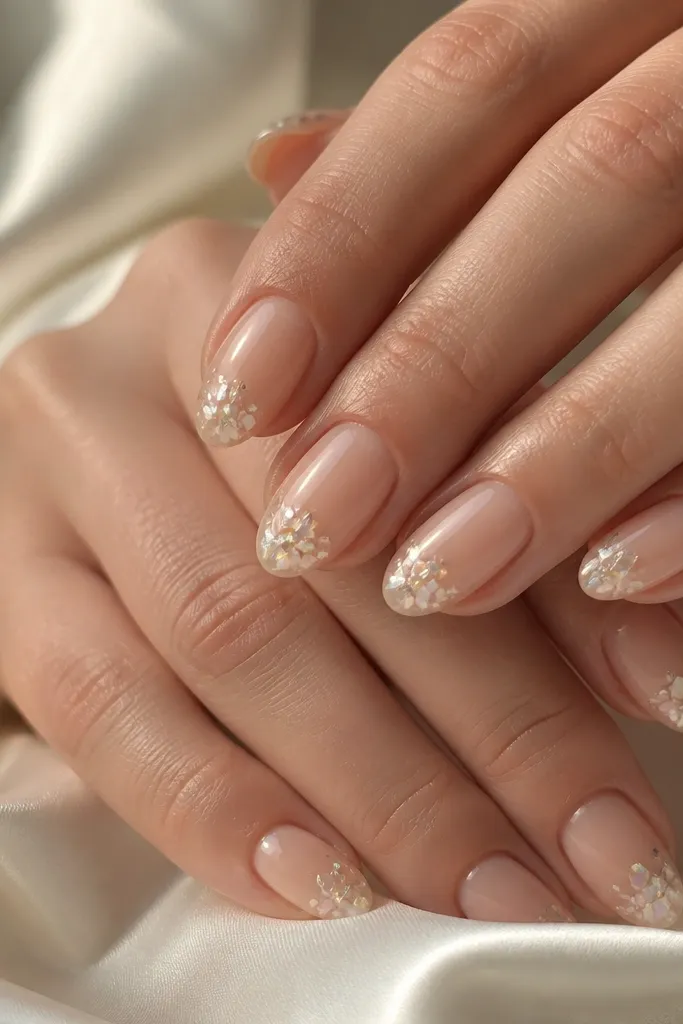
Warm nude plus iridescent confetti is the fastest way to get that "shell glow" without drawing anything. The cozy part is keeping the base creamy and the confetti placement near the tips, so it looks like light reflecting off shells in shallow water. I like short almond because the confetti stays controlled and looks like sand sparkles. This set is flattering on every skin tone because the iridescence is soft and the base is neutral.
Apply warm nude gel polish in two coats and cure. Add a thin layer of clear gel at the free edge only, then sprinkle iridescent shell confetti lightly. Press with a silicone tool, cure, and then cap with clear gel to smooth the glitter. Finish with glossy top coat and cure fully.
Editor's noteUse micro confetti flakes; bigger pieces make it look like party glitter.
Watch outDon't cover the entire nail with confetti; it stops reading as shell glow.