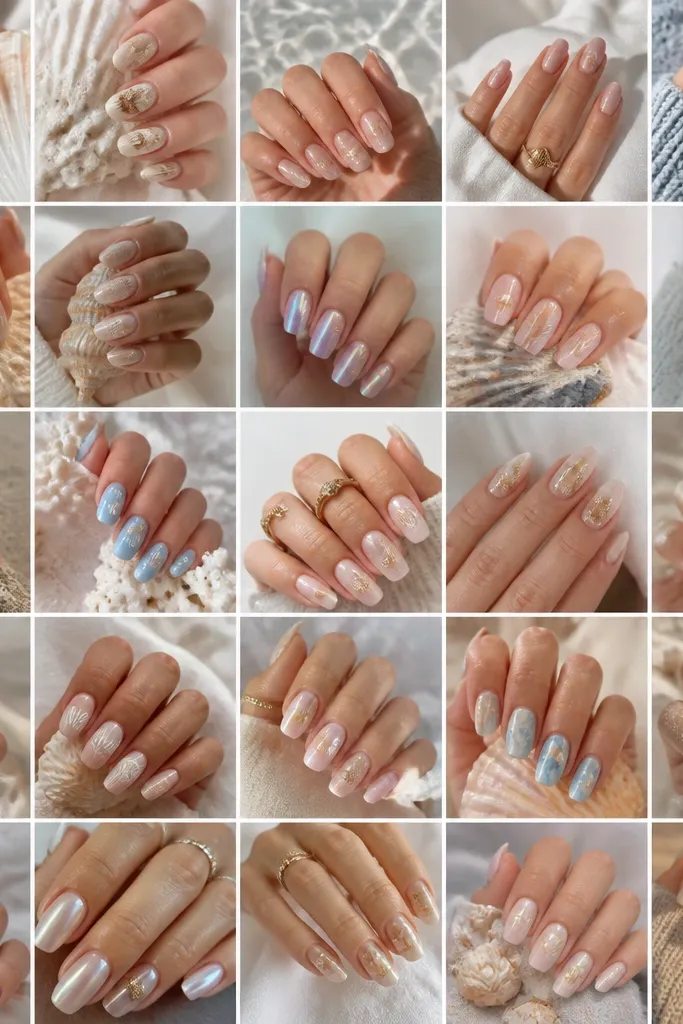
1. Wet Sand Nude With Tiny Cowrie Corners
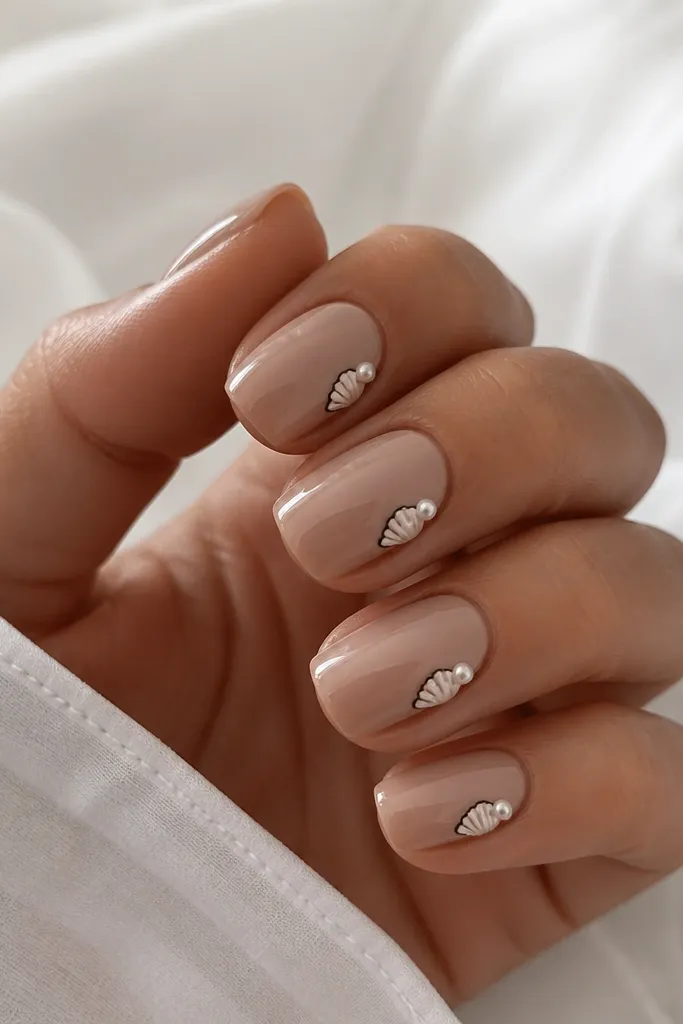
I love this set for vacations because it looks like you planned it, not like you added random art. The wet sand nude base is warm and forgiving - it flatters most skin tones because it sits close to your natural nail color, just warmer. I use a thin white outline on the cowrie shell so the shape reads even in bright sun. The pearl dot gives you that shell shine without turning the nails into glitter confetti.
Start by painting all nails with wet-sand nude gel polish and cure fully. Then on the ring finger and pinky, place a tiny cowrie shell near the outer corner - not the center - and keep it about the width of a pencil eraser. Add a thin black line along the shell ridges, then dot one micro pearl at the center ridge. Finally, seal everything with a glossy top coat, and do one extra clear coat over the shell lines so they don't catch on hair or towels.
Editor's noteIf you're going to the beach, add a second top coat layer on the shell nails the night before you leave - it helps resist chips from sand and sunscreen.
Watch outAvoid making the cowrie shell too big - oversized shells on short nails look cluttered.
2. Sea-Glass Blue With White Shell Veins
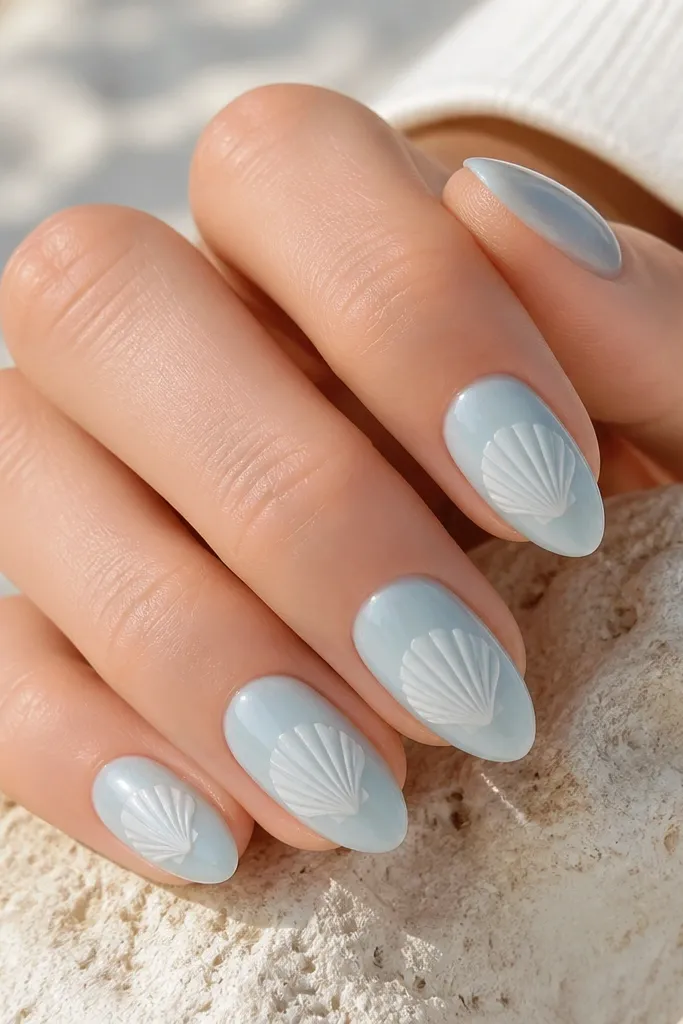
This is the "ocean glass" look that photographs super clean. The sea-glass blue base flatters cool and neutral skin tones because it doesn't fight your undertone. I paint a single shell per nail so you get breathing room, and the white vein lines create dimension like the shell is catching light. The milky finish keeps it soft instead of harsh, which matters when you're wearing light summer outfits.
Apply sea-glass blue gel polish and cure, then add a thin second coat for opacity. Use a striping brush to draw one shell outline in white at the center of each nail. Pull 3-5 short vein lines from the center outward, and keep them thin so they don't smear. Finish with a glossy top coat; if you want extra depth, add a tiny amount of clear builder gel over the shell center and cure before your final top coat.
Editor's noteUse a slightly thick white gel for the shell outline, then switch to a thinner brush for the veins so the lines stay crisp.
Watch outSkip thick, raised lines - they catch on fabric and make the shell look bulky.
3. Milky Pink Base With Floating Shells
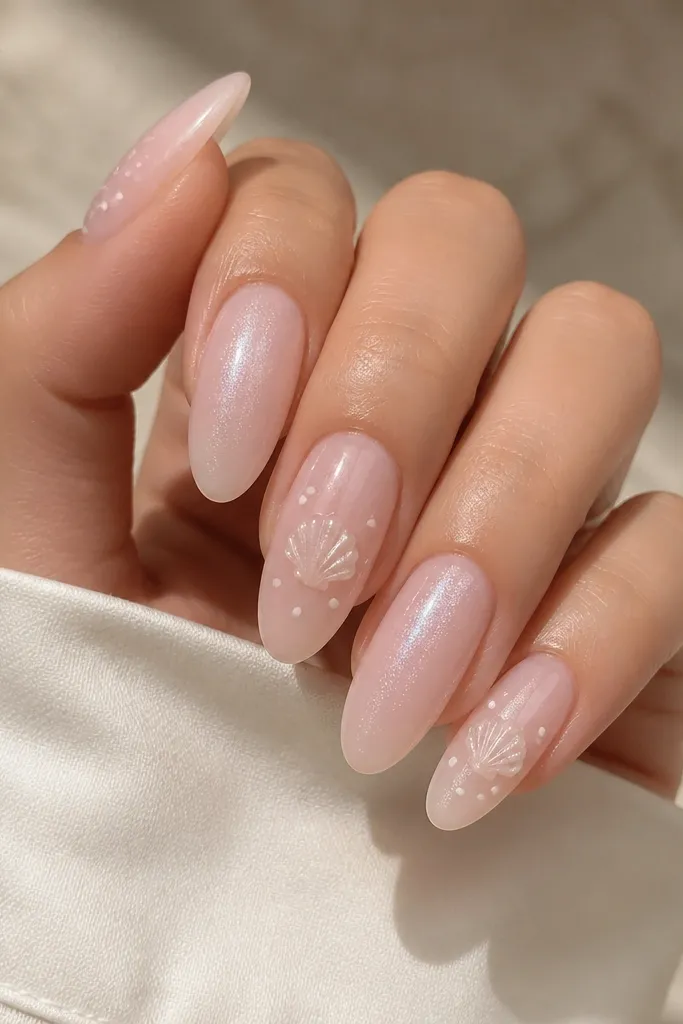
Milky pink is my go-to vacation base because it looks polished with every swimsuit color. It flatters warm skin tones especially well because it adds a soft blush warmth instead of turning your nails gray. The floating shells work because the shells are spaced - you're not filling the whole nail, so the set looks airy. Tiny bubbles around the shell make the design feel like a breeze, not a sticker sheet.
Paint all nails with milky pink gel and cure. On index and ring fingers, place one small shell at mid-nail using a decal or freehand outline, then add a few tiny white dots around it. On the middle and pinky, add a faint diagonal shimmer using a fine silver-pink glitter gel, keeping it thin so it doesn't cover the base. Seal with glossy top coat, then cap the free edge for longevity.
Editor's noteIf you're using decals, press them down with a silicone tool for 10 seconds so edges don't lift at the sides.
Watch outDon't add bubbles on every nail - two or three nails is enough for the "floating" effect.
4. Pearl Chrome French With Mini Shell Accent
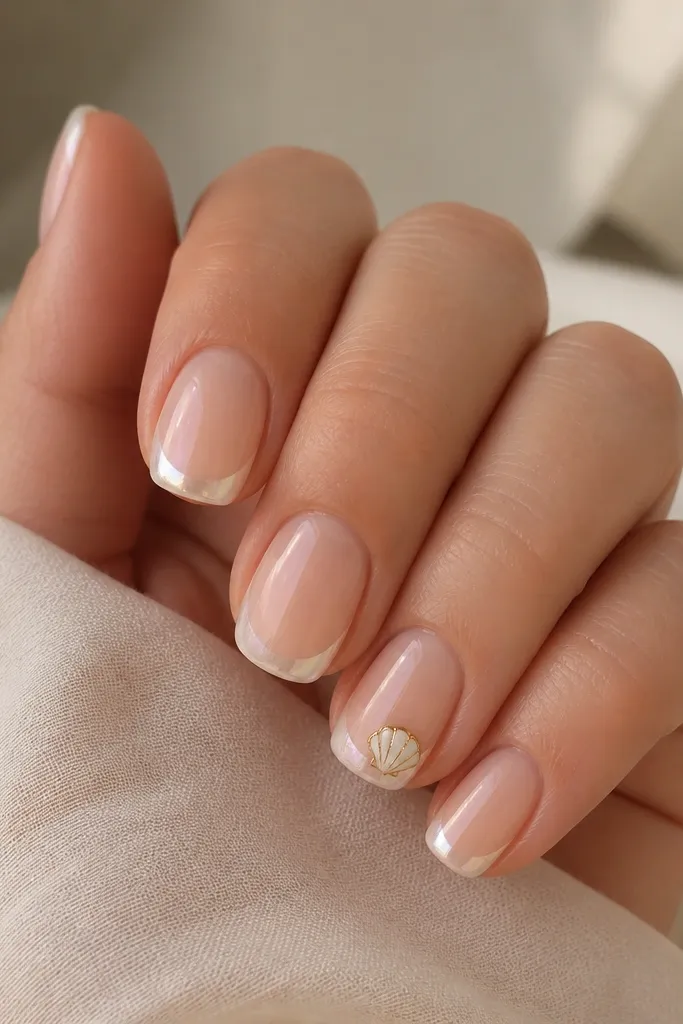
This is classy beach nails when you still want a clean, wearable look for dinner. The pearl chrome French tip flatters hands because it makes the nail bed look longer, especially on shorter nails. The sheer nude base keeps it natural, and the mini shell at the tip looks like jewelry. I add a thin gold outline because it makes the shell match accessories like gold rings and a gold watch.
Start with sheer nude gel polish and cure. Create the French tip with pearl chrome gel, keeping the smile line thin and even. On the ring finger only, draw a tiny shell right at the French edge, then outline it with gold gel using a fine liner brush. Add a small pearl dot on the shell center, cure, and finish with glossy top coat that won't dull the chrome.
Editor's noteTo keep pearl chrome from peeling, buff the nail lightly and wipe with alcohol before chrome application.
Watch outDon't cover chrome with thick matte top coat - it kills the pearl effect.
5. White Line Shells Over Sand Gradient
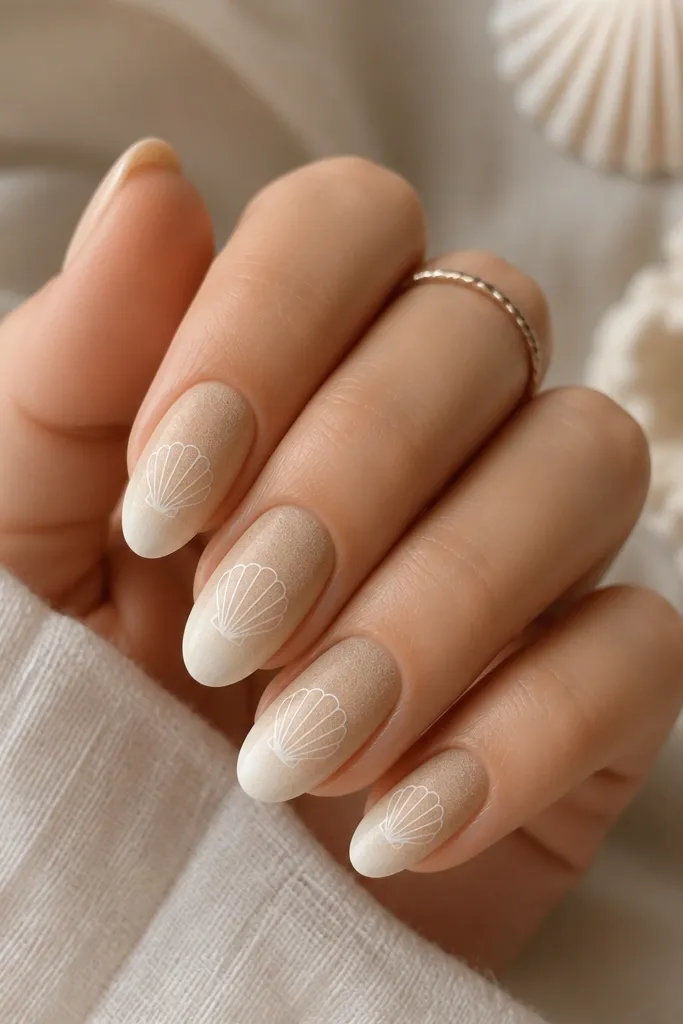
This one looks like shore foam and it's perfect if you want seashell nails but don't want heavy color. The sand gradient flatters because it creates a natural highlight down the nail, which makes fingers look longer. The thin white shell outlines keep the set airy, and the gradient makes the shells feel embedded in sand. I like it for day trips because it's subtle up close but still obvious in photos.
Paint a beige sand tone at the cuticle and blend into a lighter cream toward the tip using a makeup sponge. Cure, then take a thin nail art brush and draw a shell outline across the center of each nail. Keep the shells slightly different - a little bigger on the ring finger, smaller on the pinky - so it doesn't look stamped. Finish with glossy top coat, focusing on edge sealing so the gradient doesn't snag.
Editor's noteUse a sponge with minimal product; too much pigment makes the gradient stripey.
Watch outAvoid using pure white outlines on a pure white base - it turns the design flat.
6. Glitter Sea Foam With Shell Cap Tips
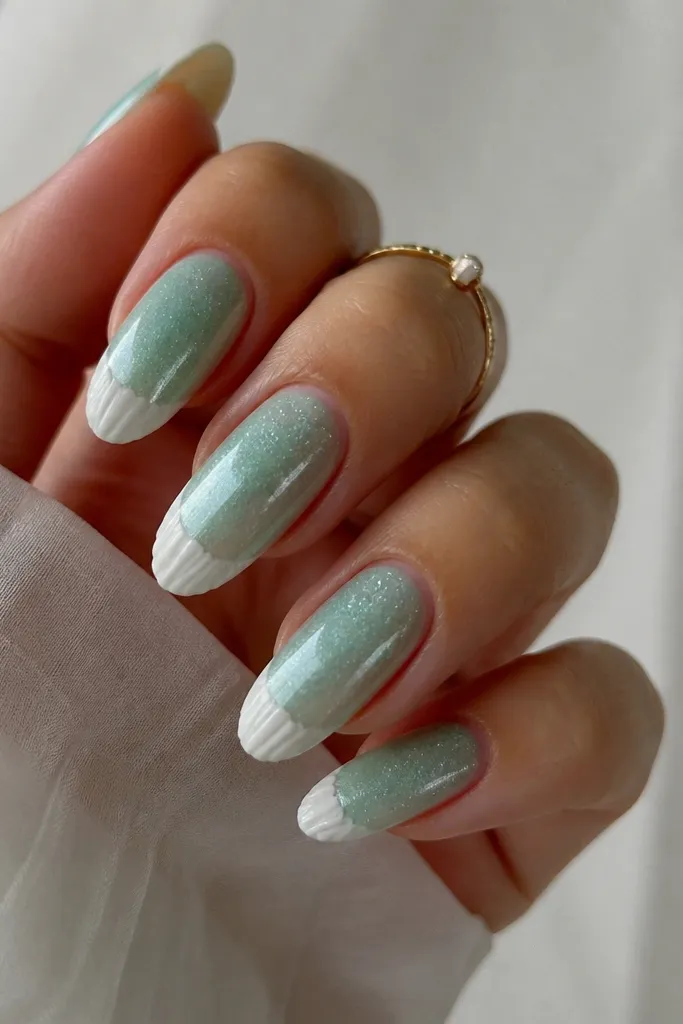
If you're packing for a party beach dinner, this set hits the sweet spot between sparkly and tasteful. The sea foam glitter catches sunlight, but because it's semi-sheer, it doesn't look heavy. The shell cap tips look like the top of a shell showing above the waterline. This style flatters most nail shapes, but long almond makes the crescent tips look extra clean.
Apply two coats of semi-sheer sea foam green glitter gel and cure each layer. At the tip on every nail, paint a crescent "shell cap" in milky white gel, leaving a thin gap between the cap and the nail edge so it looks like a highlight. Add 2-3 short curved lines inside the cap to mimic shell ridges. Cure and seal with glossy top coat; cap the tip edge so the glitter doesn't lift.
Editor's noteUse a liner brush dampened slightly with cleaner to sharpen the crescent edges.
Watch outSkip full-coverage glitter over the whole nail if you hate texture - it can feel gritty.
7. Pastel Shell Dip With Peachy Micro Glitter
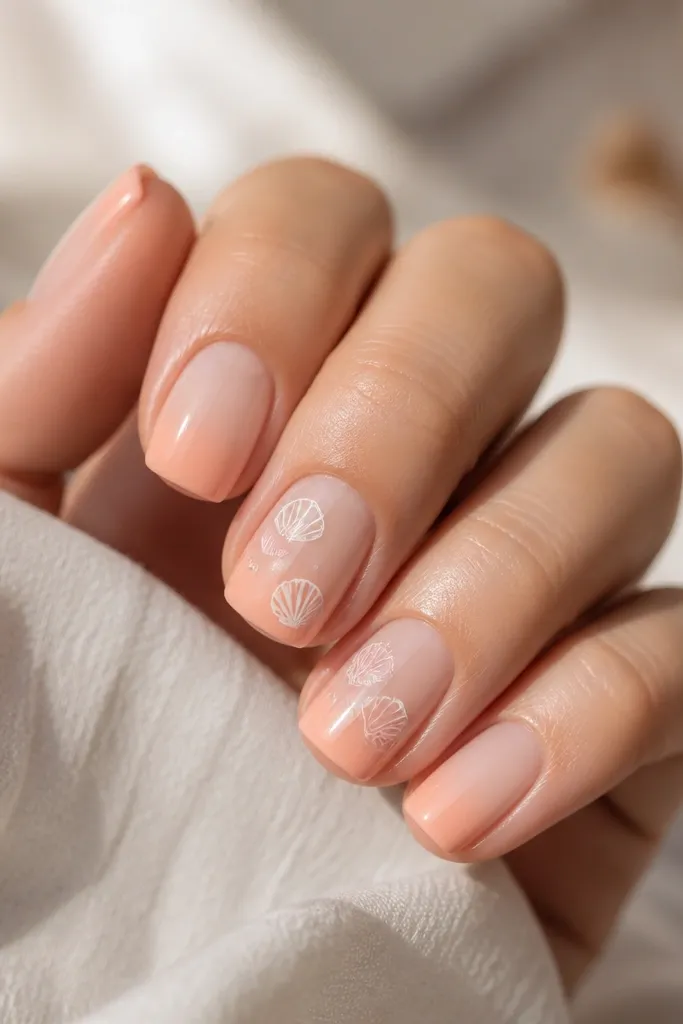
This is the vacation set for people who want seashell nails without going full ocean theme. The peach dip looks warm against tan skin and pairs perfectly with coral, white linen, and gold jewelry. I keep shells as accents on only two nails so the set looks fresh, not busy. The micro glitter in the peach tips adds a sun-kissed glow without stealing attention from the shell shape.
Base coat with pale nude gel. Create a dip on the tips using soft peach gel plus a tiny amount of fine peach micro glitter; blend with a sponge so there's no hard line. On the ring finger and middle finger, stamp or paint small shells in pale pink and white, keeping them at the center of the nail. Add a glossy top coat over the whole set to smooth the glitter and seal the design.
Editor's noteWhen blending a dip, wipe the sponge edge on a paper towel first - it prevents harsh bands.
Watch outDon't put shells on every nail with this style - the peach dip already has visual weight.
8. Ocean Ombre With One Big Shell Statement Nail
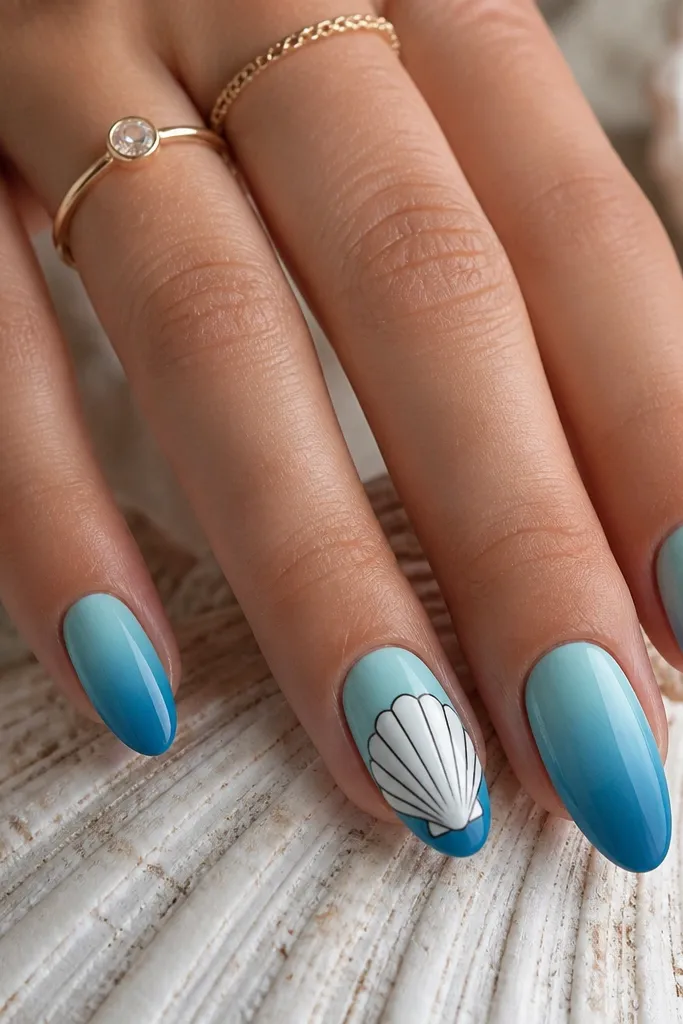
This looks like a beach postcard because the color gradient brings the water feeling, and the big shell gives you a focal point. The ombre flatters because it draws the eye down the nail, which makes fingers look longer. I keep the large shell on one nail because it keeps the set elegant and avoids the "all-over sticker" look. If you like statement nails but want them still beachy, this is the one I reach for.
Paint a light aqua base at the cuticle and blend into a medium blue toward the tip using an ombre sponge, then cure. On all nails except the ring finger, keep the shells minimal - add a tiny outline shell only at the center. On the ring finger, paint a larger white shell that reaches from mid-nail toward the tip, then add dark outline lines to show ridges. Finish with glossy top coat, and add one extra thin layer over the statement nail so the shell stays smooth.
Editor's noteUse two shades of blue max for the ombre - more shades make it look muddy on camera.
Watch outAvoid heavy black outlines on every nail; it makes the set look harsh and less beachy.
9. Shell Outline Negative Space Crescent
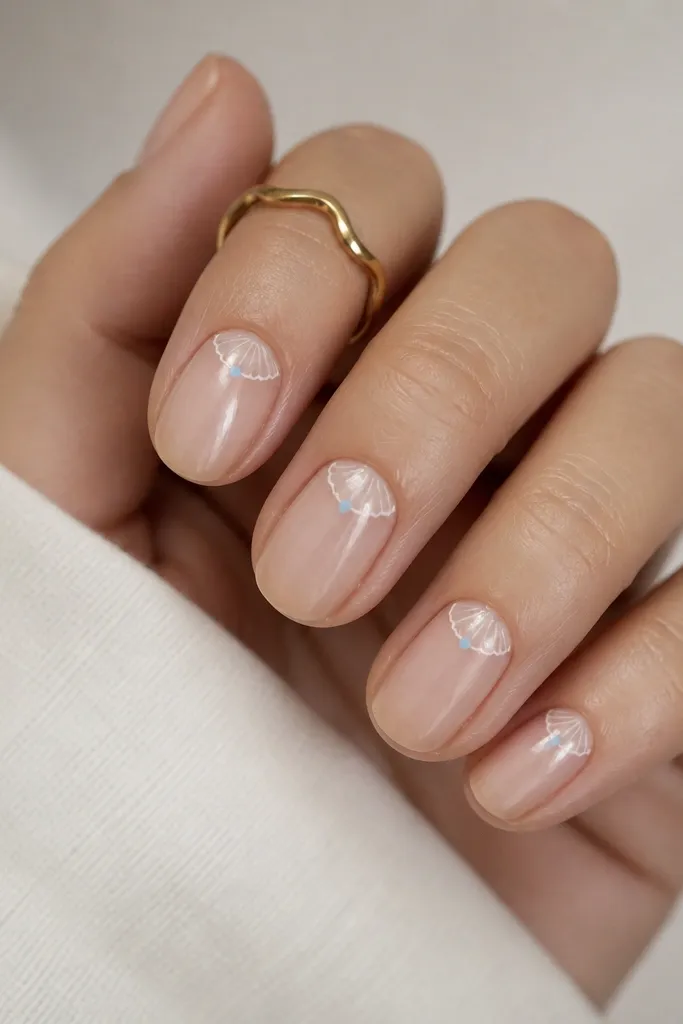
Negative space makes seashell nails look modern and clean. It also flatters because your natural nail bed shape shows through, which makes your hands look neat even if your cuticles are a little dry after travel. The shell crescent at the cuticle area feels like a shell opening, and the pale blue dots add that ocean pop without turning the nails into glitter. This style is great if you want something that matches minimalist jewelry.
Leave the nail base mostly sheer: apply a clear or sheer nude gel and cure. Use a thin brush to draw a shell outline crescent near the cuticle, keeping the curve parallel to your cuticle line. Add 2-3 tiny pale blue dots inside the shell opening for detail. Seal with glossy top coat, and lightly cap the free edge to prevent lifting.
Editor's noteIf your natural nail is stained, use a milky nude base so the negative space still looks clean.
Watch outDon't draw the crescent too low - it should start near the cuticle or it looks accidental.
10. Coral Pink Shells With White Sand Dots
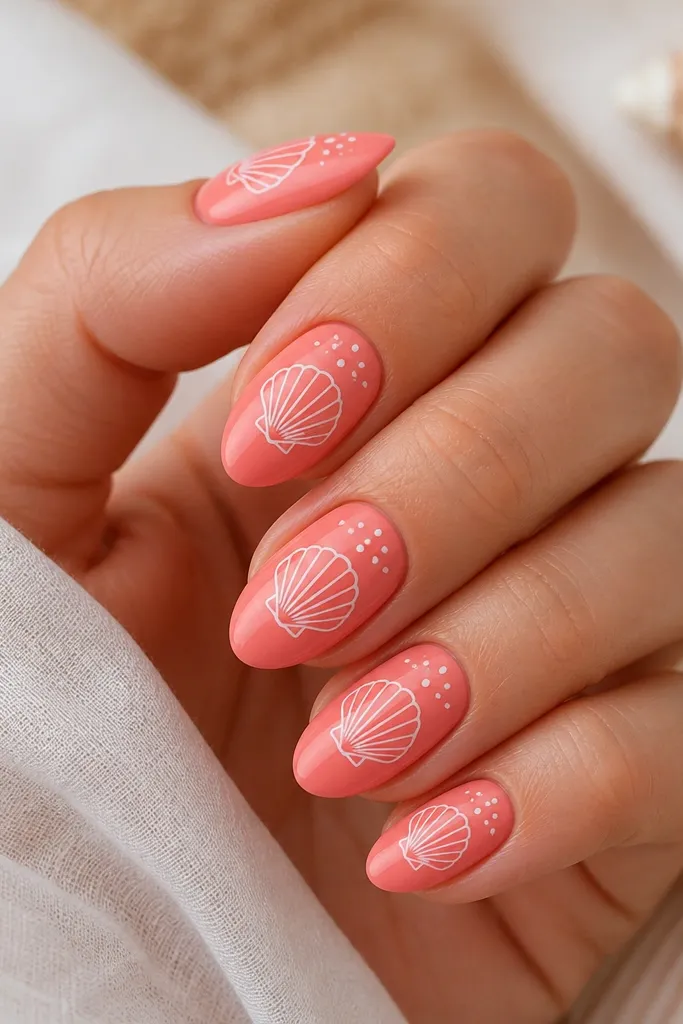
Coral pink is the vacation color that makes your hands look warm and alive. The white shell outline gives you contrast, and the dot clusters mimic sand grains so the theme feels cohesive. This set flatters warm undertones and looks amazing with gold rings and tan skin. I also like it for beach days because it doesn't show sunscreen stains as easily as pale bases.
Paint all nails coral pink gel and cure. Draw a centered white shell outline on every nail, then add 2-4 small sand dots near the cuticle - keep them clustered, not spread out. Add tiny ridge lines inside the shells with a very thin brush. Finish with glossy top coat, and do a careful side seal around the shell lines so they don't chip.
Editor's noteUse a dotting tool tip size that matches your shell scale - tiny shells need tiny dots.
Watch outAvoid using off-white dots; pure white makes the sand look too stark.
11. Iridescent Shell Flakes Over Nude Gel
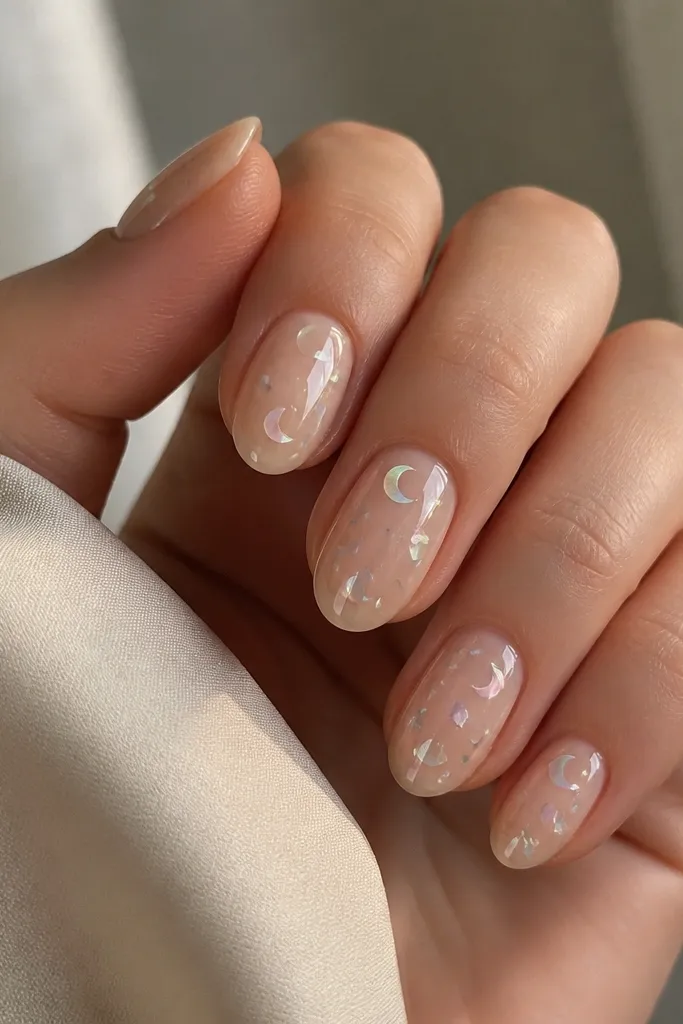
This is for the person who wants seashell nails to look like actual shell fragments under sun. The nude base keeps it wearable, while the iridescent flakes create color shifts from pink to aqua. It flatters because it adds shine without adding heavy line work, so it works on short nails too. I like this when I'm wearing simple outfits because the nails do the talking.
Apply nude gel base and cure. Place iridescent shell flakes in a scattered pattern, focusing on one or two nails as the "main" sparkle. Press flakes down lightly, then brush a thin layer of clear gel over them to anchor. Cure, then add glossy top coat and cap the free edge. If you feel any texture when you run your finger over the nail, add one more thin clear gel layer and cure.
Editor's noteChoose flakes that are mostly flat; chunky flakes lift and snag on towels.
Watch outSkip putting flakes right at the sidewalls - they catch and peel.
12. White Shell Studs With Milky Base
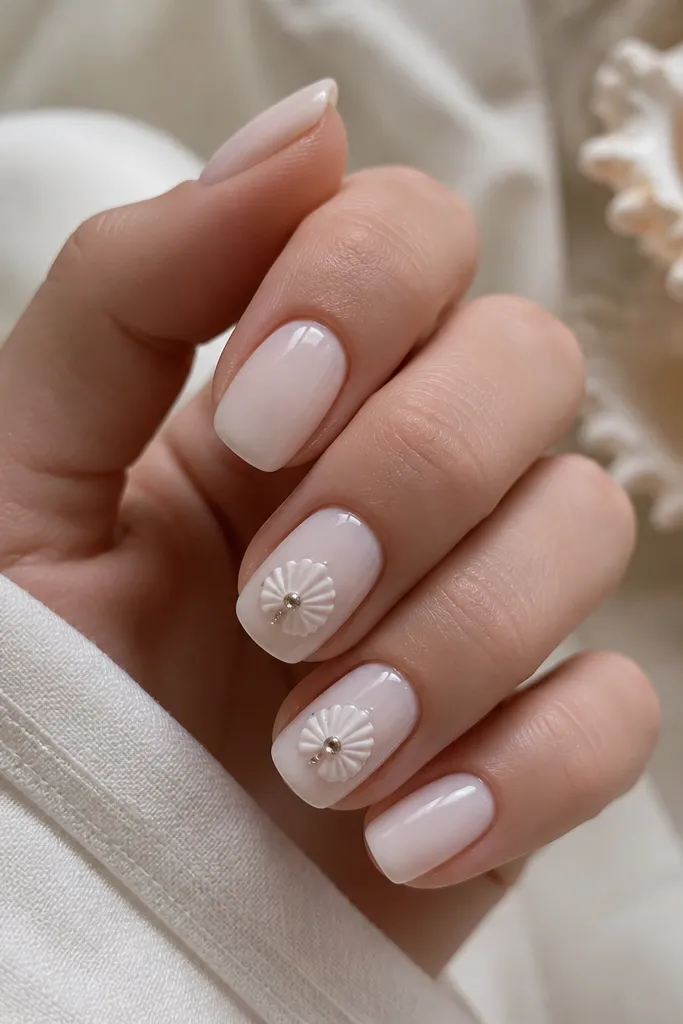
Studs give you that vacation jewelry vibe without needing a full glitter nail. Milky white makes the shell studs look clean and crisp, and it flatters most skin tones because it brightens the nail bed. I keep rhinestones minimal - one center stone does the job. The shell shape under the studs looks dimensional because the shine sits above the matte-like milky base.
Apply milky white gel to all nails and cure. On accent nails, paint a small shell in white gel, then place one micro rhinestone at the center ridge. Add 2-3 micro studs along the shell ridges using gel adhesive, then cure. Seal everything with glossy top coat, and make sure the top coat covers the rhinestone edges so they don't snag.
Editor's noteUse a gel adhesive for studs instead of dry glue - it cures flat and holds better on vacation movement.
Watch outDon't add studs on every nail - it turns into a heavy "bride" look instead of beach.
13. Beach Wave Lines With Side Shell
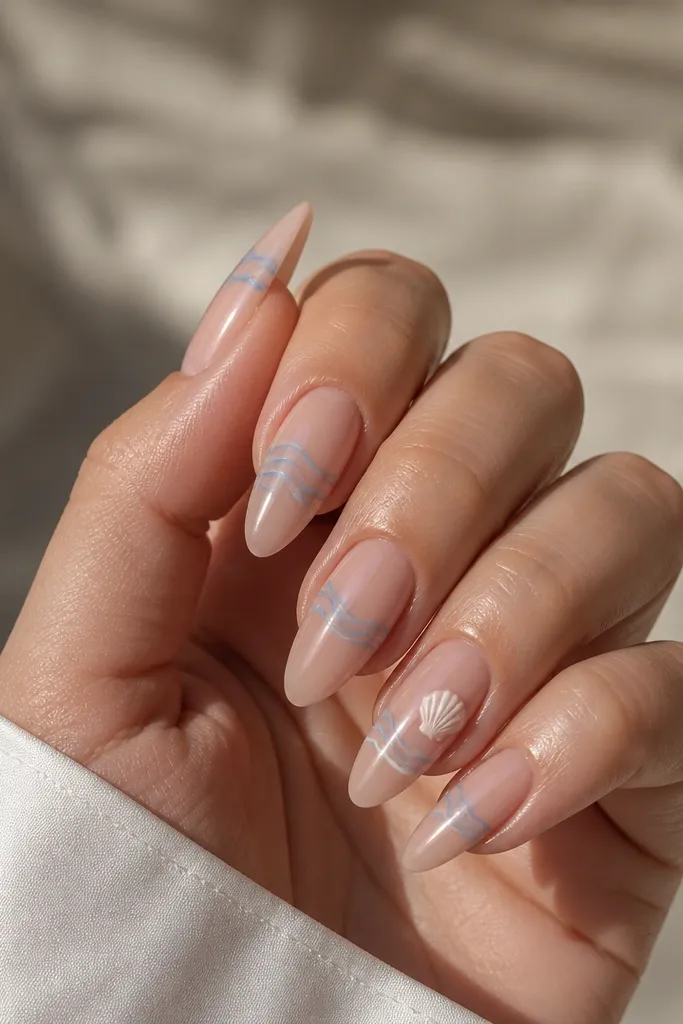
Wave lines give you movement, and the side shell keeps it from looking like a cartoon sticker. The sheer nude base flatters because it matches your skin and makes the nail art look light. Blue wave lines add the ocean feel without needing a full blue base, which is great if you hate staining. This set works especially well if you have long nails - the waves give a band effect that looks good in motion and photos.
Start with a sheer nude base and cure. Using a thin brush, paint 2-3 horizontal wave lines in sea blue across the middle of each nail. On the ring finger, paint a small white shell on the side near the cuticle, angled slightly so it follows the nail curve. Add tiny white highlights on the wave lines if you want extra foam effect. Finish with glossy top coat and cap the edges.
Editor's noteKeep wave lines the same thickness - inconsistent lines make it look messy fast.
Watch outAvoid putting the shell dead center on long nails with waves - it competes with the wave band.
14. Sandstone Texture With Raised Shell Center
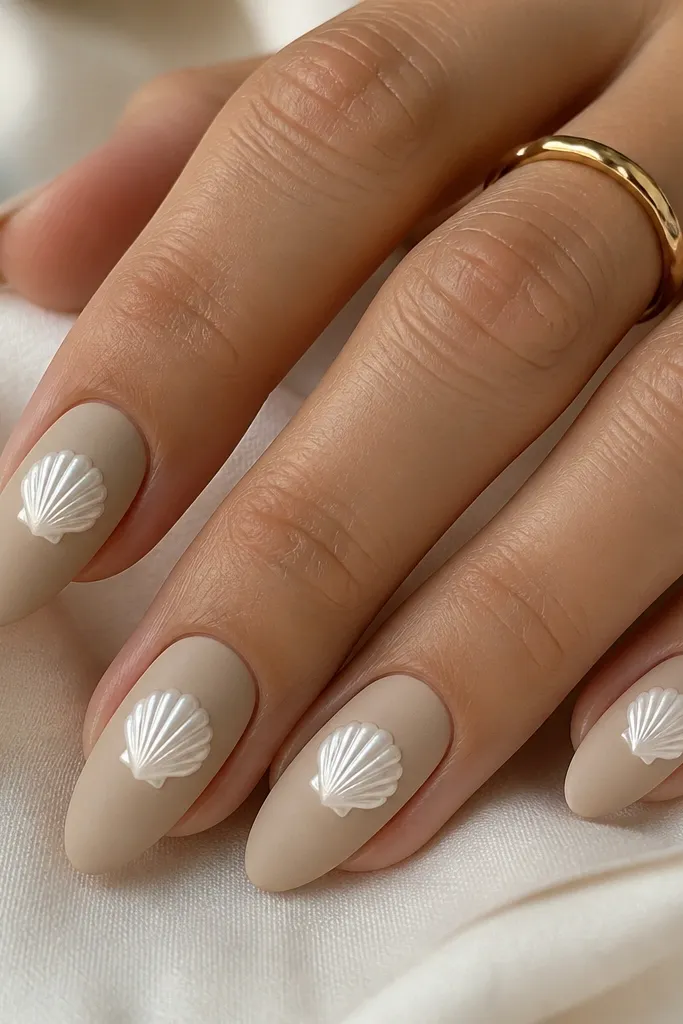
This is the tactile seashell look. The sandstone beige base looks like real shore texture, and the raised glossy shell center makes it pop. I use this when I want something different from standard painted shells, and it looks amazing under sunlight because the matte base softens everything. It flatters because the raised center draws attention to the nail length and gives a "sculpted" feel.
Apply a matte sandstone beige gel and cure. Mix a small amount of glossy clear gel with white gel to create a slightly thicker shell paste. Use a brush to sculpt a shell shape at the center of each nail, then add thin ridge lines on top while the gel is still workable. Cure and then apply glossy top coat only over the shell area, keeping the rest matte for contrast. Seal the sides so the raised shell doesn't chip.
Editor's noteIf you're traveling, keep your nails away from sand right after application - texture can pick up grit before it fully cures.
Watch outDon't make the raised shell too tall - high edges break first.
15. Aqua Marble Base With White Shell Border
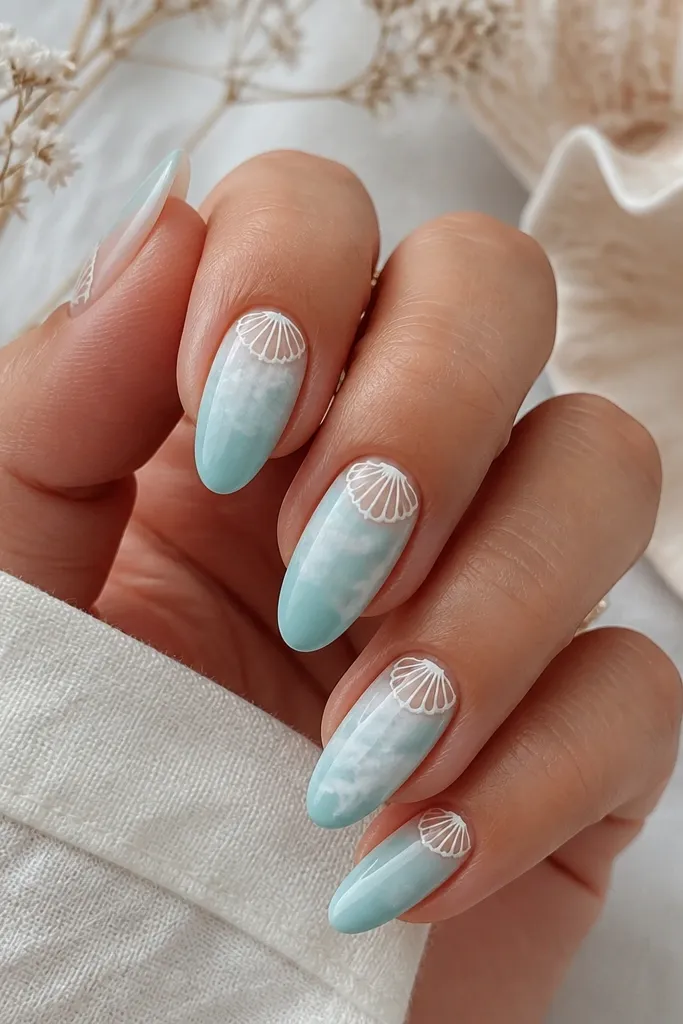
Marble gives you that watery depth, and the shell border makes it feel like seashells without drawing full shells on every nail. The aqua marble base flatters because the milky undertone keeps it soft and not too neon. The thin white border near the cuticle elongates the nail visually. I like this for vacations because it hides small imperfections in your base color - marble forgives.
Start with a milky base and cure. Add aqua marble swirls using a marbling gel and a thin brush or sponge, then cure. On each nail, draw a thin scalloped shell border along the cuticle line - think tiny half shells repeating in a row. Add one small highlight line on a few shells with white gel to keep it from looking flat. Finish with glossy top coat, making sure the border is sealed smoothly.
Editor's noteUse a steady hand and keep the border consistent - a lopsided scallop line shows up fast in photos.
Watch outDon't overload marble with too much pigment - it turns dark and kills the airy beach vibe.
16. Shell Micro-French With Pink Glitter Edge
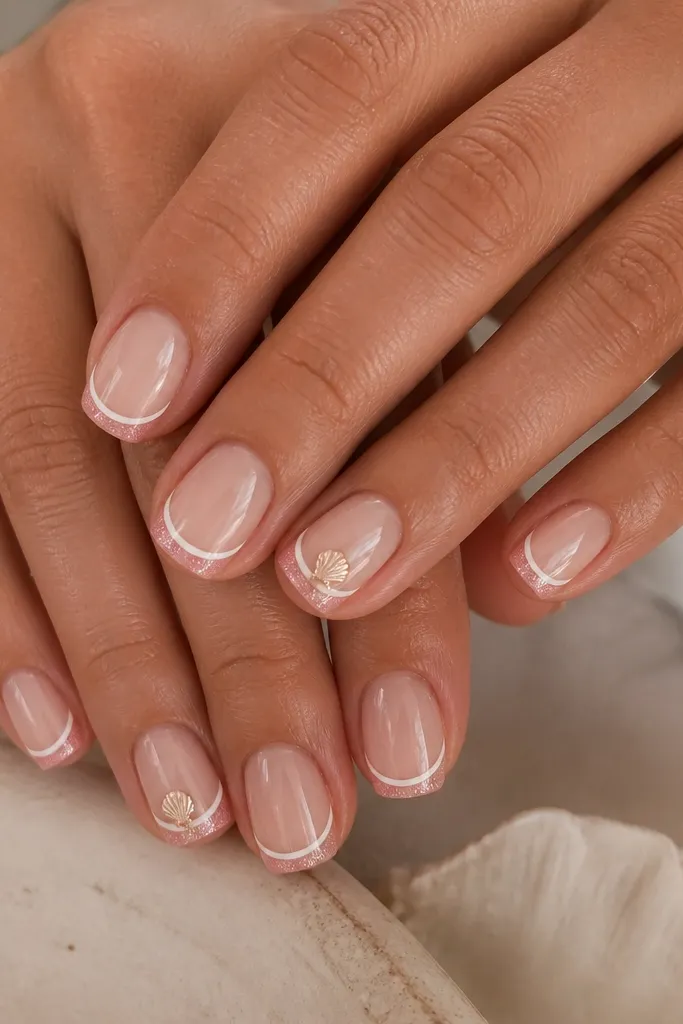
This set is for when you want seashell nails but you also want them to look neat at a glance. The micro French elongates without looking harsh, and the thin pink glitter edge adds sparkle that shows when you move. The tiny shell on two nails keeps it themed without taking over your whole manicure. It flatters because the main design stays at the tip, which is where your nail is already strongest.
Apply sheer nude gel and cure. Paint a micro French tip with white gel, keeping the line thin and close to the free edge. Add a thin strip of pink glitter gel right at the tip edge and cure. On the ring finger and middle finger, paint a tiny shell just above the glitter line - keep it small and centered. Seal with glossy top coat and cap the free edge so the glitter doesn't peel.
Editor's noteUse a striping brush for the micro French - it keeps the line sharp even on short nails.
Watch outAvoid thick French tips - they look bulky on squoval and shorten the nail visually.
17. White Shells on Nude With Seaweed Green Dots
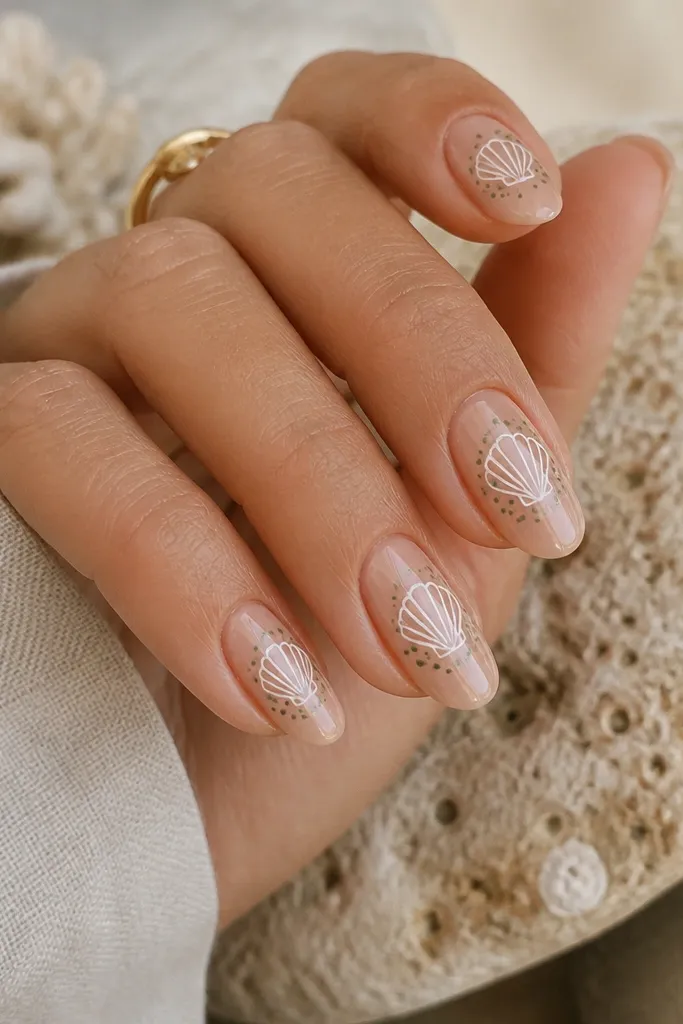
Seaweed-green dots are a fun twist that looks more grown-up than adding random blue dots. The nude beige base flatters because it blends with your skin and keeps the design clean. The white shell outline is the anchor, and the green dots act like sea plants floating around the shells. This set works well when you're wearing earthy colors like olive, tan, and cream because the green echoes your outfit.
Paint nude beige gel and cure. Draw a centered white shell outline on each nail using a fine brush, then add 2-3 short ridge lines inside. With a dotting tool, place 3-5 seaweed-green dots around the shell, leaving space so the nail still looks airy. Add a tiny white highlight dot on the shell ridge if you want extra dimension. Finish with glossy top coat and seal the sides.
Editor's noteUse green gel with a slightly muted tone - neon green makes it look like candy, not seaweed.
Watch outDon't overcrowd the dots - too many makes the shells hard to read.
18. Shell Stamp Pattern in Cream and Taupe
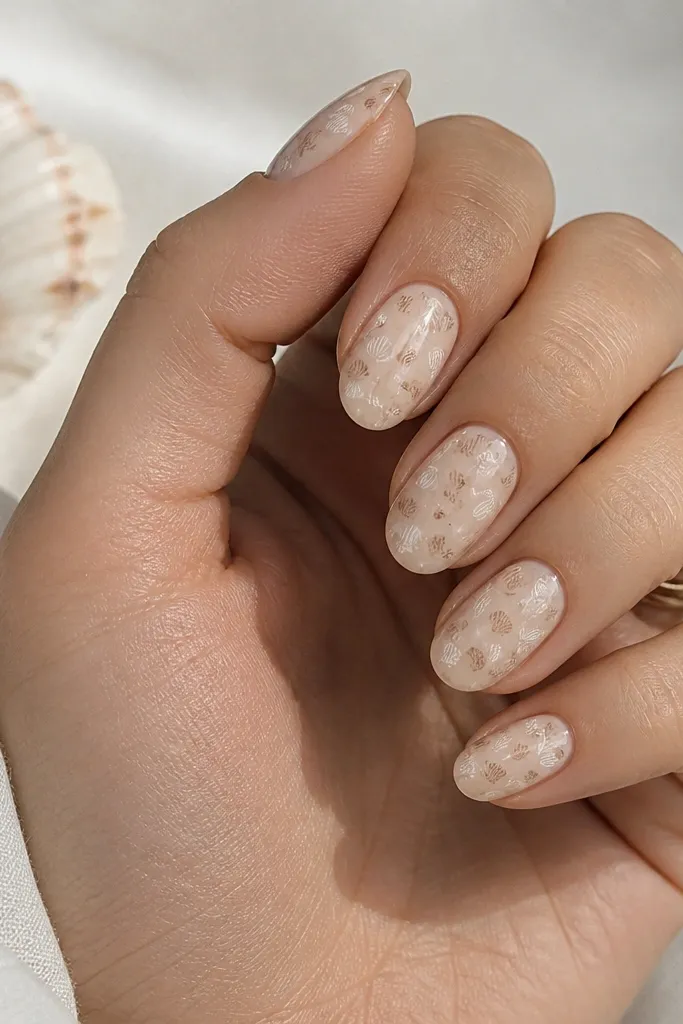
This is a "vacation but make it wearable" pattern. Creamy nude keeps it neutral, and the taupe shell stamps add depth without going dark. The repeating pattern looks like a fabric print, which reads well from a distance. It flatters because the pattern is small and consistent, so it doesn't widen the nail. I like it for long travel days when you don't want your nails to look fussy.
Apply creamy nude gel and cure. Using a nail art stamp or a dotting tool plus stencil, place tiny shell stamp shapes in cream on every nail. Add taupe shell stamps on alternating nails or alternate positions so you get variation without chaos. Keep the spacing even - about one dot-width between shells. Seal with glossy top coat and a second clear coat on the stamp nails for wear.
Editor's noteIf you don't have stamping plates, use a tiny half-moon nail decal and repeat it - it gets the same consistent spacing.
Watch outAvoid large stamps - bigger patterns start to look like you pasted stickers.
19. Icy White Shells With Silver Bubble Lines
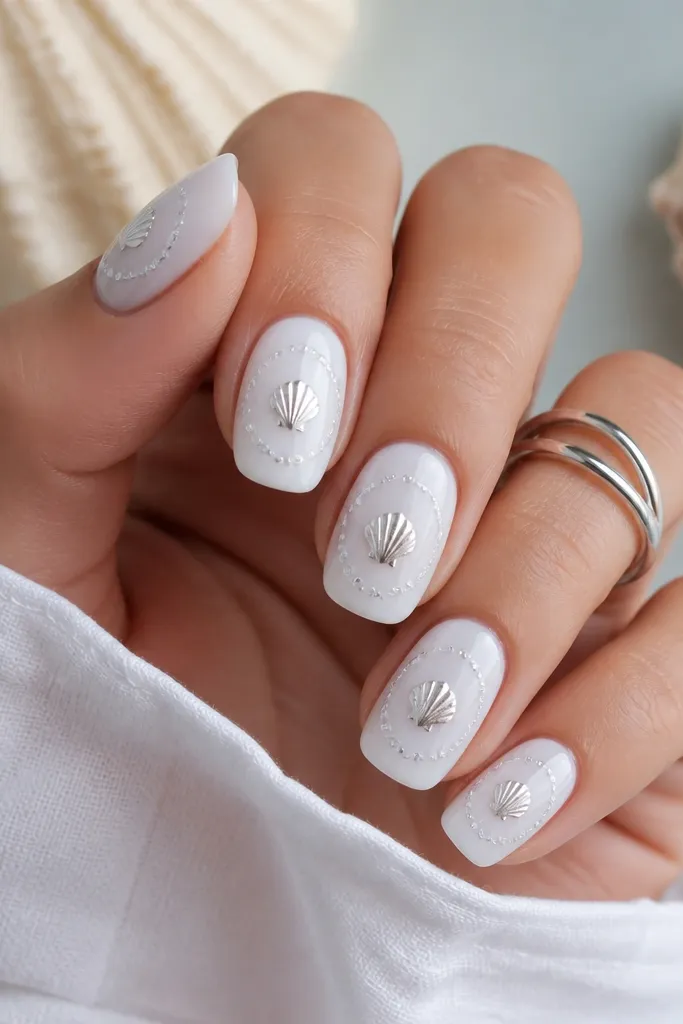
Icy white nails make shells look crisp and clean, like they're lit from within. Silver bubble lines add sparkle without glitter fallout. This set flatters cool undertones and looks amazing with silver jewelry and light denim. I keep the shell small and let the bubbles do the movement - it feels like sea foam instead of a full shell painting.
Paint icy white gel and cure. Place a small shell near the center on each nail using a decal or quick outline. Then draw 2-3 curved bubble lines in silver gel around the shell, leaving space so the nail doesn't look crowded. Add one or two tiny silver dots to mimic bubbles popping. Finish with glossy top coat and cap the free edge.
Editor's noteUse silver gel that stays opaque in one coat - watery silver looks streaky on white base.
Watch outDon't add too many bubble arcs - three curves per nail is enough.
20. Coral Swirl Waves With Shell Center Dot
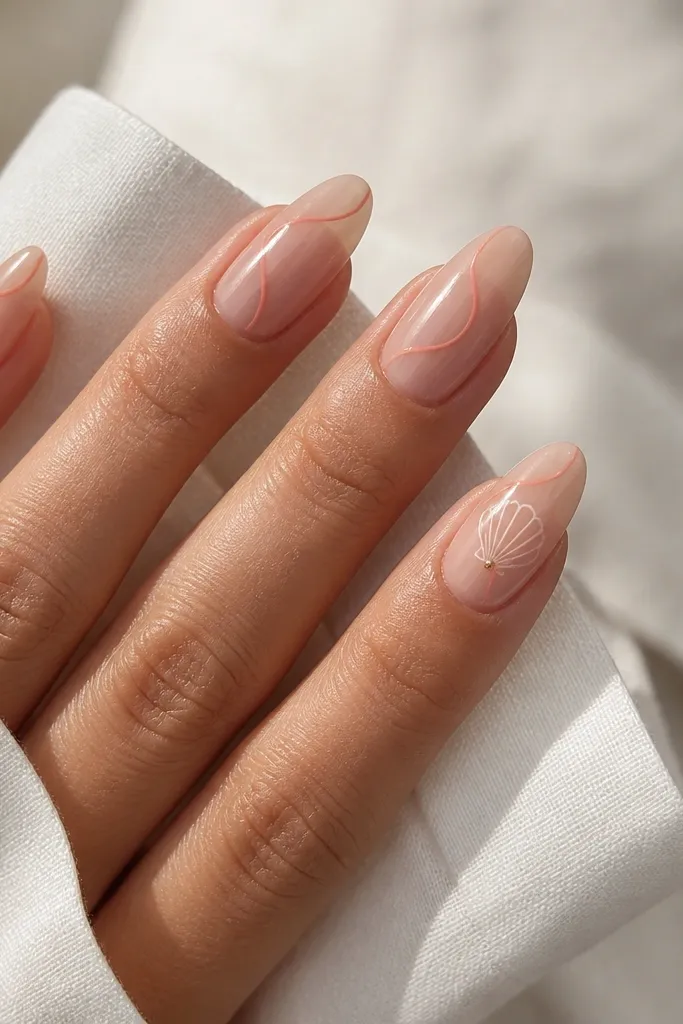
Diagonal swirls look like sunlit water moving across the surface. Sheer nude keeps it light, and coral swirls add warmth that matches beach sunsets. The shell center dot on one accent nail gives you a focal point without turning the whole set into a drawing. This flatters longer nail shapes because the diagonal motion makes the nail look sleek.
Start with sheer nude gel and cure. Paint thin coral swirl wave lines diagonally from one side of the nail to the other, keeping them airy and not thick. On the ring finger, draw a tiny shell at the center and add a small gold dot at the shell ridge. Keep the other nails swirl-only for balance. Seal with glossy top coat, and clean up side edges so the lines look sharp.
Editor's noteIf your swirl lines wobble, fix them with a tiny brush dipped in gel cleaner before curing.
Watch outAvoid thick coral lines - they look like marker and kill the delicate wave look.
21. Shell Cuticle Crowns With Nude and Gold
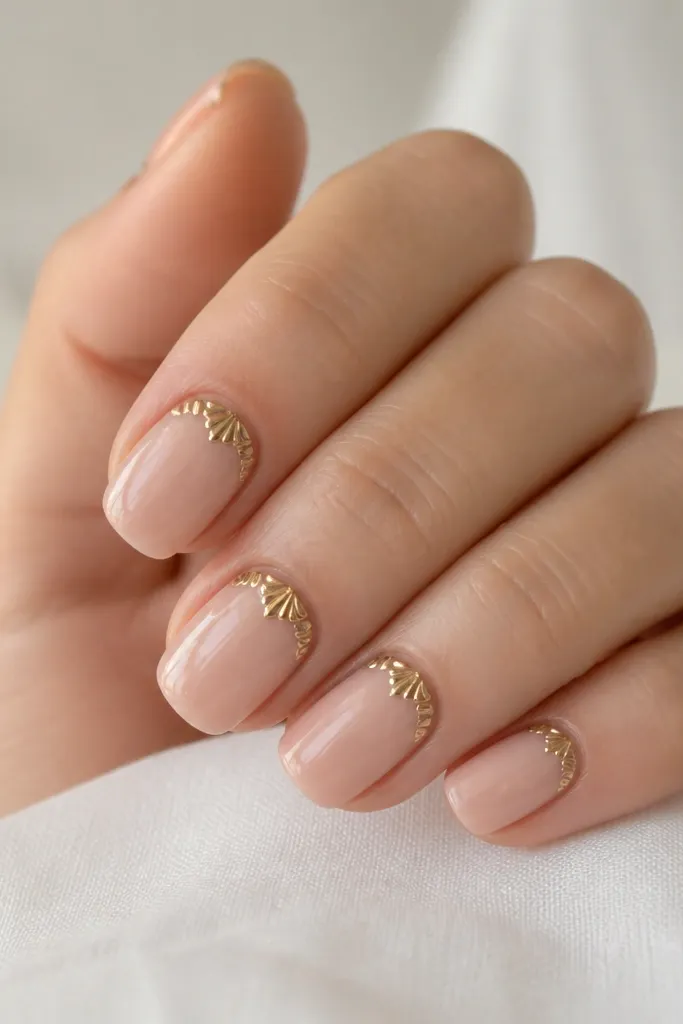
Cuticle crowns look expensive and they're perfect for vacation photos where your hands are in the frame near your jewelry. The nude base flatters because it keeps the focus on the design at the cuticle. Gold scallop crowns mimic seashell edges, and the shape gives a clean, lifted look to the nail. I keep the rest blank on purpose - it looks crisp, not busy.
Apply nude gel and cure. Use a thin liner brush to paint a small gold scallop crown along the cuticle line on each nail, with 4-6 scallops depending on your nail width. Add a tiny white highlight line inside one scallop if you want a shell ridge effect. Cure, then finish with glossy top coat, making sure the gold is sealed so it doesn't catch on fabric. Cap the free edge lightly.
Editor's noteGold gel can grab dust - wipe nails with alcohol right before application and keep your brush clean.
Watch outDon't drag gold onto the nail plate - keep it right at the cuticle line.
22. Pastel Shell Ombre Tips With Glossy Topcoat
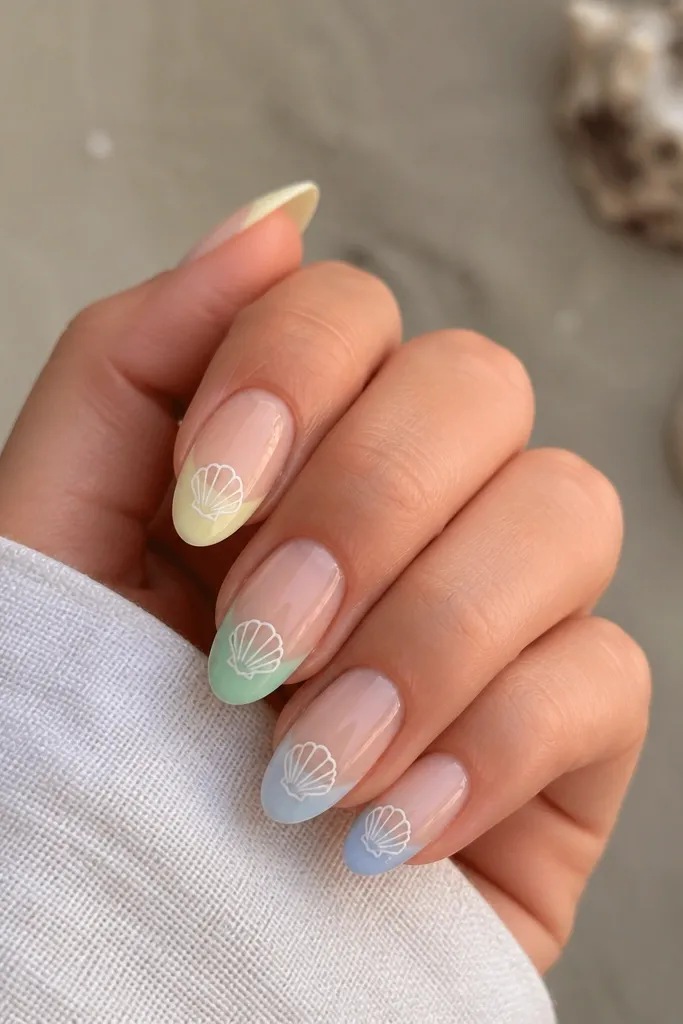
Pastel ombre tips feel like vacation candy but still look soft and grown-up. The gradient flatters because it adds color at the tips, which makes nails look longer. Tiny shell outlines near the tip keep the theme without covering the whole nail. This set works great with white dresses and striped tops because the pastel tones echo summer without clashing.
Paint a nude base and cure. Sponge on pastel ombre at the tips using three shades: pale yellow, mint, and baby blue, blending them smoothly into each other. Cure, then draw a tiny white shell outline near the tip line on each nail - keep it centered and small. Add one thin ridge line inside the shell. Finish with a glossy top coat; do two coats if you want the pastel to look extra juicy in sunlight.
Editor's noteBlend the ombre with a damp sponge for softer transitions, not a dry one that leaves hard edges.
Watch outAvoid using neon pastels - they look harsh next to shell whites.
23. Shell Decal Mix With One Hand Mirror Shine
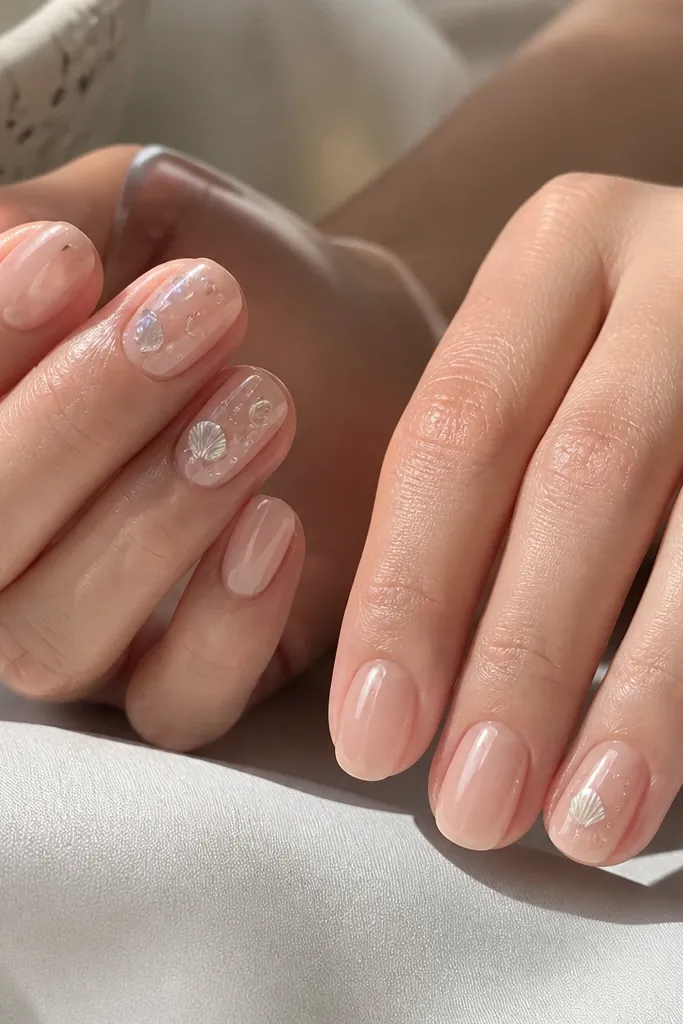
I do this when I want both day and night hands. Shell decals keep the shell shape consistent, and the sealed finish looks realistic because the decal sits under glossy gel. The mirror shine overlay makes one hand look extra reflective for dinner and beach sunsets. It flatters because the mirror shine adds a clean highlight down the nail, and the shell decals are placed only where your camera focuses - ring and middle fingers.
Apply nude gel base to both hands and cure. On one hand, place shell decals on ring and middle fingers, then add tiny bubble decals or dots near the shells. On the other hand, apply a mirror gel top layer after base cure, then place only one decal per hand on the ring finger. Seal both hands with glossy top coat, then cap the free edge. Cure fully and check for decal edges by running a cotton swab along the sides.
Editor's noteIf decals wrinkle, soak them for 8-10 seconds in warm water and slide gently - rushing makes folds.
Watch outDon't stack too many decals - it creates thickness and looks bulky.
24. Turquoise Waterline With Shells at the Sides
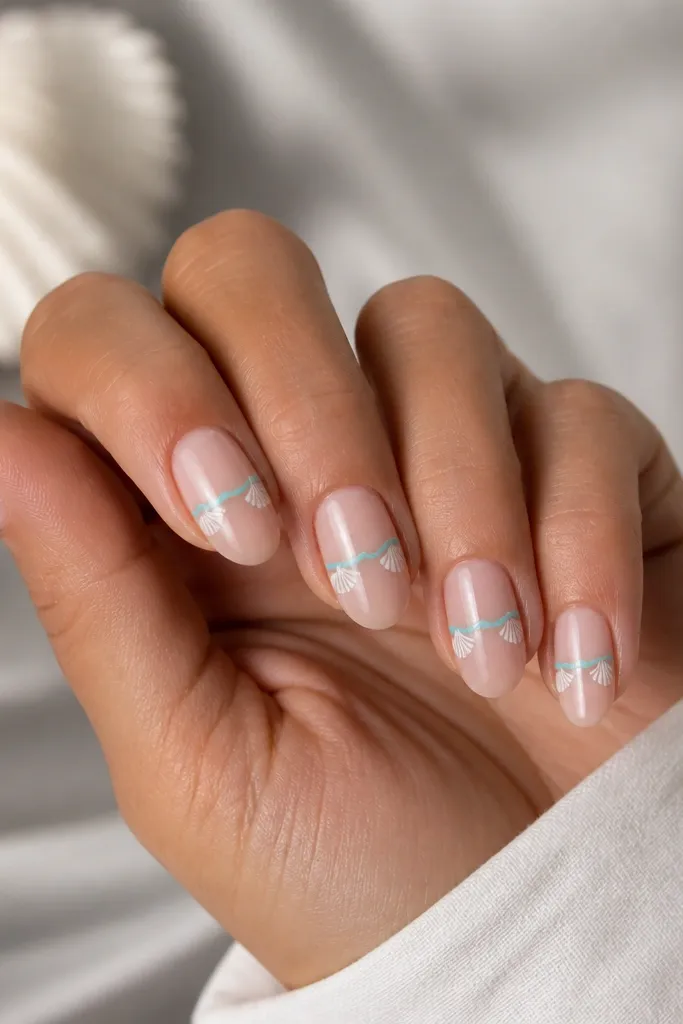
The waterline trick makes seashell nails look like they're sitting in the ocean. The turquoise stripe creates a horizontal focal point, and side shells add balance without cluttering the center. This flatters short nails because the shells sit near the edges and don't swallow your nail bed. I like it for trips where you're wearing lots of rings - the design stays clean around your fingers.
Paint sheer nude gel and cure. Draw a turquoise waterline across each nail at about mid-nail height, keeping it thin and smooth. On each nail, place a small white shell outline on the left and right sides of the nail, aligning them with the waterline. Add 2-3 tiny ridge lines inside each shell with a thin brush. Seal with glossy top coat and cap the sides lightly so the waterline doesn't chip.
Editor's noteUse a striping brush and pull from one side to the other in one motion for a straight line.
Watch outAvoid making the waterline too thick - thick stripes look like paint, not water.
25. Pearl-Edge Shell Outline Over Clear Jelly
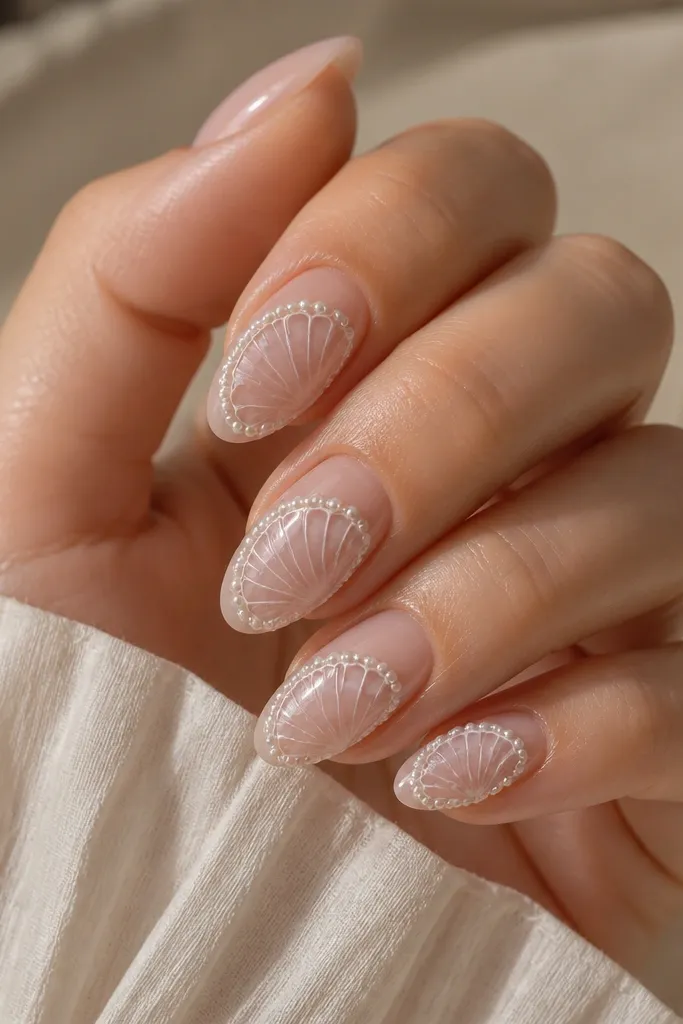
Clear jelly bases make shell nails look like you trapped the ocean inside the nail. The translucent look flatters because it doesn't cover your natural nail color - it adds glow instead. White shell outlines show up clean, and pearl-edge dots mimic the texture of real shell ridges catching light. This set is perfect for vacation because it looks fresh even when you're tanned and your skin tone shifts.
Apply a clear jelly gel base and cure. Draw shell outlines in white gel across the center of each nail, then place tiny pearl dots along the shell edges on just two or three spots per shell. Add a very small amount of clear gel over the pearl dots to help them sit smooth. Cure, then apply glossy top coat and cap the free edge. If you want extra shine, do a second thin top coat after curing and cure again.
Editor's notePearl dots look best when they're not too round - use micro pearls or a gel dot tool for small ridges.
Watch outDon't use opaque white on a clear base - it looks painted on top instead of embedded.