1. Creamsicle Base With White Ridged Tips
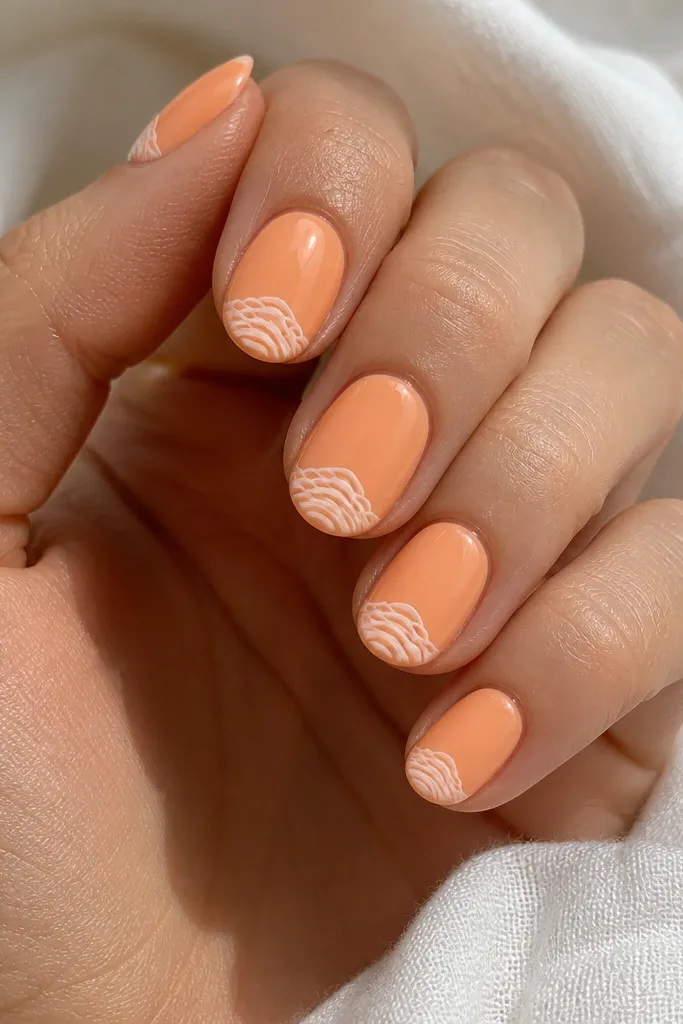
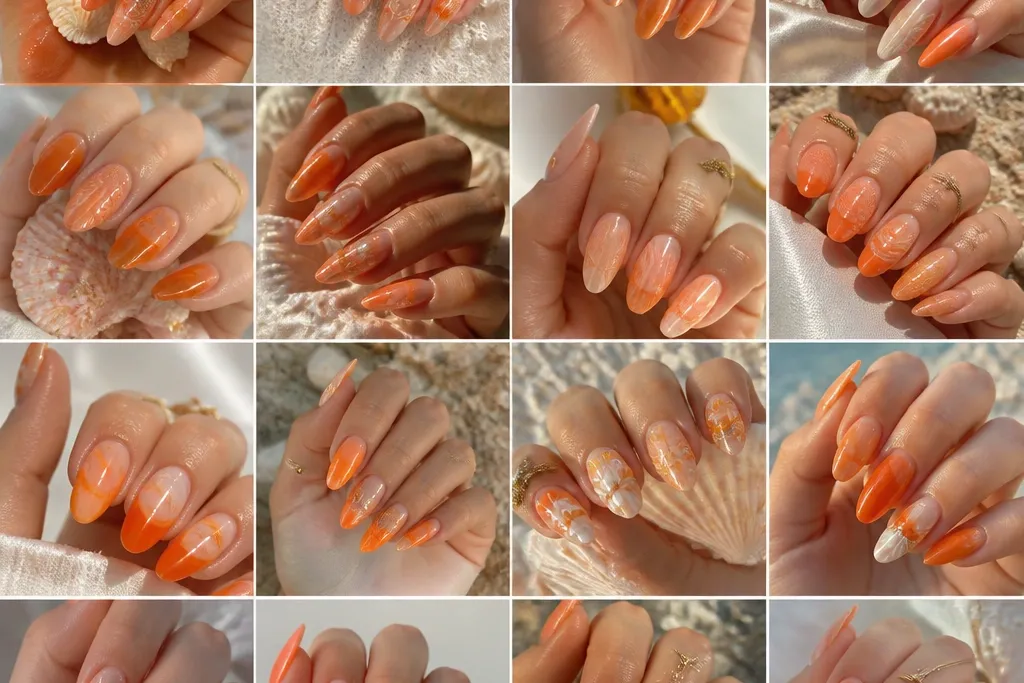
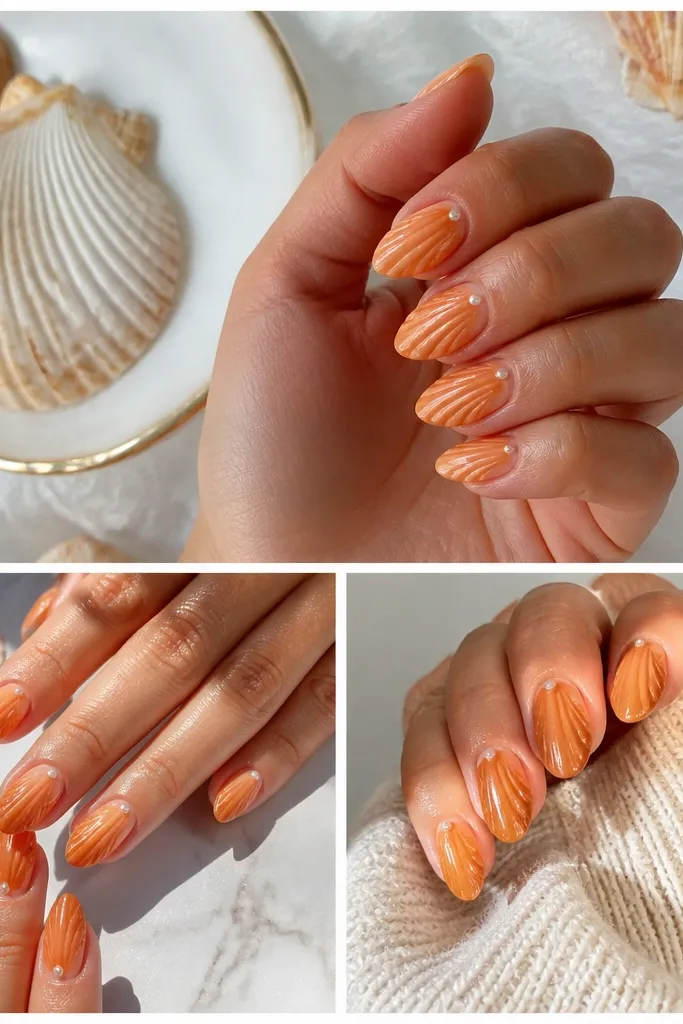
This one looks bright and still wearable because the orange stays warm and the shell ridges are pale. I've used it on short oval nails and it makes fingers look longer since the ridges sit right at the tip. The white ridges catch light and give that "shell texture" effect even when you're doing it with polish. It flatters light to medium skin tones especially well, and it also looks great against tan or warm undertones because the base reads like a creamsicle.
Start by painting a smooth creamsicle orange base in two thin coats, letting each coat dry until it's not tacky. Next, take a fine detail brush and draw 4-6 curved white ridges starting about 2-3 mm from the tip edge, arcing toward the center. Then add a second ridge pass slightly offset so the ridges look layered, not like one line. Finish with one or two coats of glossy topcoat so the ridges look raised and clean.
Editor's noteLet the white ridges dry fully before topcoat. If you rush, the ridges smear and the set looks messy.
Watch outAvoid using pure bright white straight across the whole nail - it can overpower the orange and look flat.
2. Coral Orange Half-Moon Shell Side
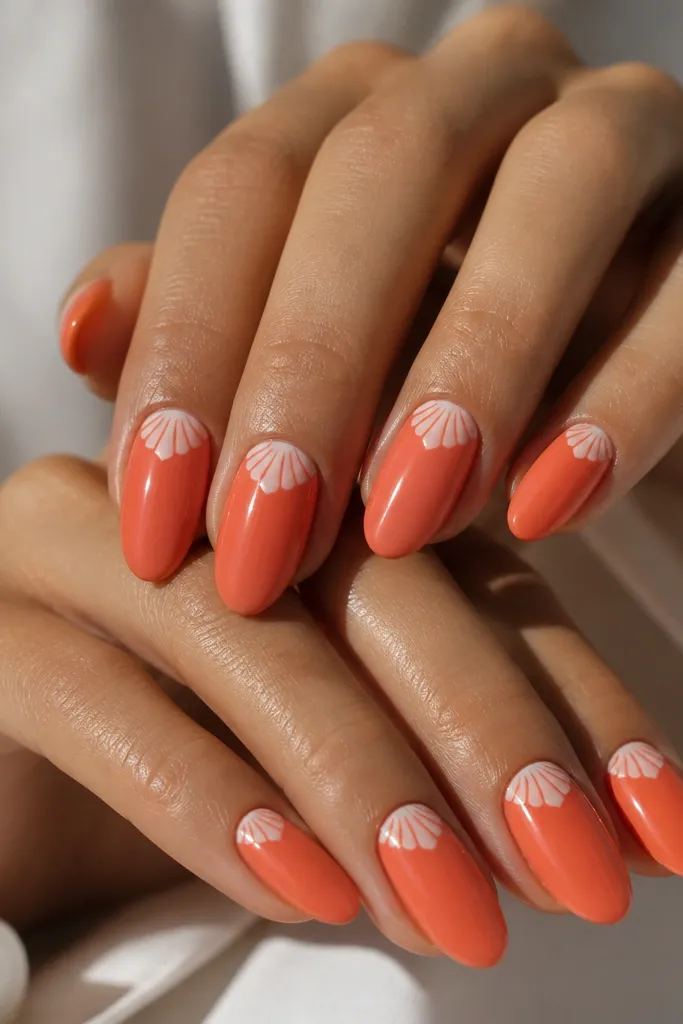
This design is my go-to when you want orange seashell nails that look expensive but still office-friendly. The shell is near the side and cuticle area, so the rest of the nail can stay clean and the look feels intentional. The coral base reads warm and flattering on most skin tones; the white ridges brighten the area around the nail bed. It's also great if you have uneven nail beds because the shell placement draws the eye upward and to one side.
Paint the whole nail coral-orange in two coats. Then, using a liner brush, draw a small curved half-moon outline near the cuticle on one side, leaving a tiny gap from the skin. Add 5-7 thin white ridges inside that half-moon, each one curving slightly to mimic shell grooves. Finally, seal with glossy topcoat, focusing extra coverage over the ridge area so it doesn't snag.
Editor's noteIf your ridges look wobbly, make them slightly shorter and stack them closer together; the density makes it look like shell texture.
Watch outDon't put the shell on both sides - it can shrink the nail visually and look cluttered.
3. Orange Ombré With Tiny Seashell Dots
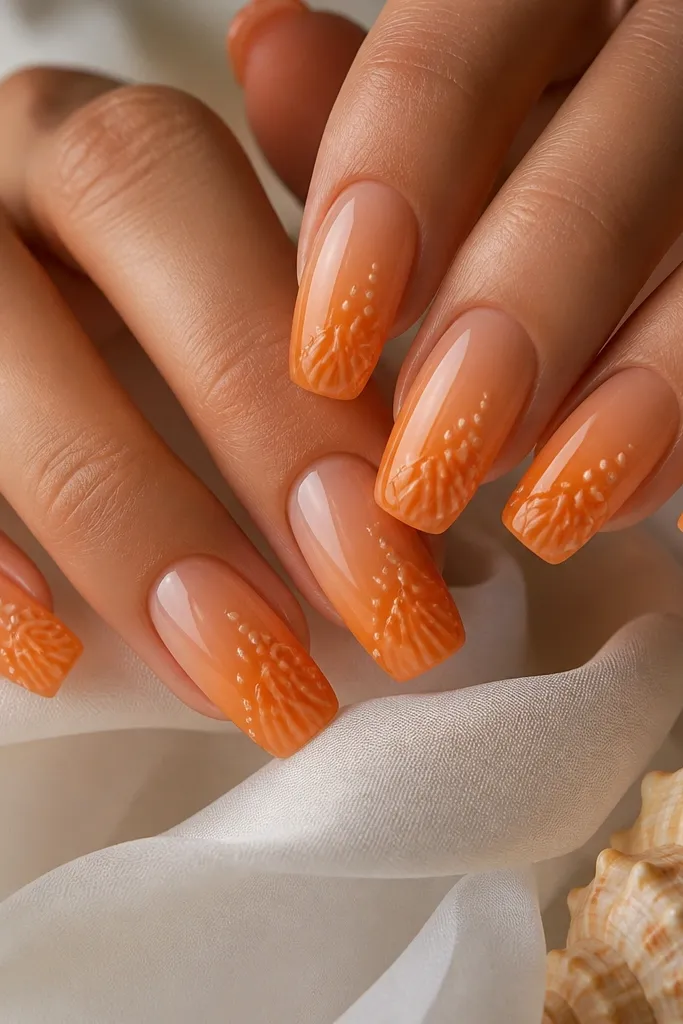
This one looks bright because the ombré creates depth, but it stays affordable because you don't need complex art. The tiny shells at the tip act like accents, so even if your dots aren't perfect, it still looks cute and beachy. I've worn it with long nails and it looks especially good with warm undertones because the peach-to-orange fade makes skin look even. It also photographs well for summer events because the gradient catches light.
Start with a peach-orange base close to the cuticle, then sponge on deeper orange at the tips using a makeup sponge. Blend the sponge edges by tapping lightly in the middle so there's no harsh line. Once dry, use a dotting tool to place 3-5 tiny pale cream dots clustered near the tip, then drag each dot into a short curved ridge with a liner brush. Seal with a glossy topcoat to lock the ombré and make the dots look smooth.
Editor's noteUse a matte or satin peach undercoat only if you plan to topcoat heavily. Gloss is what makes the gradient look clean.
Watch outAvoid heavy ombré blotches. Tap in thin layers until the fade looks smooth.
4. Neon-Orange Base With Calm White Shell Lines
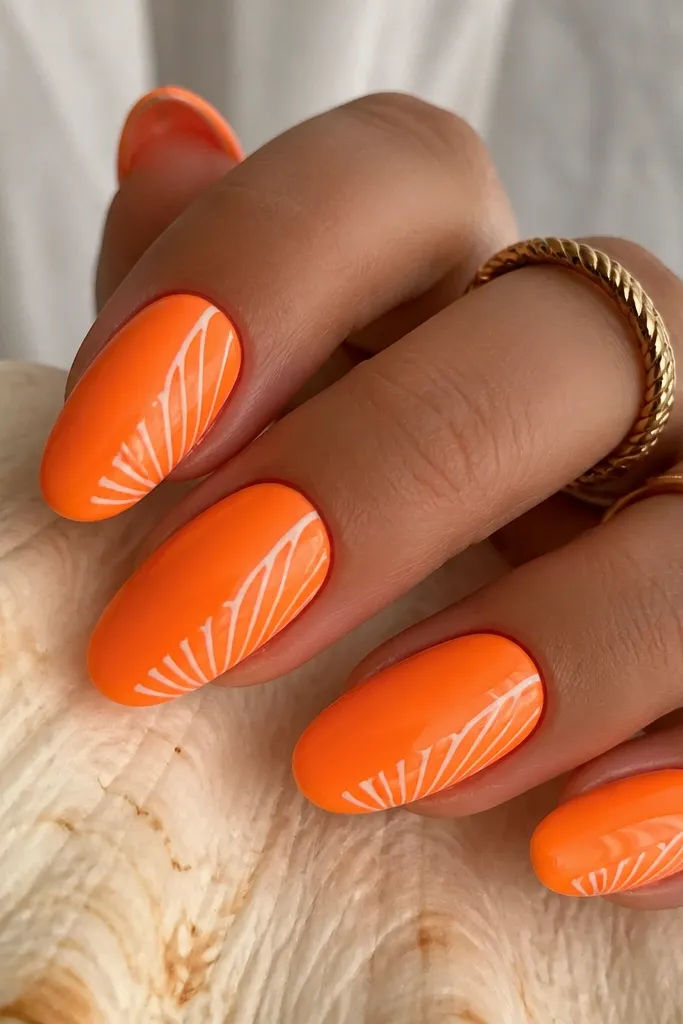
I'm a little picky here: neon can look cheap, but it works if you pair it with calm, thin white lines and lots of negative space. The ridges are delicate, so the neon doesn't overpower. This set looks bold on medium skin tones and looks striking against cooler skin undertones because the neon warms everything up. It's also a fun festival option when you want "bright" without adding glitter.
Paint neon-orange as your base in two thin coats. Then, with a liner brush, draw 6-8 thin white curved ridges that start near the tip and angle toward the center, leaving gaps between lines. Add one extra ridge closer to the side so it looks like a shell fold. Finish with glossy topcoat and cap the free edge so the lines don't chip.
Editor's noteIf the white looks too opaque, thin it slightly with a drop of polish thinner so it lays like a crisp line, not a thick stripe.
Watch outDon't add gems or chunky glitter here - the neon plus bling can read messy.
5. Orange Marble Seashell With Milky White Veins
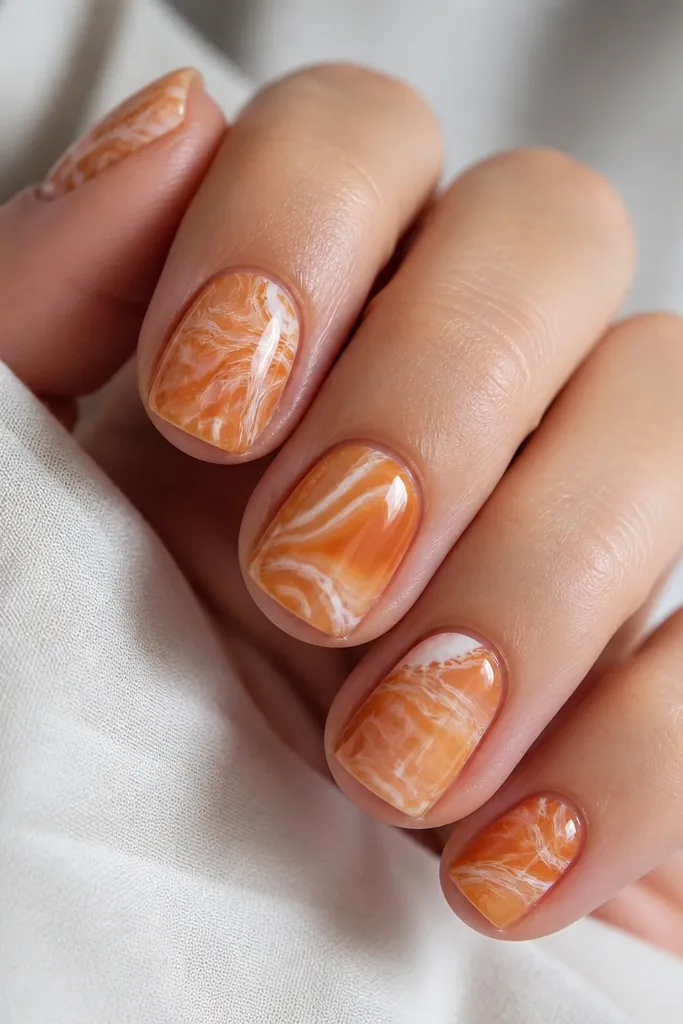
This is the seashell look for people who hate perfect symmetry. The marble background gives movement, while the milky white arcs mimic shell ridges in a softer way. On shorter nails, it looks fuller and more dimensional than plain shells because the swirls fill space. It flatters hands with shorter nail beds since the design moves across the nail instead of only sitting at the tip.
Use orange jelly polish or a semi-sheer orange base, then drop milky white polish into it with a thin brush and swirl gently for marble. While it's still slightly wet, drag a toothpick lightly to form curved arcs like shell folds. Let it dry, then add one more pass of milky white ridges over the arcs using a liner brush for definition. Seal with glossy topcoat to smooth the marble texture.
Editor's noteDo your marble on a slightly tacky base. It spreads into better-looking veins than dry polish.
Watch outDon't over-mix the marble. Too much swirling turns it muddy.
6. Sand Beige Base With Bright Orange Shell Tips
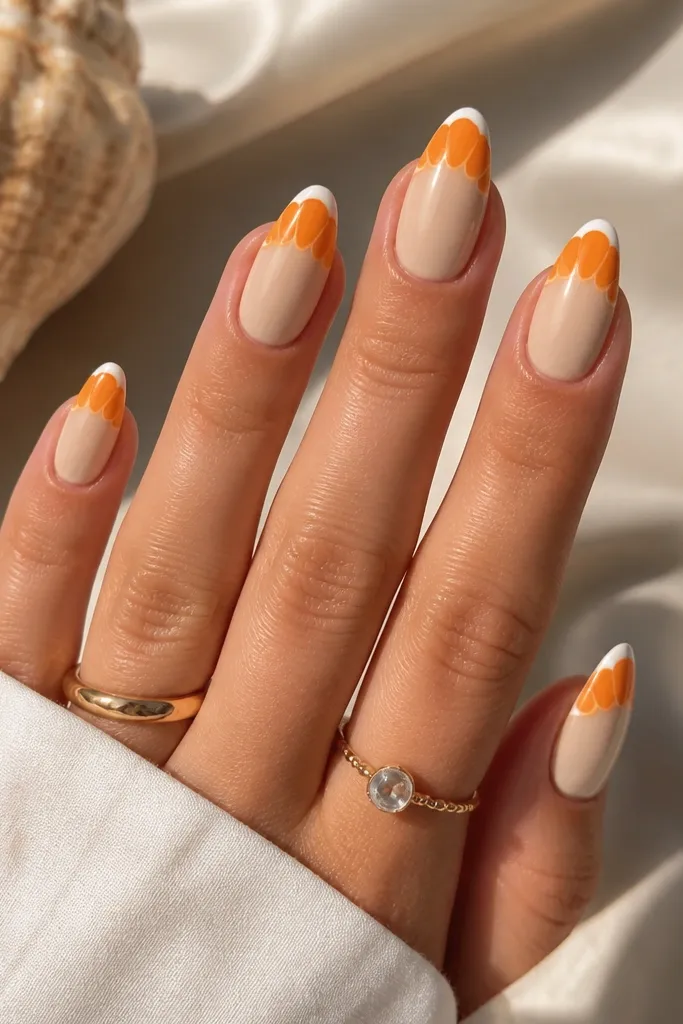
Beige makes orange pop without screaming neon. The bright orange ridges at the tip look like a shell you'd find on the beach, and the thin white outline keeps it clean. I've done this on medium almond nails and it looks flattering on hands that need a little length - the beige near the cuticle keeps the nail bed looking longer. It also works for cooler undertones because beige neutralizes the warmth.
Paint a sand beige base in two coats, keeping it close to the cuticle without flooding. Then paint the tip with a bright orange, but only the outer third so the center stays beige. Use a liner brush to draw thin orange ridges within the tip area, each ridge curving toward the center. Add a thin white outline just at the edge of the tip, then topcoat glossy.
Editor's noteIf your beige looks streaky, do a third coat only on the center of the nail - that's where streaks show most.
Watch outAvoid thick ridges. Thick lines look like paint blobs instead of shell grooves.
7. Pastel Peach Base With Gold-Edge Seashell Lines
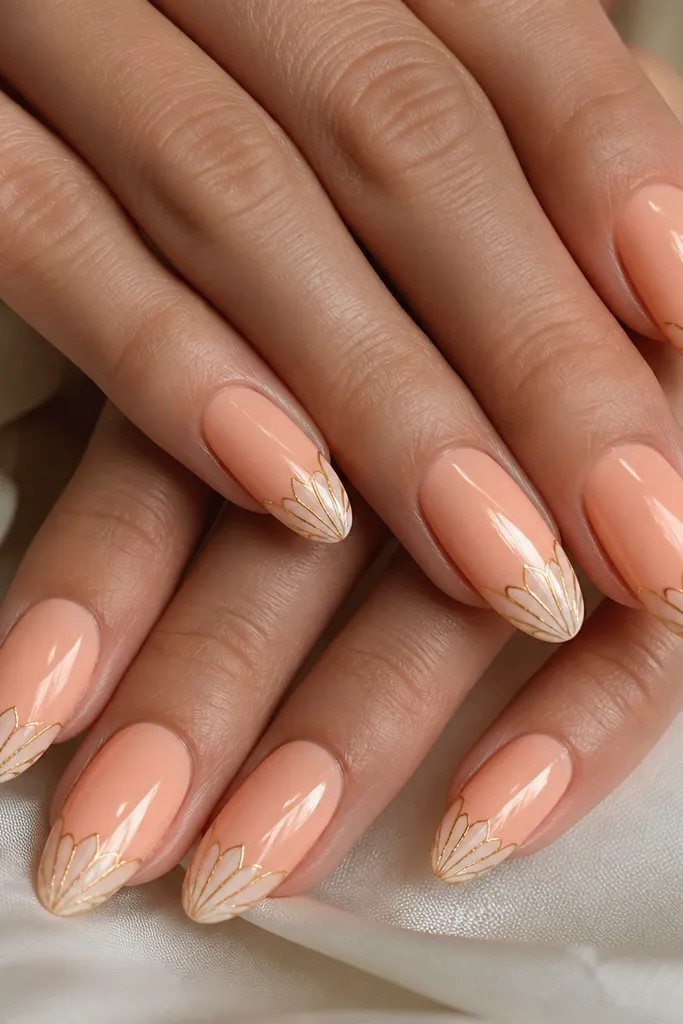
This set gives you the "beach jewelry" look without spending on expensive nail charms. The pastel peach base makes it feel soft, and the gold edge makes the shell ridges look crisp and elevated. On warm skin tones it looks like sunkissed jewelry; on fair skin it looks clean and not too loud. It's also great for weddings or dinners because it reads polished, not playful.
Paint pastel peach in two coats. Add pale cream ridges at the tips using a liner brush, starting about 2 mm from the free edge. Then use a thin metallic gold striping polish to outline the ridges - you're tracing the top edge of each curve. Keep the gold lines narrow so they don't turn into thick bands. Finish with glossy topcoat and cap the free edge.
Editor's noteUse a striping brush or a liner brush with a super fine tip. Thick metallic polish makes the gold look like a stripe, not an edge.
Watch outDon't cover the gold with matte topcoat. Matte kills the jewelry effect.
8. Orange French Tip With White Seashell Ridges
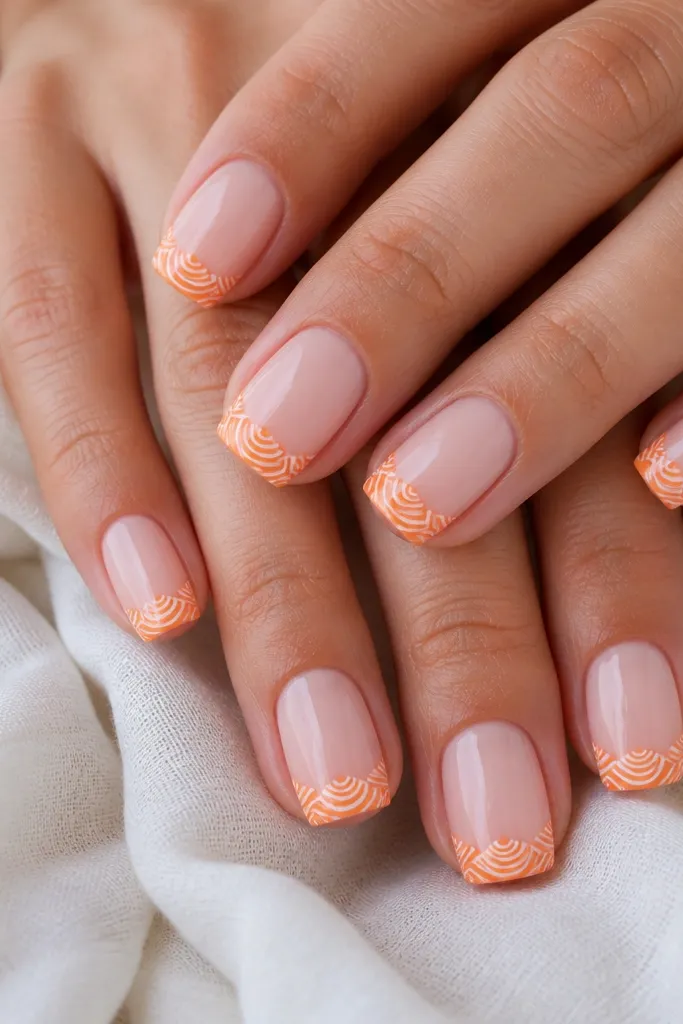
French tips are already structured, so adding shell ridges gives you a clear, flattering pattern. This is the easiest way to make orange seashell nails look neat even if your shell lines aren't perfect. The white ridges within the orange tip area create contrast that makes the nails look sharper. It flatters almost every hand because French tips visually define the nail shape and length.
Start with a nude or sheer pink base. Create the French tip with bright orange polish or striping tape, keeping the smile line smooth. Once the tip is set, draw 5-7 thin white ridges inside the orange tip area, each ridge curving from one side toward the center. Keep the ridges inside the tip so the shell pattern doesn't spill onto the nude. Seal with glossy topcoat.
Editor's noteIf your French line is uneven, clean it up with a small brush dipped in acetone around the edges before topcoat.
Watch outAvoid using a thick orange for the French. Thick tips chip and make the ridges harder to paint.
9. Terracotta Orange With Cream Scallop Half-Moons
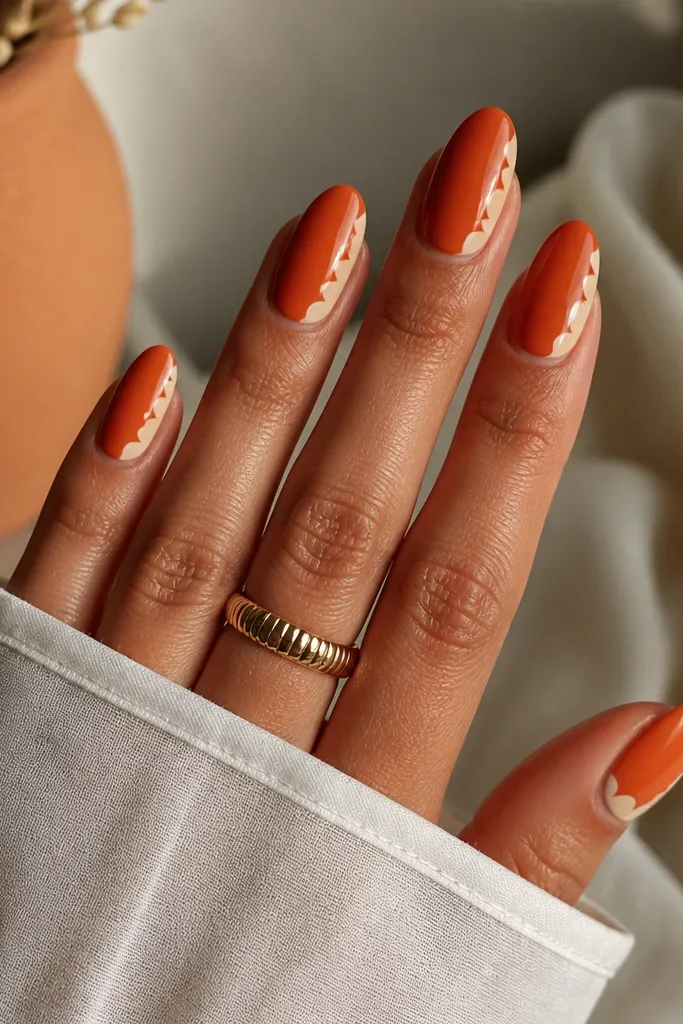
Terracotta is warm and earthy, which makes seashell nails look grown-up instead of childish. The cream scallops mimic the shell edge and give a "layered shell" effect. On medium to deep skin tones, terracotta looks rich without needing glitter. On fair skin, it still works because the cream scallops brighten and keep it from looking dull.
Paint terracotta orange in two coats. Then place 2-3 cream half-moons along one side near the tip, like scallops stacking upward. Use a dotting tool to place the base of each half-moon, then connect the curve with a liner brush. Add a tiny darker orange shadow line under the scallops to give depth. Finish with glossy topcoat.
Editor's noteUse a slightly thicker cream polish for scallops so the half-moons look defined, not faint.
Watch outDon't put scallops all over the nail. Keep them to one side for the clean shell look.
10. Orange Seashell Watercolor Wash
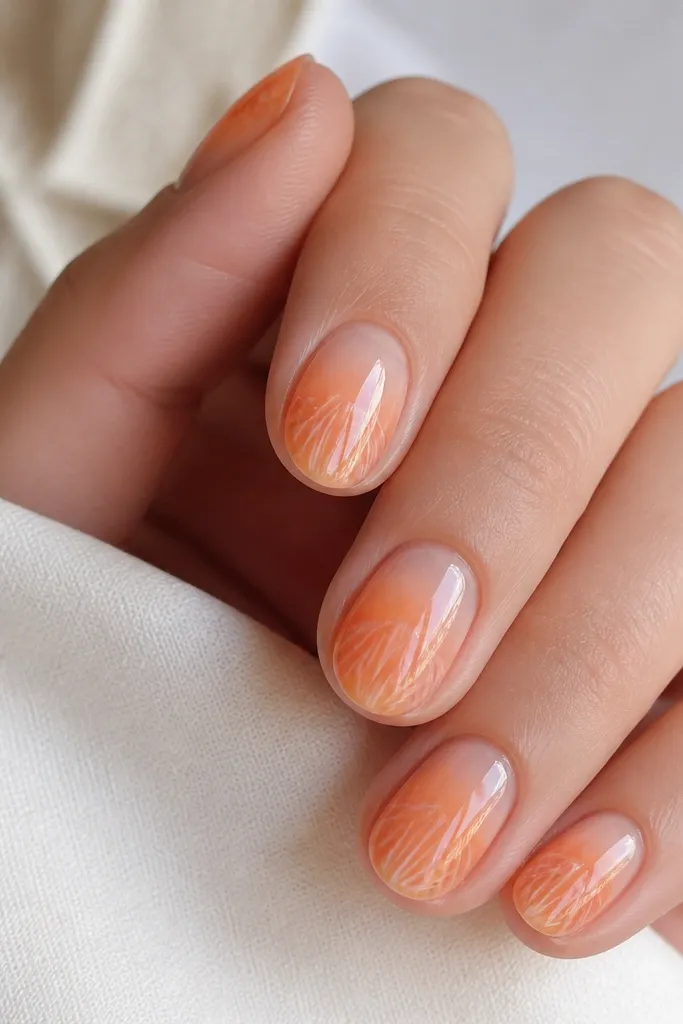
This is the softest, most forgiving option. Watercolor washes hide small mistakes because nothing has to be perfectly crisp. The shell ridges are light and airy, which keeps orange from looking harsh. I've worn this on nails that chip easily - because the design looks intentional even when a bit of polish wears. It's a great pick for casual weekends and beach trips.
Start with a sheer peach-orange base so the watercolor has room to fade. Add orange polish with a small brush, then dab and blend the edges with a makeup sponge so it looks cloudy. With a liner brush, add 4-6 faint white ridges near the tip, keeping them thin and slightly uneven. Let it dry, then topcoat glossy so the watercolor looks smooth and not streaky.
Editor's noteIf the watercolor looks too strong, add a second sheer base coat before the shell ridges.
Watch outAvoid thick white ridges here. Keep them thin so the watercolor vibe stays soft.
11. Orange Shell Burst With Tiny Starfish Accent
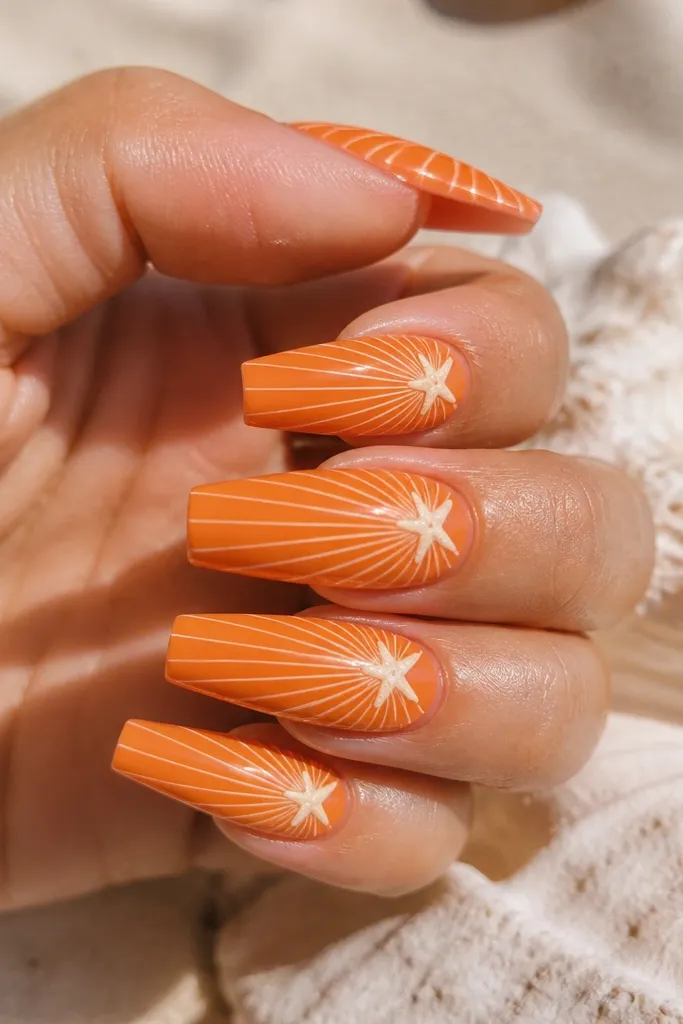
This design is for when you want "cute beach art" without using lots of charms. The shell burst gives movement and makes the nails feel special. The tiny starfish is subtle because it's pale, not neon, so it doesn't fight the orange. This looks great on long coffin or almond nails because there's space for the center burst to expand. It also works on warm undertones because the orange stays the hero color.
Paint the whole nail bright orange in two coats. Draw a center point near the middle using a dotting tool with pale cream polish. From that center, draw 7-10 curved white ridges radiating outward like a shell burst. Add one tiny starfish near the cuticle using a small dot and two short lines for arms with your liner brush. Finish with glossy topcoat and cap the edges.
Editor's noteKeep the starfish small - about the size of a grain of rice. Bigger makes it look like a sticker.
Watch outAvoid using matte topcoat. Matte makes the starfish look flat and cheap.
12. Orange Seashell Marble French Tip
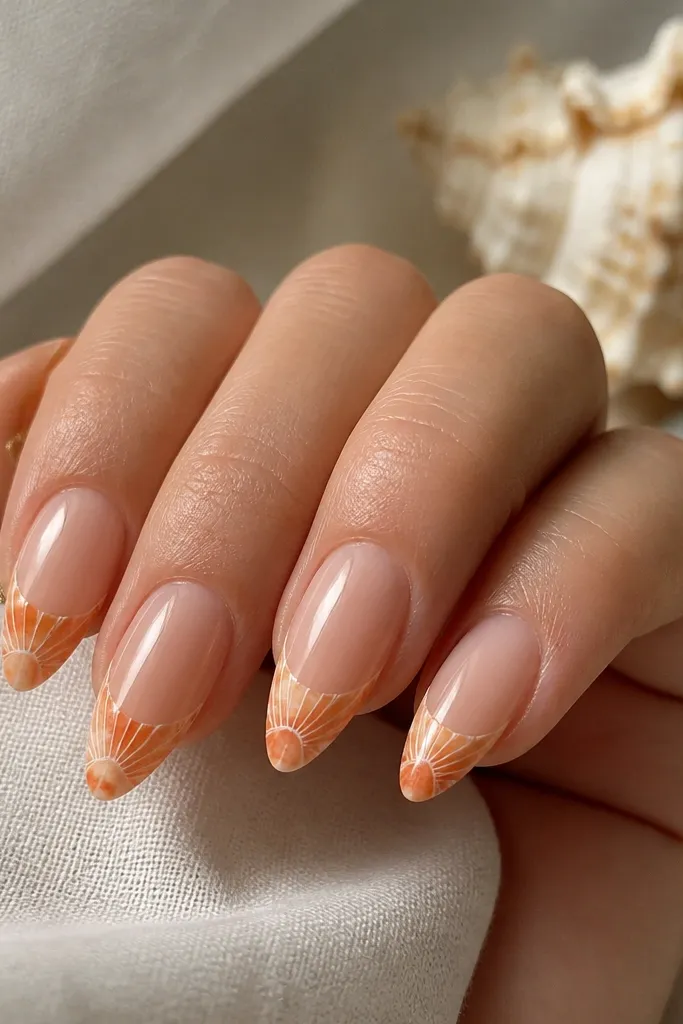
Marble French tips look high-end because the tip has movement, and the shell ridges add that beach signature. I like this for events because it looks dressed up even when you do it with regular polish. It flatters hands with shorter nails too, since the nude base creates length while the marble tip adds dimension. The white ridges keep the marble from getting messy by giving it structure.
Paint a nude base in two coats. Make the French tip area with orange marble: apply an orange base on the tip, then swirl in milky white with a thin brush and a toothpick. While it's slightly wet, draw 5-6 white ridges over the marble using a liner brush. Keep the ridges mostly parallel to the free edge. Seal with glossy topcoat and focus on smoothing the marble texture.
Editor's noteUse a slow-dry topcoat if you have one. Fast topcoats can drag marble swirls.
Watch outDon't skip smoothing topcoat. Marble tips can feel bumpy and snag sleeves.
13. Orange Base With White Shell Outline Only
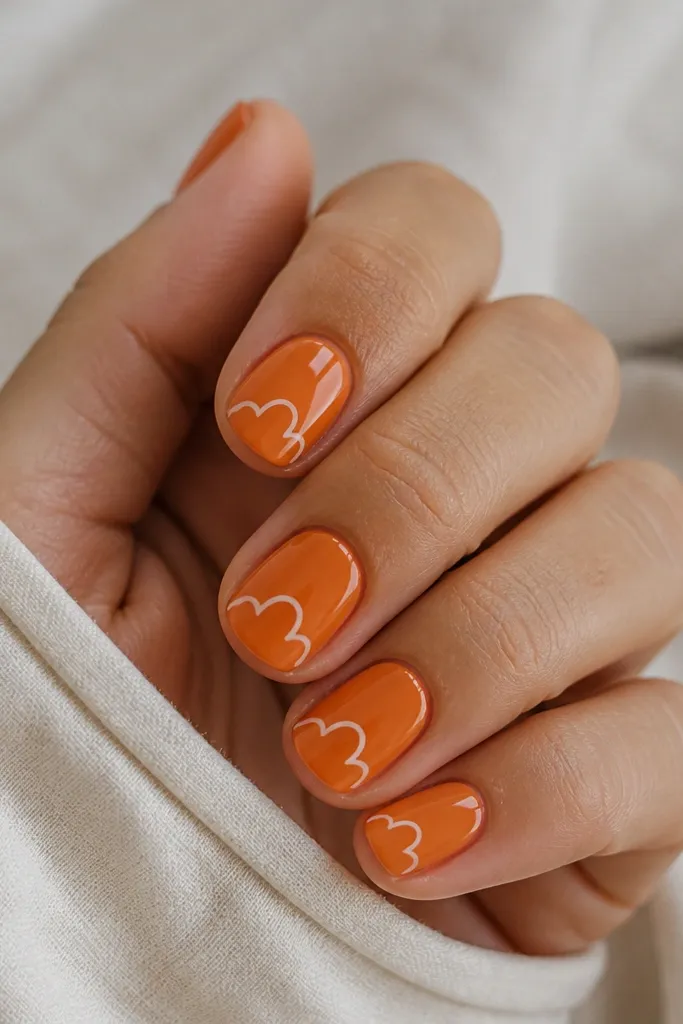
This is the cleanest, fastest style in the list. The shell outline gives the seashell vibe without needing multiple ridge lines. It looks great on short round nails because the simple outline keeps the shape neat and avoids clutter. The orange stays bold and bright, and the white border sharpens the edge so it doesn't look like plain polish. It's also super forgiving if your brush control isn't perfect.
Paint solid orange in two smooth coats. Use a liner brush to draw a scalloped or curved white outline near the tip, leaving a gap between the outline and the edge so it looks like a shell frame. Add one thin inner arc line if you want extra definition. Then topcoat glossy and cap the free edge.
Editor's notePractice the outline stroke on paper first. The scallops look better when your hand moves in one confident arc.
Watch outAvoid thick white paint. Thin lines look like design, thick lines look like correction.
14. Peachy Orange With Pink Shell Blush Ridges
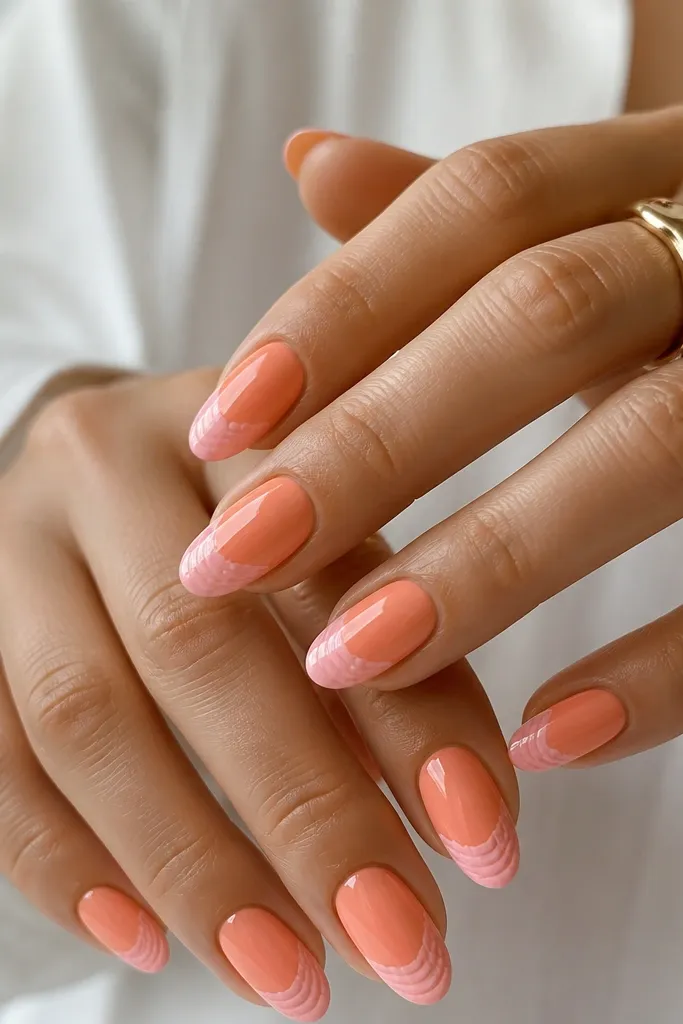
This is a softer orange seashell look that still reads bright because the base is light and the pink ridges have contrast. It's flattering on fair skin because the peach tone warms up the nail bed, and the blush pink keeps it gentle. On medium skin tones, it looks like a summer blush instead of a loud manicure. If you want orange but you don't want it to look aggressive, this is the one.
Apply peachy orange in two coats. Then draw 4-6 curved ridges near the tip using a soft pink polish in thin lines. Layer the ridges by adding a second pass on every other ridge, slightly darker pink, so it looks like depth. Keep the ridge group concentrated in the outer half of the nail for a flattering silhouette. Finish with glossy topcoat.
Editor's noteThin your pink polish a touch so the ridges stay crisp instead of chunky.
Watch outDon't spread the pink ridges all the way up to the cuticle - it can make the manicure look too busy.
15. Orange Seashell Grid With White Lines
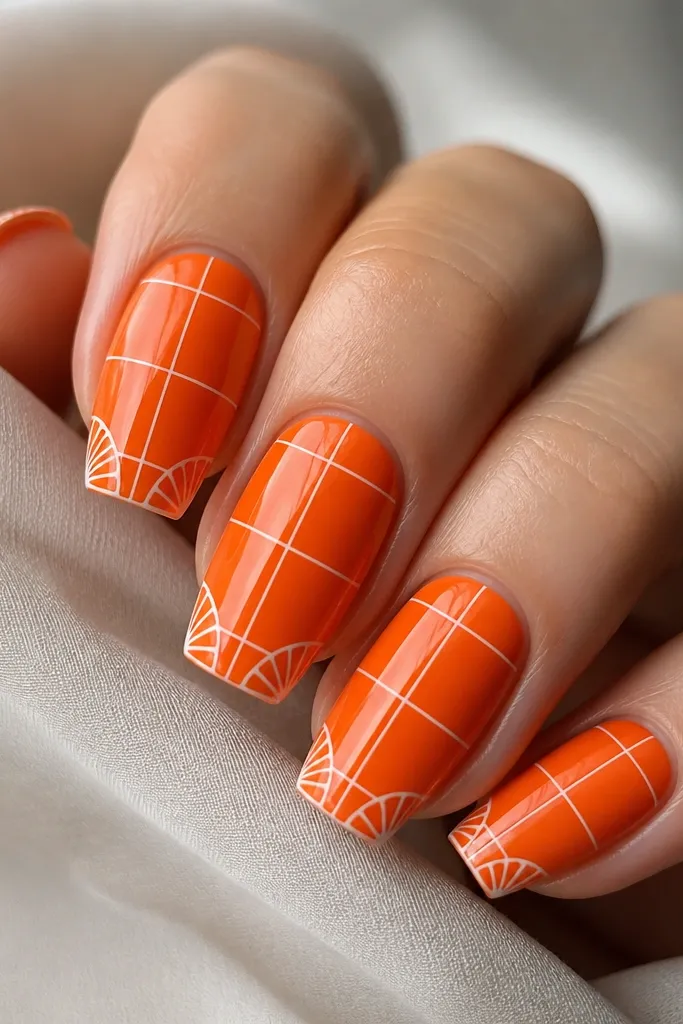
Grid patterns are underrated for seashell nails because they make the design look intentional and clean. Here, the white grid lines create a structured "shell panel" look without needing scallops everywhere. It's bright, graphic, and looks great for summer parties or photos. I've found it works especially well on longer nails because the grid has room to breathe. It also flatters hands with slender nail beds because the lines visually balance the shape.
Paint bright orange base in two coats. Use a striping brush to draw straight white lines across the nail, spacing them about 3-4 mm apart. Then, at the tip area, curve the corner lines so the ends look like shell ridges turning. Add a few small curved segments instead of full scallops to keep it from looking like plain lattice. Topcoat glossy to lock it in.
Editor's noteUse a nail art tape striping tool if you have it. Even cheap tape makes spacing more consistent.
Watch outAvoid uneven line thickness. Thick and thin lines together make the grid look messy.
16. Citrus Orange With Clear Gel Shell Texture (DIY Look)
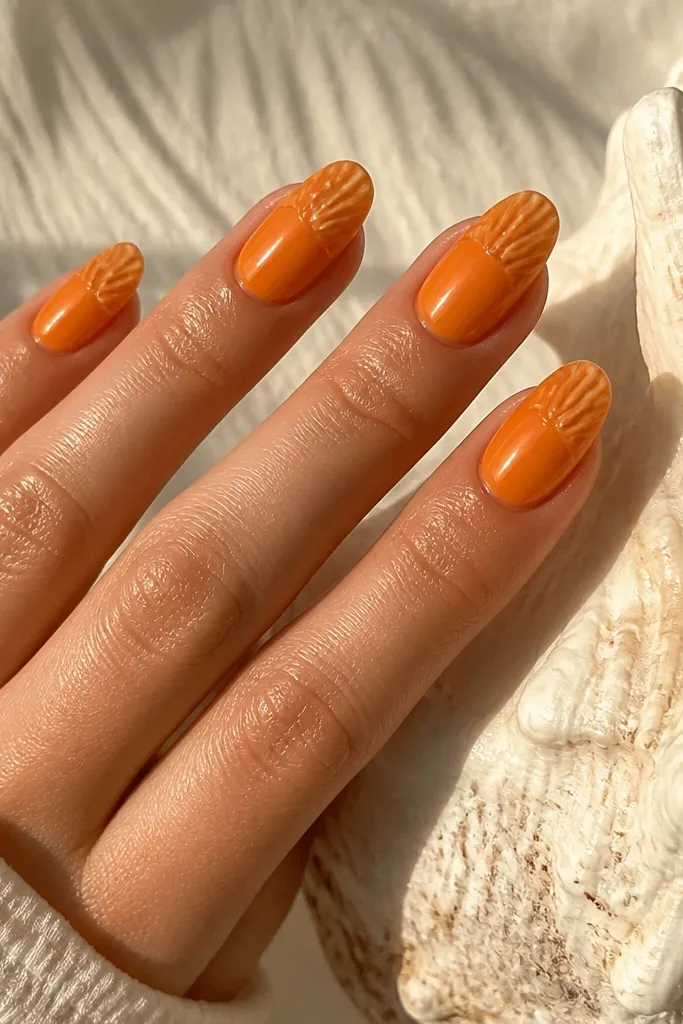
Raised texture is what makes seashell nails look real, not just painted. You don't need a fancy kit for this effect - a thick clear gel or clear builder gel creates the "ridged" look because it sits on top and reflects light. Citrus orange is bright without going neon, and the clear ridges look like they're part of the nail. This is flattering on medium almond shapes because the ridges look like waves running along the curve. It also lasts longer than thin painted lines.
Start with a glossy citrus orange base and cure/dry until fully set. Use a dotting tool or silicone nail pick to place small clear gel ridges at the tip - make 5-7 curved lines that follow the smile line. Pull each ridge slightly so it looks like a shell groove, then cure/dry according to your gel's instructions. Add one extra thin clear layer over the ridges for smoothness, then topcoat glossy.
Editor's noteLightly wipe the ridge area with gel cleanser before topcoat if you get any tacky residue - it keeps the shine glassy.
Watch outDon't make ridges too tall. If they're bulky, they snag and break faster.
17. Orange Seashell Tips With Micro Glitter Line
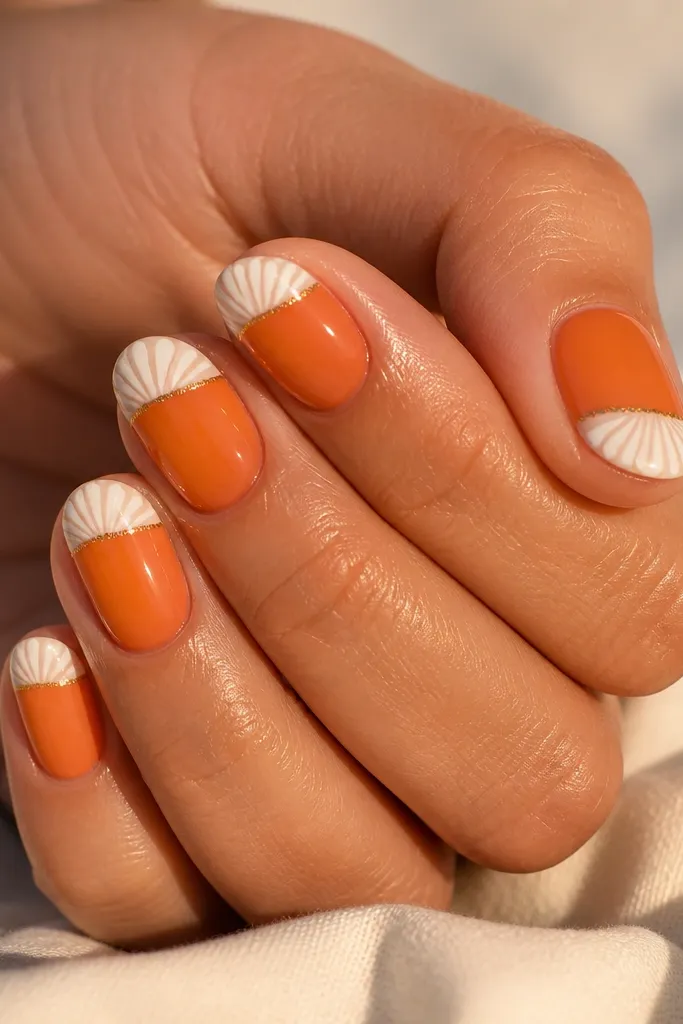
This is the affordable "celebration" version. The shell ridges do the work, and the micro glitter line just adds sparkle at the exact place the eye lands - the tip. I've worn it to birthdays where I wanted something fun but not chunky. The gold line flatters warm skin tones and looks classy on fair skin too because it's thin and controlled. It also makes the shell pattern look brighter under indoor light.
Paint your orange base in two coats. Add white shell ridges at the tips with a liner brush, keeping them thin and evenly spaced. Before topcoat, place a tiny strip of gold micro glitter along the ridge base line using a dot of clear gel or topcoat. Press the glitter lightly so it sticks in a straight line, then seal with glossy topcoat in two passes for smooth coverage.
Editor's noteUse a striping brush to apply the glitter line - it prevents glitter spread that looks messy.
Watch outAvoid glitter dust all over the nail. Keep it only on the ridge line.
18. Orange Shells on Nude Base With Cuticle Sparkle Dot
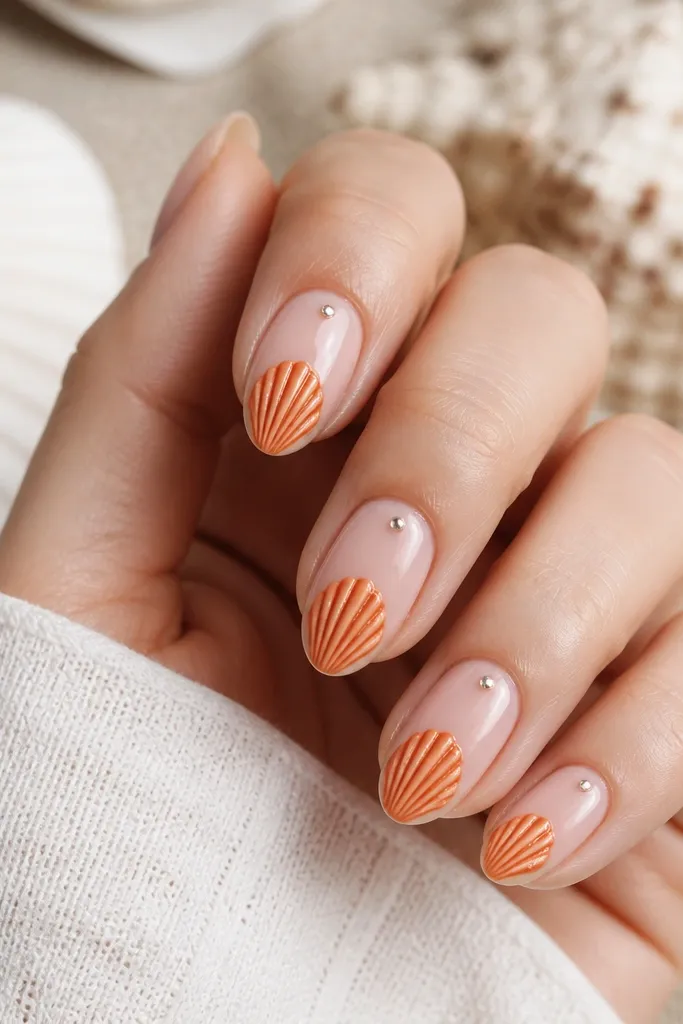
Nude base makes it feel light and clean, and the orange shells on the lower half look like they're floating. The tiny silver sparkle dot at the cuticle gives that "jewelry" effect without turning the nails into a rhinestone set. This style is flattering on short nails because the nude base keeps things looking airy. It also works well for hands that need a neutral option you can still dress up.
Start with a nude sheer base in two coats, letting it look slightly pinkish rather than chalky. Paint orange shell ridges near the tip area only - about the top third of the nail, leaving the middle nude. Use a liner brush to draw 5-6 curved ridges, then add a thin pale cream highlight line on every other ridge for depth. Finish by placing one tiny silver sparkle dot near the cuticle and sealing with glossy topcoat.
Editor's notePut the sparkle dot slightly off-center. Centered dots can look like you missed the nail art placement.
Watch outAvoid placing shells too high. If shells reach the cuticle, the nude base stops doing its lengthening job.
19. Burnt Orange With White Shell Chevron Near Tip
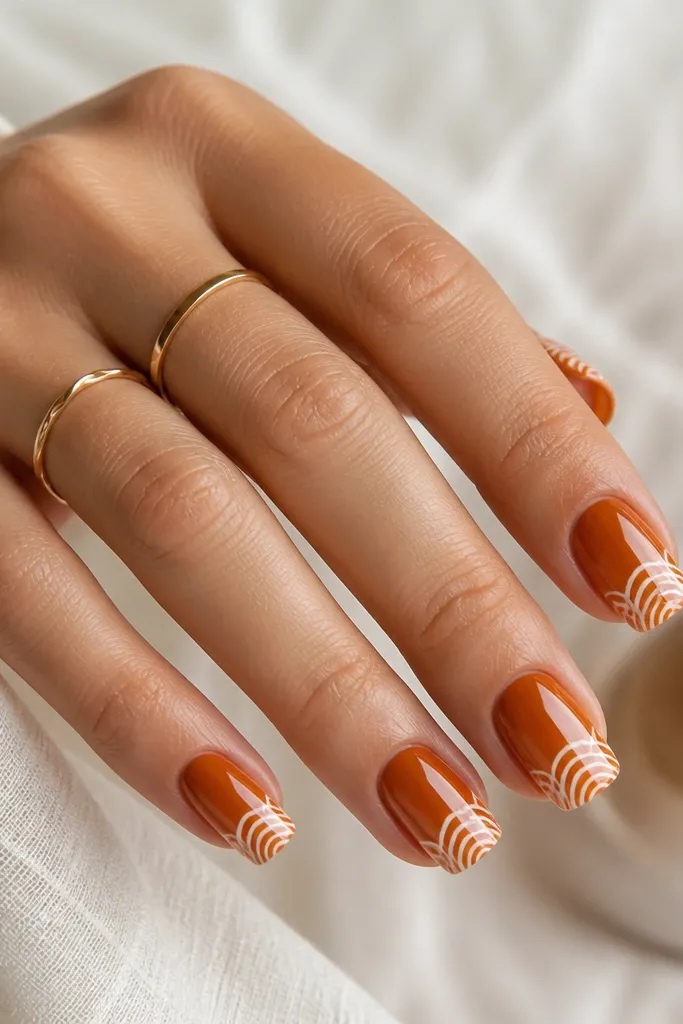
Burnt orange reads warm and autumny, but the white chevron shell pattern keeps it beachy. The chevrons look like shell folds, and because they sit near the tip, the set stays balanced. This one is flattering on medium to deep skin tones because burnt orange has enough depth to look intentional. On fair skin, it can look muted unless you keep the orange saturated, so this design asks for a true burnt orange rather than dusty brown.
Paint burnt orange in two coats. Then draw a chevron pattern near the tip using a white liner brush: start one diagonal line on the left side, then mirror it on the right so they meet toward the center. Add 3-4 stacked chevrons, each one slightly shorter and closer to the free edge. Make the chevrons curve slightly at the ends so they look like shell folds, not straight stripes. Topcoat glossy to smooth the lines.
Editor's noteIf chevrons look too sharp, soften the ends with a tiny dab of orange to blend into the base.
Watch outDon't make the chevrons too wide. Wide chevrons cover the nail and remove the shell feel.
20. Orange Seashell French With Micro Peach Dots
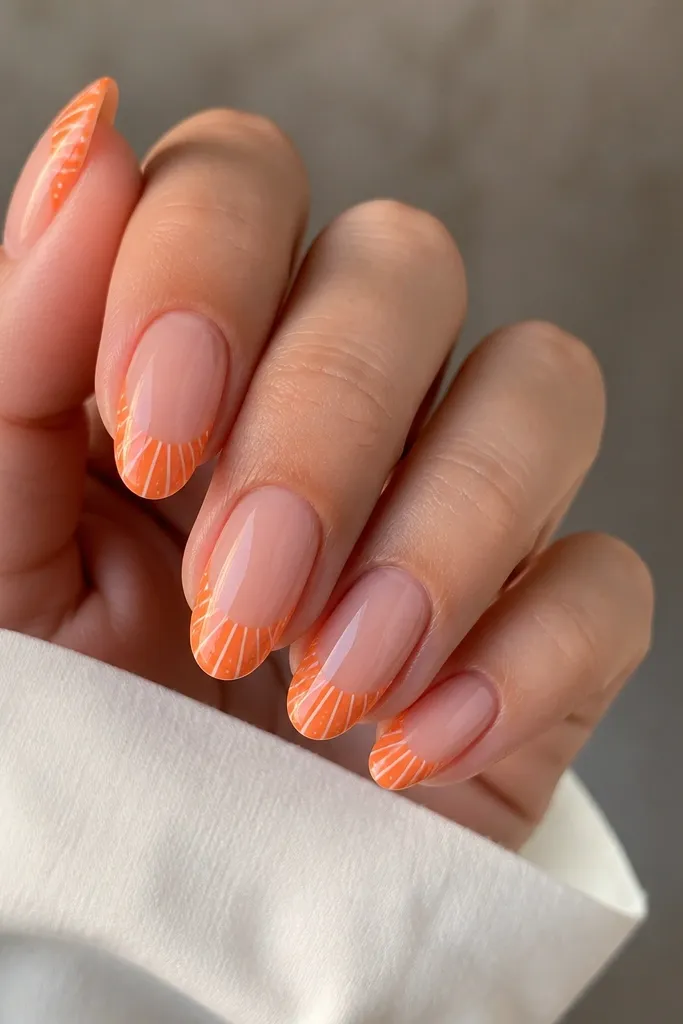
This set adds texture without using glitter. The micro peach dots sit between ridges and make the shell area look like it has tiny pores and natural variation. It's bright, but the dots keep the design from looking too stark. On short nails, dots prevent the ridges from looking like stripes. It's flattering on most skin tones because the base stays orange and the dots use a softer peach shade.
Paint a sheer nude base. Create the French tips in bright orange, then add white shell ridges inside the tip area in thin curves. With a dotting tool, add micro peach dots between select ridges, placing them closer to the center for a natural look. Keep dot size tiny - about the head of a pin - so it reads as texture. Seal with glossy topcoat and cap the tip.
Editor's noteUse a dotting tool with a smaller ball than you think. Oversized dots make it look like polka dots instead of shell texture.
Watch outAvoid adding dots all over every nail. Texture looks best when it's selective.
21. Orange and White Seashell Stripe Fade
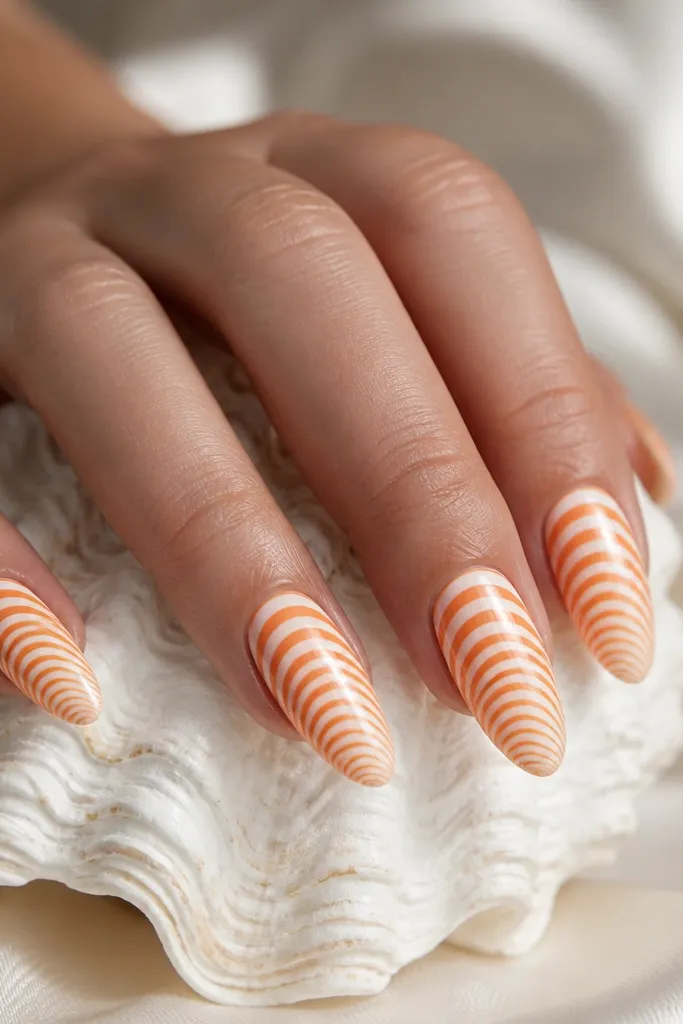
Alternate stripes make the shell pattern look effortless and clean. The fade in thickness gives a realistic shell depth, like ridges getting closer together near the edge. This is a great option if you want orange seashell nails that look bright but still minimalist. It flatters long nail shapes because the stripes follow the length and elongate the hand. On fair skin, it looks crisp; on deeper skin tones, it looks bold and modern.
Paint the base orange and let it dry completely. Add curved white stripes starting near the middle of the nail and curving toward the tip, using a liner brush. Then add orange stripes between them by tracing the same curve - keep them thinner than the white at first. As you approach the tip, make the stripes slightly narrower and closer together. Topcoat glossy so the stripes look smooth and not raised in the wrong spots.
Editor's noteKeep your stripe spacing consistent by counting ridges - I do 5 main white ridges per nail.
Watch outAvoid uneven stripe angles. If the curves change direction mid-nail, it looks off.
22. Orange Seashell With Tiny Pearl-Like Dot Accents (No Gems)
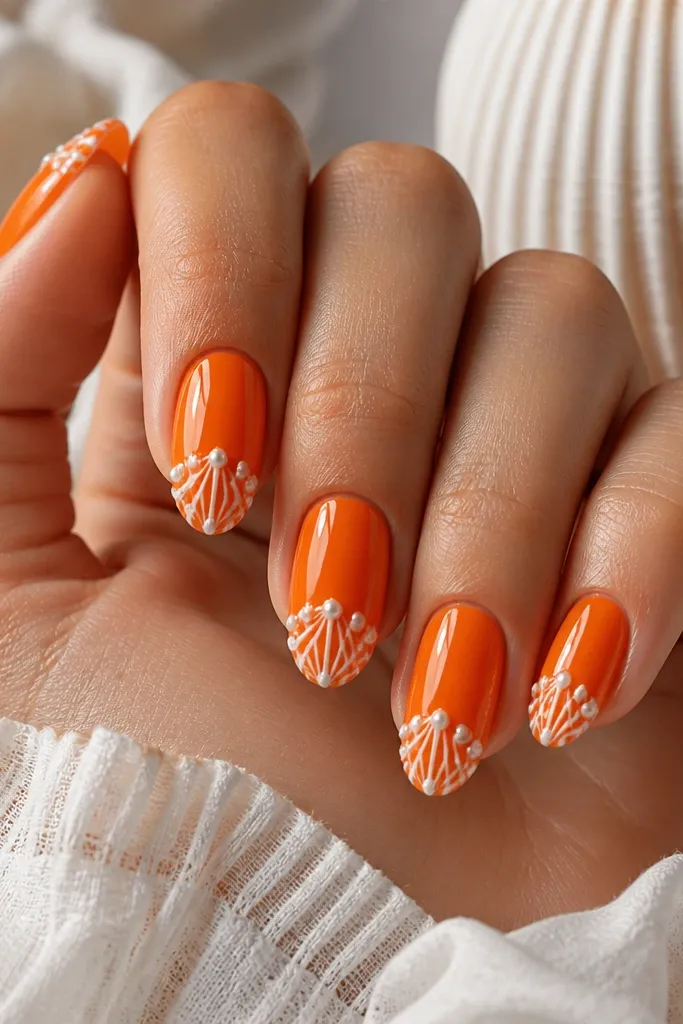
This version gives you the pearl look without buying pearls or rhinestones. The pearl-like dots are just a pale cream polish with a glossy clear layer, so they reflect like tiny pearls. The shell ridges at the tip keep it beachy, and the dots add a dressier feel. It's flattering on medium almond and oval shapes because the dots catch light along the curve. It also works for warm and cool undertones because the pearl color sits between cream and silver.
Paint bright orange in two smooth coats. Draw white shell ridges near the tip - 6-7 thin curves. At 3-4 points where ridges intersect, place small pale cream dots using a dotting tool. For the pearl effect, dab clear gel or thick topcoat over each dot and let it dome slightly before curing/drying. Finish with a final glossy topcoat around the domed dots without flattening them.
Editor's noteIf your dots flatten, add one extra thin gel layer on top instead of more polish. It domes better.
Watch outAvoid using glitter polish for the dots. Glitter pearls look cheap fast.
23. Orange Seashell Half Wrap With White Outer Curve
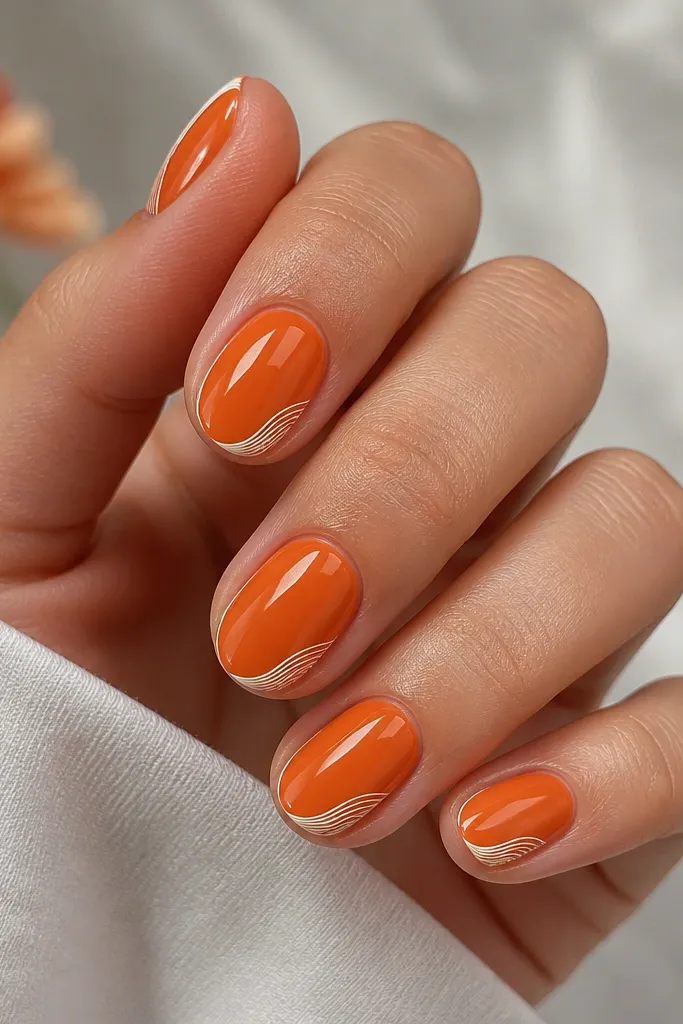
Half-wrap designs look neat because the white outer curve acts like a frame. The ridges inside feel like the shell is wrapped around the nail edge, which looks extra dimensional. I like this for short oval nails because it adds a clean border that makes the nail look more shaped. It also flatters hands that have ridges or slight unevenness because the frame gives a visual boundary. The warm orange base keeps it bright without needing extra decoration.
Paint orange base in two coats. Use a liner brush to draw a white outer curve just above the tip on both sides, meeting at the center but leaving a small gap. Inside that curve, draw 5-6 thin white ridges that curve with the outer shape. Keep the ridges thicker at the outer edge and thinner toward the center for depth. Seal with glossy topcoat and cap the free edge.
Editor's noteMark the center point first with a tiny dot. Then build the outer curve from that point so it's symmetrical.
Watch outAvoid letting the white frame touch the skin. Leave a hairline gap for a professional look.
24. Orange Seashell Tips With Dipped White Edge
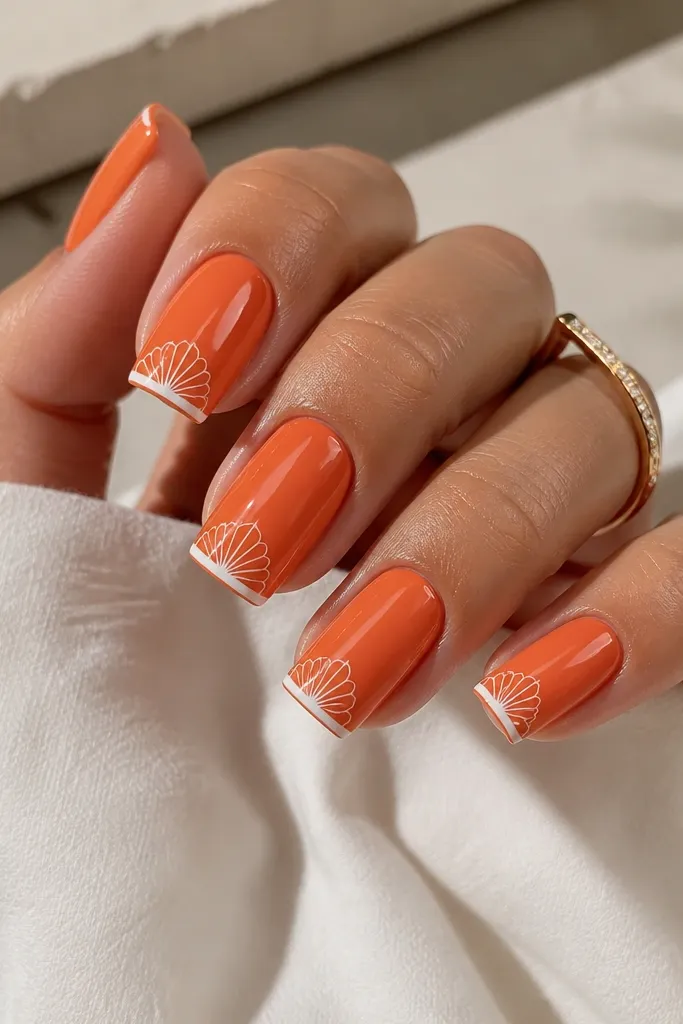
This looks like a beach shell you'd see with bright lighting because the white edge is crisp and the ridges are subtle. The dipped edge gives a clean finish even if your ridges aren't perfect. I like it for square nails because it matches the straight tip shape and keeps the design graphic. This style flatters hands with shorter nails because the white border creates contrast and makes the tip look intentional.
Paint orange base in two coats. Then apply a thin white border at the tip edge using a small brush, keeping it just 1-2 mm thick. Add shell ridges above the border inside the tip area using a liner brush - 4-6 thin ridges curving toward the center. Let it dry fully, then topcoat glossy in two thin layers for a smooth border that doesn't chip.
Editor's noteUse a steady hand and short strokes for the dipped edge. Long strokes drag and widen the white border.
Watch outAvoid thick white borders. Thick borders look like a sloppy correction line.
25. Orange Seashell Gradient With White Shell Crest
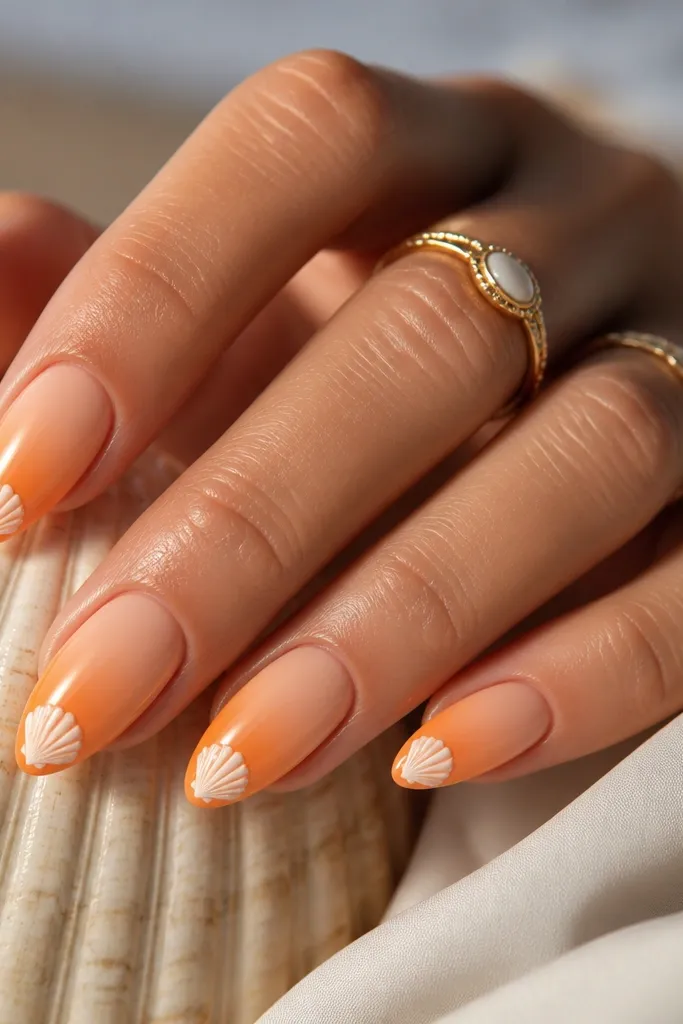
The gradient makes the nail look juicy, and the centered crest makes it look like a single shell focal point. I've done this for summer dinners and it always looks put-together because the crest is controlled and the gradient is smooth. It flatters medium almond and long oval nails since the crest sits where your eye naturally lands - the center of the tip. Warm skin tones look extra golden with this one, and fair skin looks bright without washing out because the gradient has depth.
Create the gradient by sponge-painting peach near the cuticle and deeper orange at the tip, blending in the middle. Build it in thin layers until it looks smooth. Then draw a white shell crest at the center of the tip area: start with a curved outline, then fill with 6-8 thin ridges inside. Keep the crest height about 1/4 of the nail length so it doesn't overwhelm. Finish with glossy topcoat and cap the tip.
Editor's noteIf the gradient looks patchy, add one more orange glaze layer over the whole nail before the crest.
Watch outDon't place the crest too close to the cuticle. It makes the nail look shorter.