1. Lemon Sorbet Micro-French Almonds
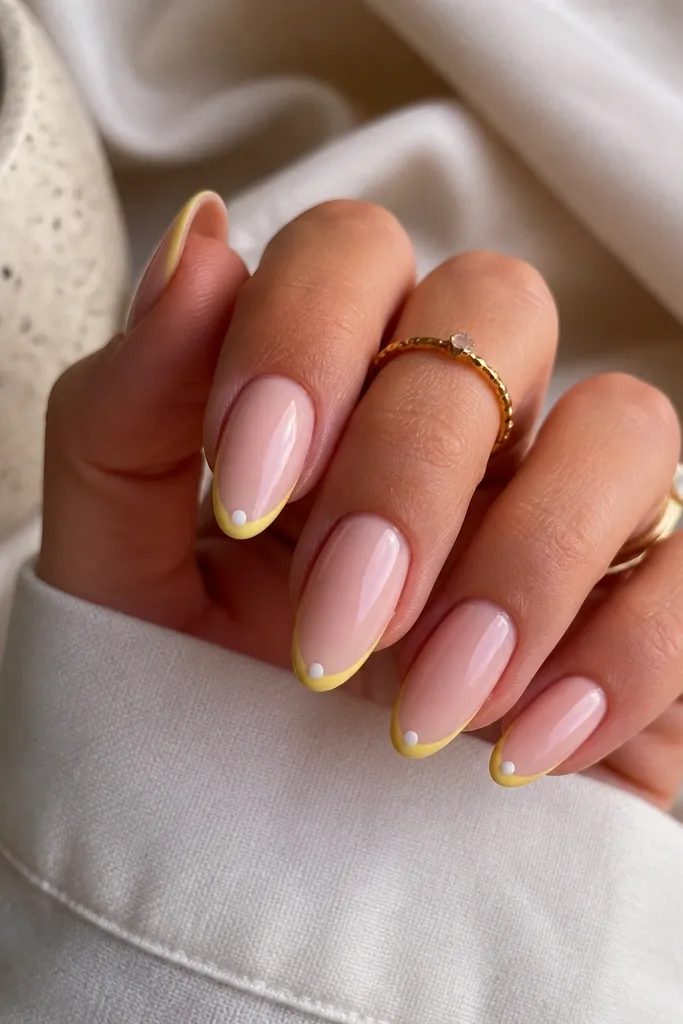
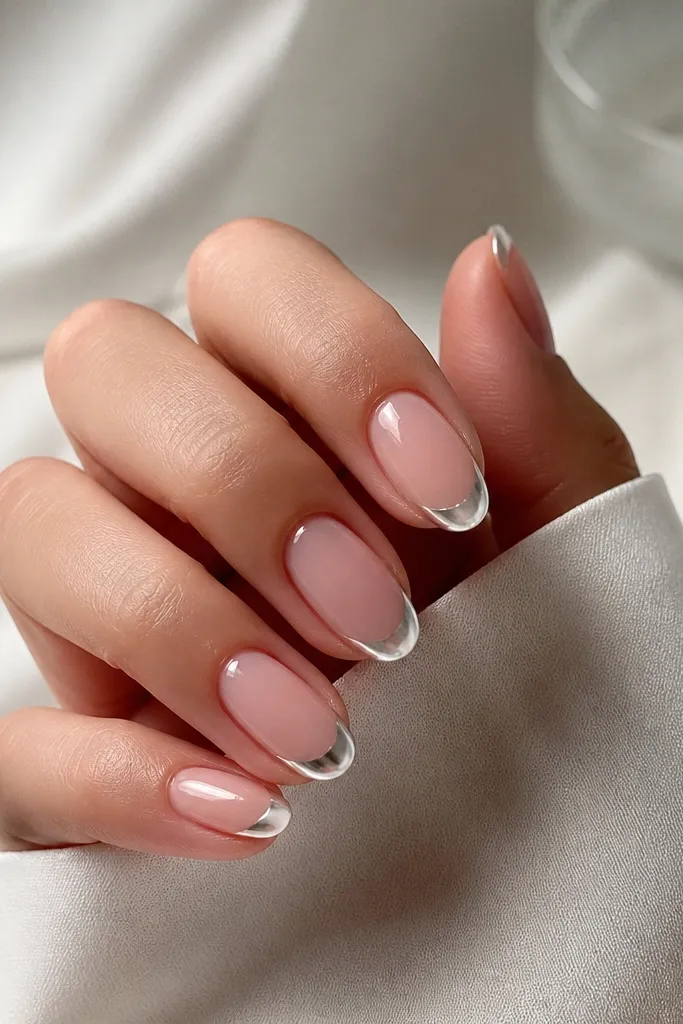
This is the summer almond design that looks like you did nail art even when you barely had time. The sheer pink base makes your skin tone look even and the lemon line pops without needing thick paint. I've worn this with both light and deep skin tones and it always reads fresh because the yellow stays thin and crisp. The micro-French also flatters shorter almond nails since the tip line is narrow and doesn't overpower the taper. It works best for daytime events, brunch, and any outfit where you want "clean cute" instead of loud.
Start with two thin coats of sheer pink (or a pink nude that matches your undertone). Place striping tape so it curves along the almond tip - you want the tape edge about 1 mm above the very tip. Paint a thin lemon yellow line, then remove the tape while the polish is still slightly tacky. Add white micro dots at the outer corners of the line on the ring finger only, then finish with a glossy top coat.
Editor's noteIf your yellow looks streaky, sponge it lightly on the tip area before you draw the line.
Watch outDon't make the French line too thick or it turns into a blocky sticker look.
2. Sea Glass Half-Moons
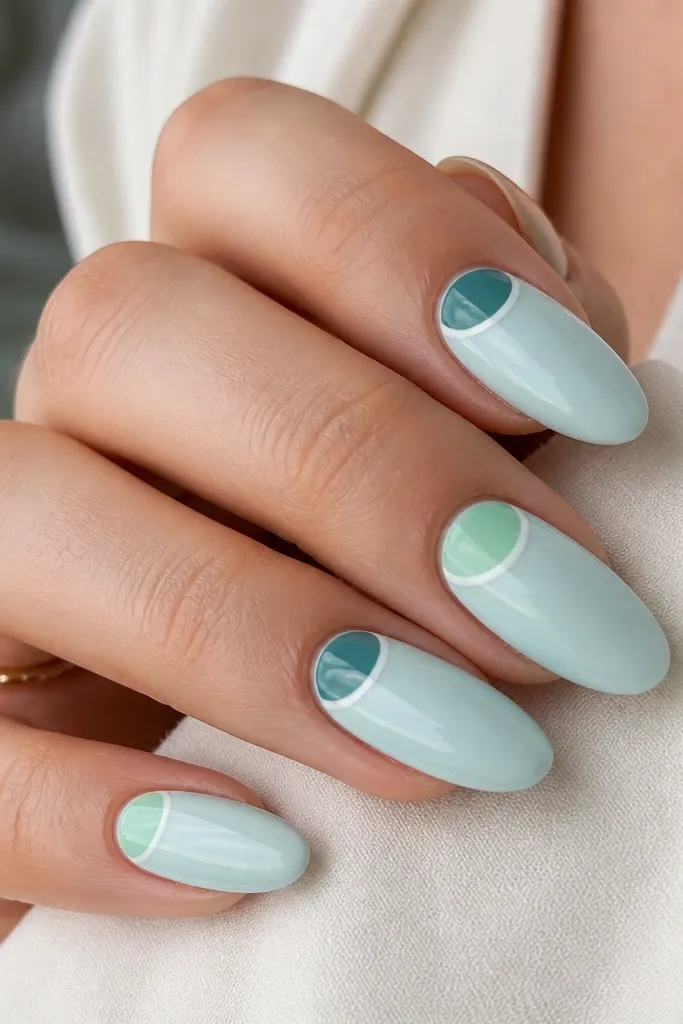
Half-moons at the cuticle look classy and summer-ready because they follow the almond curve. The sea glass palette - milky aqua, mint, and translucent teal - flatters warm and cool skin tones since the colors sit right where the nail meets your skin. I like this design for people who want nail art but hate tiny details; it's bold without being fussy. It also hides small cuticle imperfections because the shape frames the area cleanly. Wear it for beach trips, pool parties, and even office days when you want something softer than neon.
Begin with a milky aqua base, two thin coats. Use a small silicone sponge or a half-moon stencil to place the mint half-moon at the cuticle - keep it centered and about 2/3 the nail width. On the next nail, paint a translucent teal half-moon and add a thin white outline only on one side for contrast. Seal everything with a glossy top coat, then cure or dry fully before you touch anything.
Editor's noteFor a sharper half-moon edge, use a striping brush dipped lightly in acetone to clean the border after it dries.
Watch outSkip matte top coat on this one - matte makes the half-moon edges look fuzzy.
3. Watermelon Fade Ombre Tips
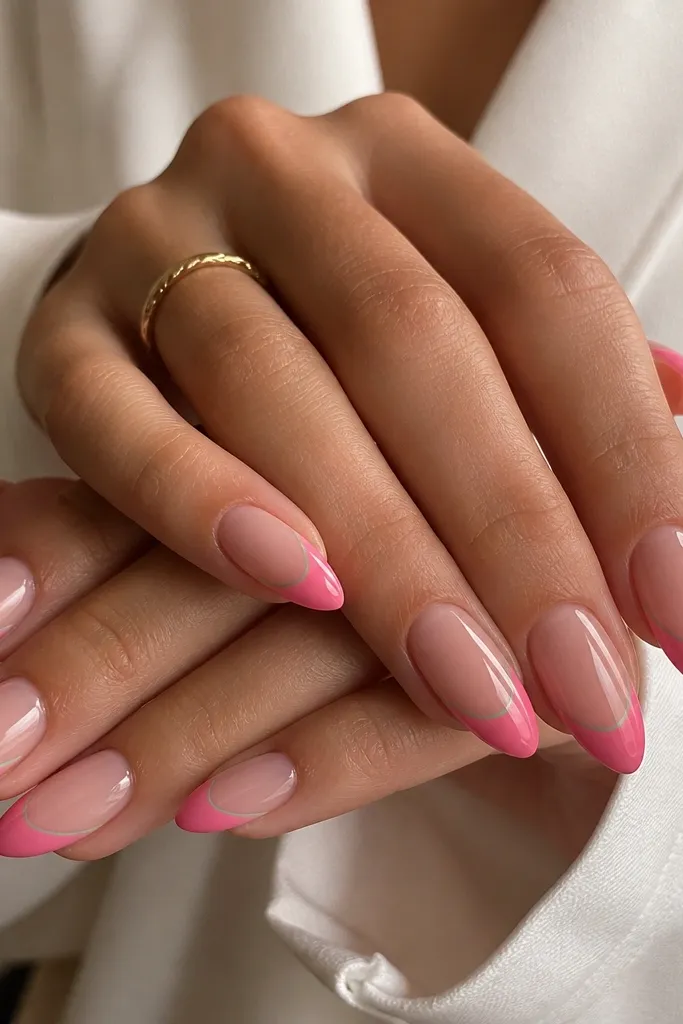
Watermelon ombre looks playful on almond nails because the taper makes the fade look intentional. The nude base keeps it wearable, and the bright pink at the tip reads like juicy fruit instead of bubblegum. I've worn this on fair, medium, and deeper skin tones; it always works because the pink is layered over a neutral base. The thin mint line adds that "real fruit" vibe without needing complicated art. This one is perfect for summer festivals, vacations, and any time you want your nails to match a bright outfit.
Paint a nude base in two coats and let it fully dry. Sponge on watermelon pink starting halfway down the nail, then fade it upward with a lighter touch - you want the darkest color at the tip. Add a thin mint green separator line just below the very tip on the middle and ring fingers. Finish with a tiny white curved highlight near the separator, then seal with glossy top coat.
Editor's noteUse a makeup sponge with minimal product - thick foam makes the fade look chalky.
Watch outDon't pull the ombre all the way to the cuticle or it loses the almond "tip focus" effect.
4. Tangerine Jelly Accent Nails
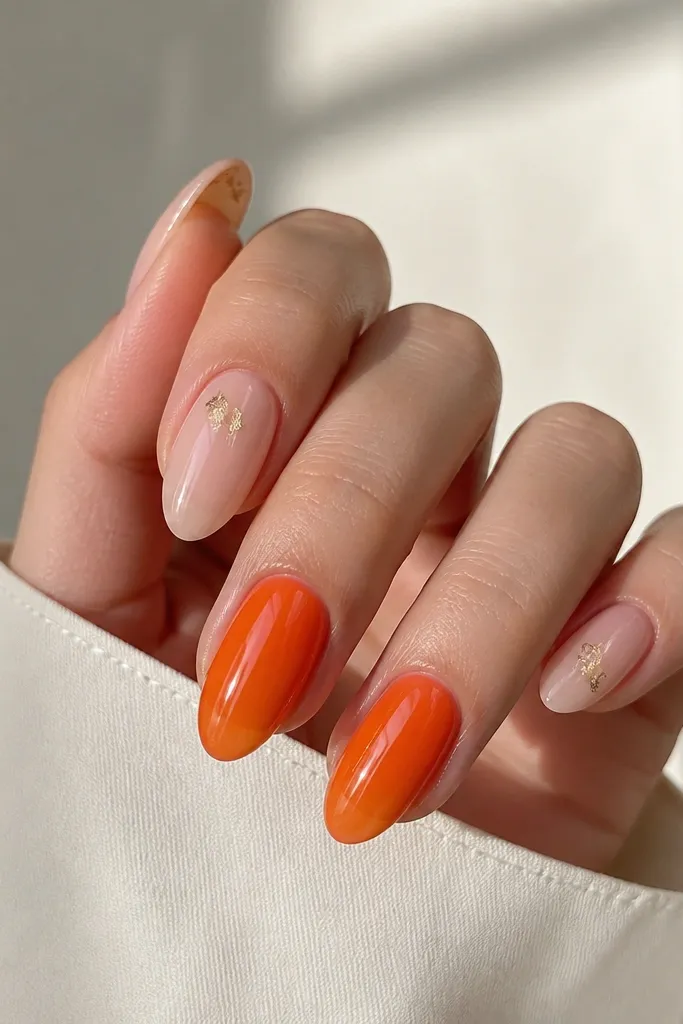
Jelly polish is the cheat code for affordable almond nails because it looks glossy and dimensional even with simple placement. Tangerine over a clear or sheer base gives that juicy summer glow that looks expensive in sunlight. This set is flattering because the jelly color doesn't block your nail bed - it enhances it. I like mixing two jelly accent nails with simpler neutrals to keep it from looking too busy. It works for weddings-in-the-summer, parties, and when you want something eye-catching but still "clean."
Paint all nails with a sheer nude base in two thin coats. On the index and ring fingers, layer a tangerine jelly polish - three thin coats look better than one thick coat so it doesn't pool. Add a single gold foil fleck near the tip on the other nails using tweezers, then press it gently. Finish with glossy top coat on every nail and wipe any foil texture with a cotton pad lightly dipped in alcohol after curing.
Editor's noteIf your jelly is streaky, do thin coats and keep a wet edge while you paint.
Watch outDon't skip top coat - jelly without it looks flat and can chip faster.
5. Nude Almond with Blueberry Dot Cluster
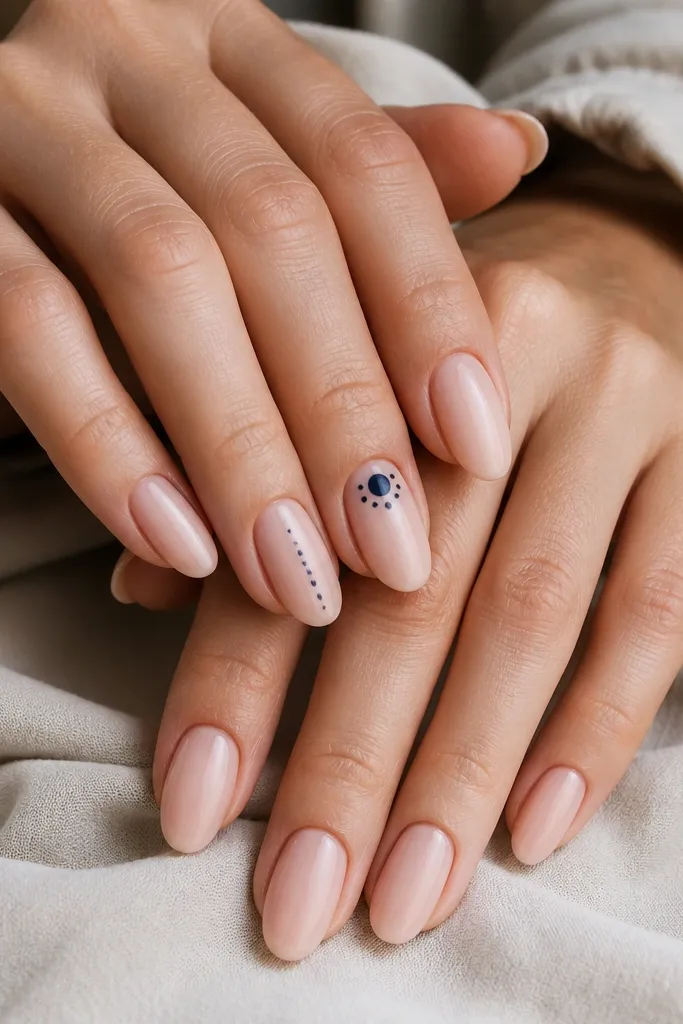
Dot clusters look cute on almond nails because they follow the nail's natural curve and don't require steady hand drawing. Deep purple dots on nude are flattering because they create contrast without turning the whole set neon. I've done this for friends with short almond tips and it still looks intentional because the dots are small and placed in a tight area. Keep the dots in the upper-middle third so the nail still looks long. This design suits casual summer days, picnics, and everyday wear.
Start with a sheer nude base and two coats. On the ring finger, place a larger deep purple dot first about 3 mm below the cuticle, then add 4-6 smaller dots around it in a loose cluster. On the middle finger, paint a short vertical row of three dots, spaced evenly. Use a thin liner brush to add two tiny highlights near the largest dot with white paint. Seal with glossy top coat.
Editor's noteFor perfect dot size, load the dotting tool lightly and wipe off excess before touching the nail.
Watch outDon't overload dots - if the cluster spreads too wide, it looks like smudges.
6. Strawberry Milk French Tips
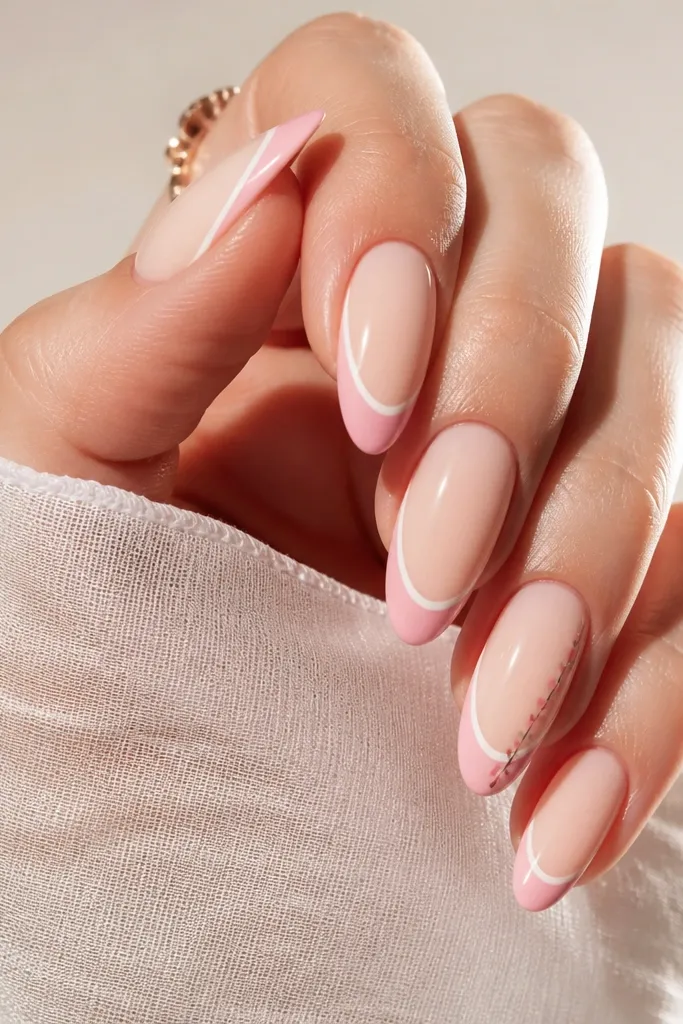
This French style looks like strawberry milk - soft, creamy, and sweet. The pale pink tip flatters all skin tones because it stays in the "skin-adjacent" family instead of harsh neon. The white inner curve adds dimension and makes the tip edge look clean even if your line isn't perfect. I recommend this if you want something romantic for summer dates or brunch. It also works with gold jewelry because the white curve catches light.
Apply two coats of creamy nude. Place striping tape at the tip and paint the strawberry pink French line - keep it narrow, about 2 mm wide. While it's still slightly tacky, remove tape and add a thin white inner curve with a liner brush just inside the pink edge. On the thumb or ring finger, add tiny seed dots using a dotting tool. Finish with a glossy top coat for the "milky" look.
Editor's noteIf your nude is too pink or too beige, adjust by mixing a drop of clear top coat into your nude so it looks creamy not chalky.
Watch outAvoid a thick white line - it makes the French look like nail art tape.
7. Chartreuse Lime Outline Nails
Outline nails look modern and graphic, and they're budget-friendly because you're painting thin lines, not full coverage. Chartreuse lime gives a summer pop that still works if you keep the base sheer. This design flatters hands because the outline guides the eye along the almond shape, making fingers look longer. I've worn this with both silver and gold rings; it looks crisp with silver because the lime feels brighter. It's great for concerts, weekend errands with bright outfits, and anyone who likes clean nail art.
Start with a sheer nude base in two coats. Using a thin liner brush, paint a chartreuse outline along the tip edge - stop at the point where the almond taper begins. Then add a short sidewall curve on each side, about 1-2 mm long, to create that "framed" look. On the index finger, skip the outline and paint a single lime dot centered on the tip. Seal with glossy top coat.
Editor's noteThin liner polish works better than thick gel for outlines - if it drags, your lines will wobble.
Watch outDon't cover the whole nail with lime; it loses the length-enhancing outline effect.
8. Pink Punch Jelly Skittle Set
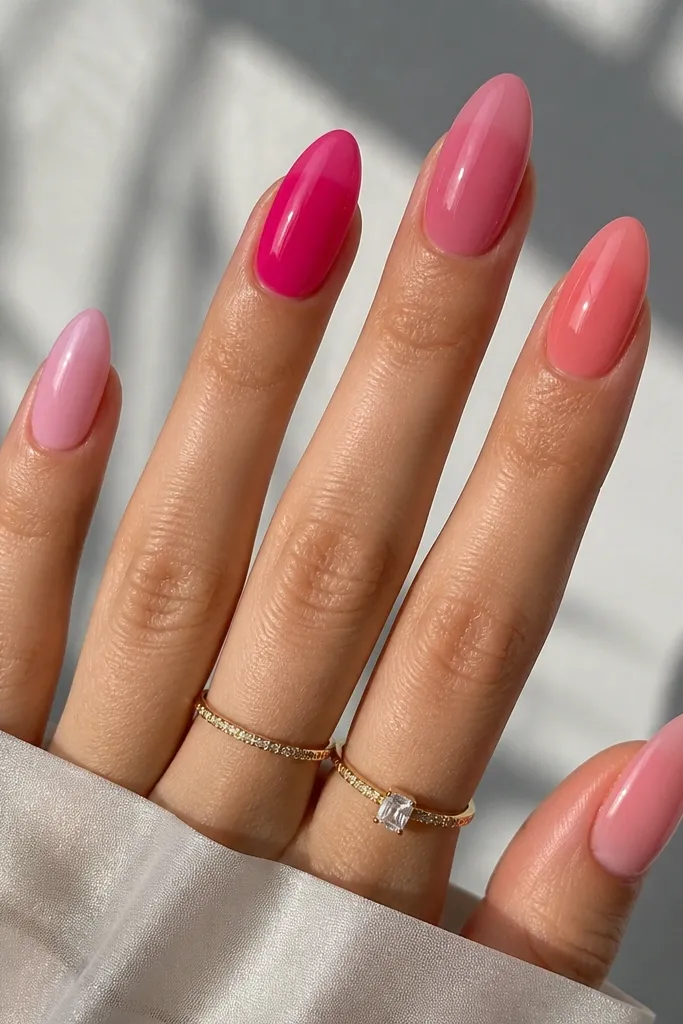
A skittle set is the easiest way to look like you planned your nails for summer without complex art. Jelly formulas make the shades look cohesive, because they blend visually instead of looking like separate painted blocks. The pink range flatters most skin tones by staying warm and bright while still letting your nail bed show through. Almond shape helps the colors feel "intentional" rather than childish. This is perfect for beach vacations and festivals where you want fun color but hate detailed nail art.
Prep nails and remove shine with a gentle buffer. Apply a sheer base coat to all nails. Then paint each nail with a different pink jelly polish in two to three thin coats - keep the color concentrated at the tip for a subtle fade. Make sure the last coat is even and glossy, especially near the sidewalls. Finish with a high-shine top coat and cure/dry fully.
Editor's noteChoose jelly shades that are all in the same brightness family so they look like one set, not five separate polishes.
Watch outSkip regular opaque polish for this one - it makes the set look heavy.
9. White Daisy Accent with Sunshine Tips
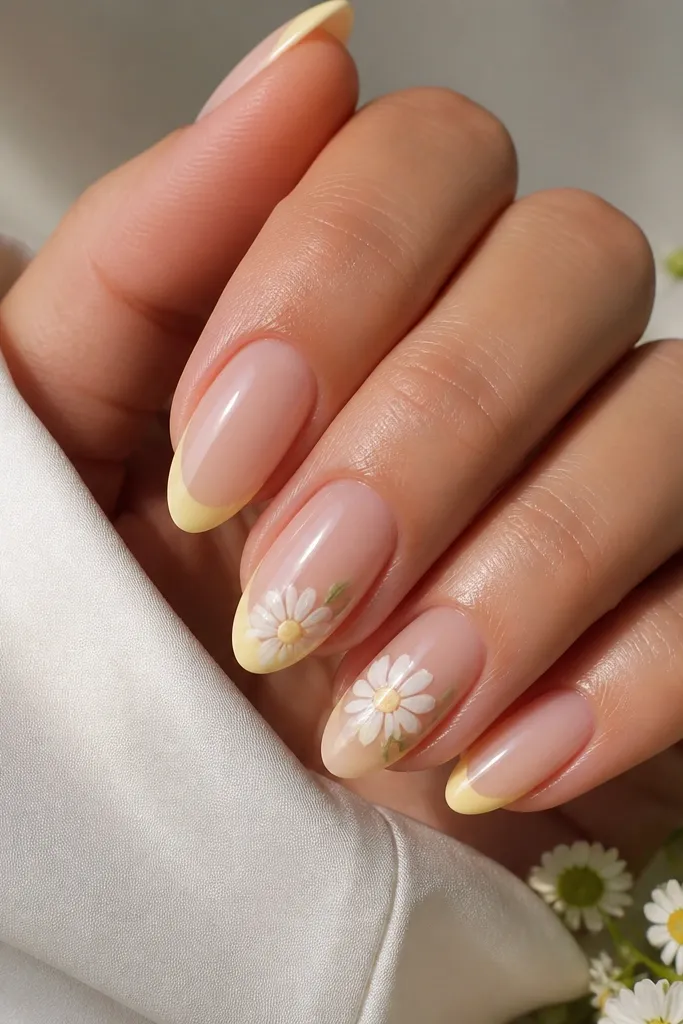
Daisies read summer instantly, and on almond nails they look neat because the petals sit well on the curved surface. The sunshine yellow tips keep the set fresh even if you only do daisies on one or two nails. I've found that small daisies look more expensive than big ones because they don't crowd the almond taper. This design flatters hands because the white petals brighten your nails and the yellow tips make your fingers look warmer. It fits everything from casual brunch to a summer wedding guest look.
Paint a nude base in two coats and add a soft yellow tip using a sponge or a thin brush. Keep the yellow tip about 2-3 mm wide and blend it lightly upward. On the accent nail, paint a yellow circle center, then add 6 white petals using the dotting tool: touch, pull slightly outward, repeat. Add two tiny green leaf strokes near the bottom of the daisy with a liner brush. Seal with glossy top coat.
Editor's noteIf petals look uneven, paint them in pairs - left and right - so the symmetry lands faster.
Watch outDon't make the daisies too close to the cuticle or they look like stickers.
10. Tropical Palm Line Art
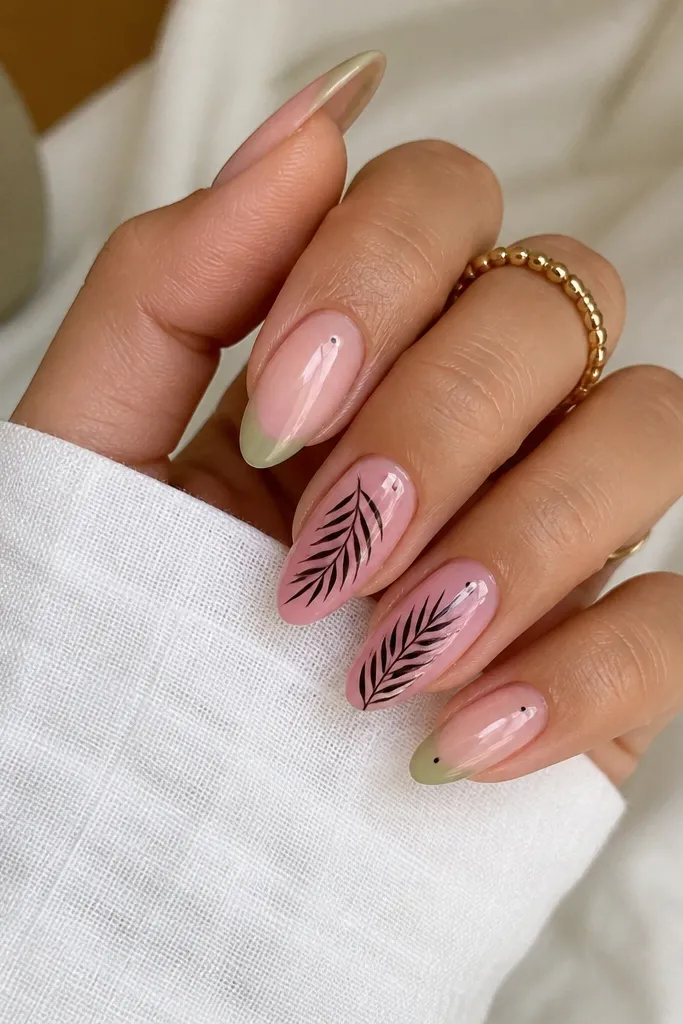
Line art looks crisp on almond nails because the shape gives the design room to stretch. A sheer pink base keeps it wearable, and black line art makes the palm fronds look graphic instead of messy. I like pairing black with a hint of green at the tip because it ties the whole set together in summer light. This design flatters shorter almond nails because the lines draw the eye lengthwise. It's a great pick for someone who wants tropical without loud neon.
Start with a sheer pink base and let it dry fully. Paint a very thin green wash at the tip on the middle and thumb fingers - keep it subtle and fade it upward. On the ring finger and index finger, use a thin liner brush to draw palm frond lines: start at the base, then fan out 6-8 lines with slight curves. Add a small curved trunk line in the center. Top coat glossy to keep the lines smooth.
Editor's notePractice one palm frond on a paper towel first - the brush pressure is the difference between elegant and wobbly.
Watch outAvoid thick black paint; it will look like marker, not line art.
11. Coral Sunset Gradient with Micro Stars
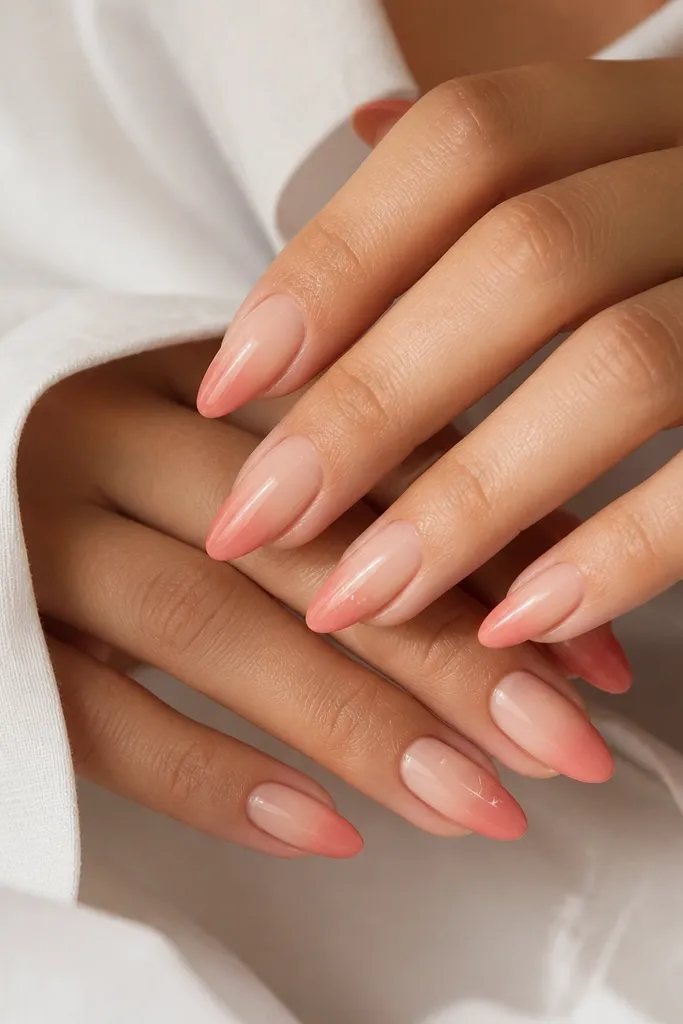
Sunset gradients look expensive on almond nails because the taper makes the fade feel smooth. Coral is flattering on most undertones, especially if you keep the base nude so it doesn't overpower your skin. Micro stars add a playful detail without turning the set into full-on nail art. I've worn this for evening dinners where you want something that looks good in photos but isn't too busy. The key is the star placement: small, near the upper third, not scattered everywhere.
Apply nude base and two coats. Sponge coral-peach color starting at the tip and fade it upward in one smooth pass; wipe the sponge edge lightly if it gets too dark. Add a second layer of lighter peach in the middle to blend. On the ring finger and pinky, dot tiny white stars: one star is 4 short lines around a center dot. Seal with glossy top coat, then clean any stray gel at the edges.
Editor's noteUse a small amount of coral and build it - overloading makes sponge gradients look muddy.
Watch outDon't add stars on every nail; it turns the set from "photo-ready" to "busy."
12. Gold Foil Confetti Almonds
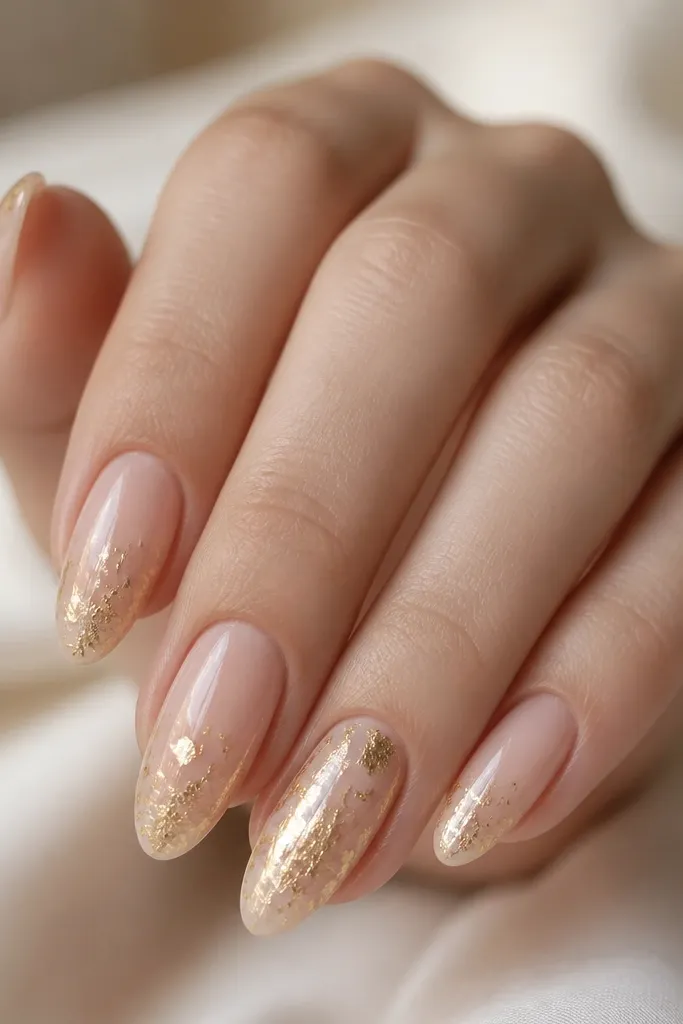
Gold foil confetti is one of those designs that always looks like you paid more. It's also forgiving because foil hides tiny brush strokes and uneven base application. The nude base keeps it wearable, and foil near the tip makes the almond shape look sharper. I've used this for nights out and it looks great under warm lighting, like restaurants with amber bulbs. It flatters hands because the nude prevents the foil from overwhelming your nail bed.
Paint a sheer nude base in two coats. Dab small pieces of gold foil near the tip using a foil transfer tool or tweezers, then press gently with a silicone tool. Add more foil on the ring finger so it becomes the focal point. If you want extra shine, add a thin layer of clear gel over the foil, cure, and then apply top coat across the whole nail. Keep foil pieces mostly in the middle-to-tip area.
Editor's noteUse a matte top coat over the foil only if you want a softer glow; glossy is the easiest for budget-friendly shine.
Watch outDon't pack foil right up to the cuticle - it looks messy and can lift.
13. Sky Blue Micro Dots with Clear Line
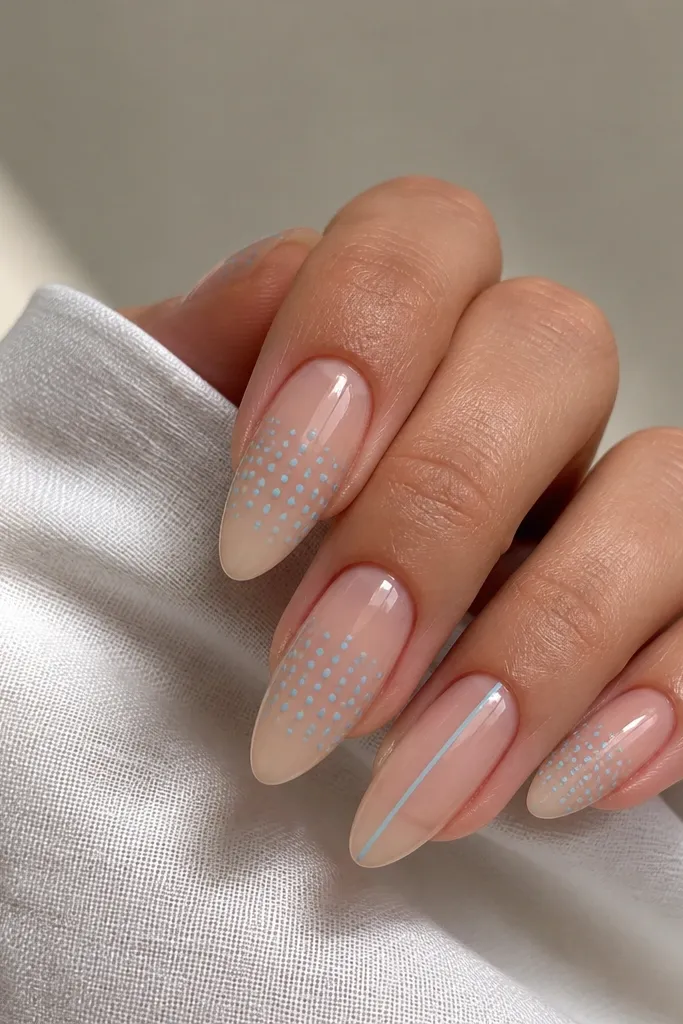
This is the "clean nail art" look that still feels special. The clear or sheer base makes it airy, and sky blue dots create a summer vibe without heavy coverage. I like it on almond nails because the middle-third dot placement keeps the nail length looking longer. It flatters hands with short nail beds because you're not blocking the cuticle area with color. This one works for workdays and casual weekends where you want something light.
Start with a clear base coat and one thin layer of sheer nude if you need coverage. Paint a sky-blue dot row pattern across the middle third: use a dotting tool and space dots evenly from sidewall to sidewall. On the accent nail, draw a single thin sky-blue vertical line down the center instead of dots. Add a second dot layer only if you want stronger color, then seal with glossy top coat.
Editor's noteIf dots smear, wait until the base is tack-free, then dot - not while it's wet.
Watch outDon't put dense dots at the tip - it makes the almond look shorter.
14. Peachy Nude Marble Swirl
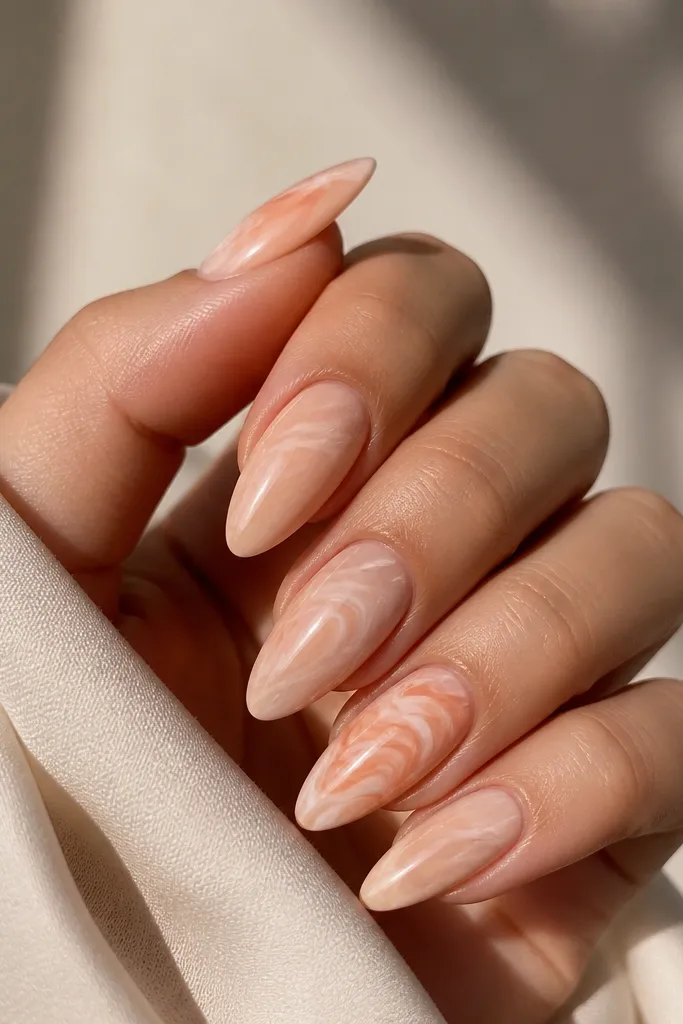
Marble nails look high-end but you can do them with the right colors and a light hand. Peachy nude marble flatters because it blends into your skin tone instead of creating a harsh block. The soft white swirls make the almond shape look dimensional and smooth. I've done marble with both gel and regular polish; gel gives cleaner movement and fewer streaks. This design is great for summer evenings and any time you want a "designer" look without rhinestones.
Start with a nude peach base, two coats. Add a few drops of white polish and a slightly darker peach on a plastic palette or glossy paper. Use a thin liner brush or toothpick to drag white and peach into loose swirls across the nail - keep it subtle and let the base show through. On one accent nail, repeat with more white for contrast. Finish with glossy top coat and cure/dry fully.
Editor's noteUse a damp brush tip to soften edges - it makes the marble look blended, not stamped.
Watch outDon't overwork the swirls; too many passes turn marble into muddy stripes.
15. Mint and Pink Candy Stripe Almond Tips
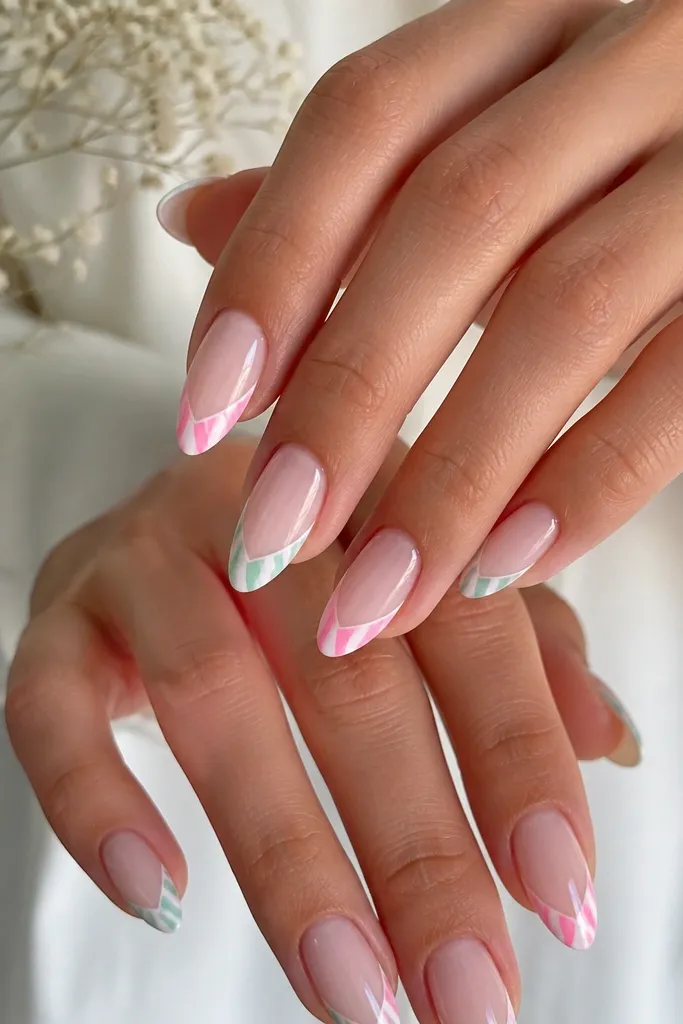
Candy stripes on almond nails look fun but still tidy when the stripes are narrow and placed only on the tip. Mint and pink together feel like a summer treat, and the sheer base keeps it from looking like costume nails. I've found diagonal stripes look better on almond than straight horizontal lines because they follow the taper. This set flatters all skin tones because the colors are bright but balanced by transparency. It's a great choice for birthdays, beach days, and cute outfit moments.
Paint a sheer base in two coats. Tape diagonal stripes on the top third of the nail using thin striping tape - alternate tape bands for mint and pink. Paint mint on one band and bubblegum pink on the next, then remove tape carefully after the paint is just set. Add a thin white outline around the striped tip area using a liner brush to make it crisp. Top coat glossy to seal everything smoothly.
Editor's notePress tape down firmly at the sidewalls so color doesn't bleed under.
Watch outSkip thick tape lines; they make the stripes look chunky.
16. Chocolate Brown Gloss with Pink Foil Edge
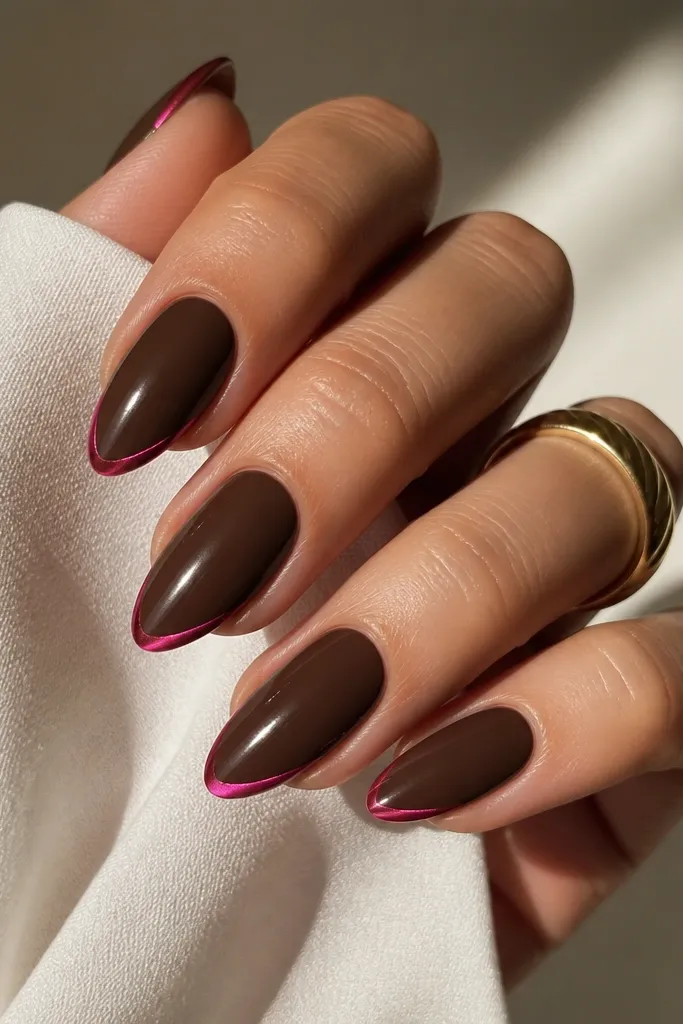
This is a summer-appropriate twist because it pairs a deep neutral with a bright pop. Chocolate brown flatters hands because it makes fingers look slimmer, and the hot pink foil edge adds that "sunset dessert" energy. I like it for medium to deep skin tones because the brown looks grounded and the pink looks electric. It also works with gold jewelry because foil catches light sharply. This design is perfect for evenings, rooftop dinners, and when you want something different from typical pastels.
Apply two coats of glossy chocolate brown to all nails. On each nail, place a small piece of striping tape along the tip curve to create a thin edge band. Press hot pink foil into the taped band area, then remove tape carefully. Add extra foil only on the ring finger for focal impact. Seal with a glossy top coat, and run the brush along the tip edge for a smooth finish.
Editor's noteIf foil is stubborn, dab a tiny amount of clear tack gel under it before pressing the foil down.
Watch outDon't paint over foil before top coat - it can dull the shine.
17. Rose Quartz Drip Tips
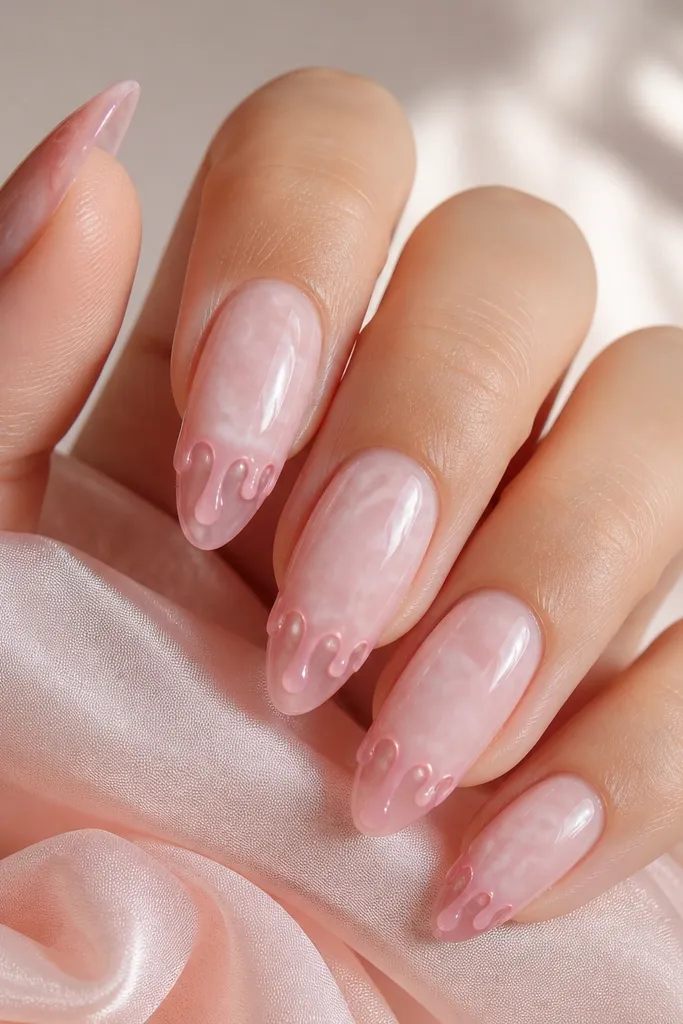
Drip tips look bold, but rose quartz keeps them soft and wearable for summer. The sheer pink base makes your nails look healthy, while the glossy drip adds a "wet" shine that photographs really well. I've seen this work on short almond too because the drip only sits at the tip, not down the nail bed. It flatters people who want a little drama without full nail art coverage. Wear it for concerts, night markets, and any date where you want your hands to look interesting.
Start with a sheer pink base and two thin coats. Add faint rose quartz marbling by using a very light mauve and white swirl - keep it thin and let the base show through. On the tips, apply a thicker glossy pink gel or polish and pull it downward slightly with a brush so it forms a few drips. Do two drips per nail max to keep it clean. Cure/dry fully, then seal with glossy top coat.
Editor's noteUse gel if you can - it's easier to control drips and keeps the shine even after curing.
Watch outDon't make drips too long; on almond shape they can cross the sweet spot and look messy.
18. Sea Salt Nude with White Wavy Lines
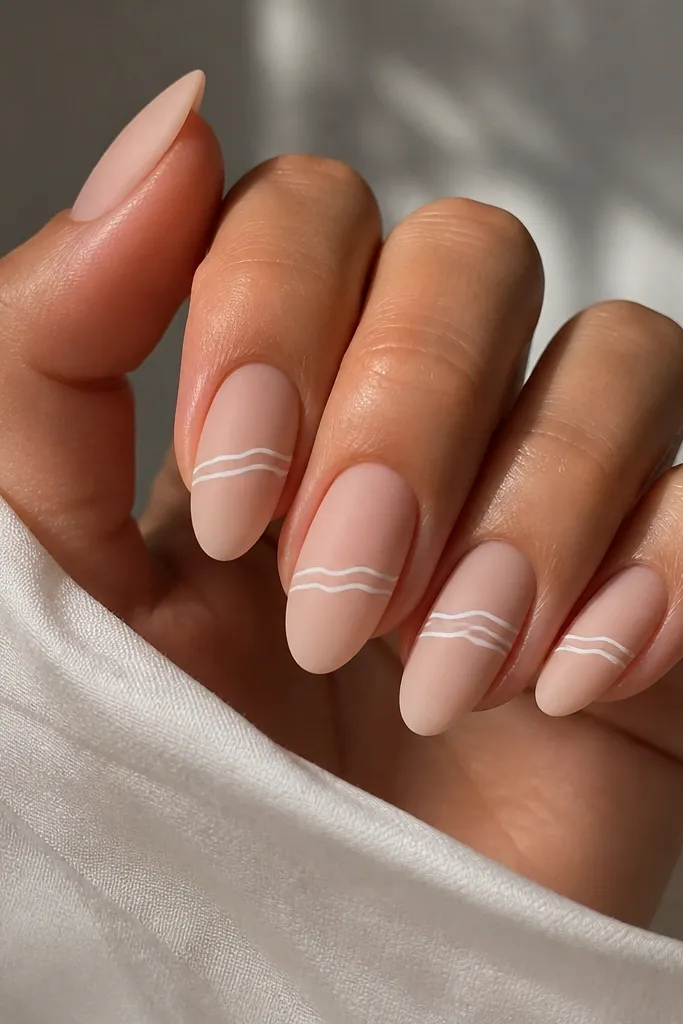
This design looks like sea salt on skin - soft, textured, and summery. A nude base keeps it flattering, and matte or satin finish makes the white lines look crisp without needing thick paint. Wavy lines are forgiving because they hide tiny brush imperfections, and the almond curve makes the waves look natural. I like this for daytime because it doesn't scream neon, but it still looks stylish. It's also a good pick if you want something that works with both casual and dressy outfits.
Paint a nude base and choose matte or satin top coat if you want the sea-salt feel. With a thin liner brush, draw one horizontal wavy line across the middle third of each nail. On the ring finger, add a second wavy line above it, spaced about 2-3 mm apart. Keep the waves light and airy - you should still see the nude base through the design. Finish with a matte top coat to lock it in.
Editor's noteIf lines look shaky, use a piece of tape as a guide for the wave baseline, then remove it after painting.
Watch outAvoid glossy top coat - it makes thin white lines look like they are floating or smudged.
19. Coral Flower Petal Accent
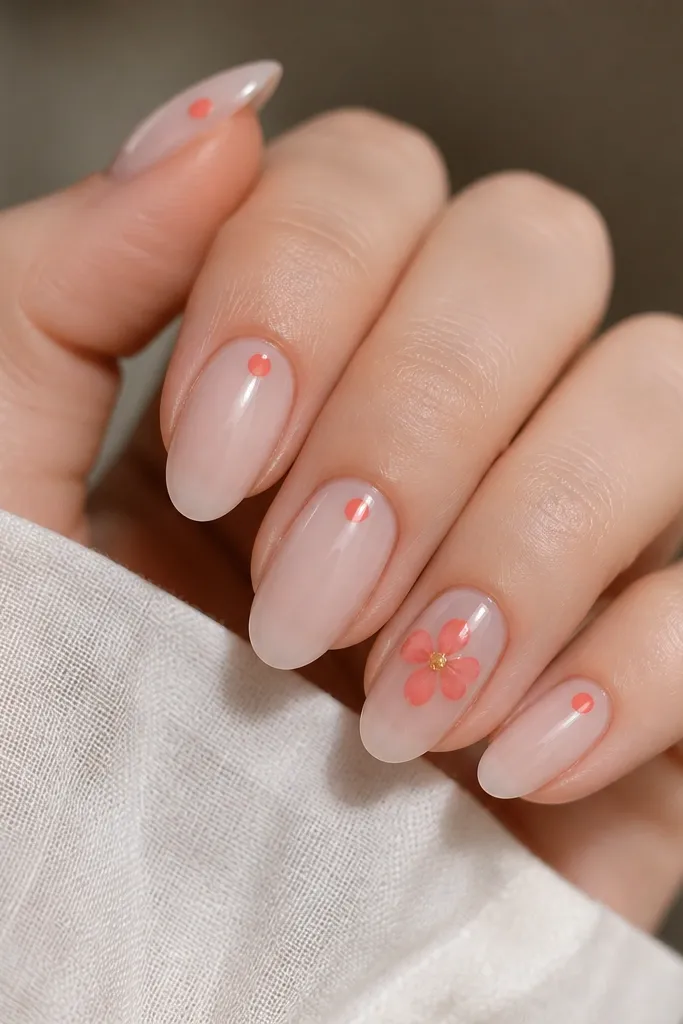
A single flower accent is my favorite budget look because it gives you one "wow" nail and keeps the rest clean. Coral flowers feel summery without being neon, and the yellow center makes the whole design pop in sunlight. Almond nails are perfect for flower accents because the nail's curve makes petals look naturally rounded. This set flatters hands because the nude base makes the flower look intentional, not heavy. It's a great match for floral dresses, sundresses, and summer weekends.
Apply a sheer nude base to all nails and let it dry. On the ring finger, paint a small yellow dot center, then add five coral petals around it using the dotting tool: touch, lift, and repeat for each petal. Add two tiny green leaf strokes beneath the flower with a liner brush. On the other nails, place one coral dot near the tip - about 2 mm from the edge. Seal with glossy top coat.
Editor's noteUse a slightly translucent coral for petals so they look soft, not painted on thick.
Watch outDon't put flowers on every nail; it kills the clean almond vibe.
20. Sunset Orange Cuticle Glow
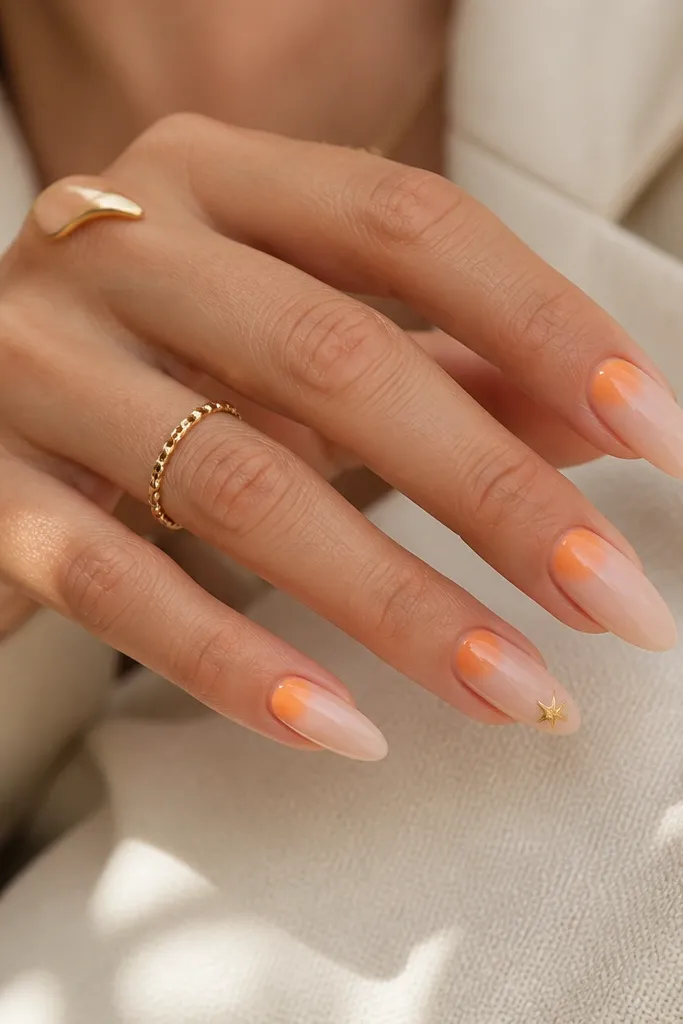
Cuticle glow designs look expensive because they create a gradient that looks like light, not paint. Orange near the cuticle flatters your nail bed and makes your hands look warm and healthy. I've used this with nude bases from pink-beige to deeper caramel tones, and it always looks cohesive because the orange fades out gently. Almond shape helps because the glow wraps naturally around the taper. This is great for daily wear when you want "pretty nails" without obvious nail art lines.
Start with a nude base in two coats. Use a small makeup sponge to apply sunset orange starting at the cuticle and blending outward about halfway down the nail. Keep it soft so you don't create harsh edges - dab and blend, don't drag. Add a tiny gold star on the ring finger near the tip using gold polish or foil. Finish with glossy top coat to make the gradient look smooth.
Editor's noteFor a cleaner glow, wipe the brush with acetone and blend at the edge only - it sharpens the fade.
Watch outDon't bring the orange all the way to the tip; it stops the glow from looking intentional.