1. Tangerine Jelly Base with White Micro Dots
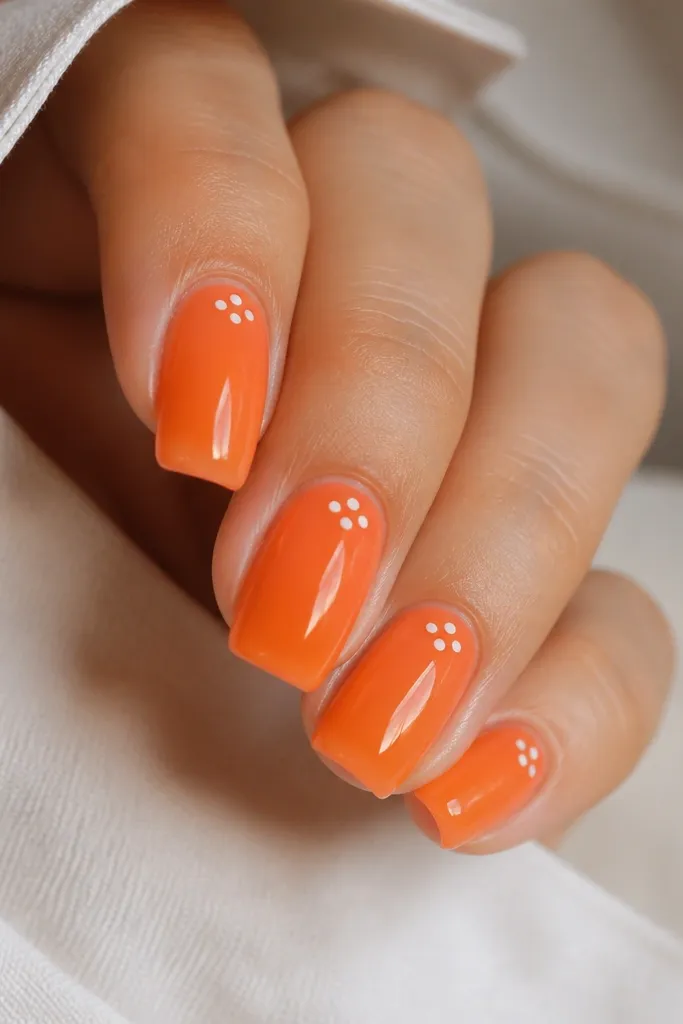
Start with a sheer tangerine jelly orange base so the nail looks juicy without turning opaque and heavy. White micro dots look crisp on square tips because the flat top gives the dots a clean stage. This set flatters warm skin tones and fair skin with peachy undertones because orange and white brighten the whole hand. Keep the dots small (like a pinhead) and place them higher toward the cuticle so the nail looks longer.
File and prep your nails, then apply two thin coats of the tangerine jelly color, curing between coats. With a dotting tool or the end of a bobby pin, add 6-10 tiny white dots in a half-moon arc starting 1 mm from the cuticle. Leave the outer third of the nail mostly blank so the design stays light. Finish with a glossy top coat, pressing extra at the square edge so the dots don’t catch on fabric.
Editor's noteIf the jelly base is streaky, do three thinner coats instead of two thick ones. It stays more even on square tips.
Watch outAvoid oversized dots — big circles make square nails look chunky in Summer light.
2. Sky Blue Half-Moon French
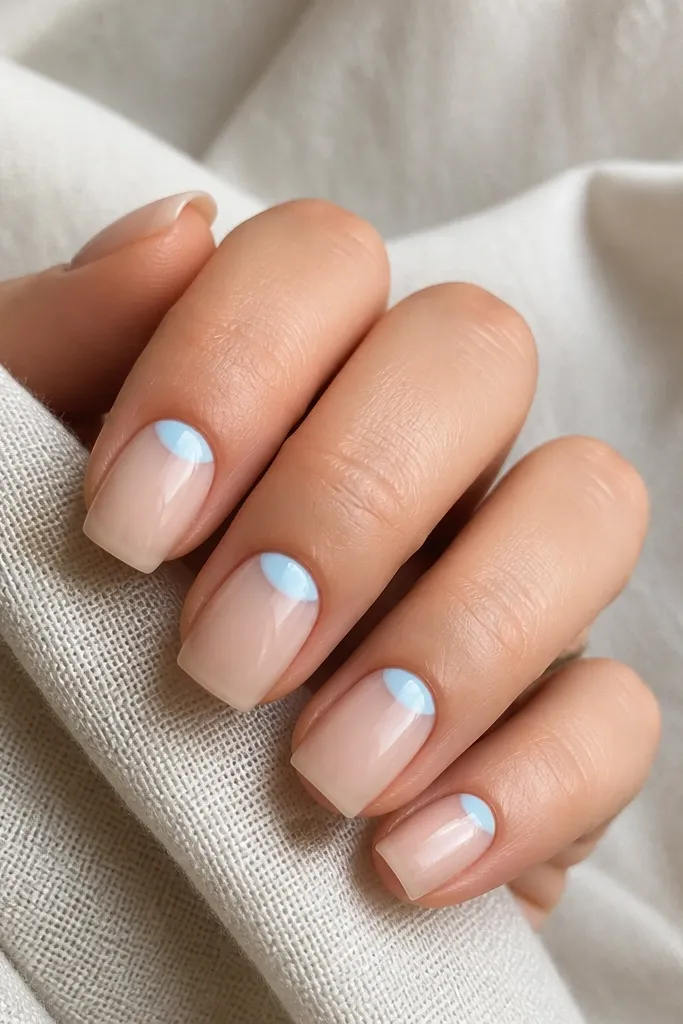
A half-moon French is the cleanest way to get a Summer pop while keeping your nails wearable. The sky-blue shape at the cuticle makes your fingers look fresher because it frames your nail bed. This design looks great on neutral skin tones too, because the nude base keeps it soft and the blue stays bright. On square nails, the straight edge of the half-moon lines up with the nail shape and looks intentional.
Apply a sheer nude base and cure. Use a small striping brush to paint a sky-blue half-moon that touches the sidewalls but leaves a 0.5 mm gap from the cuticle line for a smoother edge. Add a second coat only on the blue shape if you see thin spots. Seal with a high-gloss top coat and wipe the square corners gently with acetone on a cotton bud so no polish smears onto skin.
Editor's noteUse a flexible silicone half-moon stencil if your hand shakes. Peel it off right after painting the blue layer, not after curing.
Watch outDon’t let the blue flood the cuticle — it lifts faster and looks messy.
3. Lime Green Micro French with Nude Center
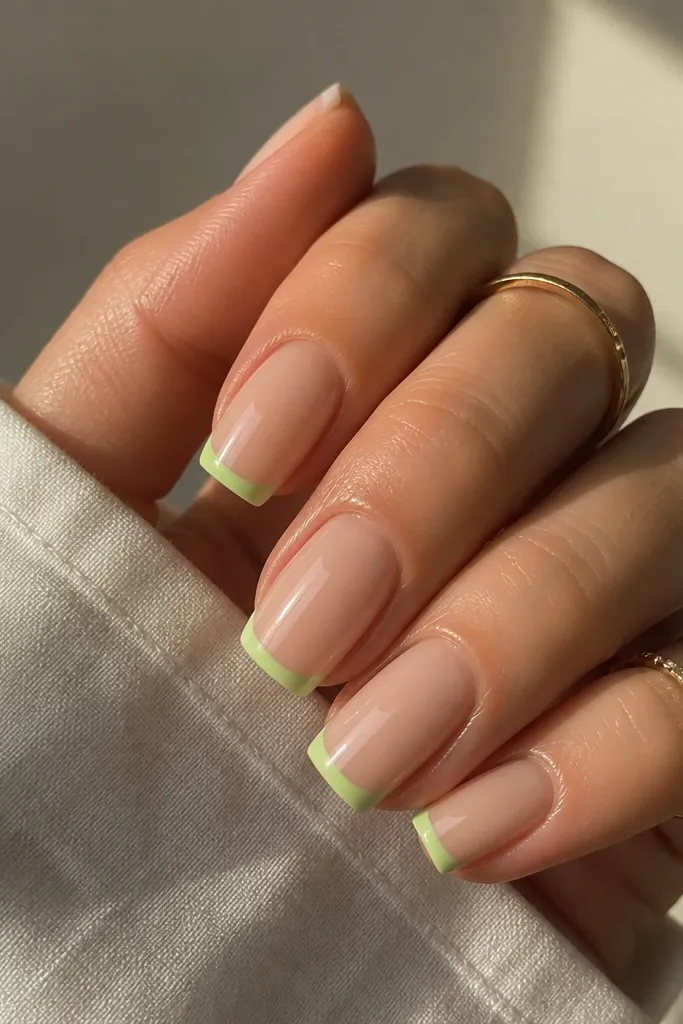
Micro French is my go-to when I want bright Summer nails without full coverage. Lime green at the very tip makes the square edge look sharp and clean, and the nude center keeps it from looking too loud. This works for all skin tones — cool greens look especially good on pink undertones, while lime still pops on deeper tones. Square tips make the micro line look straight, so the design reads polished even with minimal art.
Start with a nude sheer base and cure. With a liner brush, paint a thin lime-green stripe along the free edge, keeping it parallel to the square top. Then add a tiny second pass only at the corners so the line reaches the sidewalls. Finish with top coat, and run the brush once along the nail edge to lock the pigment in place.
Editor's noteIf lime looks too neon, mix it with a drop of white gel on a palette for a softer Spring-lime tone.
Watch outAvoid thick French lines — they make the square tip look heavy.
4. Watermelon Base with White "Seed" Confetti
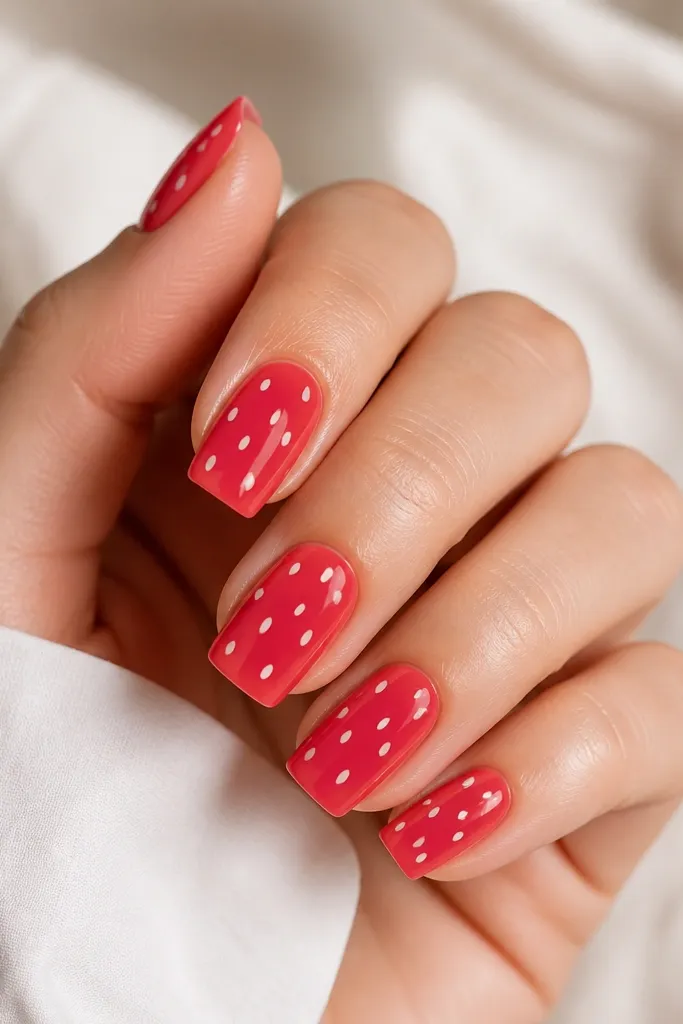
Watermelon nails look bright because you get two color signals — pink and white — without needing complex art. The square shape helps the seeds stay readable; flat tops make the seed dots look deliberate rather than smudged. This set flatters light to medium skin tones and also looks amazing on darker skin when the pink is vivid and not dusty. Keep the watermelon pink opaque enough to cover nail color under it so the seeds contrast cleanly.
Apply two coats of watermelon pink (slightly warm red) and cure fully. Use a dotting tool to place tiny white teardrops or short oval seeds — aim for 8-12 per nail, clustered more near the top half. Add one or two seeds closer to the sides so the pattern doesn’t look too centered. Seal with a thick glossy top coat so the seeds don’t feel raised.
Editor's noteFor faster seeds, use a stamping plate with seed-like motifs and then hand-pick the best placement on each nail.
Watch outDon’t put seeds all the way to the cuticle — it crowds the nail and makes it look smaller.
5. Coral + Cream Diagonal Ribbon
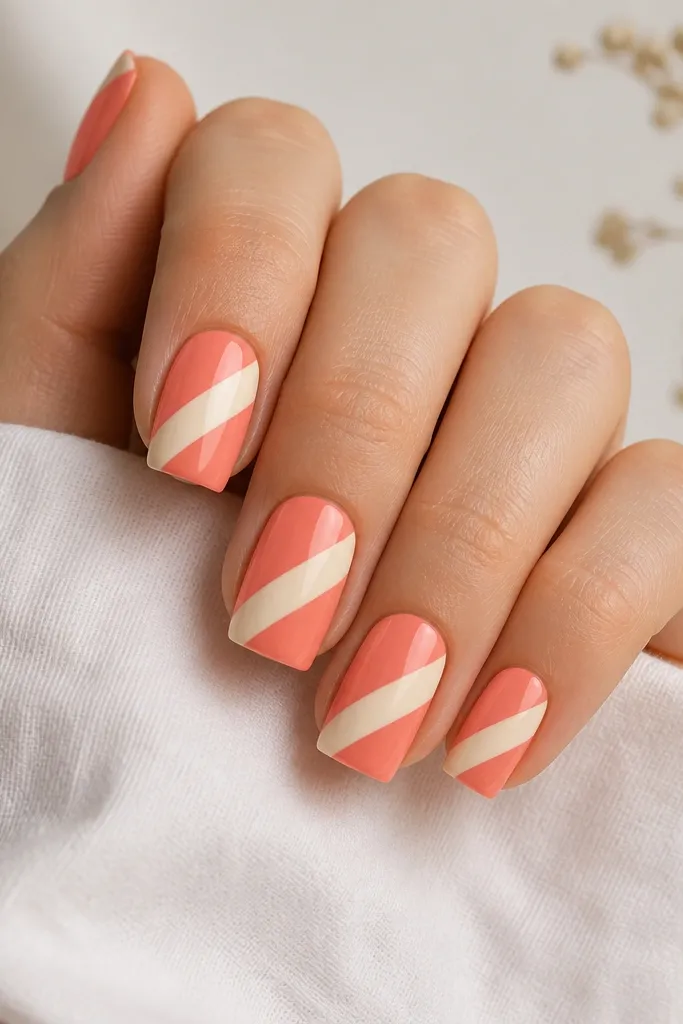
Diagonal ribbon art makes square nails look longer because it creates a slanted visual line across the flat top. Coral plus cream reads Summer immediately, and the cream ribbon keeps it from feeling too intense. This style looks good on hands with shorter nail beds because the diagonal line pulls the eye upward. Square nails also handle diagonal stripes well since the corners give the stripe a clean stop point.
Paint a coral base in two thin coats, cure between layers. Place a strip of nail tape diagonally from about 2 mm above the cuticle down toward the lower sidewall, then paint cream gel inside the tape area. Remove the tape while the gel is still uncured or right after curing the cream stripe if you used a gel tape-friendly method. Clean the edges with a brush dipped in cleanser, then top coat.
If your diagonal line wobbles, redo it on one nail first. Once the angle feels right, match the rest.
Skip freehand stripes when you’re tired — crooked diagonals look cheap on square tips.
6. Pastel Rainbow Tips (Five-Color Gradient)
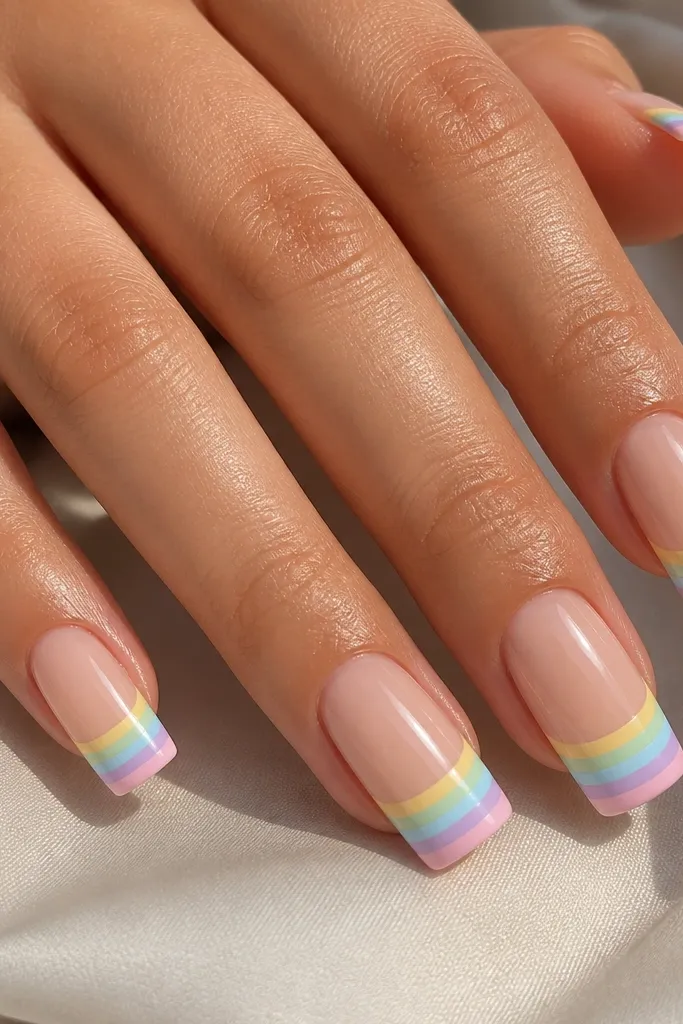
Rainbow tips look bright but still soft when you use pastels instead of neon. The square free edge is perfect for banding because each color can sit on a straight edge without blending into a muddy puddle. This design flatters cooler skin tones because pastels read airy, and it also works on warm tones if your pastels lean peachy-lavender rather than icy. It’s also great for events because it looks “done” even when your hand moves.
Start with a nude sheer base and cure. Sponge-paint or brush-paint bands across the top third of the nail — pale yellow first, then mint, then light blue, then lavender, then soft pink — each band about 1-2 mm tall. Use a makeup sponge with minimal product so the bands stay crisp. Clean up the edges with a thin brush, cure, then seal with glossy top coat.
Editor's noteDo one test nail to dial in band thickness. Thin bands look more modern on square shapes.
Watch outDon’t blend the bands too much. Soft smudging makes it look like a watercolor accident.
7. Neon Pink Gloss with Thin Black Side Lines
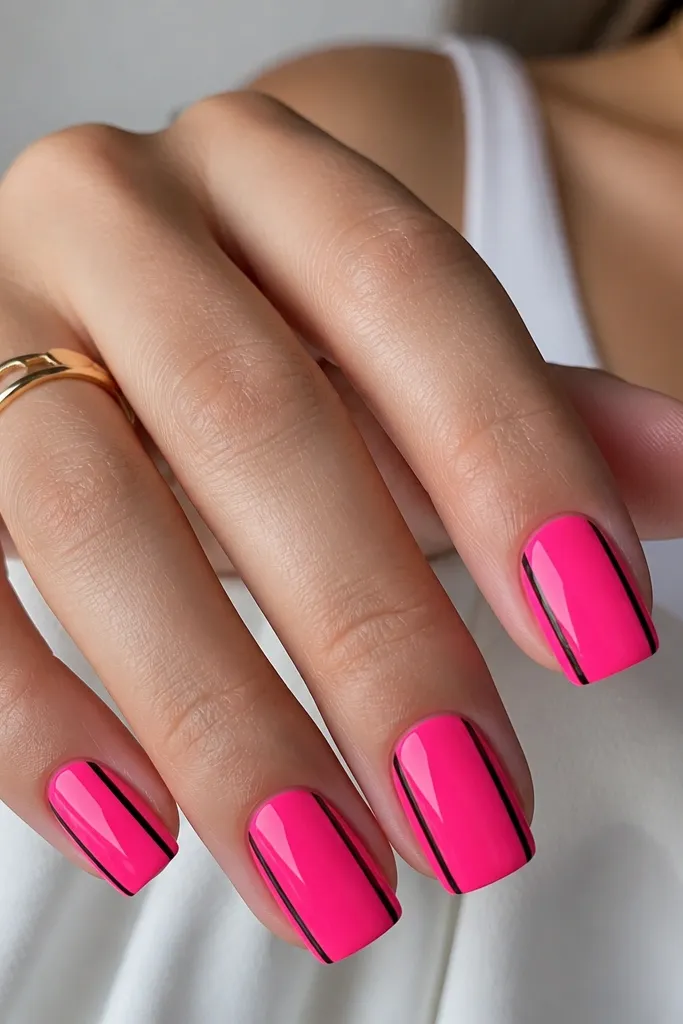
This is the “bright and stylish” combo: neon pink plus thin black lines. The black lines create a frame effect, which makes the nail look narrower and longer on square tips. I’ve worn this to hot-weather dinners and it still looks sharp under harsh indoor lighting because the top coat is mirror-gloss. It suits fair to deep skin tones — just keep the neon pink clean and opaque so it doesn’t turn patchy.
Apply two coats of neon pink gel, cure, and check for any streaks. With a fine liner brush, paint one black line 1 mm from the sidewall on the left and the same spacing on the right. Keep the lines straight from near the cuticle to just before the free edge. Cure and finish with top coat, making sure you cover the line edges so they don’t snag.
Editor's noteUse tape as a guide: stick a thin strip along the sidewall spacing, paint the line, then pull the tape immediately.
Watch outDon’t draw thick black borders — it turns into a heavy frame and loses the Summer pop.
8. Turquoise Marble with White Vein
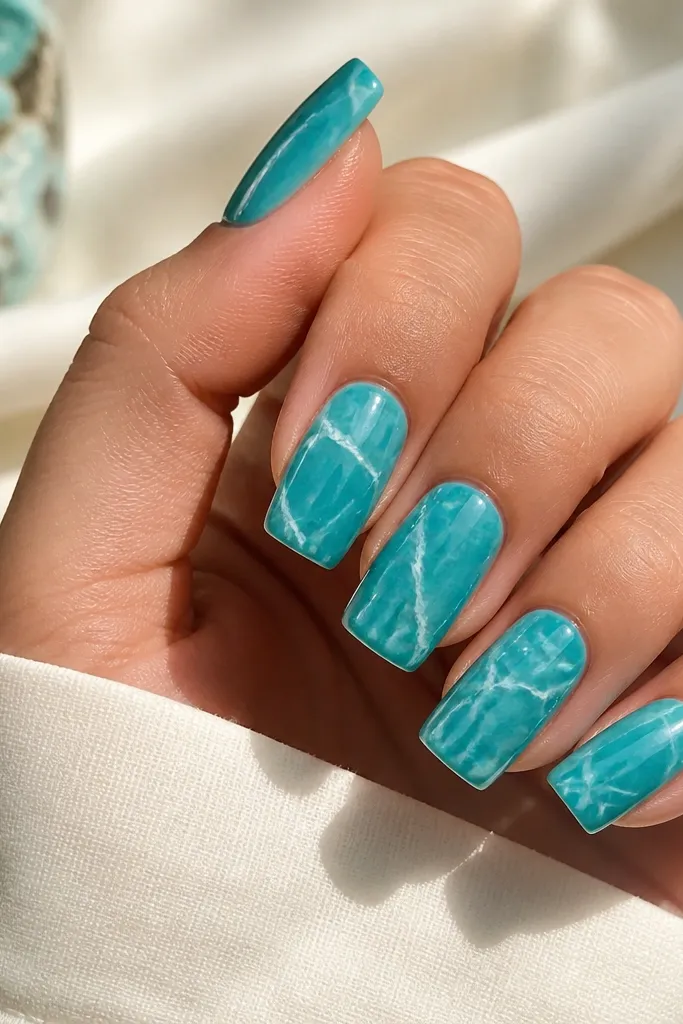
Marble looks complex, but turquoise marble with a white vein is surprisingly easy and looks expensive on square nails. The flat top of the square shape makes the veins look like real stone instead of random scribbles. This design looks amazing on medium and deeper skin tones because the turquoise pops hard against warm undertones. Keep the white veins thin and slightly curved so the pattern feels natural.
Paint a solid turquoise base in two coats and cure. Add white gel in thin streaks using a liner brush, then drag the white slightly with a clean brush tip to create veining without fully blending. Follow each vein with one or two tiny breaks so it doesn’t look like a single continuous line. Cure and seal with glossy top coat, then wipe the square edge clean so the marble doesn’t look raised.
Editor's noteIf you’re new, do marble on just two nails and keep the rest solid turquoise with top coat.
Watch outAvoid chunky white blobs — they look like correction fluid on square tips.
9. Sunflower Accent on Butter Yellow Base
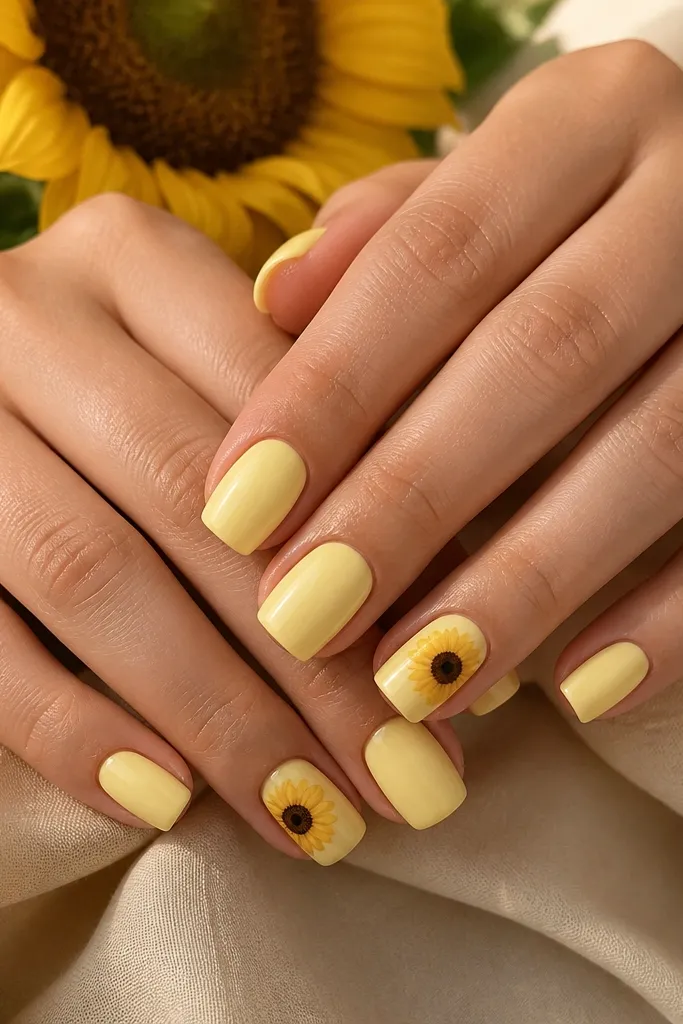
Butter yellow is bright without screaming, and a single sunflower accent keeps the set playful instead of busy. Square nails make the petals look crisp because you can keep the flower compact and centered. This works on all skin tones, but it’s especially flattering on darker skin because butter yellow gives a warm glow. The trick is to keep the sunflower small — scale matters on square shapes.
Apply butter yellow base to all nails in two thin coats and cure. Choose one accent nail per hand and dot a small brown circle in the center. Add petal shapes in yellow-orange around the center using a dotting tool, then add tiny darker specks for texture. Outline the petals with a thin brown line if needed, cure, then top coat over everything.
Editor's noteUse gel colors for the sunflower so the center stays opaque and doesn’t sink into the base.
Watch outDon’t cover every nail with flowers. Square nails get crowded fast.
10. Pearl White Chrome with Peach Cuticle Glow
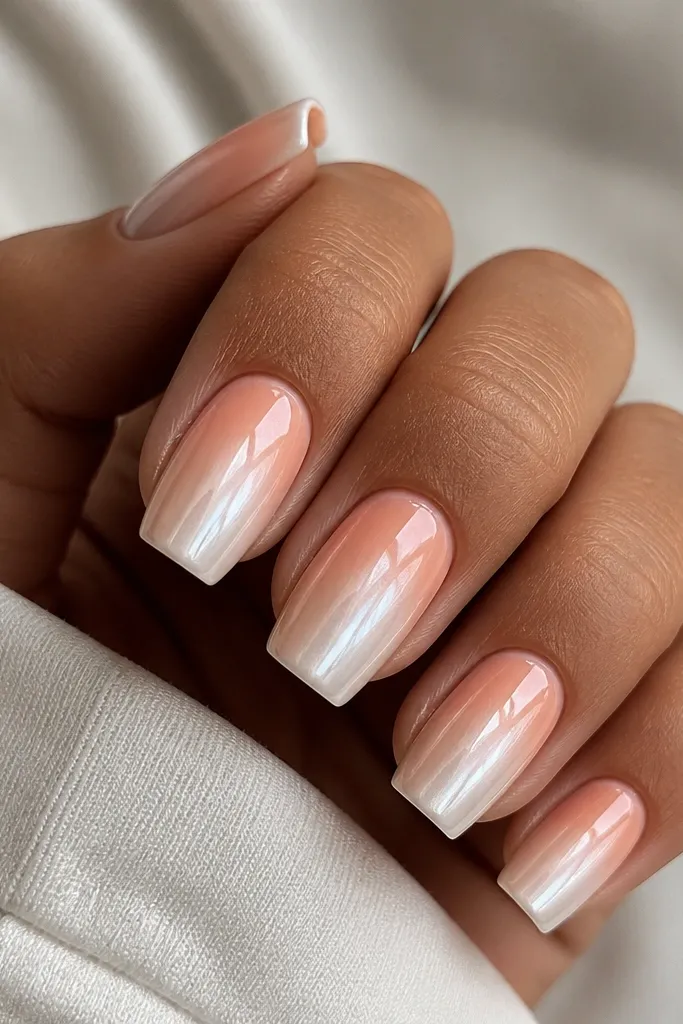
Pearl white chrome looks bright even when the rest of the design is minimal. The peach cuticle glow adds warmth and makes the nail bed look healthier, especially if your natural nails are slightly stained. I like this on square because the mirrored surface catches light evenly across the flat top. It looks best on hands that want a clean, polished vibe for brunch, weddings, or work events.
Apply a sheer nude or skin-tone base, cure. Add a thin layer of chrome base and cure as directed, then apply pearl white chrome powder and buff lightly. For the peach glow, blend peach gel at the cuticle using a small sponge, then cure. Seal with a non-wipe glossy top coat that is compatible with chrome so the shine doesn’t dull.
Editor's noteKeep the peach glow within 1-2 mm of the cuticle so the chrome stays the star.
Watch outAvoid thick top coat on chrome. It dulls the mirror finish.
11. Mint Green Jelly with Clear Negative Space Half-Moons
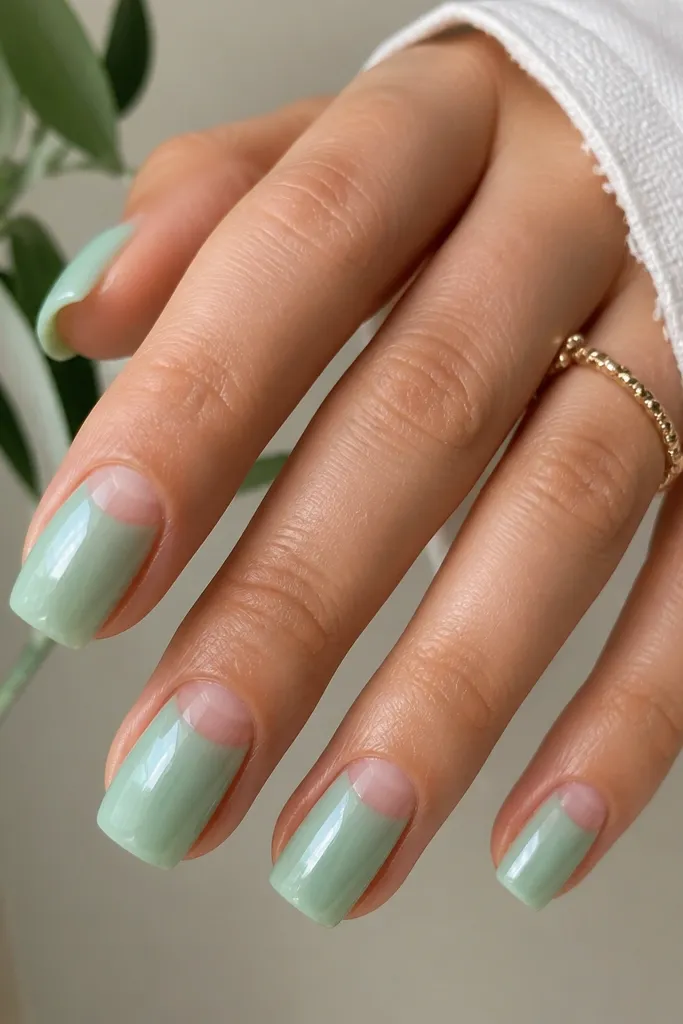
Negative space half-moons make jelly colors look modern and lighter. Mint green is fresh and bright, and the clear cutout makes your nails look longer because the eye has a break at the cuticle. This style flatters small nail beds because the clear area adds shape. Square nails keep the half-moon crisp, so you don’t need heavy line work.
Start with a protective base coat and cure. Apply mint green jelly, but mask the cuticle area with a small half-moon stencil or tape so you keep a clear crescent. Cure, then remove the stencil carefully to reveal the clean cutout. Finish with glossy top coat and run the brush along the square edge to lock the jelly.
Editor's noteUse jelly gel, not opaque mint. The clear space looks better when the jelly is slightly translucent.
Watch outDon’t overfill the cuticle area with mint. It ruins the negative space shape.
12. Hot Pink Base with White "Bite Mark" Tips
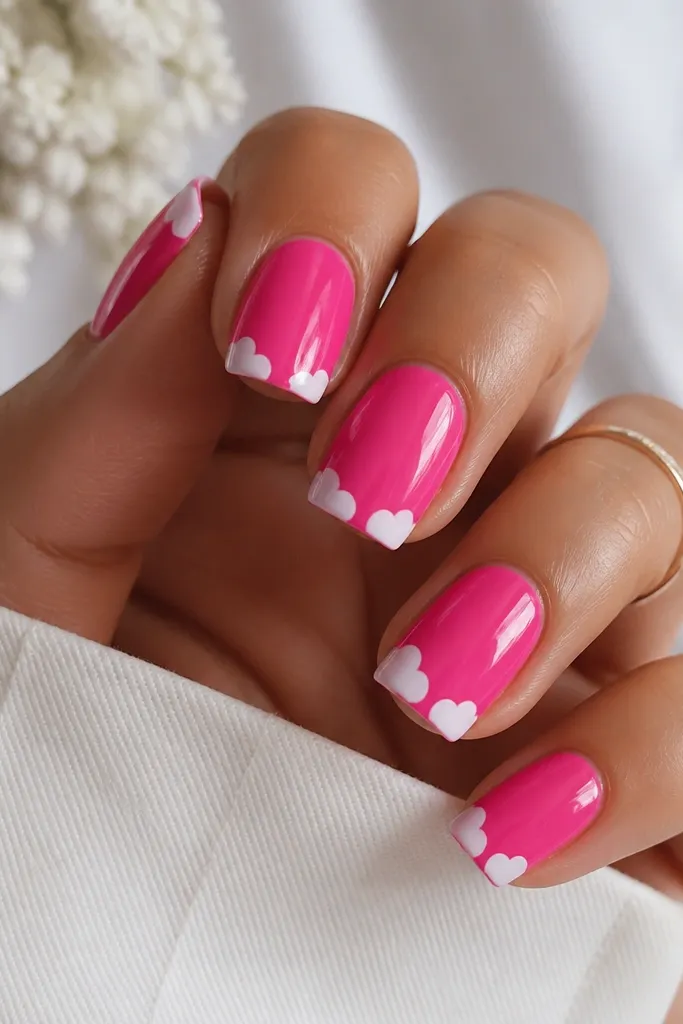
This one looks playful and a little punk, but it’s still Summer-bright. The irregular white bite marks sit on the square tip and create a graphic contrast that looks good in photos. It flatters fair skin because the hot pink pops, and it also works on deeper skin when the hot pink is truly saturated. The square top keeps the white shapes from drifting — they look like a design, not a mistake.
Paint hot pink in two coats and cure. With a thin brush, add small irregular white chunks across the top third of the nail, staying mostly on the free edge. Leave gaps between chunks so it reads as bite marks, not a full white tip. Cure and seal with glossy top coat, making sure white edges are covered so they don’t peel.
Editor's noteIf you’re worried about symmetry, do the bite marks uneven on purpose. It looks more natural.
Watch outAvoid full white coverage on the tip. The irregular negative gaps are what make it cute.
13. Yellow Base with Tiny Blue Star Dots
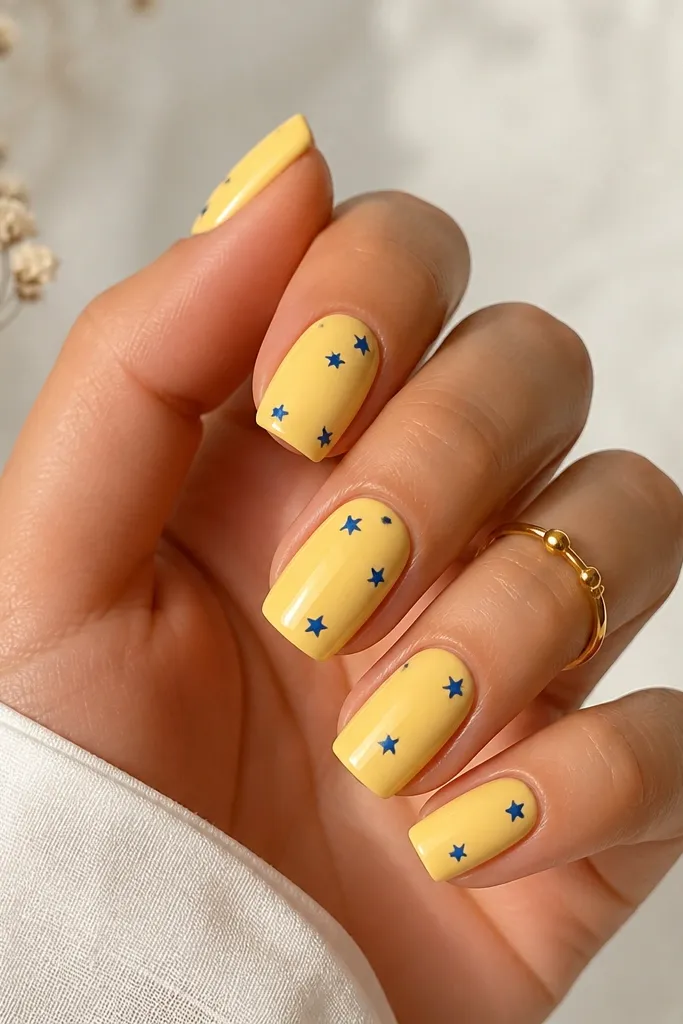
Stars look fun in Summer, and small blue stars on a yellow base are easy to place without covering the whole nail. The contrast is high, so it reads bright even when your nails are short. This set looks great on medium and deep skin tones because blue pops against warm yellow. Keep the stars tiny and spaced so your nail stays airy.
Use two coats of bright yellow, cure thoroughly. Add tiny blue star shapes using a stamping kit or a star dotting tool — place 3-6 stars per nail. Keep most stars in the top half and leave the bottom half mostly plain. Seal with glossy top coat and check the square corners for any star edges that need smoothing.
Editor's noteStamp two nails first, then copy the placement on the rest so spacing stays consistent.
Watch outDon’t cluster stars too close to the sidewalls. It can look messy on square corners.
14. Coral French Tips with Thin White Outline
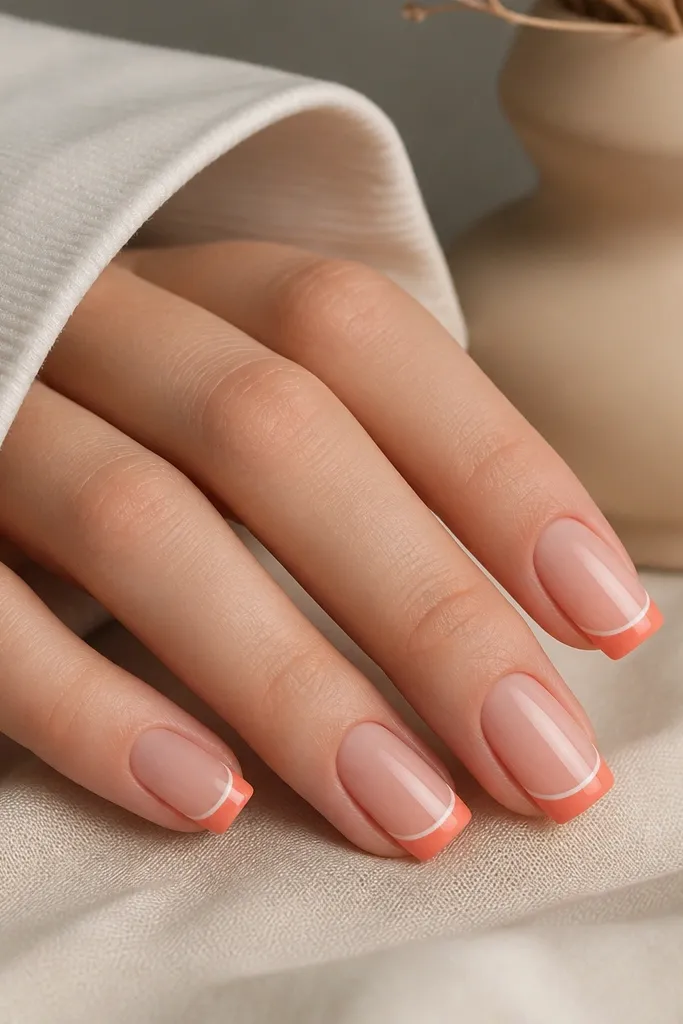
A coral French tip already looks Summer, and the thin white outline makes it look crisp like nail salon art. The white line gives the French shape a clean border, which is especially flattering on square tips because the corners are sharp. This looks great on neutral skin tones and also brightens hands that have slight discoloration, since the nude base is even and the outline is clean. It’s a good choice for work because the design stays mostly at the tip.
Apply a nude sheer base and cure. Paint coral French tips across the free edge in two thin coats, cure. Then add a thin white outline along the coral edge using a liner brush, keeping the outline about 0.5-0.8 mm thick. Finish with top coat and cap the free edge so the outline doesn’t chip.
Editor's noteFor a super clean outline, wipe your liner brush on a paper towel before you touch the nail.
Watch outAvoid thick white outlines — they make the French look heavy.
15. Blueberry Skies Gradient (Cornflower to Nude)
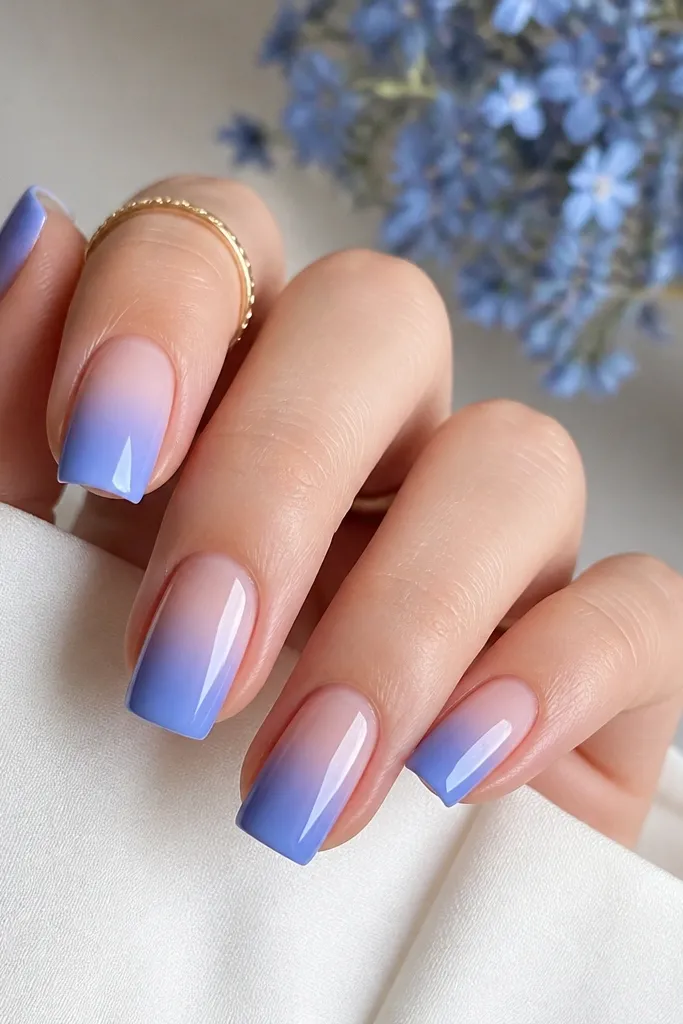
A cornflower-to-nude gradient looks bright without needing extra art. Square nails make gradients look smooth because the flat top gives you a consistent blending area. This flatters hands that want a lighter look — the nude part near the cuticle keeps fingers from looking heavy. I like this on fair to medium skin tones because cornflower blue is clear and doesn’t turn muddy.
Apply a nude base and cure. Sponge on cornflower blue starting about 2 mm above the free edge, then blend upward into the nude using the sponge with less product. Add a second gradient layer only where the blue needs more opacity. Cure and seal with glossy top coat, then check the center for smooth blending before you finish.
Use a makeup sponge and tap off excess product on a palette. Less product gives a smoother gradient.
Don’t overbuild the gradient. Too much blue turns it into a solid block.
16. Tropical Leaf Accent on Clear Pink Base
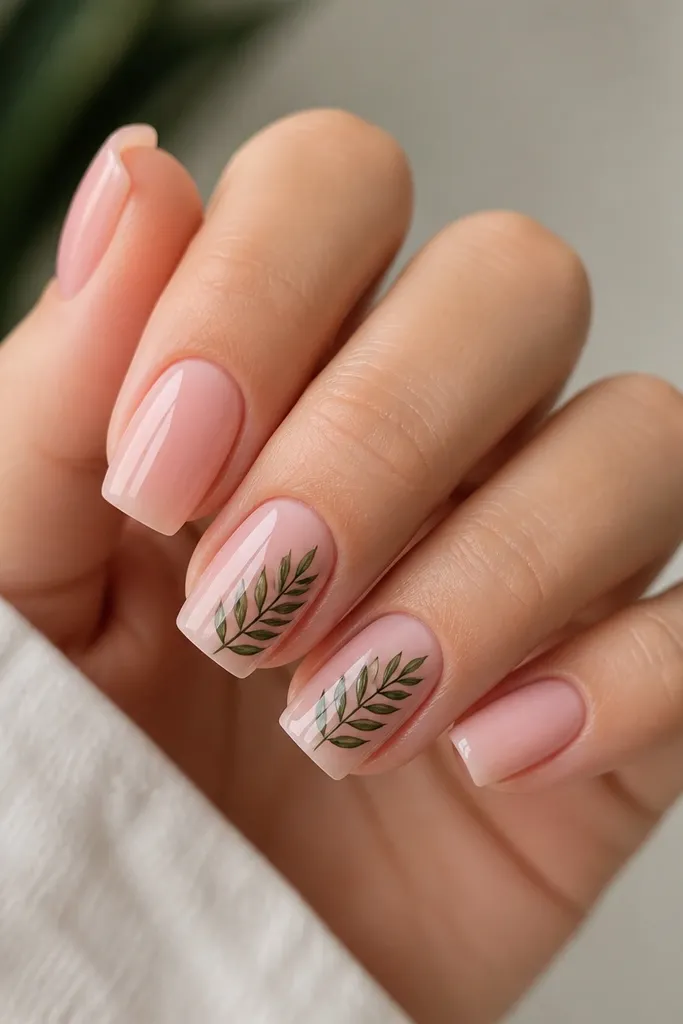
Leaf accents look like vacation photos, but keeping them on clear pink keeps them wearable. The clear pink base makes the leaves look like they’re on top of glass, which reads clean on square nails. This style looks good on all skin tones and especially flatters short square nails because the base is light and the leaves don’t overwhelm. Use dark green and a tiny bit of black for veins so it doesn’t look washed out.
Apply a clear pink gel base in two thin coats and cure. On accent nails, paint or stamp dark green leaf shapes near the center, leaving space around them. Add thin black lines as veins using a fine liner brush. Cure and seal with glossy top coat, making sure the top coat levels the leaf texture so it feels smooth.
Editor's noteIf your leaves look flat, add one lighter green highlight vein to each leaf.
Watch outAvoid neon-green leaves on a clear base. They look harsh and can look yellowed.
17. Lavender Grape Pop with White Outline Lines
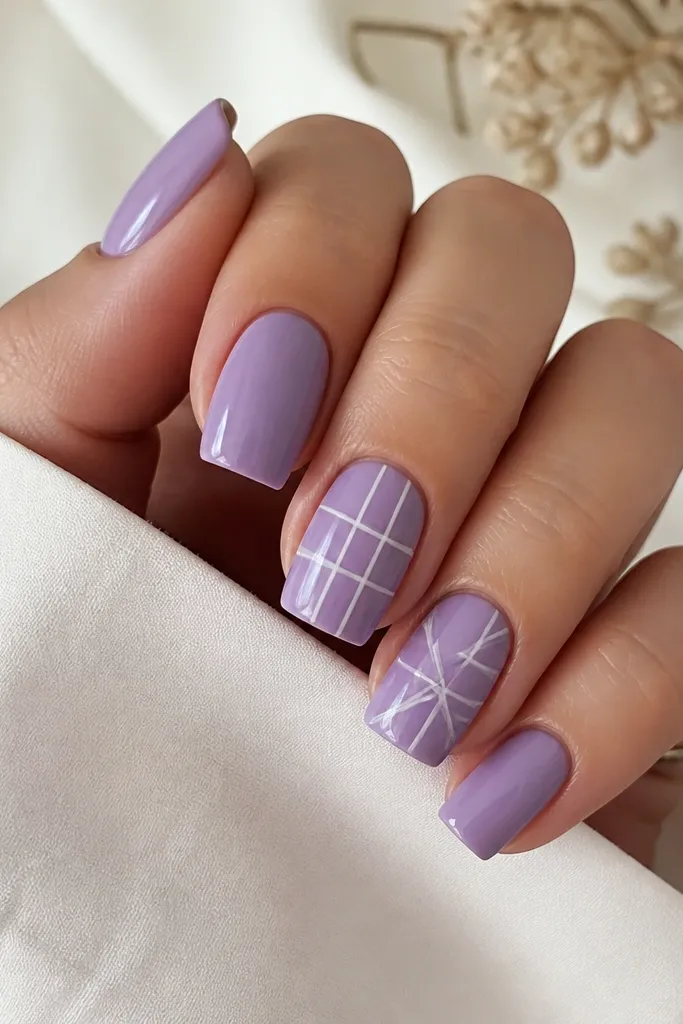
Lavender grape is a Summer color that still feels soft, and white line art makes it look sharp. The geometric grid on square nails looks clean because the square shape matches the straight lines. This works on fair and deep skin tones because lavender is not too warm and the white outlines keep it readable. I like doing the pattern on two nails per hand so the set feels bright but not busy.
Paint all nails lavender in two coats and cure. On two accent nails, use a striping brush to draw a simple grid: two vertical lines and one horizontal line, spaced evenly. Keep the lines thin and stop them 1 mm away from the sidewalls so the corners stay clean. Cure and finish with glossy top coat, then wipe any line edges with a cleanup brush for crisp corners.
Editor's notePlan your grid first by placing two tiny dots where lines will meet. It prevents uneven spacing.
Watch outSkip thick marker-style lines — they look like dry paint on square tips.
18. Peachy Nude Base with Gold Foil Flecks
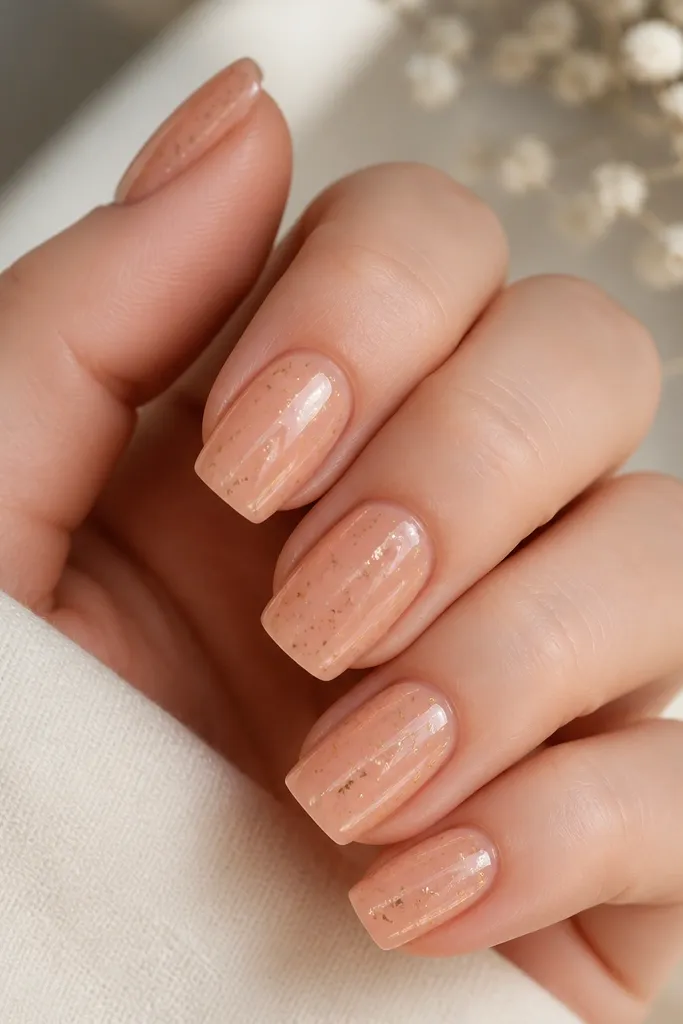
Gold foil flecks on a peachy nude base look like sunlight catching your nails. The warm nude keeps the set elegant, and the foil flecks make it feel Summer without needing bright neon. Square nails are great for foil because the flat top lets the flecks sit in one plane instead of sliding around. This flatters warm undertones and looks especially good with gold jewelry.
Apply a peachy nude base in two coats and cure. Add a thin layer of foil gel or tacky adhesive where you want flecks, then press gold foil pieces with tweezers. Tap off excess so only small fragments remain. Cure and seal with top coat, but keep your top coat layer slightly thicker over the foil so it doesn’t catch and snag.
Editor's notePress the foil with a makeup sponge instead of fingers for cleaner edges.
Watch outDon’t add foil all the way to the cuticle. It makes the set look heavy and can lift faster.
19. White Base with Neon Confetti Corners
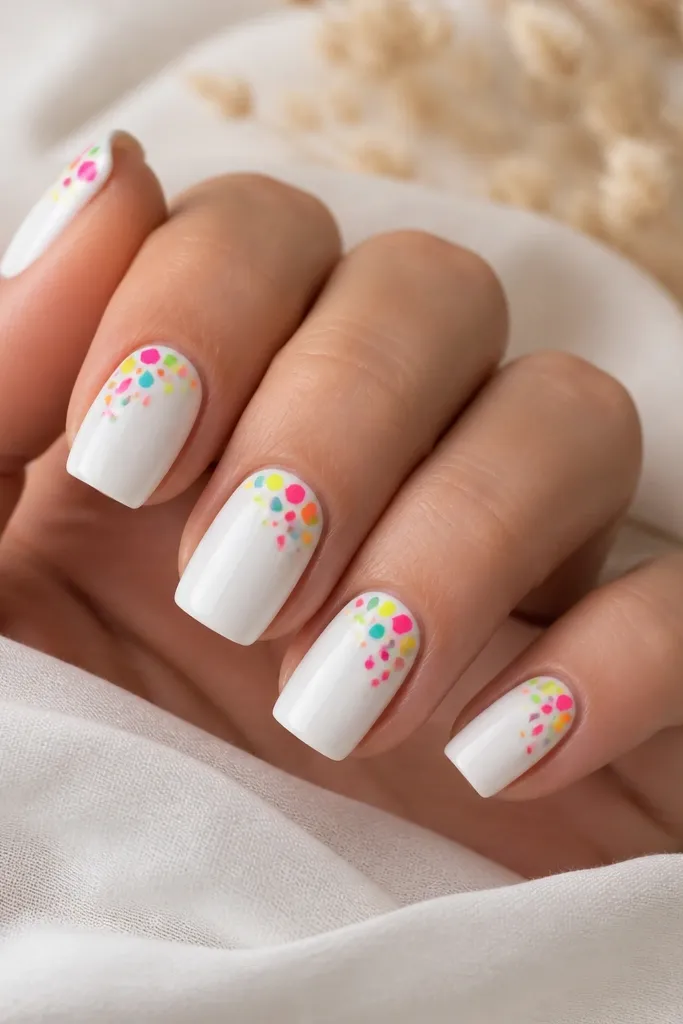
Neon confetti on white is high-contrast and makes your hands look instantly brighter. The confetti placed in one corner keeps it playful but not chaotic, and square tips help the cluster sit neatly on the flat edge. This set looks great on pale and medium skin tones because white makes neon colors pop. It also photographs well because the colors don’t blend into a base.
Paint a glossy white base in two coats and cure. Use a dotting tool or small craft brush to place tiny neon pieces (pink, lime, blue) in a corner cluster near the sidewall and about 2-3 mm down from the top. Keep the shapes small and irregular — circles and tiny rectangles work best. Seal with top coat and cap the corners so the confetti doesn’t lift.
Editor's noteDo three neon colors max. More colors make it look messy on square nails.
Watch outAvoid full confetti coverage. It turns into a thick, bumpy look.
20. Classic Nude with Hot Pink Skittle Tips
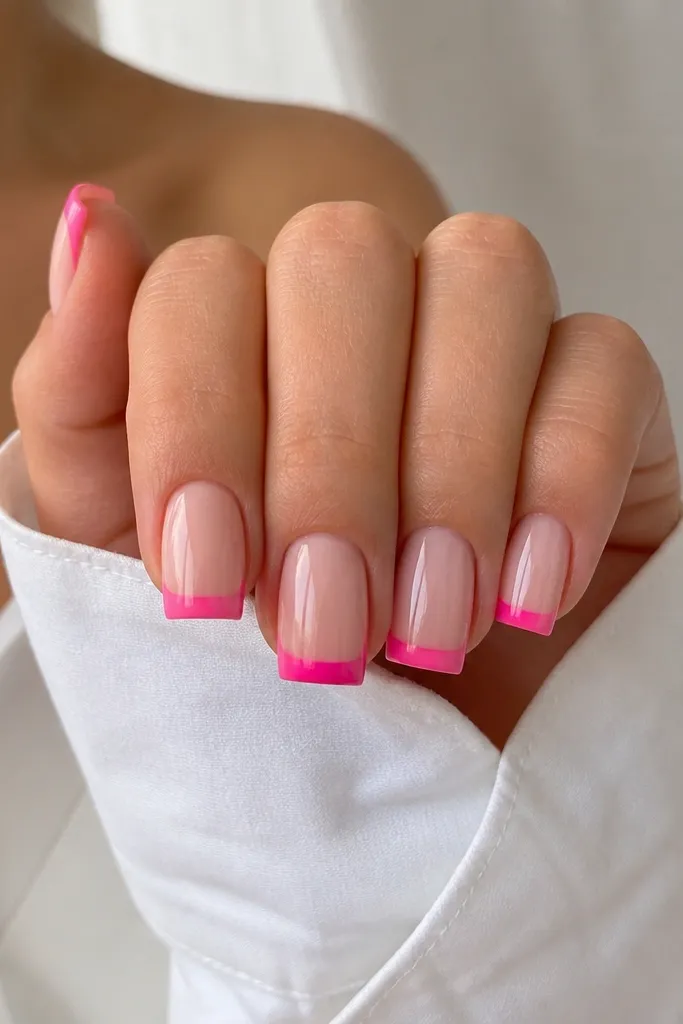
Skittle tips look fun because your nails feel coordinated but not identical. Nude base keeps it clean, and hot pink tips are bright enough for Summer without needing extra art. Square nails make the varying tip thickness look intentional since the flat top makes each tip line distinct. This is flattering on hands with shorter nail beds because the nude area stretches the look. It also works for events where you want color but need it to stay neat.
Apply nude base and cure. Paint hot pink tips, but vary how far the pink reaches: one nail is a thin tip, one is medium, one reaches higher near the center, and adjust for each nail. Keep the tip edges straight to match square shape. Cure and finish with glossy top coat, then run a thin brush with top coat along the square edge to smooth the boundary.
Editor's noteIf you struggle with tip height, mark the height with a tiny pencil dot on a practice nail first.
Watch outDon’t make the pink uneven at the corners. Square corners need a straight stop.
21. Mint and White Checkered Accent Panel
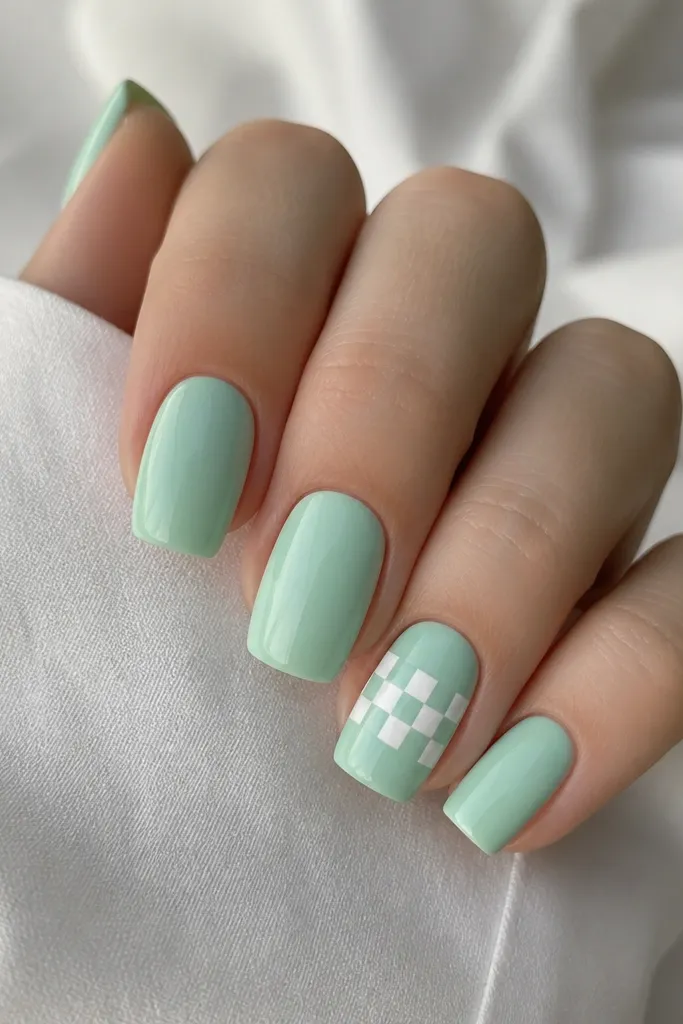
Checkered accents look playful and styled, and a small panel on square nails reads crisp instead of childish. Mint and white is Summer-clean and makes your hands look fresh. This design flatters hands that look better with cooler colors, like pink undertones or neutral skin. Keep the check size small so it stays neat on the flat square top.
Paint mint base on all nails and cure. On one accent nail, add a thin white rectangle in the center about 3-4 mm wide. Let it cure, then draw tiny mint lines inside the rectangle to form checks, or do the reverse by painting checks in white over a mint panel. Use a striping brush and keep each square about 1 mm. Cure and top coat over everything to level the lines.
Editor's noteUse a nail vinyl stencil for the rectangle so the checkered panel stays centered.
Watch outAvoid large check squares — they look clunky on square tips.
22. Tropical Sunset Ombre (Coral to Peach to Nude)
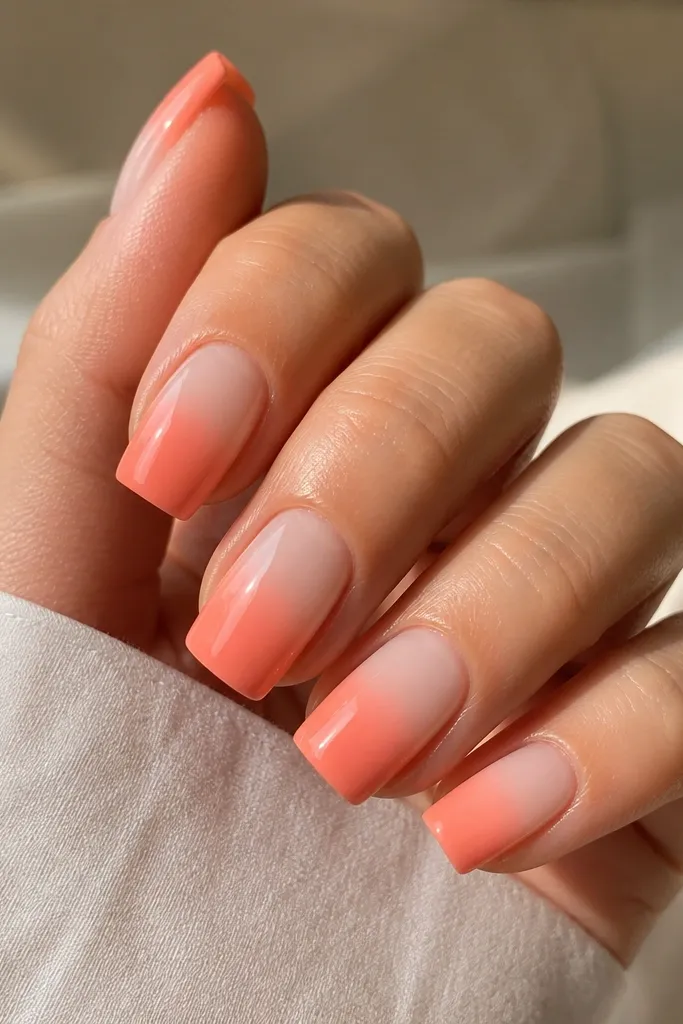
Sunset ombre looks bright because coral and peach sit in the same warm family, so it blends smoothly but still looks like color. Square nails make ombre extra flattering because the flat top gives a clean gradient band from tip to cuticle. This style looks best on hands with medium to warm undertones, but I’ve also seen it work on fair skin when the coral is not too orange. Keep the nude part near the cuticle so it doesn’t look too heavy.
Apply nude base and cure. Sponge on coral at the free edge first, then blend into peach around the mid-nail, then feather into nude near the cuticle. Do two thin gradient layers for opacity, curing between each. Clean up the edges with a brush dipped in cleanser. Seal with glossy top coat, and cap the free edge to protect the ombre fade line.
Editor's noteUse three separate sponge dots rather than one sponge swipe. That keeps the fade smooth on square tips.
Watch outAvoid muddy browns in the mix. If your coral turns brown, restart with a fresher coral gel.
23. Blueberry French with Tiny White Bow Tie Accent
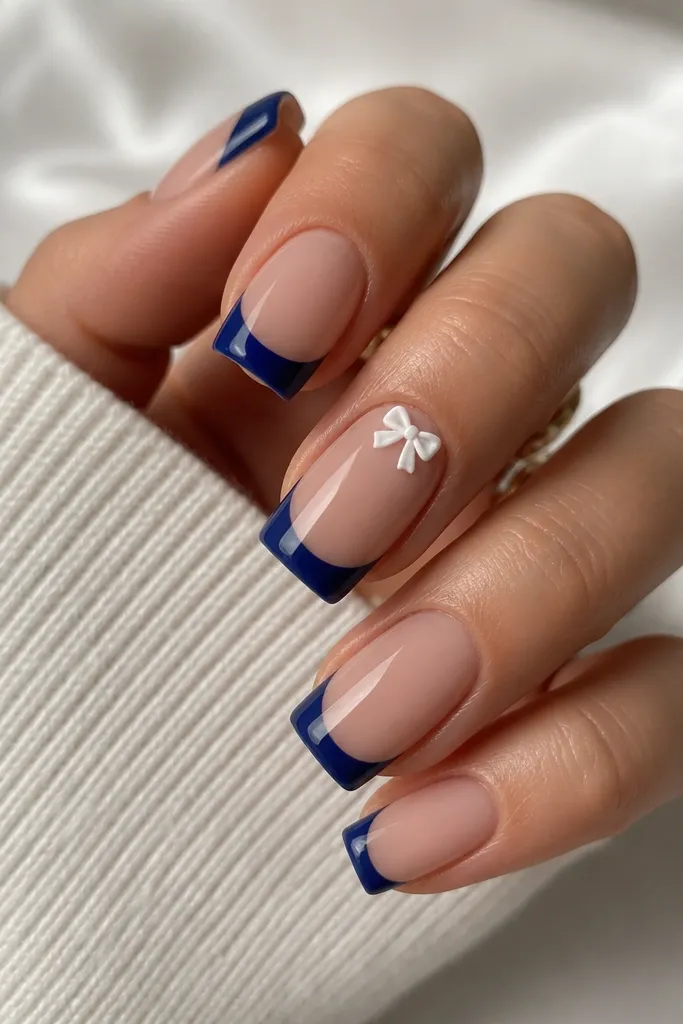
A deep blueberry French tip gives you the bright Summer look without using neon. The nude base keeps it clean, and the dark tip makes the nail edge look sharp on square shapes. A tiny bow tie accent adds a cute detail without taking over the whole nail. This flatters hands of any skin tone because the contrast is strong and the bow stays small and readable.
Paint nude base and cure. Apply blueberry gel for the French tips in two thin coats, keeping the tip edge straight and aligned with the square top. On one accent nail, place a small white bow near the cuticle: two small rounded loops with a tiny center knot. Cure and top coat, then gently cap over the bow so it feels smooth.
Editor's noteFor a clean bow, use a dotting tool and place the loops first, then add the knot last.
Watch outDon’t place the bow too low. Bow ties look best close to the cuticle on square nails.
24. Clear Jelly Base with Pink Glitter Fade
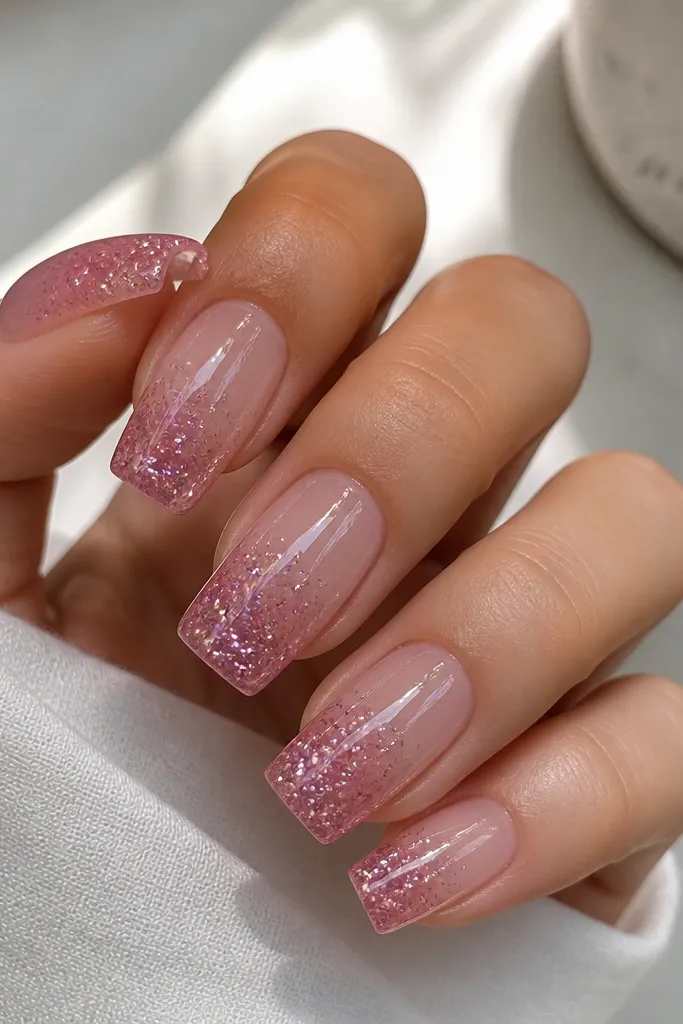
A clear jelly base with a glitter fade is one of the easiest ways to get that bright Summer sparkle without heavy glitter on the whole nail. The fade makes the square tip look dimensional, and the clear base keeps it looking light. This style looks flattering on hands with ridges because the jelly fills visually and makes the nail look smoother. It also works for parties, but the base keeps it from looking too costume-y.
Apply a clear or very sheer jelly base and cure. Sponge or dab pink fine glitter gel at the free edge, then pull the glitter upward lightly so it fades at mid-nail. Add one more light layer if you want extra sparkle at the tip. Cure and seal with glossy top coat, then press top coat on the square edge so glitter doesn’t catch.
Use fine glitter, not chunky. Fine glitter gives that smooth fade on square tips.
Avoid thick glitter clumps at the corners. They lift and snag fast.
25. Coral Bloom Sticker Look with Hand-Finished Edges
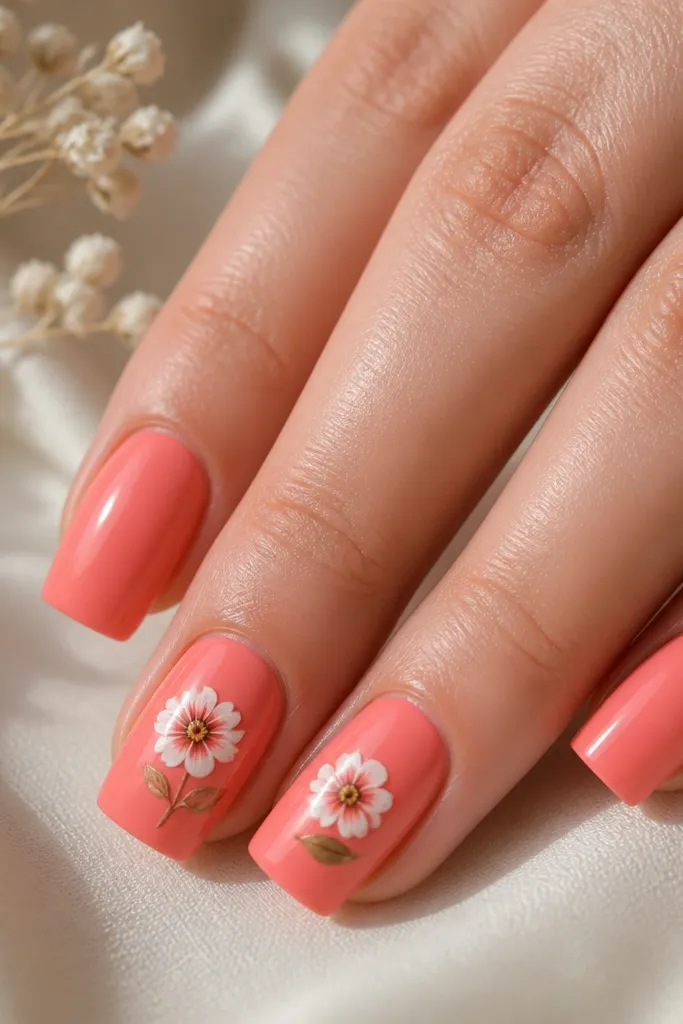
Sticker decals can look super cheap if the edges lift, but when you hand-finish them, they look like real nail art. Coral blooms look bright in Summer and the square shape makes the sticker placement look intentional. This design flatters fair and medium skin tones because coral is warm and flattering, but it also works on deeper tones when the coral is strong. Keep the sticker small and centered so it doesn’t crowd the square corners.
Paint a coral base and cure. Apply the flower decal on two accent nails, then trim any extra around the square edge with a small nail clipper. Brush a thin layer of clear gel over the decal edges, then cure. Repeat one more thin layer if you can feel a raised edge. Finish with glossy top coat on every nail so the decal disappears into the surface.
If your decal edges lift, add a second sealing layer only along the perimeter, not the whole nail.
Avoid skipping edge-sealing. That’s what makes decals peel.