
1. Neon Coral to Mango Gradient with White Squiggle Center
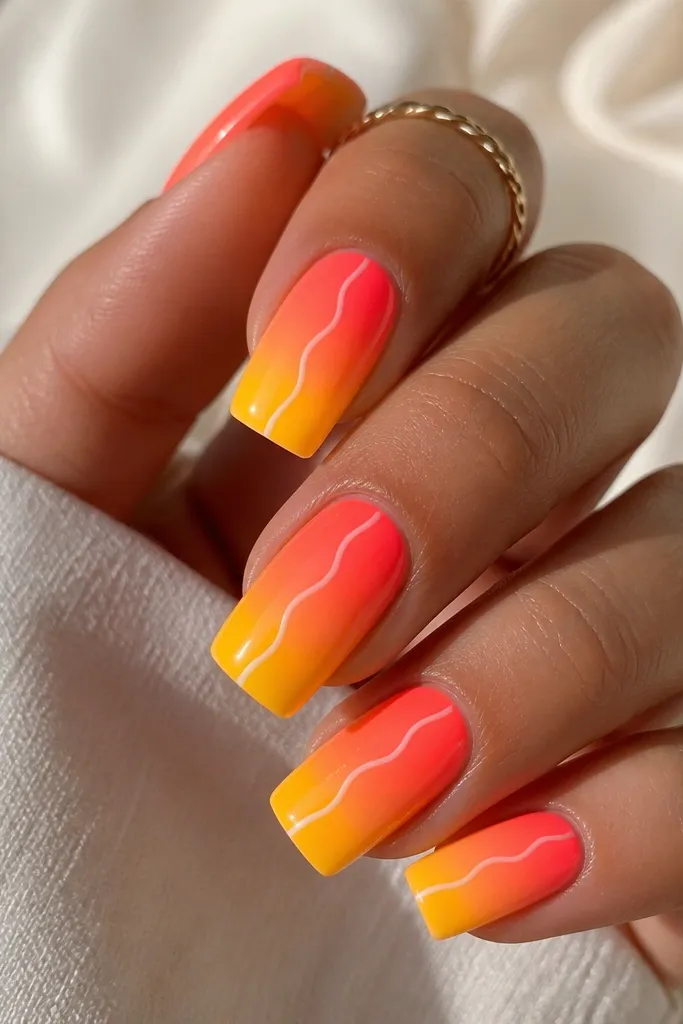
This set is pure “pool day” energy. Start with neon coral near the cuticle so it warms up your skin tone, then fade into mango yellow for that sun-kissed glow. The white squiggle gives the eye a clean path and prevents the gradient from looking like one big block of color. I like this on medium to tan skin because the coral doesn’t wash out and the yellow reads bright, not pale. It also flatters shorter square nails because the vertical squiggle makes them look longer.
Editor's noteUse a glossy top coat with a slightly thicker second layer on the tip edge — it makes neon look more saturated.
Step one: apply a sheer nude-pink base (thin layer) then build acrylic with coral at the cuticle and blend into mango yellow toward the free edge. Keep the blend smooth, no harsh banding. Step two: with a striping brush and white gel, paint one centered squiggle that starts about 1.5 mm from the cuticle and ends 1 mm above the tip — same placement on every nail. Finally, cure, then seal with a glossy top coat in two thin layers so the gradient doesn’t dull.
Watch outAvoid a gradient that hits full opacity at the cuticle; it looks chalky and cheap under daylight.
2. Electric Aqua Chrome Half-Moon with Coral Micro-French
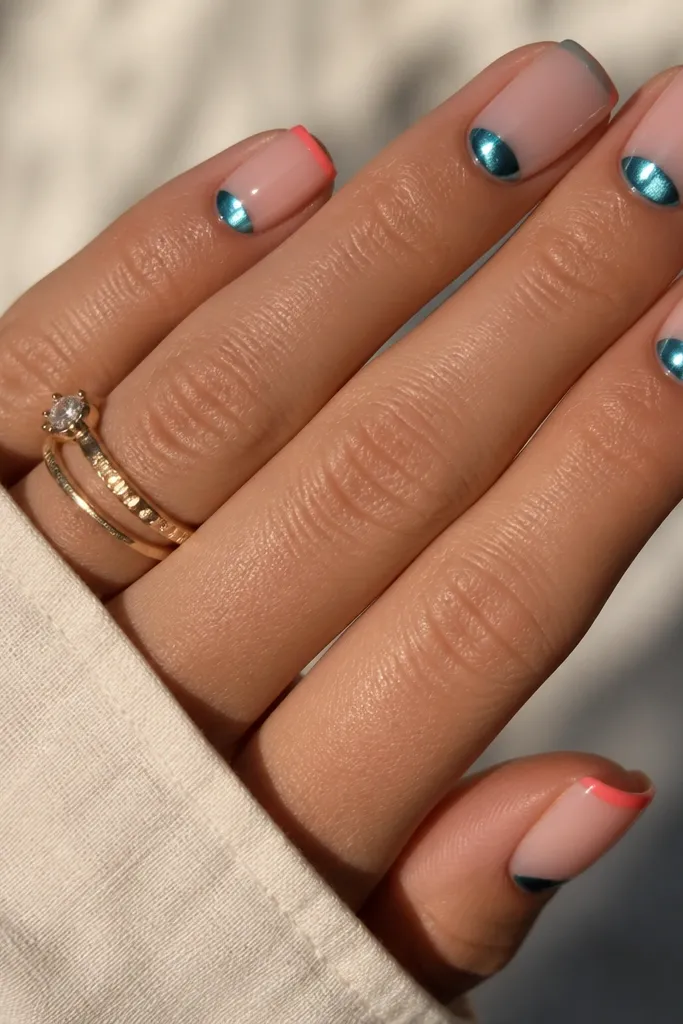
This design looks expensive because it mixes shine with restraint. The electric aqua chrome half-moon pops against a sheer nude base, and the coral micro-French ties it back to warm summer color so your nails don’t look icy-only. I’ve worn this with both gold and silver jewelry — it still reads clean because the chrome is the star. It flatters fair skin and cool undertones because aqua brightens without turning orange. It also looks neat on any length because the micro-French keeps the focus at the tip.
Step one: place a sheer nude acrylic base and shape your square tip. Step two: at the cuticle, leave a small negative space arc, then fill the arc with aqua chrome powder mixed into clear gel — keep it to about one-third of the nail width. Step three: paint a thin coral line along the free edge like a micro-French, keeping it centered and even across all nails. Finish with two coats of top coat, lightly buffing the first coat so the chrome stays smooth.
Press the chrome powder on with a firm finger for 5-8 seconds, then seal immediately — it prevents patchiness.
Don’t make the half-moon too big; if it covers more than one-third of the nail, it stops looking intentional.
3. Lemonade Yellow Base with Lime Triangle Tips
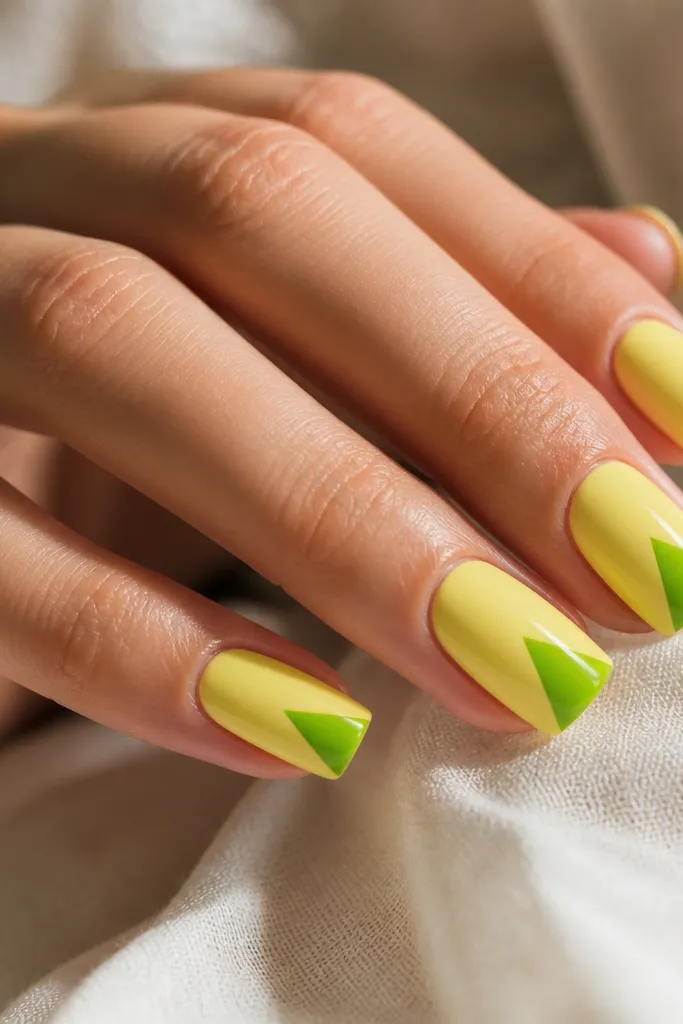
This is the “graphic t-shirt” nail set. The lemonade yellow base reads bright and cheerful, and the lime triangle tip adds a sharp, modern contrast that looks great on square edges. I like it on olive skin because yellow brings warmth and lime makes the nails look extra fresh. The geometry also flatters wide nail beds because the triangle pulls the eye toward the center. For summer photos, the triangle catches light at the edges, so the set looks crisp even from a distance.
Editor's noteMake the triangle point slightly off-center on one nail for a playful vibe, then keep the rest perfectly centered.
Step one: build a smooth lemonade yellow acrylic layer and cap the free edge so the square tip looks glassy. Step two: with a fine liner brush, place a lime triangle that starts at the tip edge and meets at a point about halfway down the nail. Keep the triangle edges clean and symmetrical across nails. Step three: add a thin clear gel over the accent to level the surface, then seal with top coat.
Watch outSkip thick paint on the triangle; raised edges catch fabric and chip faster.
4. Pink Watermelon Drip with Black Seed Dots
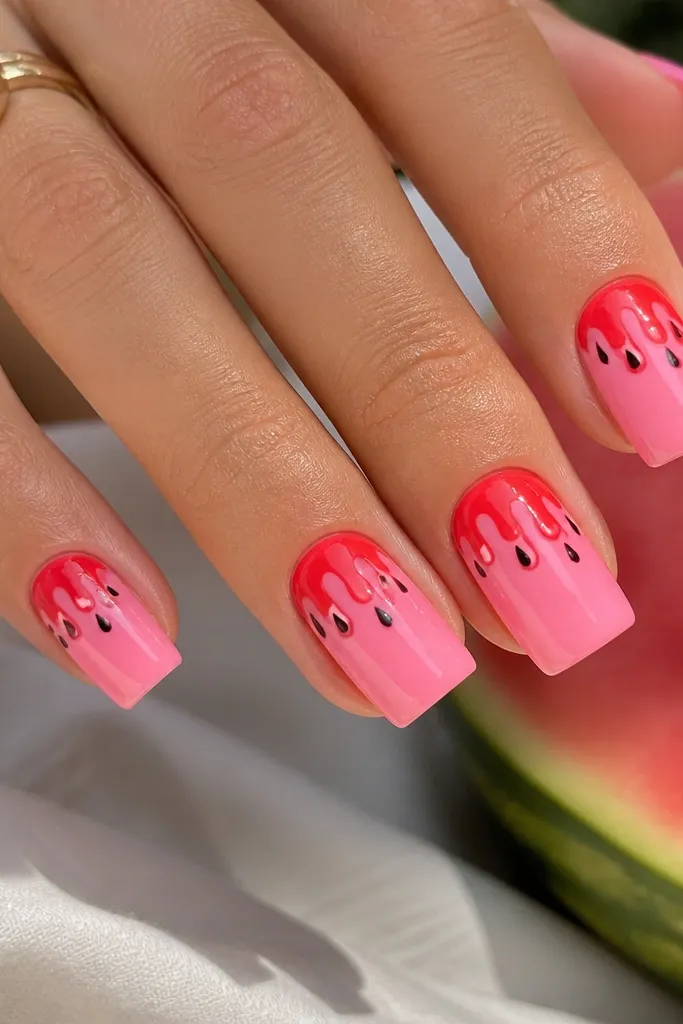
Watermelon nails always read summer, and this version stays clean instead of looking childish. The pink base is flattering on most skin tones, and the deeper red drip creates dimension. Black seed dots make it feel graphic and fun, not random. This works especially well for medium and warm undertones because pink and red look juicy and bright. Square nails are perfect because the drip lines look intentional on a flat surface.
Editor's noteDo one nail with a longer drip and keep the others shorter; it makes the set look designed, not copy-paste.
Step one: apply a glossy pink base, then add watermelon-red drip lines using gel — pull each drip down about 2-3 mm from the top third. Step two: cure, then place black seed dots with a dotting tool in small clusters that sit beside the drip, not scattered everywhere. Step three: add a thin clear gel layer over the drip so it looks smooth, then top coat twice.
Watch outDon’t use brown for the seeds; black gives the contrast that makes bright Summer Acrylic Nails Square pop.
5. Tangerine Base with White Starburst Lines and Tiny Foil Flecks
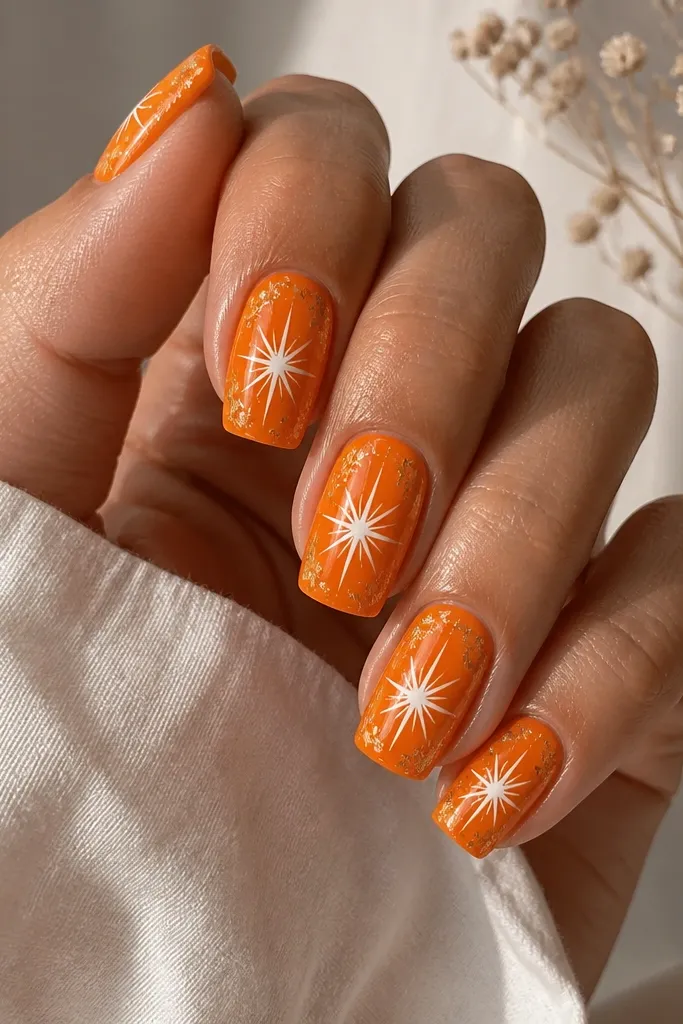
This set looks like summer fireworks. Tangerine is bold but not neon, and the white starburst lines keep everything crisp and readable. Gold foil flecks add movement when you walk — you’ll see them catch light when your hands are down and when they’re up. I like it for warmer skin tones because tangerine sits close to your natural warmth, and the white lines prevent it from looking flat. It’s also great for parties because it photographs bright without needing full neon.
Editor's noteIf you want it extra sharp, outline the starburst center with a pin-dot of white before you add rays.
Step one: build your acrylic in tangerine, keeping the cuticle slightly sheer so the nail still looks healthy. Step two: paint a small starburst with white gel by drawing 6-8 short rays from a tiny center point — keep the burst about the width of a dime. Step three: add a few gold foil flakes near the rays, pressing them lightly into tacky gel. Seal with top coat in two layers, and cap the free edge so foil doesn’t snag.
Watch outAvoid covering the whole nail in foil; it turns into glitter soup instead of a bright focal point.
6. Sky Blue Jelly Base with Clear Chrome Edge
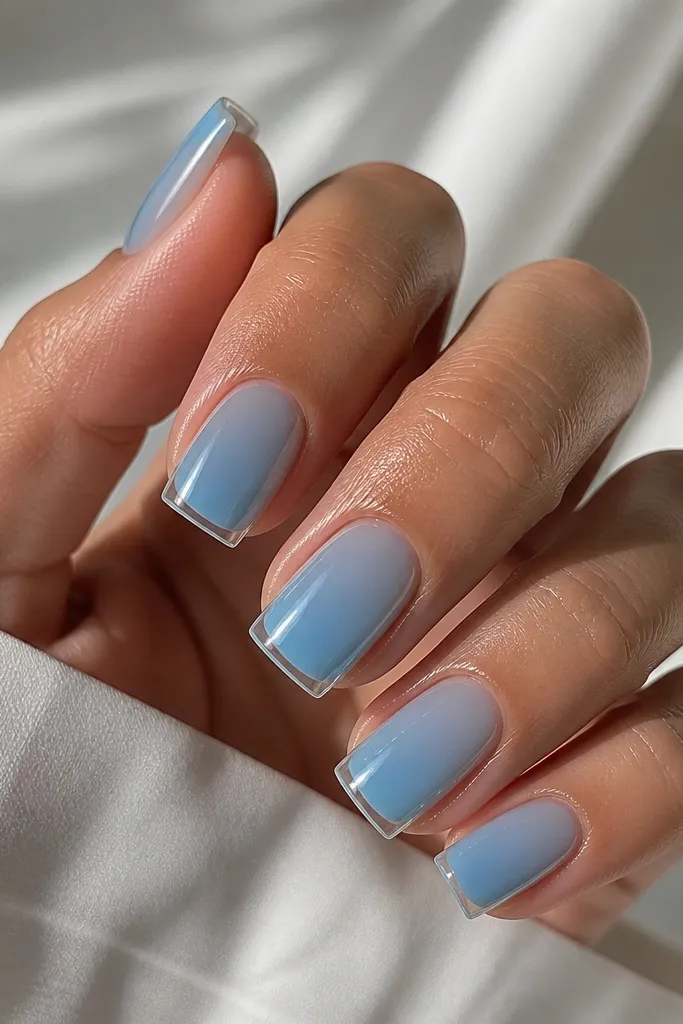
Jelly polish looks like you bottled summer light. The sky-blue jelly base is semi-sheer, so it looks airy and flattering, especially if you want your nails to look lighter on your hands. The clear chrome edge gives a clean “frame” around the square tip, making the shape look sharper. I’ve found this looks best on fair to light-medium skin because the jelly shows a soft glow without washing out. It also suits casual outfits because it’s bright but not loud.
Editor's noteUse a lint-free wipe after curing so the jelly stays clean and doesn’t look smoky under chrome.
Step one: mix acrylic or gel to create a jelly effect — you want visible translucency, so don’t fully pigment the whole nail. Build the sky-blue layer thin at the cuticle and slightly thicker toward the tip for depth. Step two: apply clear gel along the tip edge, then press a fine chrome powder along that border only, keeping it to 1 mm. Step three: cure and top coat twice for a glass finish.
Watch outSkip matte top coat on jelly designs; matte kills the glow.
7. Coral Pop with White Half-Negative Space and Gold Dot
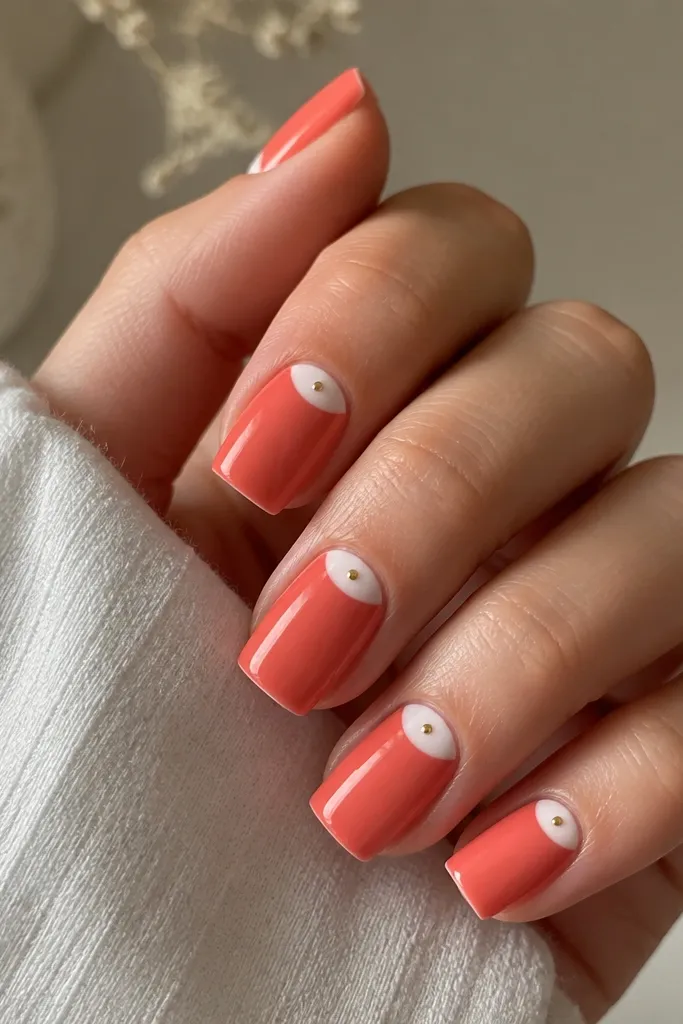
This one looks modern and expensive because it uses negative space like graphic design. The coral base brings the summer pop, while the white half shape adds contrast without covering the whole nail. A single gold dot keeps it from feeling too plain and makes the set feel intentional. I like this on hands with shorter fingers because the diagonal negative space trick makes the nails look longer. It also flatters olive and medium skin because coral gives warmth and the white keeps it bright.
Step one: build coral acrylic and shape your square tip. Step two: use tape or a small silicone stencil to create a clean half negative area near the cuticle on one side — leave it open, then fill the border with white gel so it frames the negative space. Step three: place one gold dot about 0.5 mm from the edge where coral meets white. Finally, top coat carefully, keeping the dot sealed under the gel so it won’t snag.
Use a thin brush to drag the white line to the corner — sharp corners look best on square nails.
Don’t make both sides symmetrical; the off-center look is what gives it that pop.
8. Mint Green Swirls with Hot Pink Outline
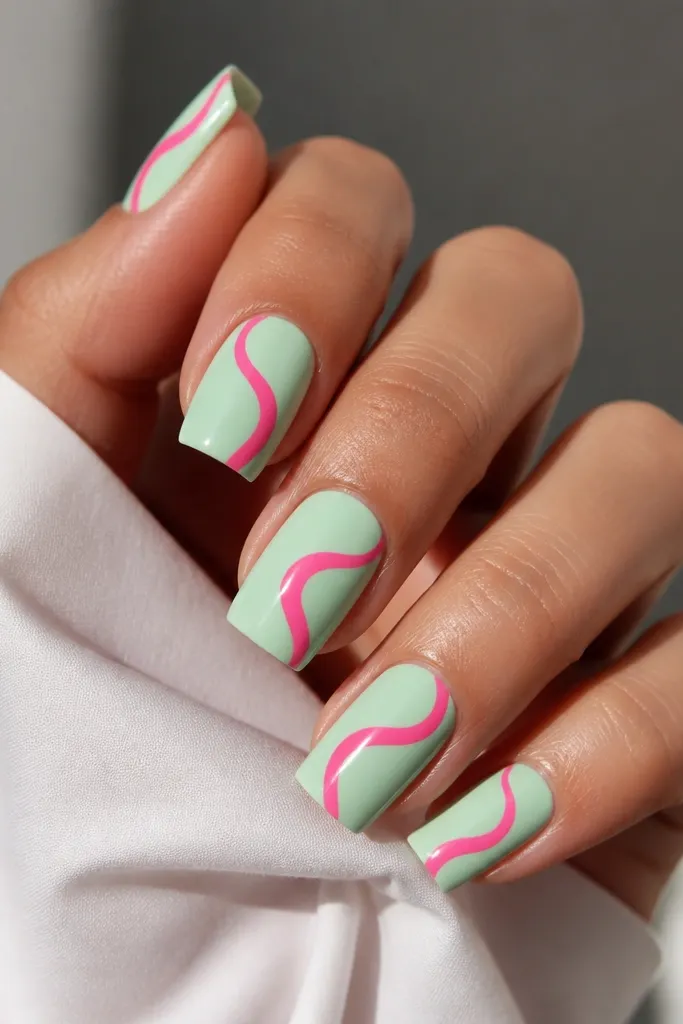
Mint and hot pink is a color combo that always looks fresh in summer. The mint base is light and flattering, and the hot pink outline makes the swirls pop instead of blending into the mint. I like this for people who want bright Summer Acrylic Nails Square pop but don’t want full coverage neon. It looks great on medium and darker skin because the hot pink reads bold without turning harsh. Square nails help because the flat surface makes the swirl lines look clean rather than wobbly.
Step one: build a smooth mint green base and cure fully. Step two: with a striping brush, draw an S-like swirl using hot pink gel — keep the line width thin, about the thickness of a credit card edge. Step three: add a second hot pink line to outline the swirl curves, leaving mint visible inside the loop. Finally, add a glossy top coat and cap the sides so the lines don’t lift.
If your swirl looks shaky, practice on a nail tip first — the acrylic surface is forgiving once you wipe clean and repaint.
Avoid filling the swirl completely with hot pink; outlines look sharper and chip less.
9. Sunflower Accent Nail Set with Yellow-Orange Fade
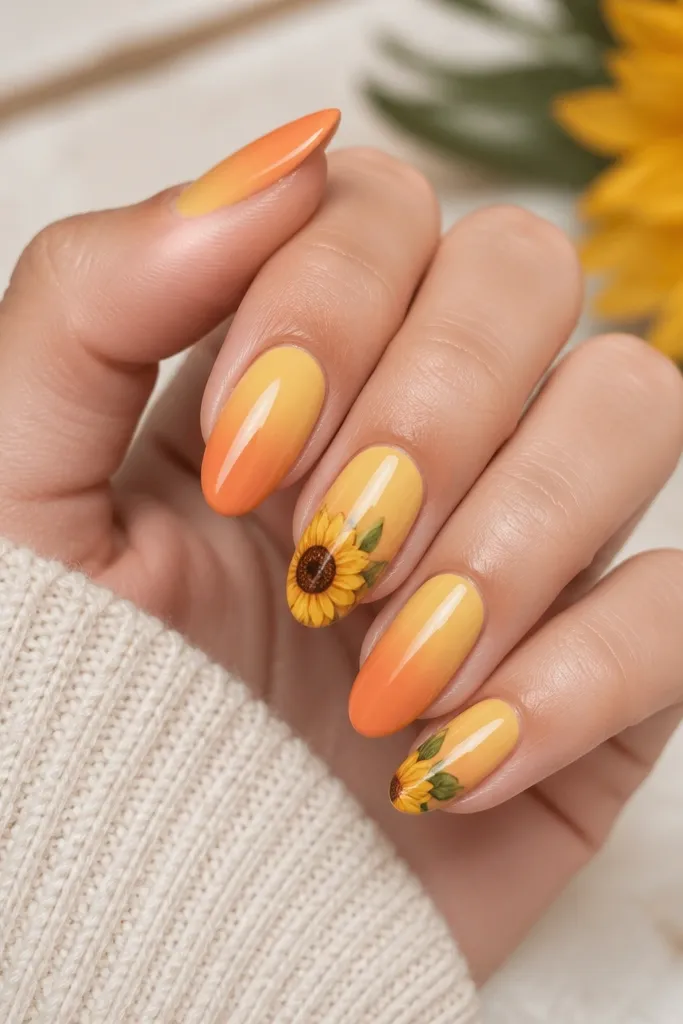
This set works because only one or two nails carry the artwork. The yellow-to-orange fade keeps everything cohesive and bright, while the sunflower illustration adds a clear theme without turning your whole hand into a mural. I’ve worn it at outdoor brunch and it looked cheerful even in shade. It flatters warm undertones because the palette matches sun warmth, and it also looks good on cool undertones because orange brings balance. On square nails, the sunflower sits nicely on the flat middle of the nail bed for crisp petals.
Editor's noteMake the sunflower center slightly raised with a thin gel mound so it catches light.
Step one: create a gradient fade on every nail — yellow at the cuticle fading into orange at the tip. Keep the blend smooth and glossy. Step two: choose two accent nails and paint sunflower petals using yellow gel, then add a dark brown center with a dotting tool. Add two tiny green leaves near the base of the flower. Step three: top coat lightly over the art first, then a full top coat once it levels.
Watch outDon’t put the sunflower on every nail; it looks busy and loses the bright Summer Acrylic Nails Square pop.
10. Neon Lime Micro-French with Clear Negative Cuticle
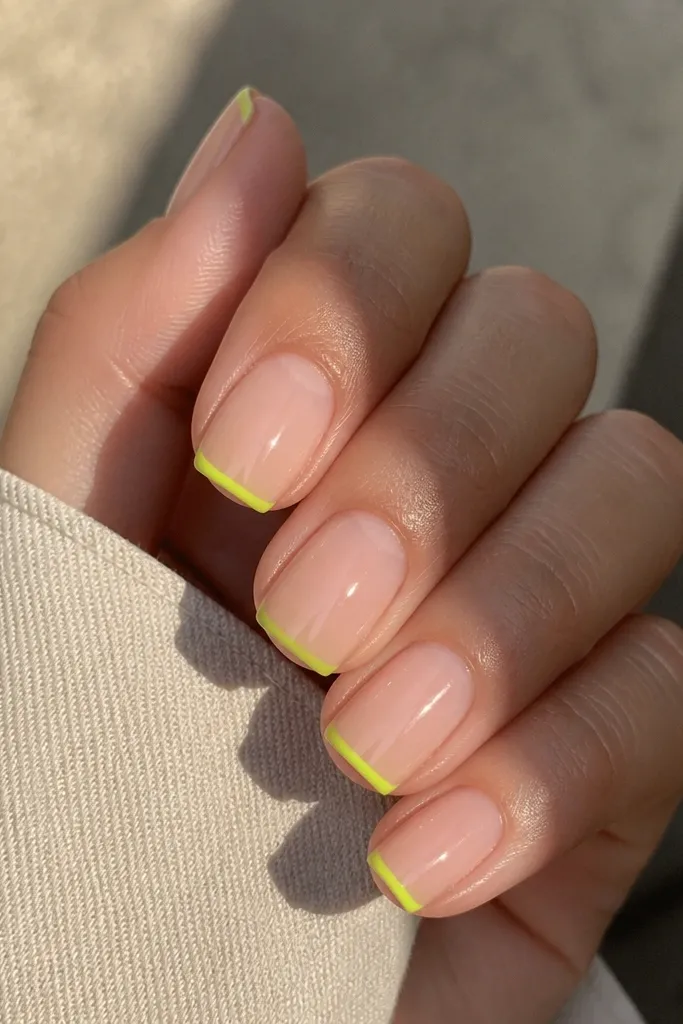
This is the cleanest way to do neon without it looking like you tried too hard. The neon lime micro-French stays sharp on a square tip, and the clear negative cuticle keeps the set airy. It flatters hands that already have strong nail beds because the clear area balances the bright tip. I love this with minimal jewelry because the nails do the talking. It also looks good on short-to-medium lengths because the neon line scales with the tip.
Editor's noteIf your neon line looks uneven, use a striping tape guide and peel it while the gel is still tacky.
Step one: apply a sheer nude acrylic base but keep the cuticle area uncovered so you have a clean clear negative space. Step two: paint a neon lime micro-French line — keep it under 1 mm tall and centered. Step three: cure and top coat twice, making sure the line is sealed and smooth at the very edge so it doesn’t peel.
Watch outSkip thick neon at the tip; it feels bulky and chips faster.
11. Royal Blue Chrome with White Dot Confetti
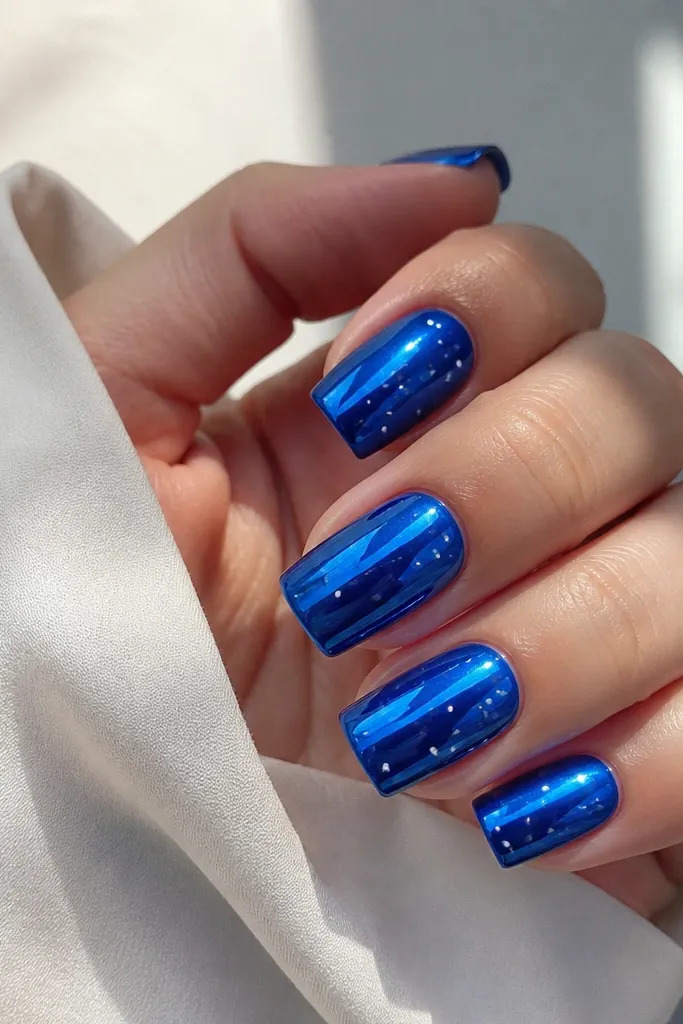
Chrome is the shortcut to “bright Summer Acrylic Nails Square pop” because the light hits instantly. Royal blue chrome looks bold without needing extra art, and the white confetti dots break up the solid color so it doesn’t feel too heavy. I’ve worn this for summer nights and it looked bright under restaurant lighting. It flatters fair and medium skin because blue pops against skin and white dots add contrast. Square nails make the chrome look smooth since you’re not fighting a curved surface.
Step one: build a solid royal blue acrylic base and buff it smooth. Step two: apply chrome powder in royal blue over clear gel, pressing firmly and curing. Step three: dot white gel in 4-6 places per nail using a small dotting tool — keep the dots irregular sizes for a natural confetti look. Finish with one top coat that’s compatible with chrome so reflections stay crisp.
Use a small dotting tool tip size that matches the nail area; tiny nails need smaller dots to avoid looking like mistakes.
Don’t over-seal with a thick top coat; it can dull chrome and flatten the pop.
12. Coral and Pink Ombre with Tiny Pearl Bead at Cuticle
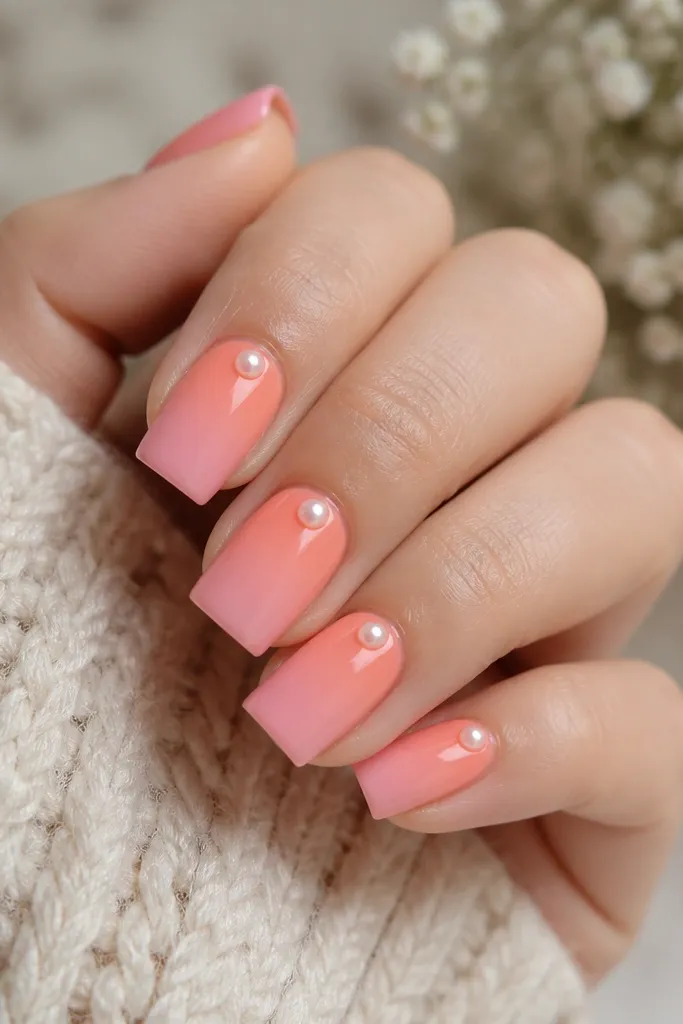
This is girly summer without looking like costume jewelry. The coral-to-pink ombre gives you a natural glow, and the tiny pearl bead adds that “caught the light” moment when you move your hands. I like it on light to medium skin because the ombre stays warm and flattering, and pearls don’t look harsh. It also works for weddings, bridal showers, and date nights because it feels polished but still bright. Square nails keep the pearl placement looking intentional — one bead near the cuticle reads centered.
Editor's noteIf you feel the bead with your finger, add another thin clear cap layer and cure again so it sits flush.
Step one: create an ombre from coral at the cuticle to soft pink near the tip, keeping the blend smooth and not muddy. Step two: cure, then place one micro pearl bead with gel adhesive right near the cuticle center — keep it small so it doesn’t lift. Step three: cap around the bead with clear gel so it feels smooth to the touch, then top coat twice.
Watch outDon’t glue a big pearl; oversized beads snag and pop off fast in summer routines.
13. Tropical Palm Leaf on Clear Base with Bright Lime Outline
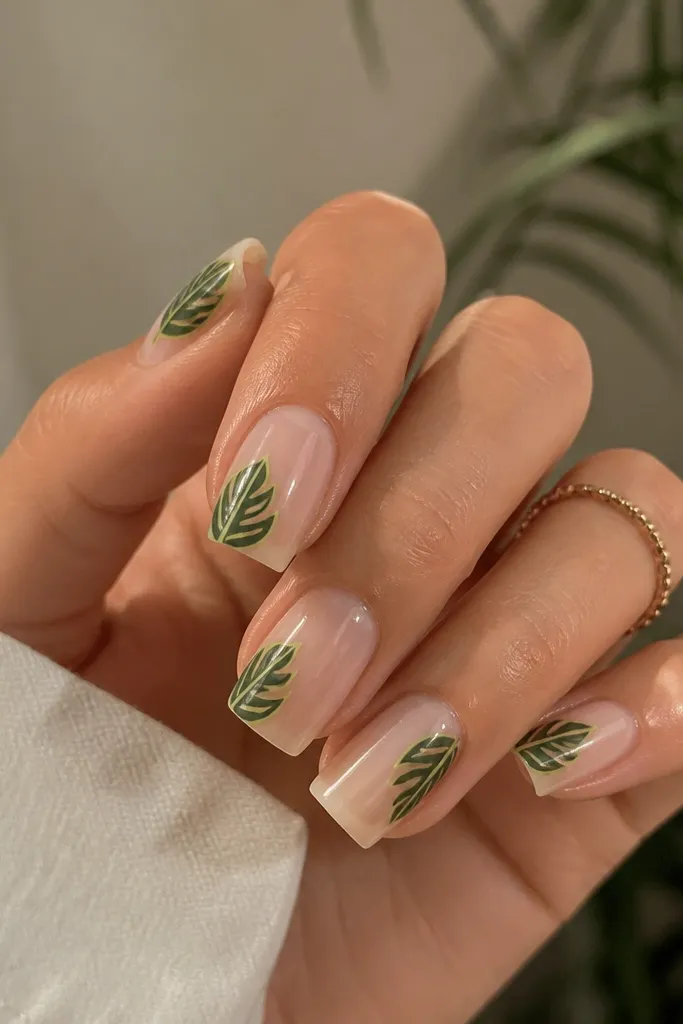
Clear base sets make art look like it’s floating, and palm leaf shapes scream summer vacation. The deep green leaf color reads fresh, while the bright lime outline forces the design to pop against the clear background. This is a great choice if you want bright Summer Acrylic Nails Square pop but you hate heavy color on your nails. It looks especially flattering on shorter squares because the clear space makes the nail look longer. I also like it on hands with a lot of natural nail growth — the clear base hides the grow-out better.
Editor's noteUse a leaf liner brush or a slightly angled brush; it gives you sharper leaf tips than a round brush.
Step one: build a clear acrylic or clear gel base and keep the cuticle area tidy. Step two: paint palm leaves in deep green gel, placing them along one side of each nail so the leaves angle toward the center. Step three: trace the leaf edges with bright lime — just a thin outline so it doesn’t look like a sticker. Finally, top coat twice, making sure the clear base stays glossy and the outline is sealed.
Watch outAvoid filling the whole nail with leaves; negative space is what keeps it clean and bright.
14. Hot Pink Base with Orange Burst Lines and Tiny Black Center Dot
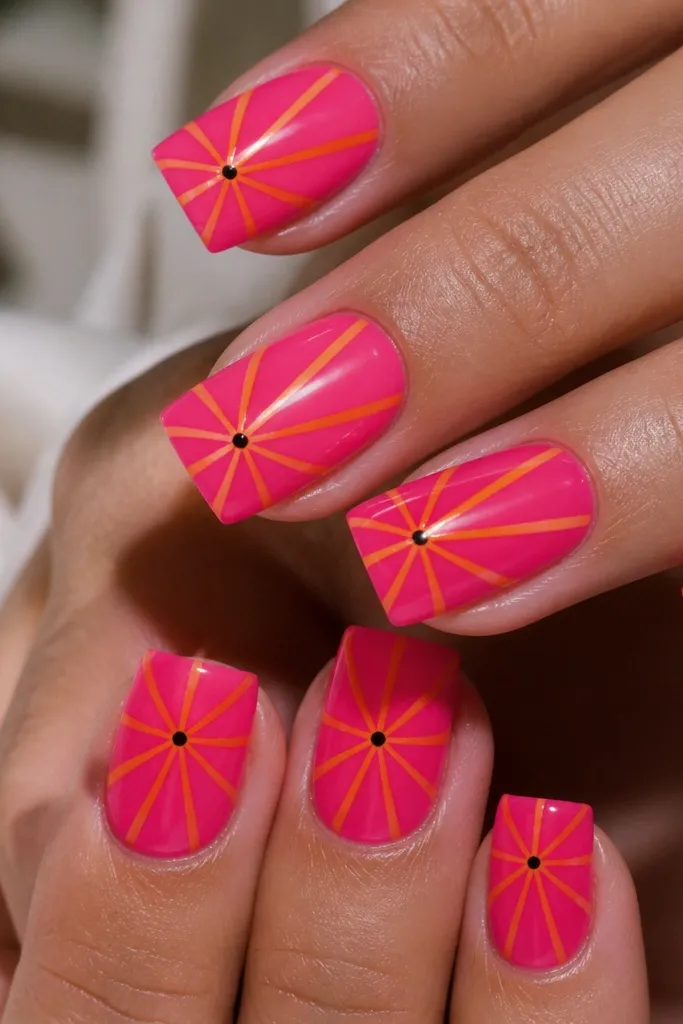
This set is loud in the best way. Hot pink is already bold, and the orange burst lines add motion so your nails look like they’re glowing from within. The tiny black center dot anchors the design so it doesn’t feel like random stripes. I’ve found this combo looks incredible on medium and deeper skin tones because the black dot makes the contrast crisp. On fair skin, it still works — the orange burst keeps it from looking too Barbie. Square nails make the burst lines look sharp because you’re drawing on a flatter surface.
Editor's noteMake the orange lines slightly curved rather than straight; it makes the burst look more natural.
Step one: apply hot pink acrylic and shape the square tips with crisp edges. Step two: place a small black dot near the center of each nail, then draw 7-9 orange lines radiating outward using a fine liner brush. Keep the lines thin and stop them before the edges so the nail still has clean hot pink space. Step three: cure and top coat twice, capping the burst lines so they don’t catch on hair.
Watch outDon’t thicken the orange lines; thick lines look like blobs on square nails.
15. White Marble Base with Neon Coral Veins and Micro Gold Flakes
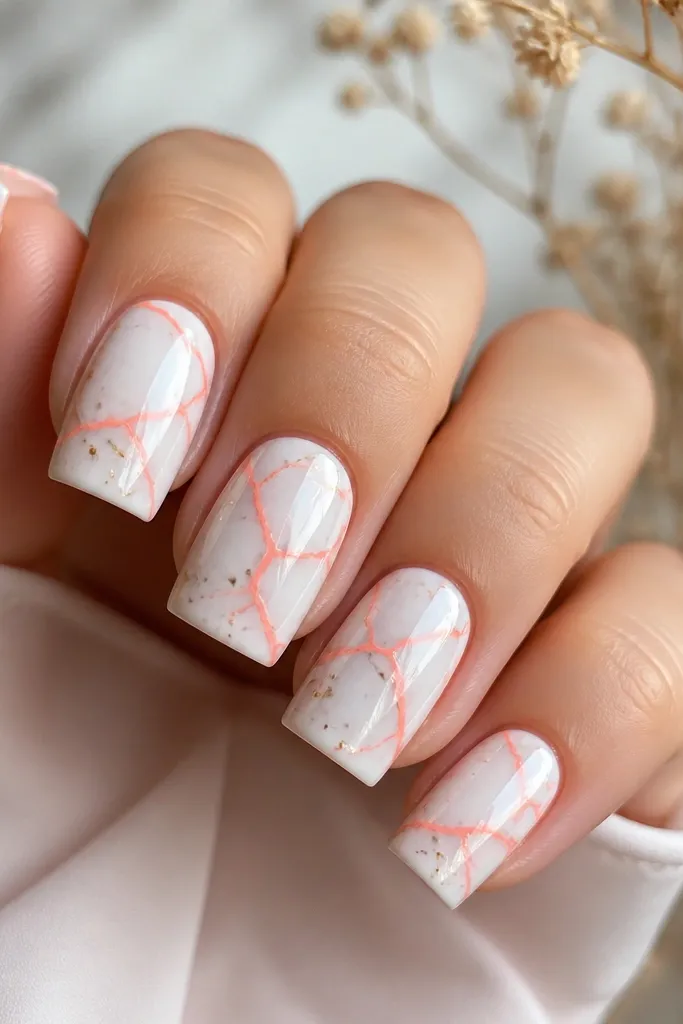
Marble nails can look boring when the veins are muted, so I go neon on purpose. The white base makes everything bright and clean, and neon coral veins add that summer pop without needing heavy saturation across the whole nail. Micro gold flakes make it feel like jewelry, especially when you’re in bright sunlight. This is flattering on all skin tones because white brightens and coral warms. Square nails are perfect for marble because the design looks crisp on a flat surface and doesn’t distort like it can on long curves.
Editor's noteKeep the coral veins off-center on two nails to avoid a copied pattern look.
Step one: build a white marble base by layering white acrylic or gel with a sheer off-white base. Then add thin neon coral vein lines using gel — keep them irregular like real marble cracks. Step two: add micro gold flakes only near the coral veins, pressing lightly into tacky gel. Step three: seal with a thick-enough top coat to level the texture, then cure and finish with a final thin gloss layer.
Watch outSkip chunky flakes; they lift and turn the marble into glitter instead of marble.



