
1. Coral Milk Square with One Gold Stripe
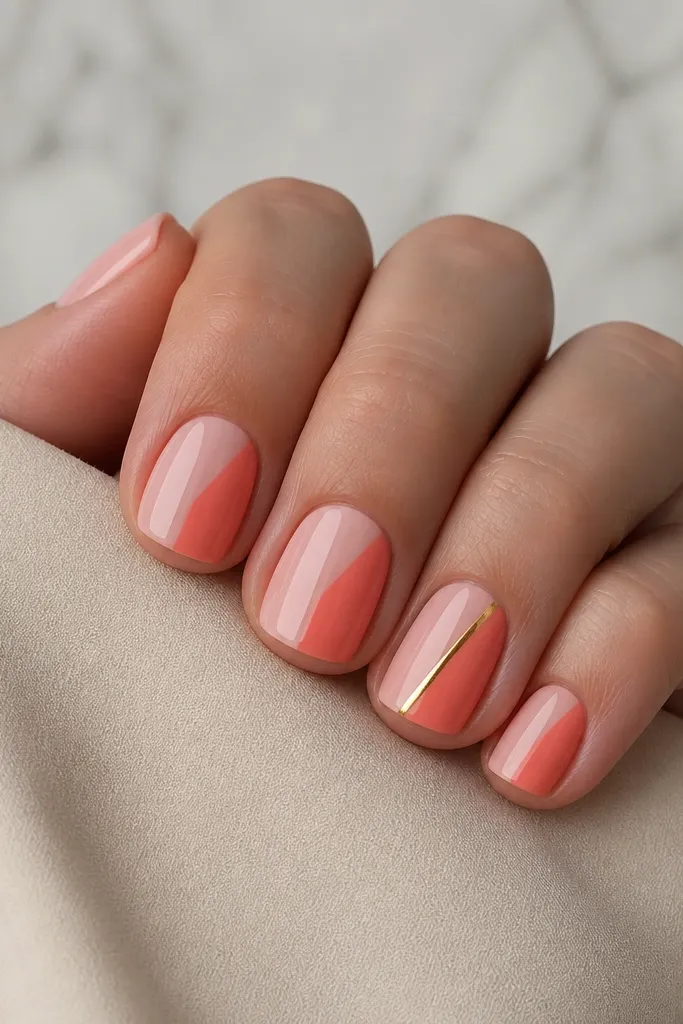
I love this design because it looks bright without looking loud. The milky nude-pink base makes coral look smooth and wearable, and the coral outer half gives you that summer “tan hands” effect. On fair skin, coral can go neon fast, so the milk base keeps it soft. On medium and deep skin tones, the coral pops immediately, especially against the milky nude. The one gold stripe keeps it from looking like a kid’s craft — it’s one controlled detail, not a full nail of glitter.
Editor's noteUse striping tape for the gold line if your hand shakes — peel it while the polish is still tacky so the edge stays sharp.
Start by painting a milky nude-pink base on all nails and cure. Then paint coral on the outer half using a striping brush, leaving a clean vertical line near the center of the nail. For the ring finger, add a thin gold stripe diagonally with striping tape or a gel striper. Finally, seal everything with two careful top coat passes, dragging the brush along each corner edge to lock the square shape.
Watch outSkipping a milky base makes coral look harsh and makes the square corners look stained.
2. Sky Blue Half-Moon Square with Clear Top
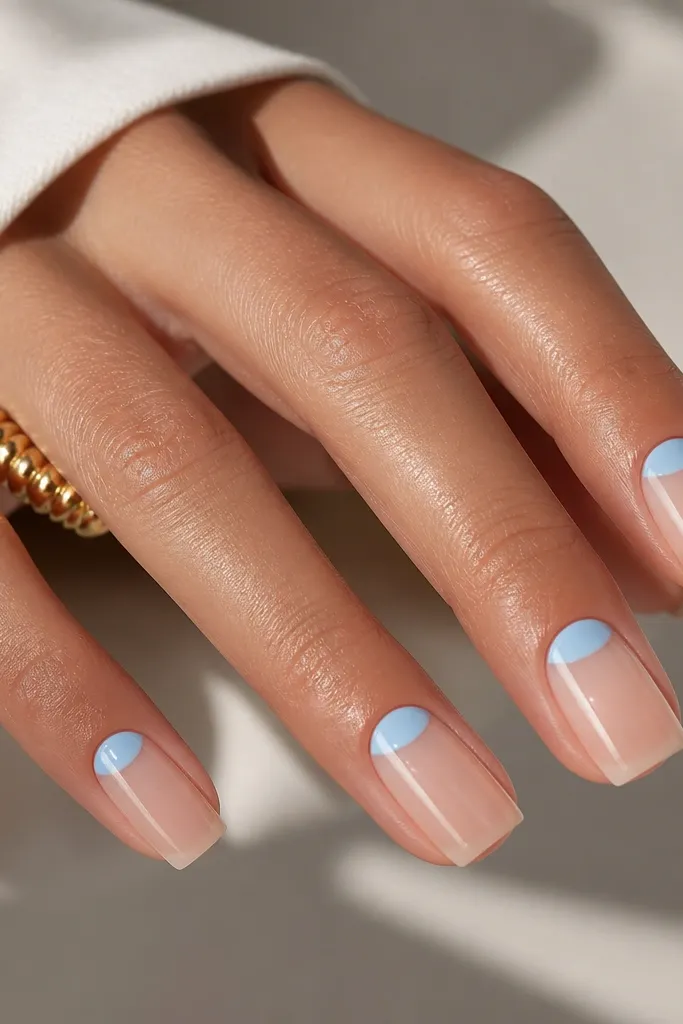
This is the design I reach for when I want “fresh” hands that still feel minimal. The sky-blue half-moon at the cuticle makes the nail look longer, because it frames the base without covering the whole nail. It’s flattering on all skin tones because the negative space keeps everything light, and the blue reads cool against warm undertones. I’ve worn it to work and to dinner — it looks tidy without needing extra art. The clear top coat makes the negative space look glassy, not patchy.
Editor's noteIf you don’t have stencils, use a small piece of tape to block the center of the cuticle, then paint the crescent with a thin brush.
Begin with a sheer nude base coat and cure fully. Place a half-moon stencil or use a small makeup sponge to dab sky blue in a crescent shape at the cuticle, then clean the edges with a cotton swab dipped in acetone. Leave the rest of the nail nude/clear for the negative space effect. Finish with top coat, and cap the free edge lightly so the square tip doesn’t catch water.
Watch outFilling the entire nail with blue ruins the length effect and makes the manicure look flat.
3. Lemon Pop Square with Micro White Dots
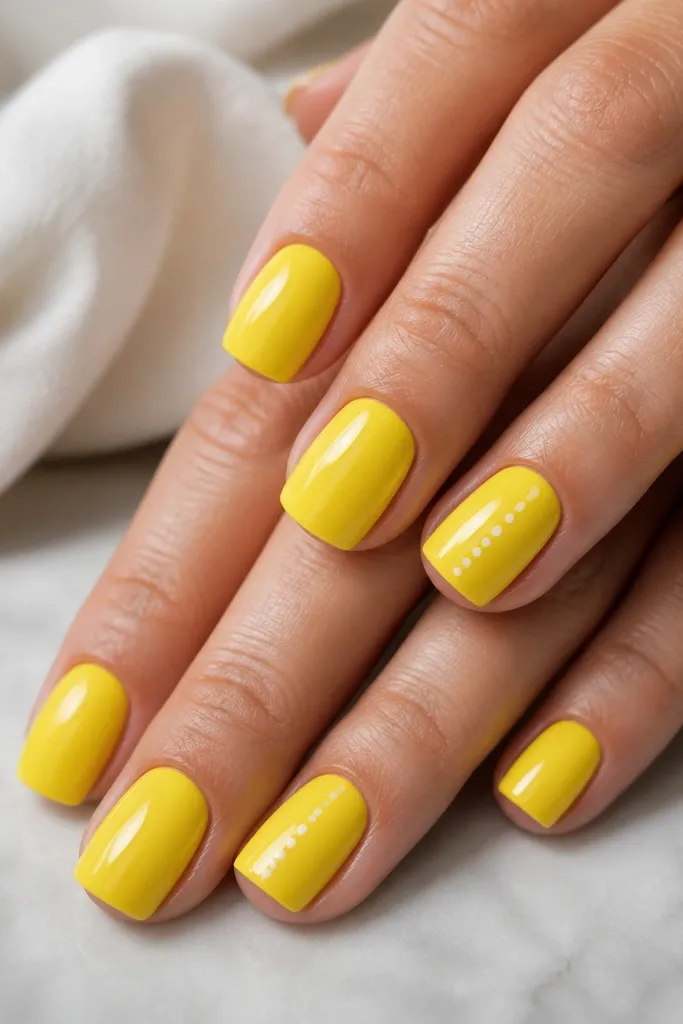
Lemon yellow is the summer cheat code. The trick is keeping it clean and bright, then adding micro white dots only as a detail so it doesn’t look cartoonish. I’ve found this works especially well on medium and deep skin tones because the yellow turns creamy and warm instead of washing out. On fair skin, it still looks great, but you need a smooth base coat and two thin coats so it doesn’t streak. The dots are small enough that your nails look intentional even when they grow out.
Editor's noteTo get perfect micro dots, wipe your dotting tool on a paper towel first so the bead is tiny.
Paint two thin coats of lemon yellow on all nails and cure between coats. On your index and ring fingers, add 4-6 micro white dots using a dotting tool — place them diagonally from lower left to upper right. Keep the dots clustered in the middle third of the nail, not near the cuticle. Seal with top coat, and take a second pass around the sidewalls to keep the square edges glossy.
Watch outPutting dots too close to the cuticle makes the manicure look messy when your nail grows.
4. Mint Matte Square with Glossy Cuticle Line
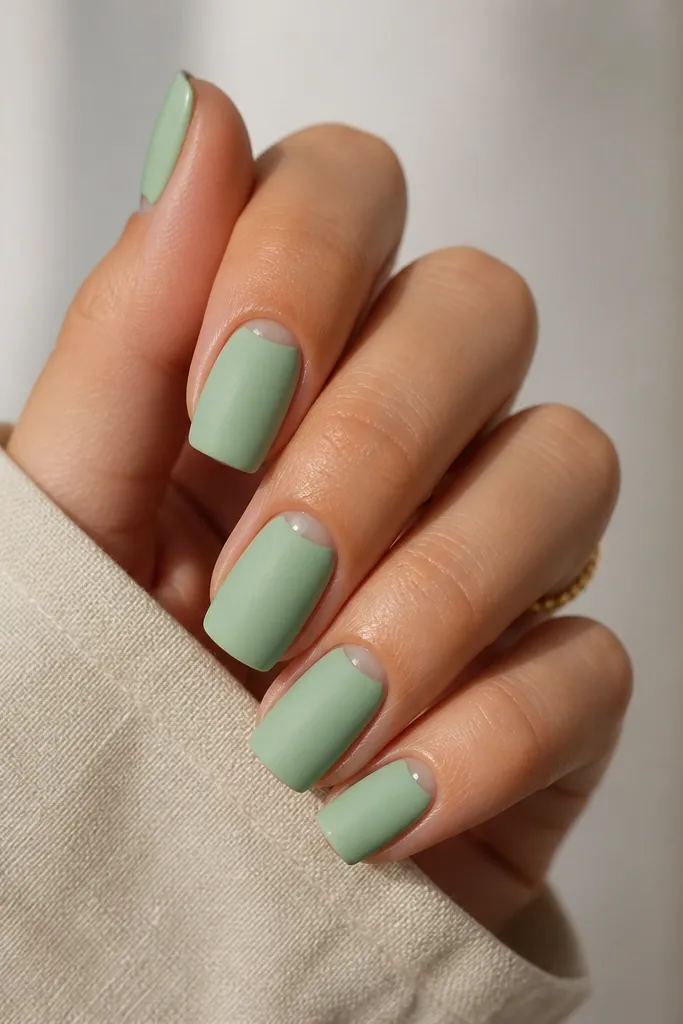
This is one of those designs that looks like you paid more because the finish contrast does the heavy lifting. Matte mint looks cool and clean in summer, and the glossy cuticle line gives shape to the nail without adding bulk. On fair skin, mint can look icy, and the glossy line warms it up visually. On deeper skin tones, mint reads fresh and modern, especially with crisp square corners. It also hides tiny chips better than full gloss because matte doesn’t show shine wear as clearly.
Editor's noteIf your cuticle line floods, use a very small brush and rest the bristles on the nail, not on your skin.
Start with a base coat, then apply mint polish in two thin coats and cure. Let it fully cure, then apply a matte top coat over the whole nail. With a gel top coat (not matte), draw a thin line along the cuticle — just the inner curve — using a striping brush. Cure again, then check the edge and add a second thin line pass if the first looks uneven.
Watch outPutting matte top coat over the cuticle line makes it disappear and kills the contrast.
5. Peach Nude Square with Thin White Side Strip
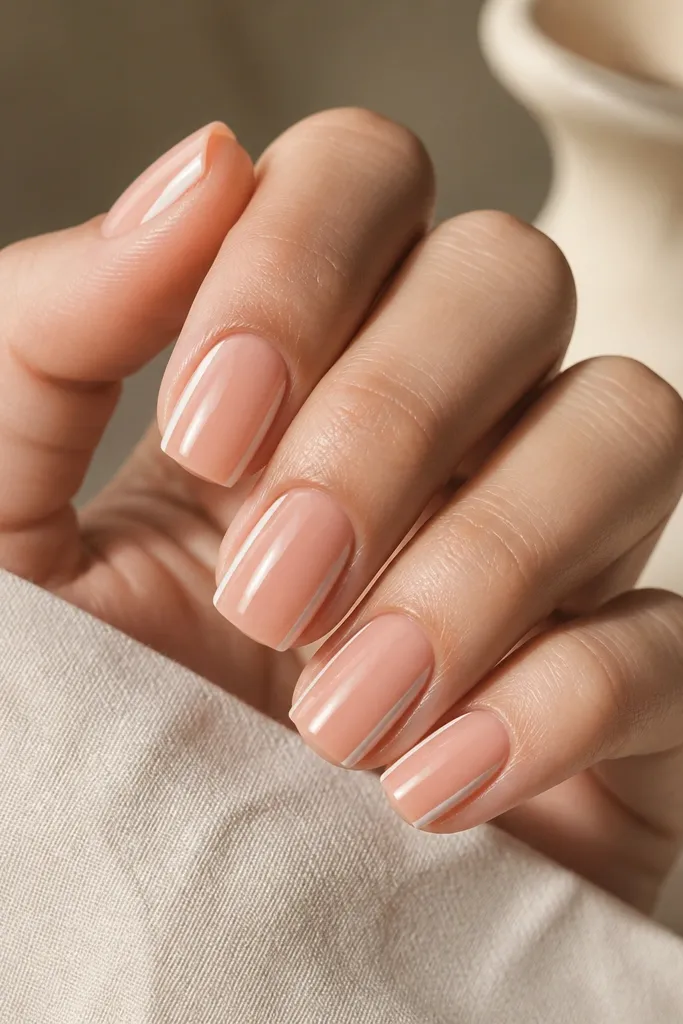
Thin side strip designs make nails look longer because the white line pulls the eye vertically. I like this one on square tips because the straight edges give the stripe a clean path, so it looks crisp instead of wiggly. Peach nude is flattering across skin tones — it looks like your nails but better, and it keeps summer colors from turning too bold. The white strip adds lightness without needing a full pattern. It’s also a great choice if you want something office-friendly but still seasonal.
Editor's noteIf your stripe looks too thick, wipe excess paint off the brush on the bottle rim before you touch the nail.
Paint two thin coats of peach nude and cure. Using a striping brush, pull a thin white line from near the cuticle to the center of the free edge, keeping it about 1-2 mm from the outer sidewall. Don’t go all the way to the edge — leave a tiny gap so it doesn’t flood the corner. Finish with glossy top coat, and cap the tip on the side where the stripe ends.
Watch outCenter stripes on square nails make them look wider; keep it on the side for a length effect.
6. Watermelon Fade Square with Tiny Black Dot
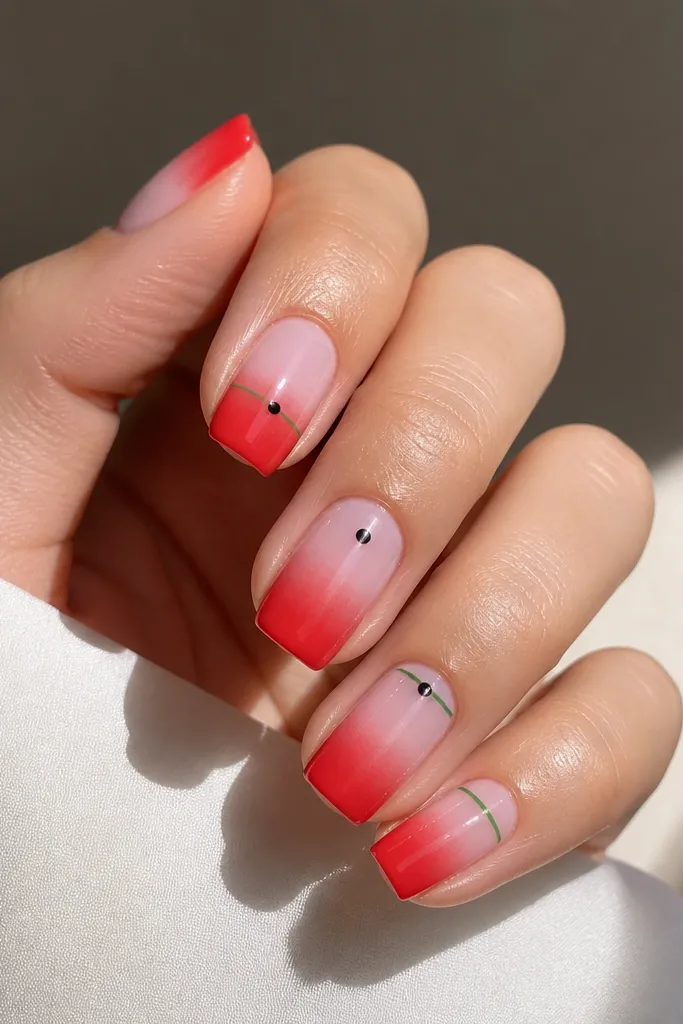
This one feels fun but still clean, because the fade is soft and the details are tiny. A pink-to-red gradient reads like watermelon when you add a thin green line near the free edge on just a couple nails. The tiny black dot works like a seed, but it’s small enough that it doesn’t look like random speckling. On medium and deep skin tones, the red looks rich and juicy. On fair skin, the fade keeps it from looking harsh, especially if you start with a pale pink base.
Start with a pale pink base coat and cure. Sponge a red gradient from the mid-nail toward the tip using a makeup sponge, then blend the boundary with a second light sponge pass. On thumb and ring finger, paint a thin green line across the top edge of the nail about 1 mm from the tip. Add a tiny black dot near the center of index and middle finger only. Seal with glossy top coat, and wipe the brush along the corners to keep the square shape crisp.
For sponges, use a paper towel to dab off excess — too much pigment makes the gradient look muddy.
Adding green on every nail makes it look like candy overload.
7. Tangerine Gloss Square with One Matte Accent Nail
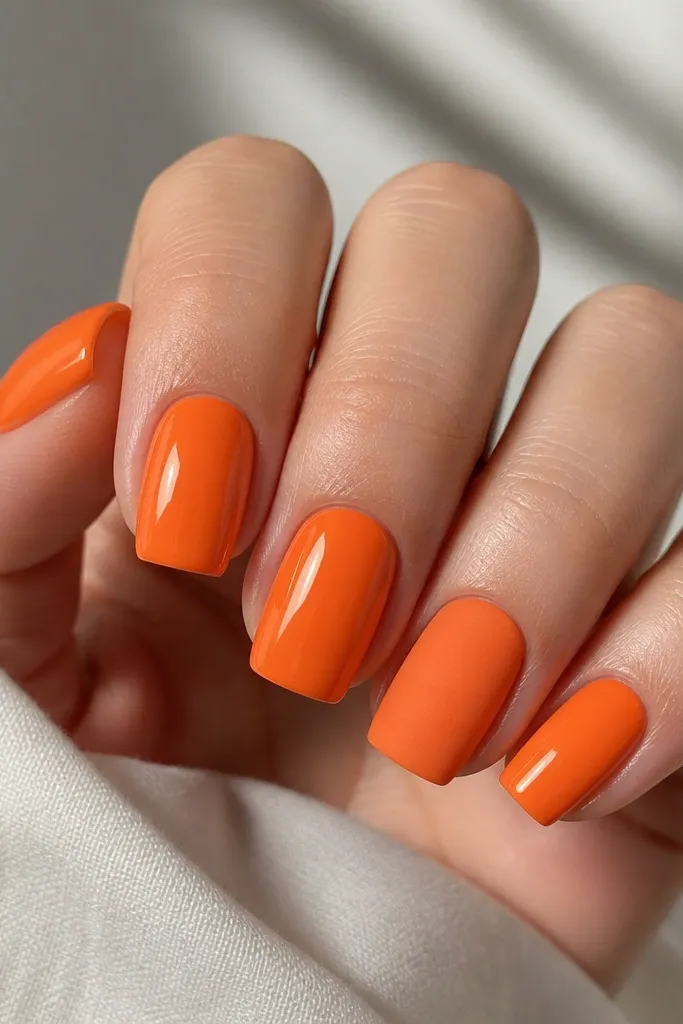
This is my lazy-summer-slay when I want it to look styled without art. Tangerine in glossy finish makes your hands look warm and sun-kissed, and the single matte accent nail adds interest without needing dots or stripes. On fair skin, orange can look too bright if you go full matte everywhere, so keep the main nails glossy. On deeper skin tones, the matte accent reads velvety and looks expensive in daylight. This design also grows out clean because there’s no small pattern that can shift.
Editor's noteIf your matte top coat looks streaky, apply a thinner layer and cap the tip lightly.
Paint all nails tangerine orange with two thin coats and cure. Apply glossy top coat to every nail except the ring finger. For the ring finger, use matte top coat over the cured color. Let it cure fully so the matte finish doesn’t smear. Finally, check the square corners and add a tiny drop of glossy top coat to the outer edge if you want extra shine only where light hits.
Watch outUsing too thick of a layer on the accent nail can make the square tip look rounded.
8. Nude Square with Neon Outline French Tips
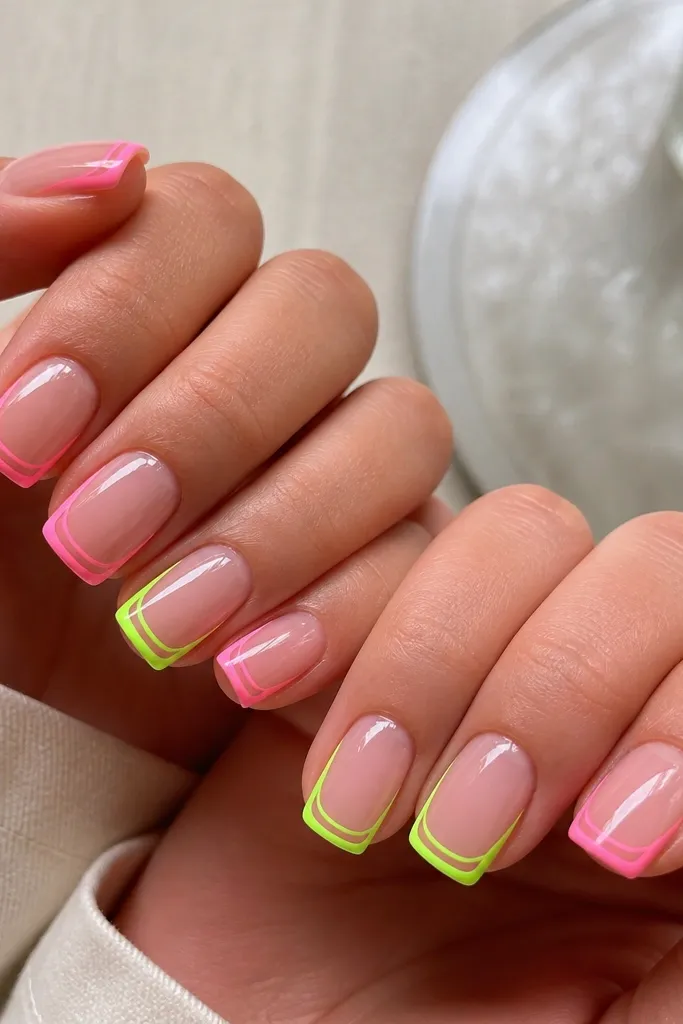
Outline French tips are the fastest way to make square nails look high-end. The nude base keeps it wearable, and the neon outline gives you that summer pop without covering the whole nail. I’ve done neon outlines for backyard parties and it still looks clean at night because the lines catch light. On fair skin, neon pink looks playful; on medium and deep skin tones, neon green and pink both pop sharply against nude. The key is keeping the outline thin so the nail still reads square and neat.
Editor's noteUse striping tape to mark the tip curve, then peel after a few seconds so the neon line stays razor-straight.
Start with a nude base that matches your skin undertone — peachy nude for warm undertones, pinky nude for cool undertones. Paint a thin neon line along the outer edge of the tip and cure. Add a second thinner line just inside the first line to create the outline look, then alternate neon colors by nail (pink on index/middle, green on ring/pinky). Leave the center of the tip nude. Seal with glossy top coat over everything, careful not to flood the neon lines.
Watch outFilling the entire tip with neon makes it look heavy and chips faster at the corners.
9. Lavender Sheer Square with Silver Confetti Flakes
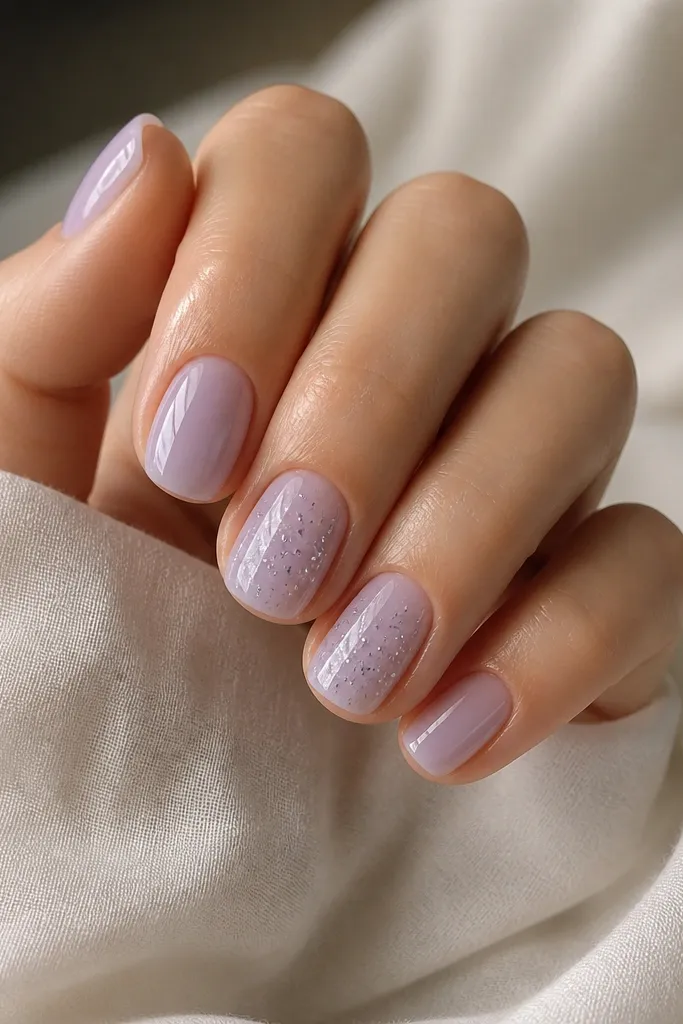
Sheer lavender is the perfect budget summer color because it looks soft and expensive even with simple flakes. The confetti flake placement is what makes it look intentional — you want it concentrated near the center, not packed at the cuticle. This works beautifully on fair and medium skin tones because the sheer base stays light and airy. On deeper skin tones, sheer lavender still shows, but you’ll want two thicker sheer coats so it doesn’t look too washed out. The silver flecks give you sparkle without the bulk of glitter gel.
Editor's noteUse a small amount of flakes — you should still see the lavender through them.
Paint a sheer lavender base and cure. Apply a second sheer coat until it looks even but still translucent, then cure again. On the accent nails only, dab a tiny amount of clear gel in the middle third of the nail and sprinkle silver confetti flakes. Press gently with a silicone tool, then seal with a thin layer of top coat to lock the flakes in. Clean up the sides with a brush dipped in acetone before curing.
Watch outOverloading flakes makes square edges look lumpy and rough.
10. Charcoal Smoke Square with Peach Accent Thumb
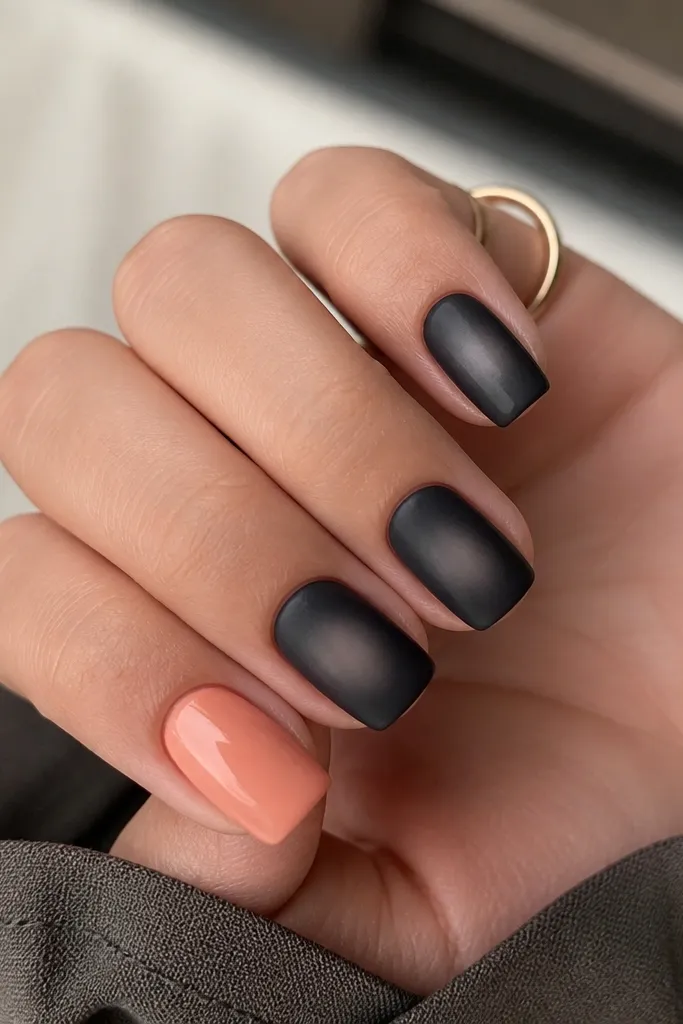
This design looks like summer at night. Charcoal smoke gives you an edgy base, and a single peach thumb keeps it warm and flattering. I’ve worn this with denim and white tees, and the contrast makes the whole look feel styled. It’s flattering on all skin tones because charcoal grounds the nails while peach brings the brightness back. The smoky effect is also forgiving — it hides small application streaks better than a solid color.
Editor's noteIf you don’t have matte top coat, use glossy on everything and just keep the smoke effect soft — it still looks good.
Start with charcoal gray and apply two thin coats, curing between coats. Add a smoky fade by using a makeup sponge with a tiny amount of charcoal polish and tapping lightly toward the center, then blend the edges with a clean sponge. For the thumb, paint it solid peach instead of charcoal and cure. Seal the charcoal nails with a matte top coat, then keep the thumb glossy. Finish by checking the square corners and wiping away any matte dust from the edges.
Watch outPainting smoke too dark at the cuticle makes it look like dirt. Keep the fade centered.
11. Seafoam Swirl Square with White Outline
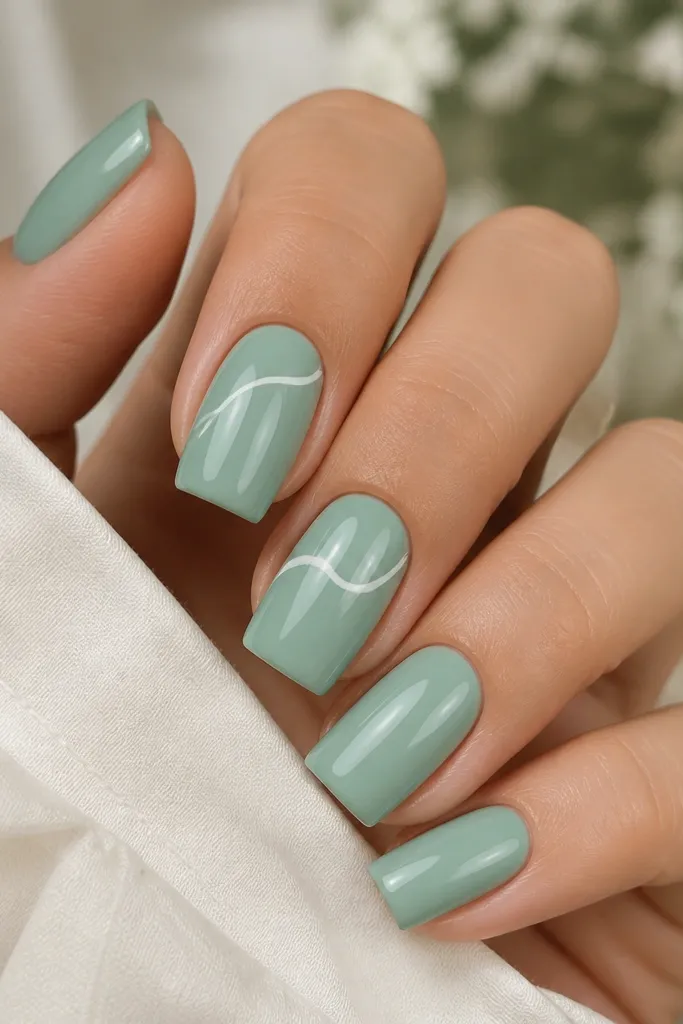
Seafoam is one of those colors that instantly reads summer without being neon. The swirl plus white outline gives you motion and a clean graphic look, and it works great on square nails because the lines stay straight at the edges. I recommend doing the swirl on two nails only so you don’t end up with a busy set. On fair skin, seafoam looks fresh and light; on medium and deep skin tones, it looks crisp and modern. The white outline makes the swirl visible even as your nails grow out.
Paint all nails seafoam green in two thin coats and cure. Choose two accent nails and draw a simple swirl shape using a striping brush — one curve across the nail, another curve back. Add a thin white outline around the swirl lines while the base is fully cured, then cure. Seal with glossy top coat, and cap the free edge carefully so the square tip stays sharp. If the swirl looks slightly thick, add a thin top coat over it to smooth the surface.
Practice the swirl on a scrap nail tip or a piece of plastic first — the curve direction matters more than you think.
Skipping the white outline can make seafoam swirls disappear on certain lighting.
12. Strawberry Shortcake Square with Dotted Cuticle
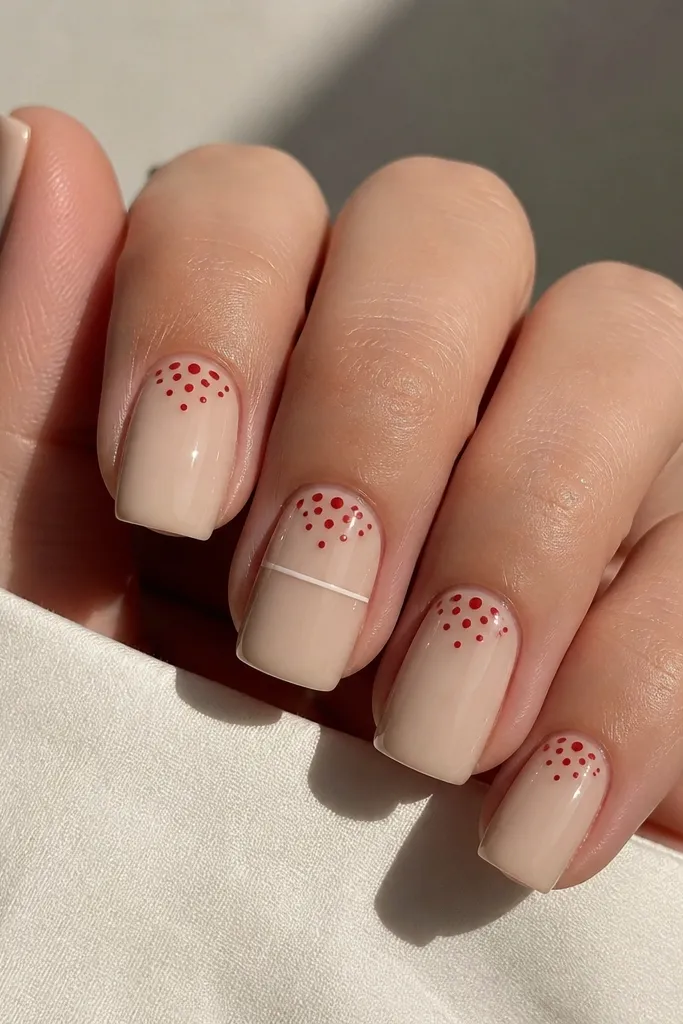
This is a cute design that still looks grown-up because the dots stay small and the base is nude. The red dots at the cuticle mimic seeds, and the glossy finish makes the whole set look juicy. It’s flattering on fair, medium, and deep skin tones because nude acts like a neutral frame. I also like adding a single thin white line on one nail — it makes the set look intentional instead of random. This one is perfect for brunch, festivals, and summer weekends when you want something sweet but not overly themed.
Start with a creamy nude base and cure. Using a dotting tool, add 6-10 tiny red dots in a cluster around the cuticle, leaving space at the sidewalls. On one accent nail, draw a thin white line horizontally across the center third. Add a second layer of top coat to smooth everything and cure fully. Clean up any dot edges with a fine brush dipped in acetone.
For seed clusters, keep the dots tighter on the center and slightly looser near the sides to look natural.
Putting big dots makes it look like paint splatter, especially on square tips.
13. Blueberry Fade Square with Tiny Gold Dot
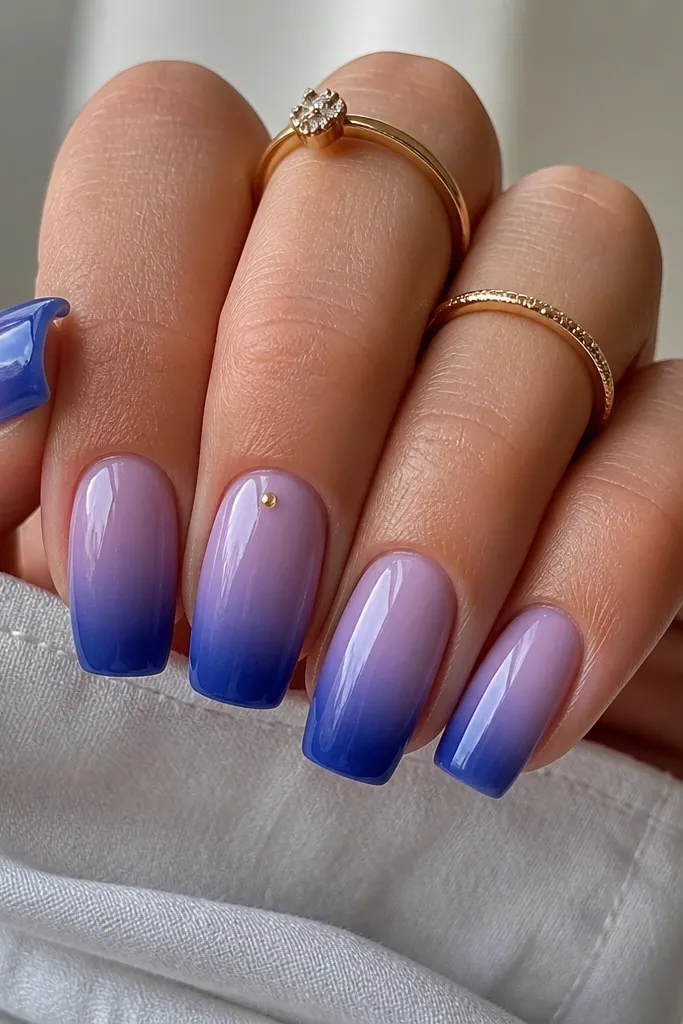
Blueberry fade nails look like you did nail art, but they’re actually simple once you master the sponge. The sheer lilac base keeps it light, and the deep blue tip gives that summer fruit color without going neon. This looks especially good on medium and deep skin tones because the deep blue shows clearly. On fair skin, the sheer base prevents patchiness and keeps the gradient looking soft. The tiny gold dot is the only extra — it reads like a highlight and keeps the set from feeling plain.
Editor's noteUse a makeup sponge that’s already used — a brand-new one can leave harsh texture in the fade.
Apply a sheer lilac base and cure. Sponge deep blue from the mid-nail to the tip, blending into the lilac with a light second sponge pass. On one accent nail, add a tiny gold dot near the cuticle using a dotting tool. Seal with two coats of glossy top coat, making sure you cap the free edge so the gradient doesn’t snag. If the gradient looks uneven, add a very thin layer of lilac at the base to even it out.
Watch outDoing the sponge too thick makes square tips look rounded and uneven.
14. White Base Square with Color-Block Corners
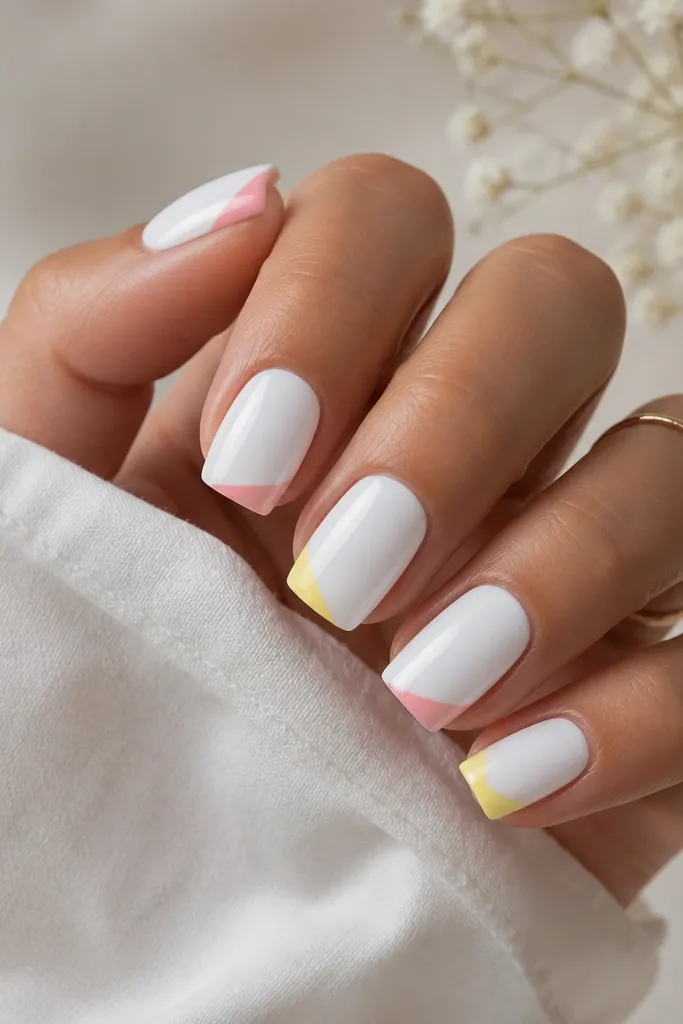
Color-block corners are my go-to when I want geometric nails that stay budget-friendly and still look crisp. A white base makes every pastel corner look clean, and the triangles at the corners keep the design airy. This flat layout is also forgiving if your hand isn’t perfect — triangles hide minor brush strokes. On all skin tones, white base is the brightening choice for summer, and the pastels keep it soft. Because the art is only at the corners, your manicure still looks good as it grows out.
Editor's noteIf white looks streaky, do three thin coats instead of one thick coat — square nails show thickness fast.
Paint all nails a solid white in two thin coats and cure. Cut tiny pieces of striping tape and place them at the top corners of the free edge to mask small triangle areas. Fill those masked areas with pastel pink on some nails and pastel yellow on others, then cure. Remove tape carefully while the polish is still tacky if you can, then seal with glossy top coat. Cap the free edge lightly so the corners don’t lift.
Watch outTrying to freehand triangles without tape usually makes the corners look rounded.
15. Nude Square with Neon Micro Line at the Tip
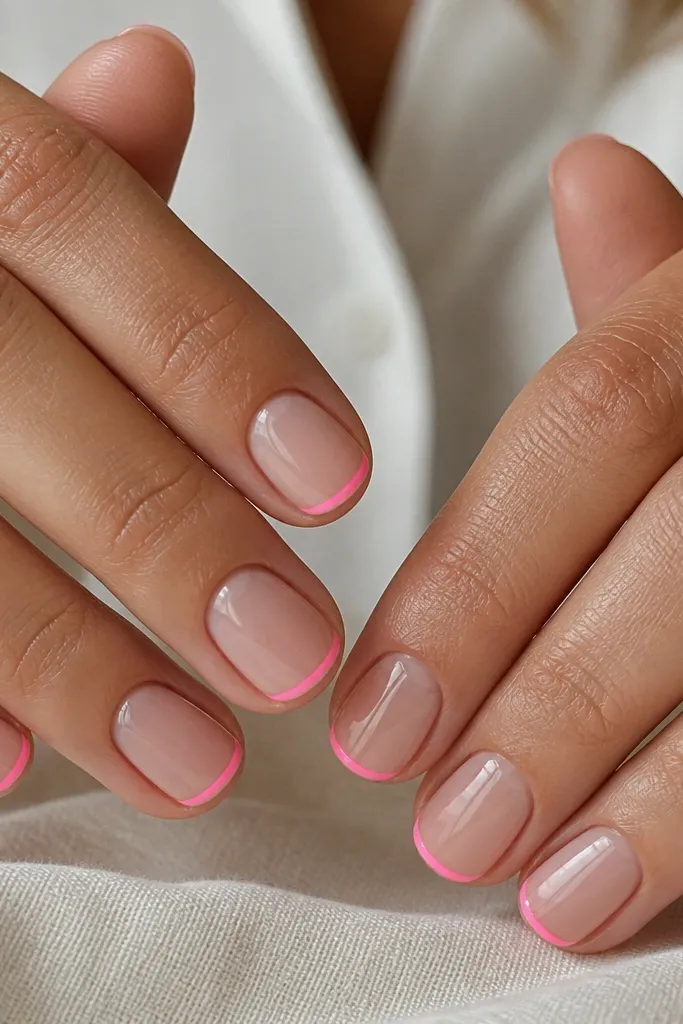
This is the simplest design that still looks like nail art. A nude base keeps it wearable, and a neon micro line at the tip makes the nail look sharper and more graphic. I use this when I’m busy because it takes minutes and looks clean even if you’re not a pro. It flatters every skin tone because nude matches your natural undertone and neon adds the summer contrast. The micro line also hides small growth because it stays at the edge.
Editor's noteLet the neon line cure fully before top coat if your top coat tends to pull color — it keeps the line crisp.
Start with nude pink and cure, then add a second thin nude coat for full opacity. Use striping tape or a thin gel brush to draw a neon line straight across the tip edge — keep it thinner than the width of your brush. Cure, then add top coat, making sure the brush lightly touches the line so it bonds. If the line looks slightly uneven, add another micro pass with the neon color only on the gaps, then top coat again. Finish by cleaning the sidewalls with a small acetone brush.
Watch outA thick neon band makes square tips look bulky and chips faster.



