
1. Matte Black Base with Mirror Chrome French Smile
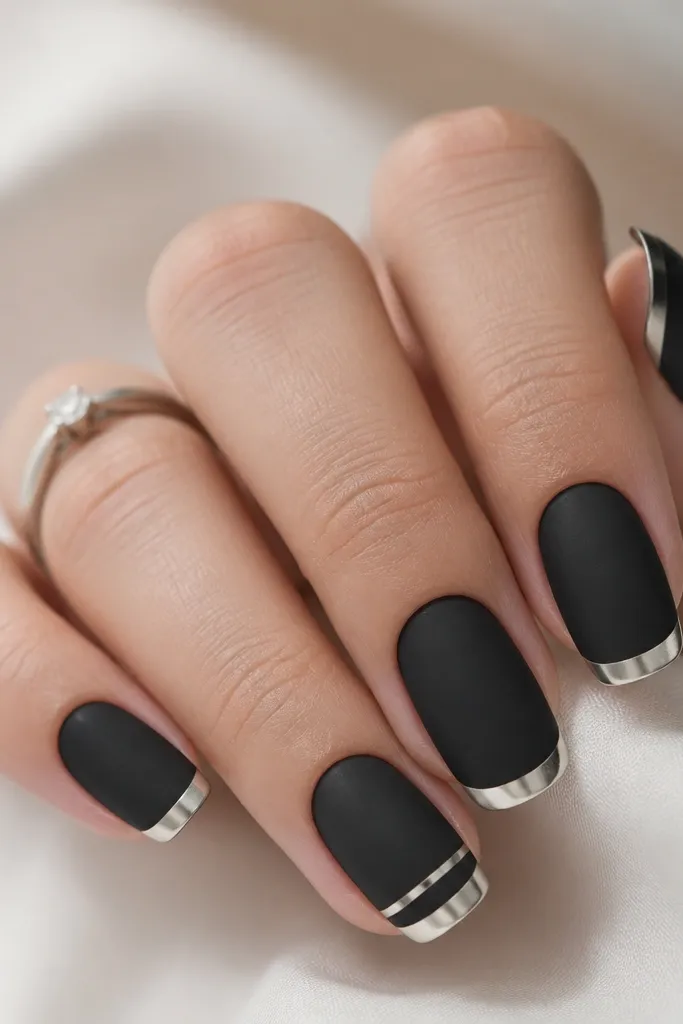
This one is my "quiet expensive" set. The matte black base looks soft and hides tiny texture, while the mirror chrome French tip catches light like jewelry. It flatters medium to long nail beds because the chrome smile has room to sit cleanly without wrapping too far over the sides. If your skin tone is warm or neutral, the silver chrome makes your hands look brighter without turning grey.
Start by applying matte black gel to the full nail and cure it fully. Place French guide stickers so the smile line sits about 1.5-2 mm above the natural free edge, then paint a thin black line at the guide edge only if you need extra contrast. Apply a tacky chrome base or tack layer just under the smile area, cure for the exact tack stage, then rub silver chrome pigment onto the smile with a firm foam applicator. Finally, seal with a glossy top coat over the chrome only, keeping the rest matte by avoiding extra passes on the black.
Editor's noteIf the chrome looks slightly smoky, wipe the tack zone with a barely damp lint-free wipe before applying pigment. It sharpens the edge and removes stray gel dust.
Watch outAvoid curing the chrome base fully before pigment - it turns patchy and looks dull.
2. Black Micro-French with Thin Chrome Border
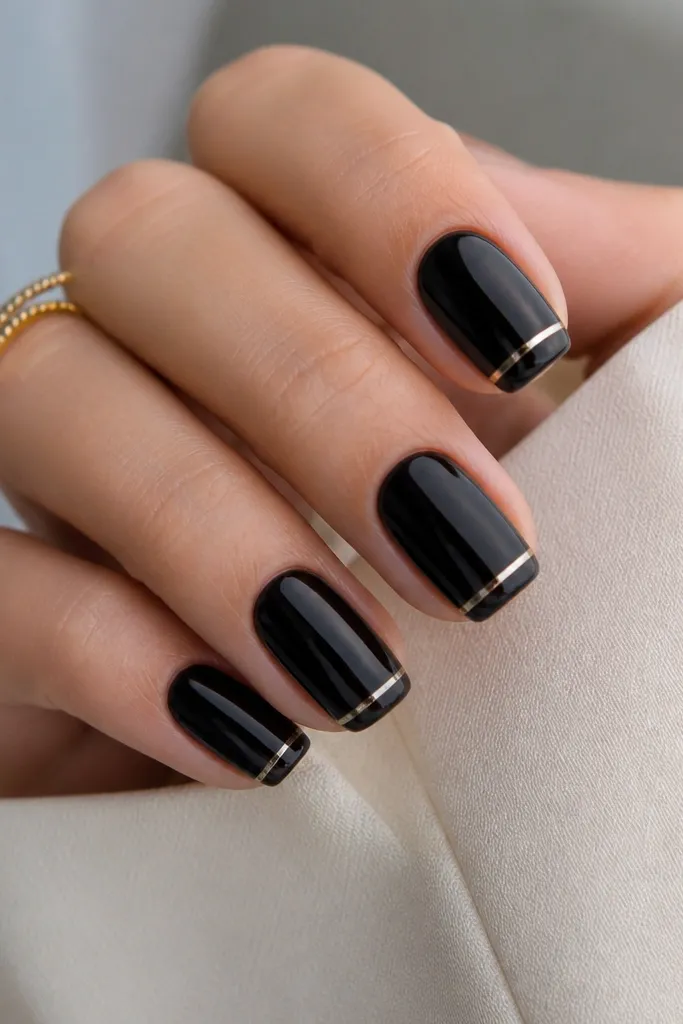
Micro-French is the style when you want the chrome to look intentional instead of loud. The black stays dominant, and the thin chrome border gives a clean edge that visually lengthens short nails. This works especially well on short squoval or rounded nails because the chrome line stays narrow and doesn't flood the nail. I like it on hands with shorter nail beds because it doesn't overwhelm the fingertip.
Start with two thin coats of glossy black gel, curing each coat. Use French guide stickers designed for micro tips or cut your own guide strips so the smile covers only 1-2 mm. Paint the micro tip area with black gel if you need a solid tip, then apply a tacky chrome layer only where the thin border will sit. Cure to tack stage, then apply chrome pigment in a thin strip, pressing lightly so you keep a crisp line. Seal with glossy top coat, but use a lighter hand over the chrome border so the line stays razor thin.
Editor's noteUse a nail art striping brush for the border after chrome - a tiny touch of clear gel can clean up the edge.
Watch outSkip thick chrome layers here - they turn into a blob and ruin the micro effect.
3. Black French Ombré into Silver Chrome Fade
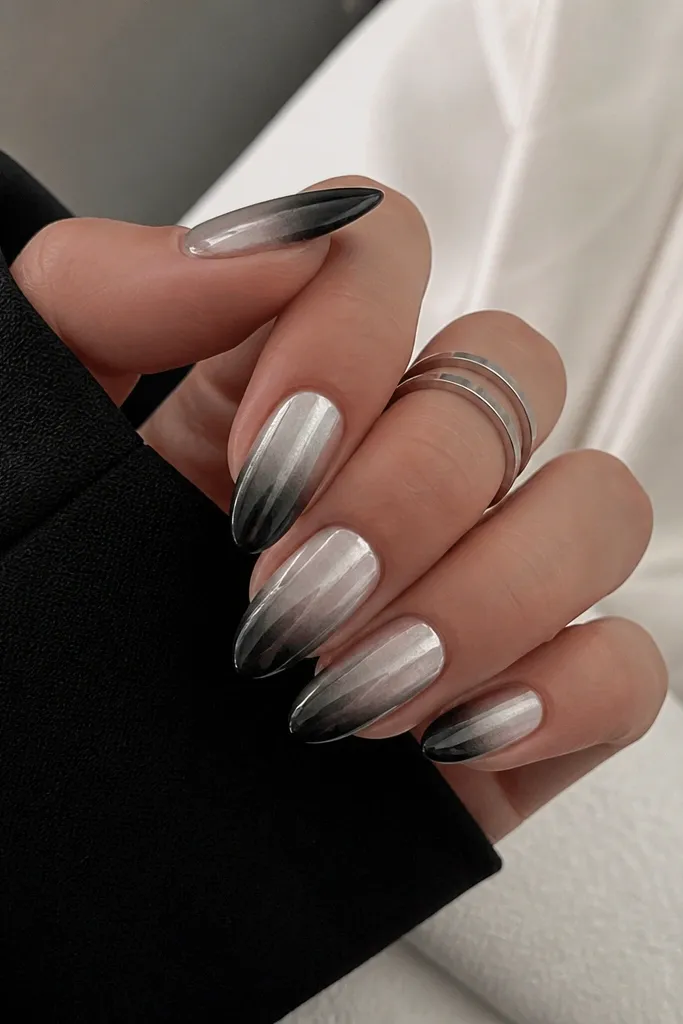
This is the set I wear when I want chrome but not a hard line. The ombré fade makes the chrome look like it's melting into the nail, which looks flattering on medium almond shapes. It's also forgiving if your smile line isn't perfectly symmetrical because the gradient hides it. For fair skin, the grey fade looks soft; for deeper skin tones, the silver still pops without looking harsh.
Start with a glossy black base on the full nail, then sponge a grey gel wash from the tip upward about one-third of the nail length. Cure, then apply a thin tacky chrome base in the outer half of the nail where you want the brightest reflection - not the whole tip. Cure to tack stage, then dab silver chrome pigment with a sponge so you get a smooth fade, pressing more at the outer edge and less near the center. Add a second mini dab if you want extra brightness, then seal with a high-gloss top coat.
Editor's noteWipe your sponge with isopropyl on a lint-free wipe between nails so the gradient stays clean.
Watch outDon't drag chrome pigment back and forth - it creates streaks that look messy under bright lighting.
4. Black Chrome French with Negative Space V-Notch
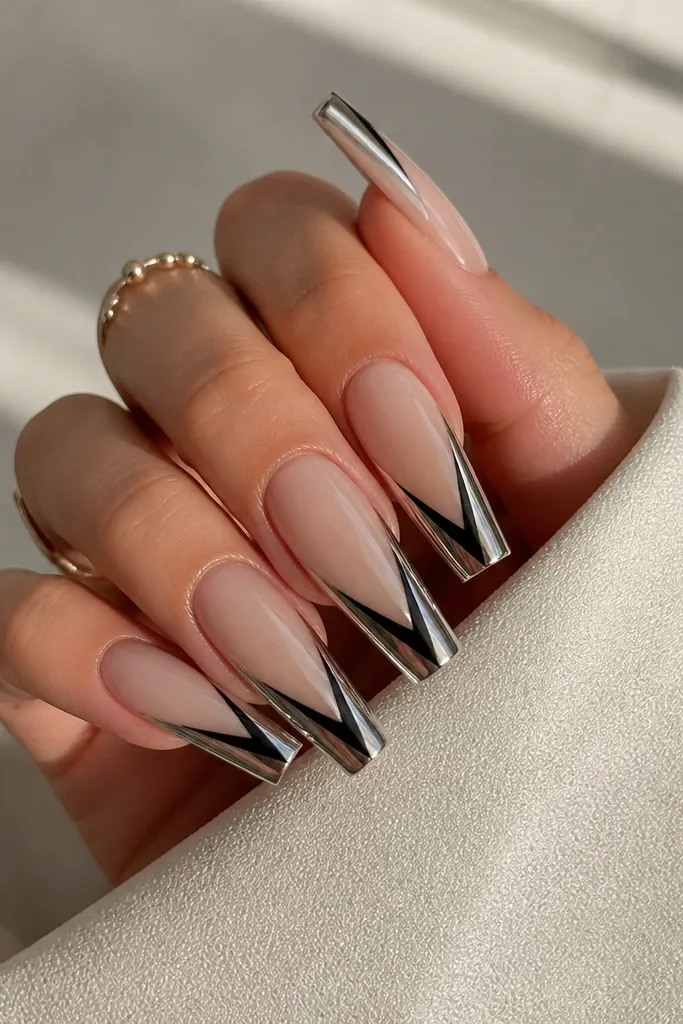
Negative space makes this chrome French feel modern instead of classic French. The V-notch gives a slimming effect, especially on long coffin nails, and it draws the eye to the center of your finger. I also like this on hands where you want your nail to look longer without covering the entire tip with heavy black. The nude base keeps it airy, so the chrome stays the star.
Start with a sheer nude base gel and cure it. Use a thin strip of French guide or cut a small V-shaped stencil from vinyl so it creates a centered V negative space. Paint the tip area surrounding the V with black gel, curing it fully, then apply a tacky chrome layer along the two outer sides only. Cure to tack stage, rub silver chrome pigment over those sides, and keep the V notch untouched. Seal with glossy top coat, avoiding overflow into the negative space.
Editor's noteIf your V line looks uneven, use a tiny brush dipped in gel remover to clean the edges before top coat.
Watch outDon't overfill the V notch with nude gel - it kills the crisp geometry.
5. Glossy Black French Tips with Gunmetal Chrome Flip
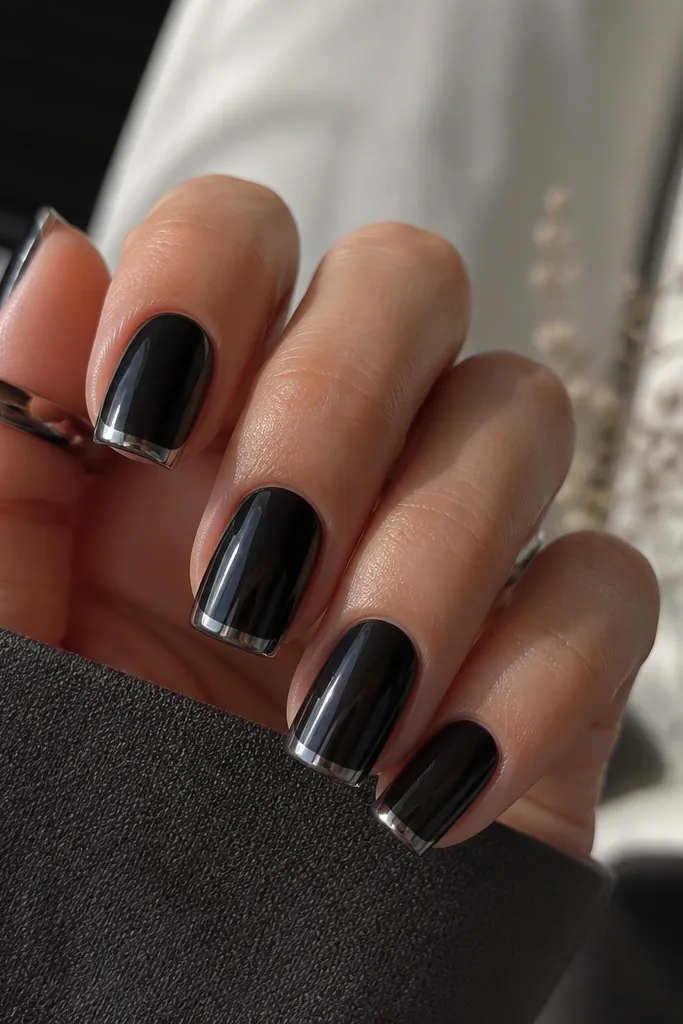
Gunmetal looks cooler and more wearable than bright silver, especially if you don't like high shine reflecting directly into your eyes. The "flip" effect at the very edge makes the tips look dimensional, not flat. This set flatters square and short-medium nails because the edge chrome is concentrated and doesn't take over the nail bed. It also looks great on darker skin tones because the gunmetal reads sleek instead of grey.
Start with glossy black on the full nail and cure. Apply French guide stickers for a standard tip shape, leaving about 2-3 mm free edge coverage. Paint the tip area in glossy black again if needed for opacity. Apply a tacky base only at the outer 0.5-1 mm of the French tip edge, cure to tack stage, then apply gunmetal chrome pigment and press it over the edge so it catches the side. Seal with glossy top coat carefully - too much top coat can mute the edge reflection.
Editor's noteUse a fine nail buffer to remove any chrome build-up along the edge before top coat so it stays smooth when you type.
Watch outSkip sealing before chrome is fully adhered - you'll trap loose pigment and get bald spots.
6. Black French with Chrome Halo Around Cuticle
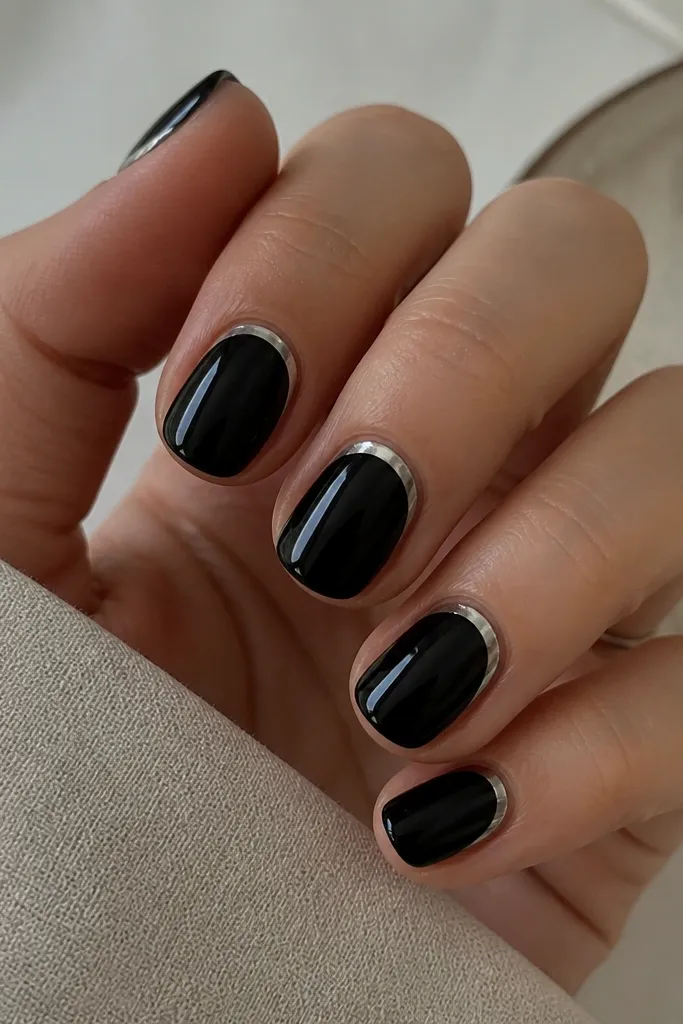
This is a chrome French set for people who want the look but don't want chrome on the tip. The halo around the cuticle brightens the hand and makes nails look more polished, even when the tips grow out. It flatters round and short nails because the chrome sits where your eye already rests. If you hate chips showing on the free edge, this design hides growth better because the chrome is not at the wear zone.
Apply glossy black gel and cure. Place a thin cuticle guide stencil (or use a small curved nail art brush) to mark a crescent around the cuticle - leave the center cuticle area black. Apply a tacky chrome layer within the halo area only, cure to tack stage, then rub mirror silver chrome pigment into the crescent. Gently remove excess pigment with a dry brush, then seal with glossy top coat on the whole nail. Add a second top coat only if you feel any roughness on the chrome halo.
Editor's noteKeep the halo width consistent at about 1 mm so it looks like one line, not two separate arcs.
Watch outDon't let chrome touch the skin - it lifts at the edges and looks messy fast.
7. Black Chrome French with Tiny Silver Studs at Smile Line
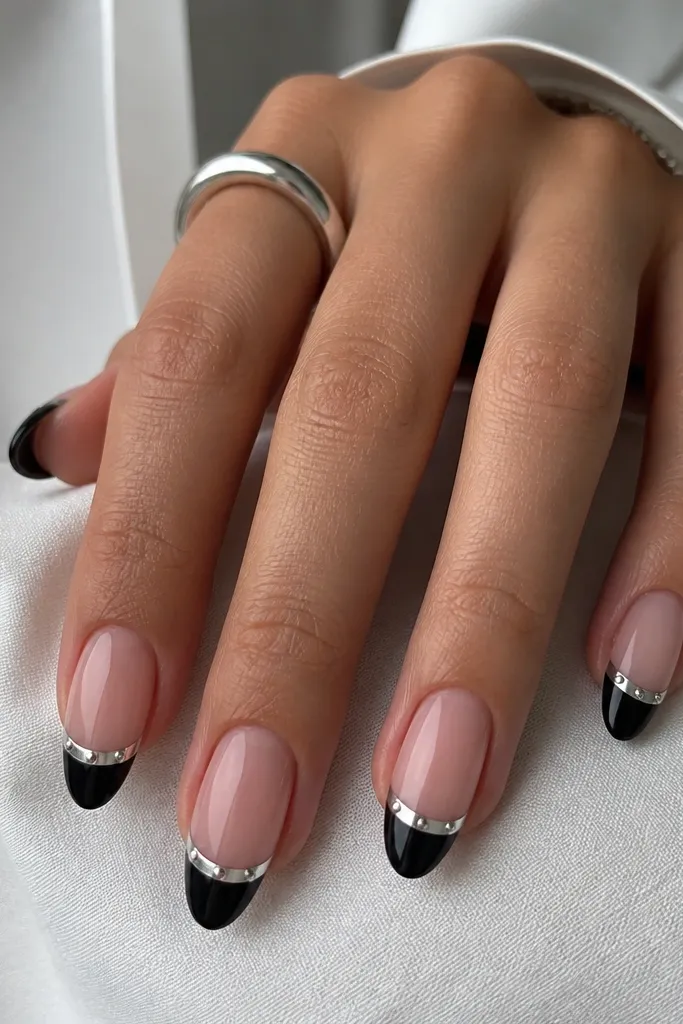
Studs make this feel party-ready without turning into chunky bling. The chrome smile keeps the studs looking sharp instead of dull, and the black base makes the stones look cleaner. This flatters almond nails because the smile line has a natural curve to follow, and the studs land in the highlight area. If your hands run warm and you sweat a bit, the glossy top coat seals the stones well so you don't lose them early.
Start with a glossy black base and cure fully. Apply French guide stickers to shape the smile line at 2 mm. Add a tacky chrome base just on the smile band, cure to tack stage, then apply silver chrome pigment. Before sealing, place three tiny flat-back studs using a dotting tool: one in the center and one on each side, spacing about 1.5-2 mm apart. Seal carefully with a glossy top coat, using thin strokes so you don't flood and drown the studs.
Editor's noteUse a top coat with a thicker consistency for stud sets. Thin top coat flows into stud gaps and makes them look cloudy.
Watch outSkip large stones - they cover the smile line and make the chrome look secondary.
8. Black French with Chrome Outline Only (No Fill)
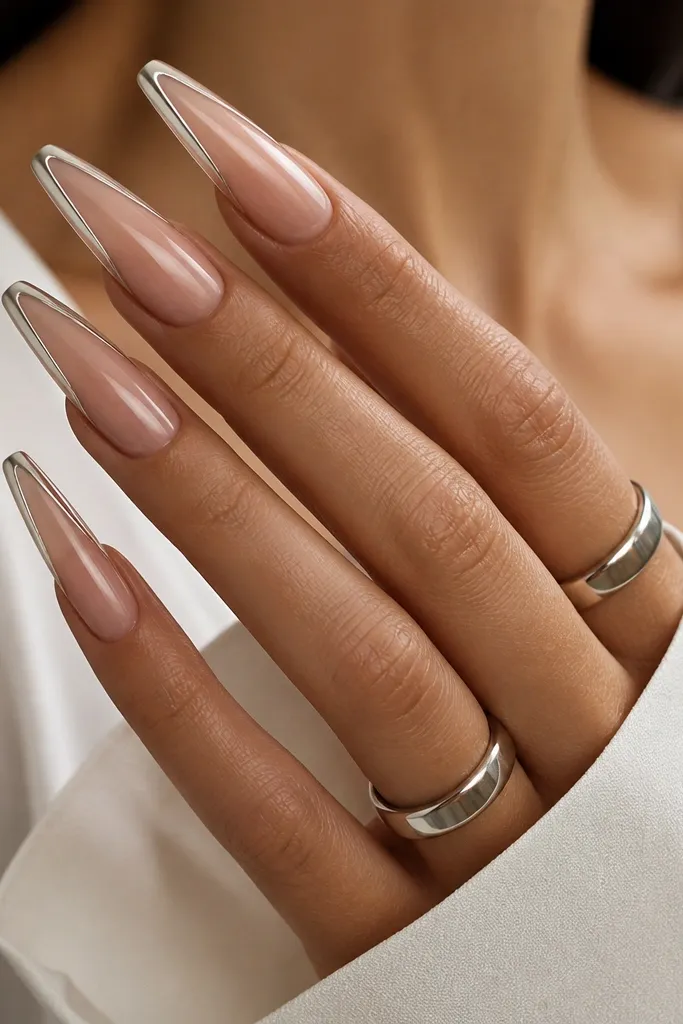
Outline-only French is the trick when you want chrome to feel airy and grown-up. The nude interior makes nails look longer, and the chrome edge gives that clean "done" finish even when the tip grows out. This works best on longer shapes like coffin or stiletto because there's enough space for the outline to breathe. For people who hate thick black tips, this keeps everything light while still looking sharp.
Start with a sheer nude gel base and cure. Use French guide stickers to define the tip outline. Apply a tacky chrome base along the outline path only, cure to tack stage, then rub chrome pigment onto just the edge line. Remove guides and clean any stray chrome with a small gel brush and gel cleanser. Seal with glossy top coat, keeping the brush strokes away from the outline to prevent smearing.
Editor's noteAfter sealing, run a lint-free wipe lightly over the chrome edge to remove any micro-lift before it hardens under top coat.
Watch outDon't paint the tip interior black before chrome - it defeats the outline effect.
9. Black French with Opal Chrome Topcoat Over Silver
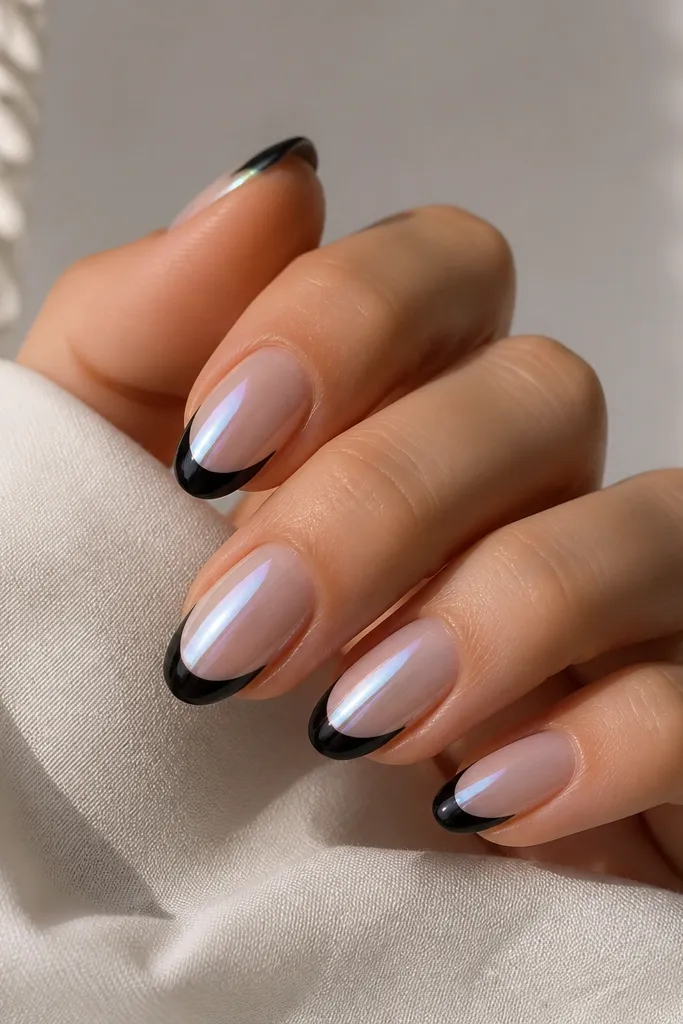
This is the chrome French set for anyone who loves shimmer but wants it to look different in every light. The silver base makes the opal chrome pop, while the black tip keeps the color shift controlled. It flatters medium almond nails because the smile line is wide enough to show the shift without looking like glitter. On cooler undertones, the opal shift reads icy; on warm undertones it reads peachy-pink.
Start with glossy black tips using French guide stickers, cure them. Apply a tacky chrome base over the smile band, cure to tack stage, then apply regular mirror silver chrome pigment. Brush off excess pigment and seal with a thin layer of clear gel that stays tacky for a moment, then apply opal chrome pigment over the silver. Cure fully and seal with glossy top coat, using two thin coats so the opal shift stays even across the smile.
Editor's noteIf your opal chrome looks flat, add a second light layer of opal chrome only on the center of the smile band.
Watch outAvoid one thick opal layer - it can look dusty instead of reflective.
10. Black French with Matte Chrome Stripe Down the Center
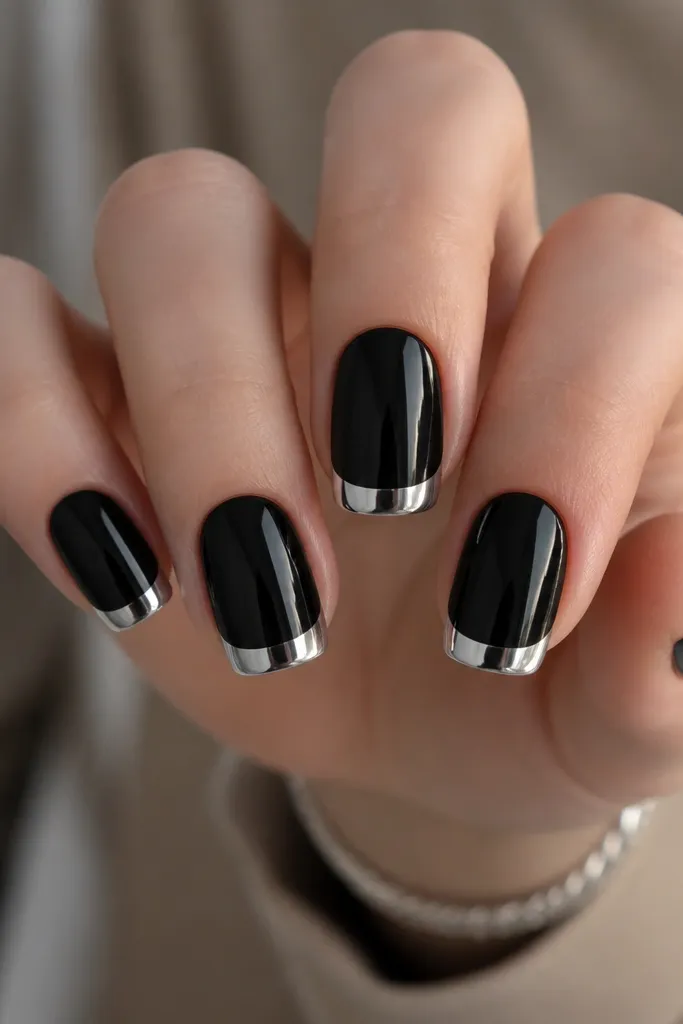
The contrast here is the point. Mirror chrome on the sides reflects hard, while the matte chrome center stripe softens it and makes the design look custom. This flatters short squoval nails because the vertical stripe gives a clean lengthening line. If you have busy rings or bracelets, this set still reads refined because the matte stripe breaks up the shine.
Apply glossy black base and cure. Use French guide stickers to create the smile area, then apply a tacky chrome base over the entire smile band and cure to tack stage. Apply mirror silver chrome pigment for the full band and seal lightly with a thin clear gel if needed. For the matte stripe, add a tacky base only in the center line (about 1 mm wide), cure to tack stage, then apply matte chrome pigment. Finish with a glossy top coat over the mirror areas and a lighter top coat over the matte stripe so it stays matte.
Editor's noteUse matte chrome pigment sparingly. A thin line always looks sharper than a wide stripe.
Watch outDon't seal matte chrome with heavy glossy top coat - it turns shiny and loses the effect.
11. Black Chrome French with Sparkle Dust Inside the Smile
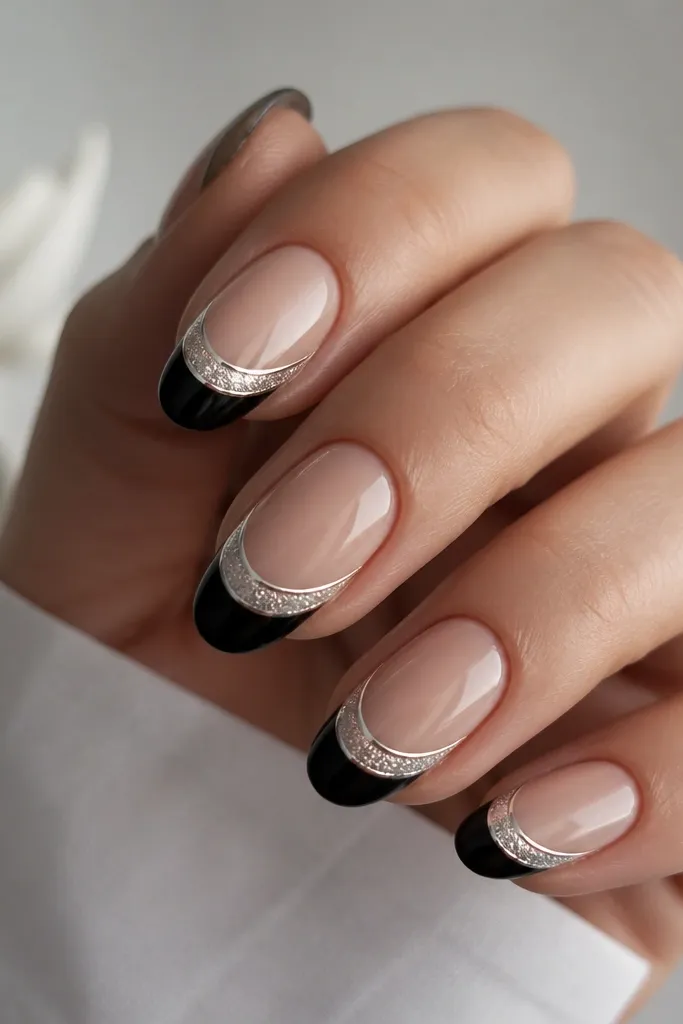
This one looks like chrome meets party lighting. The mirror edge gives you that clean French definition, while the sparkle dust inside adds texture without chunky glitter. It flatters medium oval nails because the curved smile holds the sparkle evenly. If you want something that photographs well at night, the suspended shimmer shows up without looking cheap in daylight.
Start with glossy black on the nail and cure. Apply French guide stickers to define the smile band at about 2 mm. Apply a tacky chrome base across the smile band, cure to tack stage, then apply mirror silver chrome pigment to create the edge reflect. Over the chrome band, dab a tiny amount of fine silver sparkle dust into remaining tack - don't cover the whole nail, just the smile interior. Seal with glossy top coat in two thin layers so the sparkle looks suspended and doesn't shed.
Editor's noteUse a dotting tool to press sparkle into the tack - it prevents fallout and keeps the texture even.
Watch outSkip thick glitter. Big particles grab light unevenly and make the smile look messy.
12. Black French with Chrome Swirl Tail on Accent Nail
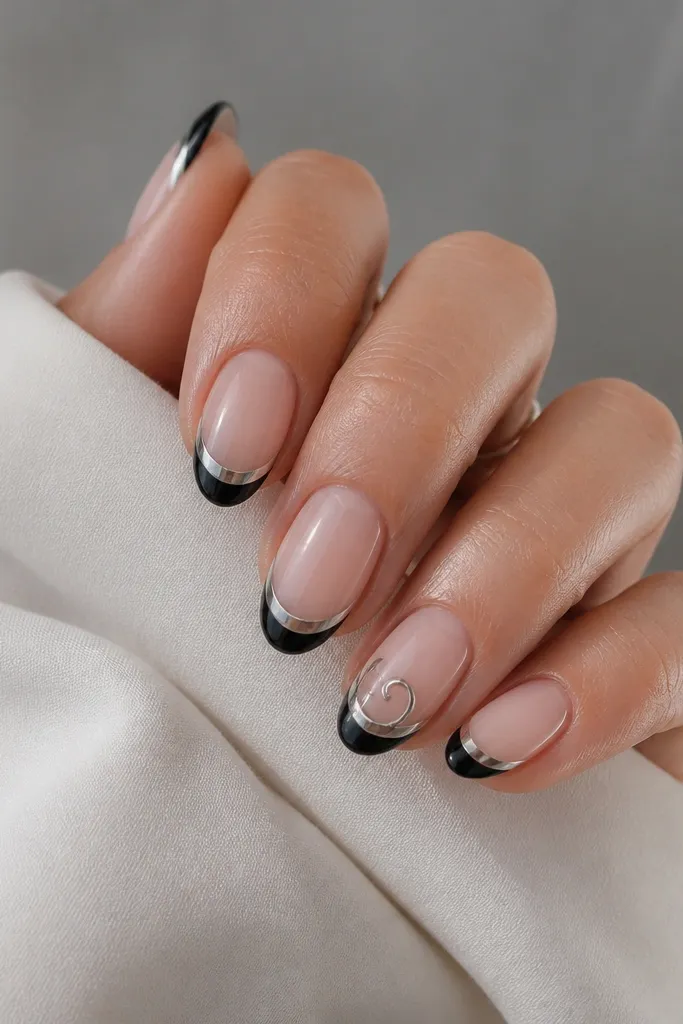
A single swirl tail makes the set feel personal. The main nails stay classic with a mirror chrome smile, and the accent nail adds movement without turning the whole set into art-glitter. This flatters oval and almond shapes because the swirl follows the curvature of the nail. If you like your nails to look styled but still wearable, this is the best balance.
Paint glossy black tips with French guide stickers and cure. Apply tacky chrome base on the smile band for all nails, cure to tack stage, and rub mirror silver chrome pigment in. For the accent nail, after chrome is applied and excess is brushed off, use a fine liner brush with a gel adhesive (or clear gel) to draw a small swirl starting at the center of the smile and curling toward the middle of the nail. Apply chrome pigment to the gel line immediately and press with a foam applicator. Seal with glossy top coat, then cap the swirl with a thin gel layer if you feel any texture.
Editor's noteDo the swirl before top coat on the accent nail. It locks the chrome into the design instead of sitting on top.
Watch outDon't try to draw swirl lines after you've fully sealed. You'll smear chrome and lose the crisp curve.
13. Black French with Chrome Lace Edge Effect (Brush-On)
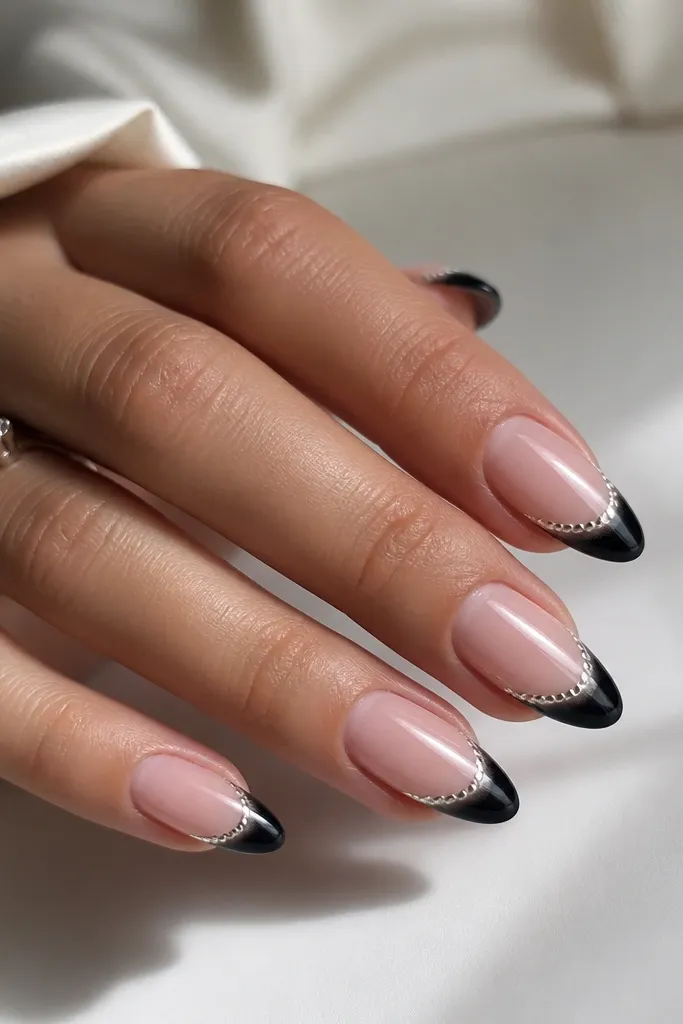
Lace edge chrome looks like you spent hours, but it's mostly brush control. The black French gives a clean base, and the lace effect adds detail right where the light hits. This flatters long almond nails because there's space for the scallops to look intentional. On hands with longer fingers, the lace border makes the set feel delicate instead of heavy.
Start with glossy black French tips using guides, cure fully. Apply a tacky chrome base along the smile line only, cure to tack stage, then apply mirror silver chrome pigment to fill the main smile. For the lace edge, use a dotting tool and a thin liner brush to place tiny connected dots and micro dashes along the outer border of the smile - apply these dots in clear gel first, then tap chrome pigment onto each dot. After the lace border is covered, seal with glossy top coat, using slow strokes so the lace doesn't get smeared.
Editor's notePractice the dot-and-dash rhythm on a spare nail tip. The spacing is what makes it look like lace instead of random glitter.
Watch outAvoid uneven dot sizes. Large dots make the edge look chunky and cheap.
14. Black Chrome French with Storage-Friendly Drawer Labels (Hands-Down Setup)
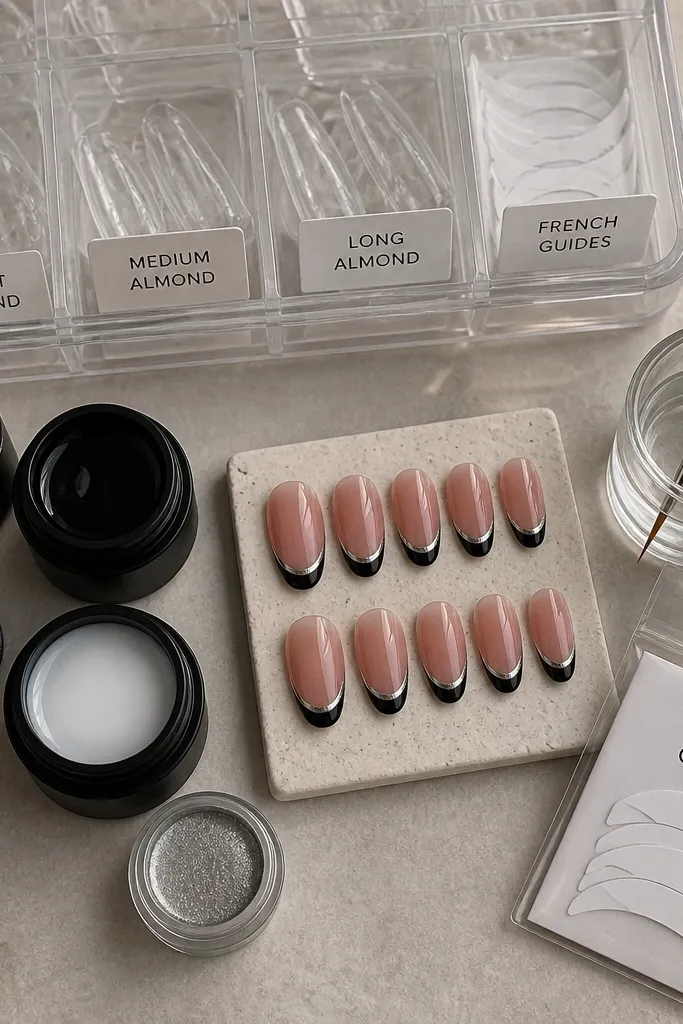
This isn't just a design, it's the setup that makes black Chrome French nails actually repeatable. When your chrome pigment, tacky base, guide stickers, and liner brush live in separate labeled spots, you stop rushing and you stop contaminating the chrome with stray dust from buffing. I built this because I kept ruining one nail per set from smudges - the chaos was the real culprit. The pictured French style is a classic mirror smile that looks clean with any outfit, and the storage setup keeps it consistent.
Start by setting up a small drawer organizer with at least four compartments: chrome pigment, tacky base, French guides, and brushes. Label them with tape so you can read them in low light. Lay your French guide stickers flat in a sleeve so they don't curl, and keep your liner brush in a separate cup with a lid nearby. When you do the nails, apply glossy black base, place guides, apply tacky base on the smile band, cure to tack stage, then apply mirror chrome pigment and seal. Finish by wiping the organizer area so chrome dust stays contained for the next set.
Editor's noteKeep a small trash bowl for chrome waste. If pigment gets on your lint-free wipes, your next nail loses reflect.
Watch outDon't store chrome pigment loose in a jar without a lid - it spreads powder into everything you'll touch next.
15. Black Chrome French with Rose-Tinted Chrome Accent on Ring Finger
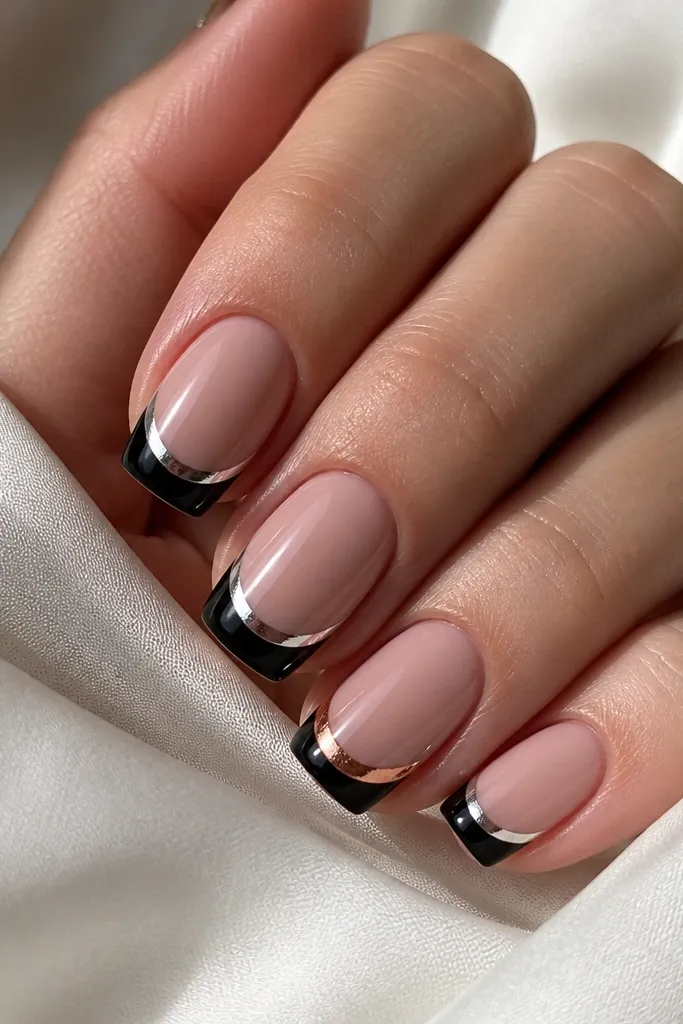
This is my favorite way to add warmth without changing the whole set. The mirror silver chrome on most nails keeps the French look sharp and classic, and the rose-tinted chrome on the accent nail makes your hands look softer. It flatters medium almond nails and looks great with gold jewelry because the rose reflection warms up the hand. If you think black chrome French is too cold for your style, this version fixes that with one controlled color swap.
Start with glossy black French tips using guides and cure. Apply tacky chrome base on the smile band for all nails, cure to tack stage, and apply mirror silver chrome pigment to four nails. For the ring finger, use rose-tinted chrome pigment instead of silver on the smile band - rub it in with the same pressure so the edge stays crisp. Brush off excess pigment, then seal with glossy top coat on every nail. Cap the ring finger smile a little thicker with top coat so the rose shift stays reflective.
Editor's noteIf you don't have rose chrome, mix a tiny amount of rose shimmer powder into the tacky base for the accent nail before chrome pigment.
Watch outAvoid using rose chrome on every nail. It can look muddy against black and loses the classy contrast.



