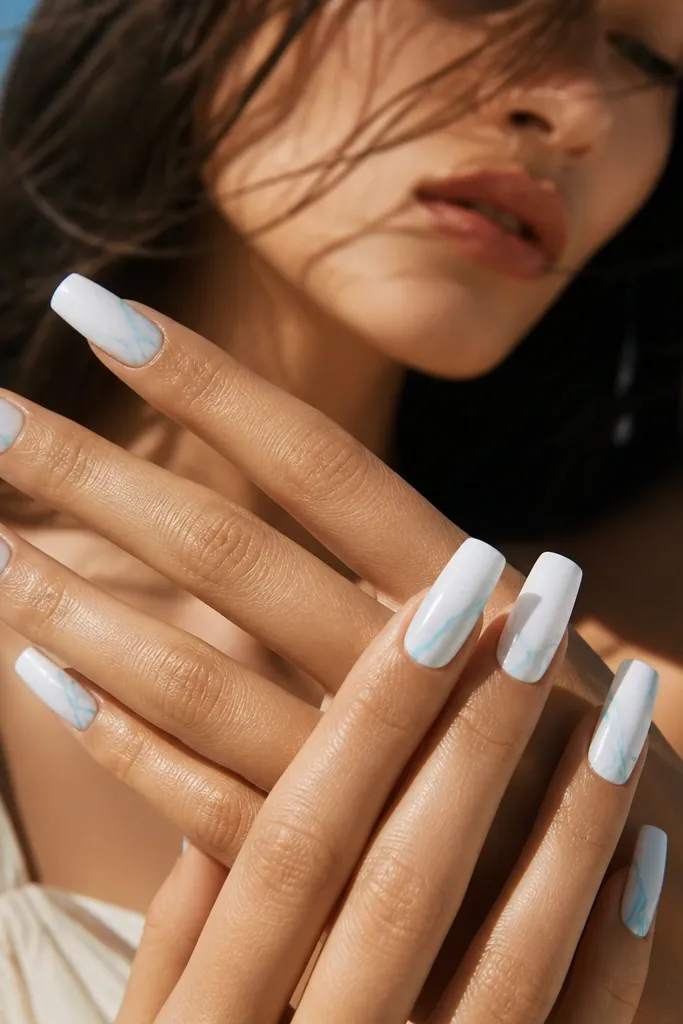
1. Jelly Coral French With Micro-Glitter Edge
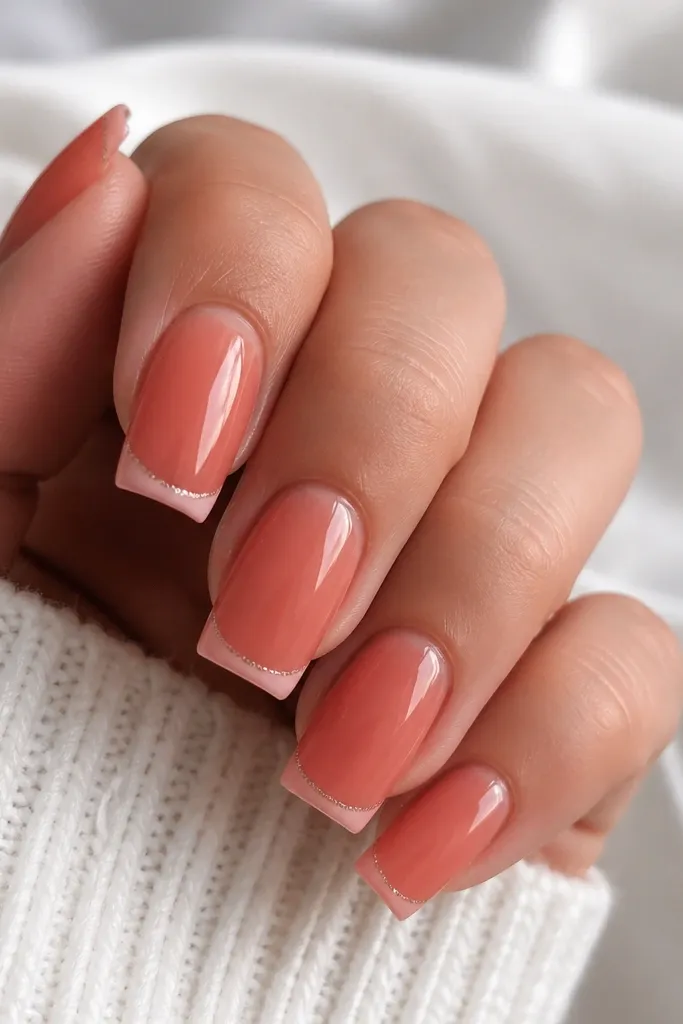
Start with a sheer coral jelly base so your nails look juicy instead of painted-flat. Add a narrow French line in white-pink, not thick and not rounded - it should look like a crisp sticker at the tip. Then press micro-glitter gel along the outermost edge of the French only, so it flashes when you move your hands. This set looks best on fair to deep skin because coral warms everything up, and the negative cuticle space keeps it airy for summer. The square shape makes the French line look sharper, so it reads "dramatic" without needing heavy 3D pieces.
First, apply a thin jelly coral layer and cure it. Next, map the French line: use a liner brush to draw a straight line across the tip, then pull it slightly inward toward the sidewalls so it's even. Apply a second thin layer of the French color for full opacity, cure, and clean the edges with a brush dipped in slip solution. Finally, dab micro-glitter gel only at the tip edge, cure, and seal with a high-gloss top coat that levels the surface.
Editor's noteWhen you draw the French, keep your brush pressure light so the line stays razor-thin. Cure in shorter intervals if your gel runs - thick gel blurs the square edge.
Watch outAvoid thick French lines that cover the whole tip - they look blocky and chip faster on long square nails.
2. Tangerine Milk Gradient With White Swirl Center
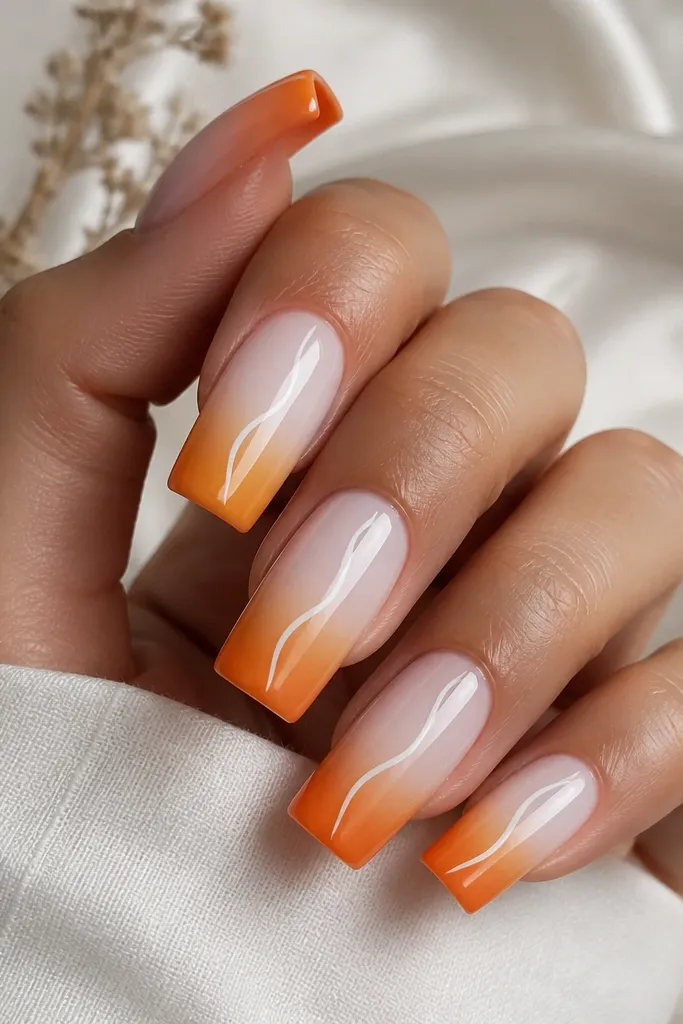
This design gives you summer brightness but stays soft because the gradient starts milky and fades into tangerine. The white swirl in the center adds motion and makes the nails look longer by drawing the eye up the middle. It flatters almost every skin tone because the base is neutral and the orange sits in a wearable, warm range rather than neon. If your hands run warm-toned, the tangerine looks like it belongs to you. If you're cool-toned, the milky base keeps the overall look from turning too orange.
First, paint a milky white gel at the cuticle area about 2 mm, then blend outward with a soft ombre sponge into tangerine at the tip. Cure, then repeat one more thin gradient layer for smooth coverage. Next, use a nail art liner brush to paint a single thin white swirl in the center - start near mid-nail and loop upward toward the tip without touching the French edge. Cure and top coat with a glossy gel that fully covers the brush strokes.
Editor's noteSwirl lines look cleaner when you keep them thin and leave tiny gaps in the white so they look like painted highlights, not a solid blob.
Watch outAvoid overworking the swirl - too many curves makes it look messy and thick on square nails.
3. Turquoise Chrome Half-Moon With Clear Negative Space
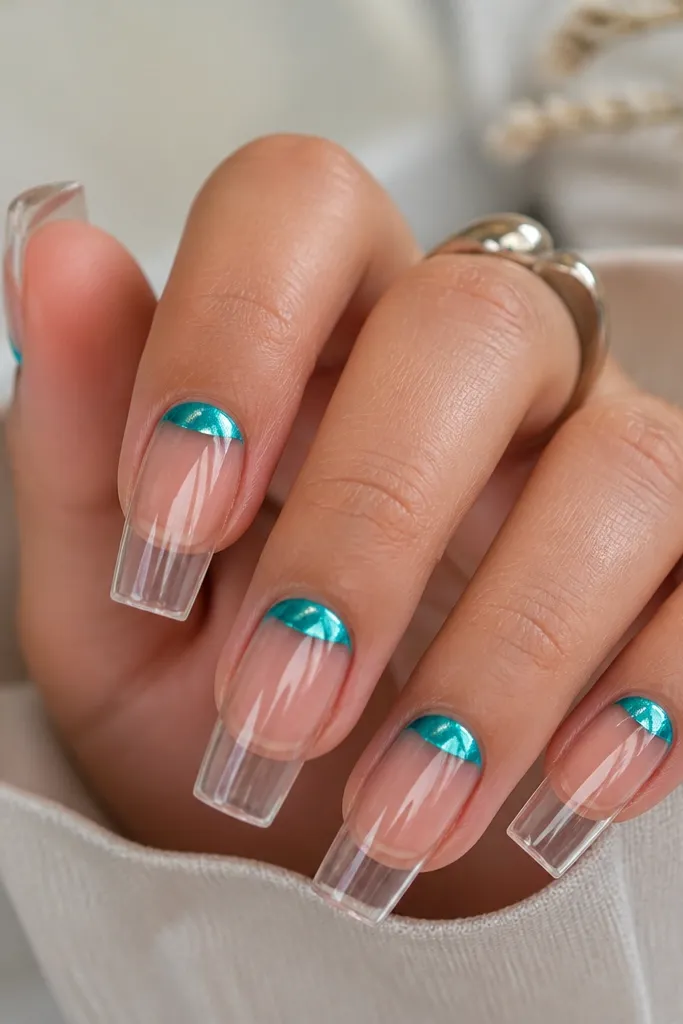
The magic here is negative space. A clear base makes your nails look fresh and longer, while a turquoise chrome half-moon gives that instant "vacation photo" drama. Chrome reflects sunlight hard, so it looks amazing outdoors and in window light. This flatters hands with any undertone because the turquoise sits between blue and green and doesn't fight pink or yellow skin. The long square shape makes the half-moon feel bold and architectural instead of cute and tiny.
First, leave the cuticle area clear and apply only a thin, curing-friendly clear base coat to the nail plate. Next, create the half-moon: use a half-moon stencil or gently paint a curved crescent in turquoise chrome gel right above the cuticle line. Cure, then gently clean the edges with a small brush. Finally, seal with a glossy top coat that won't dull chrome - apply thin layers so the reflection stays sharp.
Editor's noteIf chrome transfers onto your stencil, wipe the stencil with alcohol before the next nail so the shape stays crisp.
Watch outAvoid covering the chrome with thick top coat - it can mute the mirror effect and make it look cloudy.
4. Sunset Ombre With Hot Pink Outline Nails
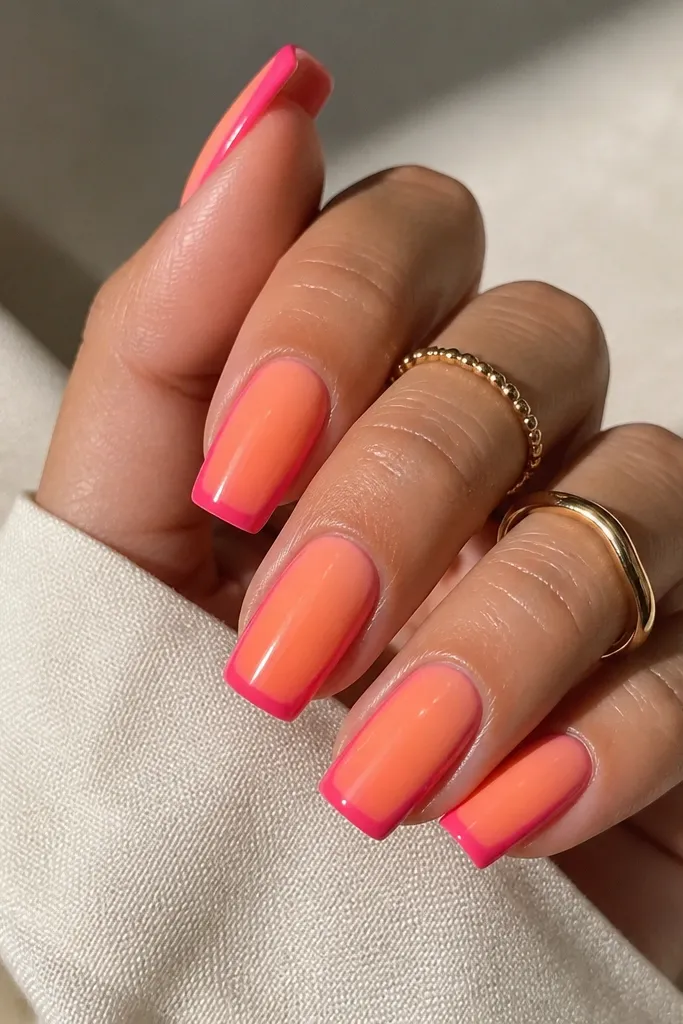
This set looks dramatic because the outline makes the gradient look intentional and framed, like nail art on a poster. The sunset palette is flattering because peach and orange brighten skin without turning neon. The hot pink outline adds a punch that reads summer instantly, especially on long square tips where the outline can be clean and straight. I've worn this with both gold and silver jewelry; the pink outline makes it pop either way. It's a great choice if you want bold nails but you still want them to look neat at work.
First, sponge an ombre starting with peach near the cuticle, then blend orange mid-nail, then coral at the tip. Cure and clean the edges. Next, use a striping brush to draw a thin hot pink outline along the outer perimeter: start at one sidewall near mid-nail, trace to the tip edge, and come down the other sidewall. Cure again and top coat with gloss for a smooth framed look.
Editor's noteUse gel striping that's fluid, not thick, so the outline sits flat and doesn't lift at the corners of the square.
Watch outAvoid painting the outline too close to the cuticle - it can crowd the nail and make the design feel heavy.
5. Lime Green Jelly With White Star Confetti
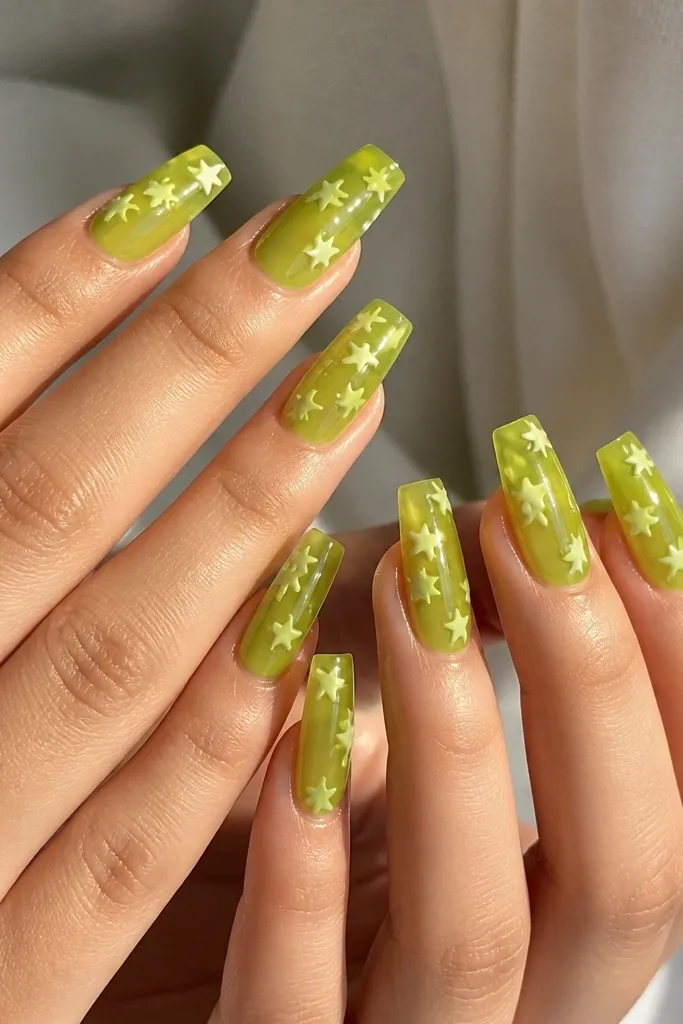
Lime jelly is the summer color I reach for when I want something playful but still clean. The translucency keeps it from looking harsh, and the white star confetti gives it a "spark in daylight" vibe. This looks great on light to deep skin because white stars give contrast without needing dark polish. The long square shape makes the scattered stars feel like a pattern instead of random dots. It's also forgiving - if your star spacing isn't perfect, it still reads cute and intentional.
First, apply a thin translucent lime jelly gel and cure. For full coverage without losing the jelly look, add a second thin layer instead of a thick one. Next, place white star decals or hand-paint stars with a dotting tool and a small liner brush; keep most stars centered and vary size (one small, one medium). Cure and then apply a glossy top coat that lightly encapsulates the stars for smoothness.
Editor's noteIf you're hand-painting stars, start with a dot for the center point, then drag each point outward like a small comet.
Watch outAvoid burying stars under a super thick top coat - it can make them sink and look dull.
6. Blueberry Jam Nails With Glossy Grape Dot Cap
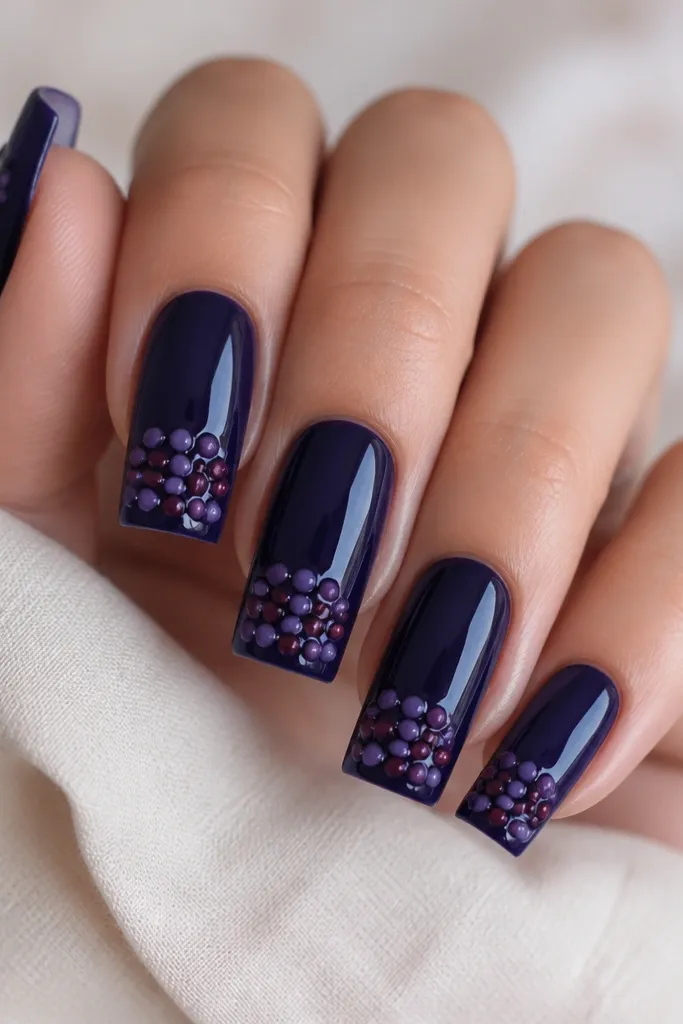
This one reads dramatic because the base is dark and juicy, and the dot "berries" catch the light like candy. Blueberry jam looks flattering on medium to deep skin because the cool berry tones bring out warmth in your complexion. On fair skin, it can still work, but I keep the dot colors a bit more plum than black so it doesn't look heavy. The glossy raised dots add a tactile feel that looks great in photos, especially when your nails are slightly angled toward the light.
First, paint a deep blueberry jelly base and cure. Next, create the dot cap: use a dotting tool to place tiny gel beads in purple, then cure each nail one at a time so the beads stay domed. Add one or two slightly larger dots near the center of the tip area and leave the sides clean for a square look. Finally, seal with a glossy top coat, but keep it thin around the dot edges so the berries keep their shine.
Editor's noteDo the dot work in a cool room or with a fan - hot gel spreads and ruins the domed berry shape.
Watch outAvoid placing the dots too close to the cuticle - the raised texture can snag and lift early.
7. White Marble Square Long With Peach Veins
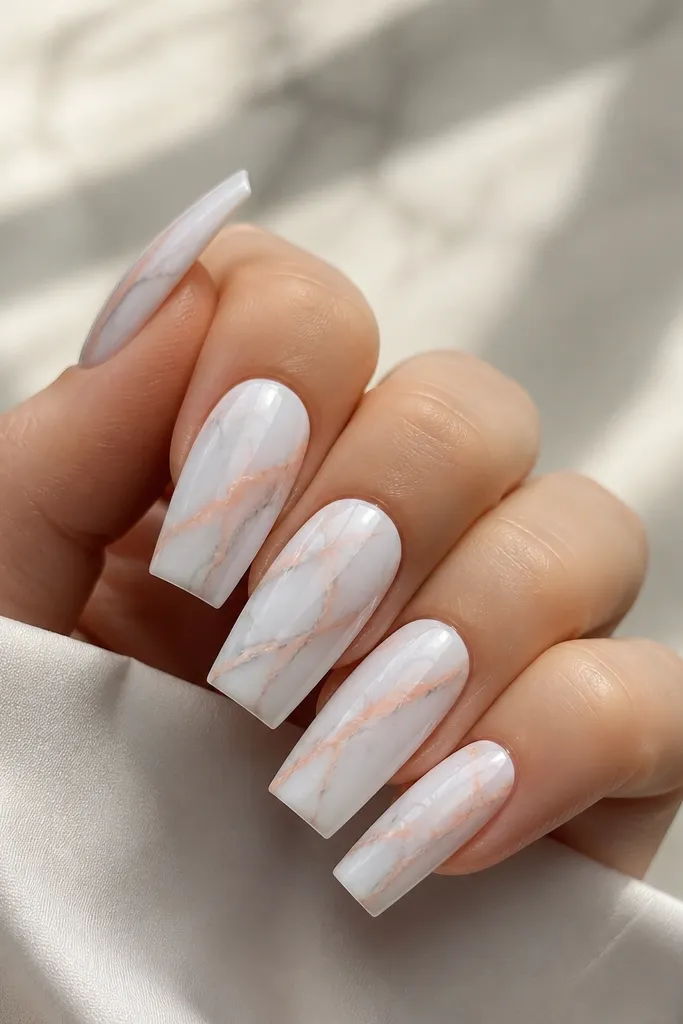
Marble nails look dramatic in summer when you shift the veins into peach instead of classic gray. The milky white base keeps it bright and airy, while peach veins add warmth that looks great with summer skin and gold jewelry. I've done this on both fair and deep skin and it always reads "fresh," because the white base gives contrast without needing neon colors. The long square shape makes the diagonal veins feel like they're stretching the nail upward. It's also a solid choice for events because it looks polished even if your hand isn't steady.
First, apply a milky white gel base and cure. Next, use a thin liner brush or marbling tool to drag peach gel veins diagonally - start near mid-nail and pull toward the tip, then add one or two thinner offshoot lines. Add tiny gray wisps sparingly so the peach doesn't look flat. Cure and seal with a glossy top coat that levels the marble lines without wiping them out.
Editor's noteKeep your veins uneven in thickness. Perfectly even lines look like a sticker and not real marble.
Watch outAvoid flooding the marble with too much color - it turns into a cloudy blob instead of defined veining.
8. Neon Pink Straight-Line Negative Space
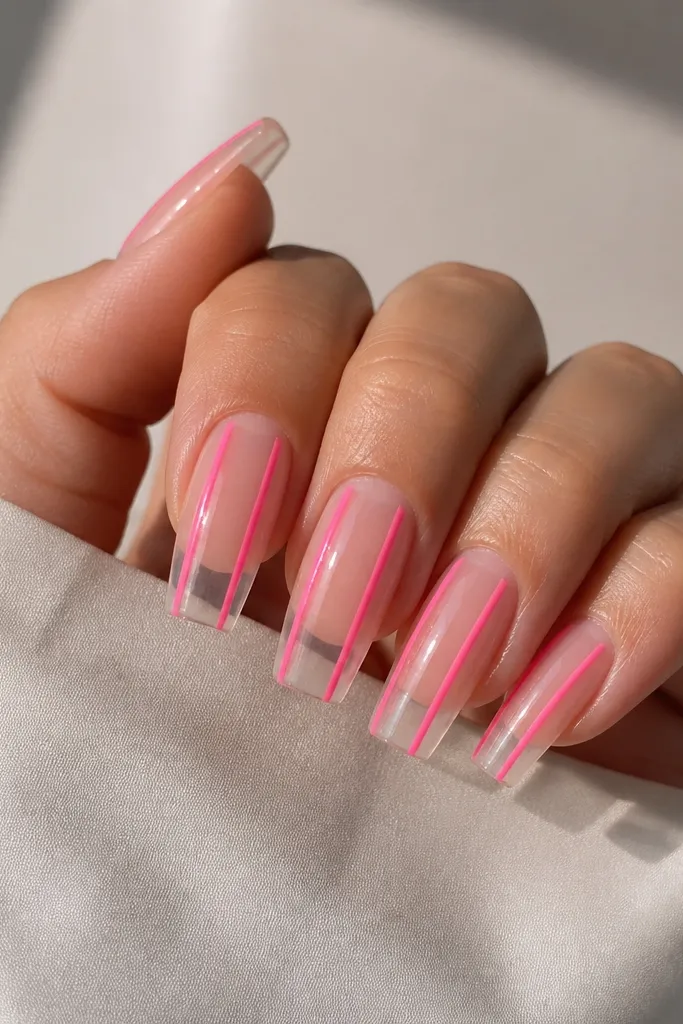
This is the kind of dramatic summer nails square long look that looks modern and clean, not busy. Neon pink on clear base gives you maximum contrast and makes the lines look crisp and graphic. It flatters hands because the transparency makes the nail bed look longer and slimmer. If you're wearing minimal jewelry, the lines still read bold. If you're wearing gold hoops or bangles, the neon pops against metal and skin.
First, prep the nail and apply a thin clear base coat, cure. Next, map the two vertical lines: use striping tape if you want perfect spacing, or freehand with a liner brush. Paint neon pink gel inside the tape guides, cure, then carefully remove tape while gel is fully set. Finally, top coat glossy and keep the top coat thin so the lines stay sharp and raised-free.
Editor's noteFor extra crisp edges, wipe the brush with gel cleanser before you draw each line so the neon doesn't streak.
Watch outAvoid letting neon gel touch the sidewalls - smudges make it look like a mistake instead of graphic art.
9. Coral Rose Ombré With Gold Foil Tips
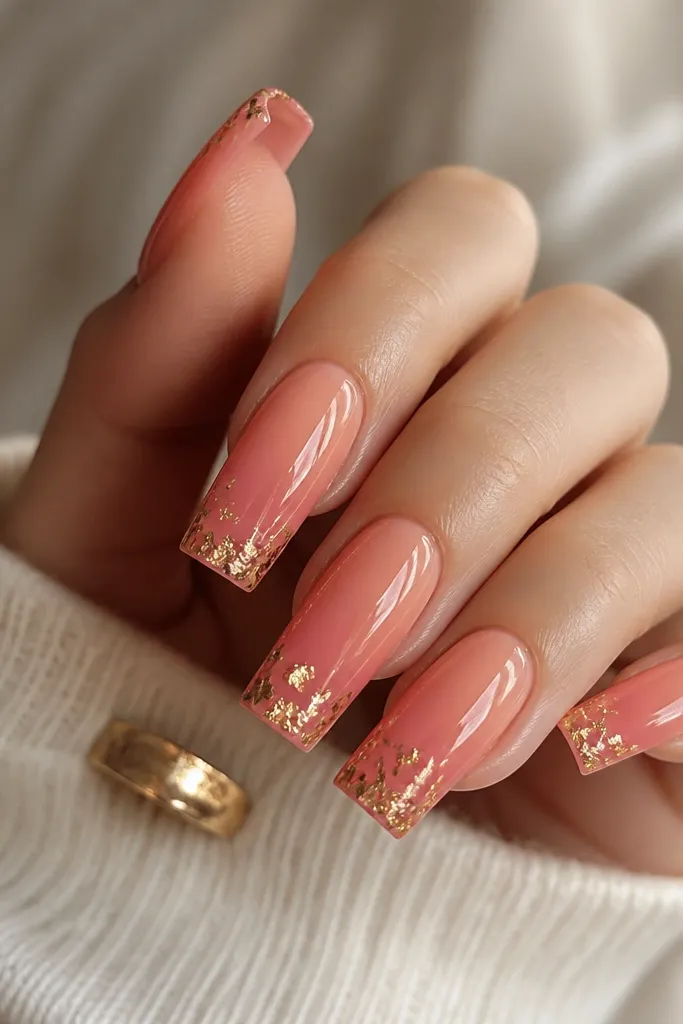
This set is dramatic because it blends romantic and beachy. The coral-to-rose ombre looks flattering on every skin tone since it's in the warm family, and the gold foil at the tip makes it feel like jewelry. Gold foil reads better on long square nails because you can place it right at the flat tip edge where it looks intentional. It's also forgiving for uneven foil placement - the irregular pieces look natural as long as you keep them near the tip.
First, sponge a sheer coral base near the cuticle and blend into rose pink at the tip, cure. Next, apply a thin layer of tacky gel at the last 2-3 mm of the nail and press small gold foil fragments onto it. Cure, then seal with a gel top coat in two thin layers so the foil doesn't lift. Clean the sidewalls and finish with a glossy top coat.
Editor's notePress foil using a silicone tool, not your finger. It keeps the foil from smearing and keeps the square tip edge sharp.
Watch outAvoid placing foil too high on the nail - it can look cluttered and makes the set feel heavy.
10. Aqua Jelly Base With White Shell Outline
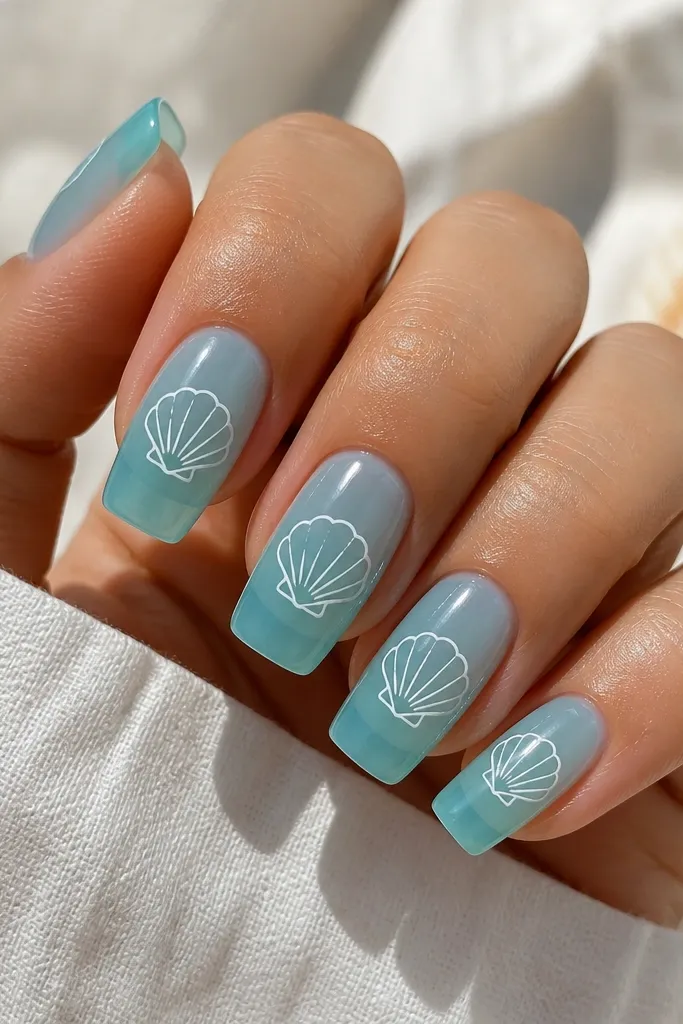
Shell outlines look summer without turning into cartoon nails. The aqua jelly base gives that beach water vibe, and the white outline keeps it crisp. This flatters light to medium skin especially, but it also works on deeper skin because aqua still contrasts hard and looks fresh. The long square shape makes the shell feel like a graphic emblem. It's a great choice when you want dramatic but wearable - you can wear it to dinners and still look put together.
First, paint a thin translucent aqua jelly and cure. Next, draw one shell outline per nail using white gel and a liner brush. Place the shell slightly above the center of the nail so it visually stretches upward. Add 2-3 tiny curved lines inside the shell for detail, then cure. Finish with a glossy top coat that keeps the lines sharp - one thick coat can blur them.
Editor's noteUse a liner brush with a fine tip and wipe it often. Clean bristles give clean shell curves.
Watch outAvoid filling the shell outline solid white - it looks chunky on square tips.
11. Mint Green French With Thin Black Grid
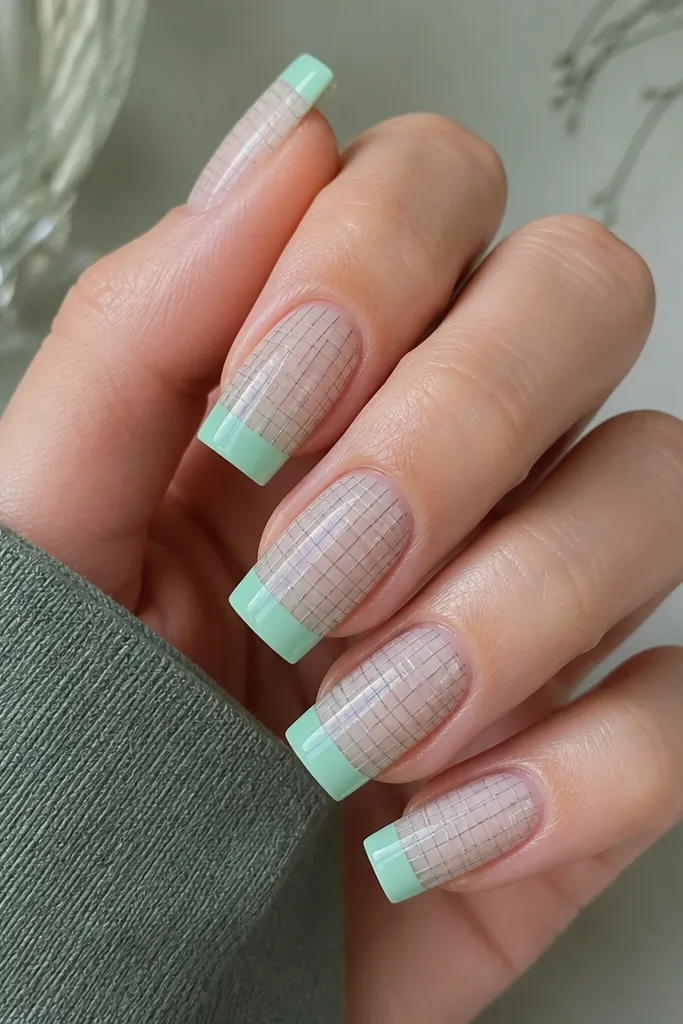
Grid nail art looks dramatic because it's structured. Mint French keeps it bright and summer, and the thin black grid adds graphic tension that looks sharp in photos and in real life. This set flatters almost anyone because mint is soft against skin, and black line work gives definition. If you have freckles or uneven tone, the clean grid helps the nails look intentional instead of random. The square shape makes the grid lines look straight and architectural.
First, apply a sheer mint base and cure. Next, paint the French tip in mint, keeping the line straight across the tip and thin enough to show the square shape. Then draw the grid: use a liner brush to add vertical and horizontal thin black lines across the nail face, leaving some negative space so it doesn't look like a full black sticker. Cure and seal with gloss.
Editor's noteDraw one line, cure for 10-20 seconds, then draw the next so the black stays controlled and doesn't bleed.
Watch outAvoid thick black lines - they make the mint look dull and can overpower your skin tone.
12. Hot Pink Marble With Clear Jelly Top
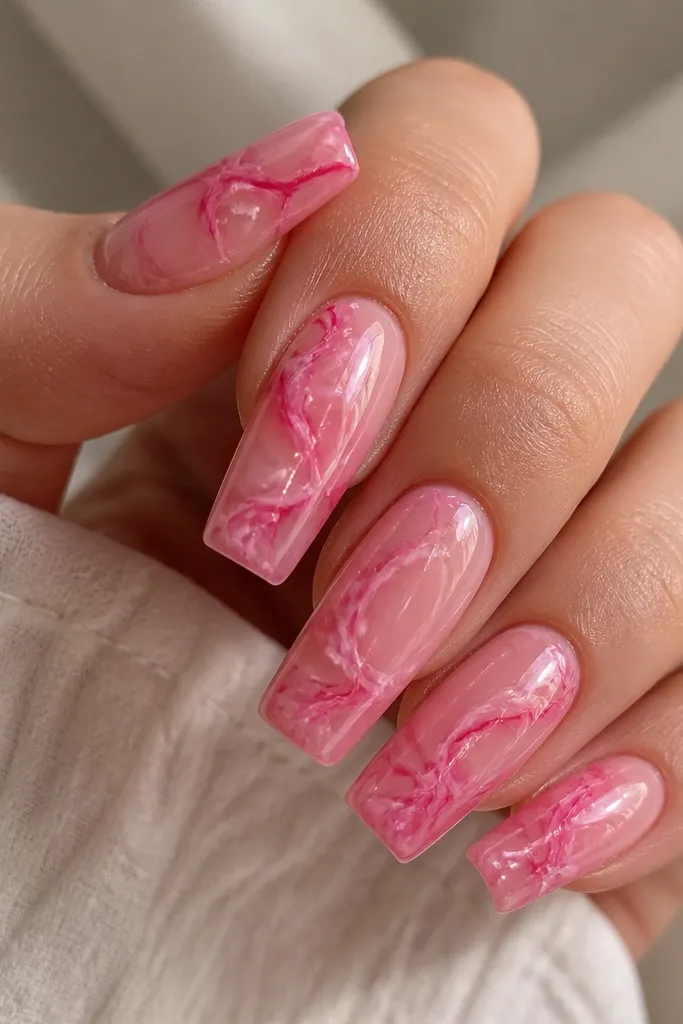
Hot pink marble looks like summer party energy without needing extra gems. The key is using a sheer base so the marble feels light, not heavy. The lighter pink wisps and tiny white flecks add depth, and the clear jelly top makes it look like glass. This is flattering on all undertones because pink stays in the same family as skin warmth and the clear top brightens everything. Long square nails make marble feel bold, not delicate.
First, apply a sheer pink base and cure. Next, create marble: drop small dots of hot pink and lighter pink into the wet gel, then drag with a clean toothpick or marbling tool to form wisps. Add tiny white flecks by tapping the brush tip lightly. Cure and then apply a thick-ish clear jelly top coat layer, cure again, and finish edges so the square tip stays clean.
Editor's noteLet the marble lines be slightly uneven. Smooth, blended marble looks plasticky on long square nails.
Watch outAvoid a fully opaque marble base - it loses the glassy summer look and chips sooner.
13. Lemon Yellow Jelly With White Outline Flowers
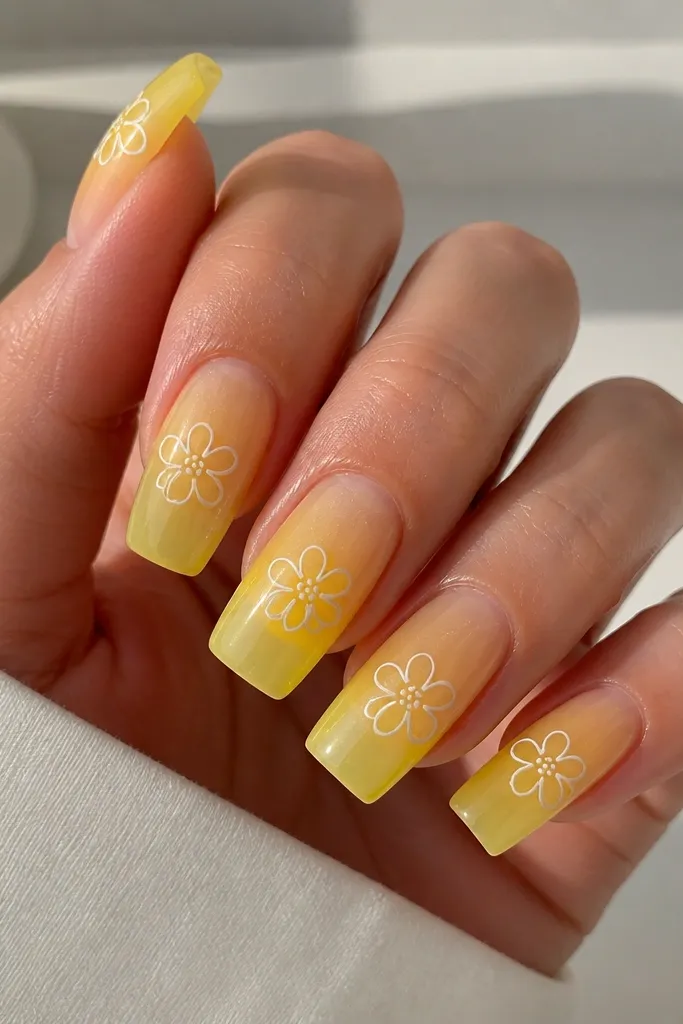
Outline flowers look cute, but the drama comes from the lemon jelly base and the contrast of white ink-like lines. The translucent yellow makes the nails glow in sunlight, and the white outlines keep the art crisp. This flatters fair to deep skin because yellow is bright and gives instant "summer fruit" energy. Long square nails give you space to draw flowers that look intentional instead of tiny. It also works for short-sleeve season when your hands are out and about.
First, apply a translucent lemon yellow jelly and cure. Next, draw one flower per nail: use a fine liner brush to paint a small center circle, then add petal loops around it with white gel. Keep petals outlined, not filled, so the jelly shows through. Cure and then seal with two thin glossy top coats - one can leave brush texture on square tips.
Editor's noteIf your lines shake, practice on a clear nail tip first. The long square shape makes small errors obvious.
Watch outAvoid thick white filled petals - they look like stickers and lose the airy jelly vibe.
14. Midnight Navy With Starry Silver Chrome Dust
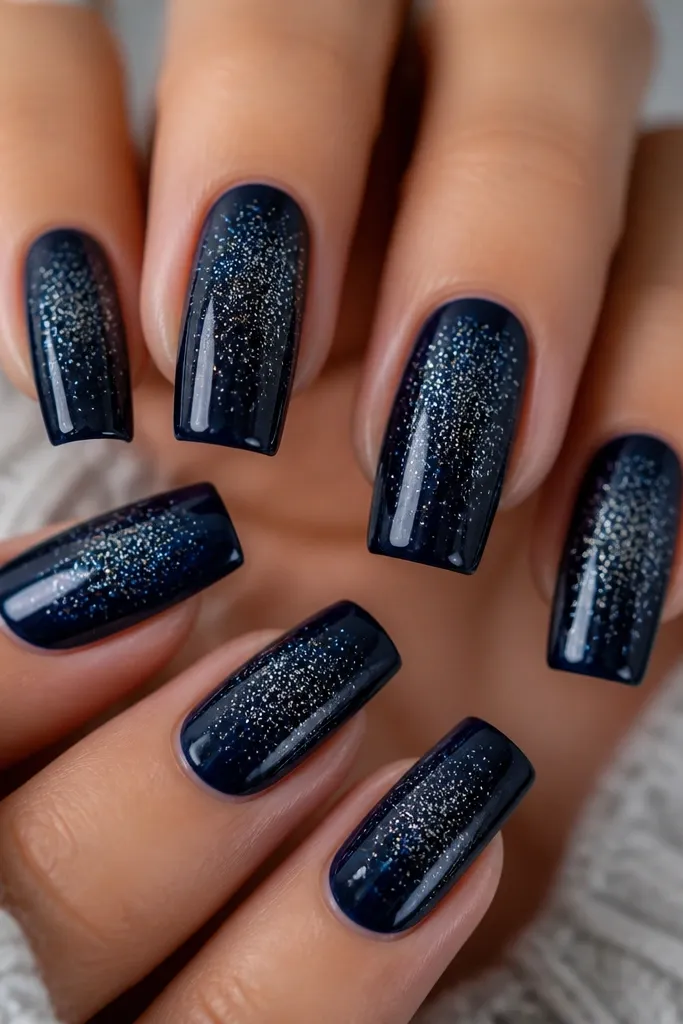
This is dramatic because it looks like night sky on your hands, but it still reads summer with the chrome spark. Midnight navy is flattering because it makes skin look brighter and jewelry look richer. Silver chrome dust catches light without needing big glitter chunks, so it stays neat on long square nails. It works especially well if you're going to beach dinners or evening events and want your nails to photograph well. The design also suits cooler undertones, but I've worn it with warm-toned skin and it still looks crisp because the chrome reflects neutrals.
First, paint full coverage midnight navy and cure. Next, add silver chrome dust: tap a small amount of chrome powder or mix it with clear gel and use a sponge or soft brush to place tiny specks. Keep the densest cluster toward the center of the nail, then fade outward. Cure and seal with a glossy top coat, applying thin layers so the dust stays suspended and doesn't dull.
Editor's noteUse a soft makeup brush for dusting. It spreads specks evenly and keeps the square edges clean.
Watch outAvoid big glitter flakes - they look bumpy and catch on hair and fabric.
15. Peachy Nude Base With Red Micro-Checkered Tips
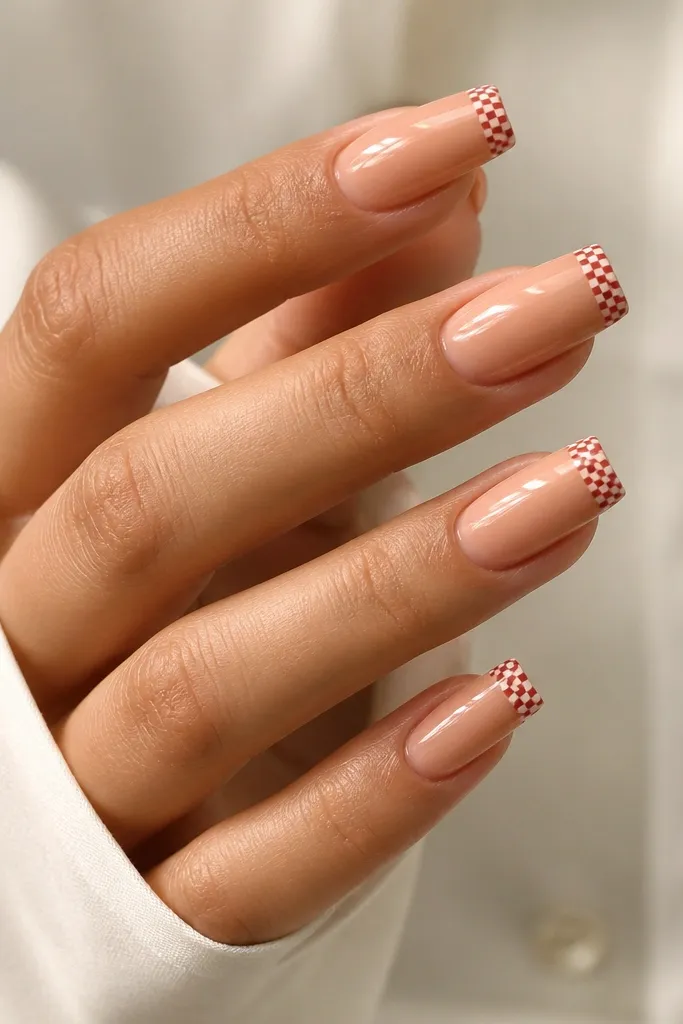
Micro-check tips look dramatic because they add pattern without taking over the whole nail. The peachy nude base keeps it wearable and makes the red look like a summer accent, not a full manicure. This flatters because nude with warm undertone makes hands look smoother and longer, especially on long square nails. If you like a sporty vibe, this is it. The square tip makes the checkerboard look precise, which is why this design works better on long square than on rounded shapes.
First, apply a peachy nude gel and cure, then make sure the sidewalls are clean. Next, create the checkered tip: use a fine liner brush and paint tiny red squares alternating with white squares on the free edge only. Keep the pattern within the last 2-3 mm so the nail still feels light. Cure and then seal with a glossy top coat that doesn't flood the pattern.
Editor's noteDo one nail at a time so the gel doesn't set while you're still painting squares.
Watch outAvoid large squares - they look childish and take over the square tip.
16. White French With Lime Green Jelly Cuticle Halo
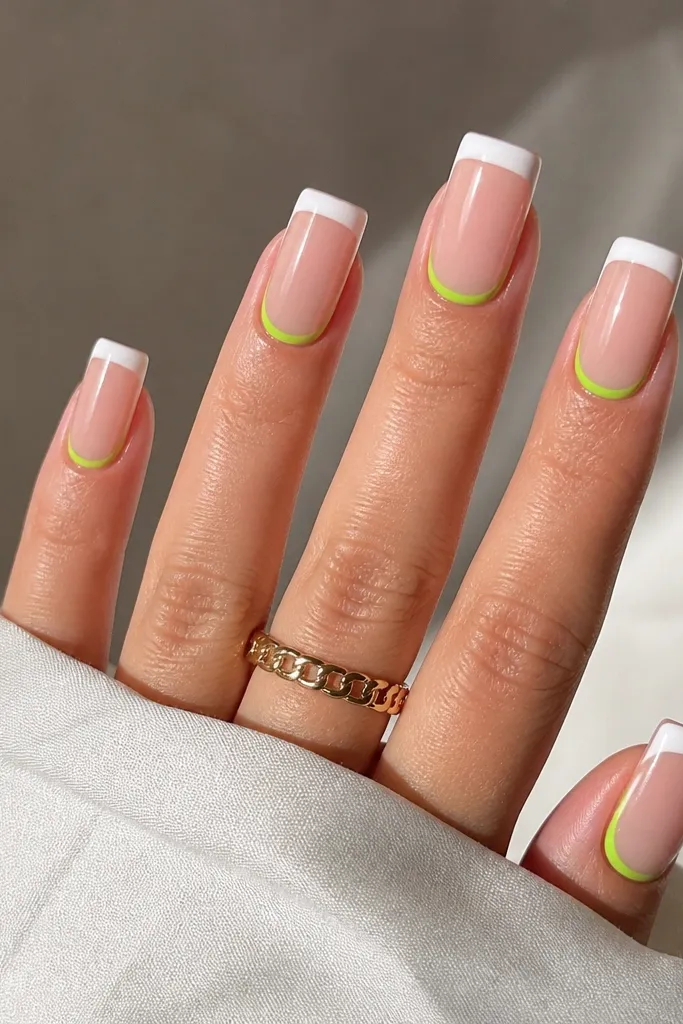
The drama comes from the halo placement. A white French tip is classic, but the lime cuticle halo makes it feel current and summer-bright. The sheer nude base keeps it flattering and prevents the design from looking too stark. Lime green looks amazing against both fair and deep skin because it's high-contrast and the jelly finish keeps it soft. Long square nails make the halo look like a frame around your nail bed, which makes your hands look polished even with minimal jewelry.
First, apply a sheer pink nude base and cure. Next, paint a thin white French tip and cure, keeping the line straight and even across the square edge. For the halo, use lime green jelly gel and paint a thin crescent around the cuticle - leave a small gap so it doesn't touch the cuticle line. Cure and seal with glossy top coat, using a light touch near the halo so it stays defined.
Editor's noteUse a half-moon stencil if you want the halo to look identical on every nail.
Watch outAvoid thick gel at the cuticle - it can flood and blur the halo into the base.
17. Seafoam Green Marble With Silver Foil Tears
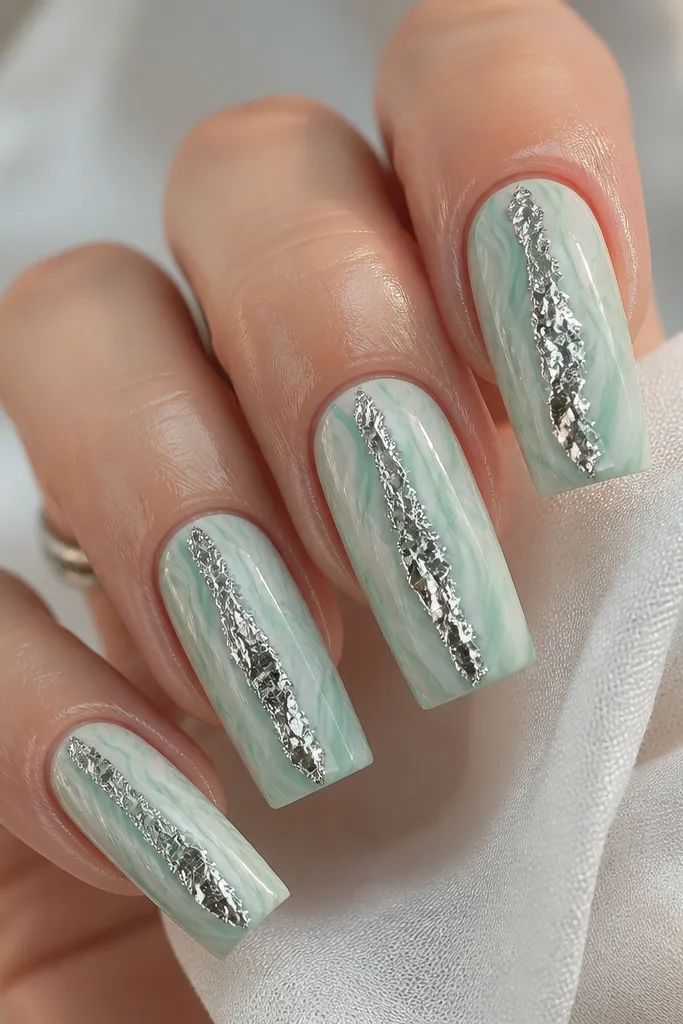
This design feels like summer waves. Seafoam marble gives you softness and movement, and silver foil tears add that dramatic sparkle without looking like random glitter. It flatters because seafoam is light and fresh, and the silver foil adds brightness that makes skin look more even. On long square nails, the foil tear placement along the center lengthens the nail and adds a vertical focal point. It's great for beach vacations, festivals, and nights out when you want your nails to catch camera flash.
First, paint a pale mint base and cure. Next, marble: add seafoam and a slightly darker mint on top, then drag with a marbling tool to create wave-like swirls. Place silver foil pieces down the center where the swirls converge, pressing them lightly into tack gel so they look like they're falling. Cure and seal with glossy top coat in two thin layers to smooth edges without flattening the foil.
Editor's notePress foil with small sections so it doesn't cover the entire nail. The negative space makes the tears look intentional.
Watch outAvoid putting foil on every swirl. Too many foil pieces make it look crowded and less dramatic.
18. Pineapple Yellow Base With Black Outline Bow Tips
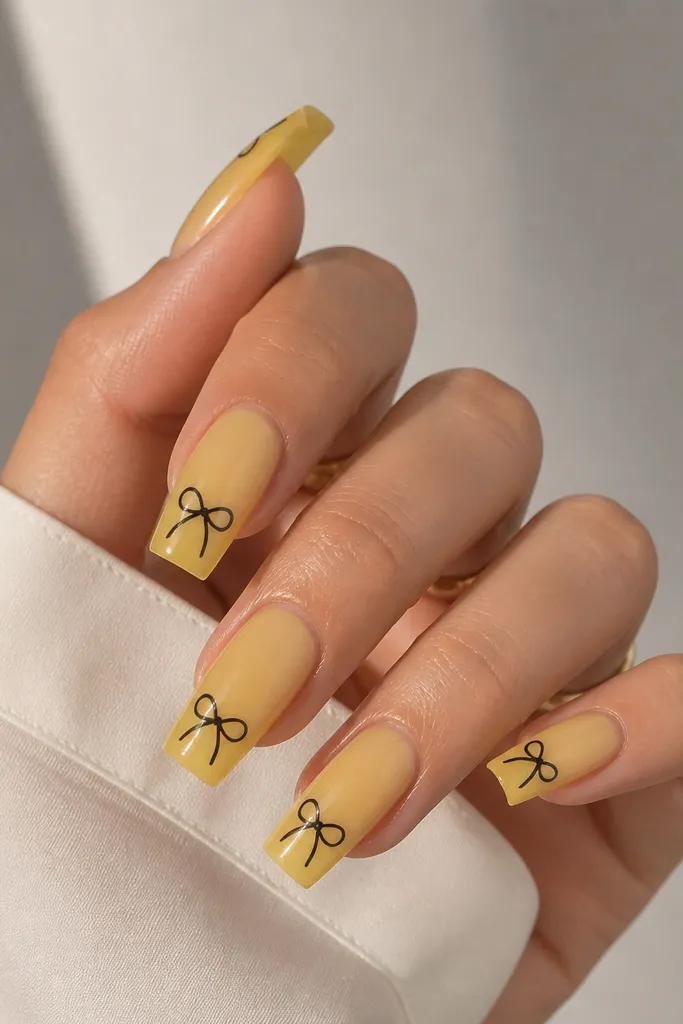
Bow tips look playful, but black outline is what turns them dramatic and sharp. Pineapple yellow reads instantly summer, and the translucent base keeps it from looking too thick. This flatters most skin tones because yellow brightens hands, and black gives crisp definition against the jelly. The long square shape makes the bow tip sit like a little accessory at the end of the nail. If you want fun nails that still look neat, this is a strong pick.
First, apply translucent pineapple yellow gel and cure. Next, draw the bow at the tip: use a fine liner brush to paint two loop outlines near the free edge, then add a tiny knot in the center. Keep the bow small and centered so it doesn't overpower the square tip. Cure and top coat glossy, making sure the bow lines stay smooth and not raised.
Editor's noteIf your bow lines look uneven, use a strip of tape to guide the bow center line, then remove it after curing.
Watch outAvoid filling the bow with black. Outline-only looks cleaner and more "designer" on square tips.
19. Rose Quartz Pink With Gold Chrome Crackle
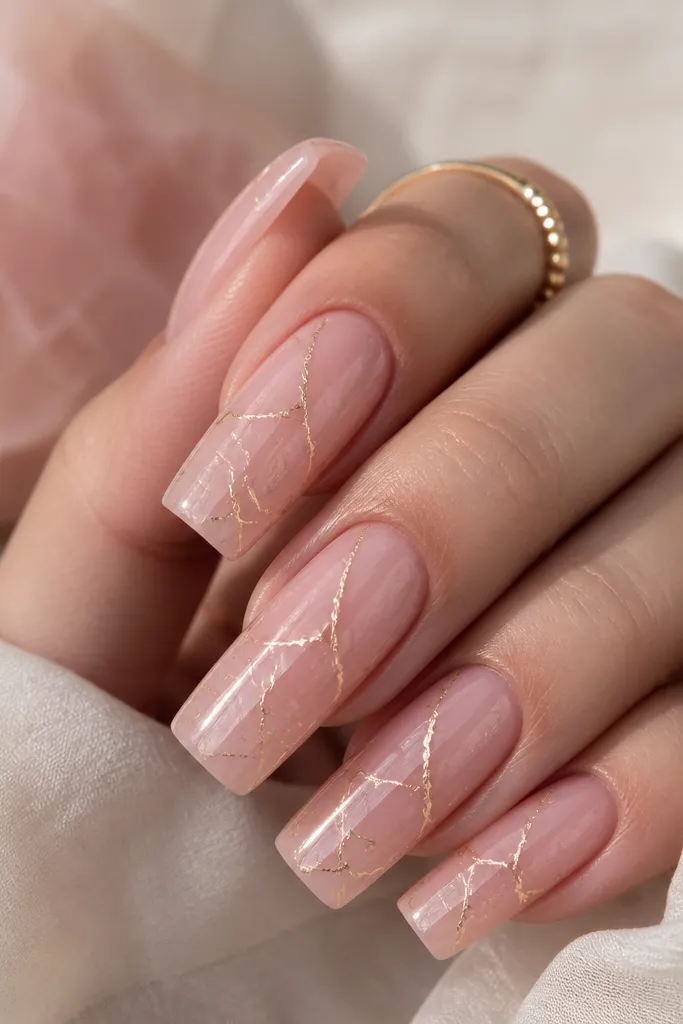
Crackle chrome looks dramatic because it mimics expensive stone patterns. The rose quartz base keeps it romantic and wearable in summer, while gold crackle gives warm light reflection that pairs with tan skin and gold jewelry. This flatters fair and medium skin beautifully, and it still works on deeper skin because the gold lines show clearly against the pink. Long square nails help the crackle pattern read "intentional" instead of random. It also looks great at night because gold chrome flashes under lights.
First, apply a soft rose quartz pink gel base and cure. Next, add gold crackle lines: use a crackle gel or paint thin gold chrome gel lines in an irregular web pattern, then cure. Keep the crack lines thin so the base still shows through. Finally, seal with a glossy top coat - apply thin layers so the chrome stays reflective and doesn't dull.
Editor's noteLet the base cure fully before applying crackle. If it's too tacky, the crackle pattern smears.
Watch outAvoid thick crackle gel - it covers the stone effect and looks like metallic paint.
20. White Base With Sky Blue Diagonal Half Panels
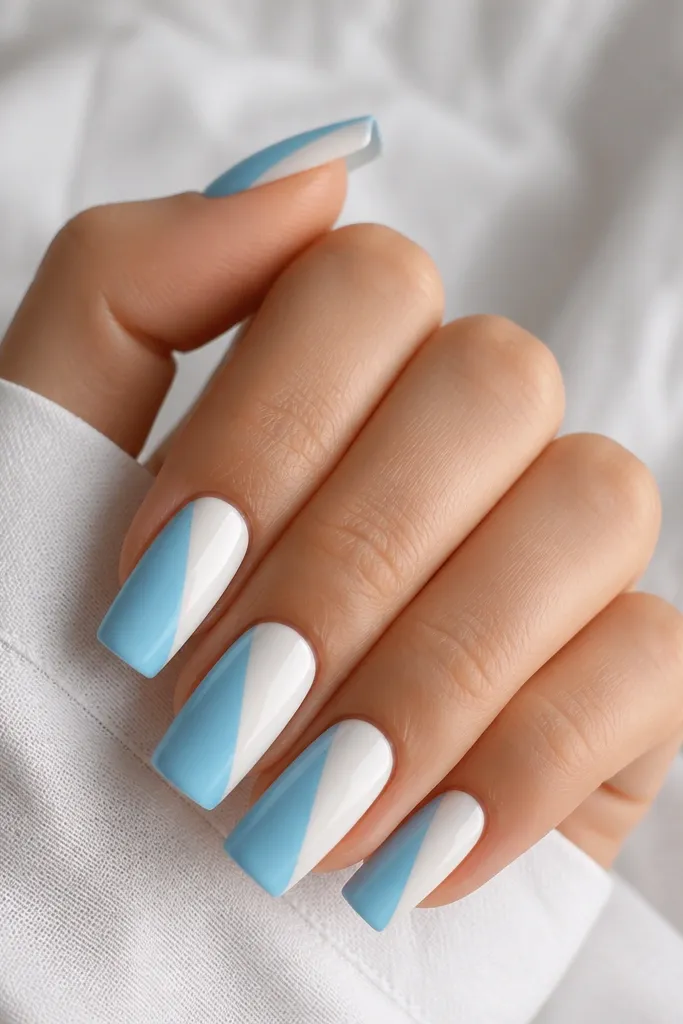
Diagonal color blocking is dramatic because it creates instant movement. A white base keeps it crisp and summer-clean, and sky blue adds a fresh pop that looks great in bright daylight. This flatters because it frames the nail bed and makes nails look longer, especially on long square shapes where diagonal lines emphasize length. It works for both casual weekends and events. The design also plays nicely with minimal rings because the nails do the talking.
First, apply a smooth white gel base and cure, making sure it's even at the cuticle. Next, create the diagonal panel: use striping tape to guide a diagonal line from near the cuticle on one side to the tip corner on the other. Paint sky blue gel inside the taped area, cure, then remove tape carefully. Seal with a glossy top coat and check the diagonal edge under a lamp for any fuzziness.
Editor's noteUse tape to get that sharp diagonal line. Freehand diagonal edges look slightly wobbly on square nails.
Watch outAvoid thick tape gel buildup at the edge. It creates a ridge that catches on clothes.
21. Coral Orange Base With Floating Pearl Studs
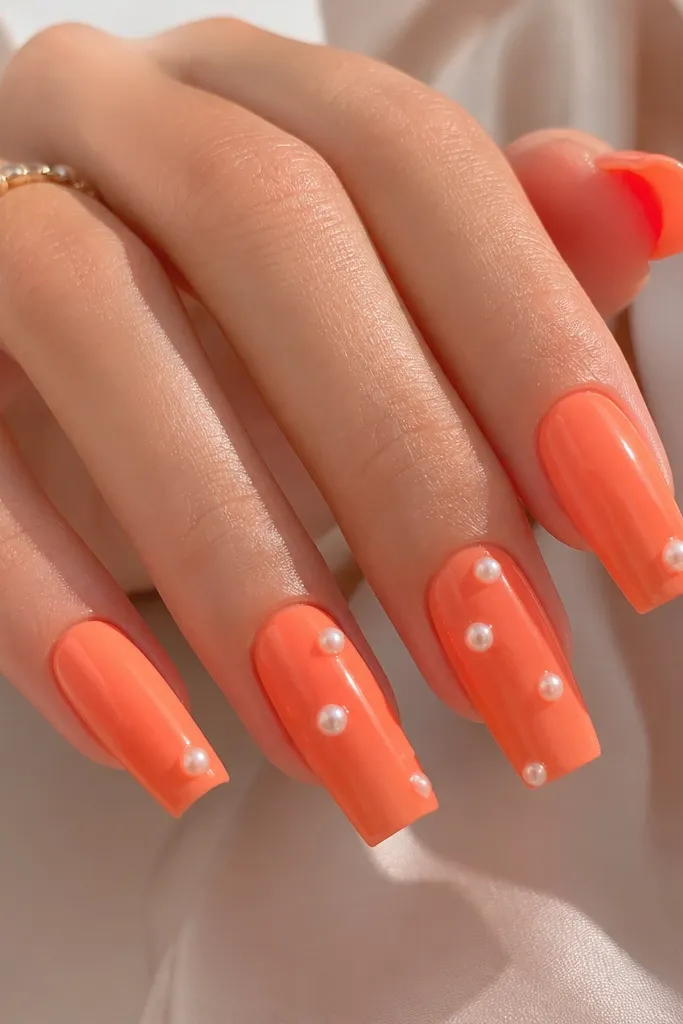
Floating pearls make summer nails feel expensive fast. Coral orange is the perfect warm base for pearls because it makes the pearls look brighter and more dimensional. This flatters because coral tones warm the skin, and pearls add a soft highlight that doesn't overpower. On long square nails, pearl placement looks best when it's not too close to the cuticle. Keep pearls slightly toward the middle or near the tip so the nails still feel long and sleek, not crowded.
First, paint coral orange glossy gel on all nails and cure. Next, place pearls: use a tiny amount of gel or nail glue on the nail where you want the pearl, then press each pearl lightly and cure if using gel. Space pearls so they don't touch each other, and keep them centered within the nail width. Finally, seal with top coat around the pearls - avoid flooding directly over the pearl so the surface stays domed and shiny.
Editor's noteIf your pearls slide while curing, hold them in place with a toothpick for 10-15 seconds before you fully cure.
Watch outAvoid placing pearls on every nail at the same height. It looks heavy and less "floating."
22. Black Cherry Base With Red Foil Half-Crescent
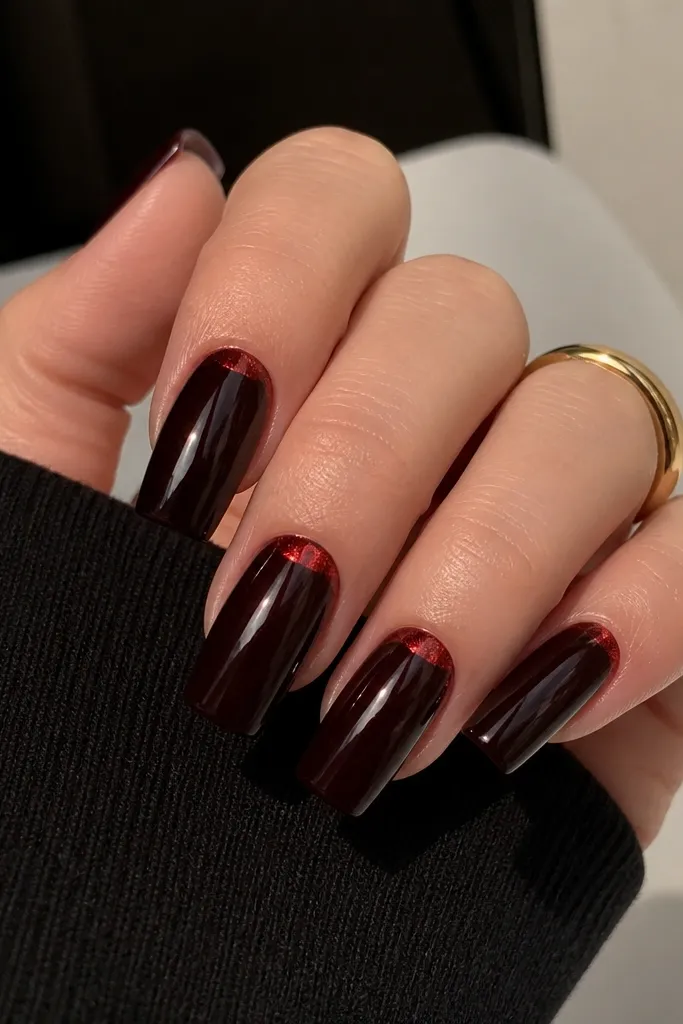
This set is dramatic because it's dark, glossy, and has one sharp foil focal point. Black cherry flatters a wide range of skin tones by making everything look brighter and more defined. The red foil half-crescent adds a summer-night feel, like cherries under streetlights. Long square nails make the crescent look like a modern ring around your nail bed. If you want nails that look bold without lots of tiny details, this is the one.
First, paint a full layer of black cherry gel and cure. Next, apply tack gel in a crescent shape just above the cuticle - use a half-moon stencil if you want symmetry. Press red foil onto the tack gel and burnish lightly with a silicone tool. Cure and seal with a glossy top coat, keeping the top coat thin around the foil edge so it stays crisp.
Editor's noteUse a slightly darker red foil than you think. Bright neon red foil can look too harsh against black cherry.
Watch outAvoid letting foil go all the way to the sidewalls. It can widen the nail visually and look messy.
23. Lime Green Micro French With Clear Center Stripe
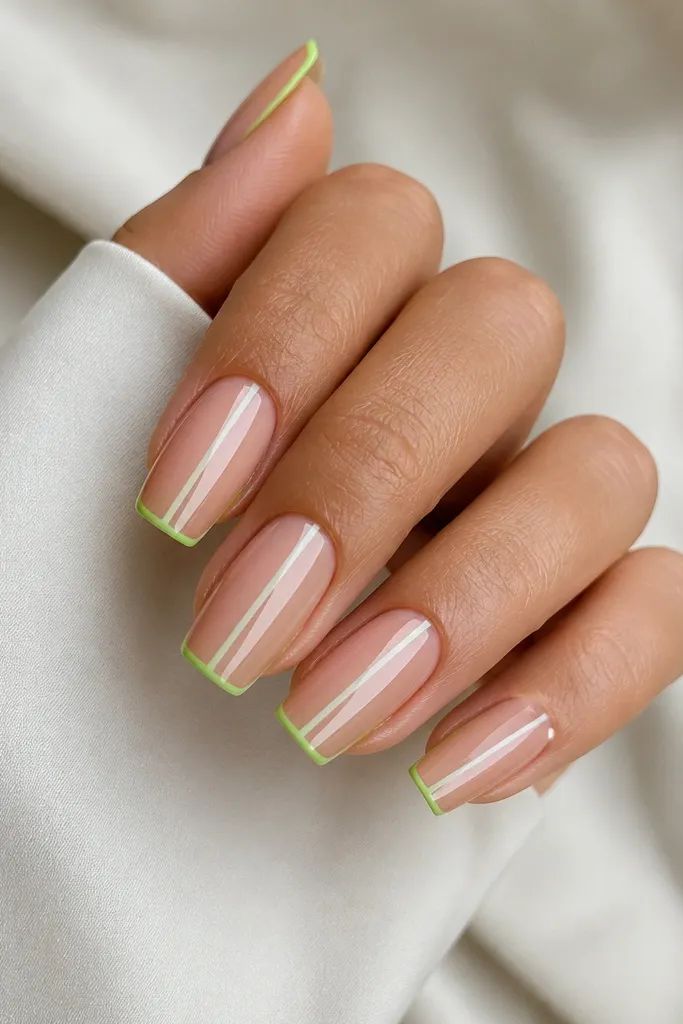
This is a clean, sharp summer design that still looks dramatic because the clear stripe creates length. The micro French gives a pop at the free edge without covering the entire tip, and lime green keeps it summer-bright. The nude base flatters by matching your skin tone and making the nails look slimmer. The clear center stripe also helps if your nail beds look uneven, because it pulls the eye straight down. Long square nails make the stripe look more graphic and less accidental.
First, apply a sheer nude base and cure. Next, protect the center stripe: use striping tape or liquid latex to keep the middle clear while you paint. Paint a thin lime green micro French at the tip, cure, then remove tape or liquid latex to reveal the clear stripe. Finally, seal with glossy top coat and clean the sidewalls for a crisp square look.
Editor's noteIf you use tape, press it down hard at the edges so the clear stripe stays perfectly straight.
Watch outAvoid thick lime French - micro should stay thin or it looks like a sticker on the tip.
24. Sapphire Blue Gradient With Silver Mirror Side Lines
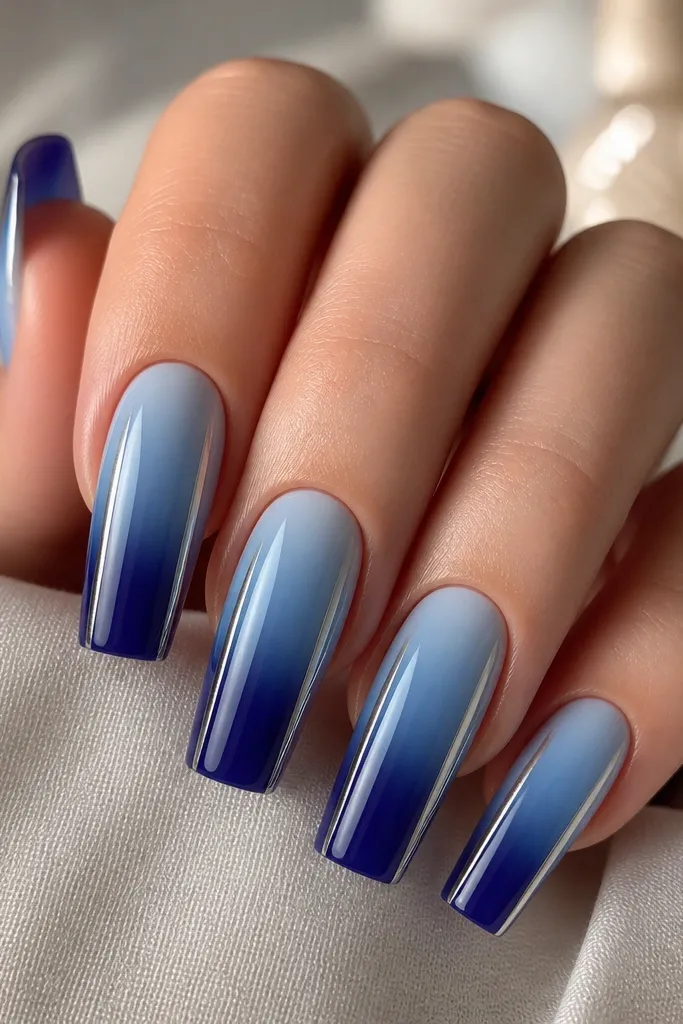
This design is dramatic because it adds "catwalk" structure: mirror side lines frame the gradient and make the nails look longer and narrower. The sapphire gradient is flattering because blue tones cool down warm skin and brighten deeper skin. Silver mirror lines catch light when you move, but they stay minimal since they're only on the sides. Long square nails make the side lines look crisp and symmetrical. It's a great pick if you want something that looks high-end but you still want to wear it with jeans and a tank.
First, sponge a gradient: light blue at the cuticle, blending into cobalt, then sapphire at the tip, cure. Next, apply silver mirror gel or rub mirror powder into gel side lines: draw a thin vertical line on each side starting around mid-nail. Cure and gently buff the center to remove any stray powder. Finally, top coat glossy in thin layers so the mirror lines stay reflective.
Editor's noteUse a nail guide strip or just measure the nail width so the two mirror lines match on every nail.
Watch outAvoid placing the mirror lines too close to the center - it can make the nail look wider instead of longer.
25. Peachy Nude With Coral Half-Moon and White Dots
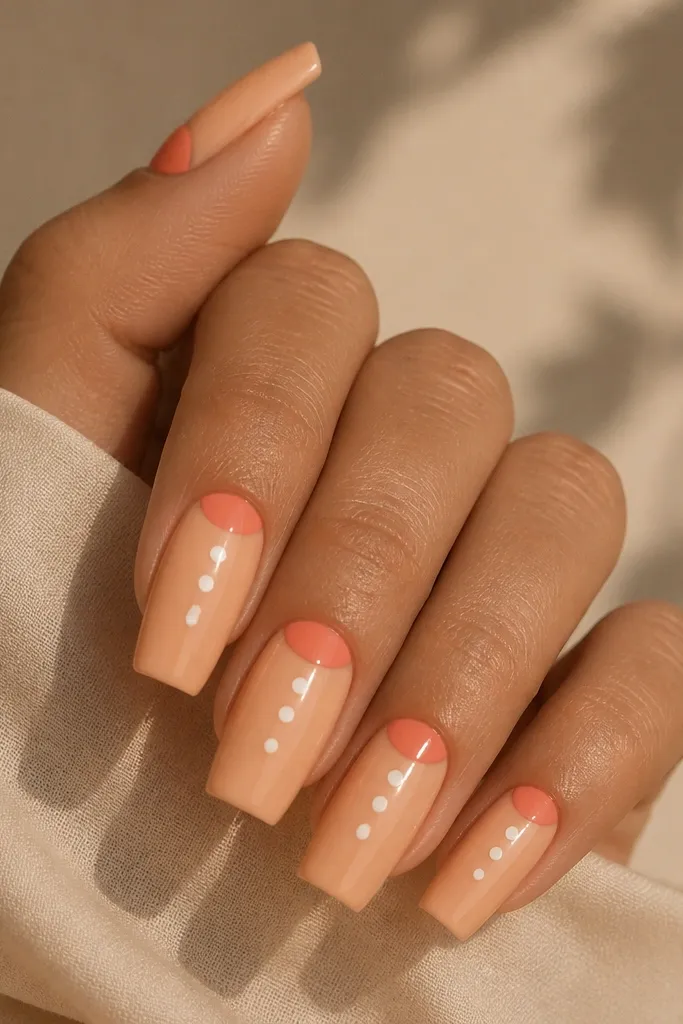
This is one of my go-to summer dramatic sets because it looks cute but still structured. The peachy nude base smooths out the look of your nail bed, and the coral half-moon adds a summer punch near the top. The three white dots add playful rhythm and draw attention down the nail, which is perfect for long square length. This flatters fair to deep skin since nude adapts to your complexion and coral stays warm. It's also easy to maintain because the design isn't dependent on tiny details that grow out awkwardly.
First, apply peachy nude gel and cure. Next, paint a coral half-moon at the cuticle - keep it thin and centered, leaving a small gap at the sides for a clean square look. Then add three tiny white dots: place one dot around mid-nail, then two more below it in a straight vertical line toward the tip, cure. Finish with glossy top coat and check that dots are sealed smoothly.
Editor's noteUse a dotting tool with a consistent tip size so the three dots look like a planned pattern, not random specks.
Watch outAvoid big dots - oversized dots look chunky on square tips and can catch on fabric.