1. Tangerine Jelly Tips with White Micro-French
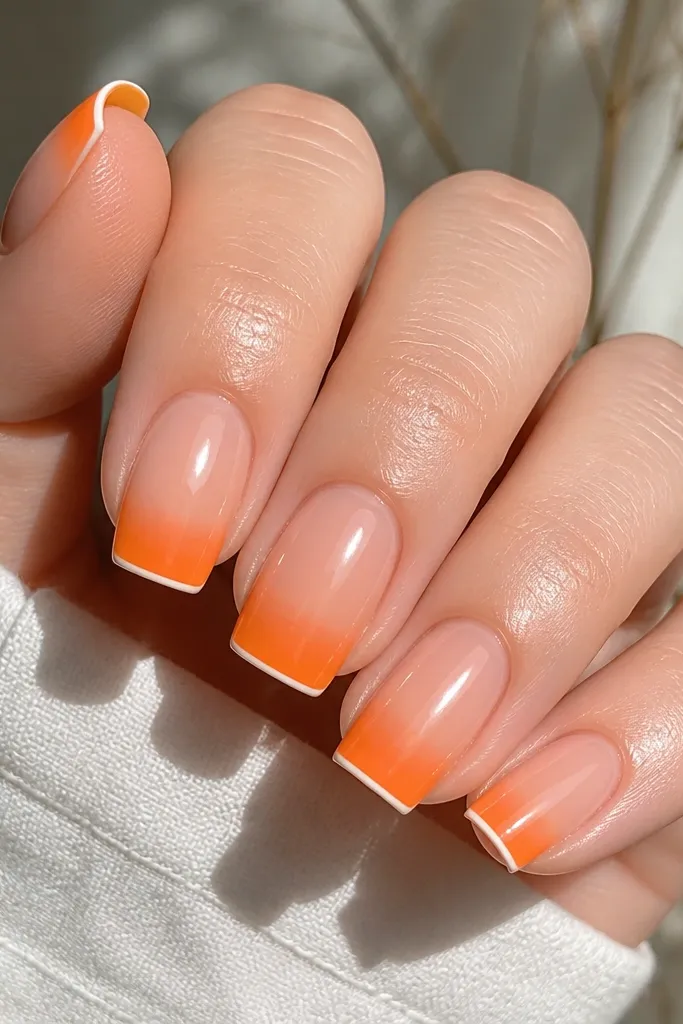
I love this because it reads summer in one swipe and still looks neat on square medium. Start with a sheer tangerine jelly base so the nail bed shows through, then keep the colored area only on the tips. The white micro-french line is thin enough that it doesn't thicken the nail visually, which matters on square shapes. This flatters light to medium skin tones especially well, because the warm orange pops against the natural warmth of your hands. For darker skin tones, tangerine still works - the trick is to keep the jelly translucent, not chalky.
Step one is base prep: push back cuticles, buff lightly, and wipe with alcohol so jelly polish grips. Paint a sheer tangerine jelly layer across the whole nail, then cure or wait until it looks evenly glossy but not fully opaque. For the tip, add a second tangerine jelly layer only on the last third, staying 1 mm away from the side edges. Then use a striping brush to draw a micro white line right where the tip starts. Finish with two thin coats of glossy top coat, letting each coat self-level before curing.
Editor's noteUse a damp brush to clean the micro-french line edges while the polish is still slightly wet for razor-clean corners.
Watch outAvoid a thick white french - it makes square medium look bulky and drags the design toward "toy" nails.
2. Seafoam Marble with Clear Jelly Base
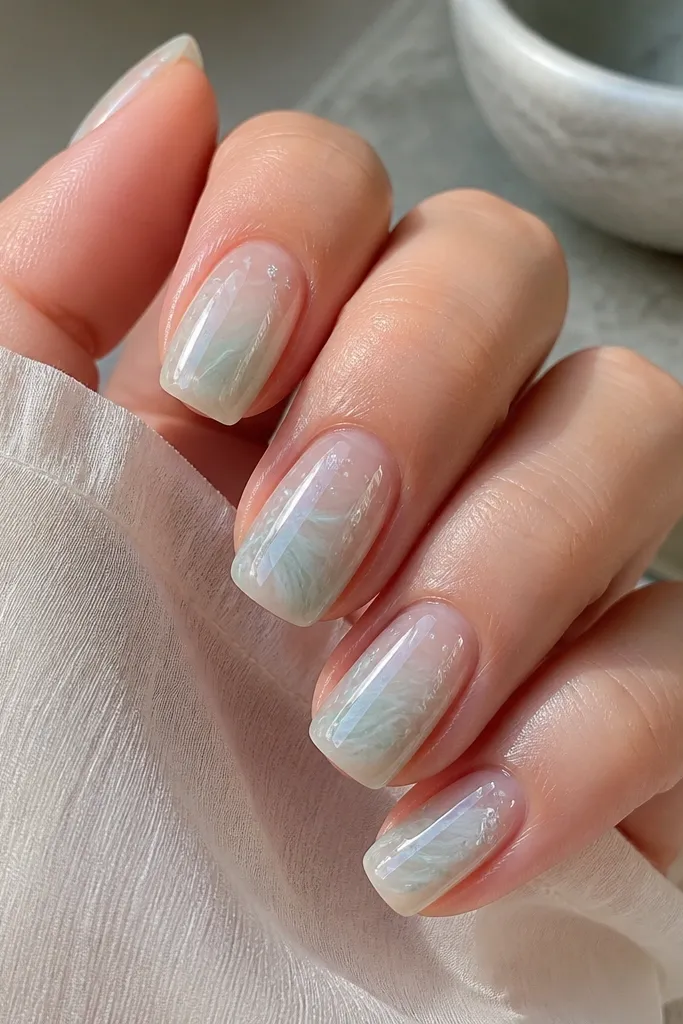
This one looks expensive because the marble is airy, not opaque. A clear jelly base keeps the nail looking fresh and lets the marble float instead of sitting on top. I use seafoam and pale mint together so the marble has depth but still feels summery. Square medium nails handle diagonal marble really well since the flat top makes the swirls look intentional. It flatters cool undertones and fair skin like a dream, and it also works on warm undertones because the white flecks soften the green.
Start with a clear jelly base and two thin coats if you need extra coverage. Then drop seafoam polish onto a silicone palette and thin it slightly with a clear medium so it flows like ink. Use a thin detail brush to drag 3-4 diagonal lines across the nail, then add two smaller offshoot streaks. Add tiny white flecks with the brush tip and stop - more flecks makes it look messy. Seal with one generous glossy top coat that levels the marble and prevents it from catching on fabric.
Editor's noteIf your marble looks too solid, add one more layer of clear jelly over the marble before the top coat.
Watch outDon't outline the marble with black - it kills the soft summer vibe.
3. Lime Chrome Half-Moons
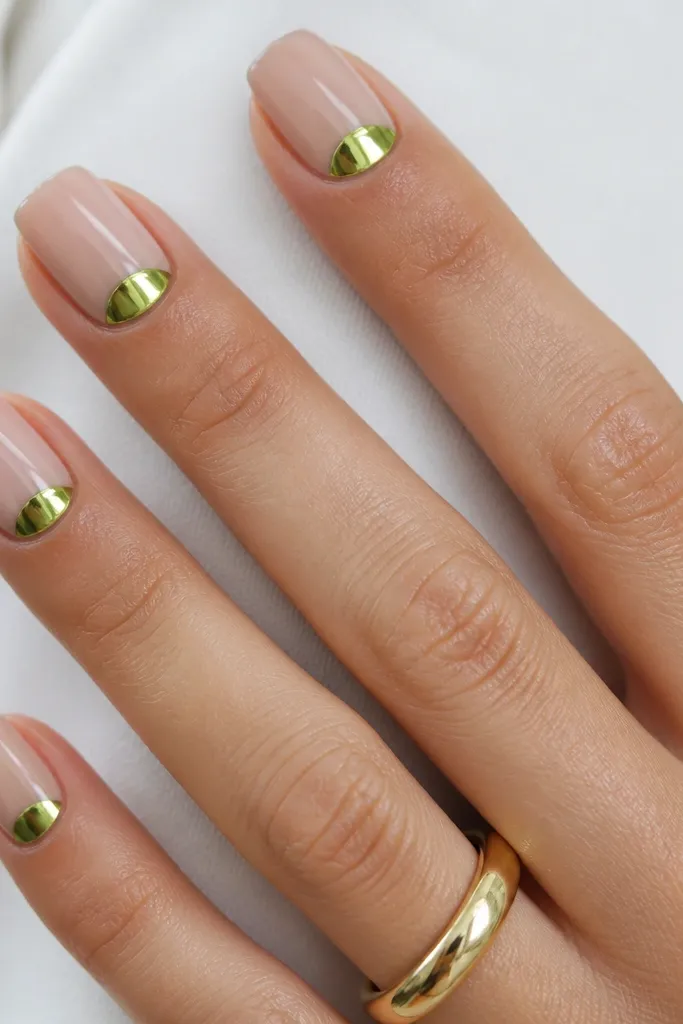
Cuticle half-moons are such a clean summer move because they frame your nail without turning the whole nail into art. Lime chrome gives you that electric pop that looks bold in photos but still feels wearable because it's only on the base. On square medium, the half-moon shape makes the nail look longer by pulling your eye toward the center. This looks amazing on medium and deep skin tones because chrome reflects warmth and highlights your natural nail bed. For fair skin, it still works - the sheer nude base keeps it from looking too harsh.
Step one: apply a sheer nude base and cure or dry fully. Use a small sponge or a half-moon stencil to map the crescent shape at the cuticle, leaving 1-2 mm of nude between the crescent and the sidewalls. Tap lime chrome powder onto the crescent with a finger applicator, then press gently to pack it in. Brush off excess and seal with a chrome-friendly top coat so the shine doesn't dull. Finish with a second thin top coat for durability if you're doing gel.
Editor's noteWarm the chrome powder in your hands for 10 seconds before applying; it grabs better and looks smoother.
Watch outSkip a full-coverage chrome coat - it chips faster and looks heavier than you want on square medium.
4. Butter Yellow French with Peach Outline
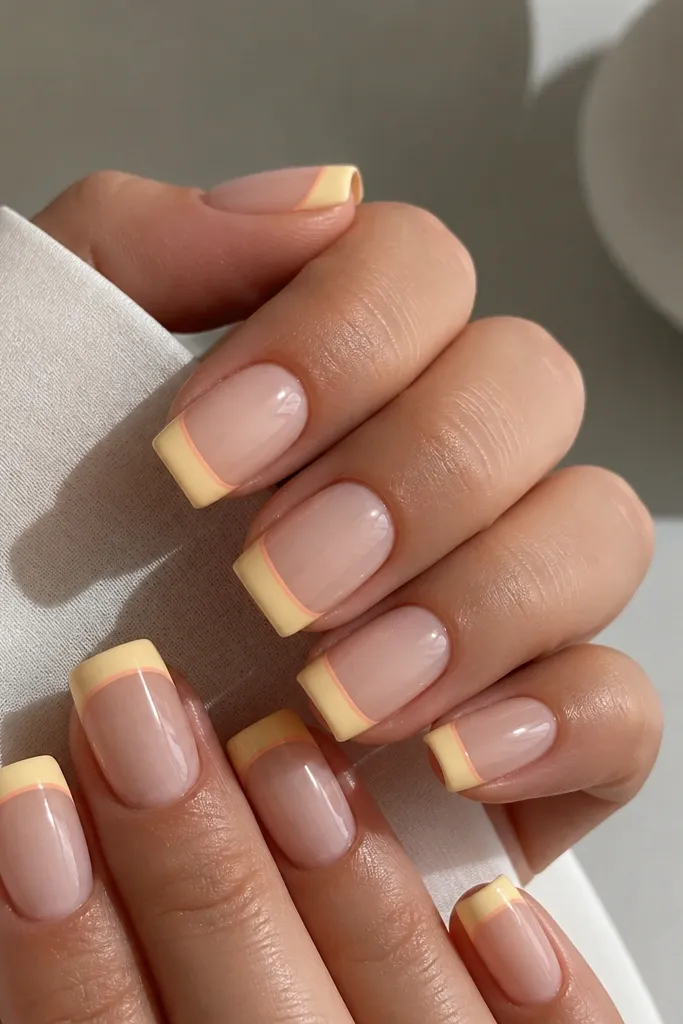
This is my "summer brunch" set. Butter yellow feels bright without being neon, and the peach outline makes the tip look sharper instead of blocky. Square medium nails show the straight french line clearly, so the edge looks clean rather than rounded. It flatters almost everyone because the base is milky nude, then the warm yellow and peach brighten your hands. If your skin runs cool, the peach outline balances it and keeps the set from looking too pale.
Paint a milky nude base first, then let it dry completely so the french stays crisp. Use a french guide sticker if you struggle with straight lines; place it so the tip is about 2.5-3 mm wide. Fill the tip with butter yellow in two thin coats. When it's dry, use a fine striping brush and peach polish to draw a single line just inside the edge of the yellow. Clean up any smudges at the sidewalls with a brush dipped in remover, then seal with glossy top coat.
Editor's noteDo the peach outline in one pass per nail; multiple strokes thicken the line.
Watch outDon't use a runny yellow - it bleeds under guides and makes french look uneven.
5. Pink Lemonade Swirls on Clear Pink
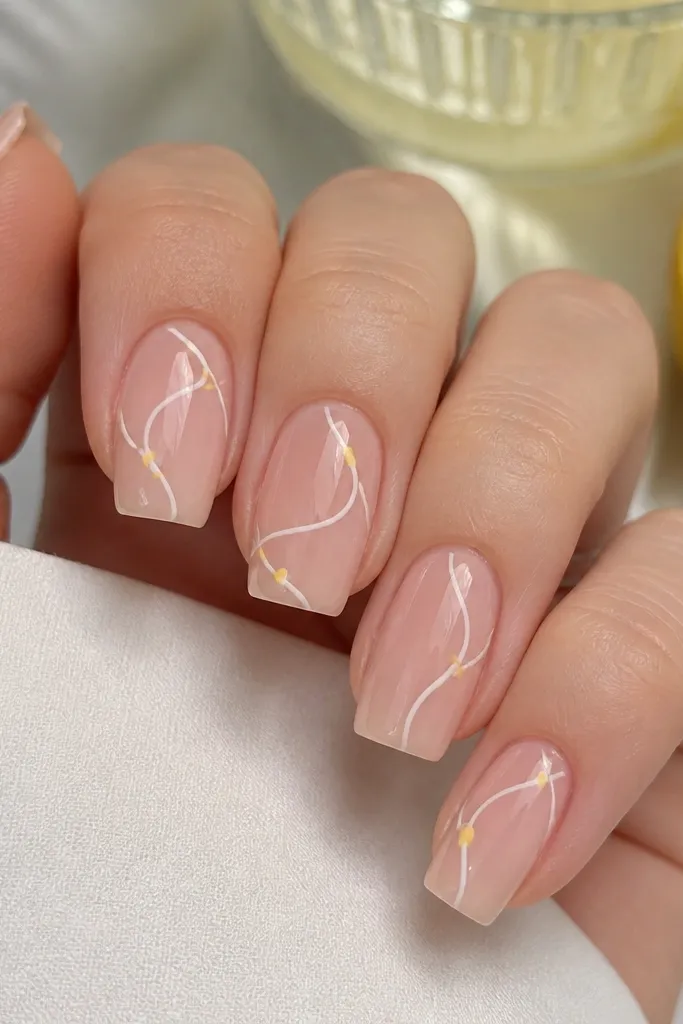
Swirls look playful, but most people place them wrong and they end up looking like random scribbles. On square medium, I keep the swirls vertical and centered so your nail still reads clean. The clear pink base keeps everything light and lets the white lines stay bright. Yellow dot accents give it that "lemonade" punch without taking over the design. This flatters hands with longer nail beds because the vertical lines make the whole nail look taller.
Start with a clear pink jelly base and build to full coverage in two thin layers. Use a striping brush to draw one vertical swirl line down the center, then add two smaller curved lines that wrap toward the tip. Add 2-3 tiny yellow dots along the swirl path with a dotting tool. Let it dry until the lines look set, then apply top coat carefully starting from the center and brushing outward so you don't drag the swirls. If you're using gel, cure each nail and do a thin top coat before a final glossy coat.
Editor's noteUse a toothpick for the yellow dots if your dotting tool makes them too round.
Watch outDon't cover swirls with thick top coat right away - it can smear fine lines.
6. Tropical Palm Fronds with Nude Negative Space
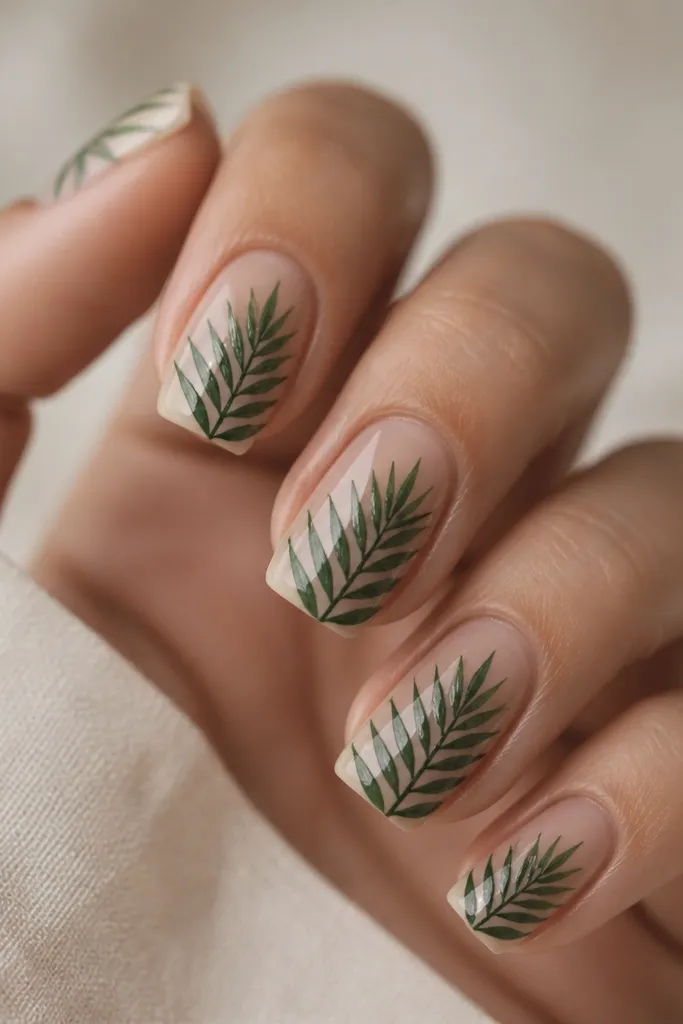
Negative space makes palm art look intentional instead of crowded. I use a nude base that matches your skin tone closely, then paint palm fronds in layered greens: deep forest for the main shape and lighter mint for highlights. On square medium, the flat top lets the fronds look like they're resting on a canvas. This set looks best on medium to deep skin tones because the nude base makes the green pop, but fair skin still works if you choose a nude that's slightly warm. Wear it for vacations, festivals, or any day you want your nails to look like a postcard.
Step one is choosing the nude: match it to your nail bed tone so the negative space looks clean. Paint one coat of nude jelly or milky nude across the nail. With a detail brush, draw a center stem line and then fan out 4-5 palm frond shapes diagonally toward the tip. Add lighter mint fragments on 1-2 fronds for dimension, keeping them small. Seal with two thin glossy top coats, and avoid pooling at the cuticle so the fronds don't lift.
Editor's noteIf your fronds look too thick, thin your green polish with a clear gel medium so the lines stay airy.
Watch outDon't paint fronds all the way to the sidewalls - square corners need breathing room.
7. Blue Skies with White Cloud Corners
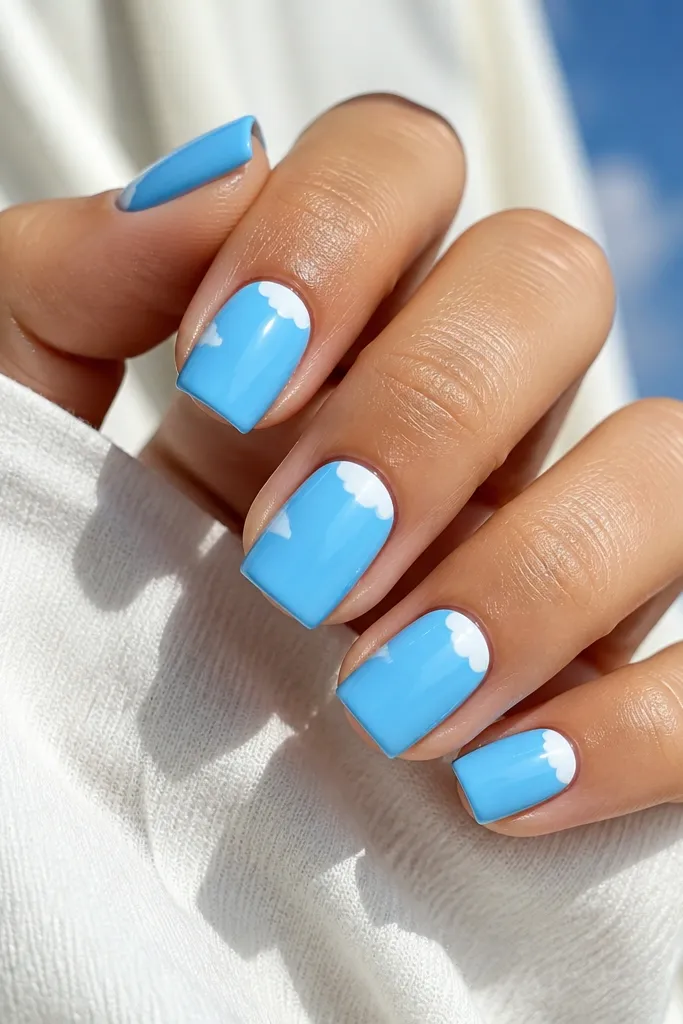
This is a simple design that still looks like nail art because it uses placement. Sky blue makes summer feel instant, and the cloud corner accents keep the nail from feeling heavy. On square medium, placing clouds at the corners makes your fingers look more structured, not flat. It flatters cool undertones and looks great with silver rings and denim. If you're wearing warm-toned outfits, the bright blue still works - just keep the base saturated and crisp instead of milky.
Paint the whole nail in sky blue in two thin coats so you don't get streaks. Let it dry fully. Use a small sponge or a makeup wedge to dab tiny white cloud shapes at both corners of the tip, keeping each cloud about 2 mm wide. With a fine brush, add one or two scalloped curves on each cloud edge. Finish with a glossy top coat, and keep the brush strokes straight to preserve the square edge.
Editor's noteFor the cleanest corners, place a strip of tape along the sidewall before dabbing the clouds.
Watch outAvoid a cloudy white base - you want crisp clouds, not a smudged gradient.
8. Coral Rose Accent on Milky Nude
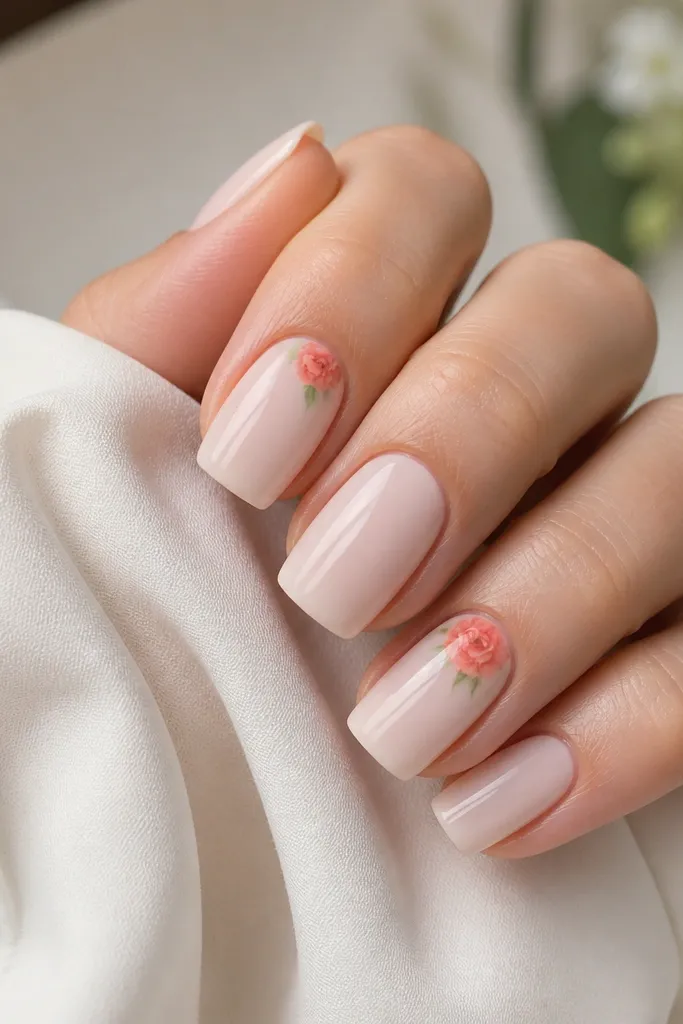
If you want summer nails that look soft and not loud, this is my go-to. The milky nude base gives you that clean, expensive look, and the coral rose adds just enough detail. Square medium nails work because the cuticle area is a perfect "frame" for a small bloom. I usually do this on ring fingers and keep the rest plain - it looks intentional and makes the rose feel like a jewelry piece. This flatters all skin tones, especially if you choose a milky nude that matches your undertone.
Paint milky nude on all nails, two thin coats for even coverage. For the accent nail, start by placing the rose near the cuticle center, about 1-2 mm above the cuticle line. Use a dotting tool to create 5-7 small coral petals, then slightly overlap them into a flower. Add a tiny green leaf with a thin brush and keep it angled toward the side. Seal with glossy top coat, and do extra care around the rose so it doesn't catch on hair or towels.
Editor's noteMake the rose slightly smaller than you think - small blooms look sharper on square medium.
Watch outDon't add more than one rose per nail unless you're using a thicker, gel-paint style.
9. Watermelon Half-Negative Space
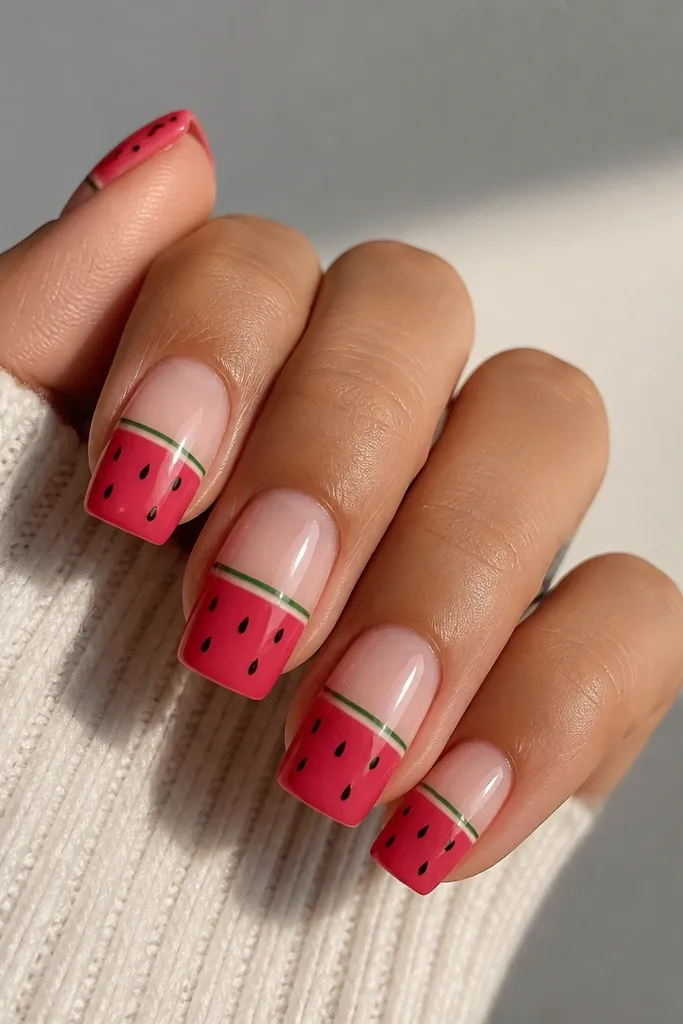
Watermelon nails are playful, but the cleanest version uses negative space like this. Leaving the top nude keeps it from looking like a sticker sheet. The watermelon pink-red base is glossy and smooth, and the black seeds add contrast without covering the whole nail. A thin green rind line makes it instantly recognizable. Square medium nails look extra crisp with this layout because the flat top makes the rind line straight.
Start with a nude base and paint only the upper half of the nail, leaving a clean line where you want the color split. Then apply watermelon pink-red to the lower half, using a straight brush so the boundary line is sharp. Add tiny black seeds by dragging the tip of a dot tool into short lines. Place a thin green line across the top of the red section like the rind. Seal with glossy top coat, and cure or dry fully so the seeds don't smear.
Editor's noteUse a gel liner for the rind line; it stays razor-straight even on square edges.
Watch outSkip thick seed clusters - they look messy and make the nail feel heavy.
10. Lavender Jelly with Silver Star Dust
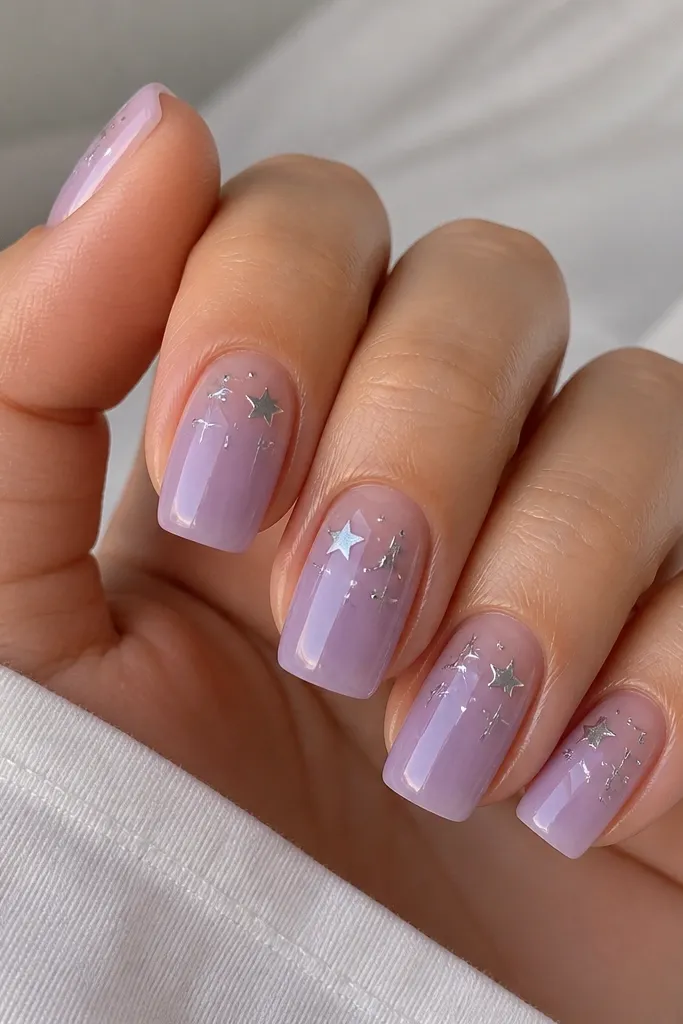
This set is for the days you want sparkle without glitter overload. Lavender jelly looks smooth and summery, and the silver star dust gives a "night sky" effect that still reads light in daylight. Square medium nails are great for scattering because the flat top gives a clean boundary for where the stars sit. It flatters fair to medium skin tones beautifully, and on deeper skin it looks bold while staying delicate thanks to the jelly base. I like it for concerts, date nights, and even office days if you keep the star placement small.
Apply a lavender jelly base in two thin coats so it stays translucent, not milky. Use a small star stencil or a star confetti mix by tapping it lightly near the cuticle and one side of the nail. If you're using loose star bits, press them gently with a dotting tool to avoid lifting. Seal with a thin layer of clear top coat first, then a second glossy coat to lock everything down. Keep the stars away from the corners so they don't snag.
Editor's notePress stars into the gel slightly before curing so they sit flat and don't rough up your hands.
Watch outDon't pack glitter densely - it turns jelly into chunky texture.
11. Mint Green One-Line Daisies
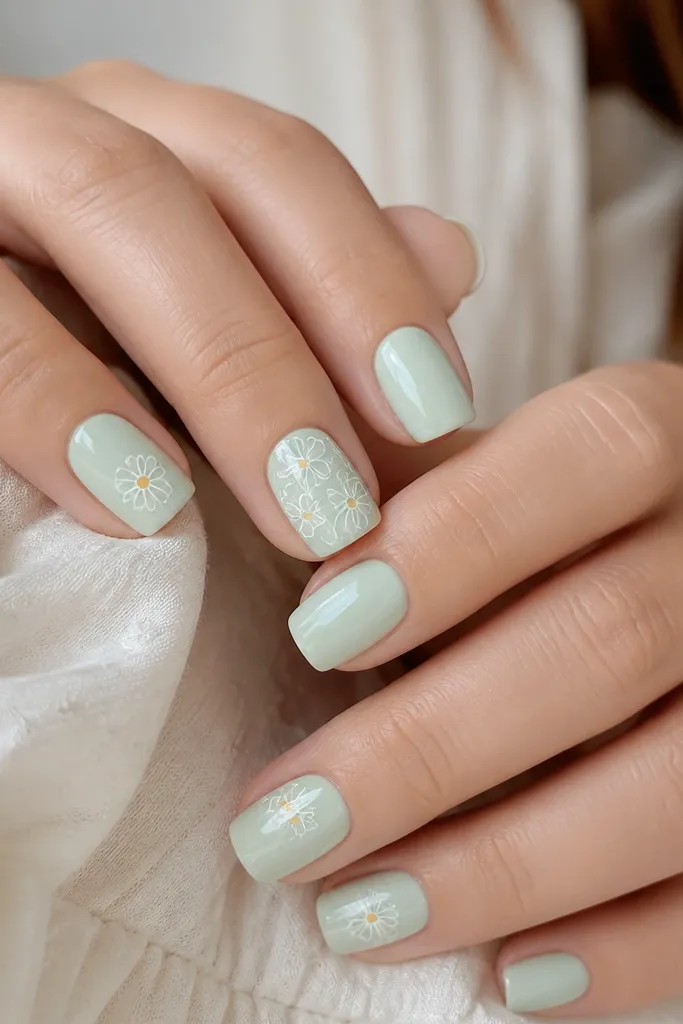
One-line daisies look charming because they stay airy. The pale mint base is the perfect summer background, and the white petals read cleanly on square medium edges. I keep the flowers small - about the size of a rice grain - because big daisies can make nails look childish fast. This flatters warm and neutral undertones, and it looks great with gold jewelry and linen outfits. If you're worried about nail art skill, one-line flowers are the easiest place to start.
Paint pale mint on all nails, then let it dry fully. Pick one accent nail and lightly sketch the daisy center with a dot tool. Use a thin brush to paint 6-7 simple curved petals around the center, leaving the lines open so it stays "one line." Add the tiniest yellow dot in the middle. Finish with glossy top coat, and keep the brush strokes flat so the petals don't smear.
Editor's notePractice on a paper towel first - the petal curve is consistent once you nail the wrist angle.
Watch outAvoid heavy shading on one-line art - it ruins the clean, airy look.
12. Hot Pink Skittle Tips with Micro Glitter
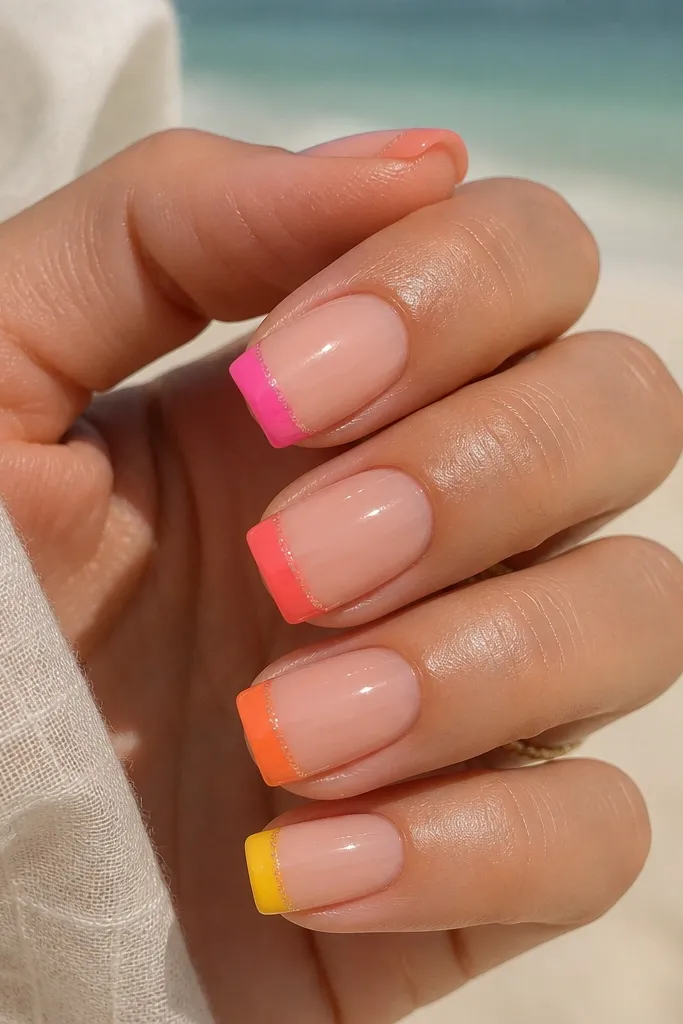
Skittle tips are fun, but the genius part is keeping the glitter band thin. The nude base keeps it chic, and the micro glitter at the tip edge makes each color look brighter under sunlight. Square medium nails show tip color changes clearly, so you get that "each nail is its own mini outfit" vibe. This is great for parties and travel because it matches a lot of outfits without you thinking too hard. On any skin tone, the hot tip colors create contrast that makes hands look alive.
Start with a nude base that matches your nail bed. Then paint a straight tip on each nail, keeping the tip width consistent at about 2.5-3 mm. Choose your tip colors: hot pink, coral, tangerine, and sunny yellow across different fingers. With a tiny liner brush, brush a micro glitter stripe along the tip edge only. Seal with glossy top coat, and wipe the brush on the rim of the bottle so you don't flood the glitter band.
Editor's noteIf tips look uneven, use a clear french guide sticker and remove it while the color is still slightly tacky.
Watch outDon't put full glitter on the whole tip - it chips faster and looks gritty.
13. Black Cat-Eye Neon Accent on Nude
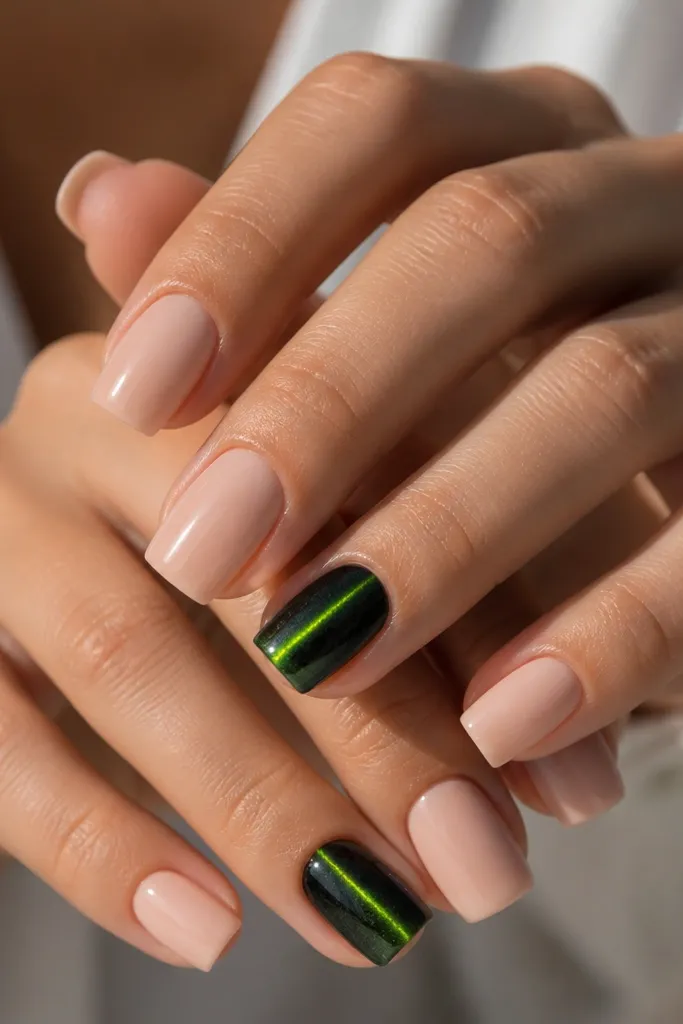
This is the summer version of "cool girl nails." Cat-eye polish already has movement, and the neon streak makes it feel electric without needing a complex pattern. I keep it on two nails so your manicure doesn't fight your outfit. On square medium, the magnetic line looks best when it runs vertically through the center - it makes nails look longer. This is especially flattering on medium to deep skin tones because the black base adds contrast and the neon shows up clearly. Fair skin looks great too, as long as you keep the nude base clean and not too pink.
Apply nude base to all nails and cure/dry fully. For the accent nails, apply a thin coat of black cat-eye polish and then hold the magnet directly over the nail while it sets. Tilt the magnet so the streak is straight down the middle, not angled. Apply a second thin coat if you want the neon line more intense, then cure fully. Finish with a glossy top coat that doesn't dull magnetic effects - use one labeled compatible with cat-eye or gel magnetic polish.
Editor's noteMagnet for 10-15 seconds per coat; rushing makes the streak fuzzy.
Watch outAvoid thick coats of cat-eye - they blur the magnetic line.
14. White Base with Peach Cuticle Bloom
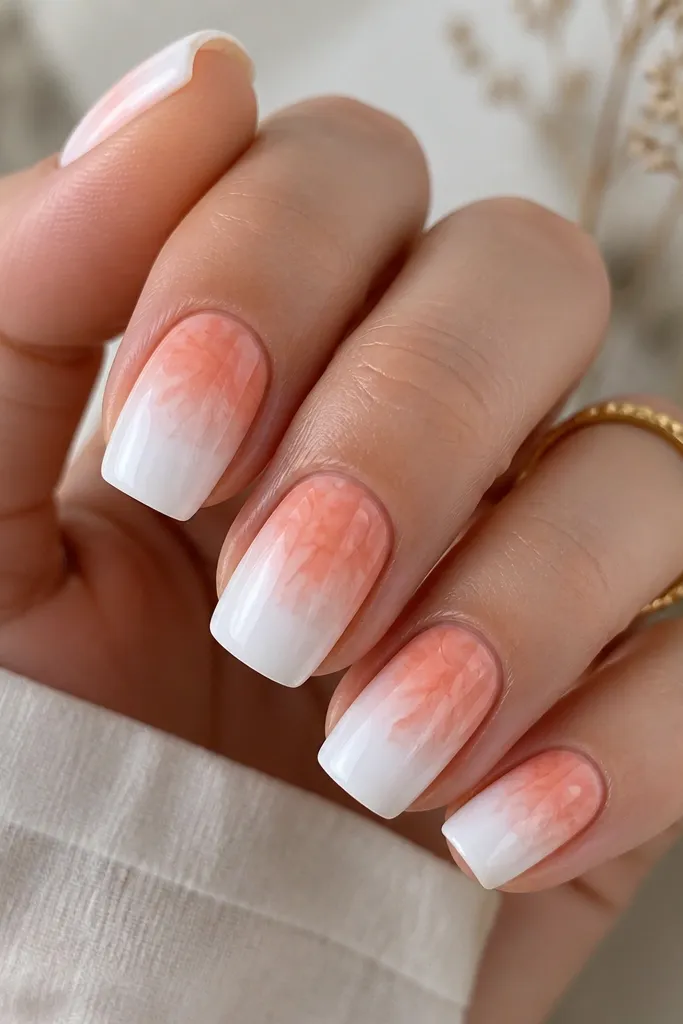
White nails can look sharp or messy depending on finish, and this design keeps them clean. The peach cuticle bloom adds softness right where your nail naturally starts, so your hands look bright without needing heavy art. Square medium works because the flat top makes the white look crisp and the bloom stays contained. I like this on fair to medium skin tones where white looks fresh, but medium to deep skin tones can also wear it - just make sure the white is opaque in two coats. It's a great option for weddings, brunch, and summer events when you want "clean" nails.
Start by painting a bright white base in two thin coats, making sure the edges near the corners are covered. For the bloom, dab peach polish at the cuticle center and use a sponge or a blending brush to spread it about 1/3 down the nail. Keep the bloom soft and round, leaving the side edges mostly white. Add one more peach layer only in the center if you want stronger contrast. Seal with glossy top coat, and be careful not to flood the cuticle area so the bloom doesn't smear.
Editor's noteLet the white fully cure/dry before you do the bloom so it doesn't mix colors.
Watch outSkip streaky white - it looks patchy on square edges.
15. Sunscreen Sheen with Clear Top and Gold Flecks
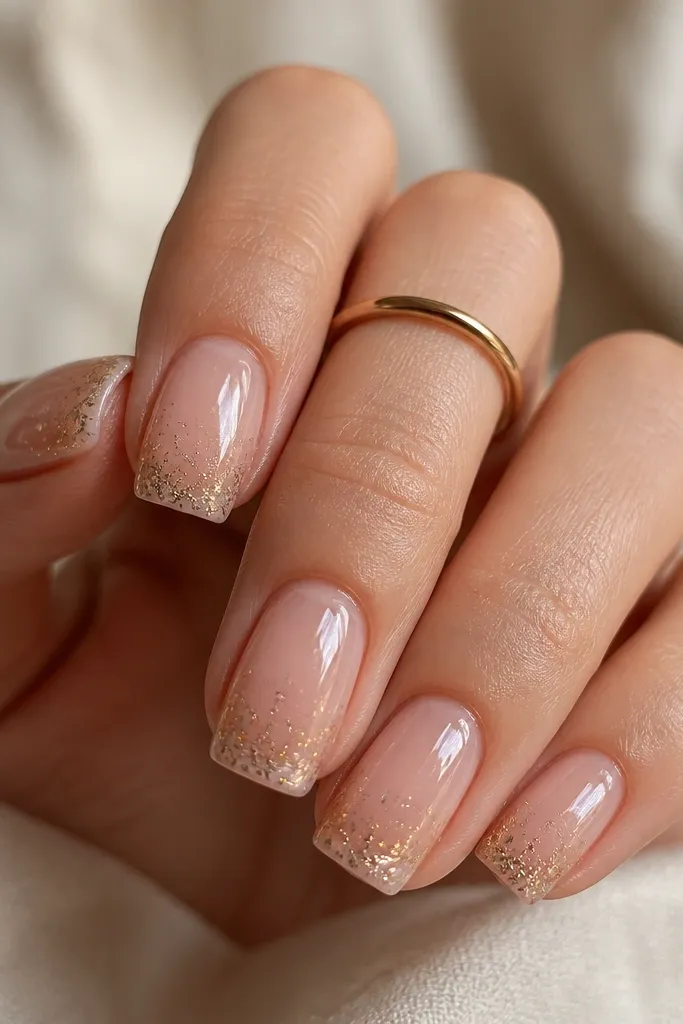
This is the "looks like you just got your nails done in the sun" effect. The trick is keeping the base translucent and using gold flecks lightly, like sunscreen shimmer on skin. Square medium nails make the flecks look intentional because the flat top area catches light evenly. It flatters every skin tone because gold flecks reflect warm highlights. If you like subtle summer nails that still get compliments, this is the set.
Apply a translucent nude base, then cure/dry. Add a clear gel layer or thick clear polish top layer without spreading too far - you want a slightly tacky surface to grab flecks. Dip a flat brush into gold shimmer flecks and tap off excess, then place flecks starting at the tip and tapering upward lightly. Add only a few flecks near the center for balance. Seal with glossy top coat in two thin layers for that glass-smooth finish.
Editor's noteTap flecks with a dry brush edge - it creates smaller particles and a cleaner look.
Watch outDon't use chunky glitter - flecks should feel like light, not like grit.
16. Tangerine to Coral Ombre Fade
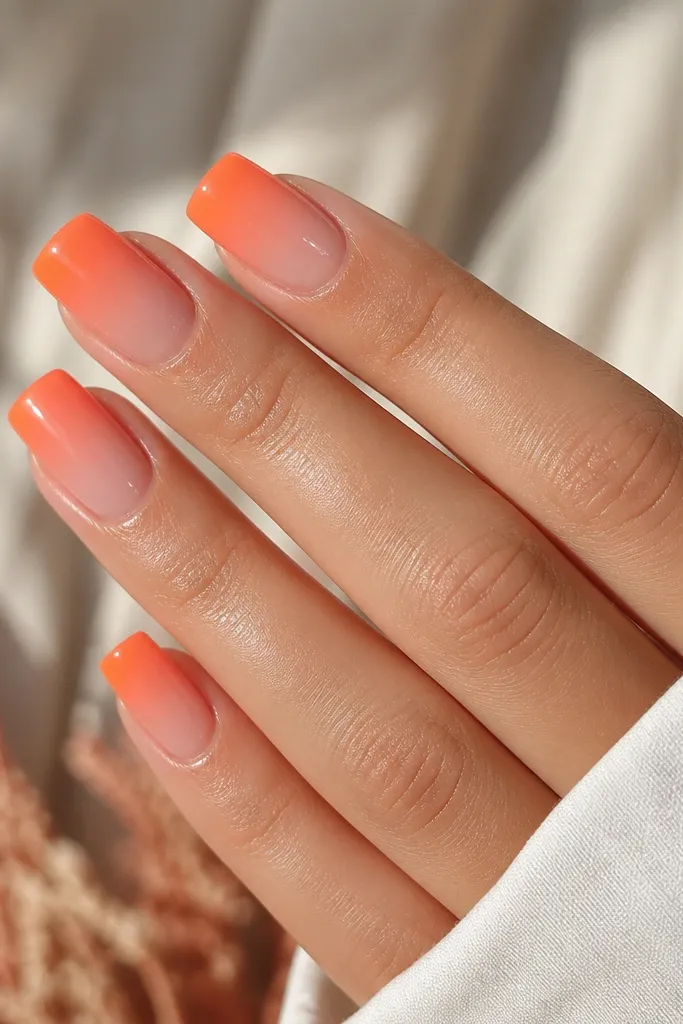
Ombre looks hardest, but on square medium it's actually forgiving if you blend the right way. The fade from tangerine to coral keeps it warm and summer-friendly, while the nude base prevents it from looking too heavy. This design flatters hands because it creates a vertical color transition that visually lengthens square nails. I wear it when I want something pretty but not fussy. It also looks great on both fair and deep skin tones because tangerine and coral sit in the warm spectrum.
Paint a nude base first and let it dry completely. Sponge on tangerine at the tip area using a small makeup sponge, then blend upward with coral so there's no sharp boundary. Use a clean sponge section for the blending pass so you don't muddy the colors. If you're using gel, do thin layers and cure between each for smoother blending. Finish with glossy top coat, and cap the free edge so the ombre doesn't lift.
Editor's noteKeep the ombre height consistent across fingers - aim for about 2-3 mm of strongest color near the tip.
Watch outAvoid over-saturating the sponge - too much polish makes ombre look muddy.
17. Turquoise Micro-Glitter Cuticle Line
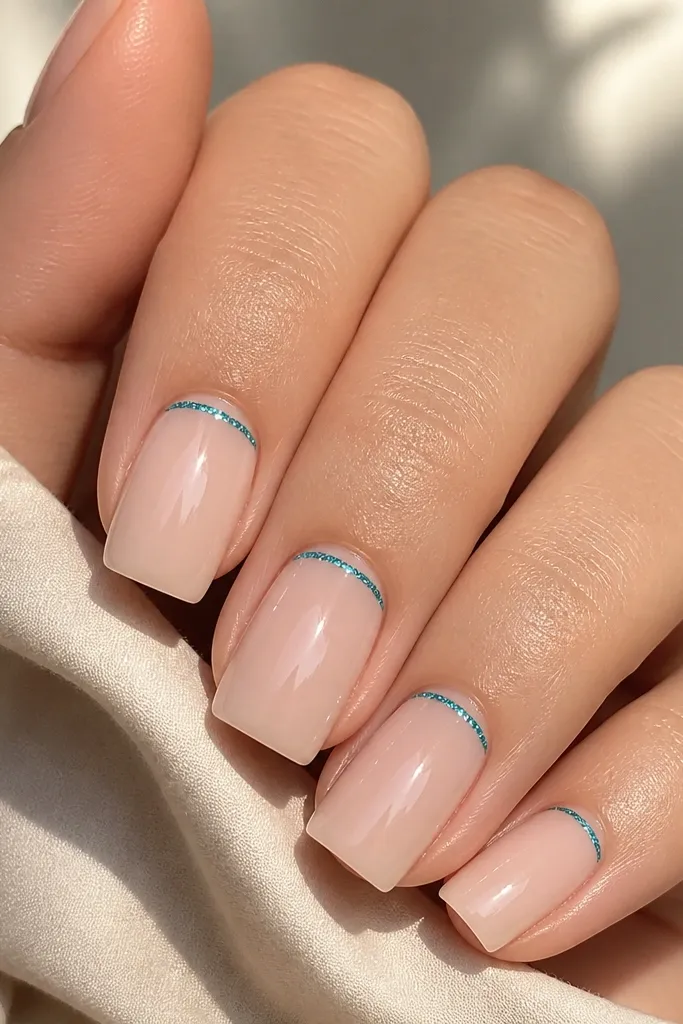
This is the manicure I wear when I want "sparkle but professional." The micro-glitter line is small enough to feel grown-up, and turquoise makes it feel like summer water. Square medium nails look sharp with a horizontal line because it defines the cuticle area and makes the nail bed look tidy. It flatters any skin tone because the base is clear and the glitter line adds a clean pop. If you work in an office or you hate loud nails, this is the one.
Apply a sheer nude base and cure/dry fully. Use a striping brush to draw a thin horizontal line 1 mm above the cuticle, making sure it doesn't touch the skin. Tap turquoise micro-glitter along the line, then press gently so it sticks evenly. Add a thin clear gel layer over the glitter line to smooth texture, then cure. Finish with glossy top coat, keeping the brush strokes centered to avoid dragging glitter.
Editor's noteDust off glitter overflow with a dry brush before sealing so the line stays crisp.
Watch outDon't make the line too thick - it turns into a chunky band on square edges.
18. White Daisy French with Yellow Centers
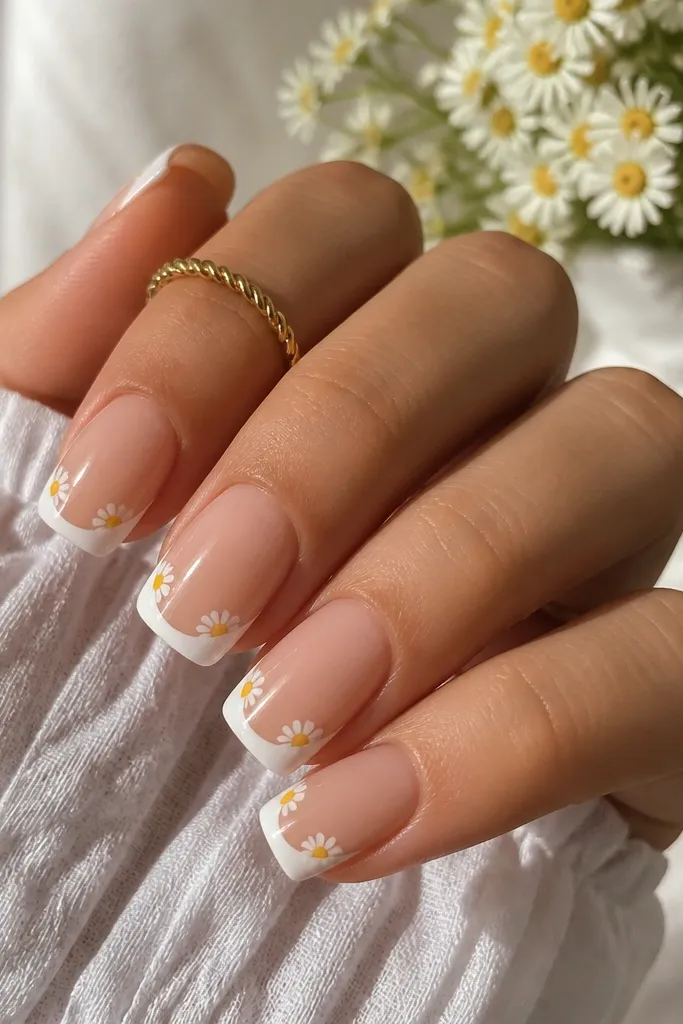
This one looks like nail art from a salon, but it's mostly placement and small details. The white french outline gives structure, and the daisies along the tip read "summer garden" without needing full nail coverage. On square medium, the daisies look best when they sit on the tip line rather than floating in the middle. It flatters hands that like bright colors because the yellow centers add warmth. If your nails are a little uneven, the french outline hides it by creating a clear boundary.
Start with a sheer nude base. Use a french guide sticker for straight tip placement and paint the tips with a thin white outline or fill, keeping it clean and not too wide. While the white is still slightly tacky, place tiny daisy petals along the french line - 5 small petals each, using a dotting tool and a fine brush. Add a yellow dot center for each daisy. Seal with glossy top coat in two thin layers, and cap the edges so flowers don't lift.
Editor's noteMake daisies smaller than your thumbprint - scale matters on square medium.
Watch outAvoid thick white french plus daisies - it makes the tips heavy and prone to chipping.
19. Coral and Pink Candy Stripe Diagonal
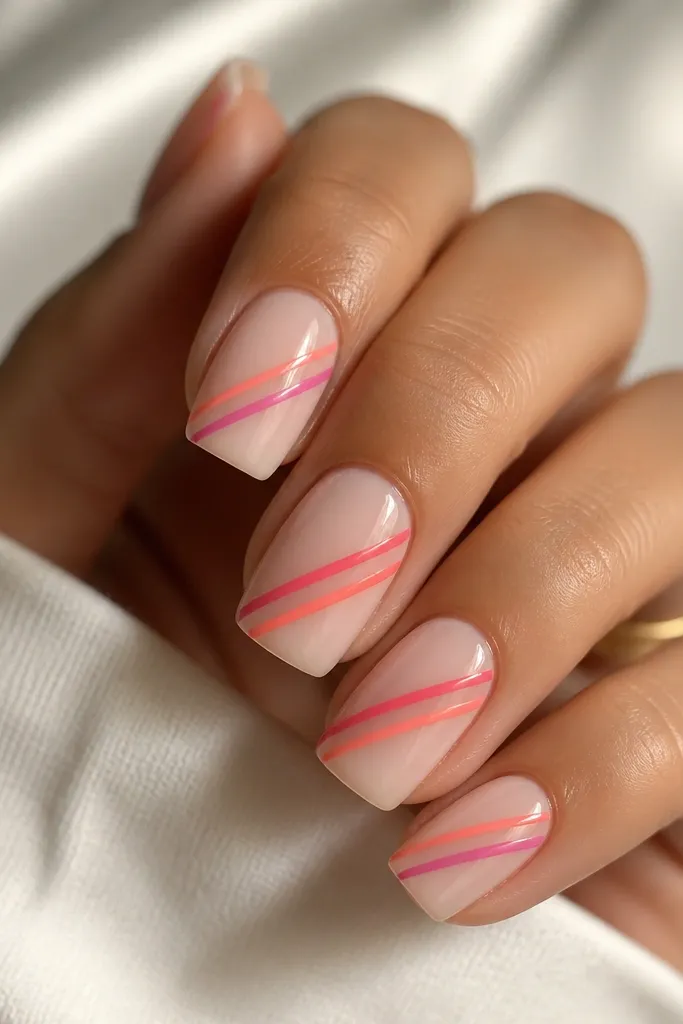
Diagonal stripes look playful, and they also make square nails look longer because the eye follows the slant. I use coral and hot pink because they feel like summer candy without turning neon. The milky nude base keeps it wearable, and the thin stripe lines prevent bulk. This flatters all skin tones because the nude base adapts and the stripes add brightness. If you want something graphic but not complicated, this is a great choice.
Paint a milky nude base and let it dry fully. Use striping tape to create two diagonal bands - place tape diagonally so the stripes are about 1.5-2 mm wide. Paint coral on one stripe and hot pink on the other, then carefully remove tape while the polish is still slightly wet. Clean edges with a fine brush dipped in remover for sharp corners. Finish with glossy top coat, and apply a slightly thicker final coat along the stripe edges to smooth and protect.
Editor's notePress tape down firmly at the corners so paint doesn't seep under and blur the stripe edges.
Watch outAvoid wide stripes - they cover too much of square medium and make it look blocky.
20. Pastel Rainbow Top Edge
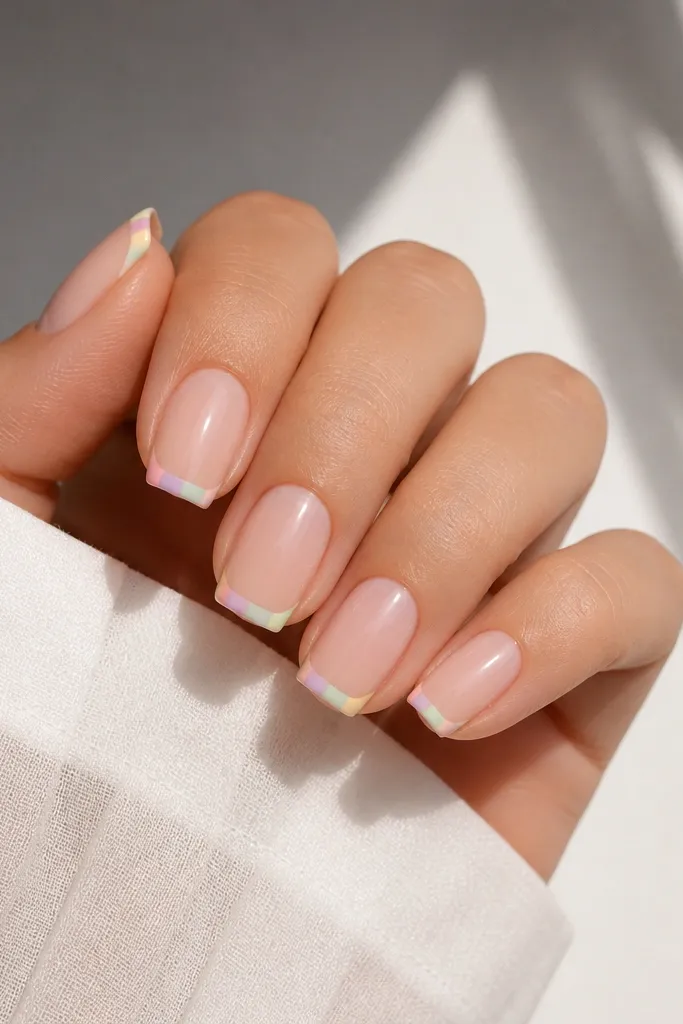
A pastel top-edge rainbow is summer-friendly because it stays soft and it's placed where your nail shape already looks tidy. The sheer nude base keeps it light, and the tiny rainbow band makes your nails look like you're wearing color without full coverage. Square medium nails make the band look straight and intentional since you're working on a flat top. This flatters fair, neutral, and warm undertones especially, and it still works on deeper skin tones if you keep the pastels opaque enough to show.
Start with a sheer nude base and cure/dry. Use a thin striping brush to paint a band along the tip edge about 2 mm tall, leaving the rest nude. Divide the band into sections with a fine brush: pink, lavender, mint, and pale yellow. Keep each section narrow and even so it doesn't turn into a smear. Seal with glossy top coat, and cap the tip edge so the pastel band stays smooth.
Editor's noteIf pastels look too sheer, do one extra thin coat only on the rainbow band, not the base.
Watch outSkip mixing colors directly on the nail - pastels muddy fast on square edges.