1. Watermelon Slice Long Square Set
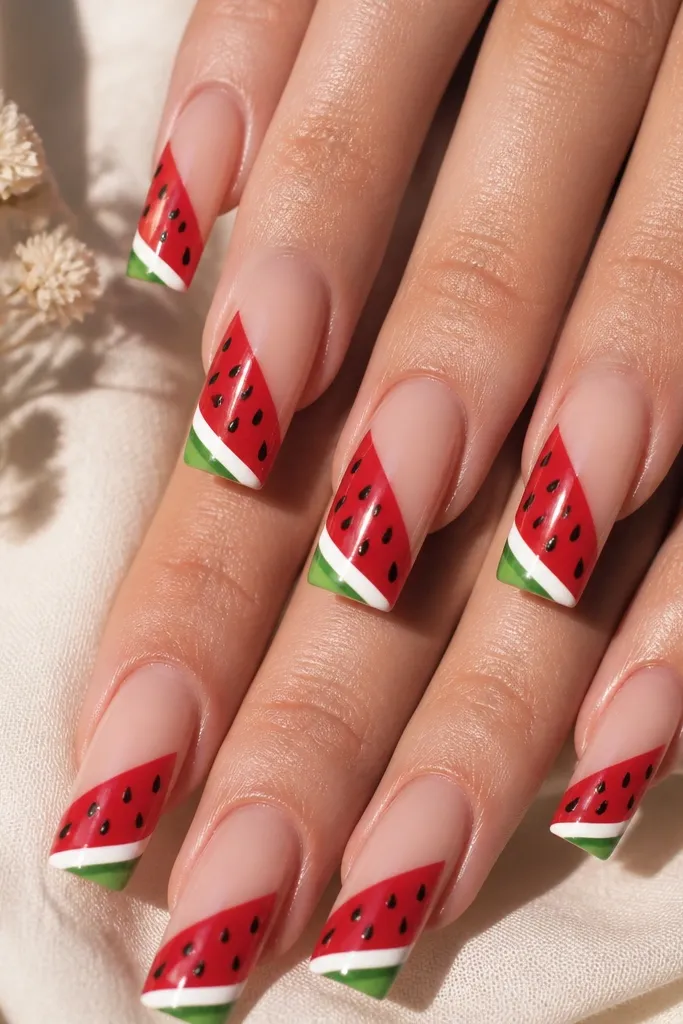
This set looks juicy because the base stays sheer and warm, so the watermelon colors pop without looking neon-clown. I use a nude pink base first, then paint the red slice with a slightly translucent coral-red for a soft glow under the topcoat. The thin white rind line is what makes it read like fruit instead of random stripes. It flatters most skin tones because the base is close to your natural nail color; on deeper skin, the nude looks rich, and on fair skin it keeps the red from overpowering your fingers. The square shape makes the "wedge" look intentional since the straight sidewalls frame the diagonal slice.
Start by filing your long square tips straight across, then square the corners with a 180-grit file until they're sharp but not paper-thin. Apply acrylic builder over a slip solution and shape a smooth apex, then buff the shine down just enough for adhesion. Paint the center diagonal wedge in coral-red, leaving a narrow gap where the white rind will go. Add a thin white stripe along the red edge, then place a tiny green triangle near the free edge on two accent nails. Finish by sealing with a gel topcoat in a thin layer, cure, then add a second topcoat focused on the corners.
Editor's noteUse a striping brush for the rind line - it should look like a clean sticker, not a thick paint stroke.
Watch outSkipping a glossy base makes the rind line look fuzzy and cheap.
2. Sunset Orange Jelly Tips
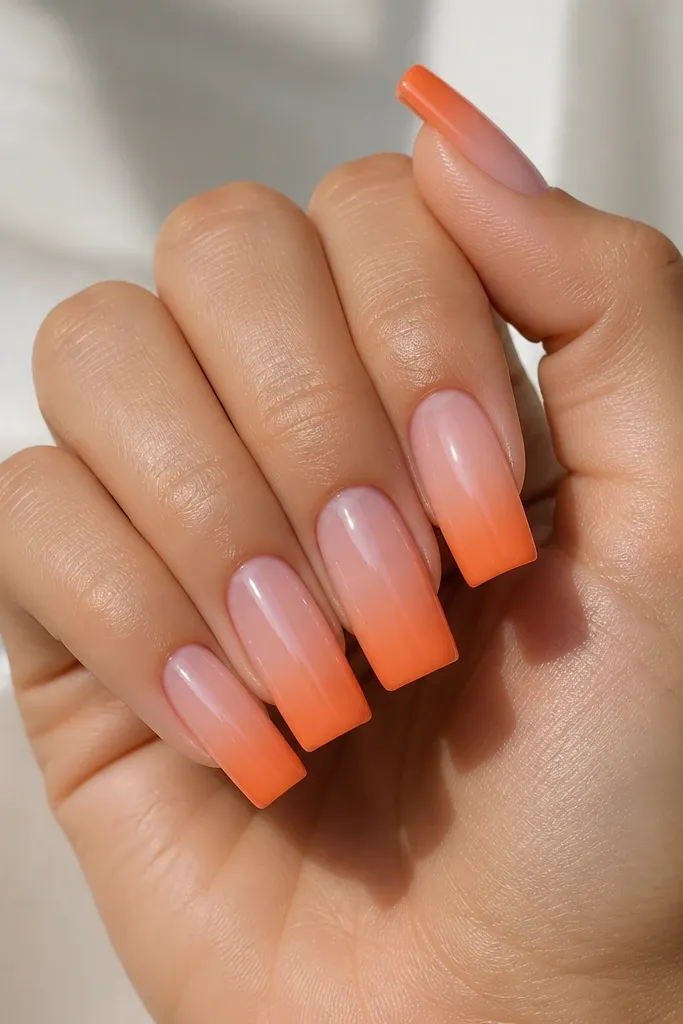
Jelly tips look expensive because they imitate stained-glass color - you see depth without chunky pigment. I build a sheer pink base, then apply a peach-to-orange gradient on just the top half of the free edge so the nail still looks light. The fade direction matters: I blend from the sidewall toward the center to avoid harsh stripes. This works on fair to medium skin because the sheer base makes your nails look longer; on deeper skin, the orange glow shows up beautifully against warm undertones. Long square nails make the gradient look smooth because the straight edge gives you a consistent blending line.
Start by prepping and buffing your nail plate lightly so the builder and gel topcoat sit flat. Build your acrylic with a clear-to-pink look, then file to a long square shape with a straight free edge. Apply a sheer pink layer, then use a makeup sponge to dab peach on the outer half of the free edge and orange in the inner half. Blend the two colors with a small flat brush until the transition looks like a soft airbrushed fade. Seal with two thin gel topcoat layers, curing each time, and cap the free edge so the jelly doesn't dull.
Editor's noteBlend under a bright desk lamp - you'll catch banding fast.
Watch outDon't paint the gradient too thick or it turns into a hard stripe instead of jelly.
3. Poolside Blue Chrome Accent
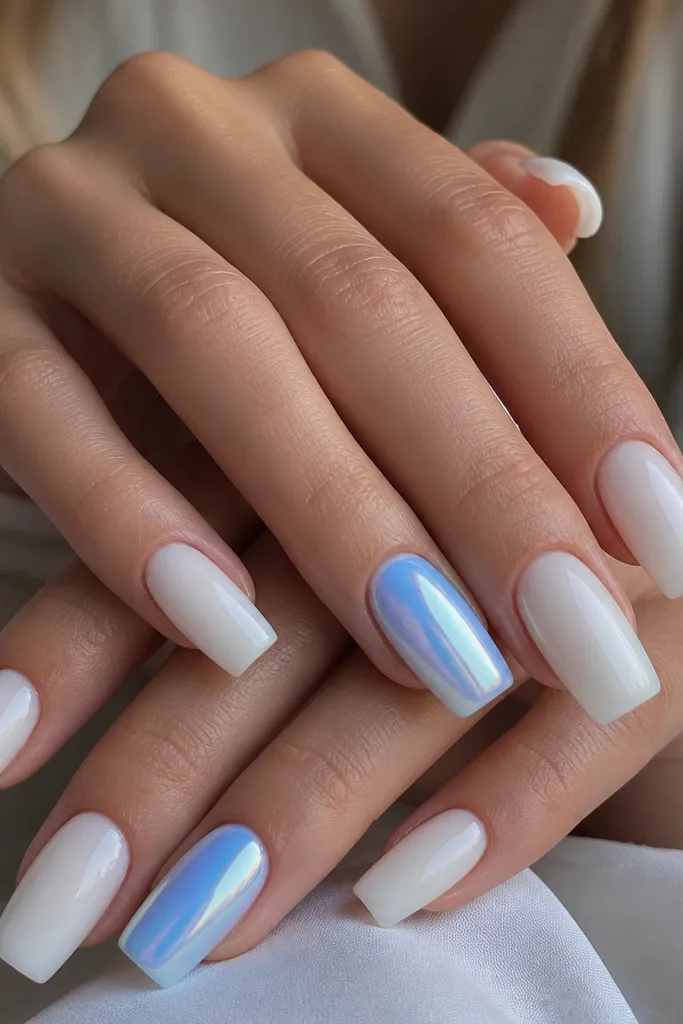
Milky white is the perfect summer "clean" base because it makes chrome look like light reflecting off water. I keep most nails milky and then chrome just the ring finger and middle finger so it looks styled, not costume. The blue chrome needs a smooth, non-matte surface because any dust turns into gray freckles. This flatters every skin tone because milky white brightens your hand, and the chrome gives a cool contrast that makes fingers look slimmer. On long square nails, the mirror finish also emphasizes the straight shape, so the corners must be sharp and even.
Start with a milky white acrylic or a milky gel base, then buff the surface until it's perfectly smooth. Clean with alcohol wipe and avoid touching the nail surface after. Apply blue chrome powder over a sticky gel layer (or chrome base) and rub gently in one direction for even coverage. Swipe off excess, then add a thin gel topcoat over the chrome carefully to avoid pulling it up - I do this in a slow, controlled pass. Finish with a second topcoat for durability, and cure fully.
Editor's noteRub the chrome with a soft foam applicator, not your fingers, so you don't leave streaks.
Watch outDon't chrome over textured glitter or matte finishes - it looks patchy and uneven.
4. Lemon Zest Micro-French
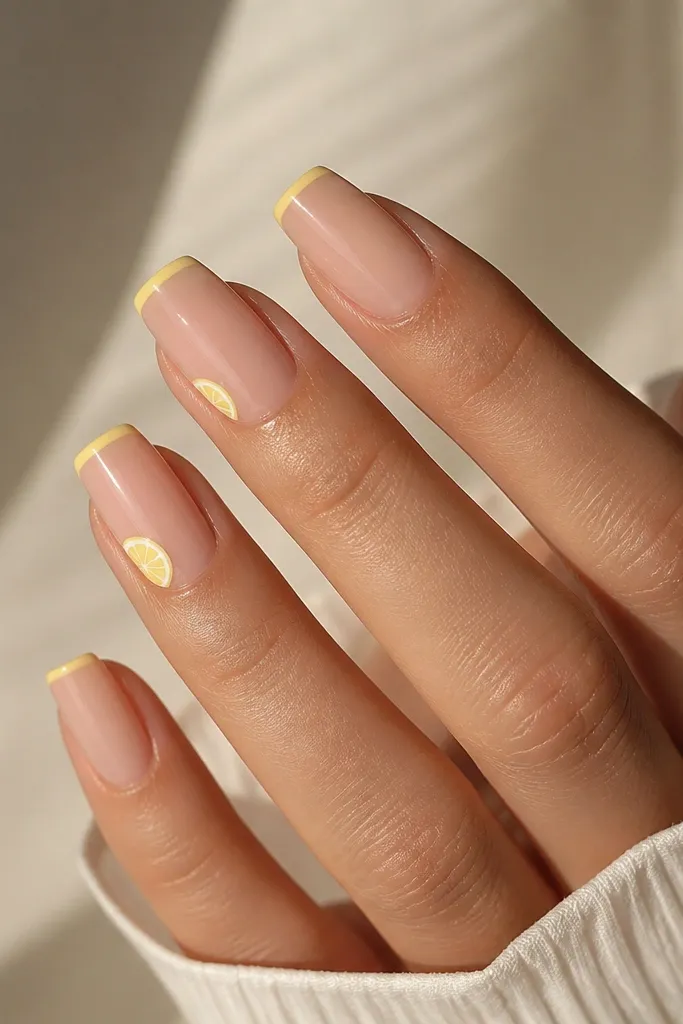
Micro-French looks clean because it frames the nail without taking up half the nail bed. I use a sheer nude base so your natural nail color peeks through, then I paint a super thin lemon line at the tip for that summer "citrus pop." The tiny lemon slices are small enough to feel cute, not cartoonish. This set flatters hands that look better with subtle color because the lemon line is a crisp accent, not a full cover. Long square nails make micro-French look sharper since the tip is straight and the line can stay even.
Start by applying a nude builder layer and file to long square with straight sides. Use striping tape or a steady hand with a thin liner brush to paint a lemon yellow micro-French along the free edge. Keep the line thickness about the width of a credit card edge - thin. Add micro details on two nails: draw a tiny lemon slice with a circle and 4-5 curved lines inside, then add a dot for the center. Seal with two thin gel topcoat layers, and cap the line at the tip so it doesn't chip.
Editor's noteLet the yellow line dry fully before topcoat - yellow pigments can smear if you rush.
Watch outAvoid thick French tips - they look bulky on long squares and snag on fabric.
5. Strawberry Milk Drip Tips
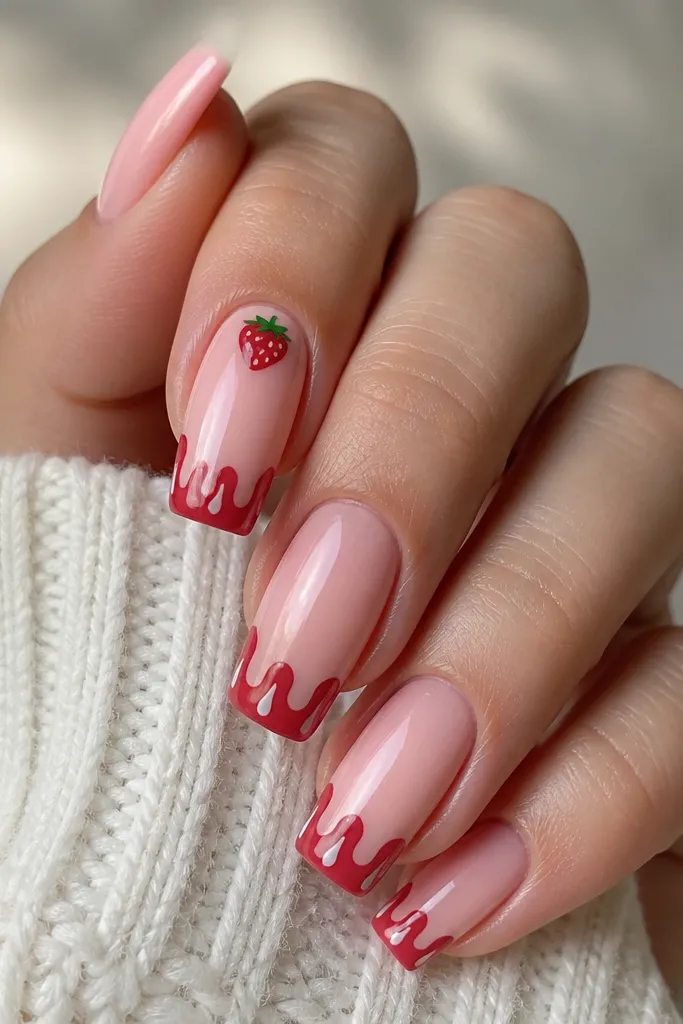
Drip art works on summer nails because it looks playful and still reads clean when it's controlled. I use strawberry red in a semi-opaque layer so it looks like fruit syrup rather than marker ink. The white "milk" gaps keep it from turning into one solid red blob. This flatters a wide range of skin tones because the creamy pink base bridges cool and warm undertones. Long square nails make the drip look deliberate since the straight tip gives you a consistent starting point for the drips.
Start with a creamy pink acrylic base and build a smooth apex so the nail doesn't look lumpy under the art. File to long square and lightly buff so paint grips. Paint the free edge in strawberry red, then draw 2-3 short drips down the center third using a liner brush. Add tiny white gaps between drips to mimic milkiness, then finish with a small strawberry icon on one accent nail (outline the shape, add seeds as tiny dots). Topcoat in two layers, and press the brush along the corners to seal the drip edges.
Editor's noteUse a nail art brush with a very fine point - thick brushes make drips look like stains.
Watch outDon't put drip art too close to the cuticle or it drags the eye upward.
6. Tropical Palm Leaf Negative Space
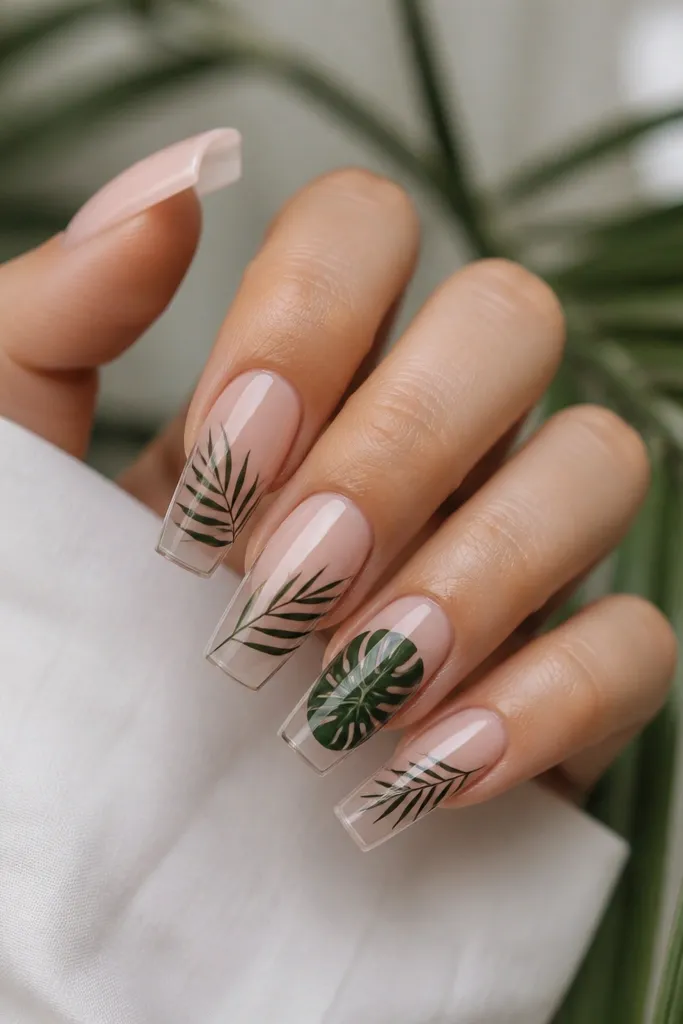
Negative space makes palm leaf designs look modern instead of busy. I keep the base sheer so the leaves look like ink on skin, then I use deep green and near-black lines for contrast. The leaves work best when they're angled from the center toward the sidewall so the nail still looks long and narrow. This set flatters hands with shorter nail beds because the sheer base keeps visual length. Long square nails help the leaf composition look intentional because the straight sides give you a clean "canvas" for the diagonal fan.
Start by building a sheer nude acrylic layer, then file to long square and buff lightly for adhesion. Use a thin striping brush to draw palm leaf stems and fronds, leaving clear negative space between each frond. Add deep green for the main leaf and near-black for the outline so it looks crisp. Do one accent nail with a solid filled leaf shape but keep the edges thin, not chunky. Seal with two gel topcoat layers, and cure fully between coats to lock in the lines.
Editor's noteMap the leaf fan with one light pencil mark on the nail first, then paint over it.
Watch outAvoid covering the entire nail with leaves - it kills the negative-space effect.
7. Coral Reef Outline Hearts
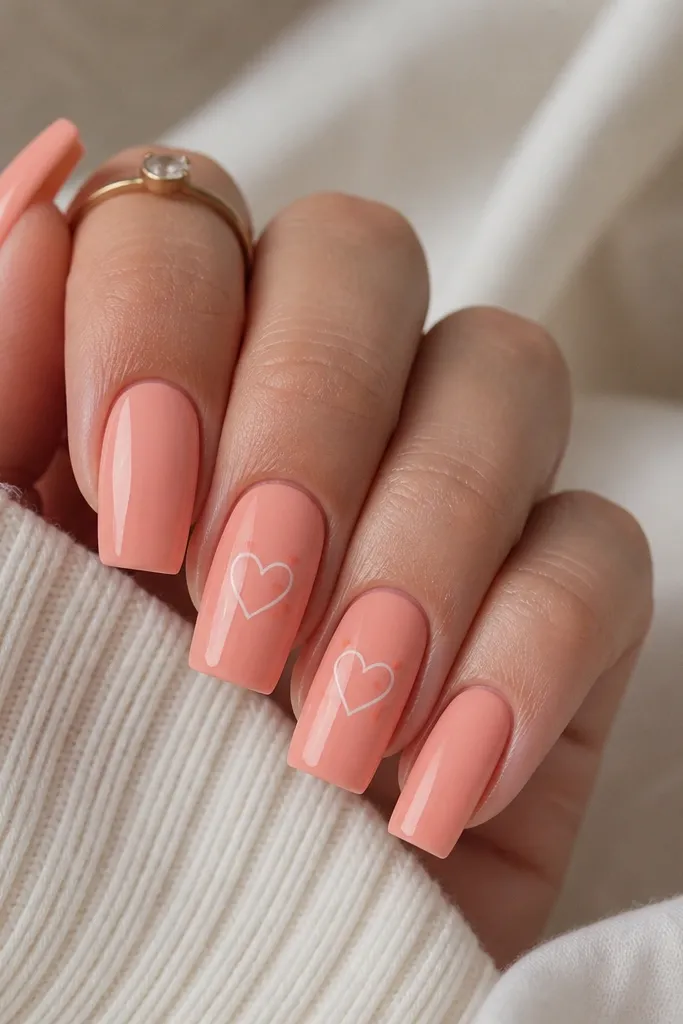
Outline hearts feel sweet without looking childish, especially when the background is coral and glossy. I choose a soft coral base instead of bright orange-red because it looks like warm ocean water. The hearts are thin white outlines, not filled, so they stay airy on long square nails. This flatters fair to medium skin because the coral warms your hand; on deeper skin, the hearts still pop thanks to the white line. The square shape keeps the hearts centered and balanced - no weird stretching like you get on rounded nails.
Start with a coral acrylic or coral gel base, then file to a clean long square. Paint a thin white heart outline on each nail's center third, keeping the heart width about two-thirds of the nail's width. Add small dot clusters near the heart points on two accent nails using a dotting tool. If you want extra dimension, add a second white outline just slightly thicker, but only on the top half of each heart. Seal with gel topcoat in two layers, and cap the sidewalls so the white line doesn't chip.
Editor's noteDot placement matters - keep dots closer to the heart point so they look like part of the design.
Watch outDon't fill the hearts solid white or they look chalky against coral.
8. Sea Glass Opal Flakes
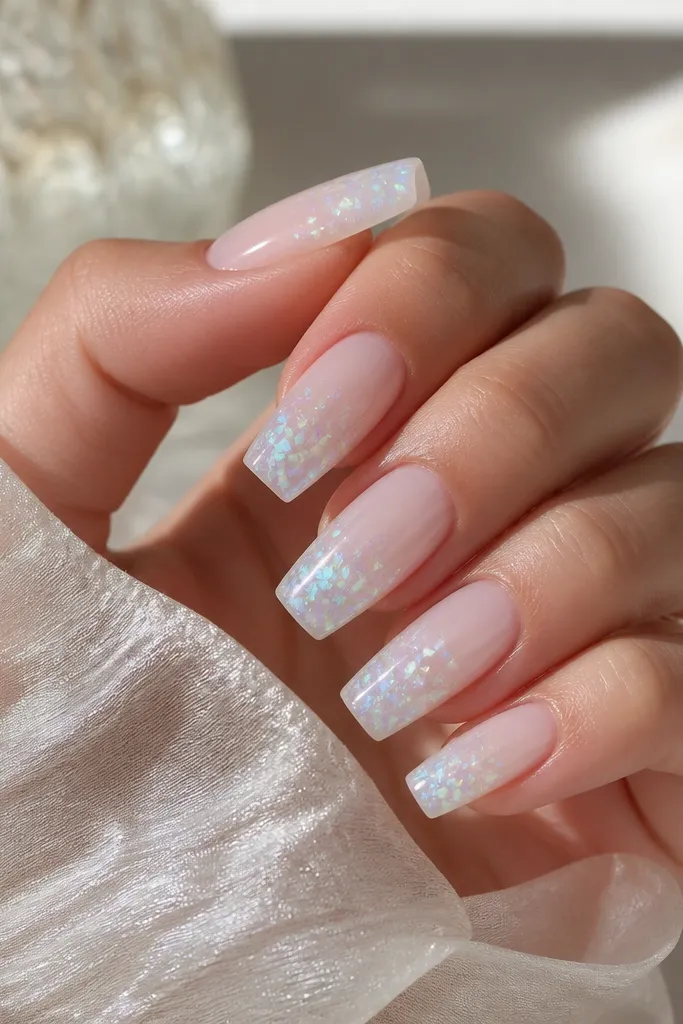
Sea glass nails look like you bottled sunlight and ocean texture. I use a milky translucent base so the flakes look layered instead of sitting on top. Opal flakes shift teal and lavender when you move your hands, which makes the set feel special even with minimal design. This flatters all skin tones because the base is light and the flakes add color without needing a heavy pigment. Long square nails make the flake placement look intentional when you keep it concentrated near the tip and let the cuticle stay clean.
Start by applying a milky translucent builder and file to long square, then buff to a smooth finish. Apply a thin gel tack layer near the free edge only - not all the way to the cuticle. Sprinkle opal sea-glass flakes, then gently press so they stick. Add a tiny amount of teal micro-glitter on one or two nails for extra summer punch. Topcoat in two layers, curing between each, and make sure you cap the free edge so flakes don't snag.
Editor's noteUse tweezers to place the larger flakes - it looks 10x cleaner than random scatter.
Watch outDon't overload flakes across the whole nail or the surface gets bumpy and catches on hair.
9. Sky Blue Micro Stars
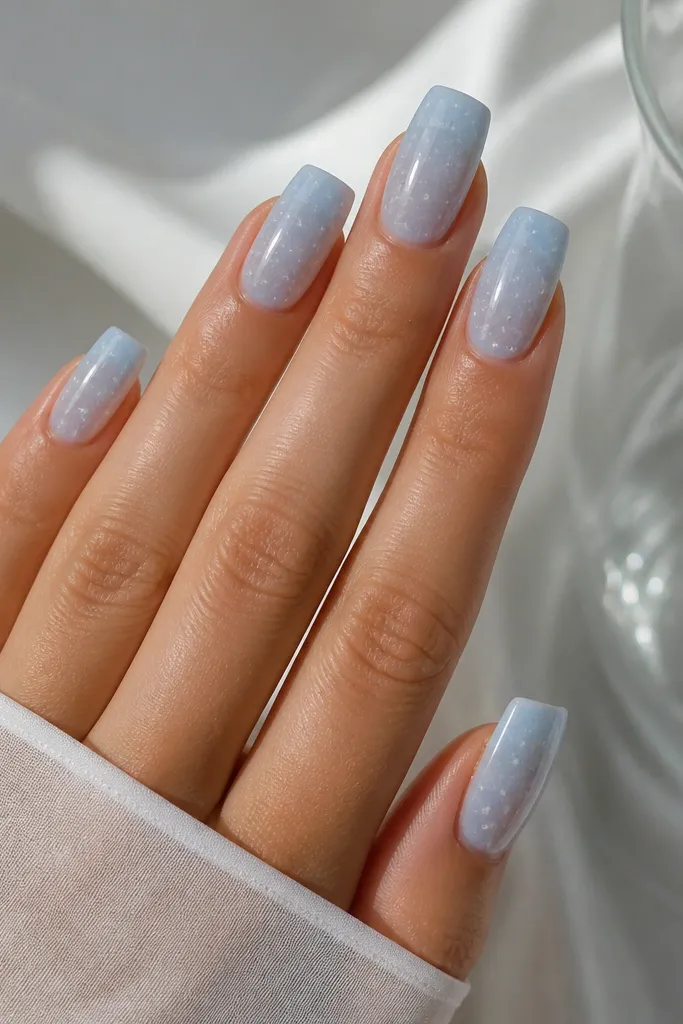
Tiny stars look like summer nights without going full galaxy. I paint a sheer baby-blue base so it still feels light and wearable, then add micro white stars with a dotting tool. The trick is spacing: leave breathing room so the stars look like they're floating. This flatters fair and olive skin because baby blue makes hands look bright, and on deeper skin it gives a cool contrast that still looks clean. Long square nails make the star pattern look neat because you can keep it mostly on the center third and avoid the sidewalls.
Start with a sheer baby-blue acrylic or gel layer, then file to long square and buff smooth. Use a dotting tool to place 6-10 tiny white stars per nail - keep them smaller near the sidewalls and slightly larger near the center. Add one diagonal "cluster" on the ring finger to make the set feel intentional. Cure or let dry fully before topcoat. Apply gel topcoat in two thin layers, and cap the tip so the stars don't wear off.
Editor's noteStar size should be consistent - if you can't keep them the same, use the smallest dotting tip only.
Watch outAvoid big stars on every nail - they look heavy and lose the airy sky effect.
10. Neon Lime Cuticle Pop
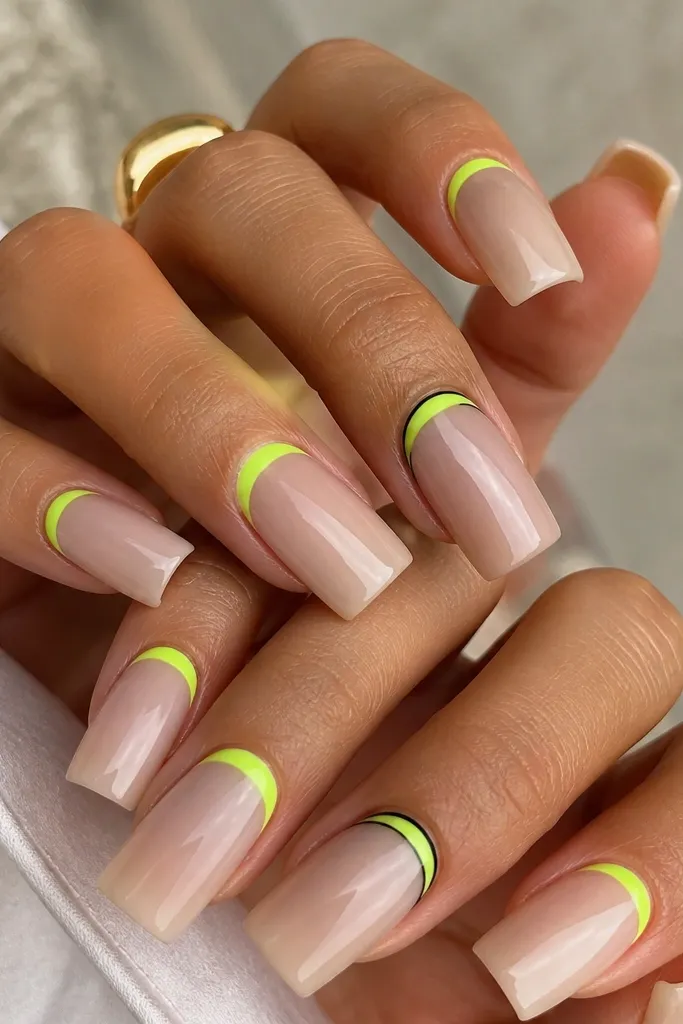
Cuticle pop designs look sharp because they frame your nail bed right where growth is visible. I use neon lime as a thin band so it stays punchy without looking like a highlighter smear. A thin black outline on accent nails makes the lime look cleaner and more graphic, especially on long squares. This flatters hands that need a lengthening trick because the neon sits high and doesn't cover the tip. On fair skin it looks bright and fresh; on deeper skin it turns into a bold summer accent that still reads neat.
Start by building a clear or sheer nude base and filing to long square with straight sides. With a fine liner brush, paint a neon lime band along the cuticle line, leaving a tiny gap at the sidewalls so it doesn't flood. On two nails, trace the lime band with a thin black line for a crisp outline. Let the neon set, then apply gel topcoat in one thin layer first to lock it down, cure. Add a second thicker topcoat for shine and durability, focusing on sealing the cuticle edges.
Editor's noteKeep the lime band thickness about the width of a pencil eraser edge so it stays graphic.
Watch outDon't paint neon too close to the skin - it lifts faster and looks messy.
11. White Daisy Side Stripe
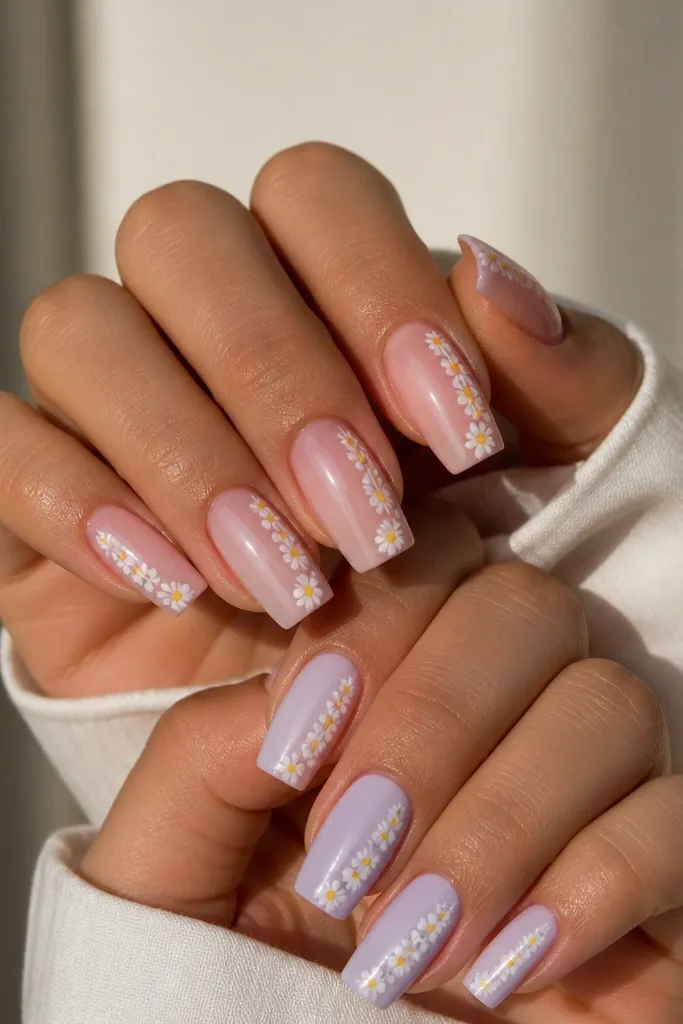
A single daisy on a side stripe looks like summer jewelry. I use a pastel base because it keeps the daisies light and not harsh, then I paint a clean white stripe down one side so your eye follows the nail length. The daisy centers are yellow dots, and the petals are short curved strokes - small enough to stay crisp on long square edges. This flatters every skin tone because the pastel base looks gentle and the white stripe adds contrast. Long square nails are perfect because the stripe stays straight and doesn't distort like it can on curved shapes.
Start with a pastel acrylic base and file to long square, keeping the sides straight. Paint a thin white stripe along one sidewall, stopping about 1-2 mm from the cuticle so it doesn't flood your skin. Add daisy petals around the stripe: draw a small yellow center dot, then 5-6 short white petal strokes radiating out. Place one daisy per nail or do two petals clusters on an accent nail for variety. Topcoat in two layers, and cap the stripe at the tip so it doesn't chip.
Editor's noteIf your stripe wobbles, re-paint it before adding daisies - it's the foundation for everything.
Watch outAvoid overcrowding daisies - two is cleaner than five on long nails.
12. Tangerine Marble Swirls
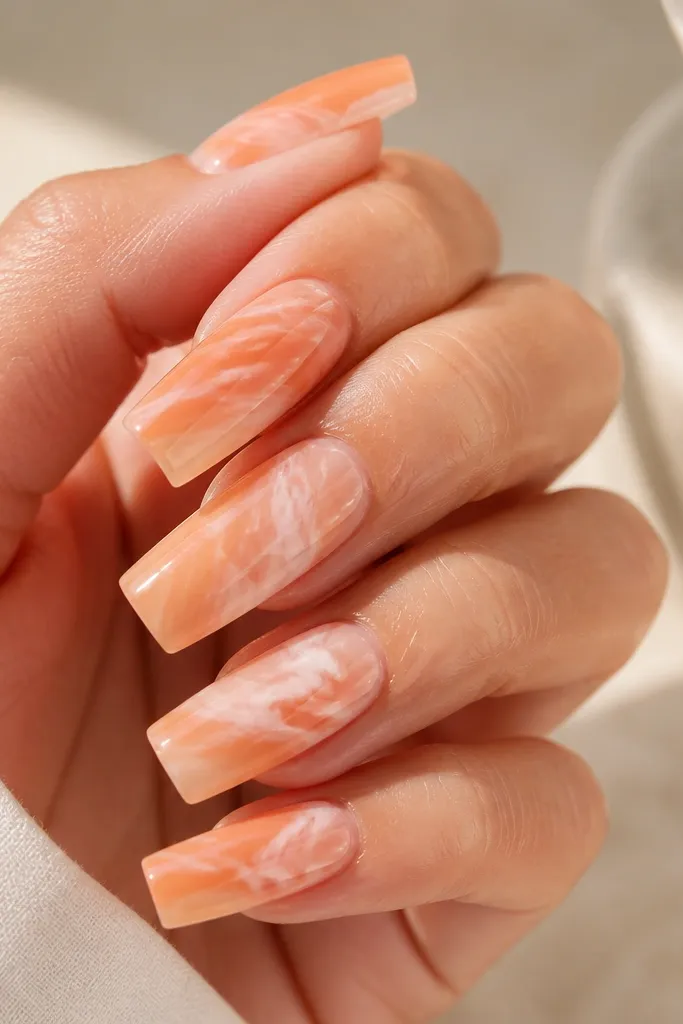
Marble looks premium when it's thin lines on a milky base, not thick paint chunks. I build a milky tangerine/orange base so the marble looks like it's floating under the surface. The swirls are pale peach and white, pulled into thin ribbons that vary in thickness so it feels organic. This flatters warm skin tones because orange sits close to your natural undertone; it also flatters cool skin when you pick a milky orange instead of neon. Long square nails keep marble elegant because the diagonal movement looks natural across the flat surface.
Start with a milky orange builder or gel base and file to a long square with smooth sides. Buff lightly so the surface is not glossy, then apply a thin layer of base gel if needed. Use a dotting tool or thin liner to drag white and pale peach through the wet base in diagonal swirls. Wipe your brush often so lines stay hair-thin. Cure fully, then topcoat twice with gel, making sure you cap the free edge and corners so the marble doesn't wear thin.
Editor's noteMarble looks better with imperfect lines - stop when it looks slightly chaotic, not when it looks finished.
Watch outDon't mix too many colors; marble with three tones looks like stone, marble with five looks like candy.
13. Pink Punch French With Micro Glitter
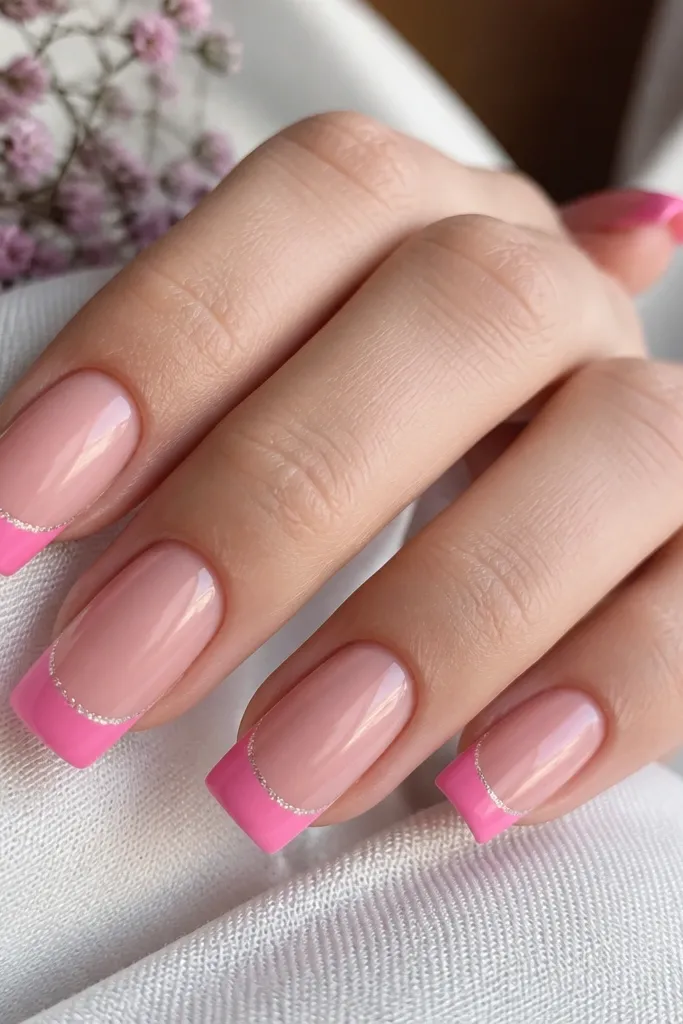
A French tip feels classic, but micro glitter at the border makes it summer. I keep the base sheer pink so the nail looks clean, then I paint a bright pink tip that's opaque enough to look solid. The glitter line is thin and placed exactly where the tip meets the base - that border sparkle catches light when you move your hands. This flatters short nail beds because the sheer base maintains visual length. Long square nails make the French line look crisp since the tip is straight and the border line can be perfectly aligned.
Start by building a sheer pink layer and filing to long square. Paint the French tip in bright pink, keeping it to about 2-3 mm from the free edge. While the tip color is tacky (or use a thin clear gel), add a micro glitter line right along the border - use a small flat brush so it stays narrow. Clean up any glitter that strays onto the base. Cure, then apply gel topcoat in two layers, capping the tip edge and corners for chip resistance.
Editor's noteUse silver micro glitter, not chunky - chunky glitter makes the border look uneven on squares.
Watch outDon't extend the glitter line down the nail bed or it looks like frosting.
14. Aqua Line Art Shells
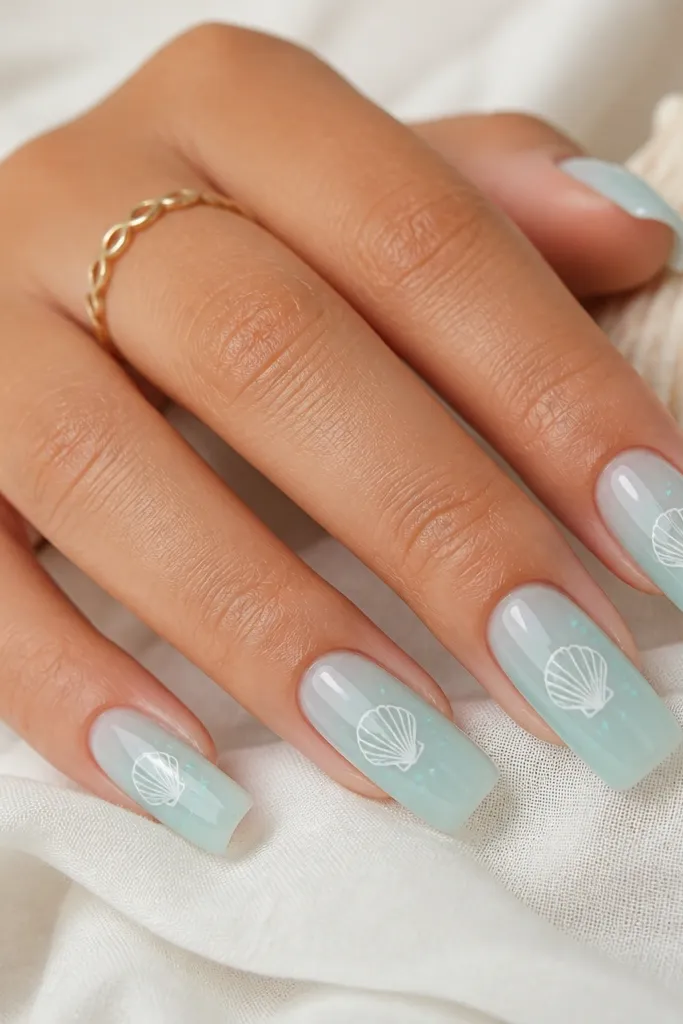
Shell line art looks fresh because it's minimal but still clearly summer. I use a sheer aqua base so it feels like the ocean without turning into a solid block of color. The shells are white outline with a few light teal dots, so the design stays airy and doesn't compete with the nail shape. This flatters fair skin because the aqua looks clean and bright; on deeper skin, the sheer aqua turns into a soft jewel tone that still reads neat. Long square nails are perfect for line art because the flat surface helps your brush lines stay consistent.
Start with a sheer aqua base and file to long square, then buff the surface lightly. With a fine liner brush, paint shell outlines near the center third, leaving space around them so they don't crowd the cuticle. Add a small curved shell opening line and a few dots in light teal to mimic sea bubbles. Keep the line thickness consistent by reloading paint only once per nail. Seal with gel topcoat in two layers, cure between coats, and cap the corners carefully.
Editor's noteOutline first, then add dots - drawing dots first makes shells look messy fast.
Watch outAvoid thick line art - it turns shells into blobs on long nails.
15. Tutti-Frutti Candy Confetti Long Square Acrylic
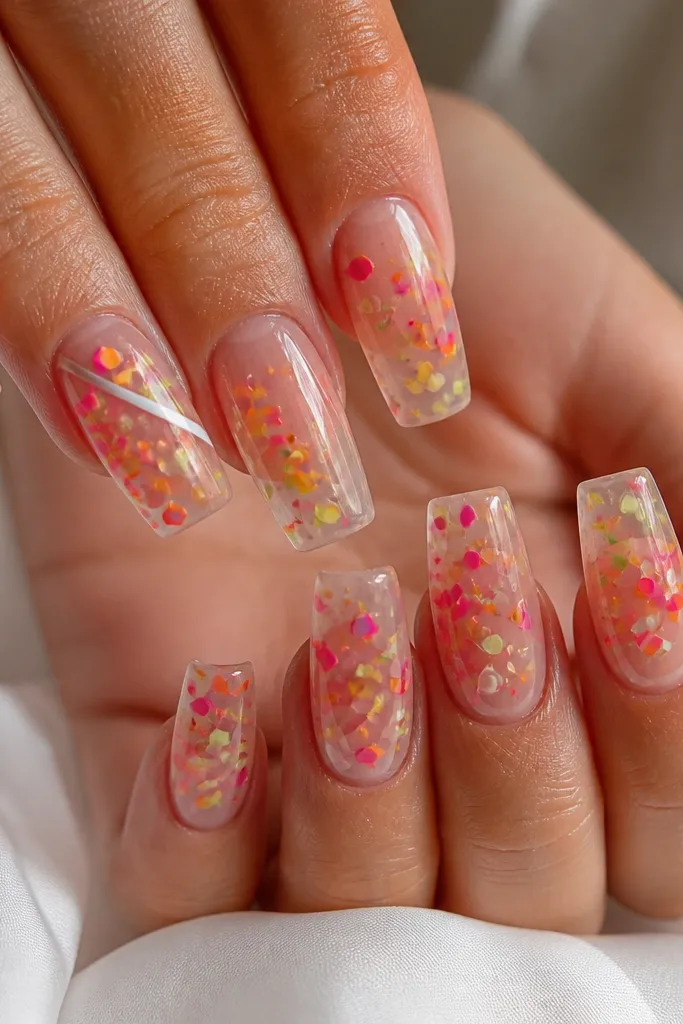
This set looks like you dumped a candy mix into clear resin and sealed it under glass. The long square shape keeps the confetti crisp instead of blobby, especially on the sidewalls. I like a sheer base because you can see the confetti depth when the nails move - it reads "3D" without sculpting extra layers. The thin white diagonal line on the accent nail gives the confetti a direction, so the design looks intentional instead of random. It also photographs well in summer light because the colors stay bright under a glossy top coat.
1) Prep and size your long square tips first. I file the free edge to a straight 90-degree square, then thin the underside so the nail doesn't feel bulky when you cap the confetti. 2) Apply a sheer builder layer, then cure. Keep it thin near the cuticle so the confetti doesn't shift upward when you place it. 3) Press tiny confetti pieces into the tacky gel with a dotting tool, one nail at a time, and cure. If the pieces float, add a micro dab of clear gel to "anchor" them, then cure again. 4) Cap with a clear builder or overlay, pulling the gel from cuticle to tip in one smooth stroke per nail. Cure fully, then file the top flat and buff to remove any edges that catch on fabric. 5) Finish with a high-gloss top coat and cure, wiping residue thoroughly for that clean glass look.
Editor's noteUse confetti pieces that are flat and small enough to sit under the gel cap. If you can feel a piece with your fingernail, file it down before top coat or it will leave a bump.
Watch outDon't dump all confetti at once across multiple nails - you'll end up with lopsided clusters and uneven depth.