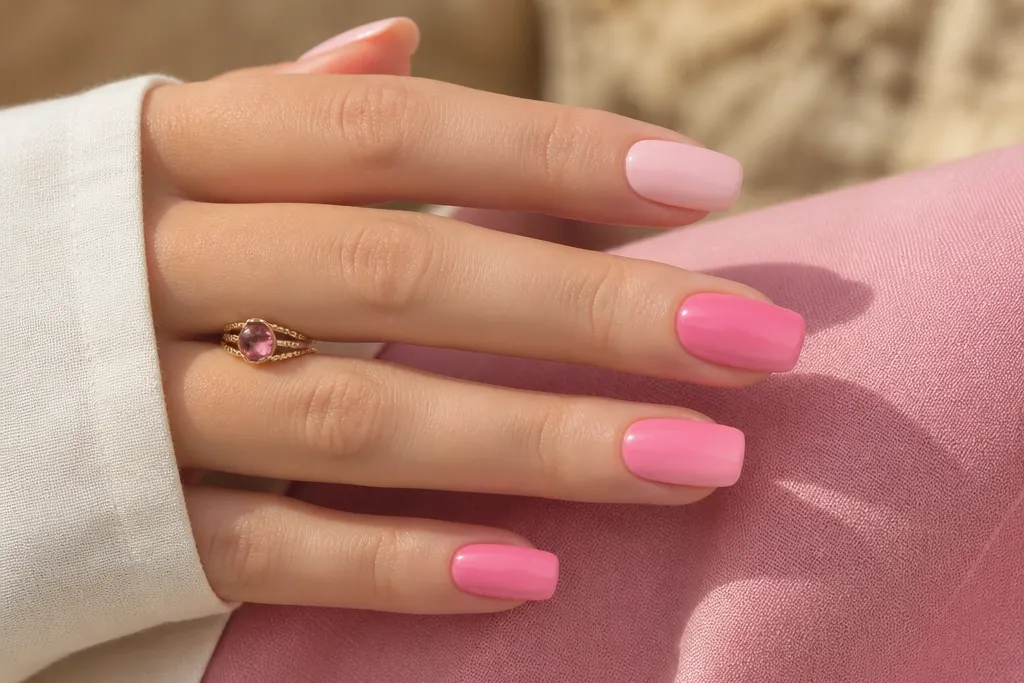
1. Icy Bubblegum Square Pink with Micro Chrome Edge
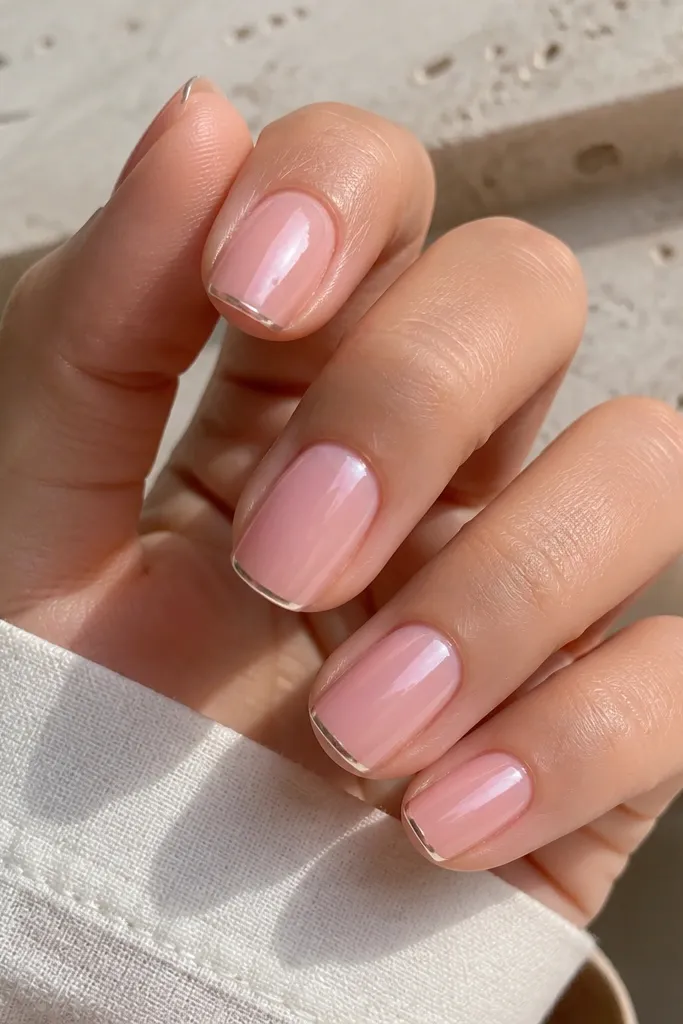
This is the "pool day manicure" look - bright, clean, and light-reflecting. The base is an icy bubblegum pink with a slightly jelly feel, so it looks like color floating over the nail instead of sitting on top. I use a micro chrome edge because it frames the square shape and makes the tips look longer without adding bulk. It flatters fair to medium skin tones especially well, since the cool pink keeps the overall look crisp. Wear it for beach weekends, festivals, and anything where you want your hands to look polished in photos.
Start by filing your nails to a medium square and pushing cuticles back, then apply a thin base coat and cure. Paint two thin coats of icy bubblegum jelly pink, curing between coats, and cap the free edge. Use a fine striping brush to place a micro chrome line along the outer edge of each nail - not across the whole tip - then cure or seal it with a chrome-friendly top coat. Finish with a thick glossy top coat so the chrome doesn't dull and the pink stays glassy.
Editor's noteIf the chrome looks patchy, wipe the brush with rubbing alcohol first so it deposits evenly.
Watch outDon't drag chrome across the nail - it smears and makes the square edges look uneven.
2. Soft Rose Pink Square with Milky White Half-Moon
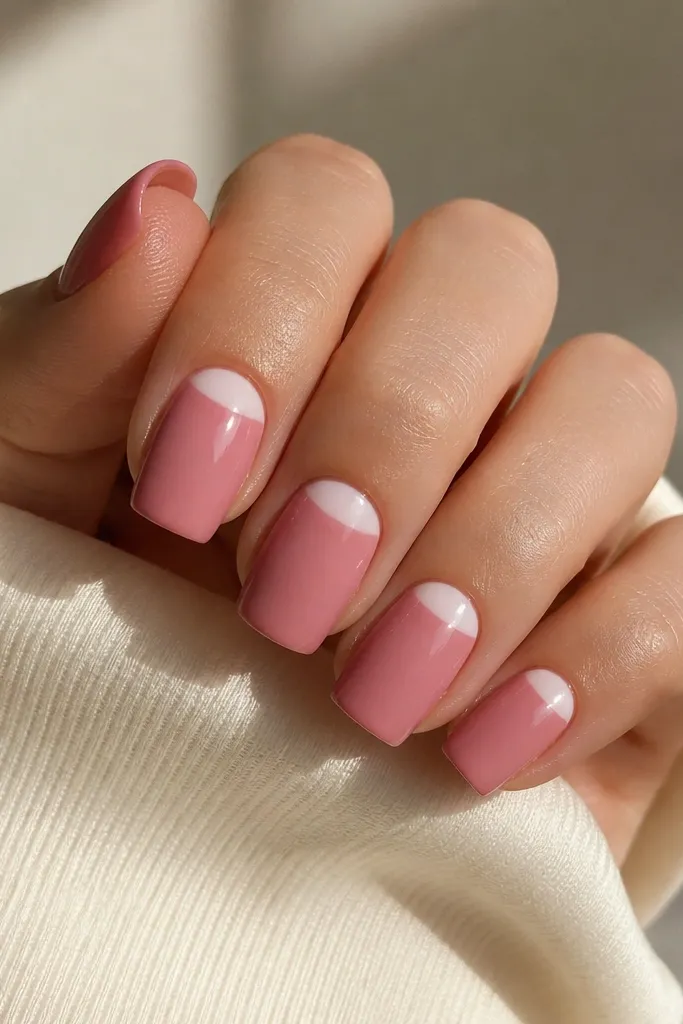
This design looks delicate but intentional. The base soft rose pink is flattering on almost everyone because it's not too bright and it doesn't pull gray. The milky white half-moon at the cuticle creates a gentle contrast that makes fingers look cleaner and slightly longer. I like it for everyday wear and workdays because it reads "put together" without being loud. If you have dry cuticles, the half-moon detail helps hide uneven cuticle edges when you keep the line neat.
Apply base coat and cure, then paint two thin coats of soft rose pink, curing each time. Leave the half-moon area bare at first - I place a small dot of milky white right at the center near the cuticle and pull it into a curved half-moon using a liner brush. Cure the white, then apply a glossy top coat over everything. If you want extra crispness, add a second pass of milky white only where the curve looks thin.
Editor's noteUse a stencil half-moon guide if your hands shake - then refine the edge with a tiny brush.
Watch outDon't make the half-moon too big; oversized moons shorten the nail visually.
3. Pink Coral Square with Sunburst Accent at the Tip
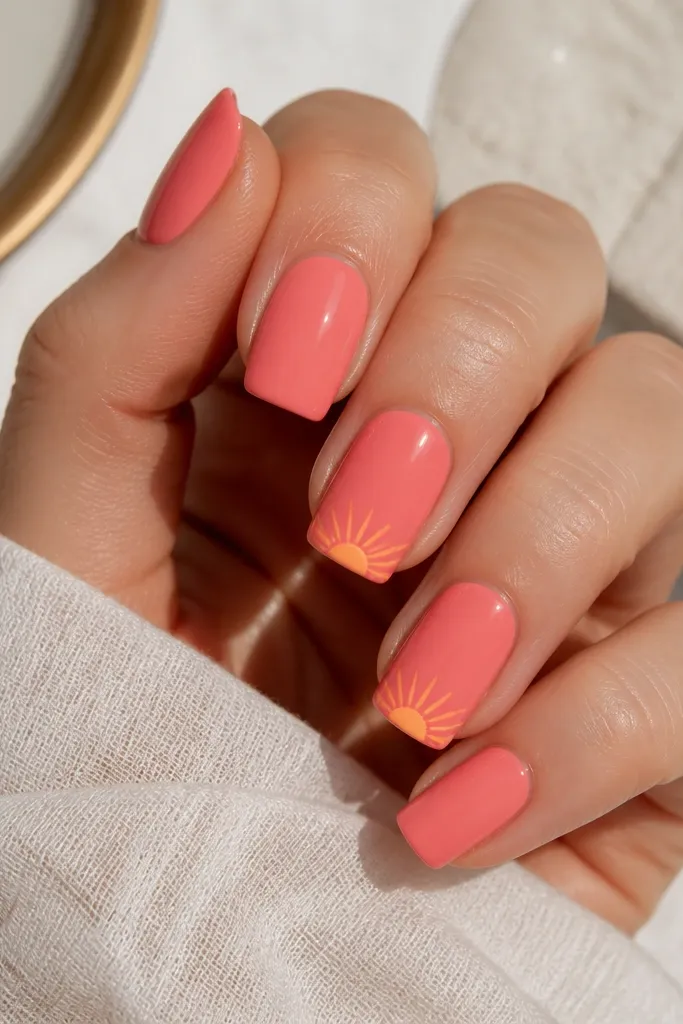
Pink coral is the summer shade that looks like warmth on your skin. It's not bubblegum bright, so it's flattering even if your nail beds are short. The sunburst accent adds motion without turning the whole set into busy nail art. I do it on only two nails because square tips already have a strong shape; too many accents look cluttered. This one works great for vacations, birthdays, and weekends when you want cheerful details.
Start with a glossy base coat, then apply two coats of pink coral, curing each time and capping the free edge. On the accent nails, draw a small dot near the center of the tip using a yellow gel or polish. With a liner brush, pull 6-8 thin rays outward from that dot, keeping them evenly spaced and short so they fit the square tip. Cure, then seal with a high-gloss top coat.
Editor's noteIf the rays look thick, load less gel on the brush and draw slower - thin rays look like sunshine, not scribbles.
Watch outAvoid covering the entire tip with rays; it makes the square shape look blocky.
4. Jelly Pink Square with White Dots Like Summer Bubbles
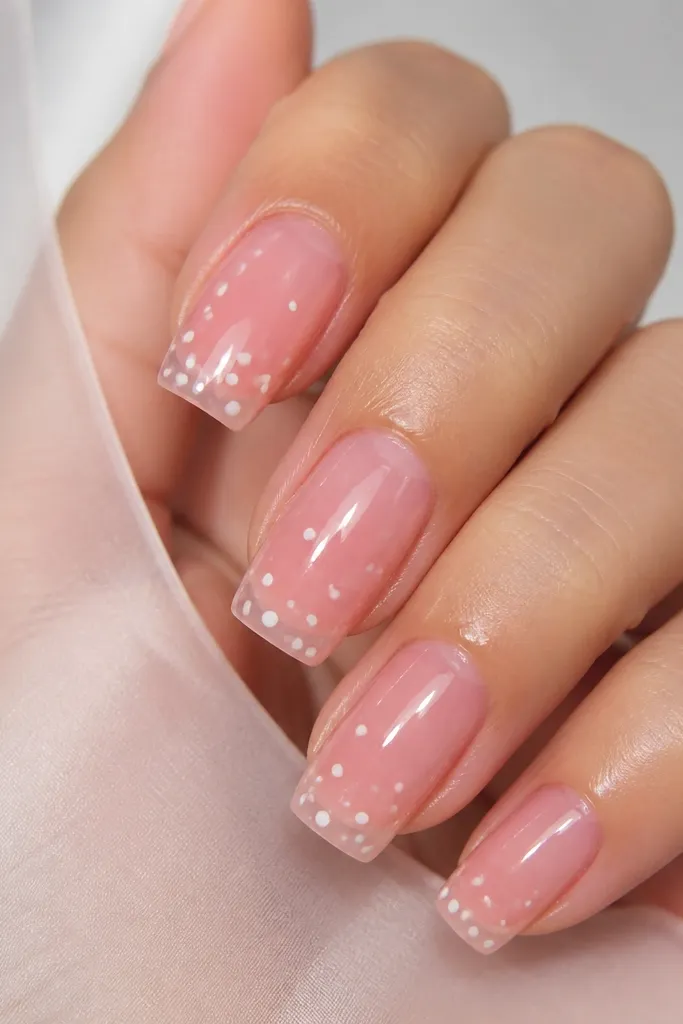
Jelly pink is the fastest way to get that "fresh from the beach" look. The translucent base lets your nail show through, which makes the color feel lighter and more summery than opaque pinks. The white dots give a playful vibe without needing long lines or complex art. I think it flatters medium to deep skin tones especially well because the dots pop cleanly against the jelly. It's also forgiving - dot placement hides small unevenness in the nail surface.
Apply base coat and cure, then paint one sheer jelly pink coat and cure, followed by a second coat only if you want it brighter. For the dots, use a dotting tool or the end of a bobby pin - place the biggest dot near the tip center and add smaller dots around it. Keep the dots mostly in the upper half so the nail stays balanced. Cure and finish with a glossy top coat, then cap the free edge.
Editor's noteFor better dot control, wipe the dotting tool between nails so the dot size stays consistent.
Watch outDon't space dots too evenly like a grid - uneven clusters look more natural.
5. Hot Pink Square with Clear Negative Space Side Stripes
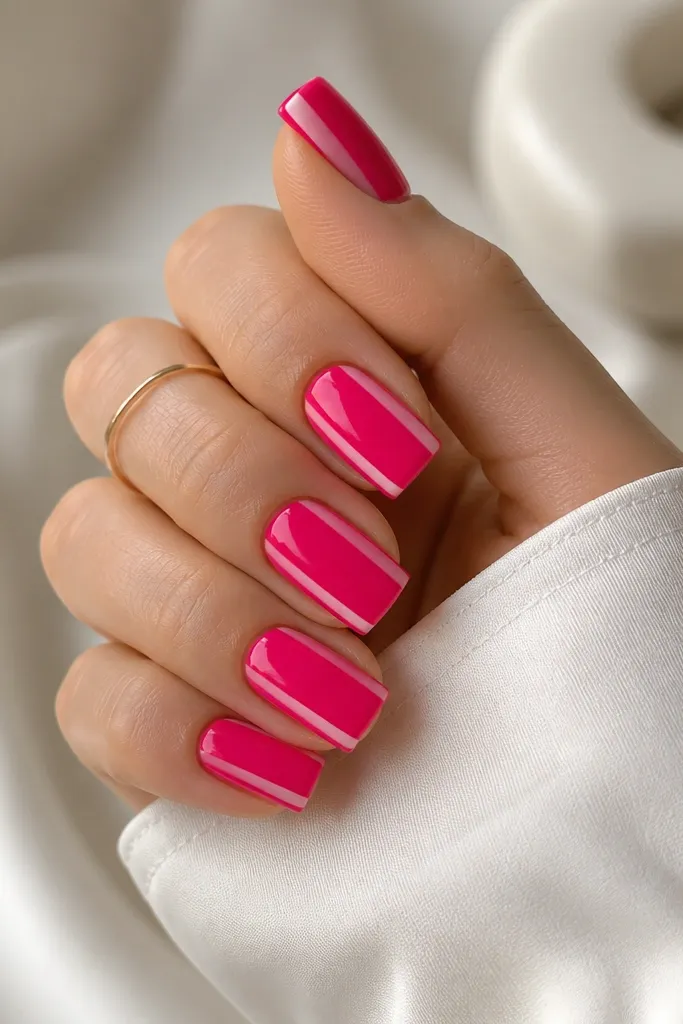
This is bold, graphic, and it makes square nails look ultra sharp. The trick is clear negative space - it breaks up the hot pink so it doesn't feel heavy. I like this on medium nail beds because the stripes lengthen visually. It also looks great on hands with warmer undertones since hot pink brings out the peachy glow. Wear it for nights out or summer events when you want your manicure to look like it belongs in a photo.
Start with a base coat and cure, then apply a hot pink gel in thin coats. Before you cure the final coat, place two thin strips of clear gel over the sidewall areas - keep them straight and parallel. Cure, then add a second hot pink coat over the center only so the clear lines stay crisp. Finish with glossy top coat and cap the edges carefully.
Editor's noteUse striping tape for the clear lines if you want them perfectly straight - press lightly and remove after curing.
Watch outDon't let hot pink creep into the clear stripes; messy borders ruin the clean graphic look.
6. Dusty Rose Square Pink with Tiny Gold Foil Flecks
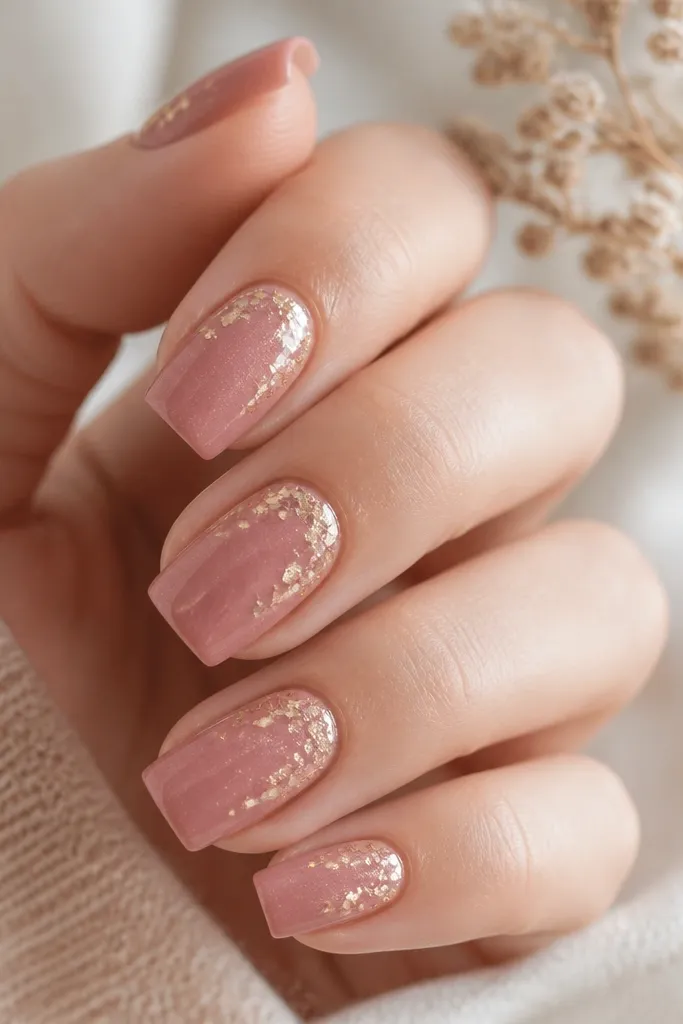
Dusty rose is my "works with everything" summer pink. It looks softer than hot pink but still shows up in sunlight. The gold foil flecks add a warm sparkle that doesn't feel like full-on glitter. I put the flecks near the cuticle because square nails already look strong at the tip; balancing it at the base looks intentional. This flatters fair, neutral, and warm-toned skin because dusty rose sits in the sweet spot between pink and nude.
Apply base coat and cure, then paint two thin coats of dusty rose pink. Add a small amount of gold foil adhesive or tacky layer near the cuticle on each nail, then press tiny pieces of gold foil so they sit irregularly. Seal with a thin layer of top coat, cure, then add a second glossy top coat for smoothness. Keep the foil sparse so it looks like sun dust, not chunky decoration.
Editor's notePress foil with a silicone tool so you don't smear the pink around the edges.
Watch outSkip thick foil layers - they catch on hair and make square corners snag.
7. Pink Marble Square with White Veins and Glossy Finish
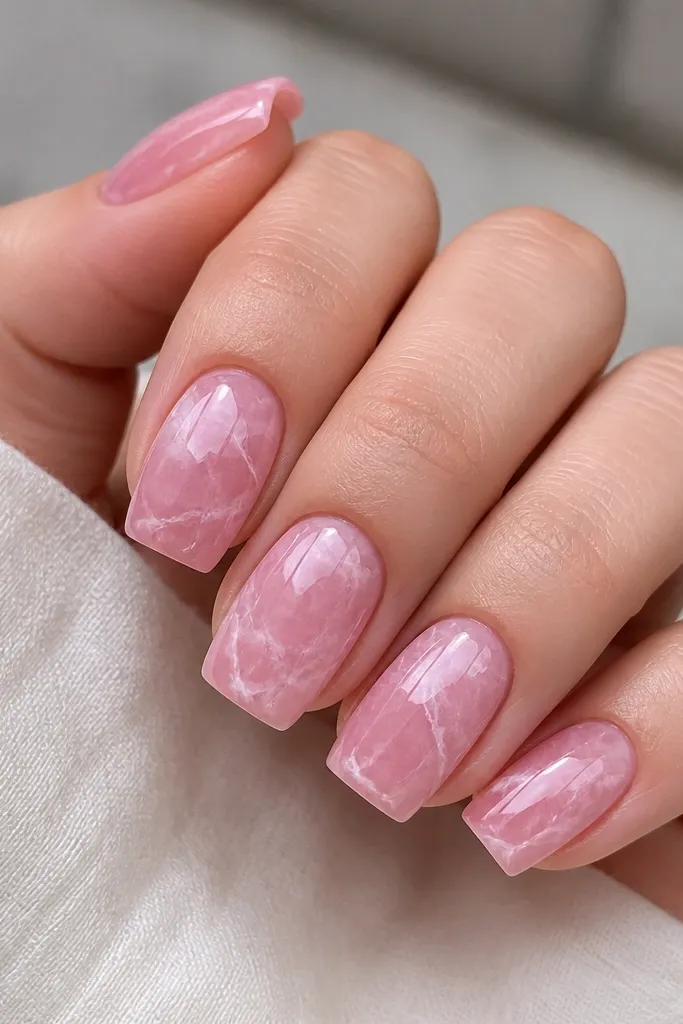
Marble nails look complicated, but they're actually easy when you keep the veins thin. The pink base should be semi-sheer so the marble looks airy, not painted. White veins add contrast and help the square shape stay defined. I like this for summer because marble reads cool and clean in warm weather, especially if you pair it with gold jewelry. It flatters most skin tones because pink + white is a reliable combo, and the glossy finish makes your hands look moisturized.
Start with a pink gel base - I use a semi-sheer rose pink and cure it well. For the veins, use a thin liner brush with milky white gel and draw irregular lines across each nail, then add smaller offshoot lines so it looks natural. Use a sponge lightly to soften the background edges if the base looks too flat, then cure. Finish with a thick glossy top coat and cap the free edge so the marble stays smooth.
Editor's noteIf your veins look too bold, wipe the brush on a lint-free wipe before you paint - less gel means finer lines.
Watch outDon't cover the whole nail with heavy white - it turns into blocky streaks.
8. Bubblegum Pink Square French Tips with Thin White Smile Line
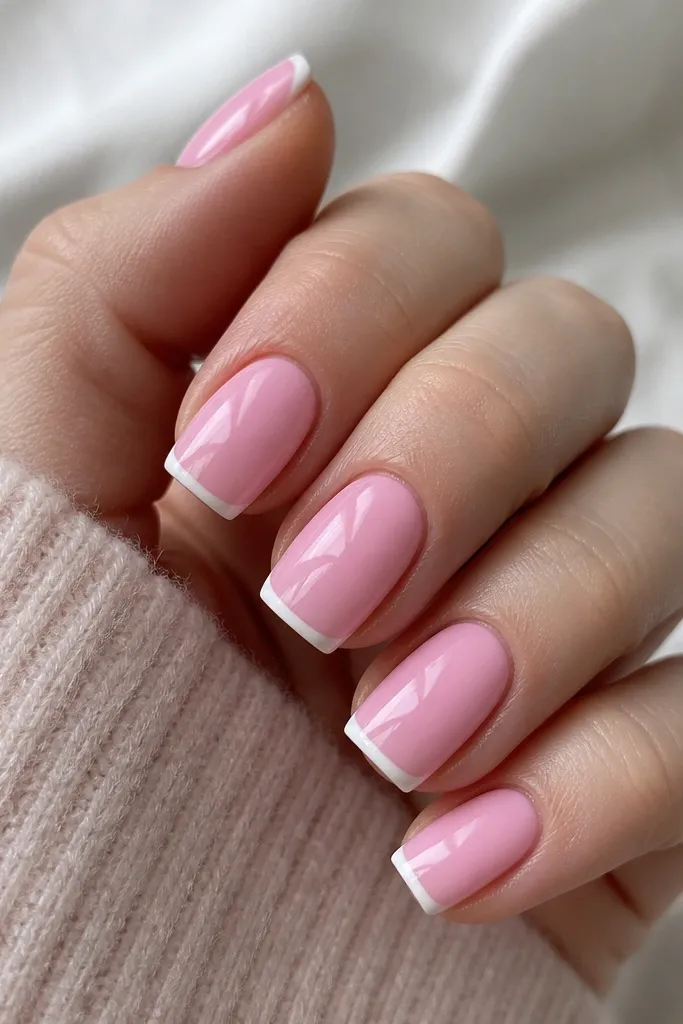
This is the cleanest way to do summer French without looking like a school uniform. Bubblegum pink is cheerful but still fits short summer outfits. The thin white smile line keeps it modern and makes the square tip look crisp. I wear this when I want my hands to look tidy even if my cuticles aren't perfectly smooth. It works on fair to deep skin tones because the pink and white contrast is strong.
Paint the full nail with bubblegum pink in two thin coats, cure, and cap the free edge. Use striping tape or a French guide to mark the tip line, then paint a thin white smile line - just the curve, not a thick wedge. Cure and remove the guide carefully. Add a glossy top coat and check the sidewalls to make sure the French edge is clean.
Editor's noteUse a gel that self-levels a bit for the white line so it stays smooth without flooding the cuticle.
Watch outDon't thicken the French tip; thick tips can make square nails look wide.
9. Peachy Rose Square Pink with Tiny Blue Liner Dots
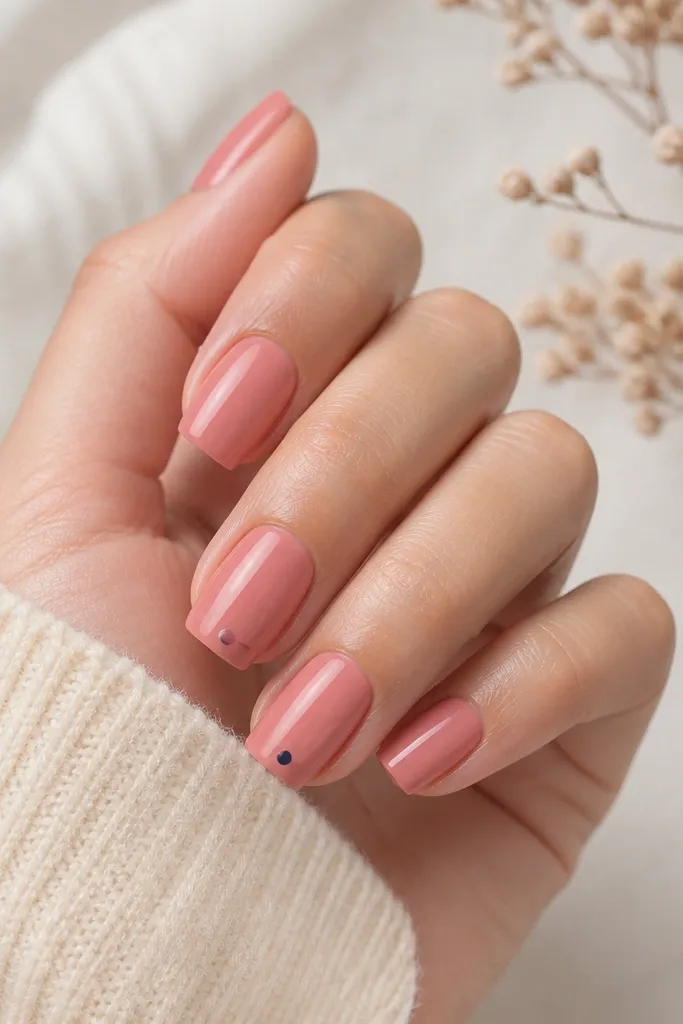
Peachy rose is my favorite when summer turns humid and you want something warm that still looks fresh. The navy-blue dots are a small contrast that makes the pink feel intentional, not plain. I like this for casual days because it looks fun but it doesn't scream for attention. It flatters warm undertones beautifully, and it also looks great on cool undertones because blue brings balance. The square shape keeps the dots from looking random - they anchor at the tip.
Start with a base coat, cure, then apply two coats of peachy rose pink. On accent nails, use a liner brush or micro detail brush to place 3-5 tiny navy-blue dots near the tip, keeping them in a short cluster. Cure the dots, then seal with glossy top coat. If the dots sit too high, add a thin top coat layer first to smooth before a final thicker coat.
Editor's noteFor dots, a toothpick tip works if you wipe it between colors so you don't smear blue into the pink.
Watch outDon't place dots too close to the cuticle; it can look like nail growth rather than design.
10. Rose Pink Square with Ombre Fade to Milky Nude
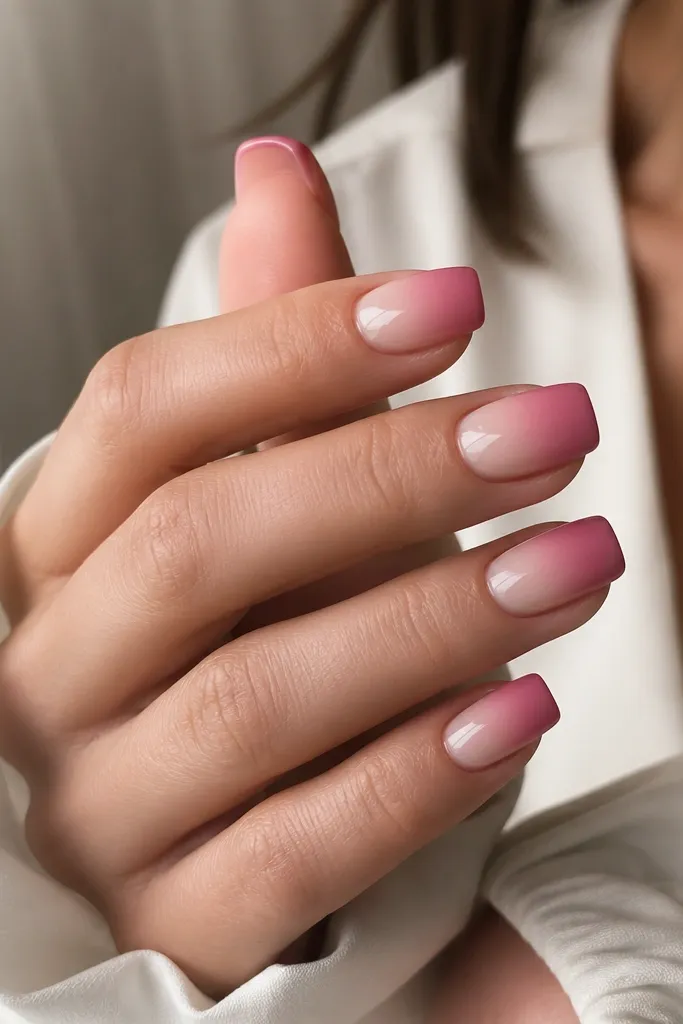
This ombre is flattering because it looks like your nails have naturally tinted color. The rose pink at the tip gives summer brightness, while the milky nude near the cuticle keeps it wearable and clean. Ombre works especially well on square nails because the straight tip gives the gradient a defined edge. I recommend this if you hate bold nail art but still want something that looks like you spent time on it. It suits a wide range of skin tones since the nude base blends and the pink tip pops.
Apply base coat and cure, then apply milky nude near the cuticle up to about 1/3 of the nail. For the fade, sponge a thin layer of rose pink from the tip upward - keep the sponge motion light so you don't get harsh patches. Cure, then add a second pass only where the fade needs more softness. Seal with glossy top coat and cap the free edge so the ombre stays smooth.
Editor's noteUse a makeup sponge cut into a small wedge for cleaner ombre control.
Watch outDon't over-sponge; too much pressure makes the gradient grainy.
11. Neon Pink Square with Clear Topcoat Half Glaze
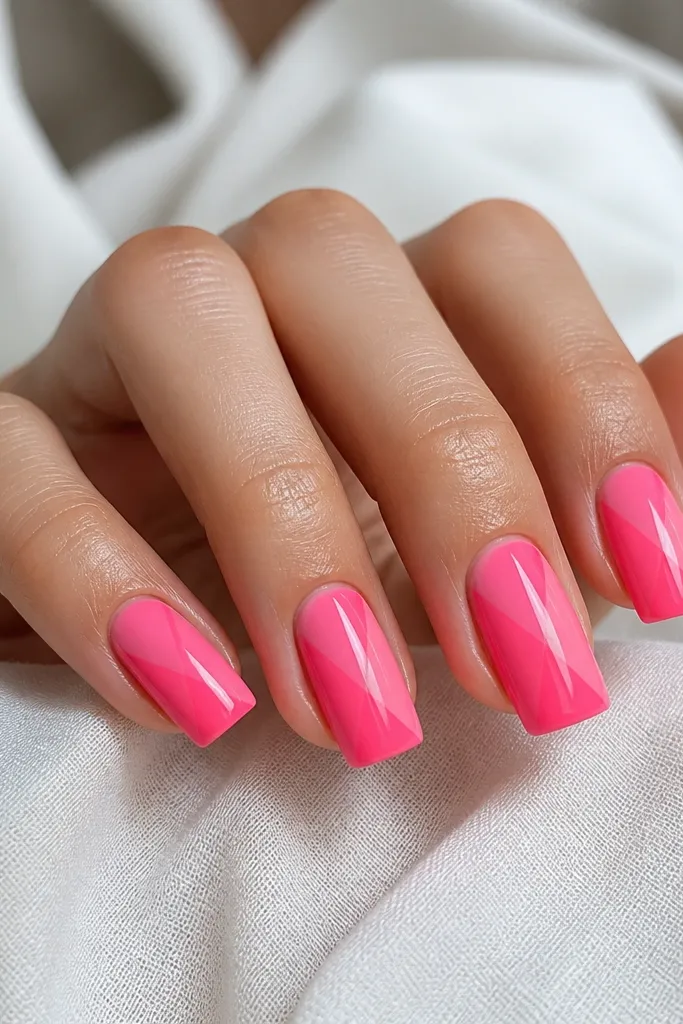
Neon pink in summer is pure energy, but the clear glaze keeps it from looking like a cheap sticker. The straight diagonal split makes the design feel modern and graphic. This works best on medium square nails because the diagonal line needs space to look intentional. I like it on light to medium skin tones where neon reads bright, but it also looks good on deeper skin tones if you use a true neon pigment rather than a dusty pink. It's a great pick for concerts and hot-weather weekends.
Paint two thin coats of neon pink and cure fully. With a striping brush, draw a clean diagonal line where you want the glaze split, then apply clear gel over one side only. Cure, then remove any stray gel edges with a clean brush dipped in cleanser. Finish with a high-gloss top coat over the whole nail so the neon and clear glaze look like one smooth surface.
Editor's noteUse striping tape for the diagonal - it saves you from wonky lines after curing.
Watch outDon't leave the glaze side uneven; uneven thickness makes the nails look bumpy.
12. Pink Satin Square with Matte Top and Glossy Accent Line
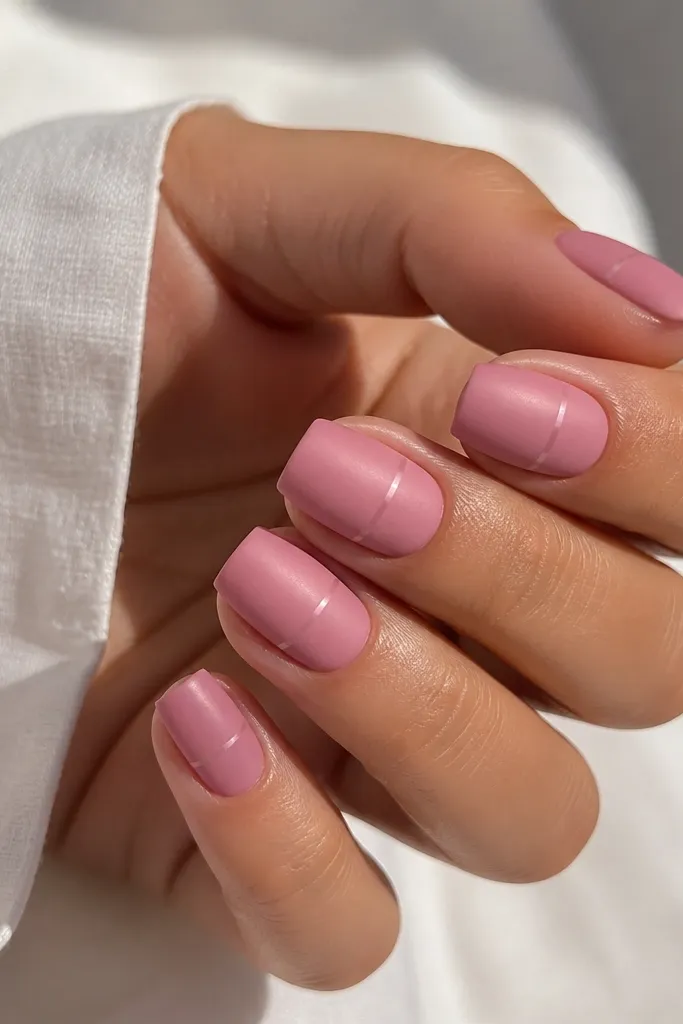
Matte pink looks expensive when you keep the design minimal. Satin-finish pink under matte top gives a soft, velvety look that doesn't look flat. The glossy accent line breaks the matte in a clean way and makes your square shape look crisp. This is great for summer evenings when you want something different from glossy "pool" nails. It flatters hands that need visual smoothing because matte hides tiny surface imperfections better than gloss.
Apply base coat and cure, then paint two coats of satin pink gel. Cure and then apply matte top coat over the whole nail. For the glossy accent, paint a thin strip of glossy top coat gel across the middle - keep it straight and narrow - then cure again. If the line looks too thick, wipe the brush and reapply thinner.
Editor's noteLet the matte top cure fully before you add the glossy line so the surfaces don't smear.
Watch outDon't put glossy accents on un-cured matte - it drags and makes streaks.
13. Classic Blush Pink Square with Tiny Clear Crystal at Cuticle
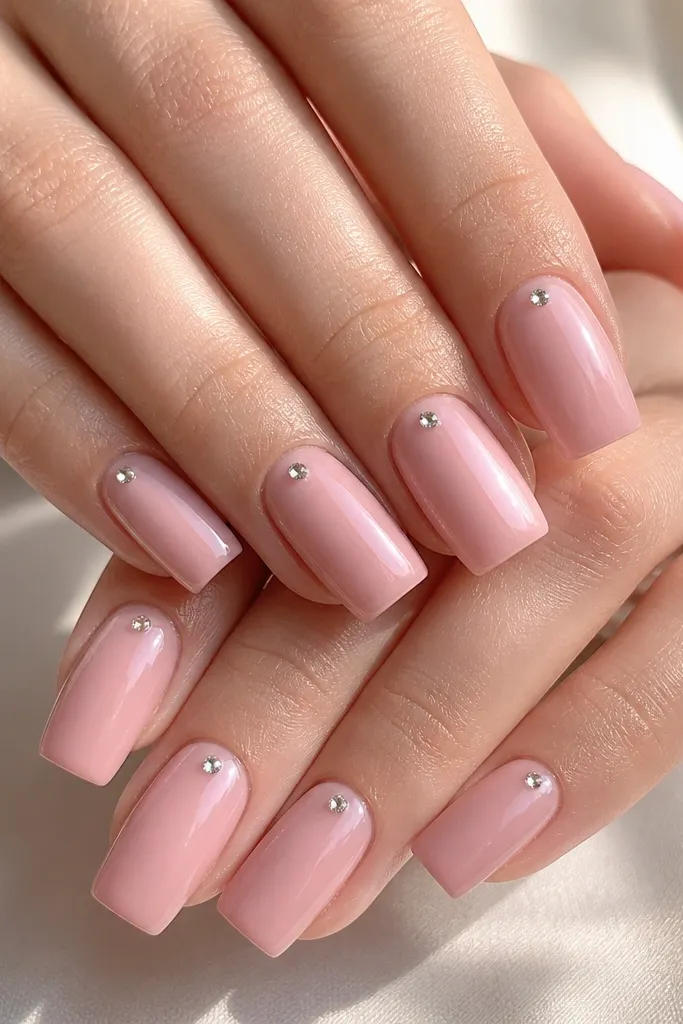
This is the "one detail" manicure that always gets compliments. Blush pink is soft and flattering, and the crystal near the cuticle makes the nails look like they have tiny light bulbs under them. I place it close to the cuticle because it visually lifts the nail bed and makes fingers look longer. It works for fair, neutral, and warm skin tones - the clear crystal doesn't fight your undertone. It's perfect for weddings, brunch, and any day you want sparkle without full glitter.
Paint two thin coats of classic blush pink, cure, and cap the free edge. Apply a small dot of clear crystal gel or top coat where you want the crystal, then place one tiny crystal per nail using tweezers. Press gently so it sits flat, cure, then apply a thin layer of top coat to fully seal around the crystal. Finish with a final glossy top coat for smoothness.
Editor's noteUse crystal gel instead of regular top coat if your crystals pop off - it grips better.
Watch outDon't place the crystal too close to the edge of the cuticle; it can lift as your nail grows.
14. Pink Glaze Square with Iridescent Holo Flakes
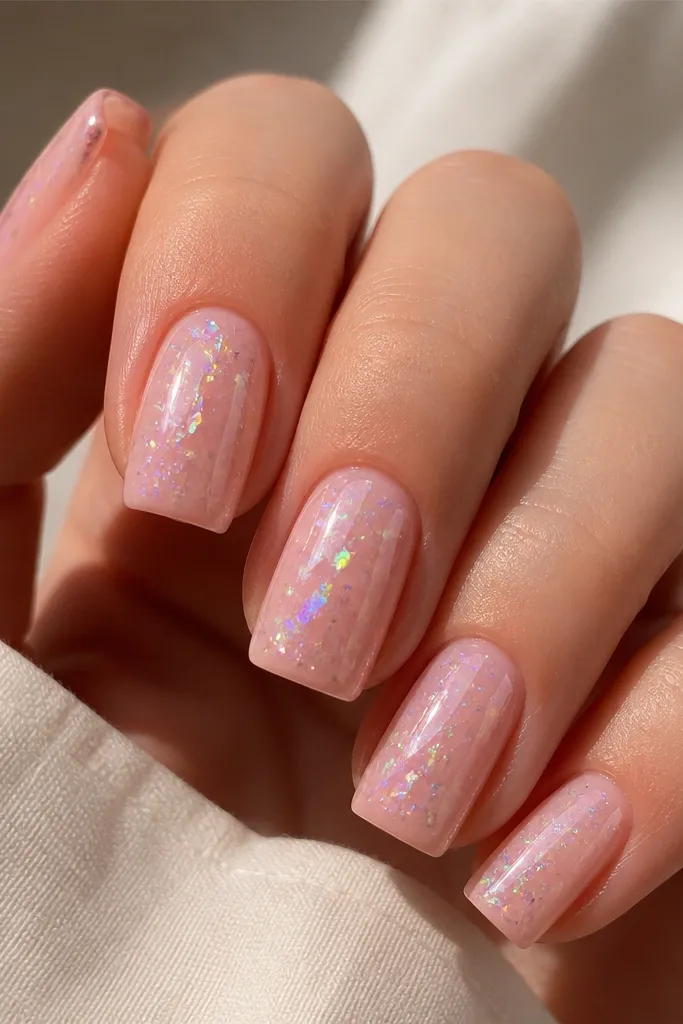
Pink glaze is a jelly-sheer look with a thick shine, and holo flakes make it feel like summer evening sky. The pink base stays readable - you don't get that dusty glitter effect. I like iridescent flakes because they move color with your hand, so the manicure never looks flat in photos. This flatters most skin tones since the holo shifts through pink, silver, and gold. It's a good pick for vacation dinners and nights out when you want sparkle that still looks classy.
Start with a base coat and cure, then apply one to two coats of pink glaze gel depending on how sheer you want it. Add iridescent holo flakes on the upper half of the nail with tweezers or a small pickup tool. Press gently and cure, then apply a thicker top coat layer to embed the flakes so they don't snag. Finish with a final glossy top coat and cap the edges.
Editor's noteIf flakes sink unevenly, add top coat in layers - a thin first layer cures, then a thicker layer smooths.
Watch outAvoid heavy flake coverage - it turns into chunky glitter and ruins the glaze effect.
15. Hot Pink Square with White Micro Doodles
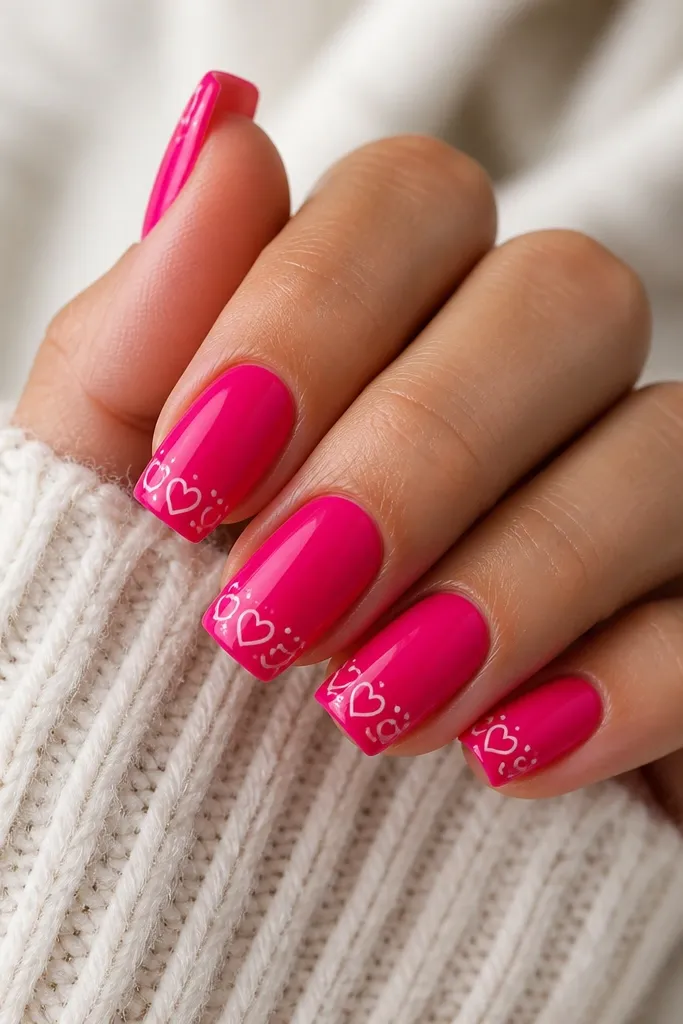
Micro doodles make hot pink feel playful instead of aggressive. Keeping the doodles white keeps it clean and readable, and the micro scale looks better on square nails than big cartoon shapes. I like this for summer school events, weekend outings, and when you want a manicure that feels personal. It flatters medium to deep skin tones because the white pops sharply. The glossy top coat makes the doodles look like they're under glass.
Paint two thin coats of hot pink and cure, then apply a glossy base top coat thin layer if your gel is too matte. With a fine liner brush, add tiny white doodles near the tip and along one side of each nail. Keep the doodles small so they don't crowd the square corners. Cure and seal with a glossy top coat, then cap the free edge to lock the art in.
Editor's notePractice one doodle on a piece of paper first - you want consistent line pressure for tiny details.
Watch outDon't overload with doodles; five nails with lots of white looks messy.
16. Pink Nude Square with Diagonal Foil Stripe
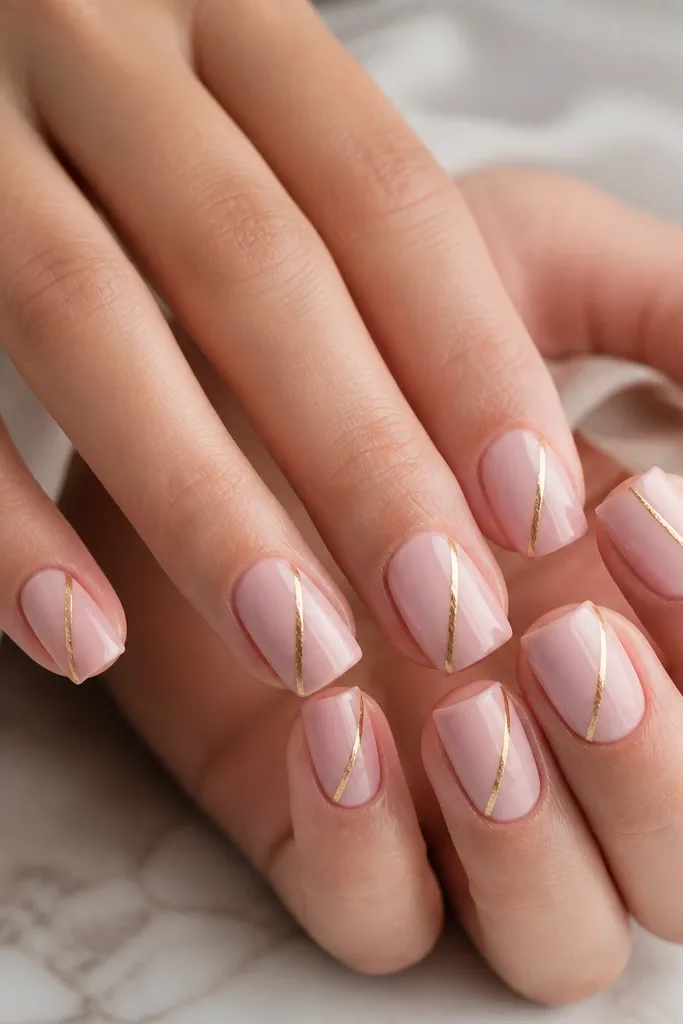
Pink nude is the "clean but interesting" shade for summer. The diagonal gold foil stripe adds a sharp line that makes the nail look longer and more structured. I like this combo because it works for workdays and still looks fancy for dinner. It flatters hands with shorter nail beds because the diagonal line pulls the eye upward. If you wear gold jewelry, this one always looks matched.
Apply base coat and cure, then paint two coats of pink nude gel. Place striping tape on each nail at a diagonal angle, then apply gold foil adhesive along the tape line and press gold foil into it. Remove tape after curing or after the foil sets, then seal with a thin top coat layer. Finish with a final glossy top coat so the stripe feels smooth and doesn't catch on fabric.
Editor's noteChoose foil that's thin and flexible so it conforms to square corners without lifting.
Watch outDon't use a thick gel stripe under foil - it creates a ridge.
17. Strawberry Pink Square with Tiny Seed Dots
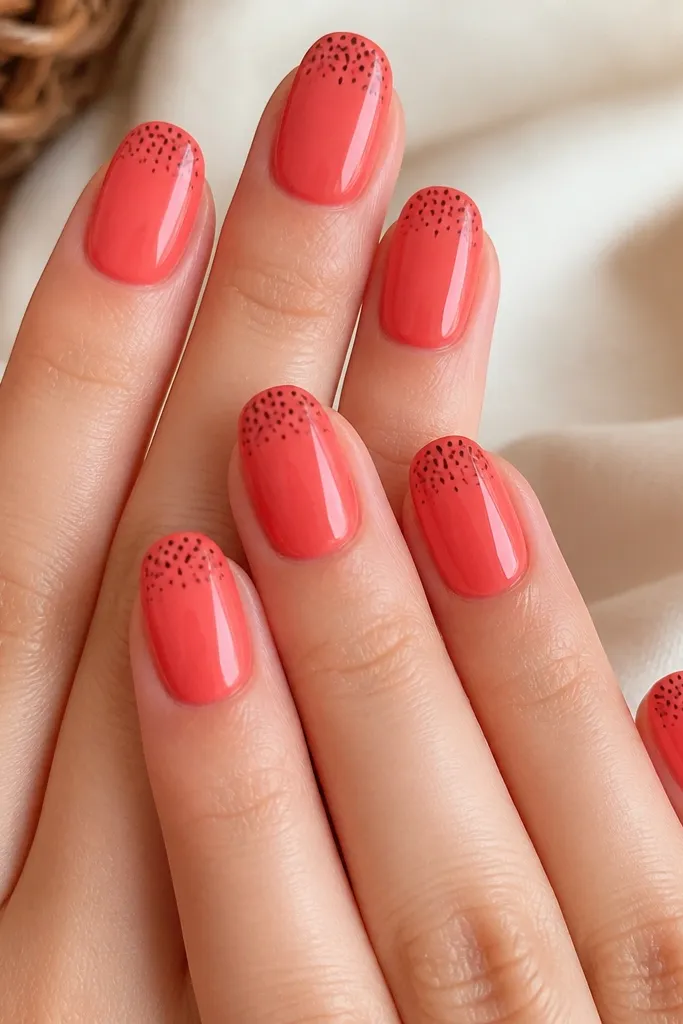
This is cute without being childish because the dots are micro and the base is a realistic strawberry pink. The cluster near the tip looks like a strawberry cap and keeps the design focused. I like it for summer barbecues and outdoor parties because it reads bright and fresh, but still looks neat. It's especially flattering on fair to medium skin tones where black dots pop cleanly. If you want a themed manicure, this is the theme that looks best in daylight.
Paint strawberry pink in two thin coats and cure. Add tiny black dots with a dotting tool - start with 6-10 dots in a tight cluster near the tip center, leaving space between them so it doesn't look like a blob. Cure the dots, then apply a glossy top coat in two layers if needed to fully smooth over the dot texture. Cap the free edge so the dots don't catch.
Editor's noteUse a fine dotting tool tip or the end of a pin for smaller seeds.
Watch outDon't make the dots big and spaced out - it turns into random speckling.
18. Pink Gradient Square with Peachy Chrome Shift
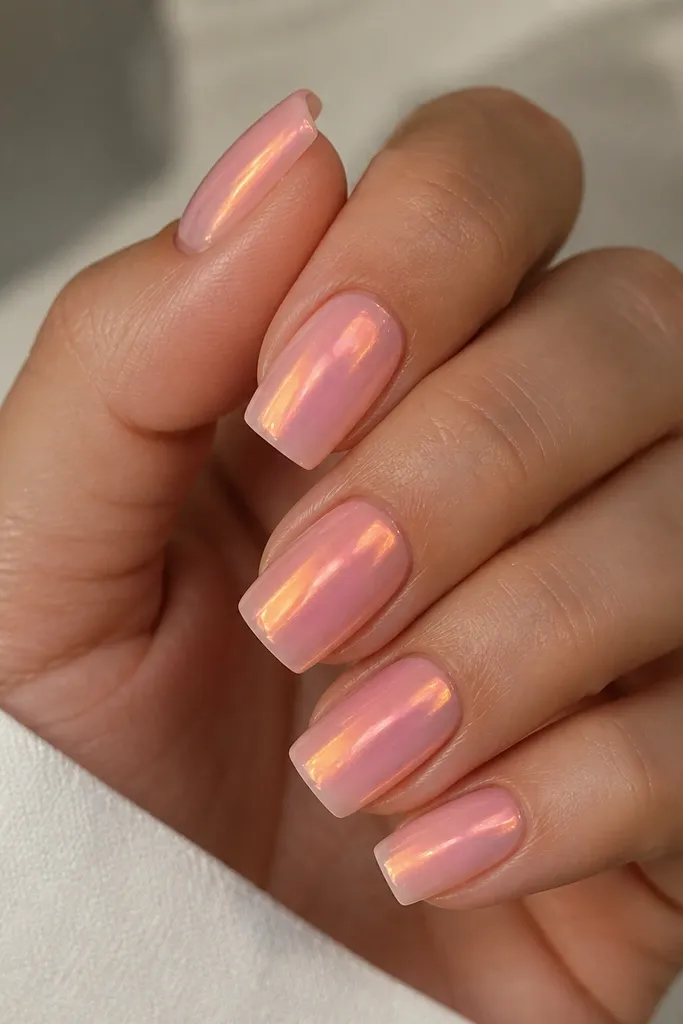
This one looks like summer light on skin. The gradient is subtle, then the chrome shift does the heavy lifting by changing tone as you move. I use peachy chrome because it warms up pink and makes your hands look sun-kissed instead of washed out. It flatters medium and warm undertones, but cool-toned skin still looks good when the chrome has a peach base rather than silver. This is a great choice for vacation photos because the shimmer shows up even in indirect light.
Start with a base coat and cure. Sponge a gradient from milky nude near the cuticle to rose pink at the mid, then blend the tip into peachy pink - cure. Apply a thin layer of chrome gel and rub peachy chrome powder over it while it's tacky. Cure, then seal with a glossy top coat that won't dull the chrome. Check the sidewalls to keep the gradient smooth up to the edges.
Editor's noteApply chrome with a firm, short rub so it lays down evenly on square corners.
Watch outDon't use a heavy top coat right away - it can mute the shift if you overdo thickness.
19. Cotton Candy Pink Square with Clear Jelly Half Cover
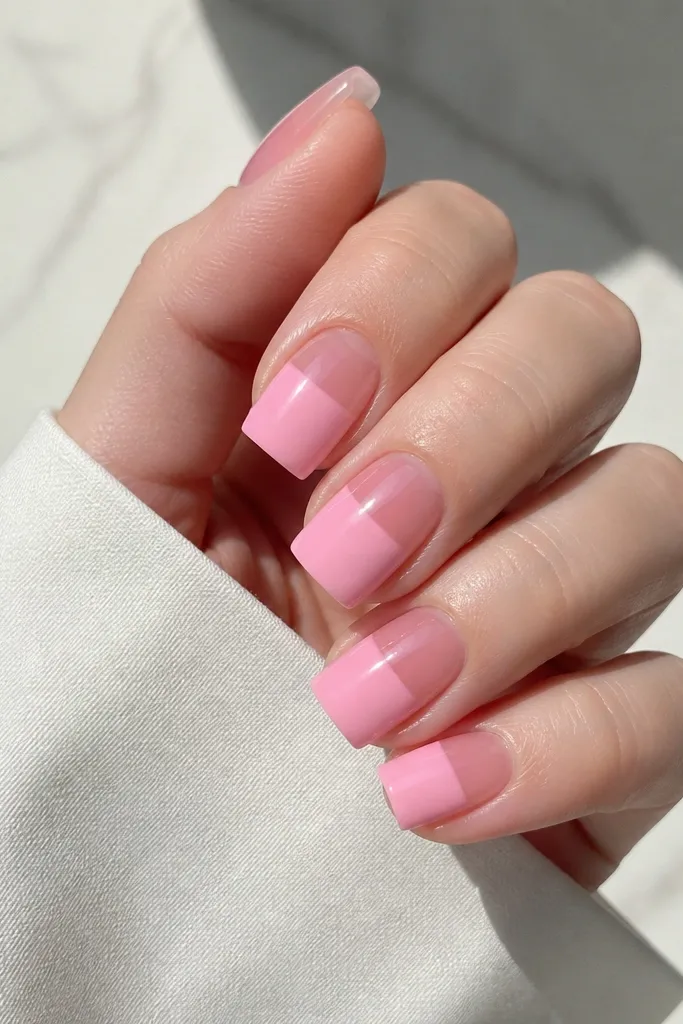
Layered half-cover looks fancy because it creates depth. The bottom solid cotton candy pink anchors the color, and the top clear jelly makes it look like the pink is under a glossy dome. This design flatters short to medium nail beds because the clear top visually lifts the nail and adds shine without heavy color. It also makes your nails feel smoother and less "painted on," which I notice right away when I wear it. Great for hot weather because it still looks fresh even if your nails grow a little.
Paint the full nail with cotton candy pink in two coats and cure. Apply a thin layer of clear jelly gel on the top half only - use a brush to stop about halfway down the nail - then cure. Add a second clear jelly layer on that top half if you want it more domed, curing each time. Finish with a glossy top coat overall, and cap the free edge so the jelly layer doesn't peel.
Editor's noteUse a small brush to draw a clean stop line where the clear jelly ends, then cure and refine with top coat.
Watch outDon't flood the cuticle area with clear jelly - it can shrink and cause lifting.
20. Strawberry Milk Pink Square with White Glossy Check on One Nail
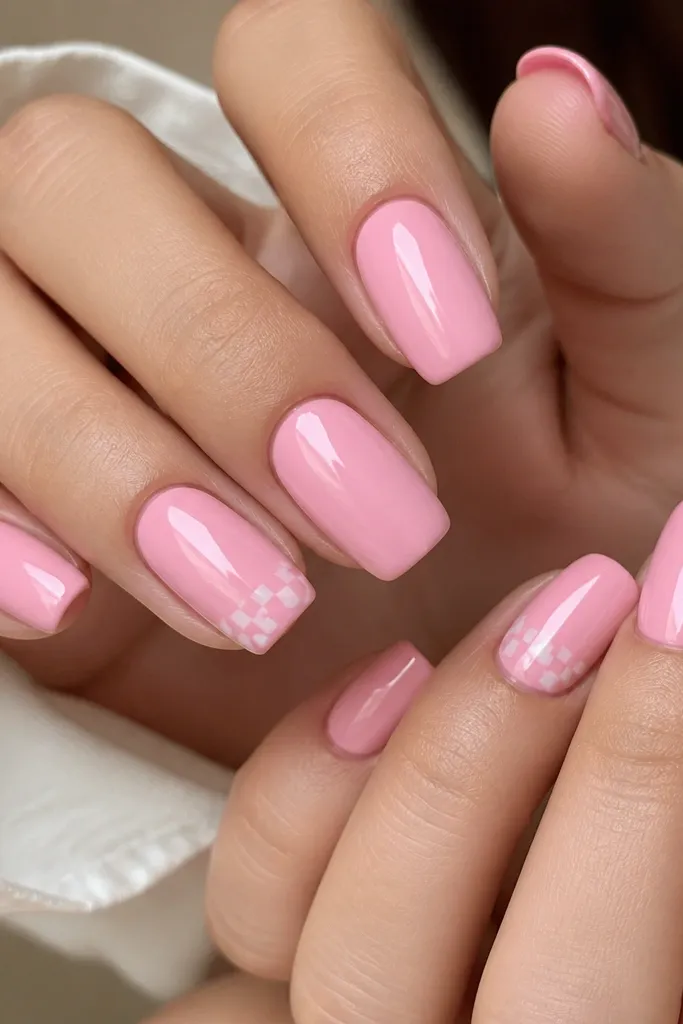
This is a fun summer manicure that still looks tidy. Strawberry milk pink is creamy and light, so it feels soft and fresh in daylight. The glossy white check on just one nail adds a playful graphic element without turning every nail into a pattern fight. I like it for brunch, casual weddings, and days when you want something cuter than plain pink but not loud. It works well on fair to deep skin because the base is milky and even, and the white is clean.
Apply base coat and cure, then paint strawberry milk pink in two thin coats, curing between. On the accent nail, draw a small grid near the tip with a striping brush using white gel. Fill alternating squares with white or leave tiny clear gaps for the check look, then cure. Seal with glossy top coat on all nails, and smooth over the check so it feels flat.
Editor's noteKeep the check small - about 1/4 of the nail width at most - for a clean modern look.
Watch outDon't cover the whole nail with checks; it overwhelms square tips.
21. Pink Rose Square with Green Leaf Tips (One Nail Accent)
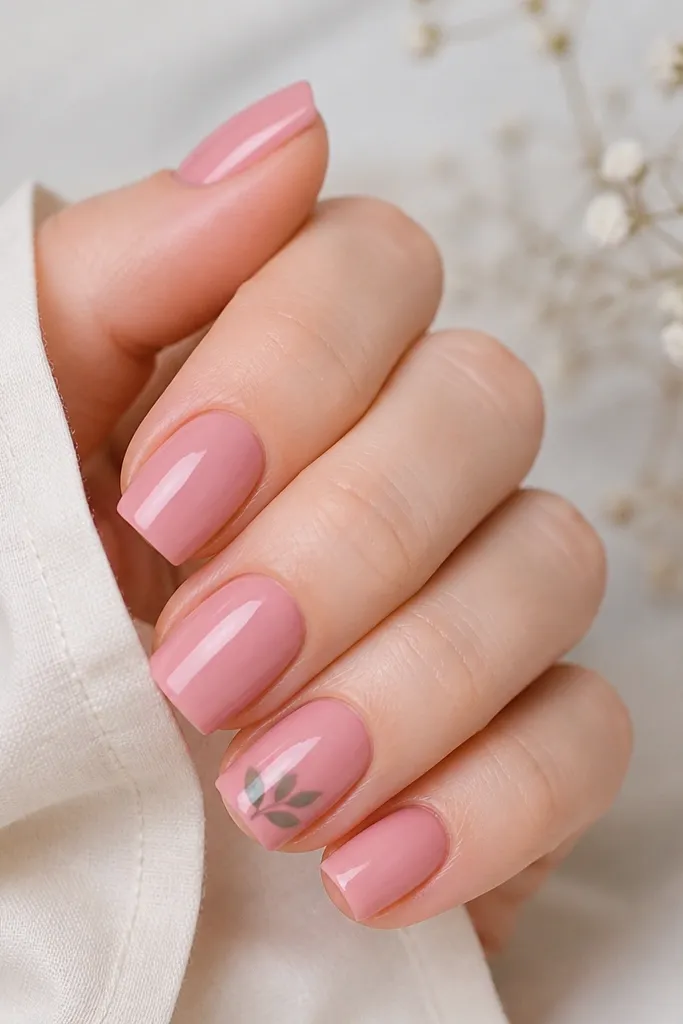
Leaf tips give summer nails that fresh-from-a-garden feeling without using heavy glitter. Rose pink is the perfect background because it's soft enough to not compete with the green. I keep the leaves on one nail per hand so your manicure looks intentional instead of themed. This flatters most skin tones, and it looks especially good with silver rings because the green reads cool and crisp. Wear it for outdoor dinners and spring-to-summer transitions.
Paint rose pink in two thin coats and cure. On the accent nail, use a fine brush to paint two small leaf shapes at the tip - start with an oval, then add a center vein line and a slightly darker green edge. Cure the leaves, then apply glossy top coat over everything. If the leaves look raised, add a thin top coat layer and cure again to fully smooth.
Editor's noteMix your leaf green with a touch of yellow-green so it doesn't look like harsh forest green.
Watch outDon't put leaves on every nail; it makes the square shape look crowded.
22. Pink Cream Square with Raised Tiny Linework
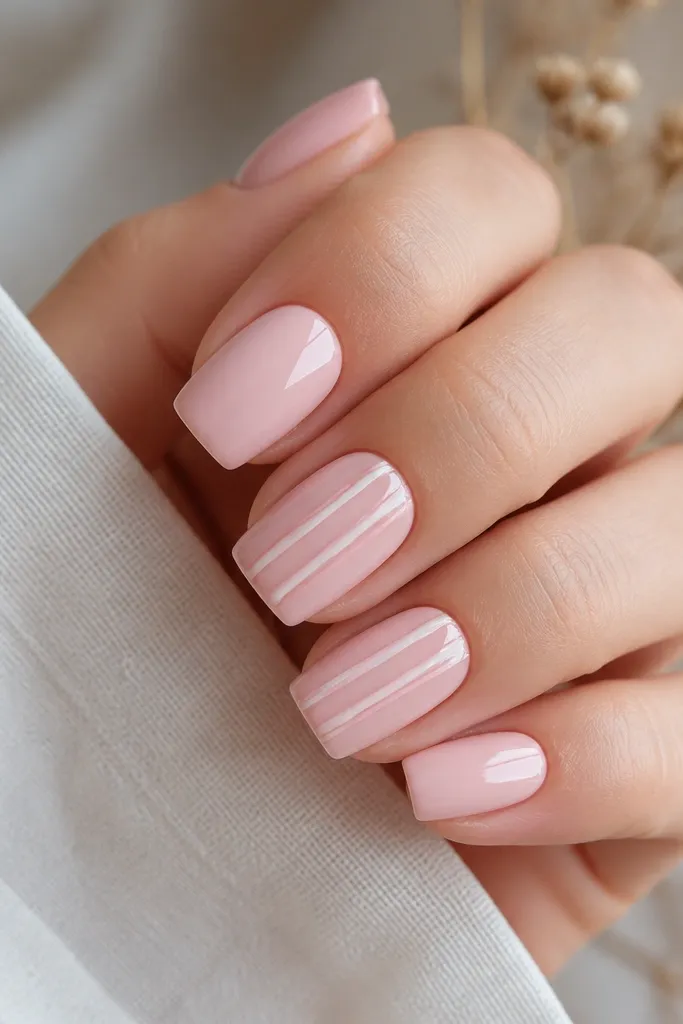
Raised linework looks like jewelry for your nails. The pink cream base is calm, and the thin vertical lines elongate the square shape instead of widening it. I use linework in white and pale pink so it stays soft and summer-appropriate. This design suits people who want something more textured but still neat. It's flattering on hands with shorter fingers because vertical lines draw the eye up.
Apply base coat and cure, then paint pink cream in two coats and cure fully. On two nails, outline thin vertical lines using a gel liner and cure each nail separately to avoid smudging. Add a second line in pale pink beside the white line for a layered look, then cure. Finish with glossy top coat in a thin smoothing layer first, then a final coat so the lines feel secure and not snaggy.
Editor's noteUse a gel liner with a fine nozzle; it gives you consistent line thickness.
Watch outDon't drag the brush - lifted lines smear and look messy.
23. Pink Punch Square with Clear Crystal Teardrop at Tip
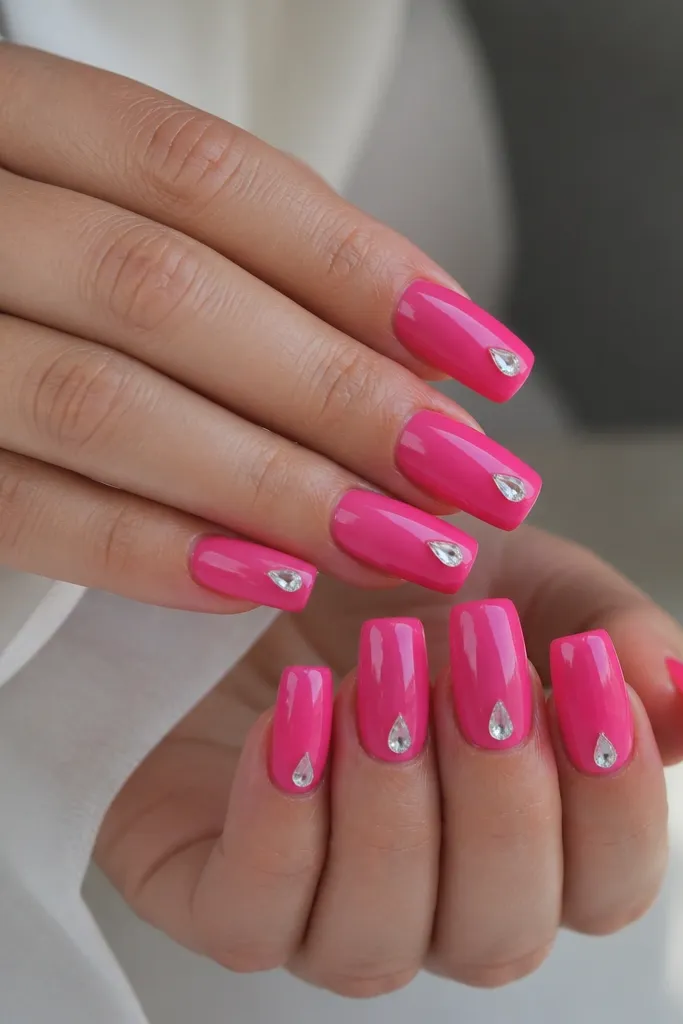
This is the "statement but still clean" crystal manicure. Pink punch is intense and fun, and the teardrop crystal at the tip makes the square shape look extra crisp. I place it centered because square nails already have strong geometry; symmetry makes it look intentional. It flatters hands with medium to longer nail beds where the tip has room to host the crystal. If you wear bold earrings or a statement dress, this manicure looks like it belongs with that energy.
Paint pink punch in two thin coats and cure, then cap the free edge. Place a small dab of crystal gel right at the tip center, then pick up a small clear teardrop crystal with tweezers and set it. Cure, then apply a thin top coat layer around the crystal edges to fully seal it. Finish with a glossy top coat over the whole nail so the crystal sits in a smooth dome.
Editor's noteIf the crystal spins when you set it, hold it in place with tweezers for 10-15 seconds before curing.
Watch outDon't put the crystal too far toward the edge - it can catch and lift.
24. Pink Gingham Square with White Check Grid on Accent Nails
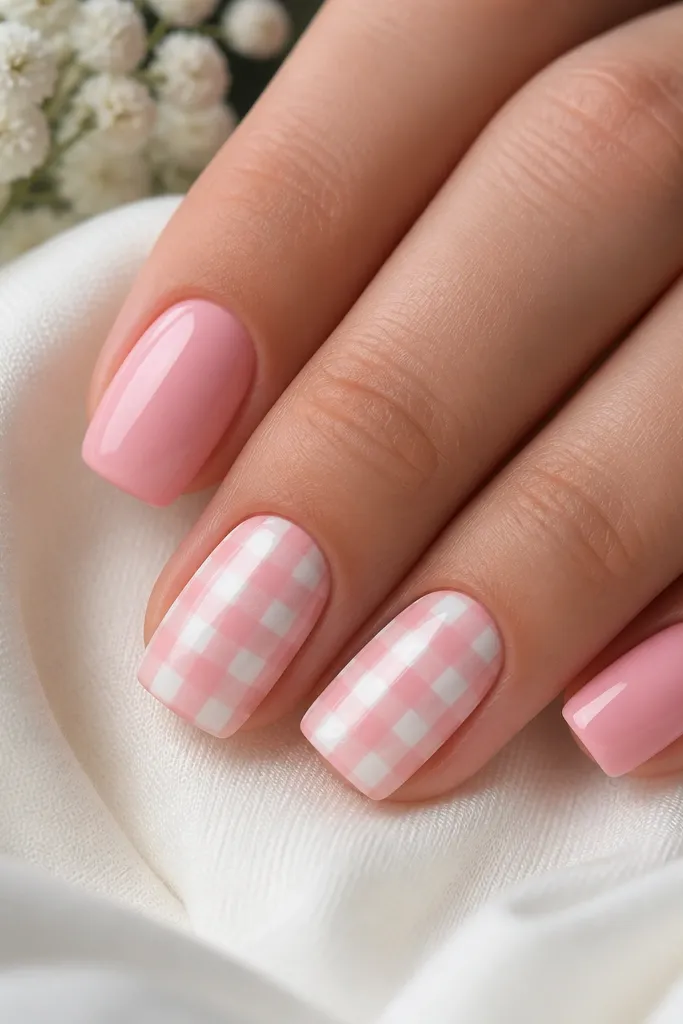
Gingham on nails looks adorable when the grid is small and the base is soft. The soft pink keeps it summer-lawn party cute instead of country costume. I do gingham on two nails because the check grid already adds visual texture; square tips keep the rest of the set clean. This is flattering on fair to medium skin tones, and it looks great with simple outfits like white tees and denim. It also hides tiny nail surface lines because the grid draws attention away from flaws.
Paint your nails with soft pink in two coats and cure. On the accent nails, draw a vertical and horizontal grid using a fine liner brush with white gel - keep each square about 1-2 mm. Fill alternating squares or simply outline the grid with a clean white line, then cure. Seal with glossy top coat, and apply a second smoothing coat if the lines feel raised.
Editor's noteUse a nail art guide ruler or mark dots lightly with a pin before you draw the lines.
Watch outDon't make the squares too big; large checks look chunky on square nails.
25. Pink Aura Square with White Center Glow
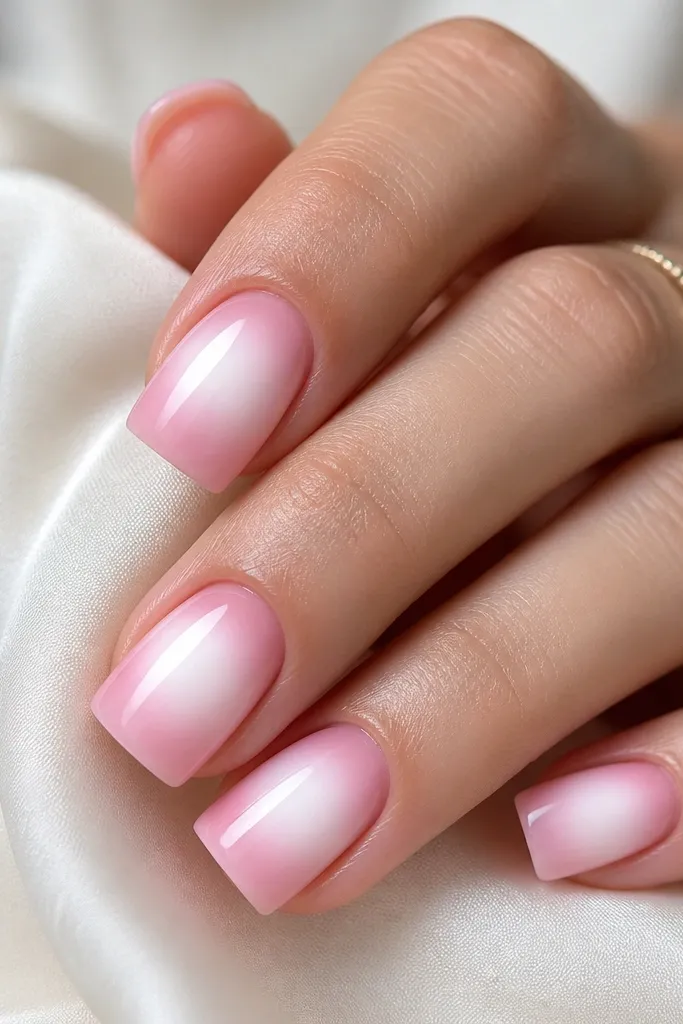
Aura nails look like light is trapped under your polish, and the white center glow makes pink feel brighter. This design is flattering because it draws attention to the middle of the nail bed and makes fingers look longer. I like it on square nails because the aura glow still looks defined even with straight edges. It works for all skin tones - the key is choosing the right pink base: rose for warm, icy pink for cool. Great for summer evenings, especially with silver rings.
Apply base coat and cure. Paint a soft pink base in two thin coats and cure thoroughly. For the aura, use white gel and a small makeup sponge to dab a white glow in the center, then blend outward into pink so the edges fade. Cure, then seal with glossy top coat and cap the free edge. If you want more glow, add a second tiny white center dab and cure again.
Editor's noteBlend the aura with sponge taps, not swipes, so you keep the center bright.
Watch outDon't overblend the edges - a muddy aura looks dull and flat.