
1. Micro French Tip With White Arc
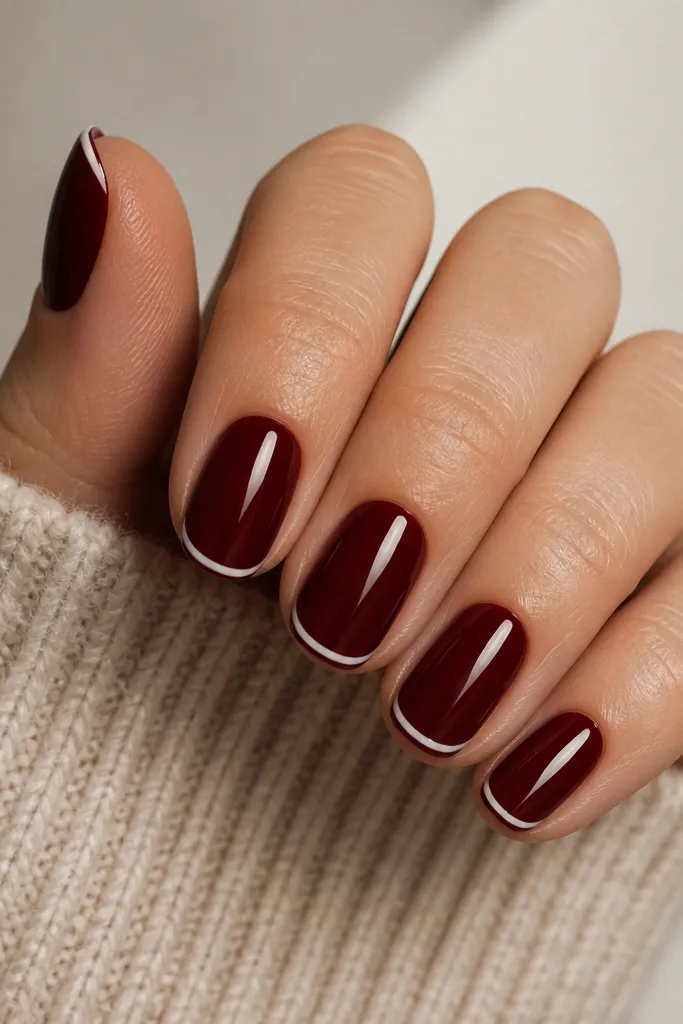
Start by painting two coats of dark cherry red, letting the second coat level fully. Use striping tape or a French guide to place a thin white crescent at the very edge — aim for about 1 mm thick. Paint white, then remove the tape while the polish is still slightly tacky to keep the line sharp. Seal with glossy top coat, and cap the free edge so the tip resists chipping.
This one looks clean because the white arc is small and perfectly centered, so it doesn’t compete with the cherry base. I do it most often on oval and short almond nails because the thin tip visually stretches the nail without adding bulk. The cherry red underneath stays the star, while the crisp white arc gives that “fresh manicure” look even when the set grows out. It flatters hands with shorter nail beds because the arc sits at the tip, not halfway up the nail.
Watch outDon’t make the white tip wide or it will turn into a blunt block that shortens the nail.
Editor's noteIf your white pulls streaky, use an opaque white gel polish and cure two shorter times instead of one long cure.
2. Cherry Red Marble Vein Accent
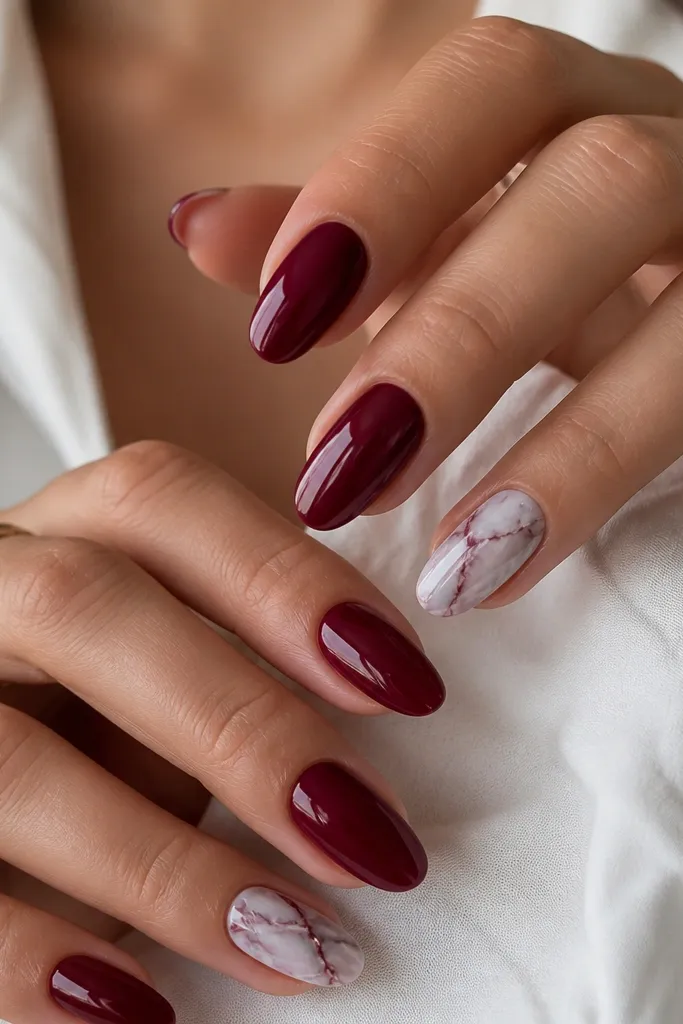
Paint all nails with two coats of dark cherry red. On the accent nails, add a few thin streaks of dark burgundy and cool gray using a striping brush — start near the center and taper the lines as you move outward. Drag a tiny bit of clear top coat over the veins with a clean brush tip if you want a softer marble blend. Finally, seal everything with glossy top coat, then cure fully for a glassy finish.
Marble works because it adds movement without needing big shapes. I like it as an accent on two nails max, because full-hand marble can get busy fast on dark cherry. The cool gray veins keep the look modern and prevent it from reading too warm or too “Halloween.” This design looks great on medium to deep skin tones because the contrast is clear, and it also flatters hands with slightly wider nail beds since the veins guide the eye inward.
Watch outDon’t draw thick veins — chunky marble lines look heavy against a dark base.
Editor's noteUse a makeup sponge dabbed lightly with gray at the edges of the veins for a subtle smoke effect.
3. Gold Leaf Corner Triangle
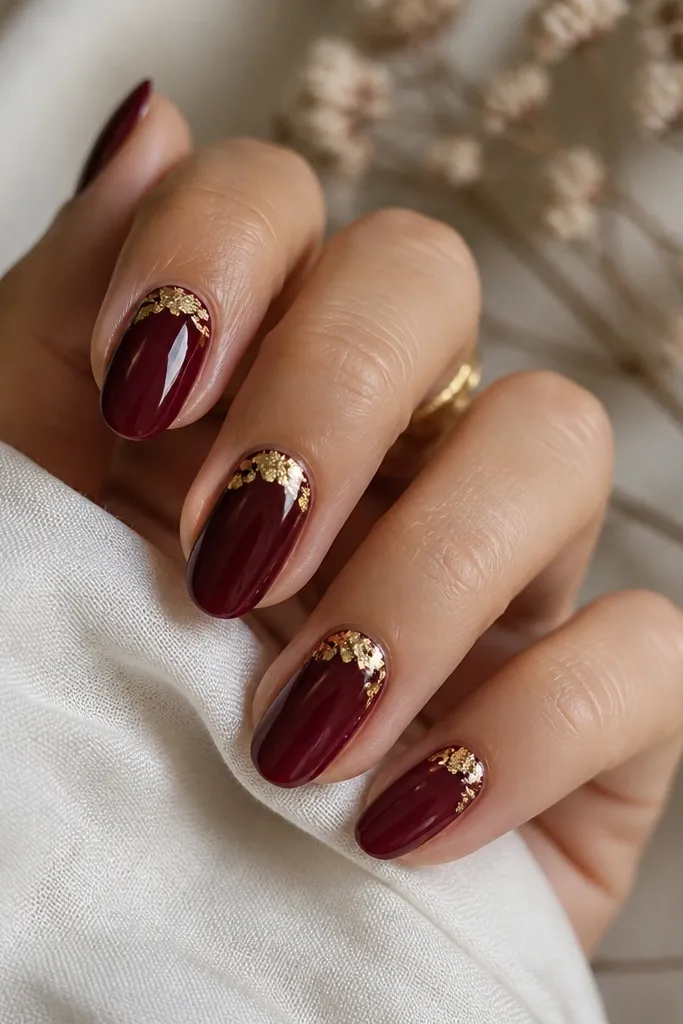
This is my go-to when I want a “jewelry” manicure without rhinestones. The gold leaf triangle catches light differently than chrome, so it looks expensive even if the application is slightly imperfect. Placement at the upper corner makes the nail look more structured, and it flatters hands with longer fingers because it adds a focal point near the cuticle. On fair and medium skin, the gold reads warm and flattering; on deep skin, it still pops because the triangle is small and high-contrast.
Start with two coats of dark cherry red and cure or fully dry. Apply a small piece of gold leaf adhesive (or tacky gel) at the upper corner of the nail — about 2-3 mm down from the cuticle and 2 mm in from the sidewall. Press gold leaf onto the tack area with tweezers or a leaf tool, then press again lightly to settle edges. Seal with a thick glossy top coat, dragging the brush over the gold so it locks down flat.
Use a matte top on the cherry base under the gold leaf if you want the leaf to look sharper and less reflective.
Don’t cover the whole nail in leaf — it turns into glittery chaos instead of a clean triangle.
4. Silver Chrome Half-Moon Cuticle
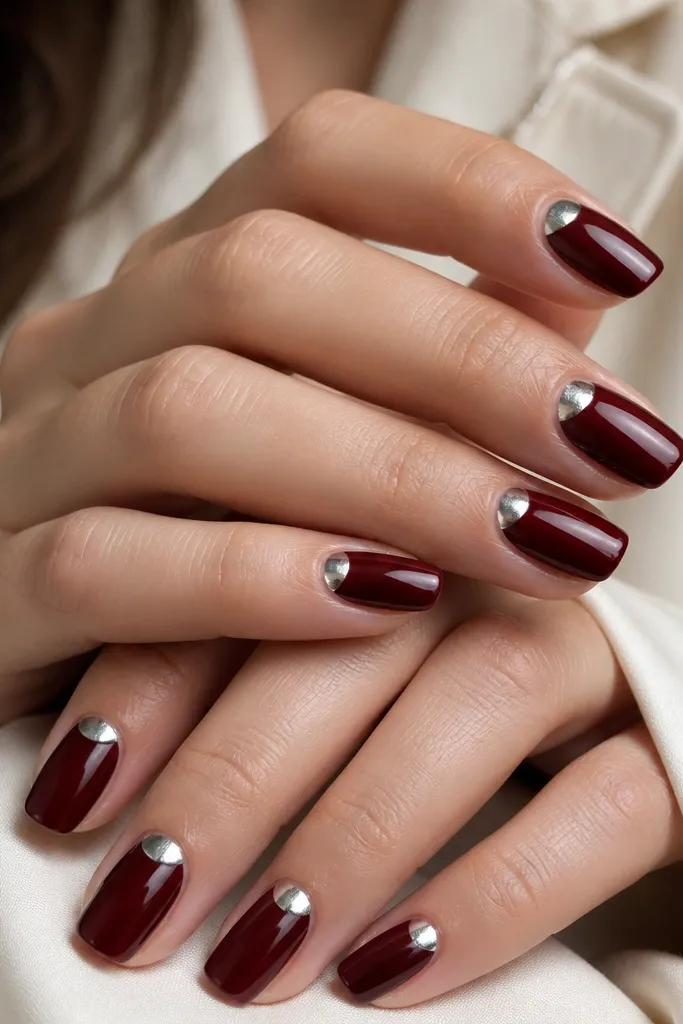
A half-moon at the cuticle looks polished because it frames the nail growth line. Silver chrome gives a cool contrast that makes the cherry red look deeper and more dimensional. This design flatters most nail lengths, but it shines on short oval and almond because the half-moon adds shape without adding width. If you wear cooler-toned jewelry (silver rings), this one matches naturally and looks intentional.
Paint two coats of dark cherry red and cure fully. At the cuticle, apply a thin layer of black or silver-toned gel base for chrome (or use a tacky chrome adhesive) in a half-moon shape — keep it small, about 1/3 of the nail width. Buff chrome powder over the tack and press until it turns mirror-smooth. Wipe off excess, then top coat carefully so you don’t smear the chrome edge.
Seal chrome with a thin first top coat, cure, then add a second layer for durability.
Don’t drag the chrome with a wet brush — it smears and ruins the crisp half-moon boundary.
5. Matte Cherry With Glossy Diagonal Line
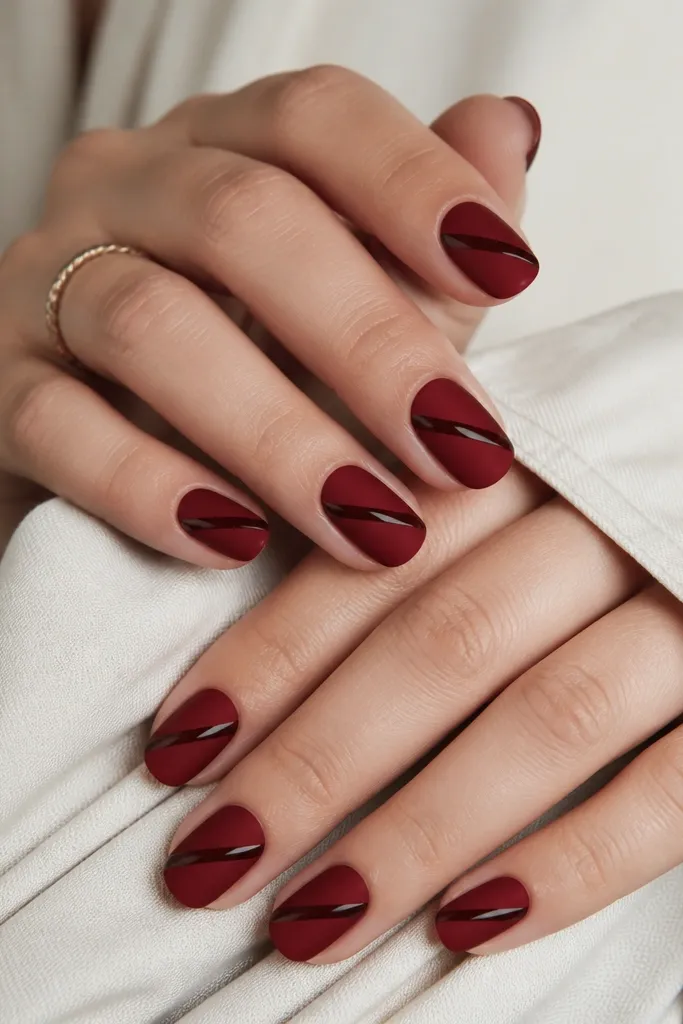
Apply two coats of dark cherry red and cure. Top with matte top coat and cure fully. Use striping tape to place a diagonal band — keep it centered and parallel across nails. Paint the stripe with glossy clear gel (or a very dark wine gel) and cure, then remove tape for a sharp edge. Finish with one more thin glossy top coat only over the stripe, not over the whole nail.
This one looks designer because the texture contrast does the work. Matte turns dark cherry into a velvety base, and the glossy line adds a “blade” highlight that makes nails look longer. I use a single diagonal stripe because it keeps the design from feeling busy. It’s flattering on medium-length nails and looks great with casual outfits because it reads modern, not fussy.
Watch outDon’t put matte over the stripe — the glossy highlight disappears.
Editor's noteIf your diagonal line wobbles, align the stripe with the nail’s natural sidewall curve and mark it lightly with a dot using a fine brush.
6. Cherry Red Rhinestone Row at Sidewall
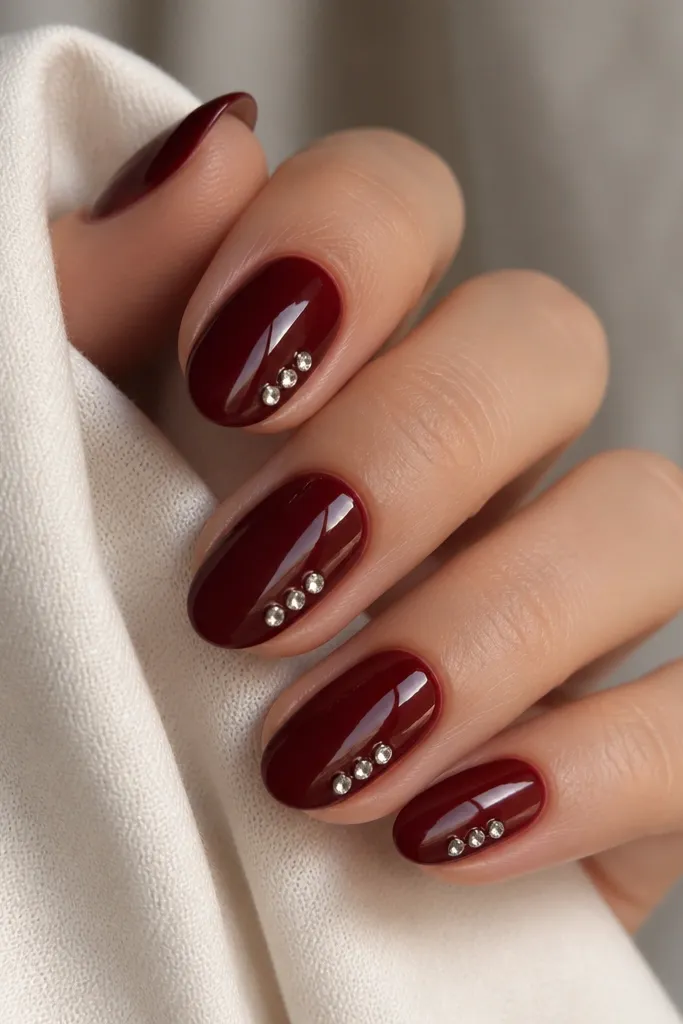
Start with two coats of dark cherry red. Apply a small bead of tacky top coat along the sidewall — place it where you want the rhinestones to sit, usually around the middle and taper up slightly. Use tweezers to place three rhinestones, pressing each down so they sit flat and level. Cure, then seal with a glossy top coat that covers the stones but keeps the surface smooth.
A sidewall rhinestone row looks like a bracelet for your fingers. The trick is spacing: three stones max per nail keeps it from looking like costume jewelry. This works especially well on almond nails because the sidewall line follows the nail’s shape and makes the nail look more tapered. It also flatters hands with warm or neutral undertones because the clear stones brighten the cherry base without changing the color temperature.
Watch outDon’t flood the stones with thick gel — it can make them pop up and snag on hair.
Editor's noteUse a dotting tool to test spacing on a scrap nail first — it helps you get the same rhythm every time.
7. Black Cherry Outline French
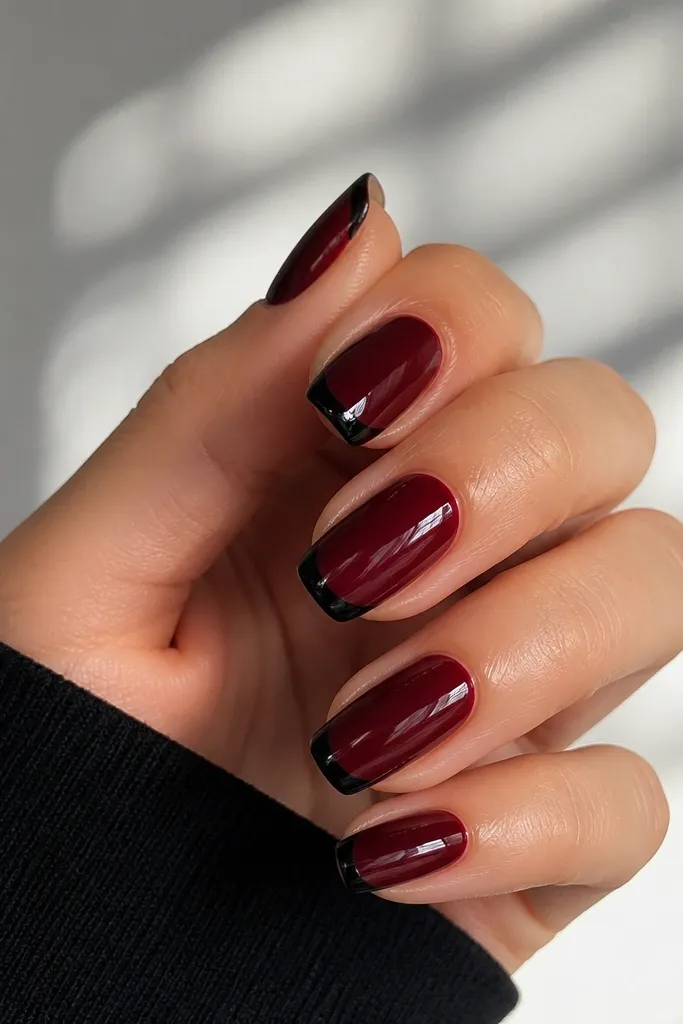
Outline French looks crisp because you’re adding definition, not extra color. The black line makes the cherry tip read sharper and gives an evening vibe without going full goth. I like it on oval nails because the outline follows the curve and looks neat. This design flatters short nail beds because the black boundary makes the tip look intentional and clean.
Paint two coats of dark cherry red and cure. Apply a French guide (or freehand with a striping brush) to mark where the tip curve will end. Do not paint a whole white tip — instead, paint a thin black outline following the curve and keep the line between 0.5-1 mm. Remove guides, then seal with glossy top coat and cap the free edge.
Use a gel liner brush with a pointed tip and wipe excess on the bottle lip so the outline doesn’t blob.
Don’t make the outline too thick — thick black lines look like marker instead of polish.
8. Cherry Red With Nude Micro Dots Grid
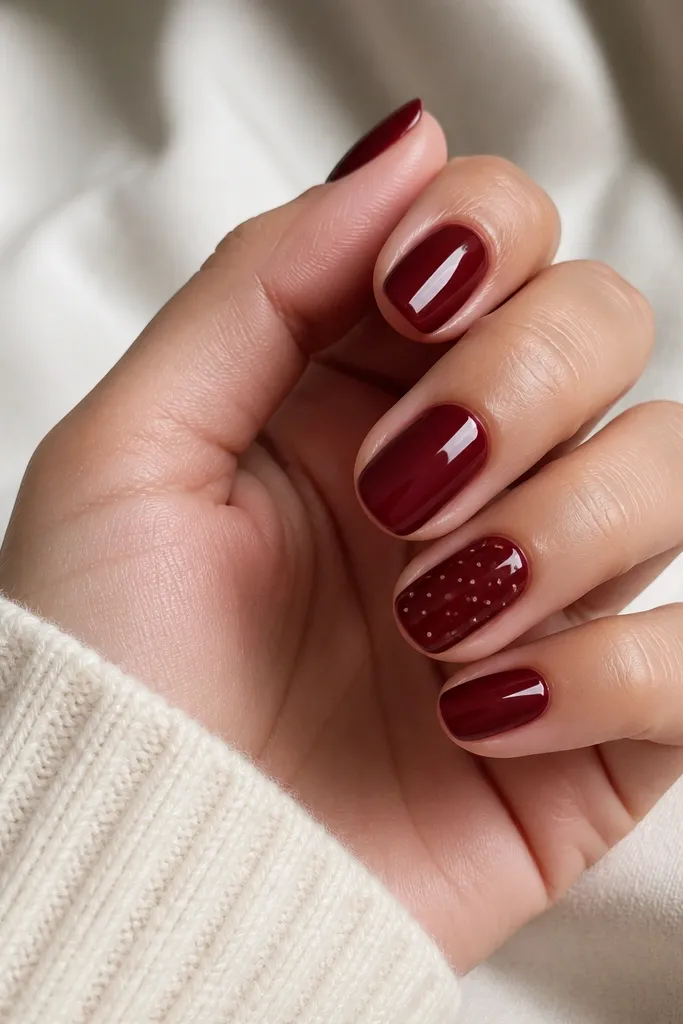
Micro dots look classy because they add texture without turning into full nail art. Nude dots soften the darkness of cherry red and make the manicure feel wearable for work and dinners. I do this as one accent nail because the grid pattern can get visually loud if you repeat it on every finger. It flatters medium and deep skin tones because the nude dots read warm and natural against the wine base.
Paint all nails with two coats of dark cherry red. On the accent nail, use a dotting tool to place tiny nude dots — start with one dot in the center, then add dots around it with equal spacing. Work in rows, but keep the grid slightly uneven so it looks hand-done, not printed. Seal with glossy top coat, using a gentle top coat brush to avoid smearing the tiny dots.
If your nude looks too pale, mix a drop of brown into your nude polish so it matches your skin tone better.
Don’t use big dots — large dots make the manicure look childish and less polished.
9. Oxblood Cherry With Crisscross Foil Threads
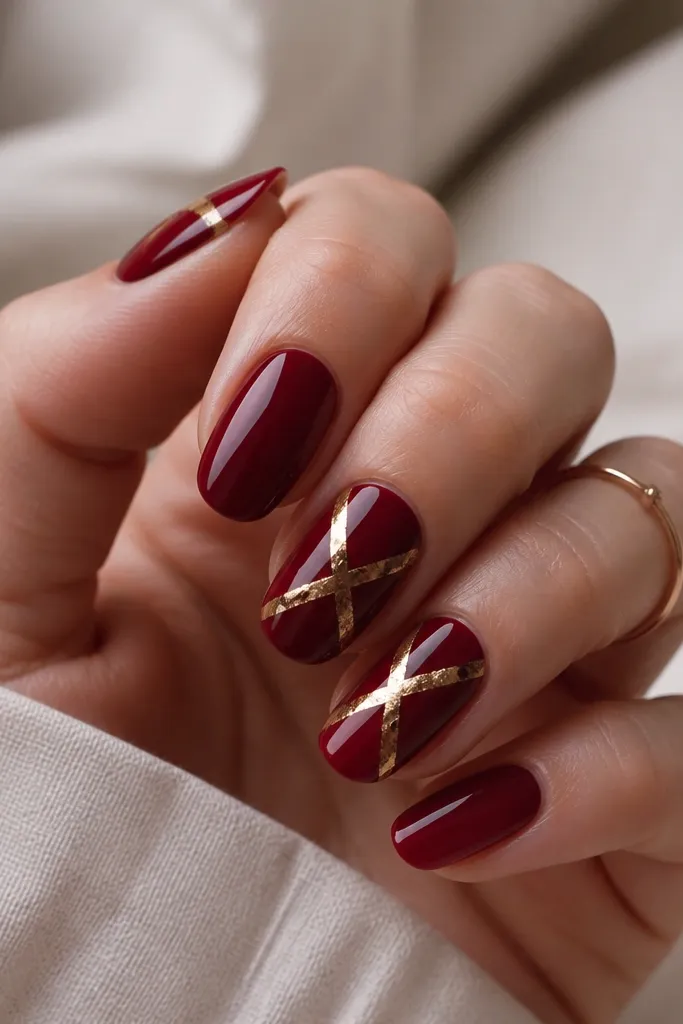
Paint all nails with two coats of dark cherry red. On the accent nails, apply a thin strip of foil adhesive in two diagonal bands that cross near the center. Press small torn pieces of gold foil onto the adhesive, then add another tiny piece where the lines intersect. Seal with a thick glossy top coat, pressing the brush over the foil so it doesn’t catch on fabric.
Foil threads look sharp because they create thin, high-contrast lines that move with light. I keep the crisscross limited to two nails because foil can overwhelm if it’s on every finger. This style flatters long almond and coffin shapes because the X pattern follows the nail length. It also looks amazing with gold jewelry, and it makes dark cherry feel more “night out” than “everyday.”
Watch outDon’t use wide foil chunks — they create lumps under top coat.
Editor's noteCut foil into tiny slivers with scissors — smaller pieces lay flatter and look like threads.
10. Cherry Red Jelly With Clear Swirl
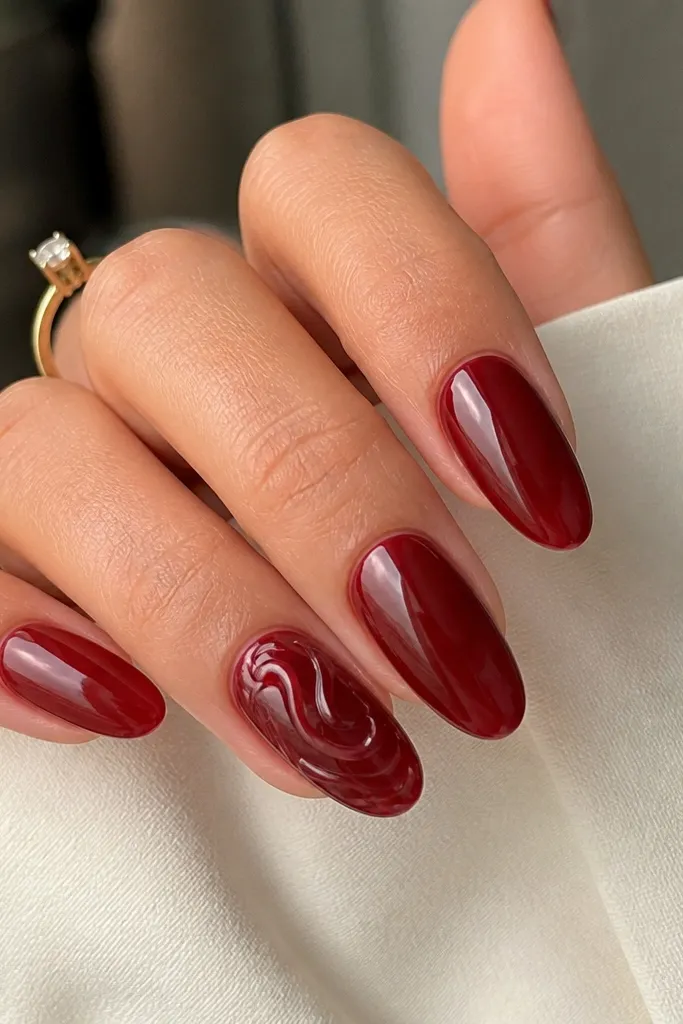
Apply a jelly dark cherry base in two thin coats, curing between coats so it stays translucent. On the accent nail, draw a smooth swirl with clear gel using a thin liner brush — start near the middle and loop toward the sidewall. Leave the swirl as clear gel, no pigment, so it looks like a glossy ribbon. Cure, then top coat over everything with a normal glossy top coat to keep the swirl shiny and protected.
Jelly-style dark cherry looks different than opaque because light passes through it. The clear swirl adds dimension without adding extra color, so it stays elegant even if your art skills are not perfect. I use this on medium length nails because the translucency shows the nail bed and makes the whole hand look softer. It flatters fair to deep skin tones since clear art doesn’t fight your complexion.
Watch outDon’t make the swirl too thick — thick clear gel can look like a sticker.
Editor's noteIf your swirl floods, wipe the brush on a lint-free pad and reload with less gel.
11. Dark Cherry Reverse French With Silver Dot
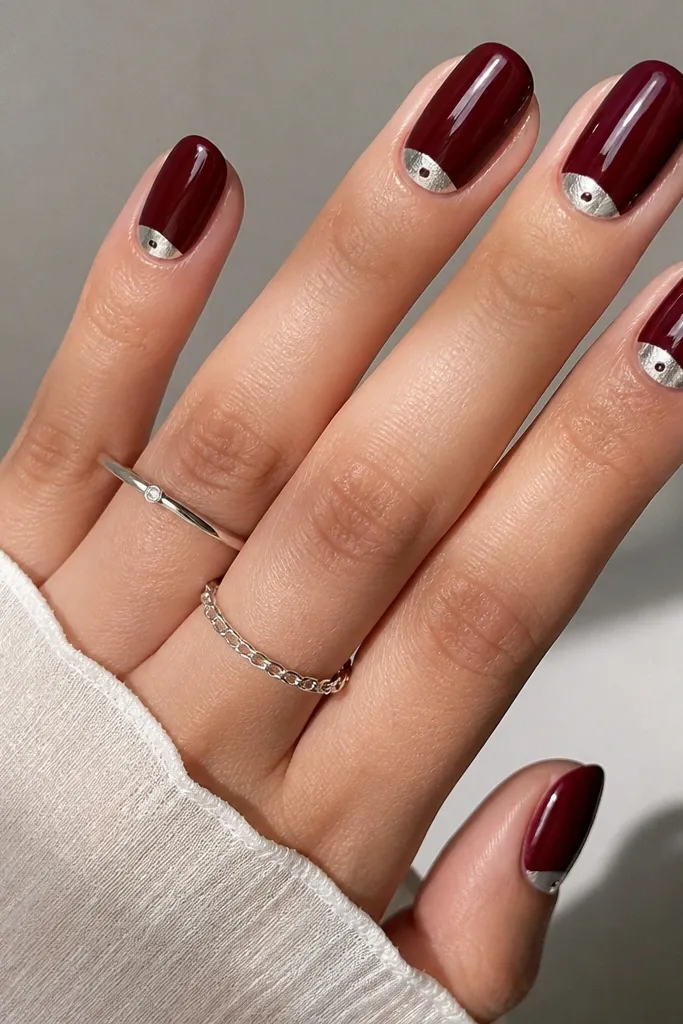
Start with two coats of dark cherry red. Use a cuticle reverse French guide to outline a half-moon — keep it thin, about 1-2 mm wide. Fill the half-moon with silver chrome or silver foil gel and cure. Add one tiny silver dot in the center using chrome powder on tack gel, then seal with glossy top coat.
Reverse French makes your cuticle area look intentional, and the silver dot gives the design a “signature.” I love this when I want a clean look that still feels special. The half-moon frames your nail bed, and the dot keeps the design from looking too plain. It flatters hands with strong cuticle lines because the silver highlights them. On deeper skin tones, silver reads bright and crisp against the dark cherry.
Watch outDon’t let chrome spill into the red — it blurs the reverse French shape.
Editor's noteUse a small strip of tape to define the half-moon edge before you apply chrome so you get a clean border.
12. Cherry Red Velvet Look With Fine Gold Lines
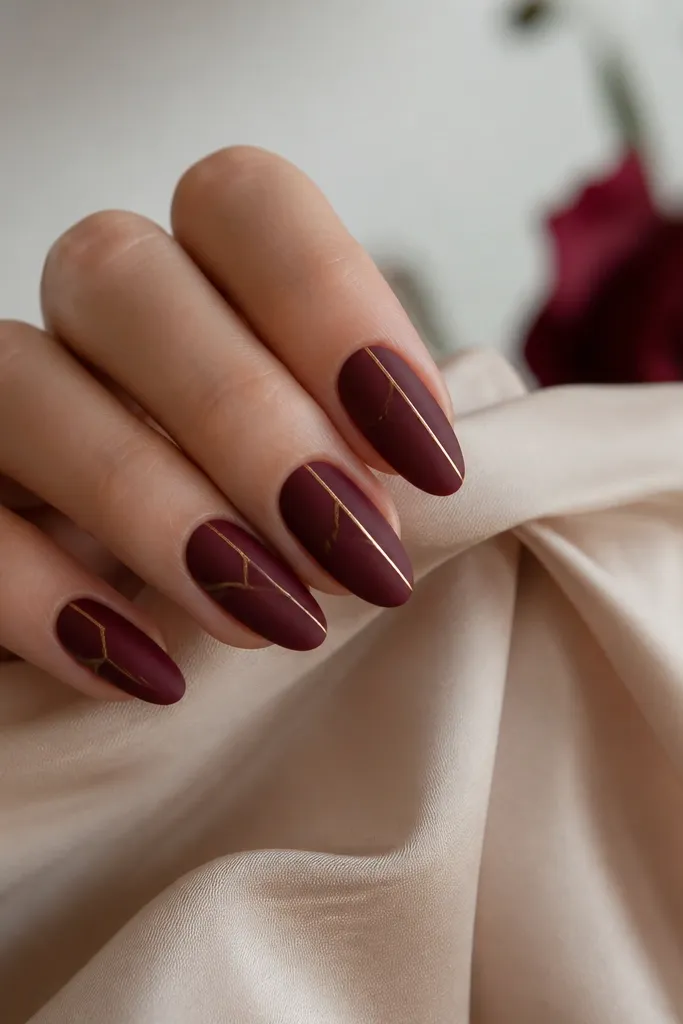
Paint two coats of dark cherry red and cure. Apply matte top coat and cure again. Use striping tape to place a thin line — I like one line per nail, angled slightly off center. Paint the line with gold gel polish, cure, then remove tape carefully. Finish by top coating only over the gold lines lightly so they stay glossy against the matte base.
Velvet matte plus thin gold lines looks expensive because it’s minimal and the gold stays crisp. The matte finish makes dark cherry look deeper, and the gold lines add a controlled glow. I use this on square and short almond nails because the thin lines give structure without making nails look narrower. It flatters almost any skin tone, and it pairs well with both gold and mixed-metal jewelry.
Watch outDon’t cover the whole nail with gold — the matte base needs space to look clean.
Editor's noteIf your gold line looks uneven, add a second thin pass instead of one thick coat.
13. Dark Cherry With Cherry Blossom Stickers
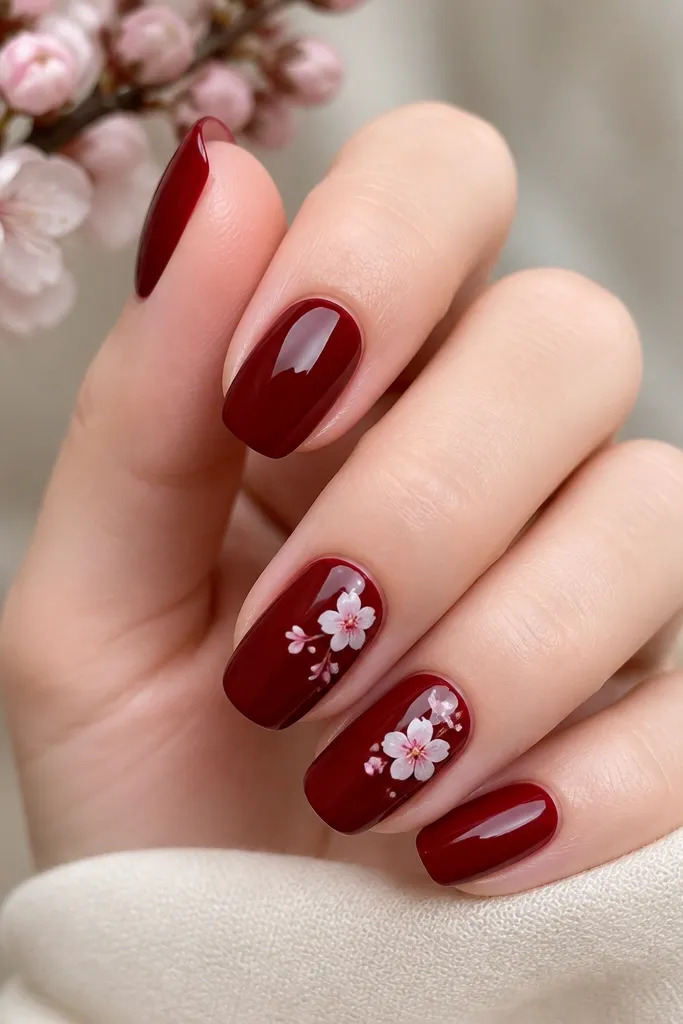
Do two coats of dark cherry red on all nails. Apply the blossoms on dry nails using nail glue or place the decal on tacky base if your stickers allow it. Position the biggest blossom near the cuticle, then let the smaller petals trail slightly toward the sidewall — keep it within the center 60% of the nail. Seal with glossy top coat in two thin layers, curing fully between if needed to prevent edges lifting.
Cherry blossom decals add a soft, romantic contrast without turning the set into spring-only. Against dark cherry, white blossoms look crisp and intentional, and pale pink centers keep it from looking like plain white stickers. I like placing them on two nails so the hand feels balanced rather than overly busy. This design flatters longer nail shapes and looks great on medium to deep skin because the blossoms pop clearly.
Watch outDon’t put blossoms on every nail — it turns from artful to cluttered.
Editor's noteTrim decal edges with small nail scissors before sealing so you don’t feel a ridge.
14. Dark Cherry Red With Black Lace Accent
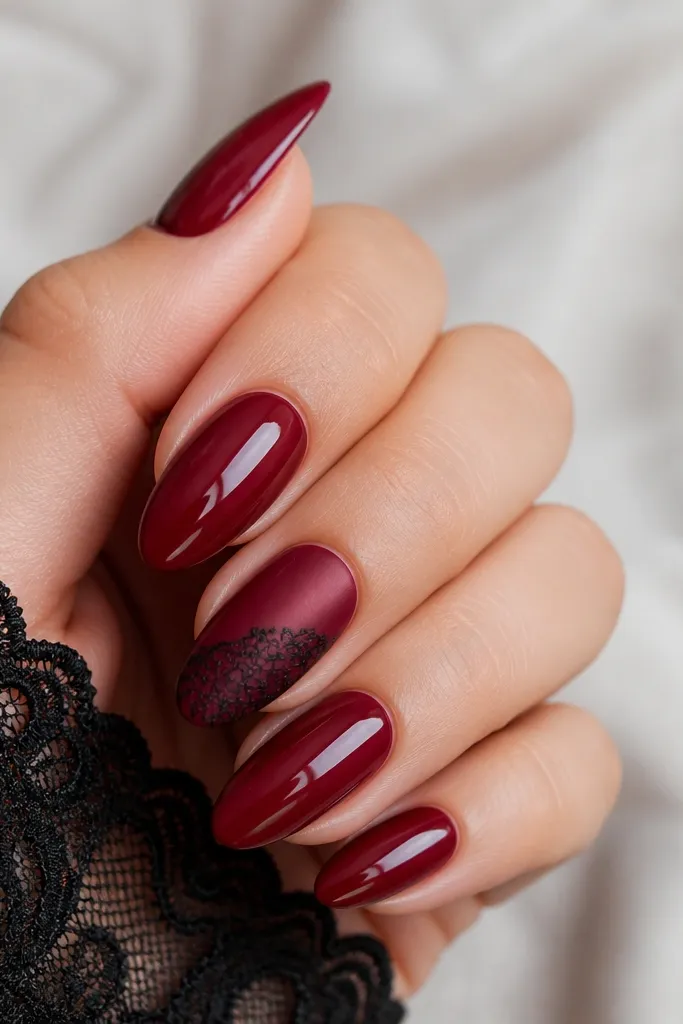
Lace looks dramatic, but on dark cherry it stays elegant when you limit it to an accent. The black lace adds texture contrast, and matte makes the lace lines look sharper and less shiny. I prefer this on oval and almond nails because the lace pattern follows the nail curve and looks like it was drawn on fabric. It’s perfect for date night and holiday parties, and it flatters fair to deep skin because black lace reads clearly against the wine base.
Paint all nails with two coats of dark cherry red. On the accent nail, place black lace transfer tape or a lace stencil — position it so it starts around the middle and stops before the tip. Press down firmly and seal with matte top coat over the lace area. Finish the other nails with glossy top coat so you still get contrast across the hand.
Use a small amount of top coat and press with a flat brush so the lace pattern stays crisp instead of filling in.
Don’t let lace reach the cuticle — it makes the design look heavy and messy.
15. Dark Cherry Red With Crystal Cluster at Tip
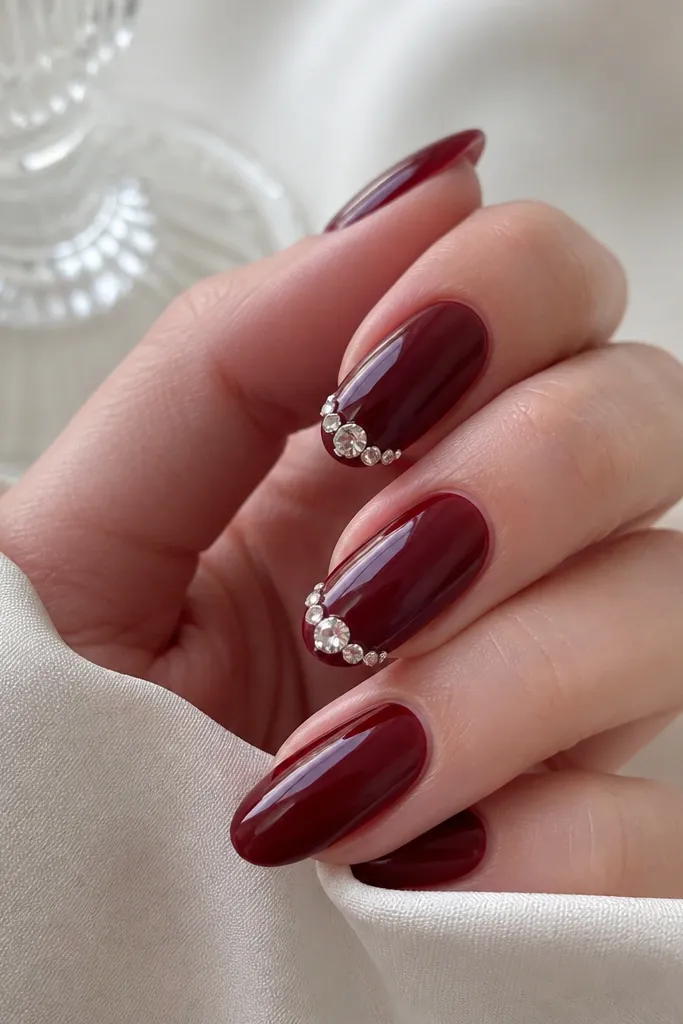
Apply two coats of dark cherry red to all nails and cure. On the accent nails, place a small arc of rhinestones or crystals about 1-2 mm away from the free edge — keep the arc centered. Use tacky gel or nail glue, press each crystal down with tweezers, then cure. Seal with a glossy top coat, and cap the edges so the cluster doesn’t lift or catch.
A crystal cluster at the tip looks like a mini chandelier. It flatters nail shapes with a defined tip, especially almond and coffin, because the cluster sits where your nail naturally catches light. The key is size control: a tight arc of crystals reads glamorous, while scattered crystals look uneven. This looks great on hands wearing rings because the sparkle echoes the jewelry and makes the whole hand feel dressed.
Watch outDon’t build a tall crystal stack — it chips faster and feels rough.
Editor's noteChoose crystals with flat backs so they sit low and feel smooth when you run your finger over them.



